并发编程之常用原子类
并发编程之常用原子类
JUC下atomic包介绍
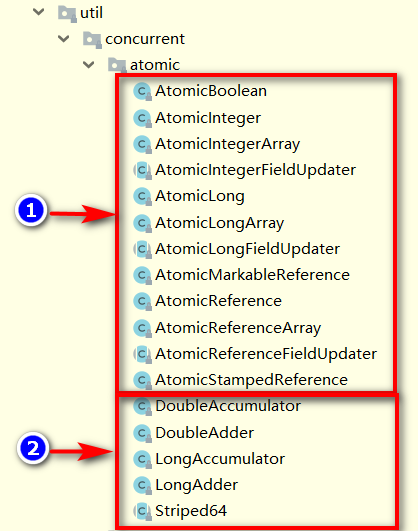
JUC包下的atomic包下的类,主要分为两部分:
-
第一部分:以Atomic开头的类,是常用原子类
-
AtomicInteger、AtomicBoolean、AtomicLong
-
AtomicIntegerArray、AtomicLongArray、AtomicReferenceArray
-
AtomicReference、AtomicMarkableReference、AtomicStampedReference
-
AtomicIntegerFieldUpdater、AtomicLongFieldUpdater、AtomicReferenceFieldUpdater
-
-
第二部分:不是以Atomic开头的类,是高并发高效统计类
- DoubleAccumulator
- DoubleAdder
- LongAccumulator
- LongAdder
常用原子类介绍及使用
常用原子类介绍
JDK1.5后提供的java.util.concurrent.atomic包下面的Atomic开头的原子更新操作类。提供了一种用法简单、
性能高效、线程安全地更新一个变量的方式。
-
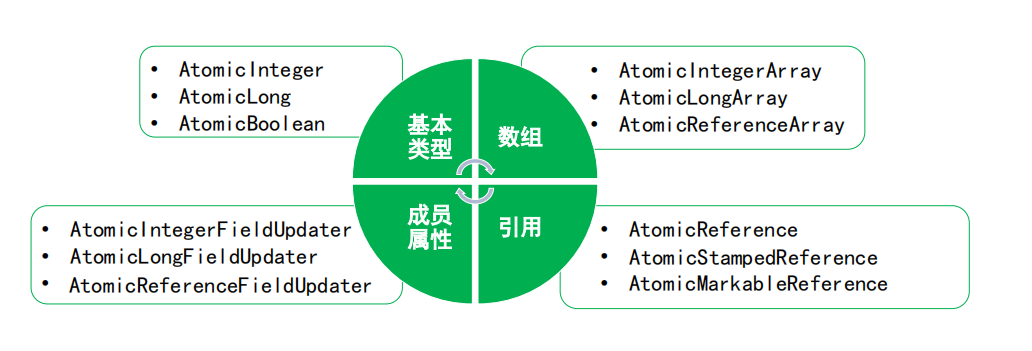
基本类型:AtomicInteger、AtomicBoolean、AtomicLong
-
数组类型:AtomicIntegerArray、AtomicLongArray、AtomicReferenceArray
-
引用类型:AtomicReference、AtomicMarkableReference、AtomicStampedReference
-
成员属性:AtomicIntegerFieldUpdater、AtomicLongFieldUpdater、AtomicReferenceFieldUpdater
通常我们采用synchronized和lock接口解决,使用多个线程累加int、long类型的成员属性,到错误值的问题。
Atomic操作类可以无锁的情况下,解决解决这个问题。
常用原子类使用
基本类型
以 使用为例,AtomicBoolean、AtomicLong使用和AtomicInteger雷同
常用方法
//以原子方式将输入的数值与实例中的值相加,并返回结果;内部使用自旋锁
int addAndGet(int delta)//输入的数值等于预期值,则以原子方式设置为输入值
boolean compareAndSet(int expect,int update)//以原子方式将当前值加1,返回自增前的值;内部使用自旋锁
int getAndIncrement()int IncrementAndGet();//最终会设置成newValue,使用lazySet设置值后,可能导致其他线程在之后的一段时间内还可以读到旧的值
void lazySet(int newValue)//以原子方式设置为newvalue的值,并返回旧值;内部使用自旋锁
int getAndSet(int newValue)int decrementAndGet();
经典实例
模拟数据库连接池
- 连接池接口ConnectionPool
public interface ConnectionPool {/*** 初始化数据库连接* @param initSize * @param maxSize* @param idleCount* @param waitTime*/public void init(int initSize, int maxSize, int idleCount, long waitTime);/*** 销毁连接池*/public void destroy();/*** 获取连接* @return*/public Connection get() throws TimeoutException;/*** 回收连接* @param conn*/public void recycle(Connection conn);
}
- 数据库连接池接口ConnectionPool实现类MyConnectionPool
public class MyConnectionPool implements ConnectionPool {private int initSize; //初始连接数大小private int maxSize;//允许最大链接数大小private int idleCount;//允许空闲的连接数private long waitTime;//等待时间private LinkedBlockingQueue<Connection> idle ;//管理准备好的资源对象private LinkedBlockingQueue<Connection> busy ;//管理被使用的资源对象private AtomicInteger activeSize = new AtomicInteger(0);//当前活跃连接数/*** 初始化数据库连接* @param initSize* @param maxSize* @param idleCount* @param waitTime*/@Overridepublic void init(int initSize, int maxSize, int idleCount, long waitTime) {this.initSize = initSize;this.maxSize = maxSize;this.idleCount = idleCount;this.waitTime = waitTime;idle = new LinkedBlockingQueue<>();busy = new LinkedBlockingQueue<>();initConnection();}private void initConnection() {for(int i =0 ;i<this.initSize;i++){this.idle.offer(MysqlConnectionUtils.getConnection());this.activeSize.incrementAndGet();}}/*** 获取连接** @return*/@Overridepublic Connection get() throws TimeoutException {//1.判断管理准备的资源idle中有没有Connection connection = idle.poll();if(connection != null){System.out.println("从提前准备的队列中idle中获取");busy.offer(connection);return connection;}//2.准备好的没有了,判断是否达到最大连接数if(this.activeSize.get() < maxSize){//3.没有达到最大连接数,判断是否能够获得连接if(this.activeSize.incrementAndGet() <= maxSize ){//不大于最大连接数,则创建连接connection = MysqlConnectionUtils.getConnection();System.out.println("重新创建了一个连接");busy.offer(connection);return connection;}else {//否则,处理由于之前比较时先增加1,不成功时,要再减去1this.activeSize.decrementAndGet();}}//3.达到最大连接数了,则等待try {connection = idle.poll(this.waitTime, TimeUnit.MILLISECONDS);System.out.println("等待获得:"+connection);if(connection == null){throw new TimeoutException("获取数据库连接超时,超过"+this.waitTime+"毫秒");}busy.offer(connection);return connection;} catch (InterruptedException e) {e.printStackTrace();}return connection;}/*** 回收连接** @param conn*/@Overridepublic void recycle(Connection conn) {if(conn==null)return;final boolean remove = busy.remove(conn);if(remove){if(idle.size() > idleCount){//如果准备好的队列的资源数,大于最大空闲连接,则关闭System.out.println("超过最大空闲连接数据,进行连接释放");MysqlConnectionUtils.close(conn);this.activeSize.decrementAndGet();return;}final boolean offer = this.idle.offer(conn);if(!offer){MysqlConnectionUtils.close(conn);this.activeSize.decrementAndGet();}System.out.println("连接回收成功!");}else{MysqlConnectionUtils.close(conn);this.activeSize.decrementAndGet();}}/*** 销毁连接池*/@Overridepublic void destroy() {}
}
- 获取Mysql连接工具类
/*** MySQL连接获取工具类,* JDBC*/
public class MysqlConnectionUtils {// 数据库配置信息static String driver = "com.mysql.jdbc.Driver";static String url = "jdbc:mysql://localhost:3306/test?useUnicode=true&characterEncoding=UTF-8&zeroDateTimeBehavior=convertToNull&useSSL=false";static String username  = "root";static String password = "root";/*** 获取数据库连接* @return*/public static Connection getConnection() {Connection conn = null;try {Class.forName(driver);conn = DriverManager.getConnection(url, username, password);return conn;} catch (ClassNotFoundException e) {e.printStackTrace();} catch (SQLException e) {e.printStackTrace();close(conn);}return conn;}/*** 关闭回收数据库连接* @param conn*/public static void close(Connection conn) {if(conn == null) {return;}try {if(! conn.isClosed()) {conn.close();}} catch (SQLException e) {e.printStackTrace();}}}
- 测试类
public class PoolConnectionTests {private int threadSize = 5000; // 线程数,模拟并发请求public static void main(String[] args) {PoolConnectionTests test = new PoolConnectionTests();test.benchmarkTest();}public void benchmarkTest() {String sql = "select goods_nums from tb_goods where goods_code = 'nuts'";// 工具对象,并发控制器、线程容器CountDownLatch cdl = new CountDownLatch(1);List<Thread> threads = new ArrayList<Thread>();ConnectionPool pool = new MyConnectionPool();pool.init(1, 10, 30, 5000L);for(int i = 0; i < threadSize; i++) {Thread th = new Thread(()->{      // 用线程模拟并发,当然可以用线程池// 创建并获取连接资源Connection conn = null;try {cdl.await(); // 等待其他线程一起执行conn = pool.get();PreparedStatement statement = conn.prepareStatement(sql);ResultSet result = statement.executeQuery();//Thread.sleep(200L);  // 模拟实际情况,查询耗时严重while(result.next()) {int nums = result.getInt(1);System.out.println("坚果还剩 "+nums+" 个");}} catch (SQLException e) {e.printStackTrace();} catch (InterruptedException e) {e.printStackTrace();} catch (TimeoutException e1) {e1.printStackTrace();}finally {// 释放资源pool.recycle(conn);}});// 启动线程th.start();threads.add(th);}// 发令枪响,并发执行请求cdl.countDown();// 等待线程结束threads.forEach((e)->{try {e.join();} catch (InterruptedException e1) {e1.printStackTrace();}});}
}
数组类型
以AtomicIntegerArray使用为例,AtomicLongArray、AtomicReferenceArray使用雷同
常用方法
//数组的索引i中,以原子方式将输入的数值与值相加,并返回结果
int addAndGet(int i,int delta)
//数组索引i中,输入的数值等于预期值,则以原子方式设置为输入值
boolean compareAndSet(int i,int expect,int update)
//数组索引i中,以原子方式将当前值加1,返回自增前的值
int getAndIncrement(int i)
//……
//你会发现和AtomicInteger API操作基本一样,只不过这里针对的是数组元素
经典实例
统计火车人数
- 一种是:AtomicIntegerArray+CountDownLatch实现
- 一种是:AtomicIntegerArray+Phaser实现
//AtomicIntegerArray+CountDownLatch实现
public class TrainCarriage {// 车厢节数private int capacity = 15;// 列车每节车厢上的乘客数量,用一个数组表示AtomicIntegerArray carriage = new AtomicIntegerArray(capacity);public static void main(String[] args) {TrainCarriage tc = new TrainCarriage();tc.totalPassengers();// 这里有一个任务,就是一辆要开往春天的火车,要经过5个站,每个站都有不同的旅客上下车// phaser实现,作为作业等大家去模拟。for(int i =0; i < 5; i++) {tc.upAndDown();tc.totalPassengers();LockSupport.parkNanos(tc, 1000 * 1000 * 3);}}/*** 到站,乘客上下车* @param up* @param down*/public void upAndDown() {CountDownLatch latch = new CountDownLatch(capacity);System.out.println(">>>>>>>>>>>>>>>>>>>>>>列车到站");for(int i = 0; i < capacity; i++) {// 每节车厢的运作new Thread(new CarrWork(i, latch)).start();}try {latch.await();} catch (InterruptedException e1) {e1.printStackTrace();}}public int totalPassengers() {int sum = 0;for(int i = 0; i < capacity; i++) {sum += carriage.get(i);}System.out.println(carriage.toString());System.out.println("===================列车总共 "+sum+" 人================");return sum;}class CarrWork implements Runnable {int index = 0;CountDownLatch latch;public CarrWork(int c, CountDownLatch l) {index = c;latch = l;}@Overridepublic void run() {// 乘客上车厢int upPassengers = ThreadLocalRandom.current().nextInt(30);for(int p = 0; p < upPassengers; p ++) {// 代表每个乘客new Thread(()->{// activeSize < maxSizeif(carriage.get(index) < 30) {if(carriage.incrementAndGet(index) <= 30) {System.out.println(Thread.currentThread().getName()+" 已经上车");}else {carriage.decrementAndGet(index);System.out.println(Thread.currentThread().getName()+" 超载,下车");}}}, "upPassenger-"+index+"-"+p).start();}			// 乘客下车厢int bound = 0;int downPassengers = ( bound = carriage.get(index)) <= 0 ? 0 : ThreadLocalRandom.current().nextInt(bound);for(int p = 0; p < downPassengers; p ++) {new Thread(()->{if(carriage.get(index) > 0) {if(carriage.decrementAndGet(index) >= 0) {System.out.println(Thread.currentThread().getName()+" 已经下车");}else {carriage.incrementAndGet(index);System.out.println(Thread.currentThread().getName()+" 没有乘客啦");}}}, "downPassenger-"+index+"-"+p).start();}//System.out.println("下车后情况:"+carriage.toString());latch.countDown();}	}
}
还有腾讯文档在线Excel多人协同中也可以使用这个实现
引用类型
以AtomicReference使用为例,AtomicMarkableReference、AtomicStampedReference使用雷同
常用方法
你会发现和AtomicInteger API操作大部分一样,只不过这里针对的是引用类型
//原子设置给定的值,并返回旧值V getAndSet(V newValue)//当前值等于预期值,则以原子方式设置为输入值update
boolean compareAndSet(int expect,int update)//通过function计算,原子更新引用值。x期望更新的引用,function中返回上一个引用和x,经过计算后更新计算后的引用。
V accumulateAndGet(V x, BinaryOperator<V> accumulatorFunction)
//……
经典案例
/*** 服务器的启动和关闭*/
public class Server {enum State{Ready,Running,Stop;}private AtomicReference<State> state = new AtomicReference<>();public Server() {state.set(State.Ready);}/*** 启动*/public void start(){if(state.compareAndSet(State.Ready,State.Running)){System.out.println("绑定了端口8080,server started!");}else {System.out.println("端口8080,已经被占用!");}}/*** 关闭*/public void stop(){if(state.compareAndSet(State.Running,State.Stop)){System.out.println("关闭了端口8080,server stoped!");}else{System.out.println("不存在端口8080的服务");}}/*** 用多个线程并发启动或者停止* @param args*/public static void main(String[] args) {CountDownLatch latch = new CountDownLatch(1);Server server = new Server();for(int i=0;i<10;i++){new Thread(()->{try {latch.await();server.start();} catch (InterruptedException e) {e.printStackTrace();}}).start();new Thread(){@Overridepublic void run() {try {latch.await();server.stop();} catch (InterruptedException e) {e.printStackTrace();}}}.start();}LockSupport.parkNanos(1000 * 1000 * 1000L);latch.countDown();}
}
成员属性
以AtomicIntegerFieldUpdater使用为例,AtomicLongFieldUpdater、AtomicReferenceFieldUpdater使用和AtomicIntegerFieldUpdater雷同
常用方法
// 使用AtomicIntegerFieldUpdater需要注意两个点:
// ☆第一,因为原子更新字段类都是抽象类,每次使用的时候必须使用静态方法
newUpdater()创建一个更新器,指定要更新的类和属性名
private static AtomicIntegerFieldUpdater<Order> orderStateAtomicUpdater =
AtomicIntegerFieldUpdater.newUpdater(Order.class, "state");
// ☆第二,Order类的state属性必须被 volatile修饰
private volatile int state;
public boolean compareAndSetState(int expect, int update) {
return orderStateAtomicUpdater.compareAndSet(this, expect, update);
}
经典案例
public class AtomicIntegerFieldUpdaterDemo {/*// 必须state为public,破坏了面向对象的封装特性private static AtomicIntegerFieldUpdater<Order> orderStateAtomicUpdater =AtomicIntegerFieldUpdater.newUpdater(Order.class, "state");private static AtomicIntegerFieldUpdater<Order> orderCountAtomicUpdater =AtomicIntegerFieldUpdater.newUpdater(Order.class, "count");*/public static void main(String[] args) {Order order = new Order(100, 0, "第一笔订单");System.out.println(order);// orderStateAtomicUpdater.incrementAndGet(order);order.incrementAndGetState();System.out.println("调用orderStateAtomicUpdater后,state值变为:" + order.getState());// 并发修改订单商品数量int threads = 200;final CountDownLatch latch = new CountDownLatch(threads);for(int i = 0; i < threads; i++) {new Thread(()->{//orderCountAtomicUpdater.incrementAndGet(order);order.incrementAndGetCount();latch.countDown();}).start();}try {latch.await();} catch (InterruptedException e) {e.printStackTrace();}System.out.println(order);}
}// 可以容忍多个线程修改,幂等性,cas提供了
class Order {// 使用AtomicIntegerFieldUpdater需要注意两个点:// ☆第一,因为原子更新字段类都是抽象类,每次使用的时候必须使用静态方法newUpdater()创建一个更新器,指定要更新的类和属性名private static AtomicIntegerFieldUpdater<Order> orderStateAtomicUpdater =AtomicIntegerFieldUpdater.newUpdater(Order.class, "state");private static AtomicIntegerFieldUpdater<Order> orderCountAtomicUpdater =AtomicIntegerFieldUpdater.newUpdater(Order.class, "count");private int id;// ☆第二,Order类的state属性必须被 volatile修饰// 如果Order类的state属性期望能被外界AtomicIntegerFieldUpdater修改,还必须被public修饰,这样就失去了封装的特性了private volatile int state; // 幂等性:操作是从0->1,发送多次操作ca(0,1),会不会影响结果呢?private volatile int count;private String name;public int getState() {return orderStateAtomicUpdater.get(this);}public int getCount() {return orderCountAtomicUpdater.get(this);}public int incrementAndGetState() {return orderStateAtomicUpdater.incrementAndGet(this);}public boolean compareAndSetState(int expect, int update) {return orderStateAtomicUpdater.compareAndSet(this, expect, update);}public int incrementAndGetCount() {return orderCountAtomicUpdater.incrementAndGet(this);}public Order(int id, int state, String name) {this.id = id;this.state = state;this.name = name;}@Overridepublic String toString() {return "Order [id=" + id + ", state=" + state + ", count=" + count + ", name=" + name + "]";}
}
高并发的高效统计
介绍
利用大量线程进行求和统计计算,可以使用下面三种方式来实现
• AtomicLong,通过一个cas自旋锁来保证自增的线程安全性
• LongAdder,通过单元格方式来实现自增数字的填充,近乎无锁化操作
• LongAccumulator,结合单元格填充数字方式,并提供改变统计计算的方式
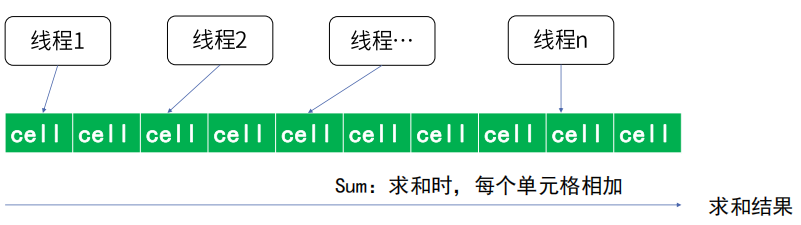
空间换时间:LongAdder、LongAccumulator基于Striped64的cell来实现单元格填充的,来避免CAS锁竞争。
适用场景:LongAdder、LongAccumulator适用高效聚合计算,如需要CAS锁,用AtomicLong这样的原子类。
经典案例
/**
* 对比AtomicLong、LongAdder、LongAccumulator
*/
public class Sum {public static void main(String[] args) {Sum sum = new Sum();System.out.println(sum.testAtomicLong());System.out.println(sum.testLongAddr());System.out.println(sum.testLongAccumulator());//打印结果://122932076//1649503186//1499983884}public long testAtomicLong(){AtomicLong atomicLong = new AtomicLong(1);for (int i=0;i<10;i++){new Thread(){@Overridepublic void run() {long startime = System.currentTimeMillis();while (System.currentTimeMillis() - startime < 2000){atomicLong.getAndIncrement();}}}.start();}LockSupport.parkNanos(1000 * 1000 * 1000 * 3L);return atomicLong.get();}public long testLongAddr(){LongAdder longAdder = new LongAdder();for (int i=0;i<10;i++){new Thread(){@Overridepublic void run() {long startime = System.currentTimeMillis();while (System.currentTimeMillis() - startime < 2000){longAdder.increment();}}}.start();}LockSupport.parkNanos(1000 * 1000 * 1000 * 3L);return longAdder.sum();}public long testLongAccumulator(){LongAccumulator longAccumulator = new LongAccumulator((x,y) ->{return x+y;},0);for (int i=0;i<10;i++){new Thread(){@Overridepublic void run() {long startime = System.currentTimeMillis();while (System.currentTimeMillis() - startime < 2000){longAccumulator.accumulate(1);}}}.start();}LockSupport.parkNanos(1000 * 1000 * 1000 * 3L);return longAccumulator.get();}
}
ABA问题
什么是”ABA”问题?
CAS实现的过程是先取出内存中某时刻的数据,在下一时刻比较并替换,那么在这个时间差会导致数据的变化,此时就会导致出现“ABA”问题
比如说一个线程one从内存位置V中取出A,这时候另一个线程two也从内存中取出A,并且two进行了一些操作变成了B,然后two又将V位置的数据变成A,这时候线程one进行CAS操作发现内存中仍然是A,然后one操作成功。
尽管线程one的CAS操作成功,但是不代表这个过程就是没有问题的。
ABA问题实例
自定义队列:Node
public class Node {private String value;private Node next;public Node(String value) {this.value = value;}public String getValue() {return value;}public void setValue(String value) {this.value = value;}public Node getNext() {return next;}public void setNext(Node next) {this.next = next;}@Overridepublic String toString() {return "Node{" +"value='" + value + '\'' +'}';}
}
自定义栈:Stack
/*** 栈*/
public class Stack {//栈顶AtomicReference<Node> top = new AtomicReference<>();/*** 入栈* 将放入的新值的下一个设置为原来栈顶的旧值,栈顶更新为新值* @param node* @return*/public void push(Node node){Node oldValue;do{//取出旧值oldValue = top.get();//将新值的next设置为旧值node.setNext(oldValue);}while(!top.compareAndSet(oldValue,node));}/*** 出栈* 将栈顶值旧值,拿出来,返回* 将旧值的下一个值,设置为栈顶* @return*/public Node pop(int time){Node oldValue;Node newValue;do{oldValue = top.get();if(oldValue == null){return null;}newValue = oldValue.getNext();if(time > 0){//延时模拟并发LockSupport.parkNanos(1000 * 1000 * time);}}while(!top.compareAndSet(oldValue,newValue));return oldValue;}
}
测试类:Test
public class Test {public static void main(String[] args) {//先放入B、A //现在准备两个线程,一个线程,弹出A,另一个线程弹出A,B,然后再放入C,D,AStack stack = new Stack();stack.push(new Node("B"));stack.push(new Node("A"));new Thread(){@Overridepublic void run() {final Node pop = stack.pop(800);System.out.println(Thread.currentThread().getName()+" "+pop.toString());System.out.println(Thread.currentThread().getName()+" done ...");}}.start();new Thread(){@Overridepublic void run() {final Node nodeA = stack.pop(0);final Node nodeB = stack.pop(0);stack.push(new Node("C"));stack.push(new Node("D"));stack.push(nodeA);System.out.println(Thread.currentThread().getName()+" done ...");}}.start();LockSupport.parkNanos(1000 * 1000 * 5000L);Node node = null;while ( (node = stack.pop(0)) != null){System.out.println(node.getValue());}//打印结果//期望是D\C,结果为 B}
}
ABA问题解决
为解决这类问题而产生
AtomicMarkableReference:维护一个对象引用和一个标记位,可以原子更新
AtomicStampedReference:维护一个对象引用和一个整数stamp,可以原子更新
采用AtomicStampedReference解决上边ABA问题,如下:
自定义栈:NStack
/*** 栈*/
public class NStack {//栈顶AtomicStampedReference<Node> top = new AtomicStampedReference<>(null,0);/*** 入栈* 将放入的新值的下一个设置为原来栈顶的旧值,栈顶更新为新值* @param node* @return*/public void push(Node node){Node oldValue;int stamp;do{//取出旧值oldValue = top.getReference();//将新值的next设置为旧值node.setNext(oldValue);stamp = top.getStamp();}while(!top.compareAndSet(oldValue,node,stamp,stamp+1));}/*** 出栈* 将栈顶值旧值,拿出来,返回* 将旧值的下一个值,设置为栈顶* @return*/public Node pop(int time){Node oldValue;Node newValue;int stamp;do{oldValue = top.getReference();if(oldValue == null){return null;}newValue = oldValue.getNext();stamp = top.getStamp();if(time > 0){LockSupport.parkNanos(1000 * 1000 * time);}}while(!top.compareAndSet(oldValue,newValue,stamp,stamp+1));return oldValue;}
}
测试类:Test
public class Test {public static void main(String[] args) {//先放入B、A//现在准备两个线程,一个线程,弹出A,另一个线程弹出A,B,然后再放入C,D,ANStack stack = new NStack();stack.push(new Node("B"));stack.push(new Node("A"));new Thread(){@Overridepublic void run() {final Node pop = stack.pop(800);System.out.println(Thread.currentThread().getName()+" "+pop.toString());System.out.println(Thread.currentThread().getName()+" done ...");}}.start();new Thread(){@Overridepublic void run() {final Node nodeA = stack.pop(0);final Node nodeB = stack.pop(0);stack.push(new Node("C"));stack.push(new Node("D"));stack.push(nodeA);System.out.println(Thread.currentThread().getName()+" done ...");}}.start();LockSupport.parkNanos(1000 * 1000 * 5000L);Node node = null;while ( (node = stack.pop(0)) != null){System.out.println(node.getValue());}//打印结果//期望是D\C,结果为 D\C}
}
@Override
public void run() {
final Node pop = stack.pop(800);
System.out.println(Thread.currentThread().getName()+" “+pop.toString());
System.out.println(Thread.currentThread().getName()+” done …");
}
}.start();
    new Thread(){@Overridepublic void run() {final Node nodeA = stack.pop(0);final Node nodeB = stack.pop(0);stack.push(new Node("C"));stack.push(new Node("D"));stack.push(nodeA);System.out.println(Thread.currentThread().getName()+" done ...");}}.start();LockSupport.parkNanos(1000 * 1000 * 5000L);Node node = null;while ( (node = stack.pop(0)) != null){System.out.println(node.getValue());}//打印结果//期望是D\C,结果为 D\C
}
}