小白学习java第18天(上):spring
Spring :是一个轻量级(一个小依赖就可以实现还不是轻量级)的控制反转(IOC)和面向切面编程(AOP)的框架!
优点:
1.Spring 是一个开源免费的框架(容器)
2.Spring 是一个轻量级、非入侵式的框架
3.控制反转(IOC)、面向切面编程(AOP)
4.支持事务的处理,对框架整合的支持
1.IOC(inversion of control)(下面举一个简单的例子!!!)
下面我们具体用代码进行实现:(用一个简单的例子去解释一下!!)
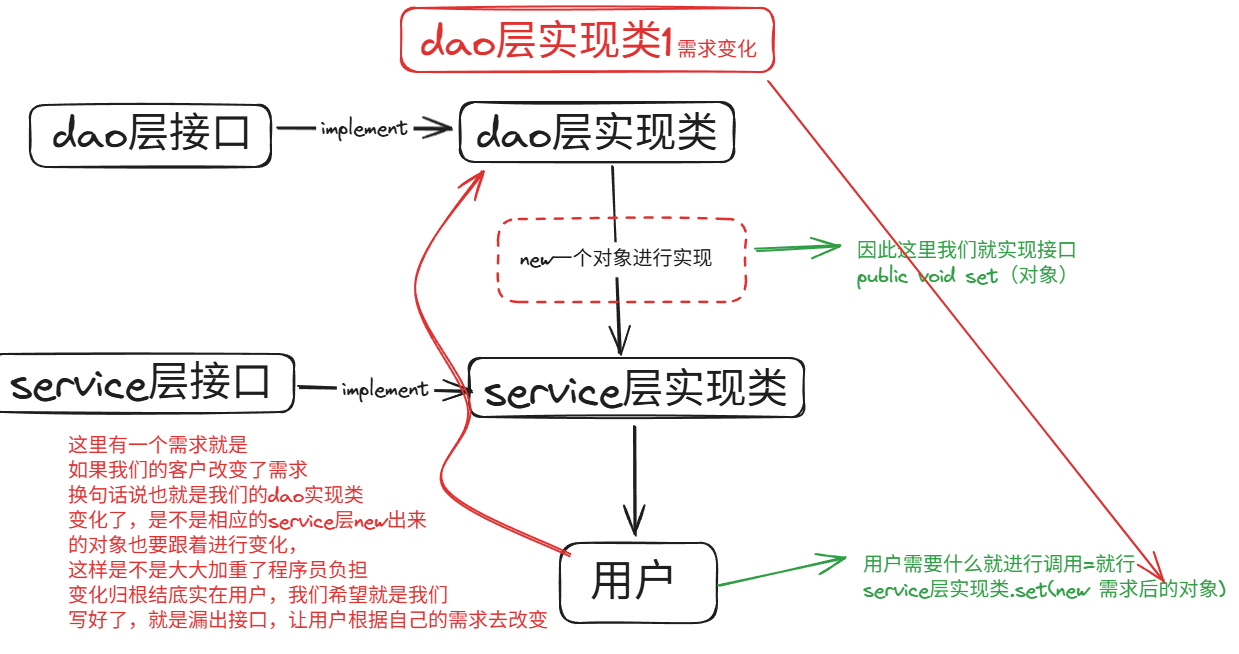
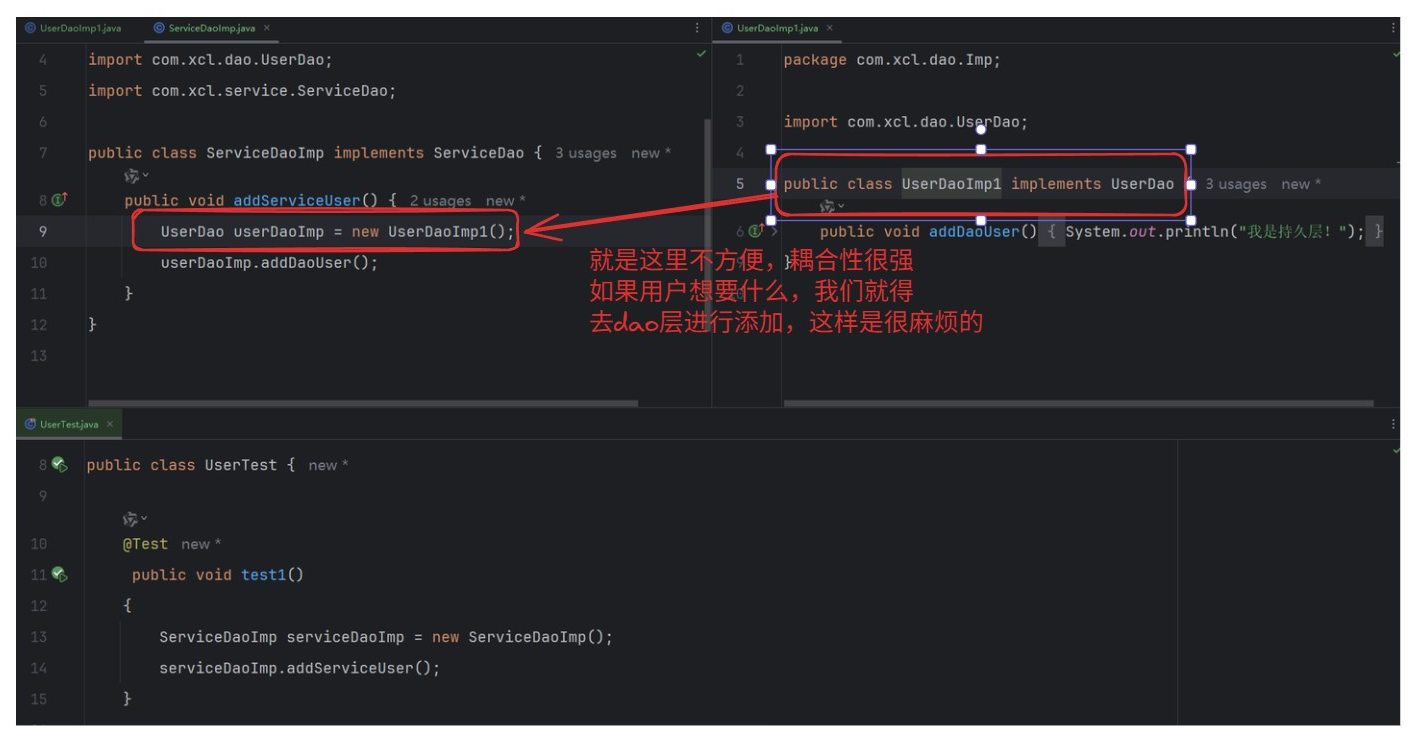
首先我们看一下我们之前的代码:(牵一发而动全身)
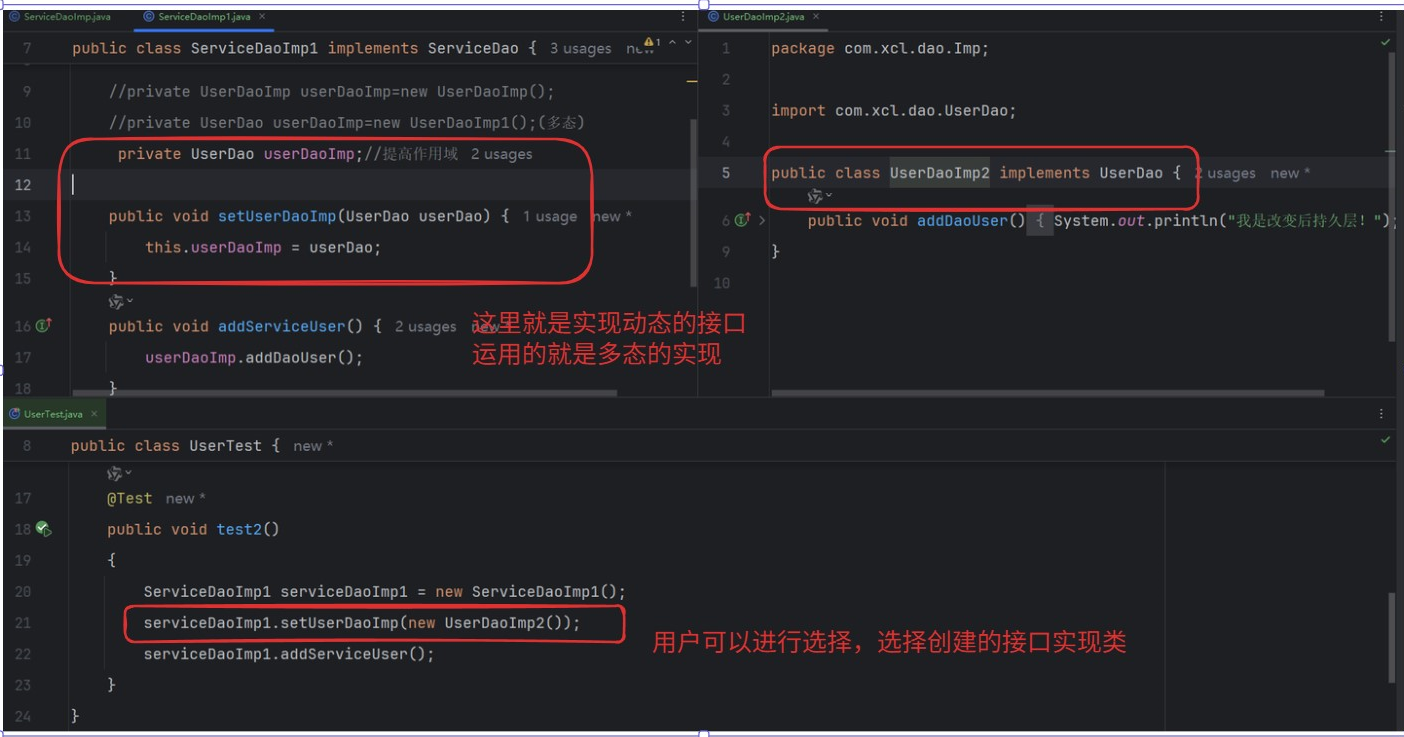
然后我们进行改进的就是(我在专注于业务的实现,而不是对于用户改变之后,我们改动,因此我们为用户提供接口,减少new的这个动作)
下面我们真正去看一下,Spring中的IOC是怎么对其进行对象进行创建、管理、装箱!
在pojo里面创建一个实体类:
package com.xcl.pojo;public class Hello {private String str;public String getStr() {return str;}public void setStr(String str) {this.str = str;}@Overridepublic String toString() {return "Hello{" +"str='" + str + '\'' +'}';}public void show(){System.out.println("helloSpring");}
}
然后在resource资源里面创建bean.xml
<?xml version="1.0" encoding="UTF-8"?>
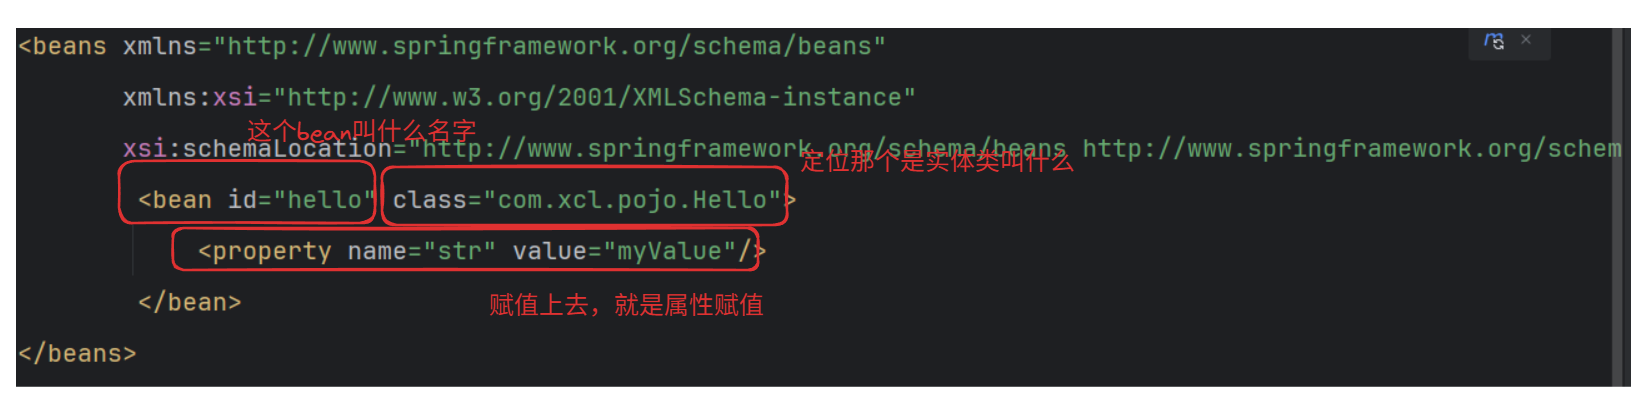
<beans xmlns="http://www.springframework.org/schema/beans"xmlns:xsi="http://www.w3.org/2001/XMLSchema-instance"xsi:schemaLocation="http://www.springframework.org/schema/beans http://www.springframework.org/schema/beans/spring-beans.xsd"><bean id="hello" class="com.xcl.pojo.Hello"><property name="str" value="myValue"/></bean>
</beans>实现依赖注入,创建对象(注意这个是无参构造)
然后就是进行测试:
package com.xcl;import com.xcl.pojo.Hello;
import org.junit.Test;
import org.springframework.context.ApplicationContext;
import org.springframework.context.support.ClassPathXmlApplicationContext;public class MyTest {@Testpublic void test(){//获取spring的上下文对象ApplicationContext context= new ClassPathXmlApplicationContext("beans.xml");Hello hello = (Hello)context.getBean("hello");System.out.println(hello);hello.show();}
}
2.Spring容器:
1.意思就是比如我们之前如果要进行结婚,我们就需要一个一个进行new一个对象
2.但是现在意思就是有一个容器bean(类似于社交网站,你需要的人都在里面进行注册),然后你只需要进行get里面就行(给你对象都放在bean里面了!)
2.依赖注入(DI)
依赖:bean对象的创建依赖于容器(依赖就是bean上面的东西对类进行依赖)
注入:bean对象中的所有属性,由容器注入!(注入就是对类里面的属性进行复制或者说明)
<?xml version="1.0" encoding="UTF-8"?>
<beans xmlns="http://www.springframework.org/schema/beans"xmlns:xsi="http://www.w3.org/2001/XMLSchema-instance"xmlns:c="http://www.springframework.org/schema/c"xmlns:p="http://www.springframework.org/schema/p"xsi:schemaLocation="http://www.springframework.org/schema/beans http://www.springframework.org/schema/beans/spring-beans.xsd">
<!--有参构造-->
<!--下标-->
<!--    <bean id="hello" class="com.xcl.pojo.Hello">-->
<!--        <constructor-arg  index="0" value="hello world"/>-->
<!--        </bean>--><!--类型赋值,不建议使用,要是类型都一样咋办呢?-->
<!--    <bean id="hello" class="com.xcl.pojo.Hello">-->
<!--        <constructor-arg  type="java.lang.String" value="hello world"/>-->
<!--    </bean>--><!--直接通过参数名字进行构建  -->
<!--    <bean id="hello" class="com.xcl.pojo.Hello">-->
<!--        <constructor-arg name="str" value="hello world"/>-->
<!--    </bean>-->
<!--就是使用c空间,也就是有参构造--><bean id="hello" class="com.xcl.pojo.Hello" c:str="我是c构造的有参构造"></bean><!--    <bean id="address" class="com.xcl.pojo.Address">-->
<!--        <property name="address" value="达州"></property>-->
<!--    </bean>--><!--就是使用p空间,也就是无参构造--><bean id="address" class="com.xcl.pojo.Address" p:address="达州"/><bean id="student" class="com.xcl.pojo.Student"><!--普通注入--><property name="name" value="xcl"></property><!--bean注入--><property name="address" ref="address"></property><!--数组注入--><property name="books"><array><value>java</value><value>c++</value><value>python</value></array></property><!--map注入--><property name="cards"><map><entry key="diver" value="123456"></entry><entry key="url" value="654321"></entry><entry key="username" value="111111"></entry><entry key="password" value="111111"></entry></map></property><!--list注入--><property name="hobbys"><list><value>打球</value><value>打豆豆</value><value>打豆豆</value></list></property><!--set注入--><property name="games"><set><value>LOL</value><value>DNF</value><value>DOTA</value></set></property><!--null注入--><property name="wife" value=" "></property><!-- Properties注入--><property name="info"><props><prop key="com">com.xcl</prop><prop key="name">xcl</prop></props></property></bean>
</beans>
3.自动装bean:
重点理解一下byName和byType区别对后面的@AutoWired和@Resource区别【一个跟着名字一个跟着类型】
<?xml version="1.0" encoding="UTF-8"?>
<beans xmlns="http://www.springframework.org/schema/beans"xmlns:xsi="http://www.w3.org/2001/XMLSchema-instance"xmlns:c="http://www.springframework.org/schema/c"xmlns:p="http://www.springframework.org/schema/p"xsi:schemaLocation="http://www.springframework.org/schema/beans http://www.springframework.org/schema/beans/spring-beans.xsd"><bean id="cat" class="com.xcl.pojo.Cat" /><bean id="dog" class="com.xcl.pojo.Dog" />
<!--    <bean id="people" class="com.xcl.pojo.People"-->
<!--          p:cat-ref="cat"-->
<!--          p:dog-ref="dog"-->
<!--          p:name="xcl" -->
<!--    />-->
<!--自动装配-->
<!--byName:需要保证所有bean的id唯一,并且这个bean需要和自动注入的属性的id一致byType:需要保证所有bean的class唯一,并且这个bean需要和自动注入的属性的class一致,加入有多Dog对应了对个id就不合适
--><bean id="people" class="com.xcl.pojo.People"p:name="xcl" autowire="byName"/></beans>
注解使用:
1.首先配置对应文件
<?xml version="1.0" encoding="UTF-8"?>
<beans xmlns="http://www.springframework.org/schema/beans"xmlns:xsi="http://www.w3.org/2001/XMLSchema-instance"xmlns:c="http://www.springframework.org/schema/c"xmlns:p="http://www.springframework.org/schema/p"xmlns:context="http://www.springframework.org/schema/context"xsi:schemaLocation="http://www.springframework.org/schema/beanshttp://www.springframework.org/schema/beans/spring-beans.xsdhttp://www.springframework.org/schema/contexthttp://www.springframework.org/schema/context/spring-context-3.0.xsd"><context:annotation-config/><bean id="cat" class="com.xcl.pojo.Cat"/><bean id="dog" class="com.xcl.pojo.Dog"/><bean id="people" class="com.xcl.pojo.People" p:name="xcl"/></beans>
2.可以直接使用@Autowired注解在属性上面
package com.xcl.pojo;
import org.springframework.beans.factory.annotation.Autowired;import javax.annotation.Resource;public class People {@Resourceprivate Dog dog;@Autowiredprivate Cat cat;private String name;public Dog getDog() {return dog;}public void setDog(Dog dog) {this.dog = dog;}public Cat getCat() {return cat;}public void setCat(Cat cat) {this.cat = cat;}public String getName() {return name;}public void setName(String name) {this.name = name;}@Overridepublic String toString() {return "People{" +"dog=" + dog +", cat=" + cat +", name='" + name + '\'' +'}';}
}
3.spring使用注解开发
详细可以参考这个https://blog.csdn.net/u010648555/article/details/76299467
4.使用java代码省去xml配置文件
package com.xcl.config;import com.xcl.pojo.User;
import org.springframework.context.annotation.Bean;
import org.springframework.context.annotation.Configuration;//@Condigficatio那就是注入到容器中
//就使用java代码省去了xml文件的配置
@Configuration
public class AppConfig {//注册一个bean,就相当于之前写的一个bean标签//方法的名字就是bean的id,return就相当于bean里面的class属性@Beanpublic User getUser(){return new User();}