【进程与线程】
文章目录
- 一、实验目的
- 二、实验内容与设计思想
- 实验内容
- 设计思路
- 三、实验代码实现
- 四、总结
一、实验目的
1.深刻理解进程和线程的概念,掌握线程与进程在组成成分上的差别;
2.进一步认识并发执行的实质。
二、实验内容与设计思想
实验内容
用pipe()创建一个管道文件,再用fork()创建两个生产者进程和两个消费者进程,让它们通过pipe()传递信息。同时,由clone()创建的线程之间通过共享内存通信,并考虑互斥问题。
设计思路
- 管道通信:使用
pipe(pipe1)和pipe(pipe2)创建两个管道,作为生产者和消费者之间的通信桥梁。 - 共享内存:利用
shmget()创建共享内存,通过shmat()将其附加到进程的地址空间。ShmData结构体用于存储共享状态,包含缓冲区、指向缓冲区的进程标识符以及互斥锁和信号量。 - 进程与线程工作流程:每个生产者通过写入管道生成消息并打印,每个消费者从管道读取消息并打印消费信息。使用
pthread_create创建消费者线程,这些线程会从共享内存读取数据。最后,在所有进程和线程工作完成后,清理共享内存、信号量和互斥锁。
三、实验代码实现
以下是具体的实验代码:
#define _GNU_SOURCE
#include <stdio.h>
#include <stdlib.h>
#include <unistd.h>
#include <string.h>
#include <sys/types.h>
#include <sys/wait.h>
#include <sys/ipc.h>
#include <sys/shm.h>
#include <pthread.h>
#include <semaphore.h>#define BUFFER_SIZE 8
#define SHM_SIZE sizeof(ShmData)typedef struct {char buffer[BUFFER_SIZE][10];int in;int out;pthread_mutex_t mutex;sem_t full;sem_t empty;
} ShmData;void* consumer_thread(void* arg);
void producer(int write_fd, int id);
void consumer(int read_fd, int id);int main() {int pipe1[2], pipe2[2];pid_t pid1, pid2, pid3, pid4;// 创建两个管道if (pipe(pipe1) == -1 || pipe(pipe2) == -1) {perror("pipe");exit(1);}// 创建共享内存int shm_id = shmget(IPC_PRIVATE, SHM_SIZE, IPC_CREAT | 0666);if (shm_id == -1) {perror("shmget");exit(1);}ShmData* shm_data = (ShmData*)shmat(shm_id, NULL, 0);if (shm_data == (ShmData*)-1) {perror("shmat");exit(1);}// 初始化共享内存中的数据memset(shm_data->buffer, 0, sizeof(shm_data->buffer));shm_data->in = 0;shm_data->out = 0;pthread_mutex_init(&shm_data->mutex, NULL);sem_init(&shm_data->full, 0, 0);sem_init(&shm_data->empty, 0, BUFFER_SIZE);// 创建两个生产者进程for (int i = 0; i < 2; i++) {if ((pid1 = fork()) == 0) {// 生产者1producer(pipe1[1], i);exit(0);}if ((pid2 = fork()) == 0) {// 生产者2producer(pipe2[1], i);exit(0);}}// 创建两个消费者进程for (int i = 0; i < 2; i++) {if ((pid3 = fork()) == 0) {// 消费者1consumer(pipe1[0], 0);exit(0);}if ((pid4 = fork()) == 0) {// 消费者2consumer(pipe2[0], 1);exit(0);}}// 创建消费者线程pthread_t thread1, thread2;pthread_create(&thread1, NULL, consumer_thread, (void*)shm_data);pthread_create(&thread2, NULL, consumer_thread, (void*)shm_data);// 等待所有进程wait(NULL);wait(NULL);wait(NULL);wait(NULL);pthread_join(thread1, NULL);pthread_join(thread2, NULL);// 清理资源shmdt(shm_data);shmctl(shm_id, IPC_RMID, NULL);sem_destroy(&shm_data->full);sem_destroy(&shm_data->empty);pthread_mutex_destroy(&shm_data->mutex);return 0;
}void producer(int write_fd, int id) {for (int i = 1; i <= 5; i++) {char message[10];sprintf(message, "P%d: %d", id, i);write(write_fd, message, strlen(message) + 1);printf("Producer %d produced: %s\n", id, message);sleep(1); // 模拟生产延迟}close(write_fd);
}void consumer(int read_fd, int id) {char buffer[10];while (1) {int bytes_read = read(read_fd, buffer, sizeof(buffer));if (bytes_read > 0) {printf("Consumer %d consumed: %s\n", id, buffer);} else {break; // 生产者结束时退出}}close(read_fd);
}void* consumer_thread(void* arg) {ShmData* shm_data = (ShmData*)arg;while (1) {sem_wait(&shm_data->full);pthread_mutex_lock(&shm_data->mutex);// 消费数据printf("Consumer Thread consumed: %s\n", shm_data->buffer[shm_data->out]);shm_data->out = (shm_data->out + 1) % BUFFER_SIZE;}return NULL;
}
- 实验结果

四、总结
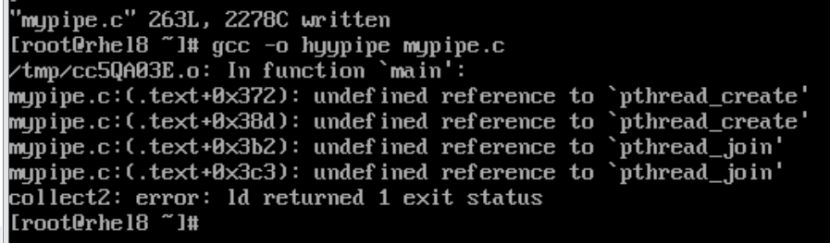
- 遇到的问题
在进行代码编译时,我遇到了错误。通过查询资料得知,是编译时没有链接成功pthead库。在编译命令中加上-lpthread后,代码就可以顺利编译成功了。
这次调试经历让我明白,在实际编程中,不仅要掌握代码逻辑,还要熟悉编译环境和相关库的使用。
- 实验反思:
- 资源管理的严谨性
实验中严格遵循 “创建 - 使用 - 销毁” 的资源管理流程:共享内存通过shmctl(IPC_RMID)标记删除,信号量用sema_destroy()释放,互斥锁通过pthread_mutex_destroy()销毁。这让我意识到,并发程序的稳定性不仅取决于逻辑正确性,更依赖资源的及时释放,避免内存泄漏或句柄残留。 - 跨平台兼容性的考量
实验代码中使用了 GNU 扩展宏_GNU_SOURCE,以及 Linux 特有的系统调用(如shmget、pipe)。若需跨平台运行,需改用 POSIX 标准接口或添加条件编译,这为后续学习分布式系统打下了兼容性思维的基础。 - 日志与调试的重要性
在调试阶段,通过打印进程 ID(getpid())、线程 ID(pthread_self())及缓冲区指针,快速定位到线程安全问题。这让我深刻体会到,合理添加调试日志是排查并发问题的 “利器”,甚至比单步调试更高效。