Spring5基础教程(2)--代理模式/AOP/Mybatis-Spring
视频参考链接:【狂神说Java】Spring5最新完整教程IDEA版通俗易懂 p17-28
1、代理模式
为什么要学习代理模式?因为这就是SpringAOP的底层!【SpringAOP 和 SpringMVC】
代理模式的分类:
- 静态代理
- 动态代理
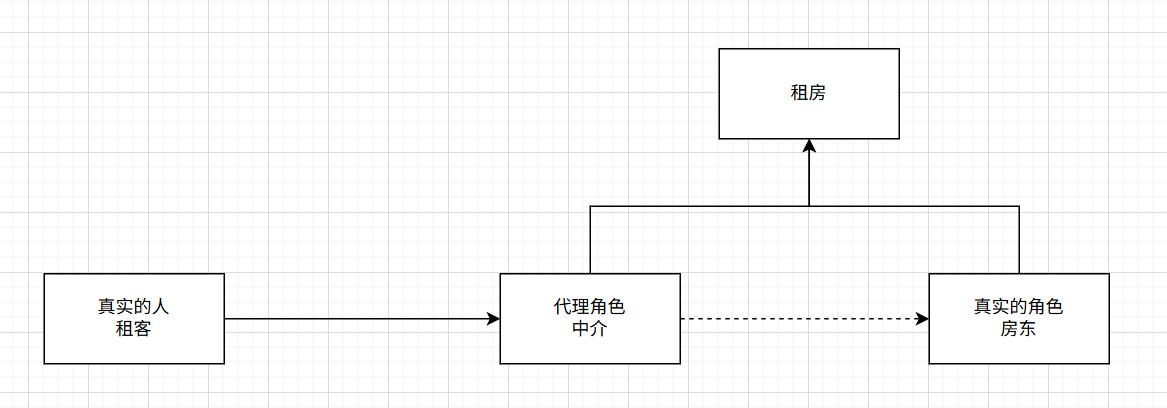
1.1、静态代理
角色分析:
- 抽象角色:一般会使用接口或者抽象类来解决
- 真实角色:被代理的角色
- 代理角色:代理真实角色,代理真实角色后,一般会做一些附属操作
- 客户:访问代理对象的人
代码步骤:
-
接口
//租房 public interface Rent {public void rent();} -
真实角色
//房东 public class Host implements Rent {@Overridepublic void rent() {System.out.println("房东要出租房子!");} } -
代理角色
public class Proxy implements Rent{private Host host;public Proxy(Host host) {this.host = host;}public Proxy() {}@Overridepublic void rent() {roomTour();host.rent();signContract();fare();}//看房public void roomTour(){System.out.println("中介带你看房!");}//收中介费public void fare(){System.out.println("收中介费");}//签合同public void signContract(){System.out.println("签租赁合同");}} -
客户端访问代理角色
public class Client {public static void main(String[] args) {//房东要租房子Host host = new Host();//代理,中介帮房东租房子,代理角色一般会有一些附属操作Proxy proxy = new Proxy(host);//你不用面对房东,直接找中介租房即可!proxy.rent();}}
代理模式的好处:
- 可以使真实角色的操作更加纯粹!不用去关注一些公共的业务
- 公共业务就交给了代理角色!实现了业务的分工!
- 公共业务发生扩展的时候,方便集中管理!
缺点:
- 一个真实角色就会产生一个代理角色;代码量会翻倍,开发效率会降低。
1.2、静态代理加深理解
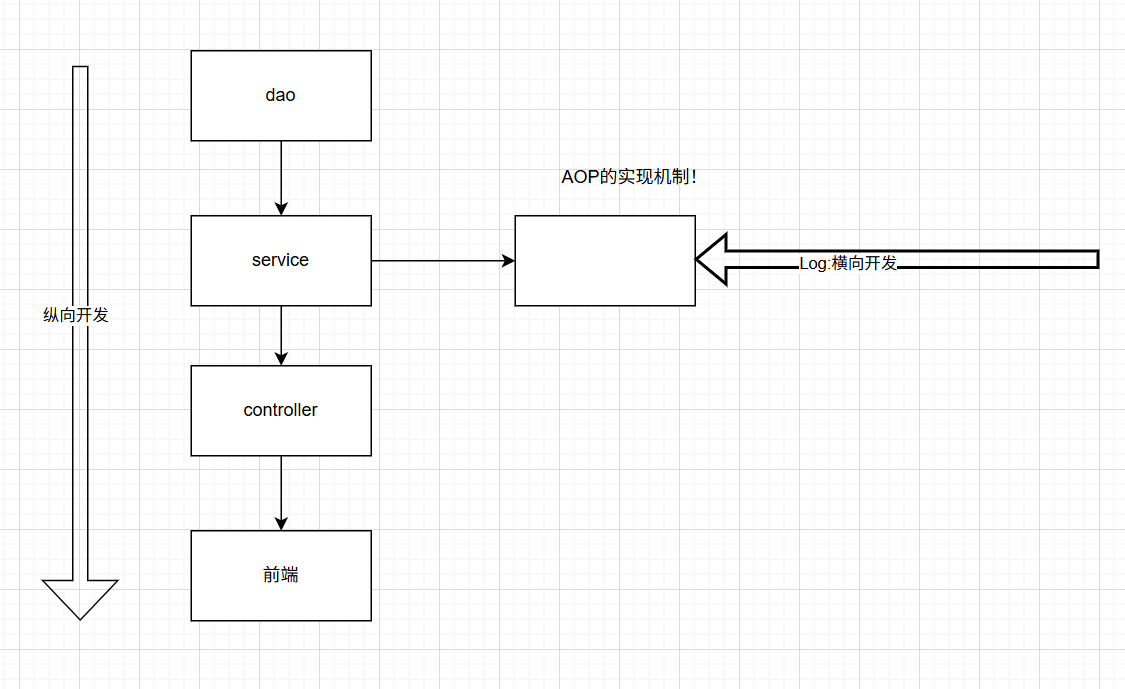
1.3、动态代理
- 动态代理和静态代理的角色是一样的
- 动态代理的代理类是动态生成的,不是我们直接写好的!
- 动态代理分为两大类:
- 基于接口的动态代理
- JDK的动态代理【此处使用】
- 基于类的动态代理
- cglib
- Java字节码实现
- Javassist
- 基于接口的动态代理
需要了解两个类:
- Proxy:代理
- InvocationHandler:调用处理程序
-
接口
//租房 public interface Rent {public void rent();} -
真实角色
//房东 public class Host implements Rent {@Overridepublic void rent() {System.out.println("房东要出租房子!");} } -
调用处理程序
//我们会用这个类,自动生成代理类! public class ProxyInvocationHandler implements InvocationHandler {//被代理的接口private Rent rent;public void setRent(Rent rent) {this.rent = rent;}//生成得到代理类public Object getProxy(){return Proxy.newProxyInstance(this.getClass().getClassLoader(),rent.getClass().getInterfaces(),this);}//处理代理实例,并返回结果@Overridepublic Object invoke(Object proxy, Method method, Object[] args) throws Throwable {//动态代理的本质,就是使用反射机制!roomTour();Object result = method.invoke(rent, args);signContract();fare();return result;}//看房public void roomTour(){System.out.println("中介带你看房!");}//收中介费public void fare(){System.out.println("收中介费");}//签合同public void signContract(){System.out.println("签租赁合同");}} -
客户端调用代理程序
public class Client {public static void main(String[] args) {//真实角色Host host = new Host();//代理角色:现在没有ProxyInvocationHandler pih = new ProxyInvocationHandler();//通过 调用程序处理角色 来处理我们要调用的接口对象pih.setRent(host);Rent proxy = (Rent) pih.getProxy();//这里的Proxy就是动态生成的,我们并没有写proxy.rent();}
}
通用的调用处理程序:
//我们会用这个类,自动生成代理类!
public class ProxyInvocationHandler implements InvocationHandler {//被代理的接口private Object target;public void setTarget(Object target) {this.target = target;}//生成得到代理类public Object getProxy(){return Proxy.newProxyInstance(this.getClass().getClassLoader(),target.getClass().getInterfaces(),this);}//处理代理实例,并返回结果@Overridepublic Object invoke(Object proxy, Method method, Object[] args) throws Throwable {log(method.getName());//动态代理的本质,就是使用反射机制!Object result = method.invoke(target, args);return result;}public void log(String msg){System.out.println("执行了"+msg+"的方法");}}
动态代理的好处:
- 可以使真实角色的操作更加纯粹!不用去关注一些公共的业务
- 公共业务就交给了代理角色!实现了业务的分工!
- 公共业务发生扩展的时候,方便集中管理!
- 一个动态代理类代理的是一个接口,一般就是对应的一类业务
- 一个动态代理类可以代理多个类,只要是实现了同一个接口即可
2、AOP
2.1、什么是AOP
AOP(Aspect Oriented Programming)意为:面向切面编程,通过预编译方式和运行期动态代理实现程序功能的统一维护的一种技术。AOP是OOP的延续,是软件开发中的一个热点,也是Spring框架中的一个重要内容,是函数式编程的一种衍生范型。利用AOP可以对业务逻辑的各个部分进行隔离,从而使得业务逻辑各部分之间的耦合度降低,提高程序的可重用性,同时提高了开发的效率。
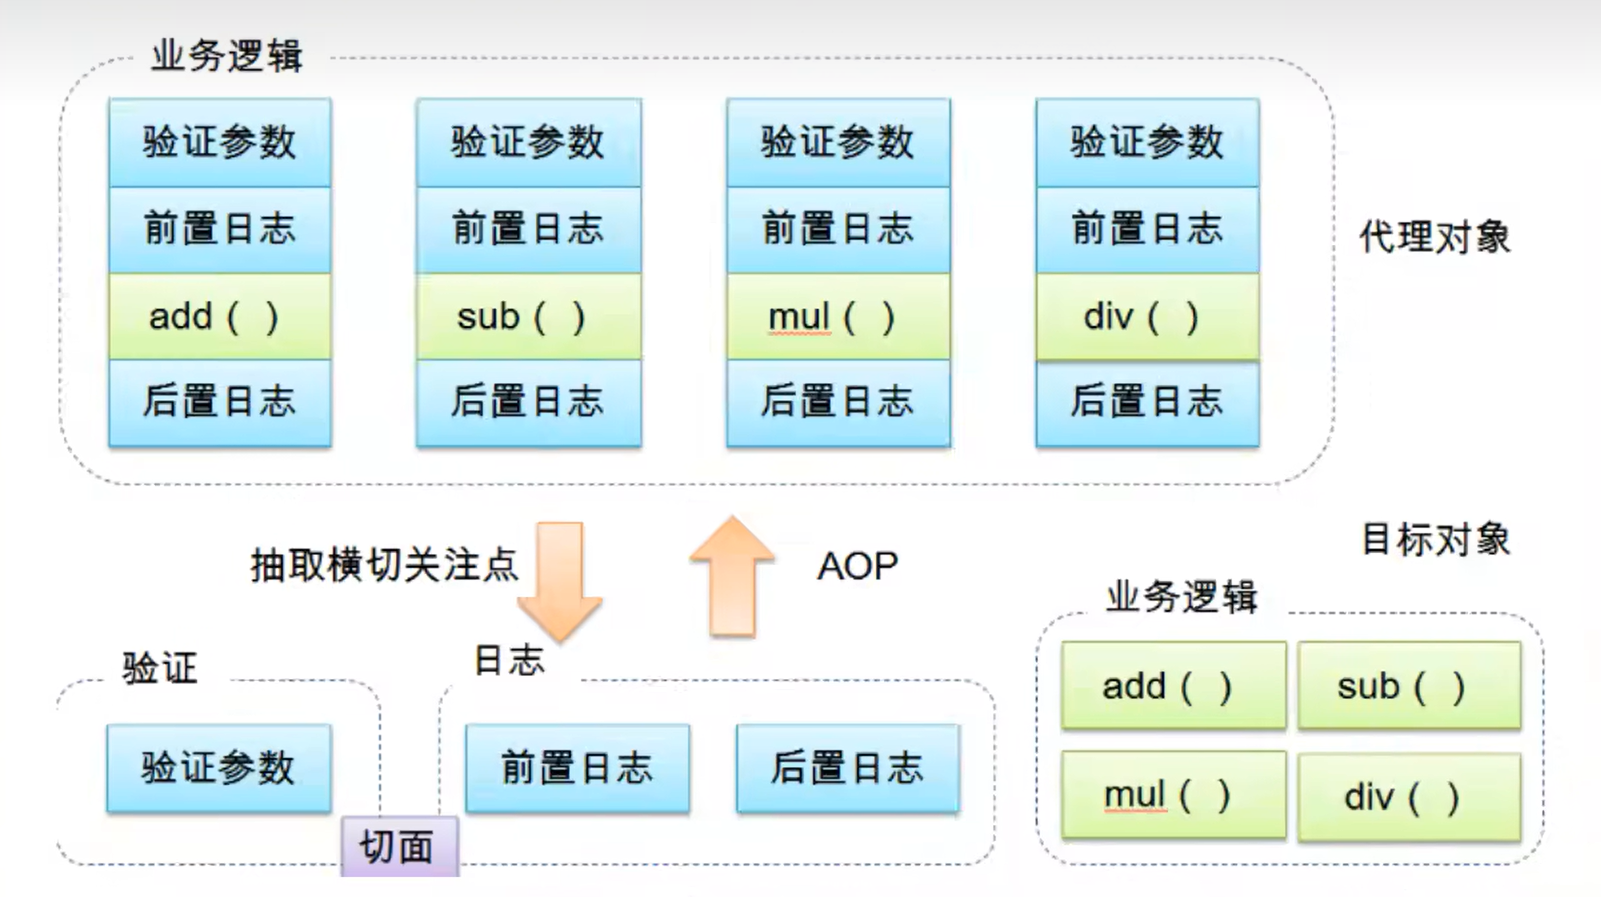
2.2、AOP在Spring中的作用
提供声明式事务;允许用户自定义切面
- 横切关注点:跨越应用程序多个模块的方法或功能。即是,与我们业务逻辑无关的,但是我们需要关注的部分,就是横切关注点。如日志,安全,缓存,事务等等 …
- 切面(ASPECT):横切关注点 被模块化 的特殊对象。即,它是一个类。
- 通知(Advice):切面必须要完成的工作。即,它是类中的一个方法。
- 目标(Target):被通知对象。
- 代理(Proxy):向目标对象应用通知之后创建的对象。
- 切入点(Pointcut):切面通知 执行的“地点“的定义。
- 连接点(JointPoint):与切入点匹配的执行点。
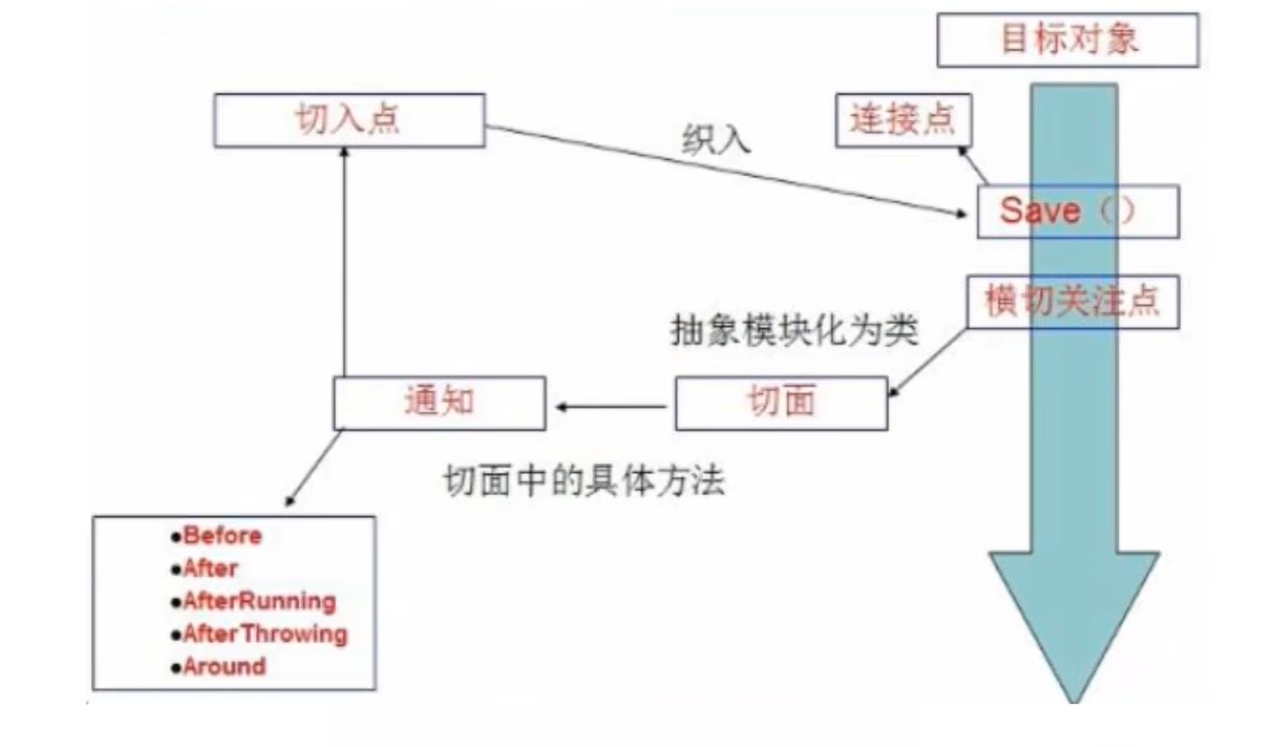
SpringAOP中,通过Advice定义横切逻辑,Spring中支持5中类型的Advice:
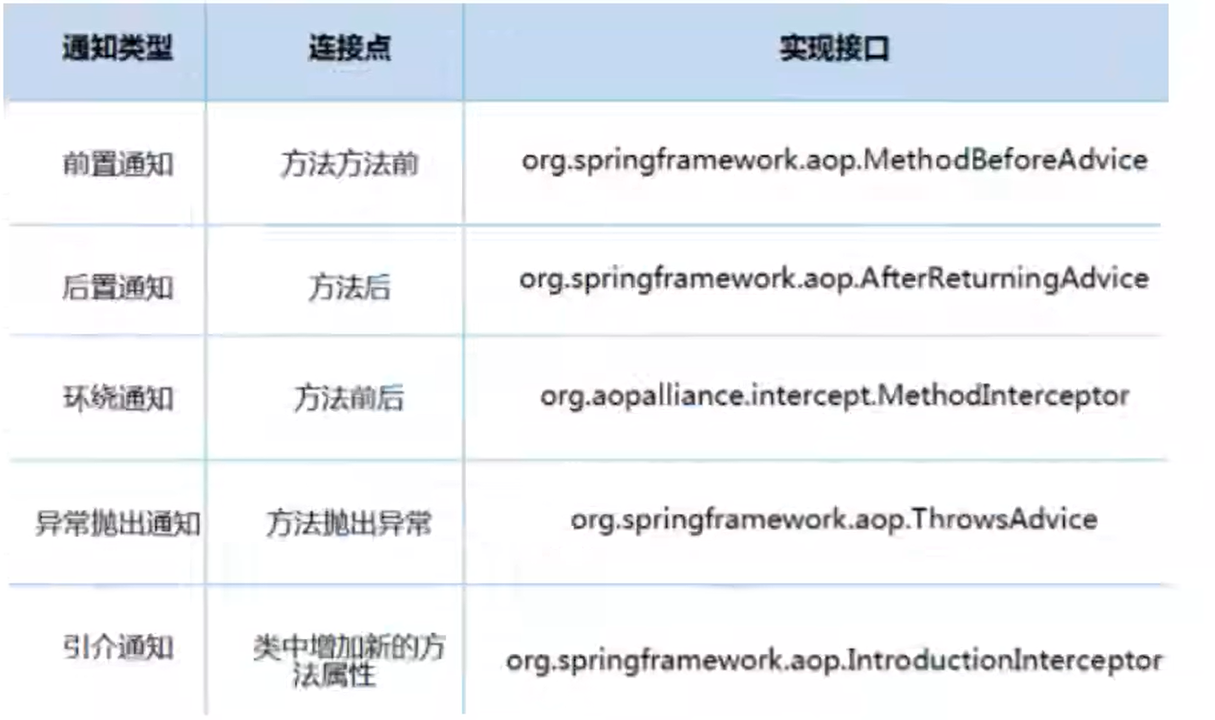
即AOP在不改变原有代码的情况下,去增加新的功能。
2.2.1、AOP中的Advice(通知/增强)
Advice 在AOP领域并不译为字面上的"建议",而是**“增强”**:
1. 历史渊源
- 在AOP概念诞生时,开发者需要描述"在特定点插入的额外行为"
- 选择了 Advice 这个词,寓意是"给程序提供的额外指导/建议"
- 中文翻译为**“增强”**是为了更直观地表达其功能
2. 实际含义
在AOP上下文中,Advice = 在连接点执行的动作:
- 在方法调用前后增加新功能
- 在异常发生时增加处理逻辑
- 在方法返回时增加后续操作
3. 更准确的理解
其实"增强"这个翻译确实有些生硬,更贴切的理解是:
Advice = 横切关注点的具体实现
- 它是你要"织入"到目标方法的额外代码
- 它是你要"添加"的跨领域功能
2.3、使用Spring实现AOP
【重点】使用AOP织入,需要导入一个依赖包!
<!-- https://mvnrepository.com/artifact/org.aspectj/aspectjweaver -->
<dependency><groupId>org.aspectj</groupId><artifactId>aspectjweaver</artifactId><version>1.9.4</version>
</dependency>
方式一:使用Spring的API接口【主要是SpringAPI接口实现】
- 后置增强
public class AfterLog implements AfterReturningAdvice {//returnValue:返回值@Overridepublic void afterReturning(Object returnValue, Method method, Object[] args, Object target) throws Throwable {System.out.println("执行了"+method.getName()+"方法:返回结果为:"+returnValue);}
}- 前置增强
public class BeforeLog implements MethodBeforeAdvice {//method:要执行的目标对象的方法//args:参数//target:目标对象@Overridepublic void before(Method method, Object[] args, Object target) throws Throwable {System.out.println(target.getClass().getName() + "的" + method.getName() + "被执行了");}
}
- xml配置
<?xml version="1.0" encoding="UTF-8"?>
<beans xmlns="http://www.springframework.org/schema/beans"xmlns:xsi="http://www.w3.org/2001/XMLSchema-instance"xmlns:aop="http://www.springframework.org/schema/aop"xsi:schemaLocation="http://www.springframework.org/schema/beanshttps://www.springframework.org/schema/beans/spring-beans.xsdhttp://www.springframework.org/schema/aophttps://www.springframework.org/schema/aop/spring-aop.xsd"><!--注册Bean--><bean id="userService" class="com.lingbo.service.UserServiceImpl"/><bean id="beforeLog" class="com.lingbo.log.BeforeLog"/><bean id="afterLog" class="com.lingbo.log.AfterLog"/><!--方式一:使用原生Spring API接口--><!--配置aop:需要导入aop的约束--><aop:config><!--切入点:expression:表达式.execution(要执行的位置! * * * * *)--><aop:pointcut id="pointcut" expression="execution(* com.lingbo.service.UserServiceImpl.*(..))"/><!--执行环绕增强--><aop:advisor advice-ref="beforeLog" pointcut-ref="pointcut"/><aop:advisor advice-ref="afterLog" pointcut-ref="pointcut"/></aop:config></beans>
- 测试代码
public class MyTest {public static void main(String[] args) {ApplicationContext context = new ClassPathXmlApplicationContext("applicationContext.xml");//动态代理代理的是接口UserService userService = (UserService) context.getBean("userService");userService.add();}
}
方式二:自定义类实现AOP【主要是切面定义】
通过配置将普通Java方法声明为AOP通知,而不是通过实现特定接口。
-
自定义类,写要用于增强的普通方法
public class DiyPointCut {public void before(){System.out.println("=================方法执行前==================");}public void after(){System.out.println("=================方法执行后==================");}} -
xml配置
<?xml version="1.0" encoding="UTF-8"?> <beans xmlns="http://www.springframework.org/schema/beans"xmlns:xsi="http://www.w3.org/2001/XMLSchema-instance"xmlns:aop="http://www.springframework.org/schema/aop"xsi:schemaLocation="http://www.springframework.org/schema/beanshttps://www.springframework.org/schema/beans/spring-beans.xsdhttp://www.springframework.org/schema/aophttps://www.springframework.org/schema/aop/spring-aop.xsd"><!--注册Bean--><bean id="userService" class="com.lingbo.service.UserServiceImpl"/><!--方式二:自定义类--><bean id="diy" class="com.lingbo.diy.DiyPointCut"/><aop:config><!--自定义切面,ref要引用的类--><aop:aspect ref="diy"><!--切入点--><aop:pointcut id="point" expression="execution(* com.lingbo.service.UserServiceImpl.*(..))"/><!--通知--><aop:before method="before" pointcut-ref="point"/><aop:after method="after" pointcut-ref="point"/></aop:aspect></aop:config></beans> -
测试代码
public class MyTest {public static void main(String[] args) {ApplicationContext context = new ClassPathXmlApplicationContext("applicationContext.xml");//动态代理代理的是接口UserService userService = (UserService) context.getBean("userService");userService.add();}}
方式三:使用注解实现!
-
定义切面容器
//方式三:使用注解方式实现AOP @Aspect//标注这个类是一个切面 public class AnnotationPointCut {@Before("execution(* com.lingbo.service.UserServiceImpl.*(..))")public void before() {System.out.println("=================方法执行前=================");}@After("execution(* com.lingbo.service.UserServiceImpl.*(..))")public void after() {System.out.println("=================方法执行后=================");}//在环绕增强中,我们可以给定一个参数,代表我们要获取处理切入的点@Around("execution(* com.lingbo.service.UserServiceImpl.*(..))")public void around(ProceedingJoinPoint jp) throws Throwable {System.out.println("环绕前");//执行方法Object proceed = jp.proceed();System.out.println("环绕后");Signature signature = jp.getSignature();//获得签名System.out.println("signature:" + signature);System.out.println(proceed);}} -
配置xml文件
<?xml version="1.0" encoding="UTF-8"?> <beans xmlns="http://www.springframework.org/schema/beans"xmlns:xsi="http://www.w3.org/2001/XMLSchema-instance"xmlns:aop="http://www.springframework.org/schema/aop"xsi:schemaLocation="http://www.springframework.org/schema/beanshttps://www.springframework.org/schema/beans/spring-beans.xsdhttp://www.springframework.org/schema/aophttps://www.springframework.org/schema/aop/spring-aop.xsd"><!--注册Bean--><bean id="userService" class="com.lingbo.service.UserServiceImpl"/><!--方式三--><bean id="annotationPointCut" class="com.lingbo.diy.AnnotationPointCut"/><!--开启注解支持! JDK(默认 proxy-target-class="false") cglib(proxy-target-class="true")--><aop:aspectj-autoproxy /></beans> -
测试代码
public class MyTest {public static void main(String[] args) {ApplicationContext context = new ClassPathXmlApplicationContext("applicationContext.xml");//动态代理代理的是接口UserService userService = (UserService) context.getBean("userService");userService.add();}}
3、整合Mybatis
步骤:
- 导入相关jar包
- junit
- mybatis
- mysql数据库
- spring相关的
- aop织入
- mybatis-spring 【new】
- 编写配置文件
- 测试
3.1、回忆Mybatis
- 编写实体类
- 编写核心配置文件
- 编写接口
- 编写Mapper.xml
- 测试
3.2、Mybatis-spring
使用SqlSessionTemplate
-
编写数据源配置
<!--DataSource:使用Spring的数据源替换Mybatis的配置 c3p0 dbcp druid 我们这里使用Spring提供的JDBC org.springframework.jdbc.datasource --><bean id="dataSource" class="org.springframework.jdbc.datasource.DriverManagerDataSource"><property name="driverClassName" value="com.mysql.jdbc.Driver"/><property name="url"value="jdbc:mysql://localhost:3306/mybatis?useSSL=false&characterEncoding=UTF-8&useUnicode=true"/><property name="username" value="root"/><property name="password" value="123456"/></bean> -
SqlSessionFactory
<!--SqlSessionFactory--> <bean id="sqlSessionFactory" class="org.mybatis.spring.SqlSessionFactoryBean"><property name="dataSource" ref="dataSource"/><!--绑定Mybatis配置文件--><property name="configLocation" value="classpath:mybatis-config.xml"/><property name="mapperLocations" value="classpath:com/lingbo/mapper/*.xml"/> </bean> -
SqlSessionTemplate
<!--SqlSessionTemplate:就是我们使用的SqlSession--> <bean id="sqlSession" class="org.mybatis.spring.SqlSessionTemplate"><!--只能使用构造器注入SqlSessionFactory,因为它没有set方法--><constructor-arg index="0" ref="sqlSessionFactory"/> </bean> -
需要给接口加实现类
public class UserMapperImpl implements UserMapper{//在原来,我们的所有操作都使用SqlSession来执行。//现在,都使用SqlSessionTemplateprivate SqlSessionTemplate sqlSession;public void setSqlSession(SqlSessionTemplate sqlSession) {this.sqlSession = sqlSession;}@Overridepublic List<User> selectUser() {UserMapper mapper = sqlSession.getMapper(UserMapper.class);return mapper.selectUser();} } -
将自己写的实现类,注入到Spring容器中
<bean id="userMapper" class="com.lingbo.mapper.UserMapperImpl"><property name="sqlSession" ref="sqlSession"/> </bean> -
测试
@Test
public void test() throws IOException {ApplicationContext context = new ClassPathXmlApplicationContext("applicationContext.xml");UserMapper userMapper = context.getBean("userMapper", UserMapper.class);List<User> userList = userMapper.selectUser();for (User user : userList) {System.out.println(user);}}
使用SqlSessionDaoSupport
-
编写数据源配置
<!--DataSource:使用Spring的数据源替换Mybatis的配置 c3p0 dbcp druid 我们这里使用Spring提供的JDBC org.springframework.jdbc.datasource --><bean id="dataSource" class="org.springframework.jdbc.datasource.DriverManagerDataSource"><property name="driverClassName" value="com.mysql.jdbc.Driver"/><property name="url"value="jdbc:mysql://localhost:3306/mybatis?useSSL=false&characterEncoding=UTF-8&useUnicode=true"/><property name="username" value="root"/><property name="password" value="123456"/></bean> -
SqlSessionFactory
<!--SqlSessionFactory--> <bean id="sqlSessionFactory" class="org.mybatis.spring.SqlSessionFactoryBean"><property name="dataSource" ref="dataSource"/><!--绑定Mybatis配置文件--><property name="configLocation" value="classpath:mybatis-config.xml"/><property name="mapperLocations" value="classpath:com/lingbo/mapper/*.xml"/> </bean> -
需要给接口加实现类,并继承SqlSessionDaoSupport
public class UserMapperImpl2 extends SqlSessionDaoSupport implements UserMapper{@Overridepublic List<User> selectUser() {return getSqlSession().getMapper(UserMapper.class).selectUser();} } -
将自己写的实现类,注入到Spring容器中,为其继承的父类设置属性sqlSessionFactory
<bean id="userMapper2" class="com.lingbo.mapper.UserMapperImpl2"><property name="sqlSessionFactory" ref="sqlSessionFactory"/> </bean> -
测试
@Test
public void test() throws IOException {ApplicationContext context = new ClassPathXmlApplicationContext("applicationContext.xml");UserMapper userMapper = context.getBean("userMapper2", UserMapper.class);List<User> userList = userMapper.selectUser();for (User user : userList) {System.out.println(user);}}
4、声明式事务
4.1、回顾事务
- 把一组业务当做一个业务来做;要么都成功,要么都失败!
- 事务在项目开发中,十分重要,涉及到数据一致性问题,不能马虎!
- 确保完整性和一致性;
事务ACID原则:
- 原子性
- 一致性
- 隔离性
- 多个业务可能操作同一个资源,防止数据损坏
- 持久性
- 事务一旦提交,无论系统发生什么问题,结果都不会再被影响,被持久化的写到存储器中!
4.2、Spring中的事务管理
- 声明式事务:AOP
- 编程式事务:需要在代码中,进行事务的管理
使用AOP给 com.lingbo.mapper 包下的方法按名字加上只读或读写事务,其他什么都不用改。
<!--配置声明式事务-->
<bean id="transactionManager" class="org.springframework.jdbc.datasource.DataSourceTransactionManager"><constructor-arg ref="dataSource"/>
</bean><!--结合AOP实现事务的织入-->
<!--配置事务通知:-->
<tx:advice id="txAdvice" transaction-manager="transactionManager"><!--给哪些方法配置事务--><!--配置事务的传播特性:new--><tx:attributes><tx:method name="add*" propagation="REQUIRED"/><tx:method name="delete*" propagation="REQUIRED"/><tx:method name="update*" propagation="REQUIRED"/><tx:method name="query*" read-only="true"/><tx:method name="*" propagation="REQUIRED"/></tx:attributes>
</tx:advice><!--配置事务切入-->
<aop:config><aop:pointcut id="txPointCut" expression="execution(* com.lingbo.mapper.*.*(..))"/><aop:advisor advice-ref="txAdvice" pointcut-ref="txPointCut"/>
</aop:config>
思考:
为什么需要事务?
- 如果不配置事务,可能存在数据提交不一致的情况。
- 如果我们不在Spring中去配置声明式事务,我们就需要在代码中手动配置事务!
- 事务在项目的开发中十分重要,涉及到数据的一致性和完整性问题,不容马虎!
