ArcGIS JSAPI 学习教程 - 场景可视区域(SceneView visibleArea)显示以及过滤要素应用
ArcGIS JSAPI 高级教程 - 场景可视区域(SceneView visibleArea)显示以及过滤要素应用
- 完整代码
- 在线示例
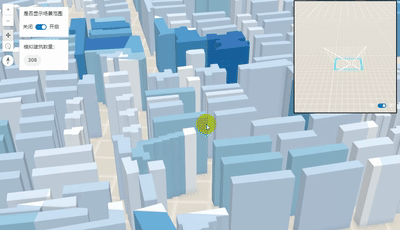
本文主要介绍一下场景可视区域(SceneView visibleArea),一般用于过滤视野内可见部分,实际为相机视锥体在地面上的近似投影多边形。
首先介绍一下实现过程:
1. 主场景称为场景,右上角场景称为类鹰眼场景。
2. 创建包含可视区域的场景,并且添加地形图层,用于计算类鹰眼展示相机高度。
3. 添加要素图层,用于实现过滤功能。
4. 通过场景相机构建类鹰眼场景中的几何体、范围、虚拟相机对象等。
5. 通过监听事件,进行数据更新、要素过滤更新等。
本文包括 完整代码以及在线示例。
完整代码
<!doctype html>
<html lang="en">
<head><meta charset="utf-8"/><meta name="viewport" content="initial-scale=1, maximum-scale=1,user-scalable=no"/><title>可视区域 | Sample | ArcGIS Maps SDK for JavaScript 4.33</title><style>html,body,#viewDiv {padding: 0;margin: 0;height: 100%;width: 100%;}#viewDivSupport {width: 25%;height: 35%;top: 5px;right: 20px;border: 2px solid black;display: none;}:root {--my-width: 100vw;}#divToggle {display: none;bottom: 0;right: 5px;}.white-text {color: white;line-height: 0;}#myCustomGroup {position: absolute;top: 16px;left: 64px;}</style><script type="module" src="https://openlayers.vip/arcgis_api/calcite-components/2.8.1/calcite.esm.js"></script><!-- 引入ArcGIS JS API样式和脚本 --><link rel="stylesheet" href="https://openlayers.vip/arcgis_api/4.33/esri/themes/light/main.css"/><script src="https://openlayers.vip/arcgis_api/4.33/init.js"></script><script>var _hmt = _hmt || [];(function () {var hm = document.createElement("script");hm.src = "https://hm.baidu.com/hm.js?f80a36f14f8a73bb0f82e0fdbcee3058";var s = document.getElementsByTagName("script")[0];s.parentNode.insertBefore(hm, s);})();</script>
</head><body><div id="viewDiv"><div id="viewDivSupport"></div><div id="divToggle"><calcite-label scale="s" layout="inline"><p class="white-text">2D</p><calcite-switch id="3dToggle" scale="s"></calcite-switch><p class="white-text">3D</p></calcite-label></div>
</div><div id="myCustomGroup"><calcite-block open heading="是否显示场景范围" id="renderNodeUI"><calcite-label layout="inline">关闭<calcite-switch id="renderNodeToggle" checked></calcite-switch>开启</calcite-label></calcite-block><calcite-tile-group id="footprintSelectTileGroup" alignment="center"><calcite-tile class="tile-container" heading="模拟建筑数量:"><div slot="content-bottom" class="tile-content"><calcite-chip></calcite-chip></div></calcite-tile></calcite-tile-group>
</div><script>require(["esri/layers/FeatureLayer","esri/layers/GraphicsLayer","esri/Graphic","esri/core/reactiveUtils","esri/geometry/Polygon","esri/views/SceneView","esri/geometry/Polyline","esri/core/promiseUtils","esri/symbols/IconSymbol3DLayer","esri/symbols/PointSymbol3D","esri/symbols/ObjectSymbol3DLayer","esri/geometry/Point","esri/Map","esri/smartMapping/renderers/color",], (FeatureLayer,GraphicsLayer,Graphic,reactiveUtils,Polygon,SceneView,Polyline,promiseUtils,IconSymbol3DLayer,PointSymbol3D,ObjectSymbol3DLayer,Point,Map,colorRendererCreator,) => {const map = new Map({ground: "world-elevation"});// 创建场景const view = new SceneView({container: "viewDiv",map: map,camera: {position: [7.95442341, 46.48978665, 3407.29792],heading: 351.99,tilt: 18.52}});// 控制开启范围显示let activateExtent = true;const renderNodeToggle = document.getElementById("renderNodeToggle");renderNodeToggle.addEventListener("calciteSwitchChange", () => {activateExtent = !activateExtent;});// 添加要素图层,统计展示过滤数量const featureLayer = new FeatureLayer({url: 'https://gs3d.geosceneonline.cn/server/rest/services/Hosted/ShangHaiBuilding/FeatureServer/0',minScale: 0,maxScale: 0,outFields: ["*"],})map.add(featureLayer);  // adds the layer to the map// visualization based on field and normalization fieldlet colorParams = {layer: featureLayer,view: view,field: "SHAPE__Area",classificationMethod: "natural-breaks",valueExpression: "$feature.SHAPE__Area",theme: "high-to-low",numClasses: 10,symbolType: '3d-volumetric',};// when the promise resolves, apply the renderer to the layercolorRendererCreator.createClassBreaksRenderer(colorParams)// colorRendererCreator.createContinuousRenderer(colorParams).then(function (response) {featureLayer.renderer = response.renderer;});// Keep track of the type of supportViewlet isSupportViewTilted = false;const cameraIconUrl = "https://openlayers.vip/examples/resources/cameraIcon.svg";const camera3DObjectUrl = "https://openlayers.vip/examples/resources/cameraObject.glb";view.when(function () {view.extent = featureLayer.fullExtent;// 创建类鹰眼场景const supportView = new SceneView({container: "viewDivSupport",map: new Map(),center: view.camera.position,zoom: 13,ui: {components: []},constraints: {tilt: {max: 0 // Prevent the user from tilting the camera. This ensures the view remains a bird's-eye view (top-down), looking straight down}}});// Add the support view to the main view ui and make it visibleconst supportViewElement = document.getElementById("viewDivSupport");view.ui.add(supportViewElement, "manual");supportViewElement.style.display = "flex";// Add a view mode toggle to the supportView for switching between top-down and tilted perspectivesconst divToggle = document.getElementById("divToggle");supportView.ui.add(divToggle, "manual");const toggle = document.getElementById("3dToggle");toggle.addEventListener("calciteSwitchChange", (event) => {handle3DToggle(event);});// 视椎体图层const frustumGraphicsLayer = new GraphicsLayer({elevationInfo: {mode: "relative-to-scene"},visible: false});supportView.map.add(frustumGraphicsLayer);// 可见区域图层const visibleAreaGraphicsLayer = new GraphicsLayer({elevationInfo: {mode: "on-the-ground"}});supportView.map.add(visibleAreaGraphicsLayer);// 虚拟相机图层const cameraGraphicLayer = new GraphicsLayer({elevationInfo: {mode: "on-the-ground"}});supportView.map.add(cameraGraphicLayer);// 相机对象const cameraGraphic = new Graphic({geometry: view.camera.position,symbol: new PointSymbol3D({symbolLayers: [new IconSymbol3DLayer({resource: {href: cameraIconUrl},angle: view.camera.heading - 90})]})});cameraGraphicLayer.add(cameraGraphic);// Wait until the support view is readysupportView.when(async () => {// Show the top-down/tilted view toggledivToggle.style.display = "flex";// Wait for the layerView of the tree feature layerconst featureLayerView = await view.whenLayerView(featureLayer);// Debounce the queries to the tree featureLayerView to avoid multiple// requests being sent to the server while the user is interacting with the Sceneconst debounceQueryTrees = promiseUtils.debounce(async () => {try {// 过滤要素const featureSet = await featureLayerView.queryFeatures({// 使用可见区域过滤geometry: view.visibleArea,returnGeometry: false,outFields: ["floor"]});// 更新显示数量const chip = document.querySelector("calcite-chip");if (chip) {chip.textContent = featureSet.features.length.toString();}} catch (error) {console.error("query failed: ", error);}});// 监听数据更新reactiveUtils.when(() => !featureLayerView.dataUpdating,() => {debounceQueryTrees().catch((error) => {if (error.name === "AbortError") {return;}console.error(error);});});// 显示区域样式const visibleAreaSymbol = {type: "polygon-3d",symbolLayers: [{type: "fill",material: {color: "white"},outline: {color: "white", width: 2},pattern: {type: "style",style: "forward-diagonal"},},]};// 获取可视区域function getVisibleAreaGraphics(visibleArea, extent) {const parts = visibleArea.rings.map((ring) => new Polygon({rings: [ring], spatialReference: visibleArea.spatialReference}));const visibleAreaPolygons = parts.map((part) => new Graphic({geometry: part,symbol: visibleAreaSymbol}));// 显示地图范围if (activateExtent && extent) {// extentBuildingconst polygonExtent = Polygon.fromExtent(extent)polygonExtent.hasZ = false;const polygonExtentGraphic = new Graphic({geometry: polygonExtent,symbol: {type: "simple-fill",color: [51, 51, 204, 0],style: "solid",outline: {color: [0, 255, 255, 1],width: 2}}});visibleAreaPolygons.push(polygonExtentGraphic);}return visibleAreaPolygons;}// 地形取样let elevationSampler = view.groundView.elevationSampler;// 监听可视区域变化reactiveUtils.when(() => view.visibleArea,() => {// Debounce the queries to the tree featureLayerView to avoid multiple requestsdebounceQueryTrees().catch((error) => {if (error.name === "AbortError") {return;}console.error(error);});// Update the supportViewupdateSceneView();},{initial: true});// 监听场景更新reactiveUtils.when(() => !view.updating,() => {supportView.goTo({// goTo the visibleArea changing the tilt for a better camera positioningtarget: [view.visibleArea.extent],tilt: isSupportViewTilted ? 60 : 0});});// 更新类鹰眼场景显示数据async function updateSceneView() {frustumGraphicsLayer.removeAll();visibleAreaGraphicsLayer.removeAll();let {visibleArea, extent} = view;const visibleAreaGraphics = getVisibleAreaGraphics(visibleArea, extent);visibleAreaGraphicsLayer.addMany(visibleAreaGraphics);// Get the elevation value from the elevationSampler starting from the camera positionconst cameraPosition = view.camera.position;const groundElevation = elevationSampler.elevationAt(cameraPosition.x, cameraPosition.y);const relativeCameraHeight = cameraPosition.z - groundElevation;// 更新相机姿态cameraGraphic.geometry = new Point({x: cameraPosition.x,y: cameraPosition.y,z: relativeCameraHeight,spatialReference: view.visibleArea.spatialReference});cameraGraphic.symbol = updateCameraSymbol(view.camera.heading, view.camera.tilt);// 可视区域样式const lineSymbol = {type: "simple-line",color: [255, 255, 255],width: 1.5,};// Iterate on the visibleArea ringsfor (const ring of visibleArea.rings) {for (const point of ring) {// Create a Polyline connecting the camera position to visibleArea verticesconst connectingLine = new Polyline({paths: [[[point[0], point[1], 0],[cameraPosition.x, cameraPosition.y, relativeCameraHeight]]],spatialReference: visibleArea.spatialReference});// Create a Graphic for the connecting line and add it its graphicsLayerconst lineGraphic = new Graphic({geometry: connectingLine,symbol: lineSymbol});frustumGraphicsLayer.add(lineGraphic);}}}});// 切换类鹰眼场景二三维效果function handle3DToggle(event) {isSupportViewTilted = event.target.checked;if (isSupportViewTilted) {frustumGraphicsLayer.visible = true;supportView.constraints.tilt = {};cameraGraphicLayer.elevationInfo.mode = "relative-to-scene";} else {// supportView is in bird's-eye view mode (top-down)frustumGraphicsLayer.visible = false;supportView.constraints.tilt.max = 0;cameraGraphicLayer.elevationInfo.mode = "on-the-ground";}// Get the proper symbol for the camera and then rotate itcameraGraphic.symbol = updateCameraSymbol(view.camera.heading, view.camera.tilt);// Center the supportView to the visibleArea extentsupportView.goTo({target: [view.visibleArea.extent],tilt: isSupportViewTilted ? 60 : 0});}// 更新相机显示function updateCameraSymbol(heading, tilt) {if (isSupportViewTilted) {return new PointSymbol3D({symbolLayers: [new ObjectSymbol3DLayer({width: 15,heading,tilt: tilt - 90,resource: {href: camera3DObjectUrl}})]});} else {// supportView is in bird's-eye view mode (top-down)return new PointSymbol3D({symbolLayers: [new IconSymbol3DLayer({resource: {href: cameraIconUrl},angle: heading - 90})]});}}})});
</script>
</body>
</html>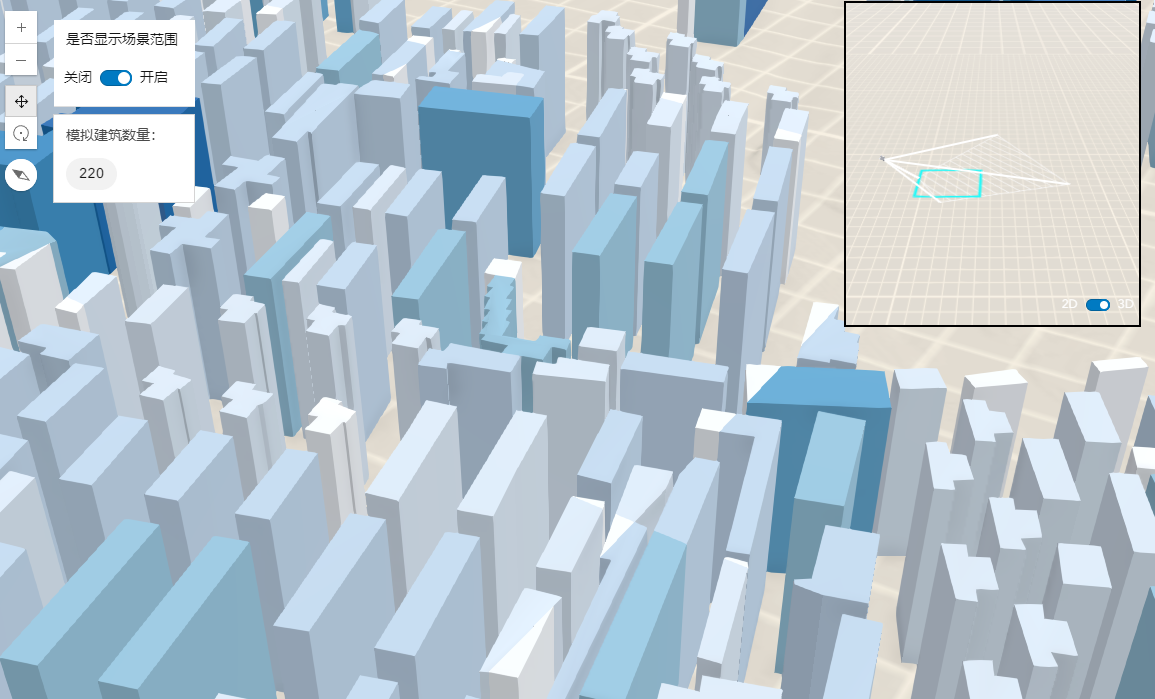
在线示例
ArcGIS Maps SDK for JavaScript 在线示例: 场景可视区域(visibleArea)显示以及过滤要素应用