CentOS7 使用RDO部署单节点Train版OpenStack
| IP地址 | 主机名 | 节点 |
| 192.168.200.135 | openstack | All-in-One |
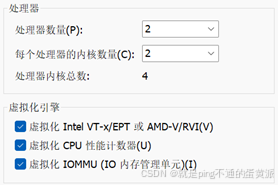
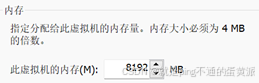
(1)创建一台虚拟机,节点为192.168.200.135,更改主机名为openstack
[root@localhost ~]# hostnamectl set-hostname openstack
[root@localhost ~]# bash
[root@openstack ~]#
(2)禁用防火墙与SELinux
[root@openstack ~]# systemctl disable firewalld
Removed symlink /etc/systemd/system/multi-user.target.wants/firewalld.service.
Removed symlink /etc/systemd/system/dbus-org.fedoraproject.FirewallD1.service.
[root@openstack ~]# systemctl stop firewalld
[root@openstack ~]# vi /etc/selinux/config
SELINUX=disabled
[root@openstack ~]# setenforce 0注意:未禁用SELinux会导致部署openstack时systemctl start httpd失败报错
(3)停用与OpenStack组件有冲突的NetworkManager服务,使用network服务
[root@openstack ~]# systemctl disable NetworkManager
Removed symlink /etc/systemd/system/multi-user.target.wants/NetworkManager.service.
Removed symlink /etc/systemd/system/dbus-org.freedesktop.nm-dispatcher.service.
Removed symlink /etc/systemd/system/network-online.target.wants/NetworkManager-wait-online.service.
[root@openstack ~]# systemctl stop NetworkManager
[root@openstack ~]# systemctl enable network
network.service is not a native service, redirecting to /sbin/chkconfig.
Executing /sbin/chkconfig network on
[root@openstack ~]# systemctl start network
(4)修改hosts配置文件
[root@openstack ~]# vi /etc/hosts
192.168.200.135 openstack
(5)配置使用阿里源
[root@openstack ~]# mkdir /root/old_repo
[root@openstack ~]# mv /etc/yum.repos.d/* /root/old_repo
[root@openstack ~]# curl -o /etc/yum.repos.d/CentOS-Base.repo https://mirrors.aliyun.com/repo/Centos-7.repo
(6) 设置时间同步
[root@openstack ~]# yum install -y chrony
[root@openstack ~]# vi /etc/chrony.conf
server ntp1.aliyun.com iburst //增加使用阿里云网络授时NTP服务器
[root@openstack ~]# timedatectl set-timezone "Asia/Shanghai" //修改时区
(7) 设置OpenStack-train库,因为CentOS官方源停止维护,将下载下来的repo文件中的官方源手动修改为阿里源
[root@openstack ~]# yum -y install centos-release-openstack-train或者直接将/etc/yum.repos.d/中相对应的repo文件手动替换
https://download.csdn.net/download/m0_75102488/92265954![]() https://download.csdn.net/download/m0_75102488/92265954
https://download.csdn.net/download/m0_75102488/92265954
(8) 安装Packstack安装器
[root@openstack ~]# yum -y install openstack-packstack
[root@openstack ~]# yum install -y python2-qpid-proton-0.26.0-2.el7.x86_64
[root@openstack ~]# packstack --gen-answer-file=/root/openstack-train-answer-file.txt //产生应答文件模板
Packstack changed given value  to required value /root/.ssh/id_rsa.pub
Additional information:* Parameter CONFIG_NEUTRON_L2_AGENT: You have chosen OVN Neutron backend. Note that this backend does not support the VPNaaS or FWaaS services. Geneve will be used as the encapsulation method for tenant networks[root@openstack ~]# vi /root/openstack-train-answer-file.txt
# Specify 'y' to provision for demo usage and testing. ['y', 'n']
CONFIG_PROVISION_DEMO=n注意:需要将应答文件中下载DEMO的选项关闭,未关闭会导致部署openstack时在Applying 192.168.200.135_controller.pp中提示下载超时
(9) 运行Packstack安装Openstack
[root@openstack ~]# packstack --answer-file=/root/openstack-train-answer-file.txtWelcome to the Packstack setup utility
The installation log file is available at: /var/tmp/packstack/20251108-113308-6jxcTi/openstack-setup.log
Installing:
Clean Up [ DONE ]
Discovering ip protocol version [ DONE ]
# 设置SSH密钥
Setting up ssh keys [ DONE ]
# 准备服务器
Preparing servers [ DONE ]
# 预安装Puppet并探测主机详情
Pre installing Puppet and discovering hosts' details [ DONE ]
# 准备预装的项目
Preparing pre-install entries [ DONE ]
# 设置证书
Setting up CACERT [ DONE ]
# 准备AMQP(高级消息队列协议)
Preparing AMQP entries [ DONE ]
# 准备MariaDB(代替MySQL)数据库项目
Preparing MariaDB entries [ DONE ]
# 修正Keystone LDAP参数
Fixing Keystone LDAP config parameters to be undef if empty[ DONE ]
# 准备Keystone(身份服务)项目
Preparing Keystone entries [ DONE ]
# 准备Glance(镜像服务)项目
Preparing Glance entries [ DONE ]
# 检查Cinder(卷存储服务)是否有卷
Checking if the Cinder server has a cinder-volumes vg[ DONE ]
# 准备Cinder(卷存储服务)项目
Preparing Cinder entries [ DONE ]
# 准备Nova API(Nova接口)项目
Preparing Nova API entries [ DONE ]
# 为Nova迁移创建SSH密钥
Creating ssh keys for Nova migration [ DONE ]
Gathering ssh host keys for Nova migration [ DONE ]
# 准备Nova(计算服务)项目
Preparing Nova Compute entries [ DONE ]
Preparing Nova Scheduler entries [ DONE ]
Preparing Nova VNC Proxy entries [ DONE ]
Preparing OpenStack Network-related Nova entries [ DONE ]
Preparing Nova Common entries [ DONE ]
# 准备Neutron(网络)项目
Preparing Neutron API entries [ DONE ]
Preparing Neutron L3 entries [ DONE ]
Preparing Neutron L2 Agent entries [ DONE ]
Preparing Neutron DHCP Agent entries [ DONE ]
Preparing Neutron Metering Agent entries [ DONE ]
# 检查NetworkManager是否启用并运行
Checking if NetworkManager is enabled and running [ DONE ]
# 准备OpenStack客户端项目
Preparing OpenStack Client entries [ DONE ]
# 准备Horizon仪表板项目
Preparing Horizon entries [ DONE ]
# 准备Swift(对象存储服务)项目
Preparing Swift builder entries [ DONE ]
Preparing Swift proxy entries [ DONE ]
Preparing Swift storage entries [ DONE ]
# 准备Gnocchi(用于计量的时间序列数据库服务器)项目
Preparing Gnocchi entries [ DONE ]
# 准备Redis(用于计量的数据结构服务器)项目
Preparing Redis entries [ DONE ]
# 准备Ceilometer(计量服务)项目
Preparing Ceilometer entries [ DONE ]
# 准备Aodh(警告)项目
Preparing Aodh entries [ DONE ]
# 准备Puppet模块和配置清单
Preparing Puppet manifests [ DONE ]
Copying Puppet modules and manifests [ DONE ]
# 应用控制节点
Applying 192.168.200.135_controller.pp
192.168.200.135_controller.pp: [ DONE ]
# 应用网络节点
Applying 192.168.200.135_network.pp
192.168.200.135_network.pp: [ DONE ]
# 应用计算节点
Applying 192.168.200.135_compute.pp
192.168.200.135_compute.pp: [ DONE ]
# 应用Puppet配置清单
Applying Puppet manifests [ DONE ]
Finalizing [ DONE ]
# 安装成功,完成应用并给出其他提示信息
**** Installation completed successfully ******
Additional information:
# 提示网络已采用OVN Neutron后端
* Parameter CONFIG_NEUTRON_L2_AGENT: You have chosen OVN Neutron backend. Note that this backend does not support the VPNaaS or FWaaS services. Geneve will be used as the encapsulation method for tenant networks
# 需要确认CentOS当前系统时间是否正确
* Time synchronization installation was skipped. Please note that unsynchronized time on server instances might be problem for some OpenStack components.
# 在用户主目录下产生keystonerc_admin文件
* File /root/keystonerc_admin has been created on OpenStack client host 192.168.200.135. To use the command line tools you need to source the file.
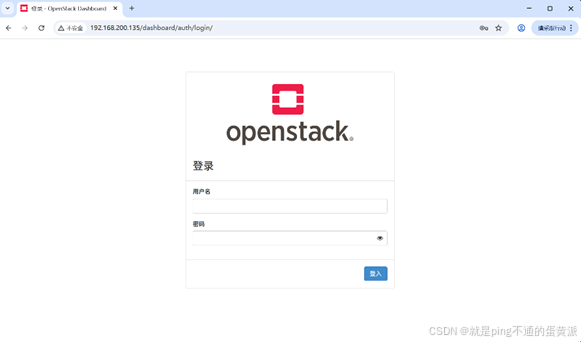
# 访问OpenStack Dashboard(Web访问界面)的地址
* To access the OpenStack Dashboard browse to http://192.168.200.135/dashboard .
Please, find your login credentials stored in the keystonerc_admin in your home directory.
# 安装日志文件名及其路径
* The installation log file is available at: /var/tmp/packstack/20251108-113308-6jxcTi/openstack-setup.log
# Puppet配置清单路径
* The generated manifests are available at: /var/tmp/packstack/20251108-113308-6jxcTi/manifests
You have new mail in /var/spool/mail/root
使用http://192.168.200.135/dashboard进入网页登陆界面:
查看管理员密码:
[root@openstack ~]# cat /root/keystonerc_admin
unset OS_SERVICE_TOKENexport OS_USERNAME=admin //管理员用户名export OS_PASSWORD='c831d5f8f93b47d8' //密码为c831d5f8f93b47d8export OS_REGION_NAME=RegionOneexport OS_AUTH_URL=http://192.168.200.128:5000/v3export PS1='[\u@\h \W(keystone_admin)]\$ 'export OS_PROJECT_NAME=admin
export OS_USER_DOMAIN_NAME=Default
export OS_PROJECT_DOMAIN_NAME=Default
export OS_IDENTITY_API_VERSION=3