quye.com的华为云服务器到期,转战阿里云,操作记录存档:ssh登录、nginx安装配置、用certbot进行证书的不同服务器转移
说多了都是泪,就是差钱,华为云不续约了,转战阿里云
采购阿里云服务器
阿里云有个活动,配置:
2vCPU/2GiB-ESSD云盘/40GiB
原价45元/月,活动折扣后79元/年,性价比非常高!果断入手一台!
但是买了之后才注意到,这个是轻服务器,不支持虚拟化,我的理解就是里面不能再装virtualbox、docker了。
它的带宽是峰值200M,共享带宽。
登录云服务器
创建后,点击“远程连接“,立即登录
是使用的admin登录的,有sudo权限。
登录信息如下:
Welcome to Ubuntu 24.04.2 LTS (GNU/Linux 6.8.0-63-generic x86_64)* Documentation:  https://help.ubuntu.com* Management:     https://landscape.canonical.com* Support:        https://ubuntu.com/proSystem information as of Mon Nov  3 11:27:24 AM CST 2025System load:  0.0               Processes:             119Usage of /:   5.8% of 39.01GB   Users logged in:       0Memory usage: 16%               IPv4 address for eth0: 172.24.38.67Swap usage:   0%Expanded Security Maintenance for Applications is not enabled.0 updates can be applied immediately.Enable ESM Apps to receive additional future security updates.
See https://ubuntu.com/esm or run: sudo pro statusThe list of available updates is more than a week old.
To check for new updates run: sudo apt updateWelcome to Alibaba Cloud Elastic Compute Service !Last login: Mon Nov  3 11:27:59 2025 from 100.104.192.178
To run a command as administrator (user "root"), use "sudo <command>".
See "man sudo_root" for details.admin@iZ2ze2j4cywindg339jqloZ:~$ sudo ls
admin@iZ2ze2j4cywindg339jqloZ:~$ who
admin    pts/0        2025-11-03 11:28 (100.104.192.178)
admin@iZ2ze2j4cywindg339jqloZ:~$ uname -a
Linux iZ2ze2j4cywindg339jqloZ 6.8.0-63-generic #66-Ubuntu SMP PREEMPT_DYNAMIC Fri Jun 13 20:25:30 UTC 2025 x86_64 x86_64 x86_64 GNU/Linux
admin@iZ2ze2j4cywindg339jqloZ:~$
添加账户
添加自己常用的账户
adduser test将用户放入wheel组,并给sudo权限,也就是编辑这两个文件
sudo vi /etc/group
sudo vi /etc/sudoers
分别在group文件的最后一个用户那里添加wheel,以加入超级用户组
在suduers文件中加入
test ALL=(ALL:ALL) ALL以便将test账户赋予sudo权限。
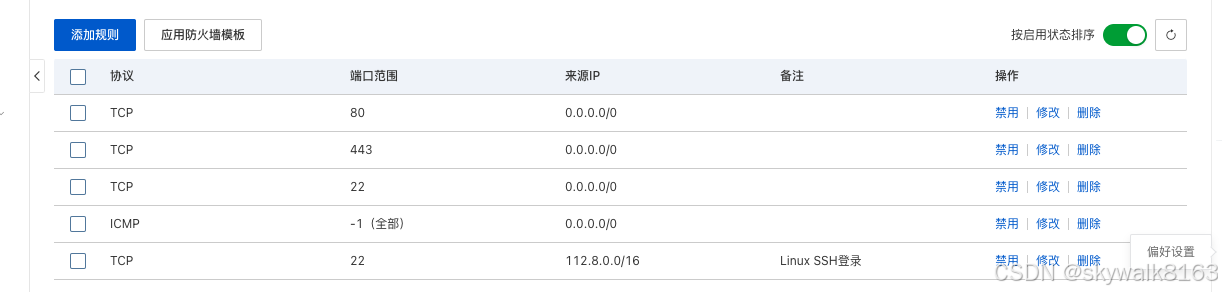
放开防火墙
默认防火墙关闭了22 80 443 和icmp,在管理界面里将它们打开。其实不是,默认是开放了22 80 443 和icmp 。
主要是它配置那里用了开关键,有点让人烧脑。也就是它显示禁用,其实证明这个端口是放开的,如果点一下,那就是禁用。
尝试远程ssh登录上去
远程ssh登录的时候报错
test@123.56.2.145: Permission denied (publickey).看到这个内容:
连接前准备
-
获取服务器公网IP:登录轻量应用服务器控制台,在对应服务器卡片上即可找到公网IP地址。
-
准备登录凭证:根据安全偏好,完成以下操作之一。
-
密码登录:服务器无默认密码,首次登录,需要先设置服务器密码
-
密钥对登录:使用密钥对登录,需要先为实例绑定密钥对。
-
也就是这样操作就行了
设置服务器密码
在Ubuntu控制台修改了root密码,ssh还是失败,自己ssh 127.0.0.1 都失败:Permission denied (publickey).
明白了,需要在vps主机的控制面板里,点“设置密码” 才行。进入Ubuntu的控制台,自己在命令行修改密码是不行的。
好了,这回ssh可以登录了。
后面就是安装nginx和备案了。。。
发现ssl竟然要收费? 咱差钱,还是自己弄吧。
安装软件
安装自由组网软件easytier
参见:https://skywalk.blog.csdn.net/article/details/149661717
wget https://github.com/EasyTier/EasyTier/releases/download/v2.4.5/easytier-linux-x86_64-v2.4.5.zip
# 或者用加速镜像
# wget https://ghfast.top/https://github.com/EasyTier/EasyTier/releases/download/v2.4.5/easytier-linux-x86_64-v2.4.5.zip
# 解压
unzip easytier-linux-x86_64-v2.4.5.zip
组网
sudo ./easytier-core --network-name test --network-secret test -p tcp://public.easytier.cn:11010 -i 10.10.2.145/24
安装nginx等略
生成本地开发环境中的Https SSL证书和私钥的工具:mkcert
参见:https://skywalk.blog.csdn.net/article/details/143780043
最终使用的不是mkcert,而是certbot
使用certbot进行网站https域名证书注册和续期(ssl证书)
参见:https://skywalk.blog.csdn.net/article/details/147170997
安装Certbot
以前安装是用pip,后来得知也可以使用apt安装。
sudo pip install certbot certbot-nginx获取并安装证书
sudo certbot --nginx只获取证书
sudo certbot certonly --nginx还可以使用apt来安装Certbot
# 安装 Certbot
sudo apt update && sudo apt install certbot -y# 创建证书目录
sudo mkdir -p /etc/letsencrypt/{live,archive,renewal}
转移证书
基本思路就是把以前服务器的证书打包,放到新的服务器相应位置即可。当然nginx等里面的配置也要对应进行设置和修改。
打包证书
# 定位证书(替换 yourdomain.com)
sudo ls /etc/letsencrypt/live/yourdomain.com# 打包证书(包含所有必要文件)
sudo tar -czvf certs.tar.gz \/etc/letsencrypt/live/yourdomain.com \/etc/letsencrypt/archive/yourdomain.com \/etc/letsencrypt/renewal/yourdomain.com.conf
scp传输证书(略)
导入并配置证书
# 解压证书
sudo tar -xzvf /tmp/certs.tar.gz -C /# 修复权限
sudo chown -R root:root /etc/letsencrypt
sudo chmod 755 /etc/letsencrypt/{live,archive,renewal}
在重启nginx服务的时候碰到报错:
service nginx restart
==== AUTHENTICATING FOR org.freedesktop.systemd1.manage-units ====
Authentication is required to restart 'nginx.service'.
Authenticating as: root
Password:
polkit-agent-helper-1: pam_authenticate failed: Authentication failure
==== AUTHENTICATION FAILED ====
Failed to restart nginx.service: Access denied
See system logs and 'systemctl status nginx.service' for details.
原来它读取认证文件的时候,还不是root,所以要加上sudo执行
sudo service nginx restart
问题搞定。在本机设置了域名解析后,用curl测试,测试通过!
curl quye.com
<!doctype html>
写个crontab任务,每月定期续证书
执行sudo crontab -e
加入如下内容
0 1 1 * * root sleep 2 && certbot renew -q使用crontab -n测试一下 ,文件存在/var/spool/cron/crontabs目录,文件名root:
/var/spool/cron/crontabs# crontab -n root
The syntax of the crontab file was successfully checked.
测试通过,这样它每月1号就回执行续订证书!