K8s Pod生命周期完全指南
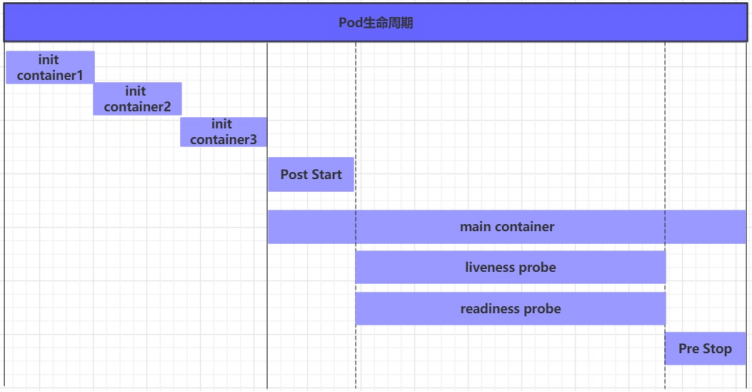
Pod生命周期
我们一般将 Pod 对象从创建至终的这段时间范围称为 Pod 的生命周期,它主要包含下面的过程:
- Pod 创建过程
- 运行初始化容器(Init Container)过程
- 运行主容器(Main Container)
- 容器启动后钩子(Post Start)、容器终止前钩子(Pre Stop)
- 容器的存活性探测(Liveness Probe)、就绪性探测(Readiness Probe)
- Pod 终止过程
在整个生命周期中,Pod 会出现 5 种状态(相位),分别如下:
- 挂起(Pending):API Server 已经创建了 Pod 资源对象,但它尚未被调度完成或者仍处于下载镜像的过程中
- 运行中(Running):Pod 已经被调度至某节点,并且所有容器都已经被 Kubelet 创建完成
- 成功(Succeeded):Pod 中的所有容器都已经成功终止并且不会被重启
- 失败(Failed):所有容器都已经终止,但至少有一个容器终止失败,即容器返回了非 0 值的退出状态
- 未知(Unknown):API Server 无法正常获取到 Pod 对象的状态信息,通常由网络通信失败所导致
一、创建和终止
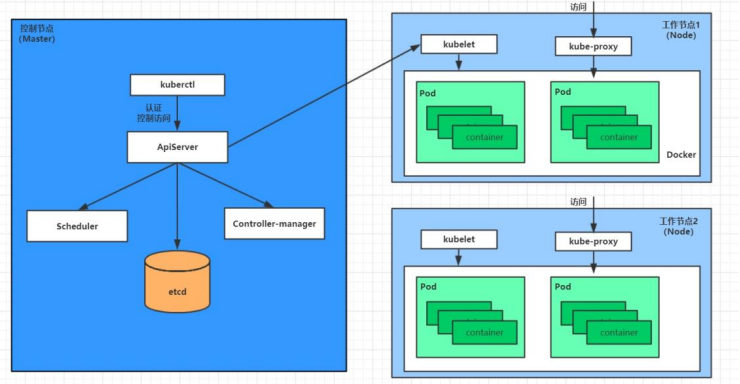
Pod 的创建过程
- 用户通过
kubectl或其他 API 客户端提交需要创建的 Pod 信息给 API Server - API Server 开始生成 Pod 对象的信息,并将信息存入 etcd,然后返回确认信息至客户端
- API Server 开始反映 etcd 中的 Pod 对象的变化,其它组件使用 Watch 机制来跟踪检查 API Server 上的变动
- Scheduler 发现有新的 Pod 对象要创建,开始为 Pod 分配主机并将结果信息更新至 API Server
- Node 节点上的 Kubelet 发现有 Pod 调度过来,尝试调用 Docker 启动容器,并将结果回送至 API Server
- API Server 将接收到的 Pod 状态信息存入 etcd 中
Pod 的终止过程
- 用户向 API Server 发送删除 Pod 对象的命令
- API Server 中的 Pod 对象信息会随着时间的推移而更新,在宽限期内(默认 30 秒),Pod 被视为 Dead
- 将 Pod 标记为 Terminating 状态
- Kubelet 在监控到 Pod 对象转为 Terminating 状态的同时启动 Pod 关闭过程
- 节点控制器监控到 Pod 对象的关闭行为时将其从所有匹配到此节点的 Service 资源的节点列表中移除
- 如果当前 Pod 对象定义了 PreStop 钩子处理器,则在其标记为 Terminating 后即会以同步的方式启动执行
- Pod 对象中的容器进程收到停止信号
- 宽限期结束后,若 Pod 中还存在仍在运行的进程,那么 Pod 对象会收到立即终止的信号
- Kubelet 请求 API Server 将此 Pod 资源的宽限期设置为 0 从而完成删除操作,此时 Pod 对于用户已不可见
二、初始化容器
初始化容器是在 Pod 的主容器启动之前要运行的容器,主要是做一些主容器的前置工作,它具有两大特征:
- 初始化容器必须运行完成直至结束,若某初始化容器运行失败,那么 Kubernetes 需要重启它直到成功完成
- 初始化容器必须按照定义的顺序执行,当且仅当前一个成功之后,后面的一个才能运行
初始化容器有很多的应用场景,下面列出的是最常见的几个:
- 提供主容器镜像中不具备的工具程序或自定义代码
- 初始化容器要先于应用容器串行启动并运行完成,因此可用于延后应用容器的启动直至其依赖的条件得到满足
接下来做一个案例,模拟下面这个需求:
假设要以主容器来运行 Nginx,但是要求在运行 Nginx 之前先要能够连接上 MySQL 和 Redis 所在服务器
为了简化测试,事先规定好 MySQL(192.168.100.10)和 Redis(192.168.100.20)服务器的地址
创建 pod-initcontainer.yaml,内容如下:
apiVersion: v1
kind: Pod
metadata:name: pod-initcontainernamespace: dev
spec:containers:- name: main-containerimage: nginx:1.17.1ports:- name: nginx-portcontainerPort: 80initContainers:- name: test-mysqlimage: busybox:1.30command: ['sh', '-c', 'until ping 192.168.100.10 -c 1 ; do echo waiting for mysql...; sleep 2; done;']- name: test-redisimage: busybox:1.30command: ['sh', '-c', 'until ping 192.168.100.20 -c 1 ; do echo waiting for reids...; sleep 2; done;']
创建 Pod 并观察效果:
# 创建 Pod
kubectl apply -f pod-initcontainer.yaml# 查看 Pod 状态
kubectl describe pod pod-initcontainer -n dev# 动态查看 Pod
kubectl get pods pod-initcontainer -n dev -w
接下来新开一个 Shell,为当前服务器新增两个 IP,观察 Pod 的变化:
ifconfig ens33:1 192.168.5.14 netmask 255.255.255.0 up
ifconfig ens33:2 192.168.5.15 netmask 255.255.255.0 up
三、钩子函数
钩子函数能够感知自身生命周期中的事件,并在相应的时刻到来时运行用户指定的程序代码
Kubernetes 在主容器的启动之后和停止之前提供了两个钩子函数:
- Post Start:容器创建之后执行,如果失败了会重启容器
- Pre Stop:容器终止之前执行,执行完成之后容器将成功终止,在其完成之前会阻塞删除容器的操作
钩子处理器支持使用下面三种方式定义动作:
-
Exec 命令:在容器内执行一次命令
lifecycle:postStart:exec:command:- cat- /tmp/healthy -
TCPSocket:在当前容器尝试访问指定的 Socket
lifecycle:postStart:tcpSocket:port: 8080 -
HTTPGet:在当前容器中向某 URL 发起 HTTP 请求
lifecycle:postStart:httpGet:path: / # URI 地址port: 80 # 端口号host: 192.168.5.3 # 主机地址scheme: HTTP # 支持的协议,http 或者 https
接下来,以 Exec 方式为例,演示钩子函数的使用,创建 pod-hook-exec.yaml 文件,内容如下:
apiVersion: v1
kind: Pod
metadata:name: pod-hook-execnamespace: dev
spec:containers:- name: main-containerimage: nginx:1.17.1ports:- name: nginx-portcontainerPort: 80lifecycle:postStart:exec:  # 在容器启动的时候执行一个命令,修改掉 nginx 的默认首页内容command: ["/bin/sh", "-c", "echo postStart... > /usr/share/nginx/html/index.html"]preStop:exec:  # 在容器停止之前停止 nginx 服务command: ["/usr/sbin/nginx","-s","quit"]
创建并验证 Pod:
# 创建 Pod
kubectl create -f pod-hook-exec.yaml# 查看 Pod
kubectl get pods pod-hook-exec -n dev -o wide# 访问 Pod
curl 10.244.2.48
四、容器探测
容器探测用于检测容器中的应用实例是否正常工作,是保障业务可用性的一种传统机制。如果经过探测,实例的状态不符合预期,那么 Kubernetes 就会把该问题实例“摘除”,不承担业务流量。Kubernetes 提供了两种探针来实现容器探测,分别是:
- Liveness Probes:存活性探针,用于检测应用实例当前是否处于正常运行状态,如果不是,K8s 会重启容器
- Readiness Probes:就绪性探针,用于检测应用实例当前是否可以接收请求,如果不能,K8s 不会转发流量
livenessProbe决定是否重启容器,readinessProbe决定是否将请求转发给容器。
上面两种探针目前均支持三种探测方式:
-
Exec 命令:在容器内执行一次命令,如果命令执行的退出码为 0,则认为程序正常,否则不正常
livenessProbe:exec:command:- cat- /tmp/healthy -
TCPSocket:将会尝试访问一个用户容器的端口,如果能够建立这条连接,则认为程序正常,否则不正常
livenessProbe:tcpSocket:port: 8080 -
HTTPGet:调用容器内 Web 应用的 URL,如果返回的状态码在 200 和 399 之间,则认为程序正常,否则不正常
livenessProbe:httpGet:path: / # URI 地址port: 80 # 端口号host: 127.0.0.1 # 主机地址scheme: HTTP # 支持的协议,http 或者 https
下面以 Liveness Probes 为例,做几个演示:
方式一:Exec
创建 pod-liveness-exec.yaml:
apiVersion: v1
kind: Pod
metadata:name: pod-liveness-execnamespace: dev
spec:containers:- name: nginximage: nginx:1.17.1ports:- name: nginx-portcontainerPort: 80livenessProbe:exec:command: ["/bin/cat","/tmp/hello.txt"]  # 执行一个查看文件的命令
创建 Pod,观察效果:
# 创建 Pod
kubectl create -f pod-liveness-exec.yaml# 查看 Pod 详情
kubectl describe pods pod-liveness-exec -n dev# 观察 Pod 信息
kubectl get pods pod-liveness-exec -n dev
方式二:TCPSocket
创建 pod-liveness-tcpsocket.yaml:
apiVersion: v1
kind: Pod
metadata:name: pod-liveness-tcpsocketnamespace: dev
spec:containers:- name: nginximage: nginx:1.17.1ports:- name: nginx-portcontainerPort: 80livenessProbe:tcpSocket:port: 8080  # 尝试访问 8080 端口
创建 Pod,观察效果:
# 创建 Pod
kubectl create -f pod-liveness-tcpsocket.yaml# 查看 Pod 详情
kubectl describe pods pod-liveness-tcpsocket -n dev# 观察 Pod 信息
kubectl get pods pod-liveness-tcpsocket -n dev
方式三:HTTPGet
创建 pod-liveness-httpget.yaml:
apiVersion: v1
kind: Pod
metadata:name: pod-liveness-httpgetnamespace: dev
spec:containers:- name: nginximage: nginx:1.17.1ports:- name: nginx-portcontainerPort: 80livenessProbe:httpGet:  # 其实就是访问 http://127.0.0.1:80/helloscheme: HTTP    # 支持的协议,http 或者 httpsport: 80        # 端口号path: /hello    # URI 地址
创建 Pod,观察效果:
# 创建 Pod
kubectl create -f pod-liveness-httpget.yaml# 查看 Pod 详情
kubectl describe pod pod-liveness-httpget -n dev# 观察 Pod 信息
kubectl get pod pod-liveness-httpget -n dev
探针配置参数
查看 Liveness Probe 的子属性:
kubectl explain pod.spec.containers.livenessProbe
输出字段说明:
exec <Object>tcpSocket <Object>httpGet <Object>initialDelaySeconds <integer>:容器启动后等待多少秒执行第一次探测timeoutSeconds <integer>:探测超时时间。默认 1 秒,最小 1 秒periodSeconds <integer>:执行探测的频率。默认是 10 秒,最小 1 秒failureThreshold <integer>:连续探测失败多少次才被认定为失败。默认是 3,最小值是 1successThreshold <integer>:连续探测成功多少次才被认定为成功。默认是 1
配置示例:
apiVersion: v1
kind: Pod
metadata:name: pod-liveness-httpgetnamespace: dev
spec:containers:- name: nginximage: nginx:1.17.1ports:- name: nginx-portcontainerPort: 80livenessProbe:httpGet:scheme: HTTPport: 80path: /initialDelaySeconds: 30  # 容器启动后 30s 开始探测timeoutSeconds: 5        # 探测超时时间为 5s
五、重启策略
在上一节中,一旦容器探测出现了问题,Kubernetes 就会对容器所在的 Pod 进行重启,其实这是由 Pod 的重启策略决定的。Pod 的重启策略有 3 种,分别如下:
- Always:容器失效时,自动重启该容器,这也是默认值
- OnFailure:容器终止运行且退出码不为 0 时重启
- Never:不论状态为何,都不重启该容器
重启策略适用于 Pod 对象中的所有容器。首次需要重启的容器,将在其需要时立即进行重启,随后再次需要重启的操作将由 Kubelet 延迟一段时间后进行,且反复的重启操作的延迟时长以此为 10s、20s、40s、80s、160s 和 300s,300s 是最大延迟时长。
创建 pod-restartpolicy.yaml:
apiVersion: v1
kind: Pod
metadata:name: pod-restartpolicynamespace: dev
spec:containers:- name: nginximage: nginx:1.17.1ports:- name: nginx-portcontainerPort: 80livenessProbe:httpGet:scheme: HTTPport: 80path: /hellorestartPolicy: Never  # 设置重启策略为 Never
运行 Pod 测试:
# 创建 Pod
kubectl create -f pod-restartpolicy.yaml# 查看 Pod 详情,发现 nginx 容器失败
kubectl describe pods pod-restartpolicy -n dev# 多等一会,再观察 Pod 的重启次数,发现一直是 0,并未重启
kubectl get pods pod-restartpolicy -n dev
六、Pod 调度
在默认情况下,一个 Pod 在哪个 Node 节点上运行,是由 Scheduler 组件采用相应的算法计算出来的,这个过程是不受人工控制的。但是在实际使用中,这并不满足需求,因为很多情况下,我们想控制某些 Pod 到达某些节点上。Kubernetes 提供了四大类调度方式:
- 自动调度:运行在哪个节点上完全由 Scheduler 经过一系列的算法计算得出
- 定向调度:NodeName、NodeSelector
- 亲和性调度:NodeAffinity、PodAffinity、PodAntiAffinity
- 污点(容忍)调度:Taints、Toleration
6.1 定向调度
定向调度,指的是利用在 Pod 上声明 nodeName 或者 nodeSelector,以此将 Pod 调度到期望的 Node 节点上。注意,这里的调度是强制的,这就意味着即使要调度的目标 Node 不存在,也会向上面进行调度,只不过 Pod 运行失败而已。
NodeName
NodeName 用于强制约束将 Pod 调度到指定的 Name 的 Node 节点上。这种方式,其实是直接跳过 Scheduler 的调度逻辑,直接将 Pod 调度到指定名称的节点。
创建 pod-nodename.yaml 文件:
apiVersion: v1
kind: Pod
metadata:name: pod-nodenamenamespace: dev
spec:containers:- name: nginximage: nginx:1.17.1nodeName: node1  # 指定调度到 node1 节点上
创建并验证 Pod:
# 创建 Pod
kubectl create -f pod-nodename.yaml# 查看 Pod 调度到 NODE 属性,确实是调度到了 node1 节点上
kubectl get pods pod-nodename -n dev -o wide
NodeSelector
NodeSelector 用于将 Pod 调度到添加了指定标签的 Node 节点上。它是通过 Kubernetes 的 Label-Selector 机制实现的,也就是说,在 Pod 创建之前,会由 Scheduler 使用 MatchNodeSelector 调度策略进行 Label 匹配,找出目标 Node,然后将 Pod 调度到目标节点,该匹配规则是强制约束。
实验步骤:
-
首先分别为 Node 节点添加标签
kubectl label nodes node1 nodeenv=pro kubectl label nodes node2 nodeenv=test -
创建一个
pod-nodeselector.yaml文件,并使用它创建 PodapiVersion: v1 kind: Pod metadata:name: pod-nodeselectornamespace: dev spec:containers:- name: nginximage: nginx:1.17.1nodeSelector:nodeenv: pro # 指定调度到具有 nodeenv=pro 标签的节点上
创建并验证 Pod:
# 创建 Pod
kubectl create -f pod-nodeselector.yaml# 查看 Pod 调度到 NODE 属性,确实是调度到了 node1 节点上
kubectl get pods pod-nodeselector -n dev -o wide
6.2 亲和性调度
亲和性调度在 NodeSelector 的基础之上的进行了扩展,可以通过配置的形式,实现优先选择满足条件的 Node 进行调度,如果没有,也可以调度到不满足条件的节点上,使调度更加灵活。
Affinity 主要分为三类:
- NodeAffinity(Node 亲和性):以 Node 为目标,解决 Pod 可以调度到哪些 Node 的问题
- PodAffinity(Pod 亲和性):以 Pod 为目标,解决 Pod 可以和哪些已存在的 Pod 部署在同一个拓扑域中的问题
- PodAntiAffinity(Pod 反亲和性):以 Pod 为目标,解决 Pod 不能和哪些已存在 Pod 部署在同一个拓扑域中的问题
关于亲和性(反亲和性)使用场景的说明:
- 亲和性:如果两个应用频繁交互,那就有必要利用亲和性让两个应用的尽可能的靠近,这样可以减少因网络通信而带来的性能损耗
- 反亲和性:当应用的采用多副本部署时,有必要采用反亲和性让各个应用实例打散分布在各个 Node 上,这样可以提高服务的高可用性
NodeAffinity
首先来看一下 NodeAffinity 的可配置项:
pod.spec.affinity.nodeAffinityrequiredDuringSchedulingIgnoredDuringExecution # Node 节点必须满足指定的所有规则才可以,相当于硬限制nodeSelectorTerms # 节点选择列表matchFields # 按节点字段列出的节点选择器要求列表matchExpressions # 按节点标签列出的节点选择器要求列表(推荐)key # 键values # 值operator # 关系符,支持 Exists, DoesNotExist, In, NotIn, Gt, LtpreferredDuringSchedulingIgnoredDuringExecution # 优先调度到满足指定的规则的 Node,相当于软限制(倾向)preference # 一个节点选择器项,与相应的权重相关联matchFields # 按节点字段列出的节点选择器要求列表matchExpressions # 按节点标签列出的节点选择器要求列表(推荐)key # 键values # 值operator # 关系符,支持 In, NotIn, Exists, DoesNotExist, Gt, Ltweight # 倾向权重,在范围 1-100
关系符的使用说明:
matchExpressions:- key: nodeenv # 匹配存在标签的 key 为 nodeenv 的节点operator: Exists- key: nodeenv # 匹配标签的 key 为 nodeenv,且 value 是 "xxx" 或 "yyy" 的节点operator: Invalues: ["xxx","yyy"]- key: nodeenv # 匹配标签的 key 为 nodeenv,且 value 大于 "xxx" 的节点operator: Gtvalues: "xxx"
硬限制示例
创建 pod-nodeaffinity-required.yaml:
apiVersion: v1
kind: Pod
metadata:name: pod-nodeaffinity-requirednamespace: dev
spec:containers:- name: nginximage: nginx:1.17.1affinity:  # 亲和性设置nodeAffinity:  # 设置 Node 亲和性requiredDuringSchedulingIgnoredDuringExecution:  # 硬限制nodeSelectorTerms:- matchExpressions:  # 匹配 env 的值在 ["xxx","yyy"] 中的标签- key: nodeenvoperator: Invalues: ["xxx","yyy"]
创建并测试 Pod:
# 创建 Pod
kubectl create -f pod-nodeaffinity-required.yaml# 查看 Pod 状态(运行失败)
kubectl get pods pod-nodeaffinity-required -n dev -o wide# 查看 Pod 的详情,发现调度失败,提示 Node 选择失败
kubectl describe pod pod-nodeaffinity-required -n dev
软限制示例
创建 pod-nodeaffinity-preferred.yaml:
apiVersion: v1
kind: Pod
metadata:name: pod-nodeaffinity-preferrednamespace: dev
spec:containers:- name: nginximage: nginx:1.17.1affinity:  # 亲和性设置nodeAffinity:  # 设置 Node 亲和性preferredDuringSchedulingIgnoredDuringExecution:  # 软限制- weight: 1preference:matchExpressions:  # 匹配 env 的值在 ["xxx","yyy"] 中的标签(当前环境没有)- key: nodeenvoperator: Invalues: ["xxx","yyy"]
创建并测试 Pod:
# 创建 Pod
kubectl create -f pod-nodeaffinity-preferred.yaml# 查看 Pod 状态(运行成功)
kubectl get pod pod-nodeaffinity-preferred -n dev
NodeAffinity 规则设置的注意事项:
- 如果同时定义了
nodeSelector和nodeAffinity,那么必须两个条件都得到满足,Pod 才能运行在指定的 Node 上 - 如果
nodeAffinity指定了多个nodeSelectorTerms,那么只需要其中一个能够匹配成功即可 - 如果一个
nodeSelectorTerms中有多个matchExpressions,则一个节点必须满足所有的才能匹配成功 - 如果一个 Pod 所在的 Node 在 Pod 运行期间其标签发生了改变,不再符合该 Pod 的节点亲和性需求,则系统将忽略此变化
PodAffinity
PodAffinity 主要实现以运行的 Pod 为参照,实现让新创建的 Pod 跟参照 Pod 在一个区域的功能。
首先来看一下 PodAffinity 的可配置项:
pod.spec.affinity.podAffinityrequiredDuringSchedulingIgnoredDuringExecution # 硬限制namespaces # 指定参照 Pod 的 namespacetopologyKey # 指定调度作用域labelSelector # 标签选择器matchExpressions # 按节点标签列出的节点选择器要求列表(推荐)key # 键values # 值operator # 关系符,支持 In, NotIn, Exists, DoesNotExistmatchLabels # 指多个 matchExpressions 映射的内容preferredDuringSchedulingIgnoredDuringExecution # 软限制podAffinityTerm # 选项namespacestopologyKeylabelSelectormatchExpressionskey # 键values # 值operatormatchLabelsweight # 倾向权重,在范围 1-100
topologyKey 用于指定调度时作用域,例如:
- 如果指定为
kubernetes.io/hostname,那就是以 Node 节点为区分范围 - 如果指定为
beta.kubernetes.io/os,则以 Node 节点的操作系统类型来区分
硬限制示例
-
首先创建一个参照 Pod,
pod-podaffinity-target.yaml:apiVersion: v1 kind: Pod metadata:name: pod-podaffinity-targetnamespace: devlabels:podenv: pro # 设置标签 spec:containers:- name: nginximage: nginx:1.17.1nodeName: node1 # 将目标 Pod 明确指定到 node1 上# 启动目标 Pod kubectl create -f pod-podaffinity-target.yaml# 查看 Pod 状况 kubectl get pods pod-podaffinity-target -n dev -
创建
pod-podaffinity-required.yaml,内容如下:apiVersion: v1 kind: Pod metadata:name: pod-podaffinity-requirednamespace: dev spec:containers:- name: nginximage: nginx:1.17.1affinity: # 亲和性设置podAffinity: # 设置 Pod 亲和性requiredDuringSchedulingIgnoredDuringExecution: # 硬限制- labelSelector:matchExpressions: # 匹配 env 的值在 ["xxx","yyy"] 中的标签- key: podenvoperator: Invalues: ["xxx","yyy"]topologyKey: kubernetes.io/hostname上面配置表达的意思是:新 Pod 必须要与拥有标签
nodeenv=xxx或者nodeenv=yyy的 Pod 在同一 Node 上,显然现在没有这样 Pod,接下来运行测试一下。# 启动 Pod kubectl create -f pod-podaffinity-required.yaml# 查看 Pod 状态,发现未运行 kubectl get pods pod-podaffinity-required -n dev# 查看详细信息 kubectl describe pods pod-podaffinity-required -n dev
PodAntiAffinity
PodAntiAffinity 主要实现以运行的 Pod 为参照,让新创建的 Pod 跟参照 Pod 不在一个区域中的功能。
它的配置方式和选项跟 PodAffinity 是一样的,这里直接做一个测试案例。
-
继续使用上个案例中目标 Pod
kubectl get pods -n dev -o wide --show-labels -
创建
pod-podantiaffinity-required.yaml,内容如下:apiVersion: v1 kind: Pod metadata:name: pod-podantiaffinity-requirednamespace: dev spec:containers:- name: nginximage: nginx:1.17.1affinity: # 亲和性设置podAntiAffinity: # 设置 Pod 反亲和性requiredDuringSchedulingIgnoredDuringExecution: # 硬限制- labelSelector:matchExpressions: # 匹配 podenv 的值在 ["pro"] 中的标签- key: podenvoperator: Invalues: ["pro"]topologyKey: kubernetes.io/hostname上面配置表达的意思是:新 Pod 必须要与拥有标签
nodeenv=pro的 Pod 不在同一 Node 上,运行测试一下。# 创建 Pod kubectl create -f pod-podantiaffinity-required.yaml# 查看 Pod,发现调度到了 node2 上 kubectl get pods pod-podantiaffinity-required -n dev -o wide
6.3 污点和容忍
污点(Taints)
前面的调度方式都是站在 Pod 的角度上,通过在 Pod 上添加属性,来确定 Pod 是否要调度到指定的 Node 上。其实我们也可以站在 Node 的角度上,通过在 Node 上添加污点属性,来决定是否允许 Pod 调度过来。
Node 被设置上污点之后就和 Pod 之间存在了一种相斥的关系,进而拒绝 Pod 调度进来,甚至可以将已经存在的 Pod 驱逐出去。
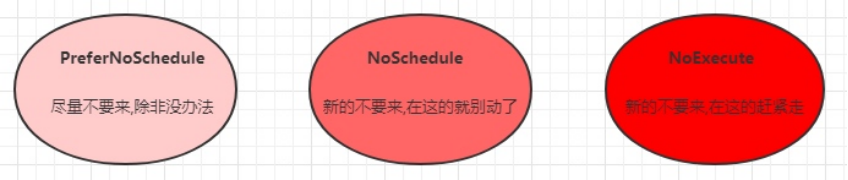
污点的格式为:key=value:effect,key 和 value 是污点的标签,effect 描述污点的作用,支持如下三个选项:
- PreferNoSchedule:Kubernetes 将尽量避免把 Pod 调度到具有该污点的 Node 上,除非没有其他节点可调度
- NoSchedule:Kubernetes 将不会把 Pod 调度到具有该污点的 Node 上,但不会影响当前 Node 上已存在的 Pod
- NoExecute:Kubernetes 将不会把 Pod 调度到具有该污点的 Node 上,同时也会将 Node 上已存在的 Pod 驱离
使用 kubectl 设置和去除污点的命令示例如下:
# 设置污点
kubectl taint nodes node1 key=value:effect# 去除污点
kubectl taint nodes node1 key:effect-# 去除所有污点
kubectl taint nodes node1 key-
接下来演示污点的效果:
- 准备节点 node1(为了演示效果更加明显,暂时停止 node2 节点)
- 为 node1 节点设置一个污点:
tag=chenyu:PreferNoSchedule;然后创建 pod1(pod1 可以) - 修改为 node1 节点设置一个污点:
tag=chenyu:NoSchedule;然后创建 pod2(pod1 正常,pod2 失败) - 修改为 node1 节点设置一个污点:
tag=chenyu:NoExecute;然后创建 pod3(3 个 pod 都失败)
# 为 node1 设置污点(PreferNoSchedule)
kubectl taint nodes node1 tag=chenyu:PreferNoSchedule# 创建 pod1
kubectl run taint1 --image=nginx:1.17.1 -n dev
kubectl get pods -n dev -o wide# 为 node1 设置污点(取消 PreferNoSchedule,设置 NoSchedule)
kubectl taint nodes node1 tag:PreferNoSchedule-
kubectl taint nodes node1 tag=chenyu:NoSchedule# 创建 pod2
kubectl run taint2 --image=nginx:1.17.1 -n dev
kubectl get pods taint2 -n dev -o wide# 为 node1 设置污点(取消 NoSchedule,设置 NoExecute)
kubectl taint nodes node1 tag:NoSchedule-
kubectl taint nodes node1 tag=chenyu:NoExecute# 创建 pod3
kubectl run taint3 --image=nginx:1.17.1 -n dev
kubectl get pods -n dev -o wide
小提示: 使用 kubeadm 搭建的集群,默认就会给 master 节点添加一个污点标记,所以 Pod 就不会调度到 master 节点上。
容忍(Toleration)
上面介绍了污点的作用,我们可以在 Node 上添加污点用于拒绝 Pod 调度上来,但是如果就是想将一个 Pod 调度到一个有污点的 Node 上去,这时候应该怎么做呢?这就要使用到容忍。
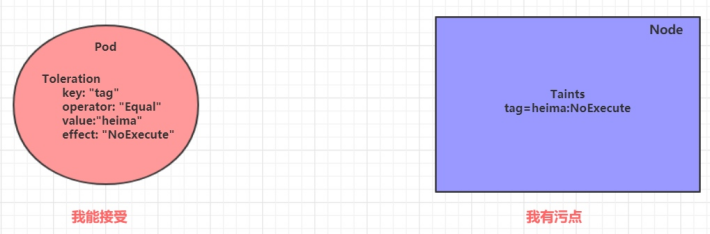
污点就是拒绝,容忍就是忽略,Node 通过污点拒绝 Pod 调度上去,Pod 通过容忍忽略拒绝
下面先通过一个案例看下效果:
- 上一小节,已经在 node1 节点上打上了
NoExecute的污点,此时 Pod 是调度不上去的 - 本小节,可以通过给 Pod 添加容忍,然后将其调度上去
创建 pod-toleration.yaml,内容如下:
apiVersion: v1
kind: Pod
metadata:name: pod-tolerationnamespace: dev
spec:containers:- name: nginximage: nginx:1.17.1tolerations:  # 添加容忍- key: "tag"        # 要容忍的污点的 keyoperator: "Equal"  # 操作符value: "chenyu"    # 容忍的污点的 valueeffect: "NoExecute"  # 添加容忍的规则,这里必须和标记的污点规则相同
验证效果:
# 添加容忍之前的 Pod
kubectl get pods -n dev -o wide# 添加容忍之后的 Pod
kubectl get pods -n dev -o wide
容忍的详细配置:
kubectl explain pod.spec.tolerations
输出字段说明:
key:对应着要容忍的污点的键,空意味着匹配所有的键value:对应着要容忍的污点的值operator:key-value 的运算符,支持Equal和Exists(默认)effect:对应污点的 effect,空意味着匹配所有影响tolerationSeconds容忍时间, 当effect为NoExecute时生效,表示pod在Node上的停留时间