Spring Boot 集成 SpringDoc OpenAPI(Swagger)实战:从配置到接口文档落地
Swagger 是一套用于构建、描述和调用 RESTful API 的规范和工具集。核心优势包括:
- 自动生成 API 文档,减少手动编写成本;
- 支持在线调试接口,无需依赖 Postman 等工具;
- 可配置性强,能根据需求定制文档信息;
- 与 Spring 生态无缝集成,上手简单。
- 页面展示:
一、环境准备
1. 核心依赖
本文使用 springdoc-openapi-ui(而非 Springfox),适配 Spring Boot 2.x 版本,直接引入用户提供的依赖:
<!-- SpringDoc OpenAPI 核心依赖(含 Swagger UI) -->
<dependency><groupId>org.springdoc</groupId><artifactId>springdoc-openapi-ui</artifactId><version>1.6.14</version>
</dependency><!-- Spring Security(用于 Swagger 页面认证,可选但推荐) -->
<dependency><groupId>org.springframework.boot</groupId><artifactId>spring-boot-starter-security</artifactId>
</dependency>
2. 关键版本适配
- Spring Boot 版本:2.x(本文基于 2.6.x 验证)
- SpringDoc 版本:1.6.14(兼容 Spring Boot 2.x,支持 OpenAPI 3.0)
- JDK 版本:1.8+
二、核心配置:从文件到代码
SpringDoc 的配置分为「配置文件(yaml/properties)」和「Java 配置类」两部分,需配合使用才能实现完整功能。
1. 配置文件:自定义 Swagger 行为
在 application.yml 中添加用户提供的 SpringDoc 配置,每一项都附带详细说明,可直接复制使用:
# SpringDoc OpenAPI 核心配置
springdoc:# Swagger UI 页面配置swagger-ui:path: /swagger-ui.html  # Swagger UI 访问路径(自定义,如:http://ip:port/上下文/swagger-ui.html)tags-sorter: alpha      # 接口标签(Tag)排序:alpha=字母序,method=定义顺序operations-sorter: alpha # 同标签下接口排序:alpha=路径字母序,method=HTTP方法序(GET→POST)# API 文档数据接口(Swagger UI 数据源,返回 JSON)api-docs:path: /v3/api-docs  # 文档数据路径(如:http://ip:port/上下文/v3/api-docs)# 接口分组配置(按包/路径筛选接口,避免无关接口混入文档)group-configs:- group: default          # 分组名称(Swagger UI 顶部可切换,默认一个分组)paths-to-match: /**     # 匹配所有路径的接口(可缩小范围,如:/personInfo/**)packages-to-scan: com.cetc.ydyl.controller # 扫描的控制器包(只解析该包下的接口)
2. Java 配置类一:OpenAPI 文档元信息(OpenApiConfig)
该类用于定义 Swagger 文档的「基础信息」和「安全方案声明」,告诉文档 “需要什么认证”,代码如下:
import io.swagger.v3.oas.models.OpenAPI;
import io.swagger.v3.oas.models.info.Contact;
import io.swagger.v3.oas.models.info.Info;
import io.swagger.v3.oas.models.security.SecurityRequirement;
import io.swagger.v3.oas.models.security.SecurityScheme;
import io.swagger.v3.oas.models.Components;
import org.springframework.context.annotation.Bean;
import org.springframework.context.annotation.Configuration;
import org.springframework.context.annotation.Profile;@Configuration
@Profile("dev")  # 仅在 dev 环境生效(生产环境建议关闭 Swagger)
public class OpenApiConfig {/*** 配置 OpenAPI 文档元信息 + 安全方案*/@Beanpublic OpenAPI customOpenAPI() {return new OpenAPI()// 1. 文档基础信息(显示在 Swagger UI 顶部).info(new Info().title("API文档")  // 文档标题.version("1.0")   // 文档版本.description("项目API文档说明")  // 文档描述(可写接口规范、注意事项).contact(new Contact().name("ydyl")))  // 联系人(维护者信息)// 2. 全局安全需求:声明所有接口需通过 "basicAuth" 认证(可按需关闭).addSecurityItem(new SecurityRequirement().addList("basicAuth"))// 3. 定义安全方案:此处为 HTTP Basic 认证(账号密码登录).components(new Components().addSecuritySchemes("basicAuth",  // 安全方案名称(需与上方 SecurityRequirement 对应)new SecurityScheme().type(SecurityScheme.Type.HTTP)  // 认证类型:HTTP.scheme("basic")));  // 认证方式:basic(基础认证)}
}
3. Java 配置类二:Swagger 安全控制(OpenAPISecurityConfig)
该类基于 Spring Security 实现「实际的认证逻辑」,控制哪些路径需要登录、用什么账号登录,代码如下:
import org.springframework.context.annotation.Bean;
import org.springframework.context.annotation.Configuration;
import org.springframework.context.annotation.Profile;
import org.springframework.security.config.annotation.web.builders.HttpSecurity;
import org.springframework.security.config.annotation.web.configuration.EnableWebSecurity;
import org.springframework.security.core.userdetails.User;
import org.springframework.security.core.userdetails.UserDetails;
import org.springframework.security.core.userdetails.UserDetailsService;
import org.springframework.security.crypto.factory.PasswordEncoderFactories;
import org.springframework.security.crypto.password.PasswordEncoder;
import org.springframework.security.provisioning.InMemoryUserDetailsManager;
import org.springframework.security.web.SecurityConfigurerAdapter;
import org.springframework.security.web.SecurityFilterChain;
import io.swagger.v3.oas.annotations.enums.SecuritySchemeType;
import io.swagger.v3.oas.annotations.security.SecurityScheme;@Configuration
@EnableWebSecurity  // 启用 Spring Security 安全控制
@Profile("dev")     // 仅 dev 环境生效
// 声明 JWT 安全方案(当前项目未使用,属于冗余配置,可删除)
@SecurityScheme(name = "bearerAuth",type = SecuritySchemeType.HTTP,scheme = "bearer",bearerFormat = "JWT"
)
public class OpenAPISecurityConfig {/*** 配置安全规则:控制路径访问权限*/@Beanpublic SecurityFilterChain filterChain(HttpSecurity http) throws Exception {http.authorizeRequests()// 1. Swagger 相关路径必须认证(避免文档暴露).antMatchers("/swagger-ui.html", "/v3/api-docs/**").authenticated()// 2. 其他业务接口允许匿名访问(可根据项目调整为 authenticated()).anyRequest().permitAll().and()// 3. 启用 HTTP Basic 认证(浏览器弹出账号密码登录框).httpBasic().and()// 4. 关闭 CSRF(开发环境简化操作,生产环境需评估).csrf().disable();return http.build();}/*** 配置认证用户:内存存储(生产环境建议用数据库存储)*/@Beanpublic UserDetailsService userDetailsService() {// 密码编码器(自动适配 BCrypt 等加密方式)PasswordEncoder encoder = PasswordEncoderFactories.createDelegatingPasswordEncoder();// 定义用户:用户名=ydyl,密码=123456UserDetails user = User.withUsername("ydyl").password(encoder.encode("123456")).roles("API_DOCS")  // 角色(可用于细粒度权限控制).build();// 内存用户管理器(仅开发环境测试用)return new InMemoryUserDetailsManager(user);}
}
注意:类上的 @SecurityScheme(bearerAuth) 是冗余配置(当前用 Basic 认证,未用 JWT),可删除以精简代码。
三、接口与实体类:用注解完善文档
Swagger 文档的核心是「接口信息」和「参数 / 返回值说明」,需通过注解在控制器和实体类中添加描述,以用户提供的 PersonInfoController 和 PersonInfo 为例。
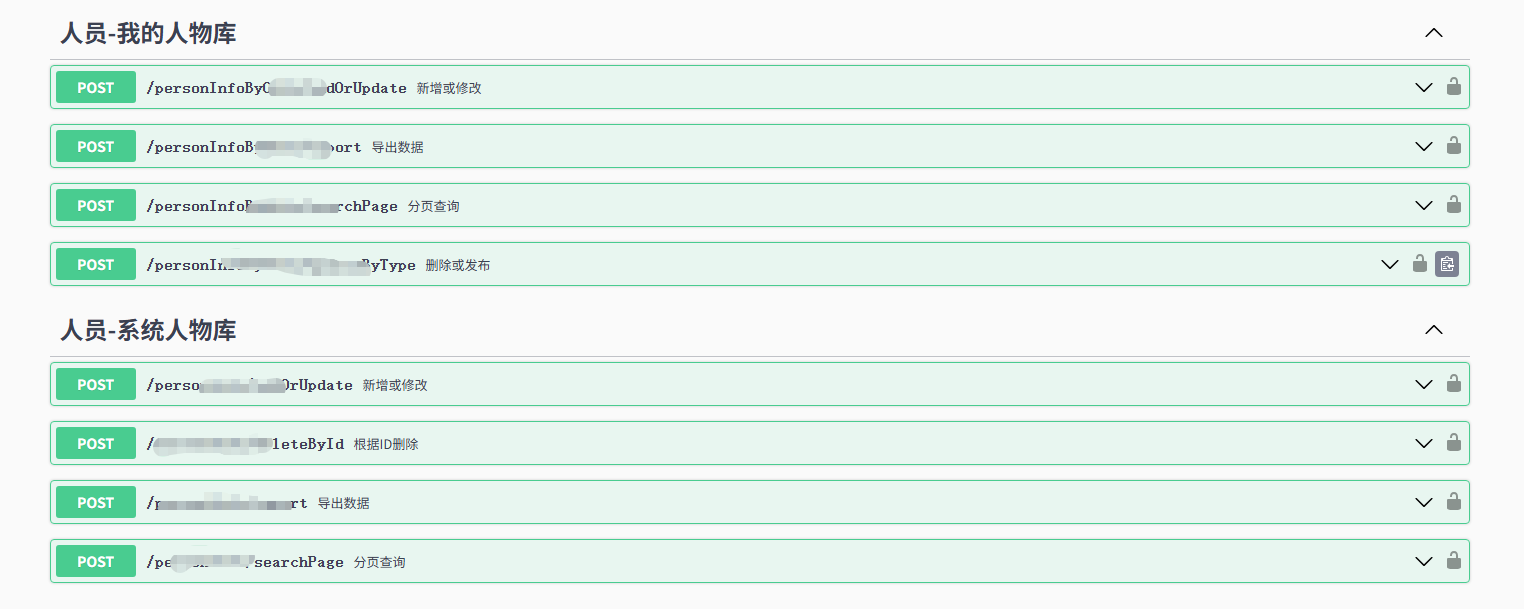
1. 控制器注解:定义接口信息(PersonInfoController)
控制器类用 @Tag 分组,接口方法用 @Operation 描述功能,代码如下:
import io.swagger.v3.oas.annotations.Operation;
import io.swagger.v3.oas.annotations.tags.Tag;
import org.springframework.web.bind.annotation.PostMapping;
import org.springframework.web.bind.annotation.RequestBody;
import org.springframework.web.bind.annotation.RequestMapping;
import org.springframework.web.bind.annotation.RestController;
import javax.validation.Validated;
import javax.servlet.http.HttpServletResponse;@RestController
@RequestMapping("/personInfo")  // 接口基础路径
@Tag(name = "人员-系统人物库")  // 接口标签(Swagger UI 左侧分组名称)
public class PersonInfoController {private final IPersonInfoService onlyService;// 构造器注入服务(推荐方式,避免字段注入)public PersonInfoController(IPersonInfoService onlyService) {this.onlyService = onlyService;}/*** 新增或修改人员信息*/@PostMapping("/addOrUpdate")@Operation(summary = "新增或修改", description = "根据传入的人员信息,不存在则新增,存在则更新")public BaseResponse<String> addOrUpdate(@Validated @RequestBody PersonInfo personInfo  // @Validated 开启参数校验) {String result = onlyService.addOrUpdate(personInfo);return BaseResponse.success(result);}/*** 根据 ID 删除人员*/@PostMapping("/deleteById")@Operation(summary = "根据ID删除", description = "传入人员ID,逻辑删除对应人员信息")public BaseResponse<String> deleteById(@Validated @RequestBody PersonUpdateVo paramVo) {String result = onlyService.deleteById(paramVo.getId());return BaseResponse.success(result);}/*** 分页查询人员信息*/@PostMapping("/searchPage")@Operation(summary = "分页查询", description = "传入查询条件(如手机号、邮箱),返回分页人员列表")public BaseResponse<Page<PersonInfo>> searchPage(@RequestBody PersonOnlyParamVo paramVo) {Page<PersonInfo> result = onlyService.searchPage(paramVo);return BaseResponse.success(result);}/*** 导出人员数据*/@PostMapping("/export")@Operation(summary = "导出数据", description = "每天最多导出10次,每次最多20条数据,返回Excel文件")public BaseResponse<?> exportPerson(@RequestBody ExportLimitDoc exportLimitDoc,HttpServletResponse response  // 用于输出Excel流) {onlyService.exportPerson(exportLimitDoc, response);return BaseResponse.success();}
}
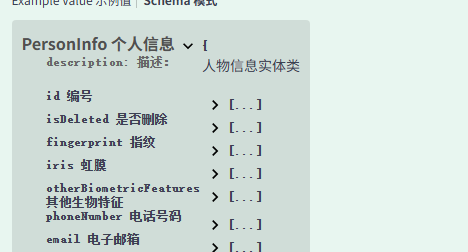
2. 实体类注解:定义参数 / 返回值说明(PersonInfo)
实体类用 @Schema 描述类和字段含义,Swagger UI 会自动显示这些说明,代码如下:
import io.swagger.v3.oas.annotations.media.Schema;
import lombok.Data;
import org.springframework.data.elasticsearch.annotations.Document;
import org.springframework.data.elasticsearch.annotations.Field;
import org.springframework.data.elasticsearch.annotations.FieldType;
import org.springframework.data.elasticsearch.annotations.MultiField;
import org.springframework.data.elasticsearch.annotations.InnerField;@Data  // Lombok 注解,自动生成 getter/setter
@Schema(description = "人物信息实体类")  // 实体类描述(Swagger 中显示)
@Document(indexName = PersonInfo.INDEXNAME, replicas = 0, shards = 1)  // Elasticsearch 注解(非 Swagger 相关,无需修改)
public class PersonInfo extends ElasticsearchEntity {public static final String INDEXNAME = "person_info";public static final String DATE_TIME_FORMAT = "yyyy-MM-dd'T'HH:mm:ss";@Schema(description = "指纹")  // 字段描述@MultiField(mainField = @Field(type = FieldType.Text),otherFields = {@InnerField(suffix = "keyword", type = FieldType.Keyword)})private String fingerprint;@Schema(description = "虹膜")@MultiField(mainField = @Field(type = FieldType.Text),otherFields = {@InnerField(suffix = "keyword", type = FieldType.Keyword)})private String iris;@Schema(description = "其他生物特征")@MultiField(mainField = @Field(type = FieldType.Text),otherFields = {@InnerField(suffix = "keyword", type = FieldType.Keyword)})private String otherBiometricFeatures;@Schema(description = "手机号码")@MultiField(mainField = @Field(type = FieldType.Text),otherFields = {@InnerField(suffix = "keyword", type = FieldType.Keyword)})private String phoneNumber;@Schema(description = "邮箱账号")@MultiField(mainField = @Field(type = FieldType.Text),otherFields = {@InnerField(suffix = "keyword", type = FieldType.Keyword)})private String email;
}
四、访问与测试:验证文档效果
1. 确定访问路径
结合配置文件中的 server.port、server.servlet.context-path 和 springdoc.swagger-ui.path,最终访问路径为:
http://localhost:9005/ydyl/swagger-ui.html
localhost:项目部署地址(若部署在服务器,替换为服务器 IP)9005:用户指定端口ydyl:应用上下文路径swagger-ui.html:Swagger UI 自定义路径
2. 登录认证
访问上述路径后,浏览器会弹出「基础认证」对话框,输入配置的账号密码:
- 用户名:
ydyl - 密码:
123456(原始密码,非加密后的字符串)
3. 文档使用
登录成功后,即可看到完整的 Swagger 文档界面:
- 左侧标签:显示
人员-系统人物库(对应@Tag注解),点击可展开所有接口; - 接口详情:每个接口显示
summary和description(对应@Operation注解),可查看请求参数(自动显示PersonInfo字段的@Schema说明); - 在线调试:点击接口右侧的「Try it out」,输入参数后点击「Execute」,即可直接调用接口并查看返回结果。