Rokid设备连接全解析:蓝牙与Wi-Fi通信源码深度剖析
一、概述
在AR眼镜开发中,设备连接是构建完整交互体验的基础环节。Rokid通过其CXR_M SDK提供了完整的蓝牙和Wi-Fi连接解决方案,本文将深入解析其实现原理和代码架构。
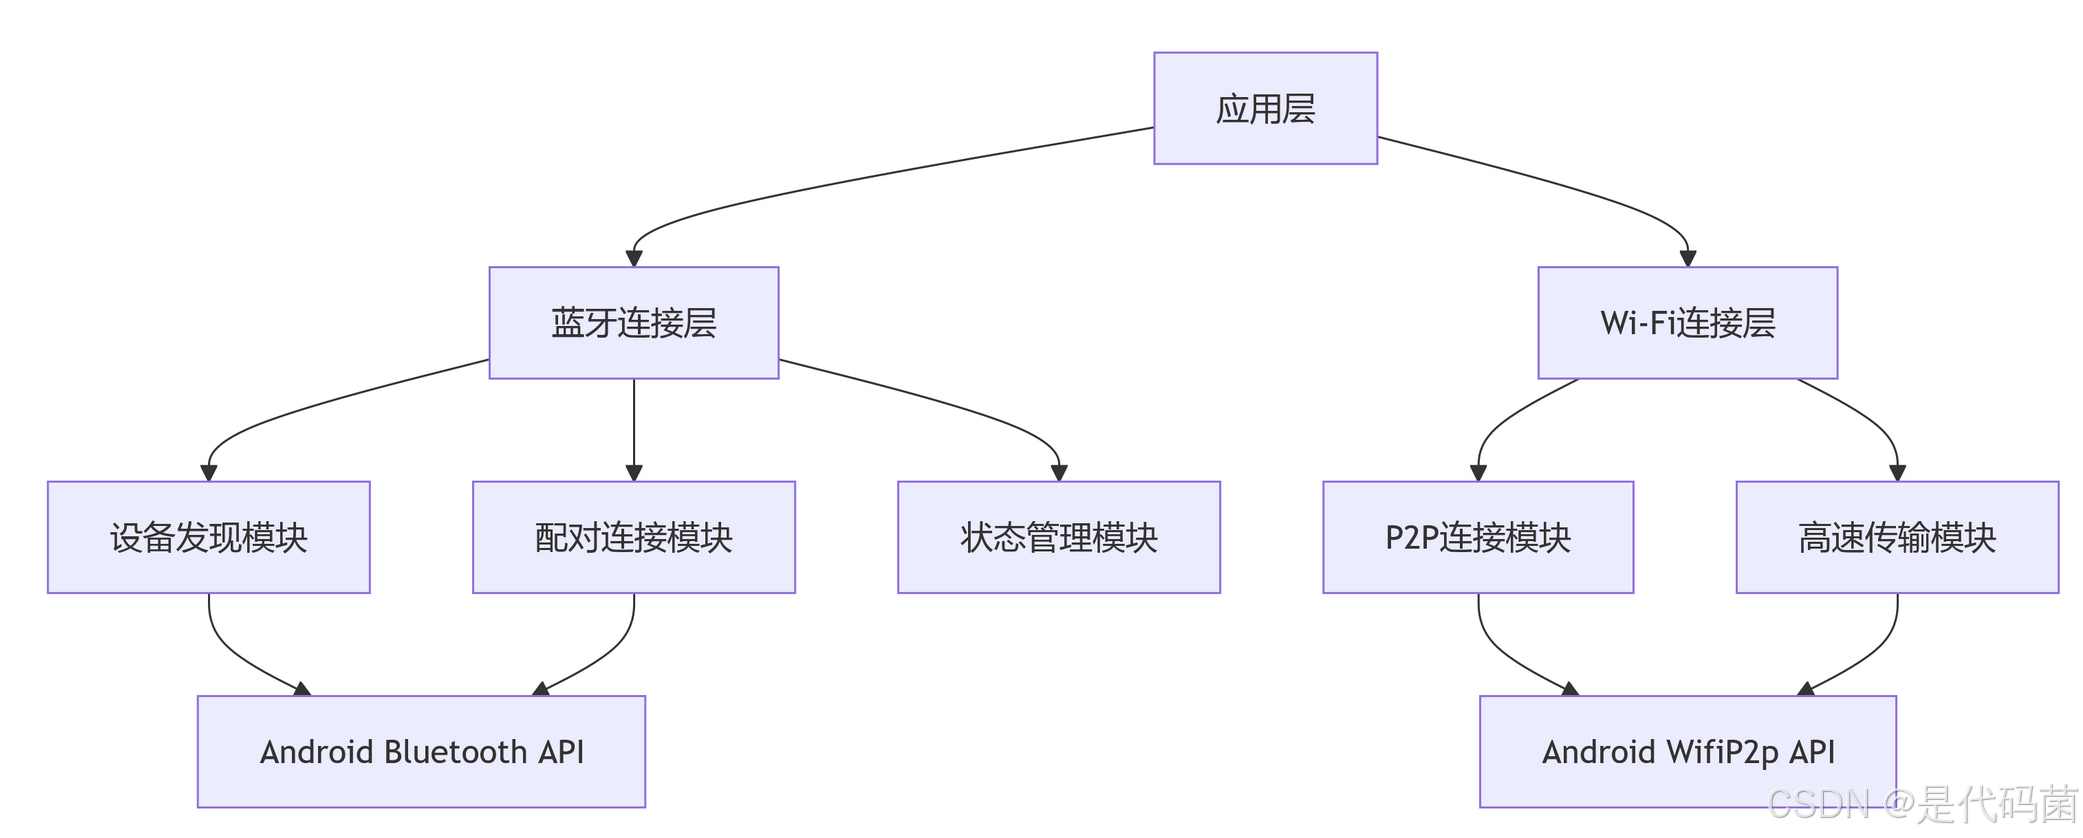
1.1 连接架构总览
Rokid设备连接采用分层设计:
二、蓝牙连接实现详解
2.1 设备发现机制
设备发现是整个连接流程的起点,Rokid通过标准的Android Bluetooth API进行设备扫描,同时使用特定UUID过滤Rokid设备。
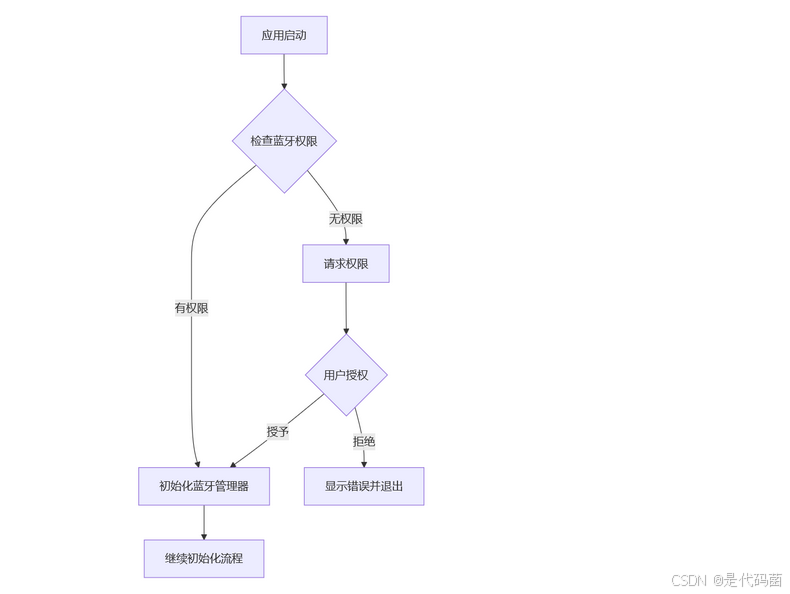
2.1.1 权限管理
class BluetoothHelper(val context: AppCompatActivity,val initStatus: (INIT_STATUS) -> Unit,val deviceFound: () -> Unit) {companion object {// 权限定义private val REQUIRED_PERMISSIONS = mutableListOf(Manifest.permission.ACCESS_FINE_LOCATION,Manifest.permission.BLUETOOTH,Manifest.permission.BLUETOOTH_ADMIN,).apply {if (Build.VERSION.SDK_INT >= Build.VERSION_CODES.S) {add(Manifest.permission.BLUETOOTH_SCAN)add(Manifest.permission.BLUETOOTH_CONNECT)}}.toTypedArray()}// 权限检查入口fun checkPermissions() {initStatus.invoke(INIT_STATUS.NotStart)context.requestPermissions(REQUIRED_PERMISSIONS, REQUEST_CODE_PERMISSIONS)context.registerReceiver(bluetoothStateListener,IntentFilter(BluetoothAdapter.ACTION_STATE_CHANGED))}}
权限管理流程:
2.1.2 设备扫描实现
// 开始扫描@SuppressLint("MissingPermission")@RequiresPermission(Manifest.permission.BLUETOOTH_SCAN)fun startScan() {scanResultMap.clear()// 获取已连接设备val connectedList = getConnectedDevices()for (device in connectedList) {device.name?.let {if (it.contains("Glasses", false)) {bondedDeviceMap[it] = devicedeviceFound.invoke()}}}// 获取已配对设备adapter?.bondedDevices?.forEach { d ->d.name?.let {if (it.contains("Glasses", false)) {if (bondedDeviceMap[it] == null) {bondedDeviceMap[it] = d}}deviceFound.invoke()}}// 开始BLE扫描try {scanner.startScan(listOf<ScanFilter>(ScanFilter.Builder().setServiceUuid(ParcelUuid.fromString("00009100-0000-1000-8000-00805f9b34fb")).build()), ScanSettings.Builder().build(),scanListener)} catch (e: Exception) {Toast.makeText(context, "Scan Failed ${e.message}", Toast.LENGTH_SHORT).show()}}
2.2 蓝牙初始化与连接
2.2.1 初始化流程
/**
Init Bluetooth
*/fun initDevice(context: Context, device: BluetoothDevice){CxrApi.getInstance().initBluetooth(context, device,  object : BluetoothStatusCallback{override fun onConnectionInfo(socketUuid: String?,macAddress: String?,rokidAccount: String?,glassesType: Int) {socketUuid?.let { uuid ->macAddress?.let { address->connect(context, uuid, address)}?:run {Log.e(TAG, "macAddress is null")}}?:run{Log.e(TAG, "socketUuid is null")}}override fun onConnected() {// 连接成功处理}override fun onDisconnected() {// 连接断开处理}override fun onFailed(p0: ValueUtil.CxrBluetoothErrorCode?) {// 错误处理}})}
2.2.2 连接建立
/**
Connect Bluetooth
*/fun connect(context: Context, socketUuid: String, macAddress: String){CxrApi.getInstance().connectBluetooth(context, socketUuid, macAddress, object : BluetoothStatusCallback{override fun onConnectionInfo(socketUuid: String?,macAddress: String?,rokidAccount: String?,glassesType: Int) {// 连接信息更新}override fun onConnected() {Log.d(TAG, "Connected")}override fun onDisconnected() {Log.d(TAG, "Disconnected")}override fun onFailed(p0: ValueUtil.CxrBluetoothErrorCode?) {Log.e(TAG, "Failed")}})}
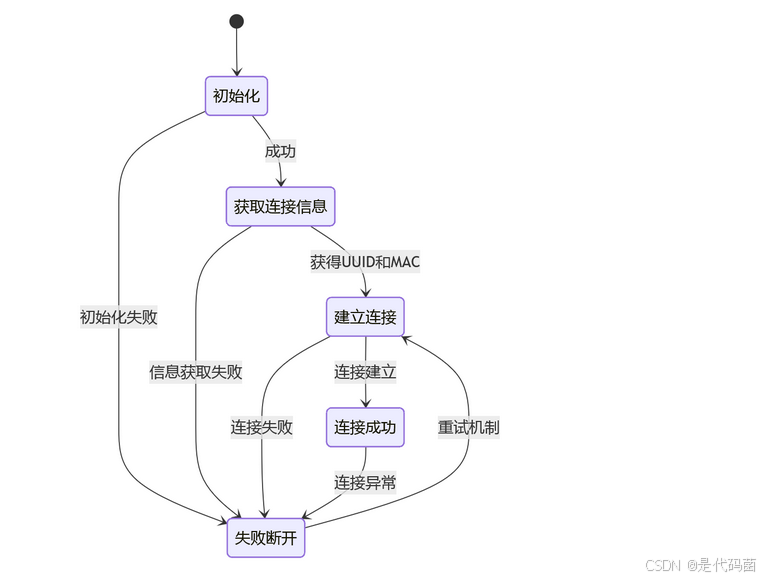
蓝牙连接状态机:
2.3 连接状态管理
2.3.1 状态查询
/**
Get Connection Status
*/fun getConnectionStatus(): Boolean{return CxrApi.getInstance().isBluetoothConnected}
2.3.2 状态监听
// Bluetooth State Listenerval bluetoothStateListener = object : BroadcastReceiver() {override fun onReceive(context: Context?, intent: Intent?) {val action = intent?.actionif (action == BluetoothAdapter.ACTION_STATE_CHANGED) {val state = intent.getIntExtra(BluetoothAdapter.EXTRA_STATE, BluetoothAdapter.ERROR)when (state) {BluetoothAdapter.STATE_OFF -> {initStatus.invoke(INIT_STATUS.NotStart)bluetoothEnabled.postValue(false)}}}}}
2.4 资源管理与重连机制
2.4.1 资源释放
/**
DeInit Bluetooth
*/fun deInit(){CxrApi.getInstance().deinitBluetooth()}
// Release@SuppressLint("MissingPermission")fun release() {context.unregisterReceiver(bluetoothStateListener)stopScan()permissionResult.postValue(false)bluetoothEnabled.postValue(false)}
2.4.2 重连机制
重连使用与初始连接相同的API,但需要保存之前的连接参数:
/**
重连实现
*/fun reconnect(context: Context, savedSocketUuid: String, savedMacAddress: String) {connect(context, savedSocketUuid, savedMacAddress)}
三、Wi-Fi连接实现详解
Wi-Fi连接建立在蓝牙连接基础之上,主要用于高速数据传输。由于Wi-Fi模块功耗较高,建议仅在需要传输大量数据时开启。
3.1 Wi-Fi初始化
3.1.1 初始化流程
/**
Init Wifi
*/fun initWifi(): ValueUtil.CxrStatus?{return CxrApi.getInstance().initWifiP2P(object : WifiP2PStatusCallback{override fun onConnected() {Log.d(TAG, "onConnected")}override fun onDisconnected() {Log.d(TAG, "onDisconnected")}override fun onFailed(errorCode: ValueUtil.CxrWifiErrorCode?) {// 错误处理}})}
Wi-Fi连接状态图:

3.2 Wi-Fi状态管理
3.2.1 连接状态查询
/**
Get Wifi Connection Status
*/fun getWiFiConnectionStatus(): Boolean{return CxrApi.getInstance().isWifiP2PConnected}
3.2.2 资源释放
/**
Deinit Wifi
*/private fun deinitWifi(){CxrApi.getInstance().deinitWifiP2P()}
四、完整连接流程与最佳实践
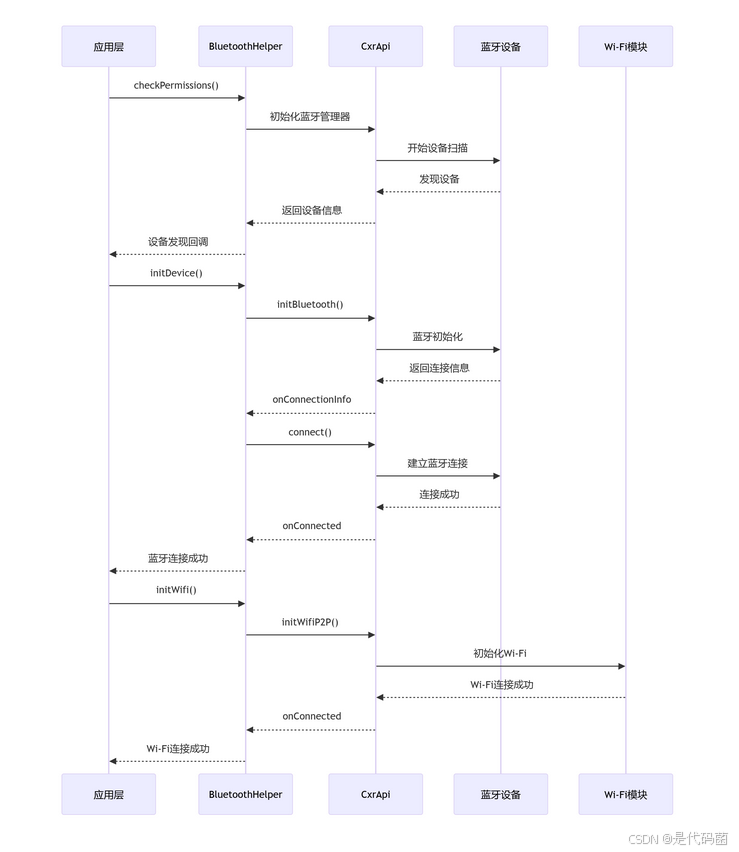
4.1 完整连接时序图
4.2 错误处理策略
4.2.1 蓝牙错误处理
override fun onFailed(errorCode: ValueUtil.CxrBluetoothErrorCode?) {when (errorCode) {ValueUtil.CxrBluetoothErrorCode.PARAM_INVALID -> {Log.e(TAG, "Invalid parameters provided")}ValueUtil.CxrBluetoothErrorCode.BLE_CONNECT_FAILED -> {Log.e(TAG, "BLE connection failed")}ValueUtil.CxrBluetoothErrorCode.SOCKET_CONNECT_FAILED -> {Log.e(TAG, "Socket connection failed")}ValueUtil.CxrBluetoothErrorCode.UNKNOWN -> {Log.e(TAG, "Unknown bluetooth error")}else -> {Log.e(TAG, "Unhandled error code: $errorCode")}}}
4.2.2 连接重试机制
建议实现指数退避的重试机制:
class ConnectionManager {private var retryCount = 0private val maxRetries = 3private val baseDelay = 1000L // 1秒fun connectWithRetry(context: Context, socketUuid: String, macAddress: String) {connect(context, socketUuid, macAddress, object : BluetoothStatusCallback {override fun onFailed(errorCode: ValueUtil.CxrBluetoothErrorCode?) {if (retryCount < maxRetries) {retryCount++val delay = baseDelay * (2 pow retryCount) // 指数退避Handler(Looper.getMainLooper()).postDelayed({connectWithRetry(context, socketUuid, macAddress)}, delay)} else {notifyConnectionFailed()}}override fun onConnected() {retryCount = 0}})}}
4.3 性能优化建议
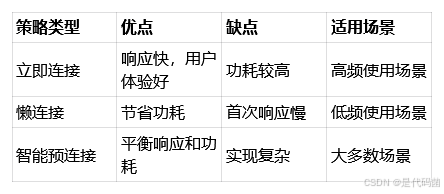
连接策略对比:
五、总结
Rokid CXR_M SDK提供了完整的设备连接解决方案,通过清晰的API设计和回调机制,让开发者能够快速实现蓝牙和Wi-Fi连接功能。