Spring Boot整合Apache Shiro权限认证框架(实战篇)
上一篇文章已经介绍了使用Apache Shiro权限认证框架实现动态授权功能。
Spring Boot整合Apache Shiro权限认证框架(应用篇)![]() https://blog.csdn.net/2501_92713943/article/details/152666246这篇文章介绍的是Apache Shiro的最佳实践,可直接用于项目。
https://blog.csdn.net/2501_92713943/article/details/152666246这篇文章介绍的是Apache Shiro的最佳实践,可直接用于项目。
目录
登录认证流程
Subject
DelegatingSubject
login()
SecurityManager
DefaultSecurityManager
Authenticator
authenticate()
AbstractAuthenticator
doAuthenticate()
ModularRealmAuthenticator
Realm
doSingleRealmAuthentication()
AuthenticatingRealm
getAuthenticationInfo()
assertCredentialsMatch()
CredentialsMatcher
SimpleCredentialsMatcher
doCredentialsMatch()
equals()
DefaultSecurityManager
createSubject()
onSuccessfulLogin()
RememberMeManager
AbsreactRememberMeManager
onSuccessfulLogin()
rememberIdentity()
rememberSerializedIdentity()
CookieRememberMeManager
rememberSerializedIdentity()
权限缓存问题
权限缓存源码
AuthorizingRealm
getAuthorizationInfo()
getAvailableAuthorizationCache()
getAuthorizationCache()
创建授权缓存类
pom.xml
RedisUtils.java
StringRedisUtils.java
RedisCache.java
ShiroConfig
RedisKeyPrefixes.java
UsernameRealm.java
密码安全问题
创建密码匹配器
PasswordEncoder.java
PasswordMatcher.java
ShiroConfig.java
修改用户登录密码
自定义未授权逻辑
指定处理路径
ShiroConfig.java
UserController.java
自定义过滤器
PermsFilter.java
ShiroConfig.java
对于刚接触Apache Shiro的同学来说,可以会觉得很好奇:
上一篇文章并没有涉及到密码比较,怎么就知道密码是对的还是错的呢?
登录认证流程
这就需要了解一下Apache Shiro的登录认证流程了:
1、对于普通的登录认证,用户会在登录页面输入账号(用户名、手机号、邮箱等)和密码;
2、在后端会得到用户输入的登录信息(账号+密码),调用Subject.login()方法登录;
Subject
org.apache.shiro.subject.Subject是一个接口,它有一个实现类DelegatingSubject
DelegatingSubject
在DelegatingSubject重写的login()方法中,调用了SecurityManager的login()方法。
login()
Subject subject = securityManager.login(this, token);SecurityManager
SecurityManager也是一个接口,其默认实现类是DefaultSecurityManager。
DefaultSecurityManager
然后让我们看看这个实现类里的login()方法的代码:
public Subject login(Subject subject, AuthenticationToken token) throws AuthenticationException {AuthenticationInfo info;try {info = authenticate(token);} catch (AuthenticationException ae) {try {onFailedLogin(token, ae, subject);} catch (Exception e) {if (log.isInfoEnabled()) {log.info("onFailedLogin method threw an " +"exception.  Logging and propagating original AuthenticationException.", e);}}throw ae; // propagate}Subject loggedIn = createSubject(token, info, subject);onSuccessfulLogin(token, info, loggedIn);return loggedIn;
}
首先会通过调用authenticate()方法得到AuthenticationInfo对象。
Authenticator
在authenticate()方法中调用了Authenticator接口的authenticate()方法。
authenticate()
public AuthenticationInfo authenticate(AuthenticationToken token) throws AuthenticationException {return this.authenticator.authenticate(token);
}
AbstractAuthenticator
查看Authenticator接口的抽象实现类AbstractAuthenticator的authenticate()方法。
public final AuthenticationInfo authenticate(AuthenticationToken token) throws AuthenticationException {if (token == null) {throw new IllegalArgumentException("Method argument (authentication token) cannot be null.");}log.trace("Authentication attempt received for token [{}]", token);AuthenticationInfo info;try {info = doAuthenticate(token);if (info == null) {String msg = "No account information found for authentication token [" + token + "] by this " +"Authenticator instance.  Please check that it is configured correctly.";throw new AuthenticationException(msg);}} catch (Throwable t) {AuthenticationException ae = null;if (t instanceof AuthenticationException) {ae = (AuthenticationException) t;}if (ae == null) {//Exception thrown was not an expected AuthenticationException.  Therefore it is probably a little more//severe or unexpected.  So, wrap in an AuthenticationException, log to warn, and propagate:String msg = "Authentication failed for token submission [" + token + "].  Possible unexpected " +"error? (Typical or expected login exceptions should extend from AuthenticationException).";ae = new AuthenticationException(msg, t);if (log.isWarnEnabled())log.warn(msg, t);}try {notifyFailure(token, ae);} catch (Throwable t2) {if (log.isWarnEnabled()) {String msg = "Unable to send notification for failed authentication attempt - listener error?.  " +"Please check your AuthenticationListener implementation(s).  Logging sending exception " +"and propagating original AuthenticationException instead...";log.warn(msg, t2);}}throw ae;}log.debug("Authentication successful for token [{}].  Returned account [{}]", token, info);notifySuccess(token, info);return info;
}
doAuthenticate()
在这个方法里通过doAuthenticate()方法获取AuthenticationInfo对象。
protected abstract AuthenticationInfo doAuthenticate(AuthenticationToken token)throws AuthenticationException;ModularRealmAuthenticator
由于AbstractAuthenticator的authenticate()方法是抽象方法,定位到其派生类ModularRealmAuthenticator。
获取所有Realm,如果只有一个Realm,调用doSingleRealmAuthentication()方法。
protected AuthenticationInfo doAuthenticate(AuthenticationToken authenticationToken) throws AuthenticationException {assertRealmsConfigured();Collection<Realm> realms = getRealms();if (realms.size() == 1) {return doSingleRealmAuthentication(realms.iterator().next(), authenticationToken);} else {return doMultiRealmAuthentication(realms, authenticationToken);}
}
Realm
doSingleRealmAuthentication()
在doSingleRealmAuthentication()方法中最终调用了Realm的getAuthenticationInfo()方法。
AuthenticationInfo info = realm.getAuthenticationInfo(token);AuthenticatingRealm
Realm是一个接口,定位到其派生类AuthenticatingRealm重写的getAuthenticationInfo()方法。
getAuthenticationInfo()
public final AuthenticationInfo getAuthenticationInfo(AuthenticationToken token) throws AuthenticationException {// 从缓存中获取AuthenticationInfoAuthenticationInfo info = getCachedAuthenticationInfo(token);if (info == null) {// otherwise not cached, perform the lookup:info = doGetAuthenticationInfo(token);log.debug("Looked up AuthenticationInfo [{}] from doGetAuthenticationInfo", info);if (token != null && info != null) {cacheAuthenticationInfoIfPossible(token, info);}} else {log.debug("Using cached authentication info [{}] to perform credentials matching.", info);}if (info != null) {assertCredentialsMatch(token, info);} else {log.debug("No AuthenticationInfo found for submitted AuthenticationToken [{}].  Returning null.", token);}return info;
}
先从缓存中获取AuthenticationInfo对象,如果缓存中没有,则通过doGetAuthenticationInfo()方法获取。
protected abstract AuthenticationInfo doGetAuthenticationInfo(AuthenticationToken token) throws AuthenticationException;其实就是调用了我们提供的UsernameRealm重写的getAuthenticationInfo()方法,这个方法返回的就是用于认证的信息。AuthorizingRealm是AuthenticatingRealm的一个派生类。
public class UsernameRealm extends AuthorizingRealm {assertCredentialsMatch()
在这里方法中完成了密码的匹配,通过调用CredentialsMatcher的doCredentialsMatch()方法。
protected void assertCredentialsMatch(AuthenticationToken token, AuthenticationInfo info) throws AuthenticationException {CredentialsMatcher cm = getCredentialsMatcher();if (cm != null) {if (!cm.doCredentialsMatch(token, info)) {//not successful - throw an exception to indicate this:String msg = "Submitted credentials for token [" + token + "] did not match the expected credentials.";throw new IncorrectCredentialsException(msg);}} else {throw new AuthenticationException("A CredentialsMatcher must be configured in order to verify " +"credentials during authentication.  If you do not wish for credentials to be examined, you " +"can configure an " + AllowAllCredentialsMatcher.class.getName() + " instance.");}
}
CredentialsMatcher
CredentialsMatcher是一个接口,定位到其派生类重写的doCredentialsMatch()方法。
SimpleCredentialsMatcher
doCredentialsMatch()
在doCredentialsMatch()方法中调用了equals()方法。
public boolean doCredentialsMatch(AuthenticationToken token, AuthenticationInfo info) {Object tokenCredentials = getCredentials(token);Object accountCredentials = getCredentials(info);return equals(tokenCredentials, accountCredentials);
}
equals()
在这个方法中,首先判断比较的两个密码是不是字节,一般来说都是字符串,所以执行else分支的通过Object的equals()方法简单比较两个对象的值是否相等。
protected boolean equals(Object tokenCredentials, Object accountCredentials) {if (log.isDebugEnabled()) {log.debug("Performing credentials equality check for tokenCredentials of type [" +tokenCredentials.getClass().getName() + " and accountCredentials of type [" +accountCredentials.getClass().getName() + "]");}if (isByteSource(tokenCredentials) && isByteSource(accountCredentials)) {if (log.isDebugEnabled()) {log.debug("Both credentials arguments can be easily converted to byte arrays.  Performing " +"array equals comparison");}byte[] tokenBytes = toBytes(tokenCredentials);byte[] accountBytes = toBytes(accountCredentials);return MessageDigest.isEqual(tokenBytes, accountBytes);} else {// 比较两个字符串的内容是否相等return accountCredentials.equals(tokenCredentials);}
}
DefaultSecurityManager
好了,获取AuthenticationInfo对象的方法已经看完了,回到刚开始的DefaultSecurityManager的login()方法。
Subject loggedIn = createSubject(token, info, subject);onSuccessfulLogin(token, info, loggedIn);return loggedIn;createSubject()
第一行代码是创建Subject对象
protected Subject createSubject(AuthenticationToken token, AuthenticationInfo info, Subject existing) {SubjectContext context = createSubjectContext();context.setAuthenticated(true);context.setAuthenticationToken(token);context.setAuthenticationInfo(info);if (existing != null) {context.setSubject(existing);}return createSubject(context);
}
onSuccessfulLogin()
继续看onSuccessfulLogin()方法。
protected void onSuccessfulLogin(AuthenticationToken token, AuthenticationInfo info, Subject subject) {rememberMeSuccessfulLogin(token, info, subject);
}
继续调用rememberMeSuccessfulLogin()方法,在这里调用了RememberMeManager的onSuccessfulLogin()方法。
protected void rememberMeSuccessfulLogin(AuthenticationToken token, AuthenticationInfo info, Subject subject) {RememberMeManager rmm = getRememberMeManager();if (rmm != null) {try {rmm.onSuccessfulLogin(subject, token, info);} catch (Exception e) {if (log.isWarnEnabled()) {String msg = "Delegate RememberMeManager instance of type [" + rmm.getClass().getName() +"] threw an exception during onSuccessfulLogin.  RememberMe services will not be " +"performed for account [" + info + "].";log.warn(msg, e);}}} else {if (log.isTraceEnabled()) {log.trace("This " + getClass().getName() + " instance does not have a " +"[" + RememberMeManager.class.getName() + "] instance configured.  RememberMe services " +"will not be performed for account [" + info + "].");}}
}
RememberMeManager
RememberMeManager是一个接口,定位到其派生类AbstractRememberMeManager重写的onSuccessfulLogin()方法。
AbstractRememberMeManager
onSuccessfulLogin()
public void onSuccessfulLogin(Subject subject, AuthenticationToken token, AuthenticationInfo info) {// always clear any previous identity:forgetIdentity(subject);// now save the new identity:if (isRememberMe(token)) {rememberIdentity(subject, token, info);} else {if (log.isDebugEnabled()) {log.debug("AuthenticationToken did not indicate RememberMe is requested.  " +"RememberMe functionality will not be executed for corresponding account.");}}
}
rememberIdentity()
方法名翻译过来是“记住身份”,很显然应该是跟会话有关。
public void rememberIdentity(Subject subject, AuthenticationToken token, AuthenticationInfo authcInfo) {PrincipalCollection principals = getIdentityToRemember(subject, authcInfo);rememberIdentity(subject, principals);
}
传参继续调用重载的rememberIdentity()方法。
protected void rememberIdentity(Subject subject, PrincipalCollection accountPrincipals) {byte[] bytes = convertPrincipalsToBytes(accountPrincipals);rememberSerializedIdentity(subject, bytes);
}
rememberSerializedIdentity()
protected abstract void rememberSerializedIdentity(Subject subject, byte[] serialized);CookieRememberMeManager
由于AbsreactRememberMeManager的rememberSerializedIdentity()方法是抽象的,定位带其派生类重写的rememberSerializedIdentity()方法。
rememberSerializedIdentity()
很显然,就是设置返回给浏览器的Cooklie值。
protected void rememberSerializedIdentity(Subject subject, byte[] serialized) {if (!WebUtils.isHttp(subject)) {if (log.isDebugEnabled()) {String msg = "Subject argument is not an HTTP-aware instance.  This is required to obtain a servlet " +"request and response in order to set the rememberMe cookie. Returning immediately and " +"ignoring rememberMe operation.";log.debug(msg);}return;}HttpServletRequest request = WebUtils.getHttpRequest(subject);HttpServletResponse response = WebUtils.getHttpResponse(subject);//base 64 encode it and store as a cookie:String base64 = Base64.encodeToString(serialized);Cookie template = getCookie(); //the class attribute is really a template for the outgoing cookiesCookie cookie = new SimpleCookie(template);cookie.setValue(base64);cookie.saveTo(request, response);
}
权限缓存问题
上面章节已经详细地深入源码介绍了Apache Shiro的登录认证流程。
接下来,有一个比较大的问题需要处理一下,每次访问API接口的时候,发现都会去查询一次用户的权限(查询角色+查询权限),用户的角色和权限通常是不会变更的,可以对权限进行缓存。
可以在UsernameRealm的doGetAuthorizationInfo()方法中增加缓存的代码。
但是,查看源代码之后会发现,Apache Shiro提供了一个缓存机制。
权限缓存源码
AuthorizingRealm
getAuthorizationInfo()
在UsernameRealm的超类中调用了我们重写的doGetAuthorizationInfo()方法
protected AuthorizationInfo getAuthorizationInfo(PrincipalCollection principals) {if (principals == null) {return null;}AuthorizationInfo info = null;if (log.isTraceEnabled()) {log.trace("Retrieving AuthorizationInfo for principals [" + principals + "]");}// 获取可用的授权信息缓存缓存类Cache<Object, AuthorizationInfo> cache = getAvailableAuthorizationCache();if (cache != null) { // 缓存可用if (log.isTraceEnabled()) {log.trace("Attempting to retrieve the AuthorizationInfo from cache.");}// 获取缓存keyObject key = getAuthorizationCacheKey(principals);// 通过key从缓存中获取值info = cache.get(key);if (log.isTraceEnabled()) {if (info == null) {log.trace("No AuthorizationInfo found in cache for principals [" + principals + "]");} else {log.trace("AuthorizationInfo found in cache for principals [" + principals + "]");}}}if (info == null) { // 没有命中缓存// 调用doGetAuthorizationInfo()方法获取授权信息info = doGetAuthorizationInfo(principals);// 缓存可用,并且获取到了授权信息if (info != null && cache != null) {if (log.isTraceEnabled()) {log.trace("Caching authorization info for principals: [" + principals + "].");}// 将授权信息存入缓存中Object key = getAuthorizationCacheKey(principals);cache.put(key, info);}}return info;
}/*** 获取缓存key*/
protected Object getAuthorizationCacheKey(PrincipalCollection principals) {return principals;
}
getAvailableAuthorizationCache()
继续深入探究如何获取可用的授权缓存。
private Cache<Object, AuthorizationInfo> getAvailableAuthorizationCache() {Cache<Object, AuthorizationInfo> cache = getAuthorizationCache();if (cache == null && isAuthorizationCachingEnabled()) {cache = getAuthorizationCacheLazy();}return cache;
}
getAuthorizationCache()
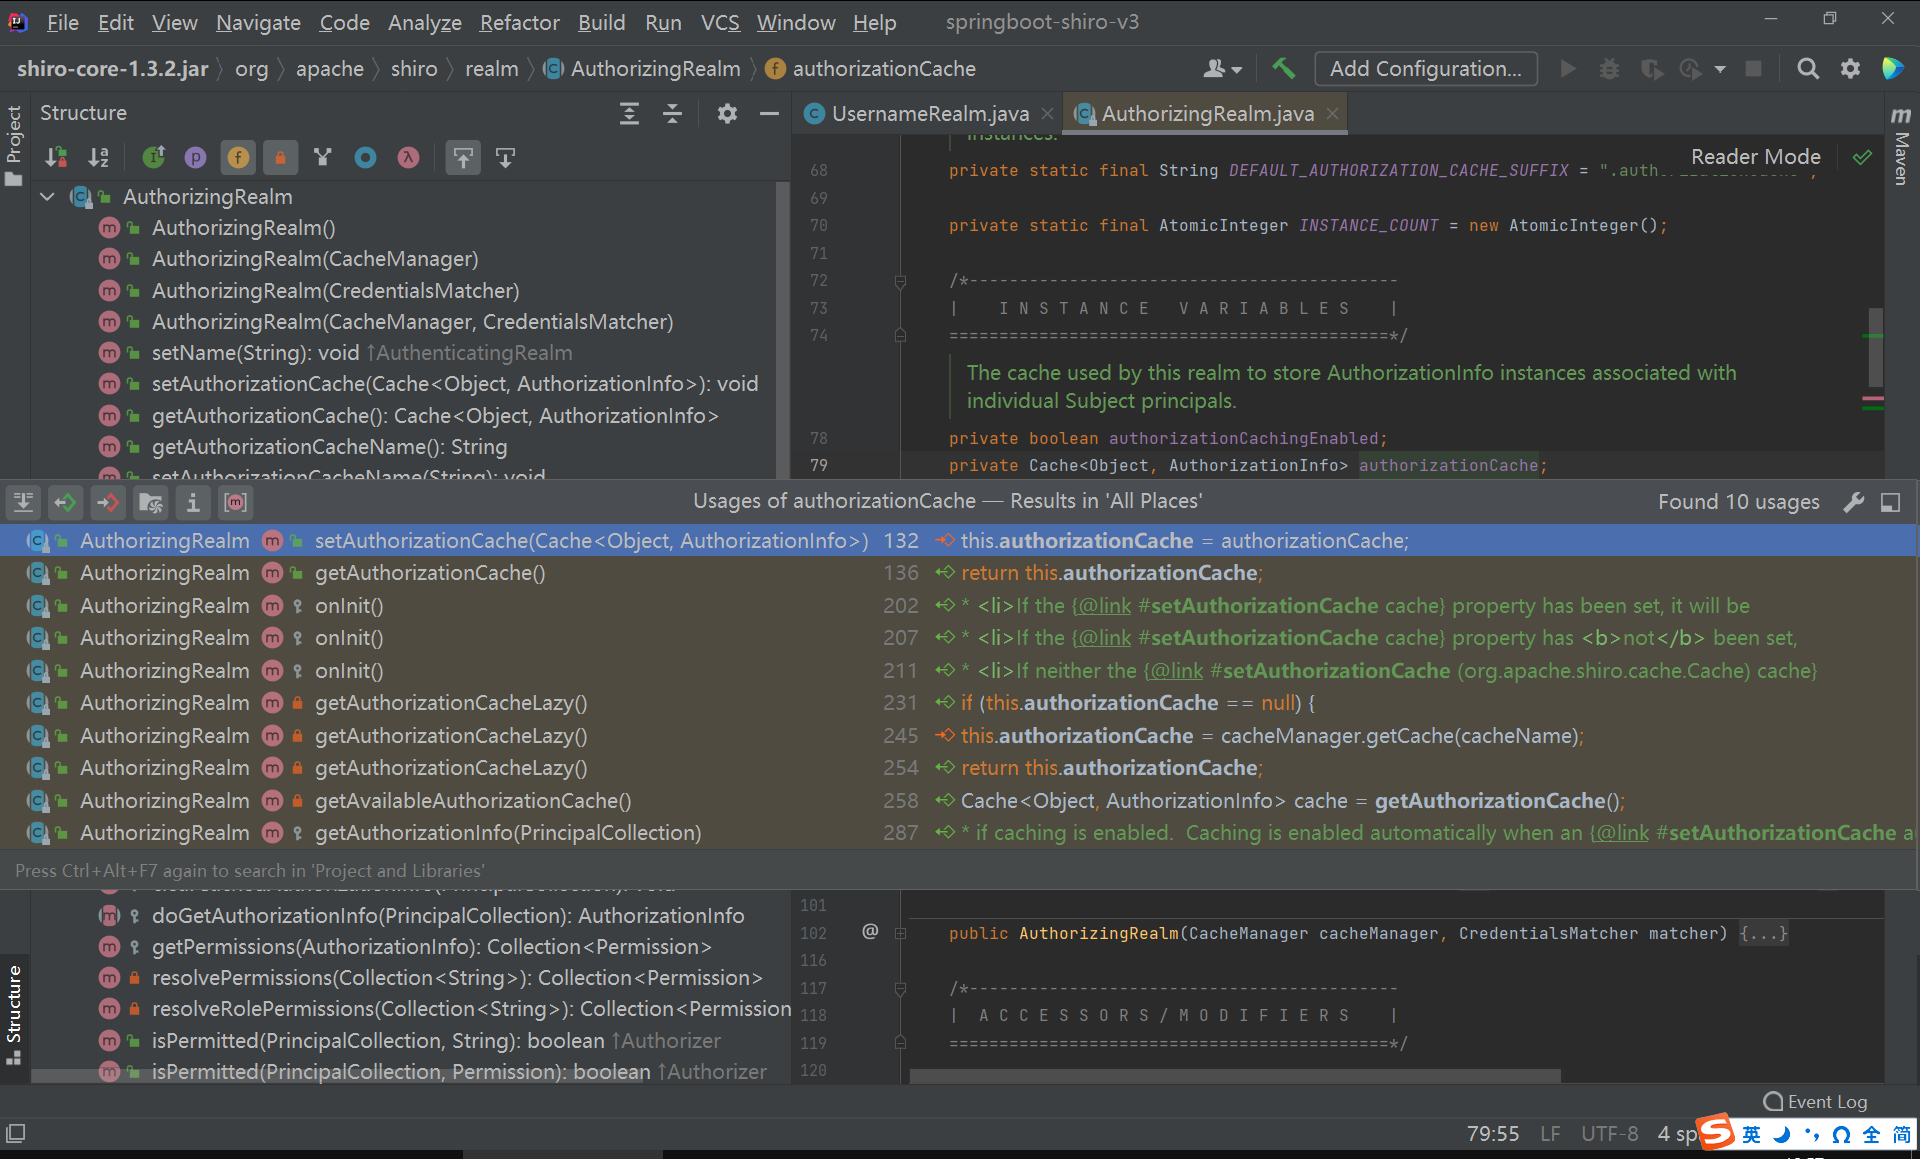
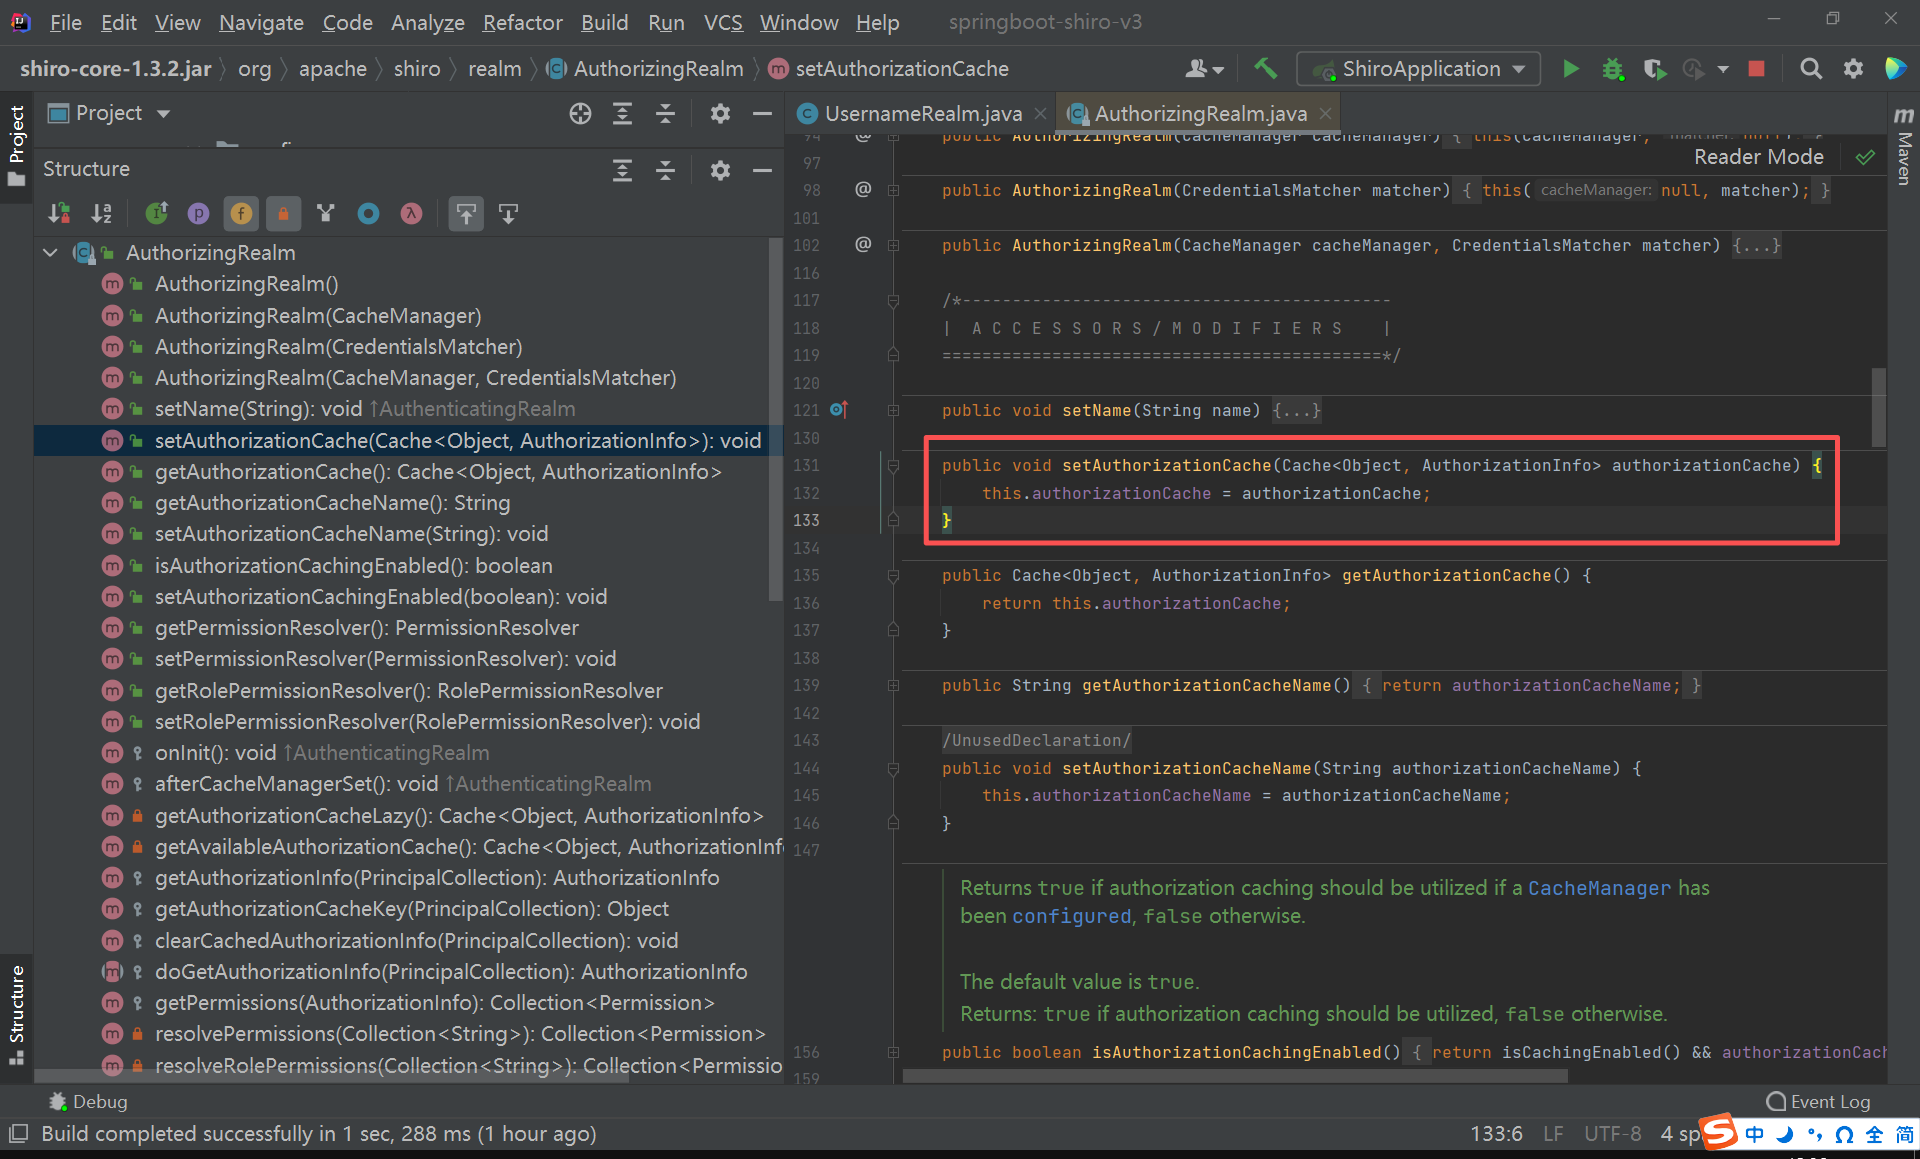
getAuthorizationCache()方法直接返回了当前类的成员变量。
public Cache<Object, AuthorizationInfo> getAuthorizationCache() {return this.authorizationCache;
}
发现只有一个set方法可以设置缓存类。
创建授权缓存类
根据上面的信息,我们可以创建一个自定义的授权缓存类。
可以将授权信息缓存到Map中,但是当登录的用户多了之后,Map中的数据会越来越大,甚至可能导致内存溢出。
因此,使用Redis作为缓存更合适,虽然没有内存中的Map快,也有每秒十万左右的并发。
pom.xml
添加Spring Boot整合Redis的依赖。
<dependency><groupId>org.springframework.boot</groupId><artifactId>spring-boot-starter-data-redis</artifactId>
</dependency>
RedisUtils.java
创建redis包,在redis包下创建RedisUtils接口。
package cn.edu.sgu.www.shiro.redis;import java.util.List;
import java.util.Set;
import java.util.concurrent.TimeUnit;/*** @author 沐雨橙风ιε* @version 1.0*/
public interface RedisUtils {/*** 获取key的值:get key* @param key redis的key* @return key的值*/String get(String key);/*** 一次性根据多个key获取多个值* @param keys key列表* @return List<String>*/List<String> multiGet(Set<String> keys);/*** 根据pattern批量获取key* @param pattern String* @return Set<String> 所有key的列表*/Set<String> keys(String pattern);/*** 设置key:set key value* @param key redis的key* @param value key的值*/void set(String key, String value);/*** 设置key:set key value ex timeout = set key value + expire key timeout* @param key redis的key* @param value key的值* @param timeout 过期时间* @param timeUnit 时间单位*/void set(String key, String value, long timeout, TimeUnit timeUnit);/*** 删除key:del key* @param key redis的key*/void delete(String key);/*** 根据pattern删除key:del keys pattern* @param pattern String*/void deleteByPattern(String pattern);/*** 让key自增:incrby key* @param key redis的key* @return 自增后的值*/Long incrBy(String key);/*** 判断key是否存在* @param key redis的key* @return key存在则返回true,否则返回false*/Boolean hasKey(String key);/*** 设置key的过期时间:expire key seconds* @param key redis的key* @param timeout 过期时间* @param timeUnit 时间单位*/void expire(String key, long timeout, TimeUnit timeUnit);
}
StringRedisUtils.java
创建RedisUtils接口的实现类。
package cn.edu.sgu.www.shiro.redis;import org.springframework.beans.factory.annotation.Autowired;
import org.springframework.data.redis.core.StringRedisTemplate;
import org.springframework.data.redis.core.ValueOperations;
import org.springframework.stereotype.Component;import java.util.List;
import java.util.Set;
import java.util.concurrent.TimeUnit;/*** 封装了StringRedisTemplate的redis工具类* @author 沐雨橙风ιε* @version 1.0*/
@Component
public class StringRedisUtils implements RedisUtils {private final StringRedisTemplate stringRedisTemplate;@Autowiredpublic StringRedisUtils(StringRedisTemplate stringRedisTemplate) {this.stringRedisTemplate = stringRedisTemplate;}@Overridepublic String get(String key) {return getValueOperations().get(key);}@Overridepublic List<String> multiGet(Set<String> keys) {return getValueOperations().multiGet(keys);}@Overridepublic Set<String> keys(String pattern) {return stringRedisTemplate.keys(pattern);}@Overridepublic void set(String key, String value) {getValueOperations().set(key, value);}@Overridepublic void set(String key, String value, long timeout, TimeUnit timeUnit) {getValueOperations().set(key, value, timeout, timeUnit);}@Overridepublic void delete(String key) {stringRedisTemplate.delete(key);}@Overridepublic void deleteByPattern(String pattern) {Set<String> keys = stringRedisTemplate.keys(pattern);if (keys != null && !keys.isEmpty()) {stringRedisTemplate.delete(keys);}}@Overridepublic Long incrBy(String key) {return getValueOperations().increment(key);}@Overridepublic Boolean hasKey(String key) {return stringRedisTemplate.hasKey(key);}@Overridepublic void expire(String key, long timeout, TimeUnit timeUnit) {stringRedisTemplate.expire(key, timeout, timeUnit);}/*** 获取ValueOperations对象* @return ValueOperations<String, String>*/private ValueOperations<String, String> getValueOperations() {return stringRedisTemplate.opsForValue();}}
RedisCache.java
创建一个Cache<Object, AuthorizationInfo>的派生类。
至于为什么是Cache<Object, AuthorizationInfo>类型的,因为set方法需要这个类型。
package cn.edu.sgu.www.shiro.support;import cn.edu.sgu.www.shiro.consts.RedisKeyPrefixes;
import cn.edu.sgu.www.shiro.redis.RedisUtils;
import com.alibaba.fastjson.JSON;
import org.apache.shiro.authz.AuthorizationInfo;
import org.apache.shiro.authz.SimpleAuthorizationInfo;
import org.apache.shiro.cache.Cache;
import org.springframework.beans.factory.annotation.Autowired;
import org.springframework.stereotype.Component;import java.util.Collection;
import java.util.List;
import java.util.Set;
import java.util.function.Function;
import java.util.stream.Collectors;
import java.util.stream.Stream;/*** @author 沐雨橙风ιε* @version 1.0*/
@Component
public class RedisCache implements Cache<Object, AuthorizationInfo> {private final RedisUtils redisUtils;@Autowiredpublic RedisCache(RedisUtils redisUtils) {this.redisUtils = redisUtils;}@Overridepublic SimpleAuthorizationInfo get(Object key) {String value = redisUtils.get(key.toString());return JSON.parseObject(value, SimpleAuthorizationInfo.class);}@Overridepublic AuthorizationInfo put(Object key, AuthorizationInfo value) {redisUtils.set(key.toString(), JSON.toJSONString(value));return value;}@Overridepublic SimpleAuthorizationInfo remove(Object key) {redisUtils.delete(key.toString());return null;}@Overridepublic void clear() {redisUtils.deleteByPattern(RedisKeyPrefixes.PREFIX_SHIRO_PERMISSIONS + "*");}@Overridepublic int size() {return keys().size();}@Overridepublic Set<Object> keys() {Set<String> keys = redisUtils.keys(RedisKeyPrefixes.PREFIX_SHIRO_PERMISSIONS + "*");Stream<String> stream = keys.stream();return stream.map(new Function<String, Object>() {@Overridepublic Object apply(String key) {return key;}}).collect(Collectors.toSet());}@Overridepublic Collection<AuthorizationInfo> values() {Set<Object> keys = keys();Stream<Object> stream = keys.stream();List<String> list = redisUtils.multiGet(stream.map(new Function<Object, String>() {@Overridepublic String apply(Object key) {return key.toString();}}).collect(Collectors.toSet()));return list.stream().map(new Function<Object, SimpleAuthorizationInfo>() {@Overridepublic SimpleAuthorizationInfo apply(Object value) {return JSON.parseObject(value.toString(), SimpleAuthorizationInfo.class);}}).collect(Collectors.toList());}}
ShiroConfig
因为要设置授权缓存的管理器,需要修改UsernameRealm的Bean定义方式。
@Bean
public UsernameRealm usernameRealm(RedisCache redisCache) {UsernameRealm usernameRealm = new UsernameRealm();usernameRealm.setAuthorizationCache(redisCache);return usernameRealm;
}
RedisKeyPrefixes.java
package cn.edu.sgu.www.shiro.consts;/*** Redis的key前缀的常量接口* @author 沐雨橙风ιε* @version 1.0*/
public interface RedisKeyPrefixes {/*** 应用名,所有key的统一前缀* 在所有key之前加上应用名,方便Redis的数据管理* 不同应用的key会通过前缀区分,做到数据隔离的效果*/String PREFIX_BASE = "springboot-shiro:";/*** Apache Shiro角色权限缓存的key前缀*/String PREFIX_SHIRO_PERMISSIONS = PREFIX_BASE + "shiro:permissions:";
}
UsernameRealm.java
删除类上的@Component注解,重写getAuthorizationCacheKey()方法,使用前缀+用户ID作为key
package cn.edu.sgu.www.shiro.support;import cn.edu.sgu.www.shiro.consts.ErrorMessages;
import cn.edu.sgu.www.shiro.consts.RedisKeyPrefixes;
import cn.edu.sgu.www.shiro.entity.User;
import cn.edu.sgu.www.shiro.mapper.RolePermissionMapper;
import cn.edu.sgu.www.shiro.mapper.UserMapper;
import cn.edu.sgu.www.shiro.mapper.UserRoleMapper;
import org.apache.shiro.authc.*;
import org.apache.shiro.authz.AuthorizationInfo;
import org.apache.shiro.authz.SimpleAuthorizationInfo;
import org.apache.shiro.realm.AuthorizingRealm;
import org.apache.shiro.subject.PrincipalCollection;
import org.springframework.beans.factory.annotation.Autowired;import java.util.HashSet;
import java.util.List;
import java.util.Set;/*** @author 沐雨橙风ιε* @version 1.0*/
public class UsernameRealm extends AuthorizingRealm {@Autowiredprivate UserMapper userMapper;@Autowiredprivate UserRoleMapper userRoleMapper;@Autowiredprivate RolePermissionMapper rolePermissionMapper;/*** 获取认证信息*/@Overridepublic AuthenticationInfo doGetAuthenticationInfo(AuthenticationToken authenticationToken) throws AuthenticationException {// 获取登录时提交的tokenUsernamePasswordToken token = (UsernamePasswordToken) authenticationToken;// 得到用户名String username = token.getUsername();// 根据用户名查询用户信息User user = userMapper.selectByUsername(username);// 查询结果为空,则说明用户不存在if (user == null) {throw new AuthenticationException(ErrorMessages.loginFail);} else if (user.isDisabled()) { // 账号被封禁,抛出异常throw new AuthenticationException("登录失败,账号状态异常!");}return new SimpleAuthenticationInfo(user, user.getPassword(), "usernameRealm");}/*** 获取授权信息*/@Overridepublic AuthorizationInfo doGetAuthorizationInfo(PrincipalCollection principals) {SimpleAuthorizationInfo authorizationInfo = new SimpleAuthorizationInfo();// 得到用户IDUser user = (User) principals.getPrimaryPrincipal();String userId = user.getId();// 查询用户的角色列表List<String> roleList = userRoleMapper.selectUserRoles(userId);if (!roleList.isEmpty()) {authorizationInfo.setRoles(new HashSet<>(roleList));Set<String> stringPermissions = new HashSet<>();for (String roleId : roleList) {// 查询角色的权限列表List<String> permissions = rolePermissionMapper.selectRolePermissions(roleId);if (!permissions.isEmpty()) {stringPermissions.addAll(permissions);}}if (!stringPermissions.isEmpty()) {authorizationInfo.setStringPermissions(stringPermissions);}}return authorizationInfo;}/*** 配置授权缓存的key* @param principals PrincipalCollection*/@Overridepublic String getAuthorizationCacheKey(PrincipalCollection principals) {User user = (User) principals.getPrimaryPrincipal();return RedisKeyPrefixes.PREFIX_SHIRO_PERMISSIONS + user.getId();}}
至此,授权缓存的问题就解决了。
密码安全问题
现在另外一个不容忽视的隐患是密码的安全问题,登录密码是直接明文存储在数据库的,对于这类高度敏感的信息,一般会采取加密的方式保证数据的安全性。
像密码这类信息,使用不可逆的加密方式会更合理,否则,安全问题依然存在。
这也就是为什么大部分APP忘记密码之后要求重置密码,应用本身也不知道你当时设置的密码是多少。
为了解决这个问题,需要查看前面AuthenticatingRealm的assertCredentialsMatch()方法。
CredentialsMatcher cm = getCredentialsMatcher();getCredentialsMatcher()方法也是返回一个当前类的成员变量。
public CredentialsMatcher getCredentialsMatcher() {return credentialsMatcher;
}
很显然,这里也能通过set方法设置这个密码匹配器。

创建密码匹配器
既然可以直接通过set方法设置这个密码匹配器,那么,我们就可以自定义验证密码的逻辑。
也就可以实现对密码的加密处理了,而不是原来的简单比较字符串内容。
PasswordEncoder.java
创建自己的密码加密器,使用MD5加密算法。
package cn.edu.sgu.www.shiro.support;import lombok.extern.slf4j.Slf4j;
import org.springframework.util.DigestUtils;import java.util.UUID;/*** 密码加密器* @author 沐雨橙风ιε* @version 1.0*/
@Slf4j
public class PasswordEncoder {/*** 对用户提供的密码进行加密* @param password 用户提供的密码* @return 加密后的密码*/public static String encode(String password) {// 生成随机盐String salt = UUID.randomUUID().toString().replace("-", "");String encodedPassword = password;encodedPassword = DigestUtils.md5DigestAsHex((salt + encodedPassword + salt + salt + encodedPassword + salt + salt + salt).getBytes());return salt + encodedPassword;}/*** 匹配密码* @param password 用户提供的密码* @param encodedPassword 加密后的密码* @return 密码匹配返回true,否则返回false*/public static boolean matches(String password, String encodedPassword) {String salt = null;try {// 获取盐salt = encodedPassword.substring(0, 32);} catch (StringIndexOutOfBoundsException e) {log.debug("密码格式错误:password = {}", encodedPassword);e.printStackTrace();}String newPassword = password;newPassword = DigestUtils.md5DigestAsHex((salt + newPassword + salt + salt + newPassword + salt + salt + salt).getBytes());newPassword = salt + newPassword;return newPassword.equals(encodedPassword);}public static void main(String[] args) {String password = "mhxy1218";System.out.println(encode(password));}}
PasswordMatcher.java
创建自定义的密码匹配器,通过调用密码加密器的matches()方法匹配密码。
package cn.edu.sgu.www.shiro.support;import cn.edu.sgu.www.shiro.consts.ErrorMessages;
import cn.edu.sgu.www.shiro.entity.User;
import org.apache.shiro.authc.AuthenticationException;
import org.apache.shiro.authc.AuthenticationInfo;
import org.apache.shiro.authc.AuthenticationToken;
import org.apache.shiro.authc.UsernamePasswordToken;
import org.apache.shiro.authc.credential.CredentialsMatcher;
import org.apache.shiro.subject.PrincipalCollection;
import org.springframework.stereotype.Component;/*** Apache Shiro密码匹配器* @author 沐雨橙风ιε* @version 1.0*/
@Component
public class PasswordMatcher implements CredentialsMatcher {@Overridepublic boolean doCredentialsMatch(AuthenticationToken authenticationToken, AuthenticationInfo authenticationInfo) {// 得到用户输入的密码UsernamePasswordToken token = (UsernamePasswordToken) authenticationToken;String password = new String(token.getPassword());// 得到数据库密码PrincipalCollection principals = authenticationInfo.getPrincipals();User user = (User) principals.getPrimaryPrincipal();String encodedPassword = user.getPassword();// 匹配密码if (!PasswordEncoder.matches(password, encodedPassword)) {throw new AuthenticationException(ErrorMessages.loginFail);}return true;}}
ShiroConfig.java
设置密码匹配器到Realm中。
@Bean
public UsernameRealm usernameRealm(PasswordMatcher passwordMatcher, RedisCache redisCache) {UsernameRealm usernameRealm = new UsernameRealm();usernameRealm.setAuthorizationCache(redisCache);usernameRealm.setCredentialsMatcher(passwordMatcher);return usernameRealm;
}
修改用户登录密码
运行PasswordEncoder的main()方法,生成通过密码加密器加密得到的密码,然后替换数据库中的用户登录密码。

自定义未授权逻辑
当访问未授权的资源时,Apache Shiro的过滤器会拦截请求,并返回401状态码。
通常,我们需要定义自己的处理逻辑,比如返回一个比较个性化的提示。
指定处理路径
Apache Shiro支持未授权时重定向到指定的URL,可以在Controller接口中处理未授权,返回包装后的响应数据。
ShiroConfig.java
/*** 配置Shiro过滤器工厂*/
@Bean
public ShiroFilterFactoryBean shiroFilter(DefaultWebSecurityManager securityManager) {ShiroFilterFactoryBean shiroFilterFactoryBean = new ShiroFilterFactoryBean();// 注册安全管理器shiroFilterFactoryBean.setSecurityManager(securityManager);/** 设置登录页面的地址* 当用户访问认证资源的时候,如果用户没有登录,那么就会跳转到该属性指定的页面*/shiroFilterFactoryBean.setLoginUrl("/login.html");/** 设置访问未授权资源时重定向的地址* 当用户访问需要指定权限才能访问的资源时,如果用户没有此权限,那么就会重定向到指定的页面*/shiroFilterFactoryBean.setUnauthorizedUrl("/user/unauthorized");// 定义资源访问规则Map<String, String> filterChainDefinitionMap = new LinkedHashMap<>();/** 过滤器说明* anon:不需要认证就可以访问的资源* authc:需要登录认证才能访问的资源* perms:需要指定权限才能访问的资源*/// 需要登录认证才能访问的资源filterChainDefinitionMap.put("/", "authc");filterChainDefinitionMap.put("/index.html", "authc");// 查询所有权限List<Permission> permissions = permissionMapper.selectPermissions();// 需要指定权限才能访问的资源for (Permission permission : permissions) {if (permission.getAnonymity() == 0) {filterChainDefinitionMap.put(permission.getUrl(), "perms[" + permission.getValue() + "]");} else {filterChainDefinitionMap.put(permission.getUrl(), "anon");}}shiroFilterFactoryBean.setFilterChainDefinitionMap(filterChainDefinitionMap);return shiroFilterFactoryBean;
}
UserController.java
@RequestMapping(path = "/unauthorized", method = RequestMethod.GET)
public JsonResult<Void> unauthorized() {throw new GlobalException(ResponseCode.UNAUTHORIZED, "正在访问未授权的资源!");
}
取消修改用户的权限,删除Redis中的权限缓存。
点击修改按钮,可以看到响应内容确实是UserController.unauthorized()方法的返回值。

自定义过滤器
除了指定未授权的处理路径,还可以通过滤器处理未授权的访问。
Shiro是通过PermissionsAuthorizationFilter这个过滤器处理授权访问资源的请求的,可以重写这个过滤器,然后覆盖设置到perms过滤器链中。
PermsFilter.java
package cn.edu.sgu.www.shiro.support;import cn.edu.sgu.www.shiro.restful.JsonResult;
import cn.edu.sgu.www.shiro.restful.ResponseCode;
import com.alibaba.fastjson.JSON;
import lombok.extern.slf4j.Slf4j;
import org.apache.shiro.web.filter.authz.PermissionsAuthorizationFilter;import javax.servlet.ServletRequest;
import javax.servlet.ServletResponse;
import javax.servlet.http.HttpServletRequest;
import javax.servlet.http.HttpServletResponse;
import java.io.IOException;
import java.io.PrintWriter;/*** 定义PermsFilter过滤器(覆盖shiro的perms过滤器)* @author 沐雨橙风ιε* @version 1.0*/
@Slf4j
public class PermsFilter extends PermissionsAuthorizationFilter {@Overridepublic boolean isAccessAllowed(ServletRequest req, ServletResponse resp, Object mappedValue) throws IOException {boolean accessAllowed = super.isAccessAllowed(req, resp, mappedValue);if (!accessAllowed) {// 获取request对象HttpServletRequest request = (HttpServletRequest) req;// 得到请求地址String requestURI = request.getRequestURI();String errorMessage = "正在访问未授权的资源:" + requestURI;log.debug(errorMessage);ResponseCode responseCode = ResponseCode.UNAUTHORIZED;// 获取response对象HttpServletResponse response = (HttpServletResponse) resp;response.setStatus(responseCode.getValue());response.setContentType("application/json;charset=UTF-8");// 构建返回对象JsonResult<Void> jsonResult = JsonResult.error(responseCode, errorMessage);try (PrintWriter writer = response.getWriter()) {writer.write(JSON.toJSONString(jsonResult));}}return true;}}
ShiroConfig.java
将PermsFilter设置到Shiro的过滤器链中,覆盖原来名字为perms的过滤器。
// 添加自定义过滤器
Map<String, Filter> filters = shiroFilterFactoryBean.getFilters();filters.put("perms", new PermsFilter());shiroFilterFactoryBean.setFilters(filters);