key:value形式的数据存储在Redis当中。
redis有16个数据库,下标为0-15,默认为0。
方式1:redis-cli -a password(默认密码为123456)
方式2:redis-cli
auth password (默认密码为123456)
exit
keys *
flushdb
flushall
select index (例如:select 0)
String类型操作
set key value(例如:set k1 100)
mset key value key value ...
get key (例如:get k1)
mget key key ...
del k1 k2...
strlen key
方式1:set key value EX seconds (例如:set a 100 EX 10)
方式2:set key value
expire key seconds
set key value
pexpire key seconds
ttl key
persist key
type key
incr key (若key存在则每次自动加1;若key不存在则自动创建,创建后的初始值为1)
incyby key increment (可通过increment指定每次递增的数值,若key存在则每次自动加increment;若key不存在则自动创建,创建后的初始值为指定的increment的数值)
decr key (若key存在则每次自动减1;若key不存在则自动创建,创建后的初始值为-1)
decrby key decrement (可通过decrement指定每次递减的数值,若key存在则每次自动减decrement;若key不存在则自动创建,创建后的初始值为指定的decrement的数值)
append key value (若key存在则追加value对应的值;若key不存在则自动创建,创建后的初始值为value)
Hash类型操作
RedisTemplate对象

--> 即如下依赖:
<dependency><groupId>org.springframework.boot</groupId><artifactId>spring-boot-starter-data-redis</artifactId>
</dependency>
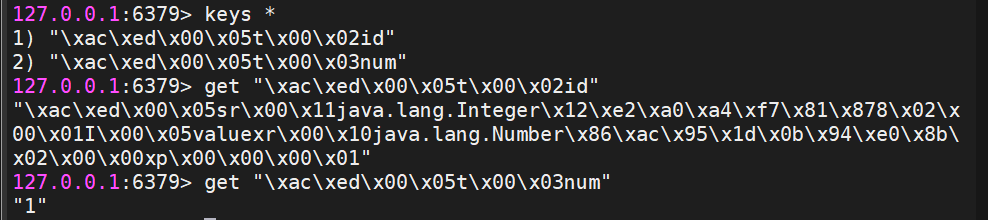
ValueOperations vo=redisTemplate.opsForValue();
vo.set("id","1"); //key和value都会默认采用JDK序列化的方式进行数据存储
String num=vo.increment("num"); //key不存在的时候会自动创建,key会采用JDK序列化的方式进行数据存储,value采用原有的类型进行存储,不会进行序列化存储
System.out.println(vo.get("id"));
System.out.println(num);
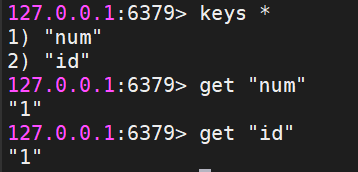
ValueOperations vo=redisTemplate.opsForValue();
redisTemplate.setKeySerializer(RedisSerializer.string());
redisTemplate.setValueSerializer(RedisSerializer.string());
vo.set("id","1");
vo.increment("num");
System.out.println(vo.get("id"));
System.out.println(vo.get("num"));
运行此段代码后,可在Linux中查看数据:
- 写一个外部类,以后写pojo类尽量都实现Serializable接口:
- IDEA自动生成序列化ID
java
@Data
@NoArgsConstructor
class Person implements Serializable {
private static final long serialVersionUID = 6625951768114336548L;
private int x;
private int y;
} |
3、写代码:
该处将value使用了json格式的序列化,应该添加如下的依赖(spring-web依赖里面有json格式序列化的方法):
java
<dependency>
<groupId>org.springframework.boot</groupId>
<artifactId>spring-boot-starter-web</artifactId>
</dependency> |
java
ValueOperations vo = redisTemplate.opsForValue();
redisTemplate.setKeySerializer(RedisSerializer.string());
redisTemplate.setValueSerializer(RedisSerializer.json()); //这里person是一个对象,应该使用json();如果使用string()的话,下面应改为vo.set("person","person");Linux中获取到的是person字符串,而不是赋的值。
Person person = new Person();
person.setX(1);
person.setY(2);
vo.set("person", person);
Object obj = vo.get("person");
System.out.println(obj); |
RedisTemplate定制的序列化和反序列化方法
- 通过添加全局配置类实现将key进行string类型的序列化,将value进行json类型的序列化。
- 代码:在base->config下面新建一个RedisConfig的类,添加@Configuration注解,@Bean注解。
- 添加上面提到的redis和spring-web依赖。
java
@Configuration
public class RedisConfig {
@Bean
public RedisTemplate redisTemplate(RedisConnectionFactory redisConnectionFactory) {
RedisTemplate redisTemplate = new RedisTemplate();
redisTemplate.setConnectionFactory(redisConnectionFactory);
redisTemplate.setKeySerializer(RedisSerializer.string());
redisTemplate.setValueSerializer(RedisSerializer.json());
redisTemplate.setHashKeySerializer(RedisSerializer.string());
redisTemplate.setHashValueSerializer(RedisSerializer.json());
return redisTemplate;
}
} |
Redis缓存测试

通过上述操作可以发现仍然可以读取到k2的数值,这是因为通过redis-cli shutdown这种方式去停掉redis,其实是一种安全退出的模式,redis在退出的时候会将内存中的数据立即生成一份完整的rdb快照,通过redis日志可以直观地看出RDB缓存。

使用shutdown命令停掉redis之后可以通过redis-server /usr/local/redis/conf/redis.conf命令重启redis
窗口1命令:

窗口2命令:

窗口3日志:

通过三个窗口的操作,我们可以看出使用kill -9 端口号进行暴力杀死进程后导致后台无法保存尚未保存的数据。
Redis架构设计
主从架构

本次实战,我们设计1个master挂3个slave的主从架构,具体实现过程如下:
第一步:创建主节点(master)的配置文件,名字为redis-6379.conf
Java
# 在redis.conf目录下执行
cp redis.conf redis-6379.conf #假如原有的redis.conf不想要了,则可以执行mv redis.conf redis-6379.conf |
第二步:修改redis-6379.conf文件内容,具体内容如下:
Java
# 将bind 127.0.0.1 -::1 修改为bind 0.0.0.0 (这里的四个0表示任意的ip地址)
bind 0.0.0.0
# 将protected-mode的默认值yes修改为no
protected-mode no
# 默认端口6379
port 6379
# pidfile 的值不变
pidfile /usr/local/redis/logs/redis_6379.pid
# 设置数据目录(这个目录需要我们手动自己创建)
dir /usr/local/redis/data/6379
# 日志文件
logfile '/usr/local/redis/logs/redis-6379.log'
# 设置redis的登录密码
requirepass 123456
# 主节点认证
masterauth 123456 |
第三步:创建从节点redis-6380.conf配置文件(cp redis-6379.conf redis-6380.conf),其修改的内容如下:
Java
# 将bind 127.0.0.1 -::1 修改为bind 0.0.0.0 (这里的四个0表示任意的ip地址)
bind 0.0.0.0
# 将protected-mode的默认值yes修改为no
protected-mode no
# 修改端口为6380
port 6380
# pidfile 的值不变
pidfile /usr/local/redis/logs/redis_6380.pid
# 设置数据目录
dir /usr/local/redis/data/6380
# 日志文件
logfile '/usr/local/redis/logs/redis-6380.log'
# 设置redis的登录密码
requirepass 123456
# 主节点认证
masterauth 123456
# 设置要连接的master的ip和端口
replicaof 192.168.8.100 6379 |
第四步:创建从节点redis-6381.conf配置文件(cp redis-6380.conf redis-6381.conf),其修改的内容如下:
Java
# 将bind 127.0.0.1 -::1 修改为bind 0.0.0.0 (这里的四个0表示任意的ip地址)
bind 0.0.0.0
# 将protected-mode的默认值yes修改为no
protected-mode no
# 修改端口为6381
port 6381
# pidfile 的值不变
pidfile /usr/local/redis/logs/redis_6381.pid
# 设置数据目录
dir /usr/local/redis/data/6381
# 日志文件
logfile '/usr/local/redis/logs/redis-6381.log'
# 设置redis的登录密码
requirepass 123456
# 主节点认证
masterauth 123456
# 设置要连接的master的ip和端口
replicaof 192.168.8.100 6379 |
第五步:创建从节点redis-6382.conf配置文件(cp redis-6381.conf redis-6382.conf),其修改的内容如下:
Java
# 将bind 127.0.0.1 -::1 修改为bind 0.0.0.0 (这里的四个0表示任意的ip地址)
bind 0.0.0.0
# 将protected-mode的默认值yes修改为no
protected-mode no
# 修改端口为6382
port 6382
# pidfile 的值不变
pidfile /usr/local/redis/logs/redis_6382.pid
# 设置数据目录
dir /usr/local/redis/data/6382
# 日志文件
logfile '/usr/local/redis/logs/redis-6382.log'
# 设置redis的登录密码
requirepass 123456
# 主节点认证
masterauth 123456
# 设置要连接的master的ip和端口
replicaof 192.168.8.100 6379 |
第六步:启动主从节点服务(可以打开多个窗口,在不同窗口启动不同服务)
Java
redis-server /usr/local/redis/conf/redis-6379.conf #主节点服务
redis-server /usr/local/redis/conf/redis-6380.conf
redis-server /usr/local/redis/conf/redis-6381.conf
redis-server /usr/local/redis/conf/redis-6382.conf |
第七步:登录主节点,并检查主从架构状态
Java
[root@JSD-Services ~]# redis-cli -p 6379
127.0.0.1:6379> auth 123456
OK
127.0.0.1:6379> info replication
# Replication
role:master
connected_slaves:3
slave0:ip=192.168.8.100,port=6380,state=online,offset=84,lag=1
slave1:ip=192.168.8.100,port=6381,state=online,offset=84,lag=1
slave2:ip=192.168.8.100,port=6382,state=online,offset=84,lag=1
master_failover_state:no-failover
master_replid:a1a3412199ada0e96d2097fc2d67dc2b323ee439
master_replid2:0000000000000000000000000000000000000000
master_repl_offset:84
second_repl_offset:-1
repl_backlog_active:1
repl_backlog_size:1048576
repl_backlog_first_byte_offset:1
repl_backlog_histlen:84 |
第八步:在主节点写入数据,检查从节点是否可以读取到数据;在任意一个从节点写入数据,检查主节点和其它从节点是否可以读取到数据
经检验都是可以实现的。
哨兵模式
Redis缓存穿透,缓存击穿,缓存雪崩
缓存穿透:
问题描述:
用户查询某一个数据,但该数据不存在于redis内存数据库中(缓存没有命中),这时候就会向持久层数据库查询,但持久层数据库也没有该数据,于是本次查询失败,若用户很多时,他们查询的数据不存在于redis内存数据库中(缓存没有命中),于是都去请求了持久层数据库,这样就会给持久层数据库带来很大的压力,这种大量不走redis内存数据库的现象就叫缓存穿透。
解决方案:
- 布隆过滤器(BloomFilter)
在控制层对请求先进行校验,不符合条件的请求则被丢弃,从而避免对持久层数据库造成的查询压力。
- 缓存空对象
当查询的数据不存在于redis中时,请求到了持久层数据库中去查询数据,但查询不出数据,这时会返回空对象,同时把该空对象缓存到redis里,然后设置一个过期时间,往后只要再次请求查询该条数据,该条数据都会从redis中获取(获取redis返回的空对象),从而保护了后端的数据源。
缺点:
- 因为空对象能被缓存起来,而有些请求有可能查询不出数据,所以过程中可能产生大量的返回空对象然后被redis缓存的现象,而这意味着redis需要更多的空间来存储更多的键。
- 即使对空对象设置了过期时间,但如果在redis的空对象在未过时的情况下,持久层数据库已经有了对应的数据,而redis对应的键的值仍是空对象,这时请求查询出的仍是空对象,而不是持久层里已经有的数据,而这种情况对于需要保持数据一致性的业务会造成影响。
缓存击穿:
问题描述:
redis里的一个key非常热点,导致大并发集中对这个key不断的进行访问,当在这个key过期的瞬间,持续的大并发就会跳过缓存,直接作用在持久层数据库上,请求在访问持久层数据库查询数据的同时,持久层数据库也需要回写缓存,这时候就会导致持久层数据库瞬间压力过大导致服务器宕机,这种现象就叫做缓存击穿。
解决方案:
- 设置热点key永不过期。
- 加互斥锁:使用分布式锁在redis和持久层数据库之间加锁,让每次查询都能保证只有一个线程进去,其他线程等待,这样做就能保证对于每一个key同时只能有一个线程去查询后端持久层数据库,而其他线程没有分布式锁的权限,所以只能等待,这种解决方案把高并发的压力转移到了分布式锁身上,但同时也加大了对分布式锁的考验。
缓存雪崩:
问题描述:
在某一时间段,一批key集中过期失效或者redis宕机,导致大量的请求作用在持久层数据库上,导致持久层数据库挂掉。
解决方案:
- redis高可用:redis集群搭建
- 限流降级:通过加锁或队列来控制读取持久层数据库的线程数量,例如通过对某个key加锁来保证只有一个线程对该key进行读和写,其他线程则需要等待。
- 数据预热:在正式部署前把可能被大量访问的数据先访问一遍,这些被访问的数据就会被加载到缓存中,在正式的大量访问到来之后减轻持久层数据库的压力;在发生大并发访问前手动触发加载缓存所需要的key,并给这些key设置不同的过期时间,让key失效的时间点尽量均匀开来,避免缓存雪崩。
综合案例
案例描述:
基于数据库中字典项表的设计,实现CRUD,基于本地缓存、Redis缓存提高查询的效率,并保证数据的一致性。
案例实现:
步骤一:建立数据库/数据表
sql
create database db_system if not exits;
drop table if exists sys_dict_type;
create table sys_dict_type
(
dict_id bigint(20) not null auto_increment comment '字典主键',
dict_name varchar(100) default '' comment '字典名称',
dict_type varchar(100) default '' comment '字典类型',
status char(1) default '0' comment '状态(0正常 1停用)',
create_by varchar(64) default '' comment '创建者',
create_time datetime comment '创建时间',
update_by varchar(64) default '' comment '更新者',
update_time datetime comment '更新时间',
remark varchar(500) default null comment '备注',
primary key (dict_id),
unique (dict_type)
) engine=innodb auto_increment=100 comment = '字典类型表';
insert into sys_dict_type values(1, '用户性别', 'sys_user_sex', '0', 'admin', sysdate(), '', null, '用户性别列表');
insert into sys_dict_type values(2, '菜单状态', 'sys_show_hide', '0', 'admin', sysdate(), '', null, '菜单状态列表');
insert into sys_dict_type values(3, '系统开关', 'sys_normal_disable', '0', 'admin', sysdate(), '', null, '系统开关列表');
insert into sys_dict_type values(4, '任务状态', 'sys_job_status', '0', 'admin', sysdate(), '', null, '任务状态列表');
insert into sys_dict_type values(5, '任务分组', 'sys_job_group', '0', 'admin', sysdate(), '', null, '任务分组列表');
insert into sys_dict_type values(6, '系统是否', 'sys_yes_no', '0', 'admin', sysdate(), '', null, '系统是否列表');
insert into sys_dict_type values(7, '通知类型', 'sys_notice_type', '0', 'admin', sysdate(), '', null, '通知类型列表');
insert into sys_dict_type values(8, '通知状态', 'sys_notice_status', '0', 'admin', sysdate(), '', null, '通知状态列表');
insert into sys_dict_type values(9, '操作类型', 'sys_oper_type', '0', 'admin', sysdate(), '', null, '操作类型列表');
insert into sys_dict_type values(10, '系统状态', 'sys_common_status', '0', 'admin', sysdate(), '', null, '登录状态列表'); |
步骤二:引入项目依赖

pom.xml
xml
<?xml version="1.0" encoding="UTF-8"?>
<project xmlns="http://maven.apache.org/POM/4.0.0" xmlns:xsi="http://www.w3.org/2001/XMLSchema-instance"
xsi:schemaLocation="http://maven.apache.org/POM/4.0.0 https://maven.apache.org/xsd/maven-4.0.0.xsd">
<modelVersion>4.0.0</modelVersion>
<groupId>com.example</groupId>
<artifactId>redis_dictionary</artifactId>
<version>0.0.1-SNAPSHOT</version>
<name>redis_dictionary</name>
<description>redis_dictionary</description>
<properties>
<java.version>1.8</java.version>
<project.build.sourceEncoding>UTF-8</project.build.sourceEncoding>
<project.reporting.outputEncoding>UTF-8</project.reporting.outputEncoding>
<spring-boot.version>2.7.6</spring-boot.version>
</properties>
<dependencies>
<dependency>
<groupId>org.springframework.boot</groupId>
<artifactId>spring-boot-starter-web</artifactId>
</dependency>
<dependency>
<groupId>org.mybatis.spring.boot</groupId>
<artifactId>mybatis-spring-boot-starter</artifactId>
<version>2.3.0</version>
</dependency>
<dependency>
<groupId>com.mysql</groupId>
<artifactId>mysql-connector-j</artifactId>
<scope>runtime</scope>
</dependency>
<dependency>
<groupId>org.projectlombok</groupId>
<artifactId>lombok</artifactId>
<optional>true</optional>
</dependency>
<dependency>
<groupId>org.springframework.boot</groupId>
<artifactId>spring-boot-starter-test</artifactId>
<scope>test</scope>
</dependency>
<!--本地缓存-->
<dependency>
<groupId>com.github.ben-manes.caffeine</groupId>
<artifactId>caffeine</artifactId>
</dependency>
<!--redis缓存-->
<dependency>
<groupId>org.springframework.boot</groupId>
<artifactId>spring-boot-starter-data-redis</artifactId>
</dependency>
</dependencies>
<dependencyManagement>
<dependencies>
<dependency>
<groupId>org.springframework.boot</groupId>
<artifactId>spring-boot-dependencies</artifactId>
<version>${spring-boot.version}</version>
<type>pom</type>
<scope>import</scope>
</dependency>
</dependencies>
</dependencyManagement>
<build>
<plugins>
<plugin>
<groupId>org.apache.maven.plugins</groupId>
<artifactId>maven-compiler-plugin</artifactId>
<version>3.8.1</version>
<configuration>
<source>1.8</source>
<target>1.8</target>
<encoding>UTF-8</encoding>
</configuration>
</plugin>
<plugin>
<groupId>org.springframework.boot</groupId>
<artifactId>spring-boot-maven-plugin</artifactId>
<version>${spring-boot.version}</version>
<configuration>
<mainClass>com.example.redis_dictionary.RedisDictionaryApplication</mainClass>
<skip>true</skip>
</configuration>
<executions>
<execution>
<id>repackage</id>
<goals>
<goal>repackage</goal>
</goals>
</execution>
</executions>
</plugin>
</plugins>
</build>
</project> |
步骤三:添加全局配置
application.properties
Properties
server.port=8080
spring.datasource.url=jdbc:mysql://localhost:3306/db_system?allowPublicKeyRetrieval=true&useSSL=true&serverTimezone=Asia/Shanghai
spring.datasource.username=root
spring.datasource.password=123456
mybatis.mapper-locations=classpath:mappers/*.xml
mybatis.configuration.map-underscore-to-camel-case=true
logging.level.com.example=INFO
logging.level.org.springframework.cache=TRACE
logging.level.com.github.benmanes.caffeine=DEBUG
spring.redis.host=192.168.8.100
spring.redis.port=6379
spring.redis.password=123456 |
步骤四:添加配置类
Cache.config
java
package com.example.redis_dictionary.base.config;
import com.github.benmanes.caffeine.cache.Caffeine;
import org.springframework.cache.CacheManager;
import org.springframework.cache.caffeine.CaffeineCacheManager;
import org.springframework.context.annotation.Bean;
import org.springframework.context.annotation.Configuration;
import java.util.concurrent.TimeUnit;
@Configuration
public class CacheConfig {
//设置本地缓存的最大容量为5000,过期时间为10分钟
@Bean
public CacheManager cacheManager() {
CaffeineCacheManager cacheManager =
new CaffeineCacheManager();
cacheManager.setCaffeine(Caffeine.newBuilder()
.maximumSize(5000)
.expireAfterWrite(10, TimeUnit.MINUTES));
return cacheManager;
}
} |
Redis.config
java
package com.example.redis_dictionary.base.config;
import org.springframework.context.annotation.Bean;
import org.springframework.context.annotation.Configuration;
import org.springframework.data.redis.connection.RedisConnectionFactory;
import org.springframework.data.redis.core.RedisTemplate;
import org.springframework.data.redis.serializer.RedisSerializer;
@Configuration
public class RedisConfig {
@Bean
public RedisTemplate redisTemplate(RedisConnectionFactory redisConnectionFactory) {
RedisTemplate redisTemplate = new RedisTemplate();
redisTemplate.setConnectionFactory(redisConnectionFactory);
redisTemplate.setKeySerializer(RedisSerializer.string());
redisTemplate.setValueSerializer(RedisSerializer.json());
redisTemplate.setHashKeySerializer(RedisSerializer.string());
redisTemplate.setHashValueSerializer(RedisSerializer.json());
return redisTemplate;
}
} |
JsonResult.java
java
package com.example.redis_dictionary.base;
import lombok.AllArgsConstructor;
import lombok.Data;
import lombok.NoArgsConstructor;
@Data
@AllArgsConstructor
@NoArgsConstructor
public class JsonResult {
private Integer code = 0;
private String message = "ok";
private Object data;
public JsonResult(Integer code, String message) {
this.code = code;
this.message = message;
}
public JsonResult(Object data) {
this.data = data;
}
} |
步骤五:创建实体类
Dict.java
java
package com.example.redis_dictionary.pojo.entity;
import lombok.AllArgsConstructor;
import lombok.Data;
import lombok.NoArgsConstructor;
import java.io.Serializable;
import java.time.LocalDateTime;
@Data
@AllArgsConstructor
@NoArgsConstructor
public class Dict implements Serializable {
private static final long serialVersionUID = 5385654745413557337L;
private Long dictId;
private String dictName;
private String dictType;
private String status;
private String createBy;
private String updateBy;
private String remark;
} |
步骤六:创建Mapper
DictMapper.java
Java
package com.example.redis_dictionary.mapper;
import com.example.redis_dictionary.pojo.entity.Dict;
import org.apache.ibatis.annotations.Mapper;
@Mapper
public interface DictMapper {
int insert(Dict dict);
Dict selectById(Long id);
} |
步骤七:创建xml
DictMapper.xml
xml
<?xml version="1.0" encoding="UTF-8" ?>
<!DOCTYPE mapper
PUBLIC "-//mybatis.org//DTD Mapper 3.0//EN"
"https://mybatis.org/dtd/mybatis-3-mapper.dtd">
<mapper namespace="com.example.redis_dictionary.mapper.DictMapper">
<select id="selectById" resultType="com.example.redis_dictionary.pojo.entity.Dict">
select * from sys_dict_type where dict_id=#{dictId}
</select>
<insert id="insert"
keyProperty="dictId"
useGeneratedKeys="true"
parameterType="com.example.redis_dictionary.pojo.entity.Dict">
insert into sys_dict_type(dict_name,dict_type,status,create_by,update_by,remark)
values(#{dictName},#{dictType},#{status},#{createBy},#{updateBy},#{remark})
</insert>
</mapper> |
步骤八:创建Service
DictService.java
java
package com.example.redis_dictionary.service;
import com.example.redis_dictionary.pojo.entity.Dict;
public interface DictService {
Dict selectById(Long dictId);
int saveDict(Dict dictType);
} |
步骤九:创建ServiceImpl
DictServiceImpl.java
java
package com.example.redis_dictionary.service.impl;
import com.example.redis_dictionary.mapper.DictMapper;
import com.example.redis_dictionary.pojo.entity.Dict;
import com.example.redis_dictionary.service.DictService;
import org.springframework.beans.factory.annotation.Autowired;
import org.springframework.cache.Cache;
import org.springframework.cache.CacheManager;
import org.springframework.data.redis.core.RedisTemplate;
import org.springframework.data.redis.core.ValueOperations;
import org.springframework.stereotype.Service;
import org.springframework.transaction.annotation.Isolation;
import org.springframework.transaction.annotation.Propagation;
import org.springframework.transaction.annotation.Transactional;
//事务注解
@Transactional(readOnly = false,
rollbackFor = Exception.class,
isolation = Isolation.READ_COMMITTED,
propagation = Propagation.REQUIRED)
@Service
public class DictServiceImpl implements DictService {
@Autowired
private DictMapper dictMapper;
//redis缓存
@Autowired
private RedisTemplate redisTemplate;
//本地缓存
@Autowired
private CacheManager cacheManager;
@Transactional(readOnly = true)
@Override
public Dict selectById(Long dictId) {
String key = "dict:" + dictId;
//从本地缓存中获取数据
Cache cache = cacheManager.getCache("dictCache");
assert cache != null;
Dict dict = cache.get(key, Dict.class);
if (dict!= null) {
return dict;
}
//从redis缓存中获取数据
ValueOperations vo = redisTemplate.opsForValue();
dict = (Dict) vo.get(key);
if (dict != null) {
cache.put(key, dict);
return dict;
}
dict=dictMapper.selectById(dictId);
cache.put(key, dict);
vo.set(key, dict);
return dict;
}
@Override
public int saveDict(Dict dictType) {
return 0;
}
} |
步骤十:创建Controller
DictController.java
Java
package com.example.redis_dictionary.controller;
import com.example.redis_dictionary.base.JsonResult;
import com.example.redis_dictionary.service.DictService;
import org.springframework.beans.factory.annotation.Autowired;
import org.springframework.web.bind.annotation.GetMapping;
import org.springframework.web.bind.annotation.PathVariable;
import org.springframework.web.bind.annotation.RestController;
@RestController
public class DictController {
@Autowired
private DictService dictService;
@GetMapping("/dict/{id}")
public JsonResult selectById(@PathVariable("id") Long dictId) {
return new JsonResult(dictService.selectById(dictId));
}
} |
步骤十一:创建HttpClient进行测试
dict-api-rest.http
HTTP
###
GET http://localhost:8080/dict/1 |
步骤十二:断点测试
在DictServiceImpl.java中添加断点测试缓存是否生效
第一次:本地缓存为NULL,Redis缓存为NULL,执行数据库查询;
第二次:本地缓存存在数据,直接执行本地缓存查询,返回数据。
业务加强:
问题描述:
用户查询某一个数据,但该数据不存在于redis内存数据库中(缓存没有命中),这时候就会向持久层数据库查询,但持久层数据库也没有该数据,于是本次查询失败,若用户很多时,他们查询的数据不存在于redis内存数据库中(缓存没有命中),于是都去请求了持久层数据库,这样就会给持久层数据库带来很大的压力,这种大量不走redis内存数据库的现象就叫缓存穿透,为了解决缓存穿透的问题,我们可以通过设置布隆过滤器来解决。
问题解决:
步骤一:添加布隆过滤器对应的pom依赖
xml
<!--hutool 工具包-->
<dependency>
<groupId>cn.hutool</groupId>
<artifactId>hutool-all</artifactId>
<version>5.8.31</version>
</dependency> |
步骤二:在CacheConfig中添加布隆过滤器配置
Java
@Bean
public BloomFilter bloomFilter(){
BitMapBloomFilter filter=
new BitMapBloomFilter(500);//设置过滤器大小为500
filter.add("dict:1");//这里可以存储一个key,用于测试,实际做了添加就不用了
return filter;
} |
步骤三:在DictServiceImpl中添加布隆过滤器过滤数据逻辑
Java
@Autowired
private BloomFilter bloomFilter;
@Override
public Dict selectById(Long dictId) {
String key = "dict:" + dictId;
//使用布隆过滤器判断key是否存在,防止缓存击穿
if (!bloomFilter.contains(key)) {
return null;
}
//从本地缓存中获取数据
Cache cache = cacheManager.getCache("dictCache");
assert cache != null;
Dict dict = cache.get(key, Dict.class);
if (dict!= null) {
return dict;
}
//从redis缓存中获取数据
ValueOperations vo = redisTemplate.opsForValue();
dict = (Dict) vo.get(key);
if (dict != null) {
cache.put(key, dict);
return dict;
}
dict=dictMapper.selectById(dictId);
cache.put(key, dict);
vo.set(key, dict);
return dict;
} |
消息队列
List实现
步骤一:创建ListQueueService
typescript
package com.example.redis_dictionary.service;
import org.springframework.beans.factory.annotation.Autowired;
import org.springframework.data.redis.core.RedisTemplate;
import org.springframework.stereotype.Service;
@Service
public class ListQueueService {
@Autowired
private RedisTemplate redisTemplate;
//左侧入队
public void enqueue(String key, Object value) {
redisTemplate.opsForList().leftPush(key, value);
}
//右侧出队
public Object dequeue(String key) {
return redisTemplate.opsForList().rightPop(key);
}
} |
步骤二:测试分析
typescript
package com.example.redis_dictionary;
import com.example.redis_dictionary.service.ListQueueService;
import com.fasterxml.jackson.annotation.JsonSubTypes;
import org.junit.jupiter.api.Test;
import org.springframework.beans.factory.annotation.Autowired;
import org.springframework.boot.test.context.SpringBootTest;
@SpringBootTest
public class ListQueueTest {
@Autowired
private ListQueueService listQueueService;
@Test
//测试入队
public void testEnqueue() {
listQueueService.enqueue("test", "value1");
listQueueService.enqueue("test", "value2");
listQueueService.enqueue("test", "value3");
}
@Test
//测试出队
public void testDequeue() {
System.out.println(listQueueService.dequeue("test"));
System.out.println(listQueueService.dequeue("test"));
System.out.println(listQueueService.dequeue("test"));
}
} |
发布订阅
步骤一:创建Service对象
typescript
package com.example.redis_dictionary.service;
import org.springframework.beans.factory.annotation.Autowired;
import org.springframework.data.redis.core.RedisTemplate;
import org.springframework.stereotype.Service;
@Service
public class PubSubService {
@Autowired
private RedisTemplate redisTemplate;
//向指定频道发布消息
public void publish(String channel, String message) {
redisTemplate.convertAndSend(channel, message);
}
} |
步骤二:消息监听对象
java
package cn.tedu.dictionary.service.listener;
import org.springframework.data.redis.connection.Message;
import org.springframework.data.redis.connection.MessageListener;
import org.springframework.stereotype.Component;
@Component
public class PubSubMessageListener implements MessageListener {
public PubSubMessageListener() {
System.out.println("PubSubMessageListener()");
}
@Override
public void onMessage(Message message, byte[] pattern) {
System.out.println("channel:"+new String(message.getChannel()));
System.out.println("message:"+new String(message.getBody()));
}
} |
步骤三:RedisConfig对象
java
@Bean
public RedisMessageListenerContainer container(RedisConnectionFactory factory,
MessageListener messageListener) {
RedisMessageListenerContainer container = new RedisMessageListenerContainer();
container.setConnectionFactory(factory);
//只能监听一个通道
// container.addMessageListener(messageListener, new ChannelTopic("channel"));
//可以监听多个通道
container.addMessageListener(messageListener,new PatternTopic("channel.*"));
return container;
} |
步骤四:Controller对象
typescript
package com.example.redis_dictionary.controller;
import com.example.redis_dictionary.base.JsonResult;
import com.example.redis_dictionary.service.PubSubService;
import org.springframework.beans.factory.annotation.Autowired;
import org.springframework.web.bind.annotation.PathVariable;
import org.springframework.web.bind.annotation.PostMapping;
import org.springframework.web.bind.annotation.RestController;
@RestController
public class MessageController {
@Autowired
private PubSubService pubSubService;
@PostMapping("/publish/{channel}/{message}")
public JsonResult publish(@PathVariable String channel, @PathVariable Object message)
{
System.out.println("channel="+channel);
System.out.println("message="+message);
pubSubService.publish(channel,message);
return new JsonResult();
}
} |
步骤五:创建HttpClient进行测试
HTTP
###
POST http://localhost:8080/publish/channel1/hello wu laoshi
Content-Type: application/json
{
}
###
POST http://localhost:8080/publish/channel2/hello world
Content-Type: application/json
{
} |
对比分析
特性 | List(点对点对列) | Pub/Sub(发布订阅) |
消息模型 | 点对点(P2P),消息被消费后即删除 | 广播式,消息发送给所有订阅者 |
消费者行为 | 主动拉取(Pull) | 被动接收推送(Push) |
是否需要监听器 | 否(依赖阻塞命令) | 是(需持续监听频道) |
消息持久化 | 支持(消息保留至被消费) | 不支持(瞬时传递,无存储) |
适用场景 | 任务队列、顺序消费 | 实时通知、事件广播(如聊天室) |