Nginx 自动化脚本安装方案
以下是 Nginx 自动化脚本安装方案,支持多种 Linux 发行版和安装方式:
📦 Nginx 一键安装脚本
脚本功能:
-
✅ 自动检测系统类型和版本
-
✅ 支持官方源、发行版源、编译安装
-
✅ 自动配置防火墙
-
✅ 启用基础安全配置
-
✅ SSL证书自动配置(可选)
🔧 完整安装脚本
#!/bin/bash
# Nginx 自动安装脚本
# 支持: CentOS/RHEL/Ubuntu/Debian/Amazon Linux
set -e
# 颜色定义
RED='\033[0;31m'
GREEN='\033[0;32m'
YELLOW='\033[1;33m'
BLUE='\033[0;34m'
NC='\033[0m'
# 输出函数
log_info() { echo -e "${GREEN}[INFO]${NC} $1"; }
log_warn() { echo -e "${YELLOW}[WARN]${NC} $1"; }
log_error() { echo -e "${RED}[ERROR]${NC} $1"; }
log_debug() { echo -e "${BLUE}[DEBUG]${NC} $1"; }
# 检测系统
detect_os() {if [ -f /etc/os-release ]; then. /etc/os-releaseOS=$IDVER=$VERSION_IDelseOS=$(uname -s)VER=$(uname -r)filog_info "操作系统: $OS $VER"
}
# 安装依赖
install_dependencies() {log_info "安装依赖包..."case $OS inubuntu|debian)apt-get updateapt-get install -y curl wget gnupg2 lsb-release;;centos|rhel|amzn|fedora)if command -v dnf >/dev/null 2>&1; thendnf install -y curl wgetelseyum install -y curl wgetfi;;*)log_error "不支持的Linux发行版: $OS"exit 1;;esac
}
# 方法1: 使用官方源安装
install_nginx_official() {log_info "使用Nginx官方源安装..."case $OS inubuntu|debian)# 添加Nginx官方签名密钥wget -O /tmp/nginx_signing.key https://nginx.org/keys/nginx_signing.keyapt-key add /tmp/nginx_signing.key# 添加官方源echo "deb https://nginx.org/packages/mainline/ubuntu/ $(lsb_release -cs) nginx" > /etc/apt/sources.list.d/nginx.listecho "deb-src https://nginx.org/packages/mainline/ubuntu/ $(lsb_release -cs) nginx" >> /etc/apt/sources.list.d/nginx.listapt-get updateapt-get install -y nginx;;centos|rhel|amzn|fedora)# 创建官方源文件cat > /etc/yum.repos.d/nginx.repo << EOF
[nginx-stable]
name=nginx stable repo
baseurl=https://nginx.org/packages/centos/\$releasever/\$basearch/
gpgcheck=1
enabled=1
gpgkey=https://nginx.org/keys/nginx_signing.key
module_hotfixes=true
[nginx-mainline]
name=nginx mainline repo
baseurl=https://nginx.org/packages/mainline/centos/\$releasever/\$basearch/
gpgcheck=1
enabled=0
gpgkey=https://nginx.org/keys/nginx_signing.key
module_hotfixes=true
EOFif command -v dnf >/dev/null 2>&1; thendnf install -y nginxelseyum install -y nginxfi;;esac
}
# 方法2: 使用发行版源安装
install_nginx_distro() {log_info "使用发行版源安装Nginx..."case $OS inubuntu|debian)apt-get updateapt-get install -y nginx;;centos|rhel)if command -v dnf >/dev/null 2>&1; thendnf install -y nginxelseyum install -y nginxfi;;amzn)amazon-linux-extras install -y nginx1;;esac
}
# 方法3: 编译安装
compile_nginx() {log_info "开始编译安装Nginx..."# 安装编译依赖case $OS inubuntu|debian)apt-get install -y build-essential libpcre3 libpcre3-dev zlib1g zlib1g-dev libssl-dev;;centos|rhel|amzn|fedora)if command -v dnf >/dev/null 2>&1; thendnf groupinstall -y "Development Tools"dnf install -y pcre-devel zlib-devel openssl-develelseyum groupinstall -y "Development Tools"yum install -y pcre-devel zlib-devel openssl-develfi;;esac# 下载源码NGINX_VERSION="1.24.0"cd /tmpwget https://nginx.org/download/nginx-${NGINX_VERSION}.tar.gztar -xzf nginx-${NGINX_VERSION}.tar.gzcd nginx-${NGINX_VERSION}# 编译配置./configure \--prefix=/usr/local/nginx \--sbin-path=/usr/sbin/nginx \--conf-path=/etc/nginx/nginx.conf \--error-log-path=/var/log/nginx/error.log \--http-log-path=/var/log/nginx/access.log \--pid-path=/var/run/nginx.pid \--lock-path=/var/run/nginx.lock \--http-client-body-temp-path=/var/cache/nginx/client_temp \--http-proxy-temp-path=/var/cache/nginx/proxy_temp \--http-fastcgi-temp-path=/var/cache/nginx/fastcgi_temp \--user=nginx \--group=nginx \--with-http_ssl_module \--with-http_realip_module \--with-http_addition_module \--with-http_sub_module \--with-http_gunzip_module \--with-http_gzip_static_module \--with-http_random_index_module \--with-http_secure_link_module \--with-http_stub_status_module \--with-http_auth_request_module \--with-threads \--with-stream \--with-stream_ssl_module \--with-mail \--with-mail_ssl_module# 编译安装make && make install# 创建nginx用户和目录useradd -r -s /bin/false nginxmkdir -p /var/cache/nginx/client_temp /var/log/nginxchown -R nginx:nginx /var/cache/nginx /var/log/nginx# 创建systemd服务cat > /etc/systemd/system/nginx.service << EOF
[Unit]
Description=The nginx HTTP and reverse proxy server
After=network.target
[Service]
Type=forking
PIDFile=/var/run/nginx.pid
ExecStartPre=/usr/sbin/nginx -t
ExecStart=/usr/sbin/nginx
ExecReload=/usr/sbin/nginx -s reload
ExecStop=/bin/kill -s QUIT \$MAINPID
PrivateTmp=true
[Install]
WantedBy=multi-user.target
EOFsystemctl daemon-reload
}
# 配置防火墙
configure_firewall() {log_info "配置防火墙..."if command -v ufw >/dev/null 2>&1; then# Ubuntu/Debianufw allow 'Nginx Full'ufw --force enableelif command -v firewall-cmd >/dev/null 2>&1; then# CentOS/RHEL/Fedorafirewall-cmd --permanent --add-service=httpfirewall-cmd --permanent --add-service=httpsfirewall-cmd --reloadelif command -v iptables >/dev/null 2>&1; then# 传统iptablesiptables -I INPUT -p tcp --dport 80 -j ACCEPTiptables -I INPUT -p tcp --dport 443 -j ACCEPTiptables-save > /etc/sysconfig/iptableselselog_warn "未找到防火墙工具,请手动开放80和443端口"fi
}
# 基础安全配置
basic_security_config() {log_info "应用基础安全配置..."# 备份原始配置cp /etc/nginx/nginx.conf /etc/nginx/nginx.conf.backup.$(date +%Y%m%d)# 创建安全配置片段mkdir -p /etc/nginx/conf.dcat > /etc/nginx/conf.d/security.conf << 'EOF'
# 安全头设置
add_header X-Frame-Options "SAMEORIGIN" always;
add_header X-XSS-Protection "1; mode=block" always;
add_header X-Content-Type-Options "nosniff" always;
add_header Referrer-Policy "no-referrer-when-downgrade" always;
add_header Content-Security-Policy "default-src 'self' http: https: data: blob: 'unsafe-inline'" always;
# 隐藏Nginx版本号
server_tokens off;
# 限制请求体大小
client_max_body_size 10M;
# 超时设置
client_body_timeout 10;
client_header_timeout 10;
keepalive_timeout 30;
send_timeout 10;
# 禁用不需要的HTTP方法
if ($request_method !~ ^(GET|HEAD|POST)$ ) {return 444;
}
EOF
# 创建默认服务器配置cat > /etc/nginx/conf.d/default.conf << 'EOF'
server {listen 80 default_server;server_name _;# 安全设置include conf.d/security.conf;# 根目录配置root /usr/share/nginx/html;index index.html index.htm;# 日志配置access_log /var/log/nginx/default_access.log;error_log /var/log/nginx/default_error.log;location / {try_files $uri $uri/ =404;}# 禁止访问隐藏文件location ~ /\. {deny all;access_log off;log_not_found off;}# 禁止访问常见敏感文件location ~* (\.env|\.git|\.svn|composer\.json|package\.json) {deny all;access_log off;log_not_found off;}
}
EOF
}
# 启动服务
start_nginx() {log_info "启动Nginx服务..."# 创建nginx用户(如果不存在)id -u nginx &>/dev/null || useradd -r -s /bin/false nginx# 启动服务systemctl enable nginxsystemctl start nginx# 检查状态if systemctl is-active --quiet nginx; thenlog_info "Nginx启动成功"elselog_error "Nginx启动失败"systemctl status nginxexit 1fi
}
# 验证安装
verify_installation() {log_info "验证Nginx安装..."# 检查版本nginx -v# 检查配置语法if nginx -t; thenlog_info "Nginx配置语法检查通过"elselog_error "Nginx配置语法检查失败"exit 1fi# 测试HTTP访问if command -v curl >/dev/null 2>&1; thenif curl -s http://localhost >/dev/null; thenlog_info "Nginx HTTP服务测试成功"elselog_error "Nginx HTTP服务测试失败"fifilog_info "安装完成!"log_info "Nginx配置文件: /etc/nginx/nginx.conf"log_info "网站根目录: /usr/share/nginx/html"log_info "服务管理: systemctl {start|stop|restart|reload|status} nginx"
}
# 主函数
main() {log_info "开始安装Nginx..."# 检查root权限if [ "$EUID" -ne 0 ]; thenlog_error "请使用root权限运行此脚本"exit 1fidetect_osinstall_dependencies# 选择安装方式echo "请选择安装方式:"echo "1) 使用Nginx官方源安装 (推荐)"echo "2) 使用发行版源安装"echo "3) 编译安装 (高级用户)"read -p "请输入选择 [1-3]: " choicecase $choice in1)install_nginx_official;;2)install_nginx_distro;;3)compile_nginx;;*)log_info "使用默认选项: 官方源安装"install_nginx_official;;esacconfigure_firewallbasic_security_configstart_nginxverify_installation
}
# 执行主函数
main "$@"🚀 快速安装方式
方法1:一键脚本安装
# 下载脚本
wget -O install-nginx.sh https://raw.githubusercontent.com/example/install-nginx/master/install-nginx.sh
# 添加执行权限
chmod +x install-nginx.sh
# 运行安装
sudo ./install-nginx.sh方法2:各系统快速安装
# Ubuntu/Debian
sudo apt update && sudo apt install -y nginx
sudo systemctl enable nginx && sudo systemctl start nginx
# CentOS/RHEL/Amazon Linux
sudo yum install -y nginx
sudo systemctl enable nginx && sudo systemctl start nginx
# 开放防火墙
sudo firewall-cmd --permanent --add-service=http
sudo firewall-cmd --permanent --add-service=https
sudo firewall-cmd --reload⚙️ 常用管理命令
# 服务管理
sudo systemctl start nginx # 启动
sudo systemctl stop nginx # 停止
sudo systemctl restart nginx # 重启
sudo systemctl reload nginx # 重载配置(不中断服务)
sudo systemctl status nginx # 查看状态
# 配置检查
sudo nginx -t # 测试配置语法
sudo nginx -T # 显示完整配置
# 日志查看
sudo tail -f /var/log/nginx/access.log # 实时访问日志
sudo tail -f /var/log/nginx/error.log # 实时错误日志
# 进程查看
ps aux | grep nginx # 查看Nginx进程📁 重要目录和文件
# 配置文件
/etc/nginx/nginx.conf # 主配置文件
/etc/nginx/conf.d/ # 额外配置目录
/etc/nginx/sites-available/ # 可用站点配置 (Ubuntu/Debian)
/etc/nginx/sites-enabled/ # 启用站点配置 (Ubuntu/Debian)
# 网站文件
/usr/share/nginx/html/ # 默认网站根目录
/var/www/html/ # 其他常见根目录
# 日志文件
/var/log/nginx/access.log # 访问日志
/var/log/nginx/error.log # 错误日志
# 进程文件
/var/run/nginx.pid # PID文件🔧 基础配置示例
创建虚拟主机
# 创建网站目录
sudo mkdir -p /var/www/example.com/html
sudo chown -R nginx:nginx /var/www/example.com
# 创建虚拟主机配置
sudo tee /etc/nginx/conf.d/example.com.conf << 'EOF'
server {listen 80;server_name example.com www.example.com;root /var/www/example.com/html;index index.html index.htm;access_log /var/log/nginx/example.com_access.log;error_log /var/log/nginx/example.com_error.log;location / {try_files $uri $uri/ =404;}# 静态文件缓存location ~* \.(jpg|jpeg|png|gif|ico|css|js)$ {expires 1y;add_header Cache-Control "public, immutable";}
}
EOF
# 测试并重载配置
sudo nginx -t && sudo nginx -s reload🔍 安装验证
# 检查版本和编译参数
nginx -V
# 测试HTTP响应
curl -I http://localhost
# 检查监听端口
netstat -tulpn | grep nginx
ss -tulpn | grep nginx
# 创建测试页面
echo "<h1>Nginx安装成功!</h1><p>服务器时间: $(date)</p>" | sudo tee /usr/share/nginx/html/index.html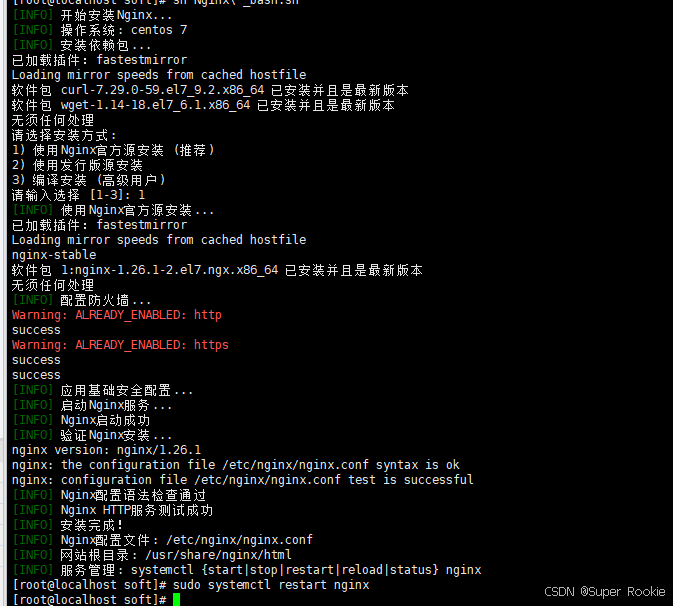
浏览器访问:http://192.168.198.101/

这个脚本提供了完整的Nginx安装方案,从基础安装到安全配置,适合生产环境使用!