框架--Spring
Spring框架介绍
一、Spring 介绍
Spring 是一款开源框架,专为简化企业级应用开发而生。它以 IOC(控制反转) 和 AOP(面向切面编程) 为思想内核,提供了控制层 SpringMVC、数据层 SpringData、服务层事务管理等丰富技术,还能无缝整合众多第三方框架。
Spring 能将复杂代码简化为优雅简洁的实现,有效降低代码耦合度,极大方便项目后期的维护、升级与扩展。其官方地址为:https://spring.io/
1.1 Spring6 版本介绍
2022 年底,Spring 正式发布 Spring6,距离 Spring5 发布已超四年,是一次跨越式升级,核心变化如下:
- 最低支持 JDK 版本直接升级至 JDK17;
- Servlet、JPA 等从 javax 命名空间迁移到 jakarta;
- 兼容 jakarta EE 9 与 jakarta EE 10;
- 支持 AOT( Ahead-of-Time Compilation,提前编译) 技术。
此次升级主要为 SpringBoot 3.0 做准备,AOT 等新功能会在 SpringBoot 3.0 中详细体现。
二、Spring 体系结构

Spring 框架按功能划分为多个模块,可按需选择使用,满足所有企业级应用开发需求。各模块关系与功能如下:
| 模块分类 | 包含组件 | 核心功能 |
|---|---|---|
| Core Container(核心容器) | Core、Beans、Context、SpEL | 所有功能的基础,提供 Bean 管理、配置解析、上下文环境等核心能力,任何功能都依赖此模块 |
| Data Access/Integration | JDBC、ORM、OXM、JMS、Transactions | 提供数据持久化支持,如数据库操作、ORM 框架整合、事务管理等 |
| Web | WebSocket、Servlet、Web Portlet | 提供 Web 开发支持,如 Servlet 集成、WebSocket 通信等 |
| AOP | AOP、Aspects | 提供面向切面编程实现,支持与 AspectJ 框架集成 |
| Instrumentation | Instrumentation | 提供类工具支持和类加载器实现,适用于特定应用服务器 |
| Messaging | Messaging | 集成基础报文传送应用 |
| Test | Test | 提供与 JUnit 等测试框架的集成,支持 Spring 组件的单元测试 |
三、IOC:控制反转思想

IOC(Inversion of Control,控制反转) 的核心是将对象创建的权利交给框架,而非由调用者手动管理。
3.1 传统开发的问题
传统开发中,对象实例由调用者创建,存在两大问题:
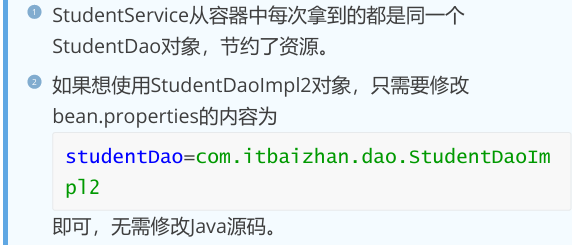
- 资源浪费:调用方法时反复创建对象(如 StudentService 每次调用都新建 StudentDaoImpl);
- 耦合度高:若替换实现类(如 StudentDaoImpl2),需修改 StudentService 源码。
示例代码(传统方式):
// Dao 接口
public interface StudentDao {Student findById(int id);
}// Dao 实现类
public class StudentDaoImpl implements StudentDao {@Overridepublic Student findById(int id) {// 模拟数据库查询return new Student(1, "百战程序员", "北京");}
}// Service 层(调用者手动创建 Dao 对象)
public class StudentService {public Student findStudentById(int id) {// 手动创建对象,耦合度高StudentDao studentDao = new StudentDaoImpl();return studentDao.findById(id);}
}
3.2 IOC 思想的优势
IOC 让框架接管对象的创建、分配与管理,控制权从代码转移到框架,完美解决传统开发的问题:
- 避免重复创建对象,节约资源;
- 替换实现类时无需修改源码,仅需调整框架配置。
四、IOC:自定义对象容器
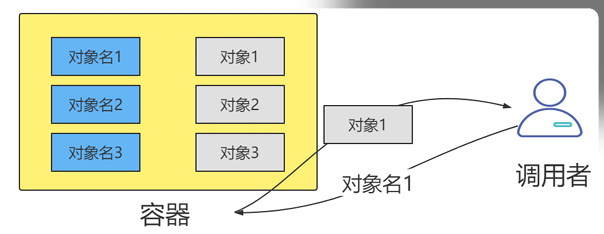
通过模拟 Spring 容器思想,用集合管理对象,实现 “创建一次、多次复用”,降低耦合度。
4.1 步骤实现
- 创建实体类
public class Student {private int id;private String name;private String address;// 省略 getter、setter、构造方法、toString
}
- 创建 Dao 接口与多实现类
// Dao 接口
public interface StudentDao {Student findById(int id);
}// 实现类 1
public class StudentDaoImpl implements StudentDao {@Overridepublic Student findById(int id) {System.out.println("旧实现:查询学生");return new Student(1, "百战程序员", "北京");}
}// 实现类 2(新实现)
public class StudentDaoImpl2 implements StudentDao {@Overridepublic Student findById(int id) {System.out.println("新实现:查询学生");return new Student(1, "百战程序员", "北京");}
}
- 配置文件(bean.properties)
定义需管理的对象,格式为 “对象名 = 全类名”:
studentDao=com.itbaizhan.dao.impl.StudentDaoImpl
- 容器管理类(Container)
类加载时读取配置文件,创建所有对象并存入 Map:
import java.io.InputStream;
import java.util.Enumeration;
import java.util.HashMap;
import java.util.Map;
import java.util.Properties;public class Container {// 存储对象的容器static Map<String, Object> map = new HashMap<>();static {try {// 读取配置文件InputStream is = Container.class.getClassLoader().getResourceAsStream("bean.properties");Properties props = new Properties();props.load(is);// 遍历配置,创建对象并放入容器Enumeration<Object> keys = props.keys();while (keys.hasMoreElements()) {String key = keys.nextElement().toString();String className = props.getProperty(key);// 反射创建对象Object obj = Class.forName(className).newInstance();map.put(key, obj);}} catch (Exception e) {throw new RuntimeException(e);}}// 从容器获取对象public static Object getBean(String key) {return map.get(key);}
}
- 调用者(StudentService)
从容器获取对象,而非手动创建:
public class StudentService {public Student findStudentById(int id) {// 从容器获取对象,无耦合StudentDao studentDao = (StudentDao) Container.getBean("studentDao");System.out.println("对象哈希值:" + studentDao.hashCode()); // 多次调用哈希值相同,说明是同一对象return studentDao.findById(id);}
}
- 测试类
public class Test {public static void main(String[] args) {StudentService service = new StudentService();// 两次调用,获取同一对象System.out.println(service.findStudentById(1));System.out.println(service.findStudentById(1));}
}
4.2 测试结果与优势
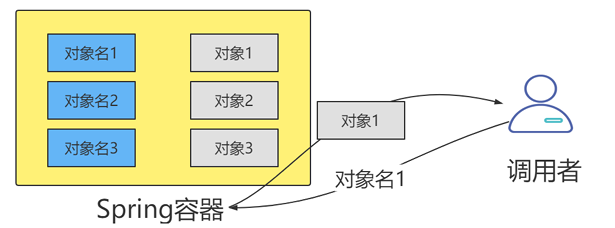
五、IOC:Spring 实现 IOC
Spring 内置容器管理对象,无需手动编写容器类,仅需通过配置文件或注解声明对象即可。
5.1 步骤实现
- 创建 Maven 项目,引入依赖
<dependencies><!-- Spring 核心容器依赖 --><dependency><groupId>org.springframework</groupId><artifactId>spring-context</artifactId><version>6.0.11</version></dependency><!-- JUnit 测试依赖 --><dependency><groupId>junit</groupId><artifactId>junit</artifactId><version>4.12</version><scope>test</scope></dependency>
</dependencies>
1,创建POJO类、Dao类和接口
public class Student {private int id;private String name;private String address;// 省略getter/setter/构造方法/tostring}public interface StudentDao {// 根据id查询学生
Student findById(int id);}public class StudentDaoImpl implements
StudentDao{@Overridepublic Student findById(int id) {// 模拟从数据库查找出学生
return new Student(1,"clx","北京");}}- 编写配置文件(bean.xml)
通过 <bean> 标签声明需 Spring 管理的对象:
<?xml version="1.0" encoding="UTF-8"?>
<beans xmlns="http://www.springframework.org/schema/beans"xmlns:xsi="http://www.w3.org/2001/XMLSchema-instance"xsi:schemaLocation="http://www.springframework.org/schema/beanshttp://www.springframework.org/schema/beans/spring-beans.xsd"><!-- 配置 StudentDao 对象:id=对象名,class=全类名 --><bean id="studentDao" class="com.itbaizhan.dao.StudentDaoImpl"></bean>
</beans>
- 测试从 Spring 容器获取对象
import org.junit.Test;
import org.springframework.context.ApplicationContext;
import org.springframework.context.support.ClassPathXmlApplicationContext;public class TestContainer {@Testpublic void testIOC() {// 1. 创建 Spring 容器(加载配置文件)ApplicationContext ac = new ClassPathXmlApplicationContext("bean.xml");// 2. 从容器获取对象(两种方式)// 方式 1:通过 id 获取,需强转StudentDao studentDao1 = (StudentDao) ac.getBean("studentDao");// 方式 2:通过类型获取,无需强转(容器中该类型唯一时可用)StudentDao studentDao2 = ac.getBean(StudentDao.class);// 验证是否为同一对象(单例默认)System.out.println(studentDao1.hashCode()); System.out.println(studentDao2.hashCode()); System.out.println(studentDao1.findById(1));}
}
六、IOC:Spring 容器类型
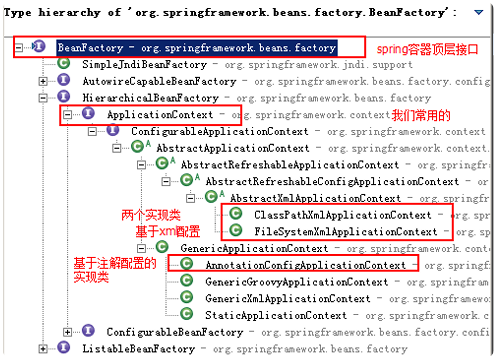
Spring 容器有两大核心接口,及多个实现类,适用于不同场景。
6.1 核心接口
| 接口 | 功能描述 |
|---|---|
| BeanFactory | 容器顶层接口,提供 Bean 管理的基础功能(如获取对象),延迟初始化(获取时才创建对象) |
| ApplicationContext | BeanFactory 的子接口,扩展了国际化、资源访问、事件传播等功能,默认立即初始化(容器启动时创建对象) |
6.2 常用实现类
| 实现类 | 适用场景 | 示例代码 |
|---|---|---|
| ClassPathXmlApplicationContext | 从项目类路径(resources 目录)读取 XML 配置 | ApplicationContext ac = new ClassPathXmlApplicationContext("bean.xml"); |
| FileSystemXmlApplicationContext | 从本地磁盘绝对路径读取 XML 配置 | ApplicationContext ac = new FileSystemXmlApplicationContext("C:\\bean.xml"); |
| AnnotationConfigApplicationContext | 无 XML 配置,通过注解读取配置 | ApplicationContext ac = new AnnotationConfigApplicationContext(SpringConfig.class); |
七、IOC:对象的创建方式
Spring 支持三种对象创建方式,默认使用空参构造方法。
7.1 方式 1:空参构造方法(默认)
Spring 调用类的空参构造方法创建对象,若类无空参构造,会报错。
示例:
// 有空参构造(默认隐式存在,若显式定义有参构造,需手动加空参)
public class StudentDaoImpl implements StudentDao {// 空参构造public StudentDaoImpl() {}@Overridepublic Student findById(int id) {return new Student(1, "百战程序员", "北京");}
}
配置文件(无需额外配置,默认调用空参):
<bean id="studentDao" class="com.itbaizhan.dao.StudentDaoImpl"></bean>
7.2 方式 2:工厂类的普通方法
通过第三方工厂类的普通方法创建对象,需先配置工厂对象,再配置目标对象。
示例:
// 1. 工厂类(提供创建对象的普通方法)
public class StudentDaoFactory {public StudentDao getStudentDao() {return new StudentDaoImpl(); // 调用有参构造(假设 StudentDaoImpl 只有有参构造)}
}
配置文件:
<beans><!-- 第一步:配置工厂对象 --><bean id="studentDaoFactory" class="com.itbaizhan.dao.StudentDaoFactory"></bean><!-- 第二步:配置目标对象(factory-bean=工厂id,factory-method=工厂方法) --><bean id="studentDao" factory-bean="studentDaoFactory" factory-method="getStudentDao"></bean>
</beans>
7.3 方式 3:工厂类的静态方法
通过工厂类的静态方法创建对象,无需配置工厂对象,直接指定工厂类和静态方法。
示例:
// 1. 工厂类(提供静态方法)
public class StudentDaoFactory2 {public static StudentDao getStudentDao() {return new StudentDaoImpl();}
}
配置文件:
<bean id="studentDao" class="com.itbaizhan.dao.StudentDaoFactory2" factory-method="getStudentDao"></bean>
八、IOC:对象的创建策略(scope 属性)

通过 <bean> 标签的 scope 属性设置对象的创建策略,默认 singleton(单例)。
| scope 值 | 含义 | 适用场景 | 销毁时机 |
|---|---|---|---|
| singleton | 单例,整个项目仅创建一个对象(默认) | 无状态组件(如 Dao、Service) | 容器销毁时销毁 |
| prototype | 多例,每次获取对象时新建一个 | 有状态组件(如 Controller) | JVM 垃圾回收时销毁 |
| request | 每次 HTTP 请求创建一个对象(仅 Web 环境) | Web 请求相关组件 | 请求结束时销毁 |
| session | 每次 HTTP 会话创建一个对象(仅 Web 环境) | Web 会话相关组件 | 会话失效时销毁 |
| global-session | 集群环境下,每次集群会话创建一个对象(仅 Web 集群环境) | 集群会话组件 | 集群会话失效时销毁 |
8.1 单例配置(singleton)
可通过 lazy-init 控制创建时机:
lazy-init="false"(默认):容器启动时创建对象;lazy-init="true":第一次获取对象时创建。
示例:
<bean id="studentDao" class="com.itbaizhan.dao.StudentDaoImpl" scope="singleton" lazy-init="false"></bean>
测试(验证单例):
@Test
public void testSingleton() {ApplicationContext ac = new ClassPathXmlApplicationContext("bean.xml");StudentDao dao1 = ac.getBean(StudentDao.class);StudentDao dao2 = ac.getBean(StudentDao.class);System.out.println(dao1 == dao2); // true(同一对象)
}
8.2 多例配置(prototype)
<bean id="studentDao" class="com.itbaizhan.dao.StudentDaoImpl" scope="prototype"></bean>
测试(验证多例):
@Test
public void testPrototype() {ApplicationContext ac = new ClassPathXmlApplicationContext("bean.xml");StudentDao dao1 = ac.getBean(StudentDao.class);StudentDao dao2 = ac.getBean(StudentDao.class);System.out.println(dao1 == dao2); // false(不同对象)
}
九、IOC:对象的生命周期
Spring 可配置对象创建和销毁时自动执行的方法,通过 <bean> 的 init-method 和 destroy-method 属性实现。
9.1 步骤实现
- 定义生命周期方法
public class StudentDaoImpl implements StudentDao {// 创建时执行的方法(方法名自定义)public void init() {System.out.println("StudentDao 对象创建完成!");}// 销毁时执行的方法(方法名自定义)public void destroy() {System.out.println("StudentDao 对象销毁完成!");}@Overridepublic Student findById(int id) {return new Student(1, "百战程序员", "北京");}
}
- 配置生命周期方法
<bean id="studentDao" class="com.itbaizhan.dao.StudentDaoImpl" init-method="init" destroy-method="destroy"></bean>
- 测试(需手动关闭容器)
@Test
public void testLifecycle() {// 使用 ClassPathXmlApplicationContext(有 close() 方法)ClassPathXmlApplicationContext ac = new ClassPathXmlApplicationContext("bean.xml");StudentDao dao = ac.getBean(StudentDao.class);// 手动关闭容器,触发 destroy 方法ac.close();
}
- 输出结果
StudentDao 对象创建完成!
StudentDao 对象销毁完成!
十、IOC:获取对象的方式
Spring 提供三种获取容器中对象的方式,按需选择。
| 获取方式 | 适用场景 | 示例代码 |
|---|---|---|
| 通过 id/name 获取 | 容器中同一类型有多个对象时 | StudentDao dao = (StudentDao) ac.getBean("studentDao"); |
| 通过类型获取 | 容器中同一类型仅一个对象时(无需强转) | StudentDao dao = ac.getBean(StudentDao.class); |
| 通过类型 + id 获取 | 同一类型有多个对象,且需指定具体对象时 | StudentDao dao = ac.getBean("studentDao", StudentDao.class); |
示例:同一类型多对象的获取
<!-- 配置两个 StudentDao 实现类 -->
<bean id="studentDao1" class="com.itbaizhan.dao.StudentDaoImpl"></bean>
<bean id="studentDao2" class="com.itbaizhan.dao.StudentDaoImpl2"></bean>
@Test
public void testGetBean() {ApplicationContext ac = new ClassPathXmlApplicationContext("bean.xml");// 错误:同一类型有多个对象,通过类型获取会报错// StudentDao dao = ac.getBean(StudentDao.class);// 正确:通过类型+id 获取StudentDao dao1 = ac.getBean("studentDao1", StudentDao.class);StudentDao dao2 = ac.getBean("studentDao2", StudentDao.class);System.out.println(dao1);System.out.println(dao2);
}
十一、IOC:依赖注入(DI)

依赖注入是Spring框架实现控制反转的核心机制,它允许容器在创建对象时自动注入所依赖的对象,从而降低组件间的耦合度。主要方式包括构造器注入和Setter注入,适用于不同场景。
11.1 构造器注入
构造器注入通过bean的构造器参数注入依赖对象,适用于必须依赖或不可变的场景。确保依赖在对象创建时即被设置。
示例配置:
<!-- 定义依赖对象 -->
<bean id="studentDao" class="com.itbaizhan.dao.StudentDaoImpl"/><!-- 通过构造器注入依赖 -->
<bean id="studentService" class="com.itbaizhan.service.StudentServiceImpl"><constructor-arg ref="studentDao"/> <!-- 注入studentDao bean -->
</bean>
测试验证:
@Test
public void testConstructorInjection() {ApplicationContext ac = new ClassPathXmlApplicationContext("bean.xml");StudentService service = ac.getBean(StudentService.class);// 假设StudentServiceImpl的saveStudent方法内部使用studentDaoservice.saveStudent(new Student(1, "测试", "北京")); // 验证无异常且依赖注入成功System.out.println("构造器注入测试通过!");
}
11.2 Setter注入
Setter注入通过bean的setter方法注入依赖对象,适用于可选依赖或需要动态变更的场景。灵活性更高。
示例配置:
<!-- 定义依赖对象 -->
<bean id="studentDao" class="com.itbaizhan.dao.StudentDaoImpl"/><!-- 通过Setter注入依赖 -->
<bean id="studentService" class="com.itbaizhan.service.StudentServiceImpl"><property name="studentDao" ref="studentDao"/> <!-- 注入studentDao bean -->
</bean>
测试验证:
@Test
public void testSetterInjection() {ApplicationContext ac = new ClassPathXmlApplicationContext("bean.xml");StudentService service = ac.getBean(StudentService.class);// 假设StudentServiceImpl的updateStudent方法内部使用studentDaoservice.updateStudent(new Student(2, "更新", "上海")); // 验证无异常且依赖注入成功System.out.println("Setter注入测试通过!");
}
十二、IOC:自动装配(autowire)
自动装配允许Spring容器基于类型或名称自动注入依赖,减少手动配置。通过 <bean> 的 autowire 属性设置。
12.1 按类型自动装配(byType)
容器根据依赖对象的类型自动匹配并注入。要求同一类型在容器中仅有一个bean。
示例配置:
<bean id="studentService" class="com.itbaizhan.service.StudentServiceImpl" autowire="byType"/>
<bean id="studentDao" class="com.itbaizhan.dao.StudentDaoImpl"/> <!-- 类型匹配,自动注入 -->
测试验证:
@Test
public void testAutowireByType() {ApplicationContext ac = new ClassPathXmlApplicationContext("bean.xml");StudentService service = ac.getBean(StudentService.class);service.process(); // 内部使用studentDao,验证自动注入成功System.out.println("按类型自动装配测试通过!");
}
12.2 按名称自动装配(byName)
容器根据依赖对象的属性名称与bean id匹配并注入。要求属性名与bean id一致。
示例配置:
<bean id="studentService" class="com.itbaizhan.service.StudentServiceImpl" autowire="byName"/>
<bean id="studentDao" class="com.itbaizhan.dao.StudentDaoImpl"/> <!-- 属性名studentDao与id匹配,自动注入 -->
测试验证:
@Test
public void testAutowireByName() {ApplicationContext ac = new ClassPathXmlApplicationContext("bean.xml");StudentService service = ac.getBean(StudentService.class);service.process(); // 验证自动注入成功System.out.println("按名称自动装配测试通过!");
}
十三、DI:构造方法注入
通过调用对象的有参构造方法为属性赋值,适用于属性必须赋值的场景。
13.1 步骤实现
- 被注入类(Service)提供有参构造
public class StudentService {private StudentDao studentDao;// 有参构造(参数为依赖的属性)public StudentService(StudentDao studentDao) {this.studentDao = studentDao;}public Student findStudentById(int id) {return studentDao.findById(id);}
}
- 配置文件(通过
<constructor-arg>标签注入)
<beans><!-- 1. 配置 Dao 对象 --><bean id="studentDao" class="com.itbaizhan.dao.StudentDaoImpl"></bean><!-- 2. 配置 Service 对象,通过构造方法注入 --><bean id="studentService" class="com.itbaizhan.service.StudentService"><!-- name:构造方法的参数名;ref:依赖对象的 id --><constructor-arg name="studentDao" ref="studentDao"></constructor-arg></bean>
</beans>
- 测试
@Test
public void testConstructorDI() {ApplicationContext ac = new ClassPathXmlApplicationContext("bean.xml");StudentService service = ac.getBean(StudentService.class);System.out.println(service.findStudentById(1));
}
十四、DI:自动注入
自动注入无需手动配置 <property> 或 <constructor-arg>,Spring 自动从容器中匹配对象并赋值,支持全局配置和局部配置。
14.1 自动注入策略(autowire 属性)
| autowire 值 | 含义 | 依赖条件 |
|---|---|---|
| no | 不自动注入(默认) | - |
| byName | 按 “属性名” 匹配容器中对象的 id,匹配成功则注入 | 需提供 Setter 方法 |
| byType | 按 “属性类型” 匹配容器中对象的类型,匹配成功则注入 | 需提供 Setter 方法;容器中该类型唯一 |
| constructor | 按 “构造方法参数类型” 匹配容器中对象,匹配成功则注入 | 需提供有参构造;容器中该类型唯一 |
14.2 局部配置(单个 bean 生效)
在 <bean> 标签中设置 autowire 属性:
<beans><!-- 配置 Dao 对象(id=studentDao,与 Service 中属性名一致) --><bean id="studentDao" class="com.itbaizhan.dao.StudentDaoImpl"></bean><!-- 局部自动注入(byName:按属性名匹配) --><bean id="studentService" class="com.itbaizhan.service.StudentService" autowire="byName"></bean>
</beans>
14.3 全局配置(所有 bean 生效)
在 <beans> 标签中设置 default-autowire 属性:
<beans xmlns="http://www.springframework.org/schema/beans"xmlns:xsi="http://www.w3.org/2001/XMLSchema-instance"xsi:schemaLocation="http://www.springframework.org/schema/beanshttp://www.springframework.org/schema/beans/spring-beans.xsd"default-autowire="byType"> <!-- 全局自动注入策略 --><bean id="studentDao" class="com.itbaizhan.dao.StudentDaoImpl"></bean><bean id="studentService" class="com.itbaizhan.service.StudentService"></bean>
</beans>
十五、DI:注入不同类型属性
Spring 支持注入 Bean 类型、简单数据类型(基本类型 + 字符串)、集合类型(List、Set、Map)、Properties 对象等。
15.1 注入 Bean 类型(已讲,回顾)
<bean id="studentDao" class="com.itbaizhan.dao.StudentDaoImpl"></bean>
<bean id="studentService" class="com.itbaizhan.service.StudentService"><property name="studentDao" ref="studentDao"></property>
</bean>
15.2 注入简单数据类型
通过 <property> 的 value 属性或 <value> 子标签注入:
public class StudentService2 {private String name; // 字符串private int count;   // 基本类型// 省略 Setter 方法
}
<bean id="studentService2" class="com.itbaizhan.service.StudentService2"><!-- 方式 1:value 属性 --><property name="name" value="百战程序员"></property><!-- 方式 2:<value> 子标签 --><property name="count"><value>100</value></property>
</bean>
15.3 注入 List 集合
public class StudentService2 {private List<String> nameList; // 字符串 Listprivate List<Student> studentList; // 对象 List// 省略 Setter 方法
}
<bean id="studentService2" class="com.itbaizhan.service.StudentService2"><!-- 注入字符串 List --><property name="nameList"><list><value>尚学堂</value><value>百战程序员</value></list></property><!-- 注入对象 List(内部配置 Student 对象) --><property name="studentList"><list><bean class="com.itbaizhan.domain.Student"><property name="id" value="1"></property><property name="name" value="张三"></property></bean><bean class="com.itbaizhan.domain.Student"><property name="id" value="2"></property><property name="name" value="李四"></property></bean></list></property>
</bean>
15.4 注入 Set 集合
与 List 类似,仅标签改为 <set>(Set 不允许重复元素):
<property name="studentSet"><set><bean class="com.itbaizhan.domain.Student"><property name="id" value="1"></property><property name="name" value="张三"></property></bean></set>
</property>
15.5 注入 Map 集合
通过 <map> 和 <entry> 标签注入,key 为字符串,value 可为简单类型或对象:
public class StudentService2 {private Map<String, String> nameMap; // 字符串 Mapprivate Map<String, Student> studentMap; // 对象 Map// 省略 Setter 方法
}
<bean id="studentService2" class="com.itbaizhan.service.StudentService2"><!-- 字符串 Map --><property name="nameMap"><map><entry key="user1" value="张三"></entry><entry key="user2" value="李四"></entry></map></property><!-- 对象 Map(引用外部 Student 对象) --><bean id="student1" class="com.itbaizhan.domain.Student"><property name="id" value="1"></property><property name="name" value="张三"></property></bean><property name="studentMap"><map><entry key="stu1" value-ref="student1"></entry></map></property>
</bean>
15.6 注入 Properties 对象
通过 <props> 和 <prop> 标签注入(key 和 value 均为字符串):
public class StudentService2 {private Properties props;// 省略 Setter 方法
}
<property name="props"><props><prop key="jdbc.username">root</prop><prop key="jdbc.password">123456</prop></props>
</property>
十六、注解实现 IOC
注解配置是 XML 配置的替代方案,更简洁高效。核心是通过注解声明对象、注入依赖,无需编写大量 XML。
16.1 核心注解:@Component
- 作用:创建对象并放入 Spring 容器,等价于
<bean id="" class="">; - 位置:类上方;
- 属性:value(可选),指定 bean 的 id,默认值为 “首字母小写的类名”。
步骤实现
配置文件开启注解扫描:
<?xml version="1.0" encoding="UTF-8"?>
<beans xmlns="http://www.springframework.org/schema/beans"xmlns:context="http://www.springframework.org/schema/context" <!-- 引入 context 约束 -->xmlns:xsi="http://www.w3.org/2001/XMLSchema-instance"xsi:schemaLocation="http://www.springframework.org/schema/beanshttp://www.springframework.org/schema/beans/spring-beans.xsdhttp://www.springframework.org/schema/contexthttp://www.springframework.org/schema/context/spring-context.xsd"><!-- 开启注解扫描:扫描 com.itbaizhan 包下所有类 --><context:component-scan base-package="com.itbaizhan"></context:component-scan>
</beans>
使用 @Component 声明对象:
// 方式 1:默认 id(studentDaoImpl)
@Component
public class StudentDaoImpl implements StudentDao {@Overridepublic Student findById(int id) {return new Student(1, "百战程序员", "北京");}
}// 方式 2:手动指定 id(studentDao)
@Component("studentDao")
public class StudentDaoImpl implements StudentDao {// 同上
}
16.2 分层注解:@Repository、@Service、@Controller
与 @Component 功能一致,仅用于区分层归属,提高代码可读性:
- @Repository:Dao 层(持久层);
- @Service:Service 层(业务层);
- @Controller:Controller 层(控制层)。
示例:
// Dao 层
@Repository
public class StudentDaoImpl implements StudentDao { /* ... */ }// Service 层
@Service
public class StudentService { /* ... */ }// Controller 层
@Controller
public class StudentController { /* ... */ }
16.3 作用域注解:@Scope
- 作用:指定 bean 的创建策略,等价于
<bean scope="">; - 位置:类上方;
- 取值:singleton(单例,默认)、prototype(多例)等。
示例:
@Service
@Scope("prototype") // 多例
public class StudentService { /* ... */ }
十七、注解实现 DI
通过注解自动注入依赖,无需配置 <property> 或 <constructor-arg>。
17.1 自动注入注解:@Autowired
- 作用:按 “属性类型” 从容器中匹配对象并注入;
- 位置:属性上方、Setter 方法上方、构造方法上方;
- 优势:写在属性上方时,可省略 Setter 方法。
示例:
@Service
public class StudentService {// 按类型注入 StudentDao(无需 Setter 方法)@Autowiredprivate StudentDao studentDao;public Student findStudentById(int id) {return studentDao.findById(id);}
}
注意事项
- 若容器中无对应类型对象,启动时报错;
- 若容器中有多个对应类型对象,会按 “属性名” 匹配 bean 的 id,匹配失败则报错(需配合 @Qualifier 解决)。
17.2 指定 id 注入:@Qualifier
- 作用:在 @Autowired 按类型注入的基础上,按 “bean 的 id” 注入;
- 位置:属性上方;
- 注意:必须与 @Autowired 一起使用。
示例(解决多类型匹配问题):
@Service
public class StudentService {// 按类型匹配 + 指定 id=studentDaoImpl2@Autowired@Qualifier("studentDaoImpl2")private StudentDao studentDao;
}
17.3 注入简单类型:@Value
- 作用:注入字符串或基本数据类型;
- 位置:属性上方;
- 用法:直接赋值或读取配置文件。
示例 1:直接赋值
@Service
public class StudentService {@Value("100")private int count;@Value("clx")private String name;
}
示例 2:读取配置文件
编写配置文件(db.properties):
jdbc.username=root
jdbc.password=123456
配置文件开启配置扫描:
<!-- 扫描配置文件 -->
<context:property-placeholder location="classpath:db.properties"></context:property-placeholder>
注入配置值:
@Service
public class StudentService {@Value("${jdbc.username}")private String username;@Value("${jdbc.password}")private String password;
}
十八,纯注解配置(无 XML)
18.1 核心注解
| 注解 | 作用 | 位置 |
|---|---|---|
| @Configuration | 声明该类是配置类,等价于 XML 配置文件 | 配置类上方 |
| @ComponentScan | 指定注解扫描的包,等价于 context:component-scan | 配置类上方 |
| @PropertySource | 扫描配置文件,等价于 context:property-placeholder | 配置类上方 |
| @Bean | 将方法返回值放入容器,等价于 <bean>(适用于第三方类) | 配置类方法上方 |
| @Import | 导入其他配置类,解决多配置类问题 | 主配置类上方 |
18.2 步骤实现
- 创建主配置类
使用 Java 配置类替代 XML 文件,定义扫描路径和第三方 Bean。
import org.springframework.context.annotation.ComponentScan;
import org.springframework.context.annotation.Configuration;
import org.springframework.context.annotation.PropertySource;// 声明为配置类
@Configuration
// 扫描 com.itbaizhan 包下的注解
@ComponentScan("com.itbaizhan")
// 扫描配置文件(classpath: 表示类路径)
@PropertySource("classpath:db.properties")
public class SpringConfig {// 配置第三方类的 bean(示例:Druid 数据源)@Bean // 方法返回值放入容器,默认 id=方法名(getDataSource)public DataSource getDataSource() {DruidDataSource dataSource = new DruidDataSource();dataSource.setDriverClassName("com.mysql.jdbc.Driver");dataSource.setUrl("jdbc:mysql:///student");dataSource.setUsername("root");dataSource.setPassword("123456");return dataSource;}
}
- 测试(使用 AnnotationConfigApplicationContext)
通过配置类加载容器,并获取 Bean 进行测试。
@Test
public void testPureAnnotation() {// 加载配置类,创建容器ApplicationContext ac = new AnnotationConfigApplicationContext(SpringConfig.class);StudentService service = ac.getBean(StudentService.class);System.out.println(service.findStudentById(1));
}
十九、Spring 整合 MyBatis
MyBatis 需手动创建 SqlSessionFactory、SqlSession 等对象,Spring 可接管这些对象的创建与管理,简化开发。
19.1 步骤 1:创建 Maven 项目,引入依赖
<dependencies><!-- MyBatis 核心 --><dependency><groupId>org.mybatis</groupId><artifactId>mybatis</artifactId><version>3.5.13</version></dependency><!-- MySQL 驱动 --><dependency><groupId>mysql</groupId><artifactId>mysql-connector-java</artifactId><version>8.0.26</version></dependency><!-- Druid 连接池 --><dependency><groupId>com.alibaba</groupId><artifactId>druid</artifactId><version>1.2.16</version></dependency><!-- Spring 核心 --><dependency><groupId>org.springframework</groupId><artifactId>spring-context</artifactId><version>6.0.11</version></dependency><!-- Spring JDBC(事务依赖) --><dependency><groupId>org.springframework</groupId><artifactId>spring-jdbc</artifactId><version>6.0.11</version></dependency><!-- Spring 事务 --><dependency><groupId>org.springframework</groupId><artifactId>spring-tx</artifactId><version>6.0.11</version></dependency><!-- MyBatis-Spring 整合包 --><dependency><groupId>org.mybatis</groupId><artifactId>mybatis-spring</artifactId><version>3.0.2</version></dependency><!-- JUnit 测试 --><dependency><groupId>junit</groupId><artifactId>junit</artifactId><version>4.12</version><scope>test</scope></dependency><!-- Spring 测试整合 --><dependency><groupId>org.springframework</groupId><artifactId>spring-test</artifactId><version>6.0.11</version><scope>test</scope></dependency>
</dependencies>
19.2 步骤 2:编写配置文件
1. 数据库配置文件(db.properties)
jdbc.driverClassName=com.mysql.jdbc.Driver
jdbc.url=jdbc:mysql:///student
jdbc.username=root
jdbc.password=root
2. MyBatis 配置文件(SqlMapConfig.xml)
数据源、接口扫描交由 Spring 管理,仅保留基础配置:
<?xml version="1.0" encoding="UTF-8"?>
<!DOCTYPE configurationPUBLIC "-//mybatis.org//DTD Config 3.0//EN""http://mybatis.org/dtd/mybatis-3-config.dtd">
<configuration><!-- 可配置别名、插件等,数据源由 Spring 管理 -->
</configuration>
3. Spring 配置文件(applicationContext.xml)
<beans xmlns="http://www.springframework.org/schema/beans"xmlns:context="http://www.springframework.org/schema/context"xmlns:xsi="http://www.w3.org/2001/XMLSchema-instance"xsi:schemaLocation="http://www.springframework.org/schema/beanshttp://www.springframework.org/schema/beans/spring-beans.xsdhttp://www.springframework.org/schema/contexthttp://www.springframework.org/schema/context/spring-context.xsd"><!-- 1. 包扫描 --><context:component-scan base-package="com.itbaizhan"></context:component-scan><!-- 2. 读取数据库配置文件 --><context:property-placeholder location="classpath:db.properties"></context:property-placeholder><!-- 3. 配置 Druid 数据源 --><bean id="dataSource" class="com.alibaba.druid.pool.DruidDataSource"><property name="driverClassName" value="${jdbc.driverClassName}"></property><property name="url" value="${jdbc.url}"></property><property name="username" value="${jdbc.username}"></property><property name="password" value="${jdbc.password}"></property></bean><!-- 4. 配置 Spring 封装的 SqlSessionFactory(代替 MyBatis 手动创建) --><bean id="sqlSessionFactory" class="org.mybatis.spring.SqlSessionFactoryBean"><property name="dataSource" ref="dataSource"></property> <!-- 关联数据源 --><property name="configLocation" value="classpath:SqlMapConfig.xml"></property> <!-- 关联 MyBatis 配置 --></bean><!-- 5. 配置 Spring 封装的 SqlSession(代替 MyBatis 手动创建) --><bean id="sqlSession" class="org.mybatis.spring.SqlSessionTemplate"><constructor-arg name="sqlSessionFactory" ref="sqlSessionFactory"></constructor-arg></bean><!-- 6. 配置 Mapper 扫描(自动创建 Dao 代理对象,无需手动 getMapper) --><bean id="mapperScanner" class="org.mybatis.spring.mapper.MapperScannerConfigurer"><property name="basePackage" value="com.itbaizhan.dao"></property> <!-- 扫描 Dao 接口包 --></bean>
</beans>
19.3 步骤 3:编写 Java 代码
1. 实体类(Student)
public class Student {private int id;private String name;private String sex;private String address;// 省略 getter、setter、toString、构造方法
}
2. Dao 接口(StudentDao)
@Repository // 声明为 Dao 层组件
public interface StudentDao {// MyBatis 注解写 SQL@Select("select * from student")List<Student> findAll();
}
3. Service 层(StudentService)
@Service
public class StudentService {@Autowiredprivate StudentDao studentDao;public List<Student> findAllStudent() {return studentDao.findAll();}
}
4,单元测试(Spring 整合 JUnit)
@RunWith(SpringJUnit4ClassRunner.class)
@ContextConfiguration(locations = "classpath:applicationContext.xml")
public class StudentServiceTest {@Autowiredprivate StudentService studentService;@Testpublic void testFindAll() {List<Student> students = studentService.findAllStudent();students.forEach(System.out::println);}
}
二十、AOP:面向切面编程
AOP(Aspect Oriented Programming)是 Spring 另一大核心思想,在不修改源码的基础上,对已有方法进行增强(如日志、事务、权限控制)。
20.1 AOP 核心概念
| 术语 | 含义 |
|---|---|
| Joinpoint(连接点) | 能被拦截的点,Spring 中仅 “方法” 可作为连接点 |
| Pointcut(切点) | 需增强的连接点,即 “被拦截的方法” |
| Advice(通知) | 拦截后执行的逻辑(如日志打印),分为前置、后置、异常、最终、环绕通知 |
| Aspect(切面) | 切点 + 通知的组合,即 “对哪个方法执行什么增强” |
| Target(目标对象) | 被代理的原始对象(如 UserDao) |
| Proxy(代理对象) | 增强后的对象,Spring 动态生成 |
| Weaving(织入) | 生成代理对象的过程 |
20.2 AOP 实现原理
基于 动态代理技术,Spring 自动生成代理对象:
- 若目标对象实现接口,使用 JDK 动态代理;
- 若目标对象未实现接口,使用 CGLIB 动态代理(生成子类代理)。
20.3 AOP 优势与应用场景
优势:减少重复代码(如统一日志)、提高开发效率、便于维护;
应用场景:事务管理、日志记录、权限控制、性能监控、异常处理。
21. 基于 AspectJ 实现 AOP
21.1 引入依赖
<!-- Spring 核心 -->
<dependency><groupId>org.springframework</groupId><artifactId>spring-context</artifactId><version>6.0.11</version>
</dependency>
<!-- AspectJ 织入器 -->
<dependency><groupId>org.aspectj</groupId><artifactId>aspectjweaver</artifactId><version>1.8.7</version>
</dependency>
<!-- JUnit 测试 -->
<dependency><groupId>junit</groupId><artifactId>junit</artifactId><version>4.12</version><scope>test</scope>
</dependency>
<!-- Spring 测试 -->
<dependency><groupId>org.springframework</groupId><artifactId>spring-test</artifactId><version>6.0.11</version><scope>test</scope>
</dependency>
21.2 编写连接点(目标方法)
@Repository
public class UserDao {// 目标方法(将被增强)public void add() {System.out.println("用户新增");}public void delete() {System.out.println("用户删除");}
}
21.3 编写通知类(增强逻辑)
// 通知类(包含增强逻辑)
public class MyAspectAdvice {// 前置通知:目标方法执行前执行public void myBefore() {System.out.println("前置通知:方法即将执行");}// 后置通知:目标方法正常执行后执行public void myAfterReturning(JoinPoint joinPoint) {// JoinPoint 可获取目标方法信息(如方法名)String methodName = joinPoint.getSignature().getName();System.out.println("后置通知:" + methodName + " 方法执行完成");}// 异常通知:目标方法抛出异常后执行public void myAfterThrowing(Exception ex) {System.out.println("异常通知:发生异常:" + ex.getMessage());}// 最终通知:无论目标方法是否异常,都会执行public void myAfter() {System.out.println("最终通知:方法执行结束(无论是否异常)");}// 环绕通知:目标方法执行前后都执行(可控制目标方法是否执行)public Object myAround(ProceedingJoinPoint pjp) throws Throwable {System.out.println("环绕前:目标方法执行前");// 执行目标方法(必须调用,否则目标方法不执行)Object result = pjp.proceed();System.out.println("环绕后:目标方法执行后");return result;}
}
21.4 XML 配置切面
<beans xmlns="http://www.springframework.org/schema/beans"xmlns:context="http://www.springframework.org/schema/context"xmlns:aop="http://www.springframework.org/schema/aop" <!-- 引入 aop 约束 -->xmlns:xsi="http://www.w3.org/2001/XMLSchema-instance"xsi:schemaLocation="http://www.springframework.org/schema/beanshttp://www.springframework.org/schema/beans/spring-beans.xsdhttp://www.springframework.org/schema/contexthttp://www.springframework.org/schema/context/spring-context.xsdhttp://www.springframework.org/schema/aophttp://www.springframework.org/schema/aop/spring-aop.xsd"><!-- 包扫描 --><context:component-scan base-package="com.itbaizhan"></context:component-scan><!-- 配置通知对象 --><bean id="myAspectAdvice" class="com.itbaizhan.advice.MyAspectAdvice"></bean><!-- 配置 AOP 切面 --><aop:config><!-- 配置切面(关联通知对象) --><aop:aspect ref="myAspectAdvice"><!-- 配置切点(execution 为切点表达式,指定增强的方法) --><aop:pointcut id="myPointcut" expression="execution(* com.itbaizhan.dao.UserDao.*(..))"/><!-- 配置通知(关联切点) --><aop:before method="myBefore" pointcut-ref="myPointcut"></aop:before> <!-- 前置通知 --><aop:after-returning method="myAfterReturning" pointcut-ref="myPointcut"></aop:after-returning> <!-- 后置通知 --><aop:after-throwing method="myAfterThrowing" pointcut-ref="myPointcut" throwing="ex"></aop:after-throwing> <!-- 异常通知 --><aop:after method="myAfter" pointcut-ref="myPointcut"></aop:after> <!-- 最终通知 --><aop:around method="myAround" pointcut-ref="myPointcut"></aop:around> <!-- 环绕通知 --></aop:aspect></aop:config>
</beans>
21.5 测试
@RunWith(SpringJUnit4ClassRunner.class)
@ContextConfiguration(locations = "classpath:applicationContext.xml")
public class UserDaoTest {@Autowiredprivate UserDao userDao;@Testpublic void testAdd() {userDao.add(); // 执行目标方法,自动触发增强}
}
输出结果(无异常时)
环绕前:目标方法执行前
前置通知:方法即将执行
用户新增
环绕后:目标方法执行后
后置通知:add 方法执行完成
最终通知:方法执行结束(无论是否异常)
二十一,AOP:切点表达式语法规则
切点表达式用于指定“对哪些方法进行增强”,标准格式如下:
访问修饰符 方法返回值 包名.类名.方法名(参数列表)
语法规则分解
| 部分 | 说明 | 示例 |
|---|---|---|
| 访问修饰符 | 可省略(如 public、private) | public 或省略 |
| 方法返回值 | 必须指定,* 表示任意返回值 | String、* |
| 包名 | * 表示任意包,*.. 表示任意多级包 | com.itbaizhan.dao、*..dao |
| 类名 | * 表示任意类 | UserDao、*Dao |
| 方法名 | * 表示任意方法 | add、find* |
| 参数列表 | * 表示一个任意类型参数,.. 表示任意类型任意个数参数 | (int)、(String)、(..) |
常用切点表达式示例
- 增强
UserDao的所有方法:execution(* com.itbaizhan.dao.UserDao.*(..)) - 增强所有
Dao类的find方法:execution(* com.itbaizhan.dao.*.find*(..)) - 增强所有层的所有方法(全通配):
execution(* *..*.*(..)) - 增强
Service层的无参方法:execution(* com.itbaizhan.service.*.*())
二十二,AOP:注解配置实现
通过注解配置 AOP 比 XML 更简洁,核心步骤包括:
步骤 1:XML 配置开启 AOP 注解支持
在 Spring 配置文件中添加以下内容:
<beans><context:component-scan base-package="com.itbaizhan"></context:component-scan><!-- 开启 AOP 注解支持 --><aop:aspectj-autoproxy></aop:aspectj-autoproxy>
</beans>
步骤 2:注解声明切面与通知
使用 @Aspect 声明切面类,并通过 @Before、@After 等注解定义通知:
@Component // 纳入 Spring 容器管理
@Aspect    // 声明为切面类
public class MyAspectAdvice {// 1. 定义可复用的切点@Pointcut("execution(* com.itbaizhan.dao.UserDao.*(..))")public void myPointcut() {} // 空方法,仅用于承载 @Pointcut// 2. 前置通知@Before("myPointcut()")public void myBefore() {System.out.println("前置通知");}// 3. 后置通知@AfterReturning("myPointcut()")public void myAfterReturning() {System.out.println("后置通知");}// 4. 异常通知@AfterThrowing(value = "myPointcut()", throwing = "ex")public void myAfterThrowing(Exception ex) {System.out.println("异常通知:" + ex.getMessage());}// 5. 最终通知@After("myPointcut()")public void myAfter() {System.out.println("最终通知");}// 6. 环绕通知@Around("myPointcut()")public Object myAround(ProceedingJoinPoint pjp) throws Throwable {System.out.println("环绕前");Object result = pjp.proceed();System.out.println("环绕后");return result;}
}
步骤 3:测试调用
调用目标方法时,自动触发注解配置的增强逻辑:
@Test
public void testAdd() {userDao.add(); // 自动触发 AOP 增强
}