rclone:安装与配置
一、安装rclone
1.1 Linux系统安装
在Linux系统上安装rclone非常简单,官方提供了一键安装脚本:
curl https://rclone.org/install.sh | sudo bash
这个脚本会自动检测你的系统架构,下载对应版本的rclone并完成安装。安装完成后,可以通过以下命令验证是否安装成功:
rclone version
如果显示rclone的版本信息,则说明安装成功。
1.2 安装必要依赖
rclone在挂载云盘到本地时需要使用FUSE(Filesystem in Userspace)技术,因此需要安装fuse3依赖:
# 对于CentOS/RHEL系统
yum -y install fuse3# 对于Ubuntu/Debian系统
apt-get install fuse3
安装完依赖后,你就可以使用rclone的挂载功能了。
二、配置rclone
2.1 配置文件位置
rclone的配置文件默认存储在以下位置:
- Linux系统:
/root/.config/rclone/rclone.conf - Windows系统:
C:\Users\Administrator\AppData\Roaming\rclone\rclone.conf
配置文件采用INI格式,每个云存储服务都有一个独立的配置块。
2.2 配置Google Drive
下面以配置Google Drive为例,详细介绍rclone的配置过程:
- 启动配置向导:
rclone config
- 创建新配置:
No remotes found, make a new one?
n) New remote
s) Set configuration password
q) Quit config
n/s/q> n
- 为配置命名:
Enter name for new remote.
name> test
这里的名称(示例中为"test")将在后续命令中用于标识这个云存储配置。
- 选择存储类型:
Option Storage.
Type of storage to configure.
...
Storage> 17
选择"17"代表Google Drive。
- 配置OAuth参数:
Option client_id.
client_id> Option client_secret.
client_secret>
对于一般使用,可以直接按Enter跳过这些参数,rclone会使用默认的内部密钥。
- 设置访问权限:
Option scope.
...
scope> 1
选择"1"表示完全访问所有文件(不包括应用程序数据文件夹)。
- 配置服务账户(可选):
Option service_account_file.
service_account_file>
一般用户可以直接按Enter跳过。
- 高级配置:
Edit advanced config?
y) Yes
n) No (default)
y/n>
直接按Enter跳过高级配置。
- 浏览器认证:
Use web browser to automatically authenticate rclone with remote?
y) Yes (default)
n) No
y/n>
直接按Enter,rclone会启动一个临时Web服务器并显示认证URL。你需要在有图形界面的机器上打开这个URL,登录Google账户并授权rclone访问。
- 配置共享云盘(可选):
Configure this as a Shared Drive (Team Drive)?
y) Yes
n) No (default)
y/n> y
如果你需要访问Google Team Drive,选择"y"。
- 选择共享云盘:
Option config_team_drive.
...
config_team_drive> 1
选择你要挂载的共享云盘。
- 完成配置:
Configuration complete.
...
Keep this "test" remote?
y) Yes this is OK (default)
e) Edit this remote
d) Delete this remote
y/e/d>
确认配置无误后,按Enter保存配置。
2.3 无图形界面环境配置
在Linux服务器等无图形界面的环境中,无法直接完成浏览器认证。解决方法是在有图形界面的机器上完成配置后,将配置文件复制到目标机器。
具体步骤如下:
- 在有图形界面的机器上完成上述配置过程。
- 找到配置文件(Linux系统:
/root/.config/rclone/rclone.conf)。 - 将配置文件复制到目标机器的相同位置。
- 在目标机器上验证配置是否生效。
三、常用命令
3.1 查看云盘内容
# 查看云盘目录("test"是配置时使用的名称)
rclone lsd test:# 查看云盘文件
rclone ls test:
3.2 挂载云盘到本地
# 挂载云盘到本地目录
rclone mount test: /data &
这个命令会将Google Drive挂载到本地的/data目录。注意:
test:是配置名称,后面必须加冒号/data是本地挂载点目录&表示将命令放到后台执行
3.3 其他实用命令
# 复制文件到云盘
rclone copy /local/path test:remote/path# 同步本地目录到云盘
rclone sync /local/path test:remote/path# 从云盘下载文件
rclone copy test:remote/file /local/path# 删除云盘文件
rclone delete test:remote/file# 移动文件
rclone move /local/file test:remote/path
四、实用技巧
4.1 后台运行挂载命令
使用&将挂载命令放到后台执行是一种简单的方法,但更推荐使用screen或systemd来管理挂载进程:
# 使用screen管理挂载进程
screen -S rclone
rclone mount test: /data
# 按Ctrl+A+D退出screen,挂载进程继续在后台运行# 重新连接到screen
screen -r rclone
4.2 优化挂载参数
rclone挂载时可以使用一些参数来优化性能:
rclone mount test: /data \--allow-other \--buffer-size 256M \--dir-cache-time 96h \--cache-dir /tmp/rclone \--vfs-cache-mode writes \--vfs-cache-max-size 10G \--vfs-cache-max-age 48h &
这些参数的含义:
--allow-other:允许其他用户访问挂载点--buffer-size:设置缓冲区大小--dir-cache-time:目录缓存时间--cache-dir:缓存目录--vfs-cache-mode:VFS缓存模式--vfs-cache-max-size:VFS缓存最大大小--vfs-cache-max-age:VFS缓存最大年龄
4.3 配置文件备份与迁移
rclone配置文件包含了所有云存储的认证信息,非常重要。建议定期备份配置文件:
# 备份配置文件
cp /root/.config/rclone/rclone.conf /backup/rclone.conf.backup# 恢复配置文件
cp /backup/rclone.conf.backup /root/.config/rclone/rclone.conf
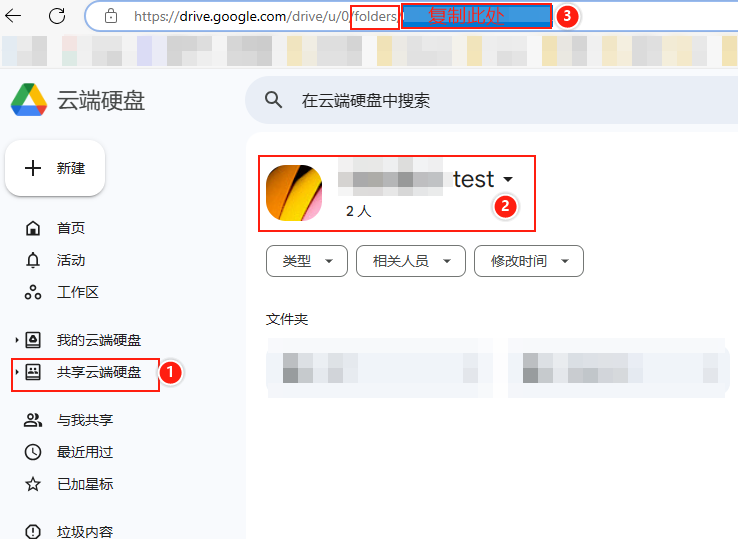
4.4 Google Drive团队共享盘挂载问题
在rclone配置文件中的team_drive字段,需要填写想要挂载的Google团队盘的ID。这个ID是Google Drive分配给每个团队盘的唯一标识符。
以下是获取和填写team_drive ID的步骤:
找到团队盘ID: 登录Google Drive网页版,进入想要挂载的共享云盘盘。在浏览器的地址栏中,URL的最后部分(/folders/之后的部分)就是团队盘ID。
vim /root/.config/rclone/rclone.conf
[test]
type = drive
token = {"access_token":"xxxxxxxxxxxxxxxxx","token_type":"Bearer","refresh_token":"1//xxxxxxxxxxxxx","expiry":"2024-05-27T18:17:06.901539936+08:00"}
#team_drive是配置共享云盘的参数
team_drive = xxxxxxxxxxxx