pytest学习
pytest学习
文章目录
- pytest学习
- 1. 用例结果
- 2. 用例发现规则
- 3. 用例内容规则
- 4. 小测试
- 5. 配置框架
- 6. 标记mark
- 1. 用户自定义标记
- 2. 框架内置标记
- 7. 数据驱动测试参数
- 8. 夹具fixture
- 1. 创建使用fixture
- 2. 高级用法
- 9. 插件
- 1. 插件管理
- 2. 常用第三方插件
- 10. 企业级测试报告
- 11. Web自动化测试
- 12. 测试框架要封装什么
- 13. YAML文件格式
- 13.1 安装yaml文件
- 13.2 编写yaml文件
- 13.3 加载yaml文件
- 14. 接口测试用例
- 参考
常见测试框架
java:junit,testng
python:unittest,pytest
pip install pytest -U
pytest有三种启动方式:
- 命令
- 代码
- 鼠标
1. 用例结果
1.执行环境:版本、根目录、用例数量
2.执行过程:文件名称、用例结果、执行进度
3.失败详情:用例内容、断言提示
4.整体摘要:结果情况、结果数量、花费时间
| 缩写 | 单词 | 含义 |
|---|---|---|
| . | passed | 通过 |
| F | failed | 失败(用例执行时报错) |
| E | error | 出错(fixture执行报错) |
| s | skipped | 跳过 |
| X | xpassed | 预期外的通过(不符合预期) |
| x | xfailed | 预期内的失败(符合预期) |
2. 用例发现规则
测试框架在识别、加载用例的过程,称之为:用例发现
pytest的用例发现步骤:
1.遍历所有的目录,例外:venv,.开头的目录
2.打开python文件,test_开头或者_test结尾
3.遍历所有的Test开头类
4.收集所有的test_开头的函数或者方法
3. 用例内容规则
pytest 8.4 增加了一个强制要求
pytest对用例的要求:
1.可调用的(函数、方法、类、对象)
2.名字test_开头
3.没有参数(参数有另外含义)
4.没有返回值(默认为None)
4. 小测试
main.py
import pytestpytest.main()
test_add.py
import pytestdef add(a,b):return a+bdef test_add():res=add(1,3)assert res==4def test_add_():res=add("1","3")assert res=="13"class TestAdd:def test_int(self):res=add(1,3)assert res==4def test_str(self):res=add("1","3")assert res=="13"def test_list(self):res=add([1,2,3],4)assert res==[1,2,3]
============================= test session starts =============================
platform win32 -- Python 3.13.7, pytest-8.4.2, pluggy-1.6.0
rootdir: C:\Users\21609\PycharmProjects\PythonProject1\pytest
plugins: anyio-4.10.0
collected 5 itemstest_add.py ....F                                                        [100%]================================== FAILURES ===================================
______________________________ TestAdd.test_list ______________________________self = <test_add.TestAdd object at 0x0000025FC14A6D70>def test_list(self):
>       res=add([1,2,3],4)^^^^^^^^^^^^^^test_add.py:20:
_ _ _ _ _ _ _ _ _ _ _ _ _ _ _ _ _ _ _ _ _ _ _ _ _ _ _ _ _ _ _ _ _ _ _ _ _ _ _ _a = [1, 2, 3], b = 4def add(a,b):
>       return a+b^^^
E       TypeError: can only concatenate list (not "int") to listtest_add.py:2: TypeError
=========================== short test summary info ===========================
FAILED test_add.py::TestAdd::test_list - TypeError: can only concatenate list...
========================= 1 failed, 4 passed in 0.10s =========================
5. 配置框架
配置可以改变 pytest 默认的规则:
- 命令参数
- ini文件文件
查看所有的配置方式
pytest -h
有哪些配置
- -开头:命令行参数
- 小写字母开头:ini配置
- 大写字母开头:环境变量
配置文件:pytest.ini
常用参数:
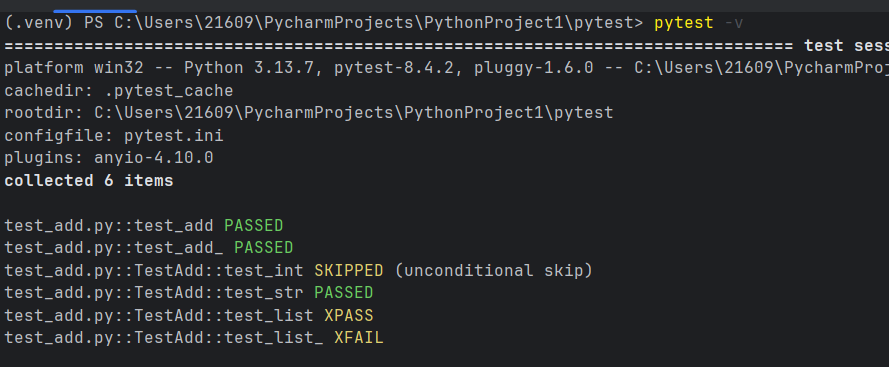
-v:增加用例详细内容
-s:在用例中正常的使用输入输出
-x:快速退出,当遇到失败的用例则全部停止执行
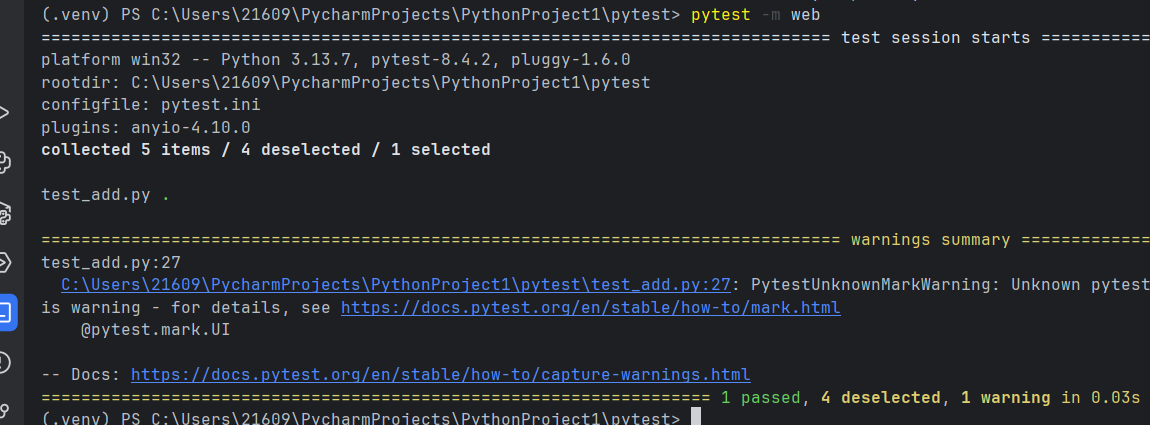
-m:用例筛选(pytest -m web)
6. 标记mark
标记可以让用例与众不同,进而可以让用例被区别对待。
1. 用户自定义标记
用户自定义标记只能实现用例筛选。
步骤:
- 先注册
- 再标记
- 后筛选
pytest.ini文件中增加内容:
[pytest]markers =api: 接口web: UI测试Ut: 单元测试login: 登录相关pay: 支付相关
pytest --markers

修改test_add.py
class TestAdd:@pytest.mark.apidef test_int(self):res=add(1,3)assert res==4@pytest.mark.webdef test_str(self):res=add("1","3")assert res=="13"@pytest.mark.UIdef test_list(self):res=add([1,2,3],4)assert res==[1,2,3]
只执行web用例
pytest -m web
2. 框架内置标记
框架内置标记可以为用例增加特殊执行效果。
和用户自定义标记区别:
-
不需注册,可以直接使用
-
不仅可以筛选,还可以增加特殊效果
-
不同的标记,增加不同的特殊效果
-
skip:无条件跳过
-
skipif:有条件跳过
-
xfail:预期失败
-
parametrize:参数化
-
usefixtures:使用fixtures
-
修改test_add.py
class TestAdd:@pytest.mark.skip@pytest.mark.apidef test_int(self):res=add(1,3)assert res==4@pytest.mark.skipif(1==2,reason="跳过了")@pytest.mark.webdef test_str(self):res=add("1","3")assert res=="13"@pytest.mark.xfail()@pytest.mark.UIdef test_list(self):res=add([1,2,3],[4])assert res==[1,2,3,4]@pytest.mark.xfail()@pytest.mark.UIdef test_list_(self):res = add([1, 2, 3], [4])assert res != [1, 2, 3,4]
7. 数据驱动测试参数
数据驱动测试=参数化测试+数据文件
根据数据文件的内容,动态决定用例的数量、内容
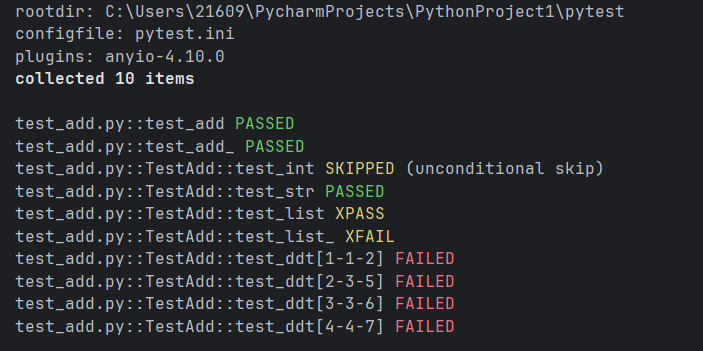
新建data.csv
a,b,c
1,1,2
2,3,5
3,3,6
4,4,7
pytest.ini添加ddt: 数据驱动测试
修改test_add.py
from baifan import readCSV
class TestAdd:#其他不变@pytest.mark.ddt@pytest.mark.parametrize("a,b,c",readCSV("data.csv"))def test_ddt(self,a,b,c):res=add(int(a),int(b))assert res==c
添加baifan.py
import csv
def readCSV(csvFile):with open(csvFile, newline='') as f:reader = csv.reader(f)return list(reader)[1:]

8. 夹具fixture
夹具:在用例执行之前、执行之后,自动运行代码
场景:
-
之前:加密参数/之后:解密结果
-
之前:启动浏览器/之后:关闭浏览器
-
之前:注册、登录账号/之后:删除账号
1. 创建使用fixture
创建
- 创建函数
- 添加装饰器
- 添加yield关键字
使用
方法1:在用例的参数列表中,加入fixture名字即可
方法2:给用例加上usefixtures标记
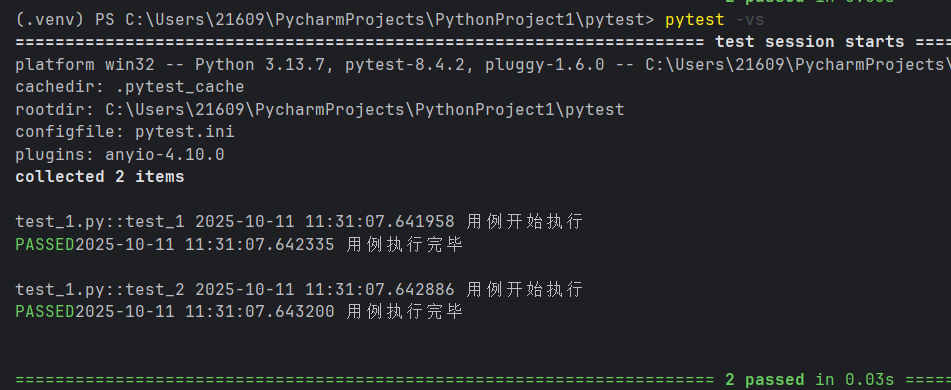
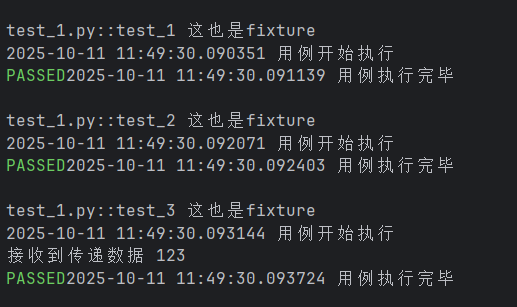
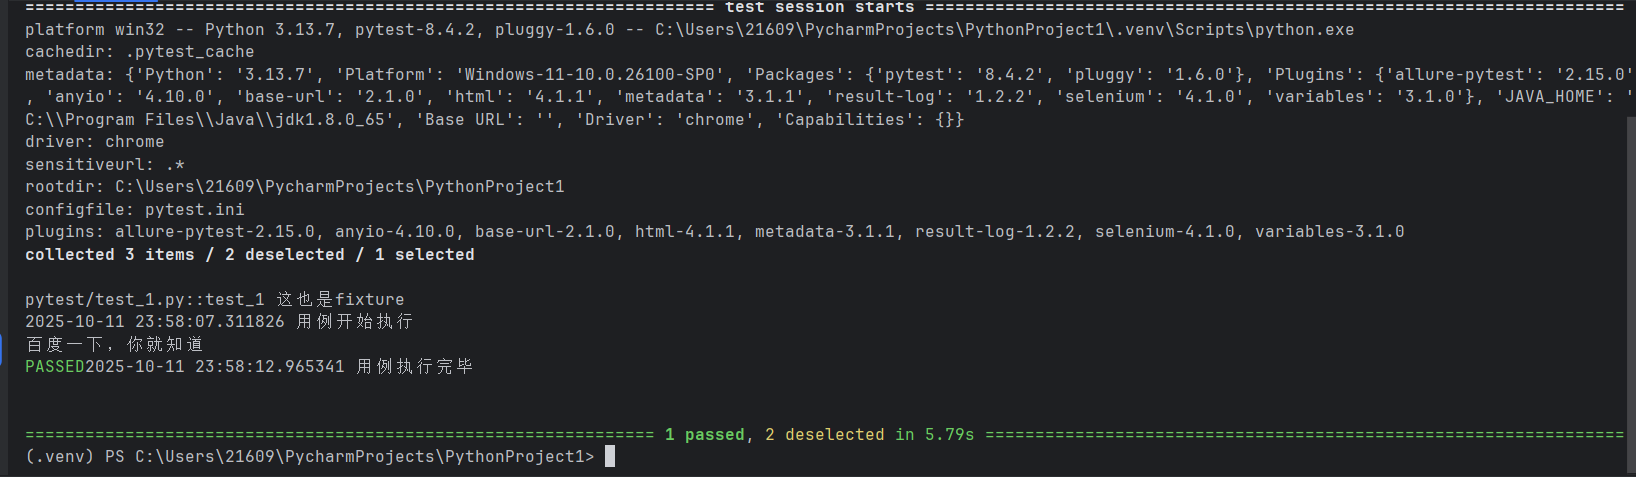
新建test_1.py
import datetime
import pytest@pytest.fixture
def app():print(datetime.datetime.now(),"用例开始执行")# 前置操作yield# 后置操作print(datetime.datetime.now(),"用例执行完毕")def test_1(app):pass@pytest.mark.usefixtures("app")
def test_2():pass
pytest -vs
2. 高级用法
-
自动使用(所有用例都会使用该fixture)(@pytest.fixture(autouse=True))
-
依赖使用(fixture作为参数,一个fixture作为另一个fixture参数)
- linux:使用linux进行编译
- git:使用git进行版本控制
- fixture:使用fixture进行前后置自动操作
-
返回内容:接口自动化封装:接口关联
-
范围共享
-
默认范围:function
-
全局范围:session
- 使用conftest.py(跨文件传递命名空间)
-
test_1.py
import datetime
import pytest@pytest.fixture
def ff():print("这也是fixture")@pytest.fixture(autouse=True)
def app(ff):print(datetime.datetime.now(),"用例开始执行")# 前置操作yield 123# 后置操作print(datetime.datetime.now(),"用例执行完毕")def test_1():passdef test_2():passdef test_3(app):print("接收到传递数据",app)
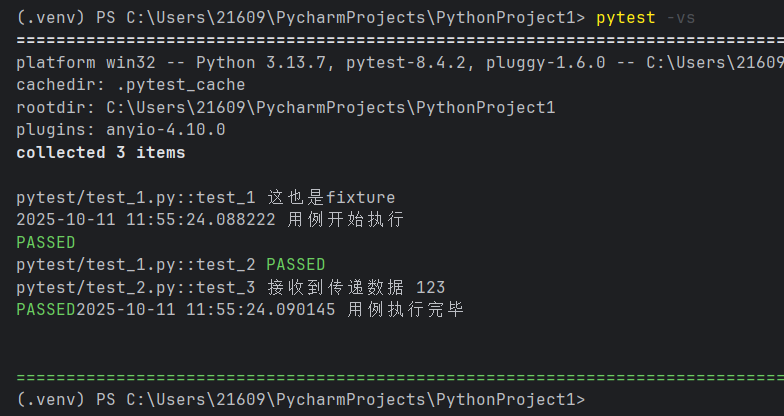
test_1.py
def test_1():passdef test_2():pass
test_2.py
def test_3(app):print("接收到传递数据",app)
新建C:\Users\21609\PycharmProjects\PythonProject1\conftest.py
import datetime
import pytest@pytest.fixture(scope="session")
def ff():print("这也是fixture")@pytest.fixture(autouse=True, scope="session")
def app(ff):print(datetime.datetime.now(),"用例开始执行")# 前置操作yield 123# 后置操作print(datetime.datetime.now(),"用例执行完毕")
可以看到跨文件传递命名空间和范围共享的效果
9. 插件
1. 插件管理
pytest插件生态是pytest特别的优势之处。
插件分成两类:
- 不需要安装:内置插件
- 需要安装:第三方插件
插件的启用管理:
- 启用:-p abc
- 禁用:-p no:abc
插件使用方式:
- 参数
- 配置文件
- fixture
- mark
2. 常用第三方插件
pytest 有1400+插件:https://docs.pytest.org/en/stable/reference/plugin_list.html
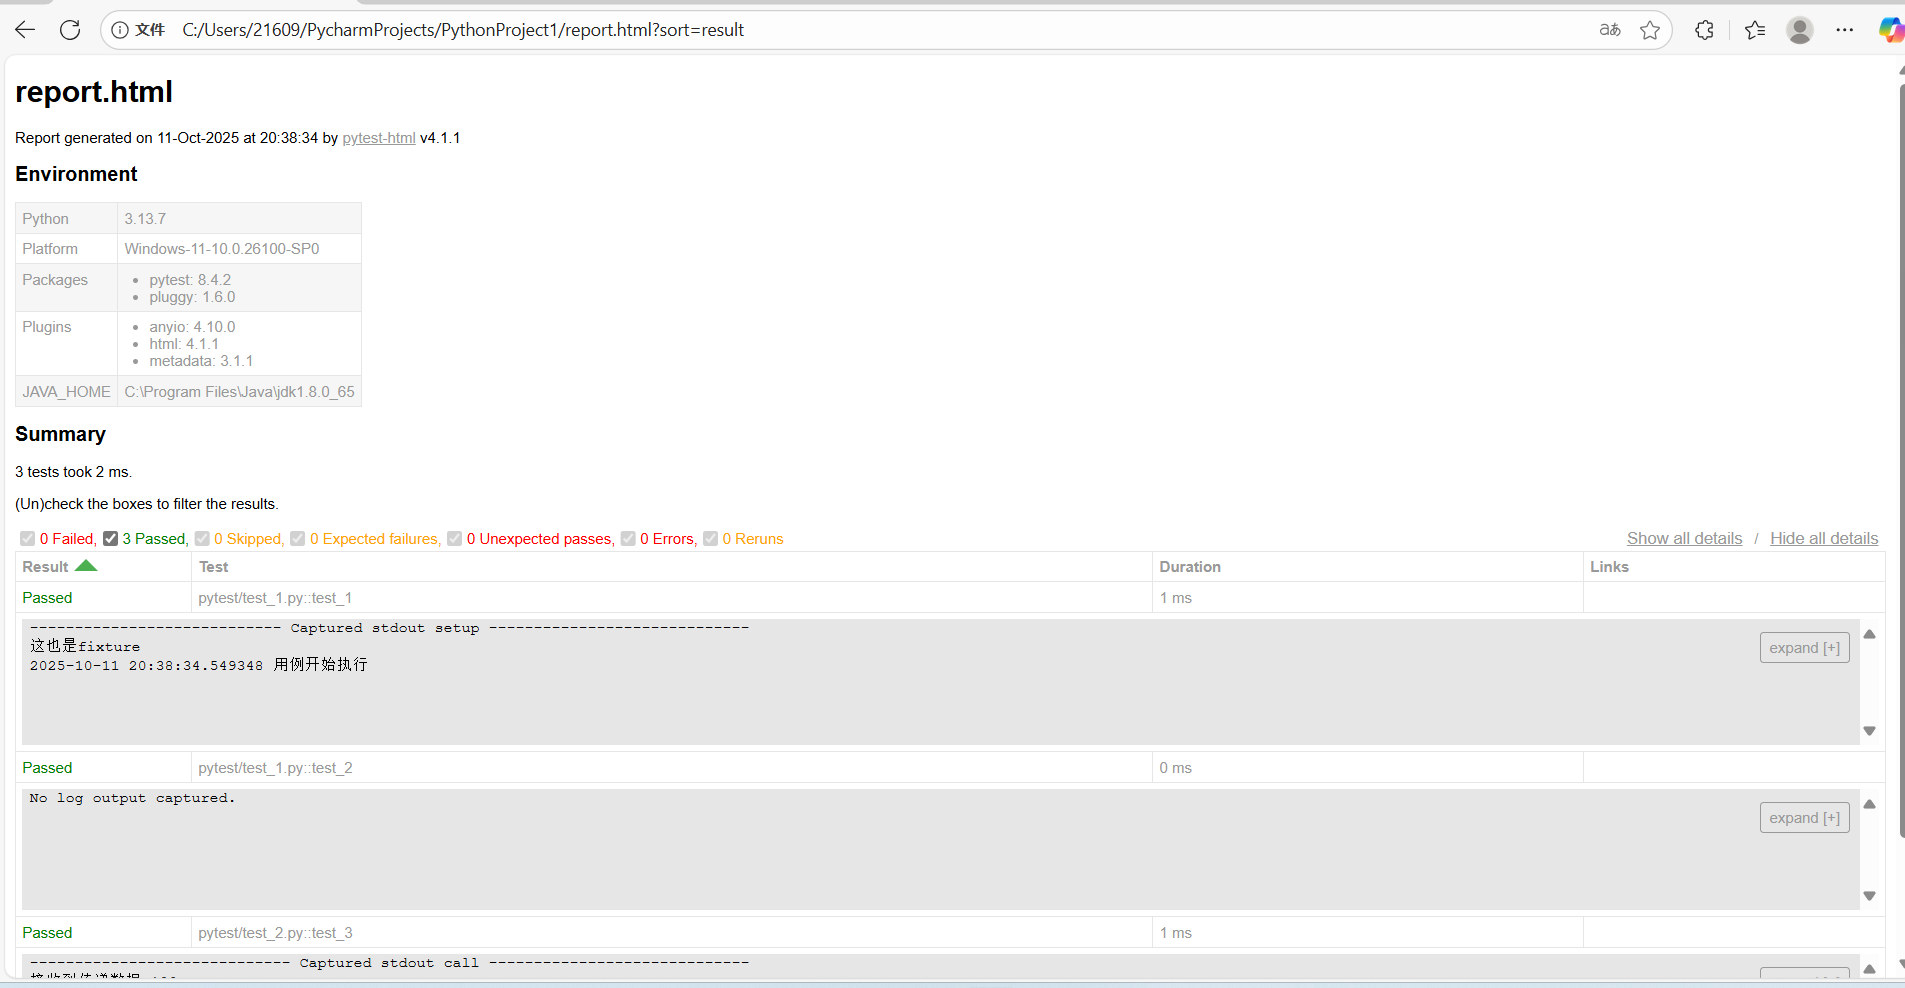
pytest-html
用途:生成HTML测试报告
安装:
pip install pytest-html
使用(参数):
pytest --html=report.html --self-contained-html
或者在pytest.ini里面加上
(注意pytest.ini要移动到C:\Users\21609\PycharmProjects\PythonProject1)
addopts = --html=report.html --self-contained-html
然后
pytest -sv
pytest-xdist
用途:分布式执行(多进程)
安装:
pip install pytest-xdist
使用:
-n N
只有在任务本身耗时较长,超出调用成本很多的时候,才有意义。
分布式执行,有并发问题,资源竞争,乱序。
pytest-rerunfailures
用途:用例失败之后,重新执行
安装:
pip install pytest-rerunfailures
使用:
--reruns 5 --reruns-delay 1
pytest-result-log
用途:把用例的执行结果记录到日志文件中
安装:
pip install pytest-result-log
使用:
log_file =./logs/pytest.log
log_file_level= info
log_file_format =%(levelname)-8s %(asctime)s [%(name)s:%(lineno)s]:%(message)s
log_file_date_format = %Y-%m-%d %H:%M:%S;记录用例执行结果
result_log_enable= 1
;记录用例分制线
result_log_separator= 1
;分制线等级
result_log_level_separator= warning
;异常信息等级
result_log_level_verbose =info
10. 企业级测试报告
allure是一个测试报告框架。
下载allure
https://github.com/allure-framework/allure2/releases
将C:\Users\21609\Downloads\allure-2.35.1\bin添加到环境变量
安装
pip install allure-pytest
配置
修改pytest.ini
addopts = --alluredir=temps --clean-alluredir
生成报告(命令行,也可以通过python代码来启动)
pytest
allure generate -o report -c temps
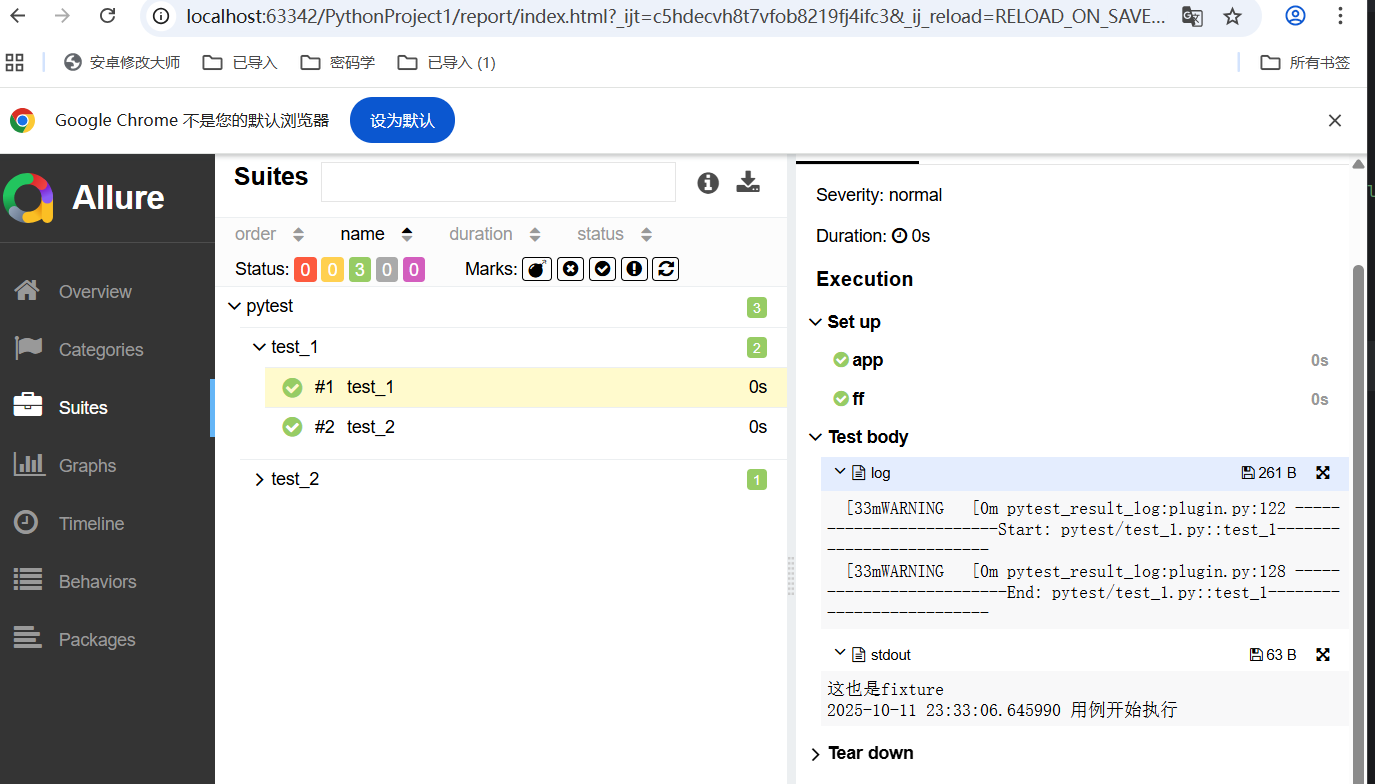
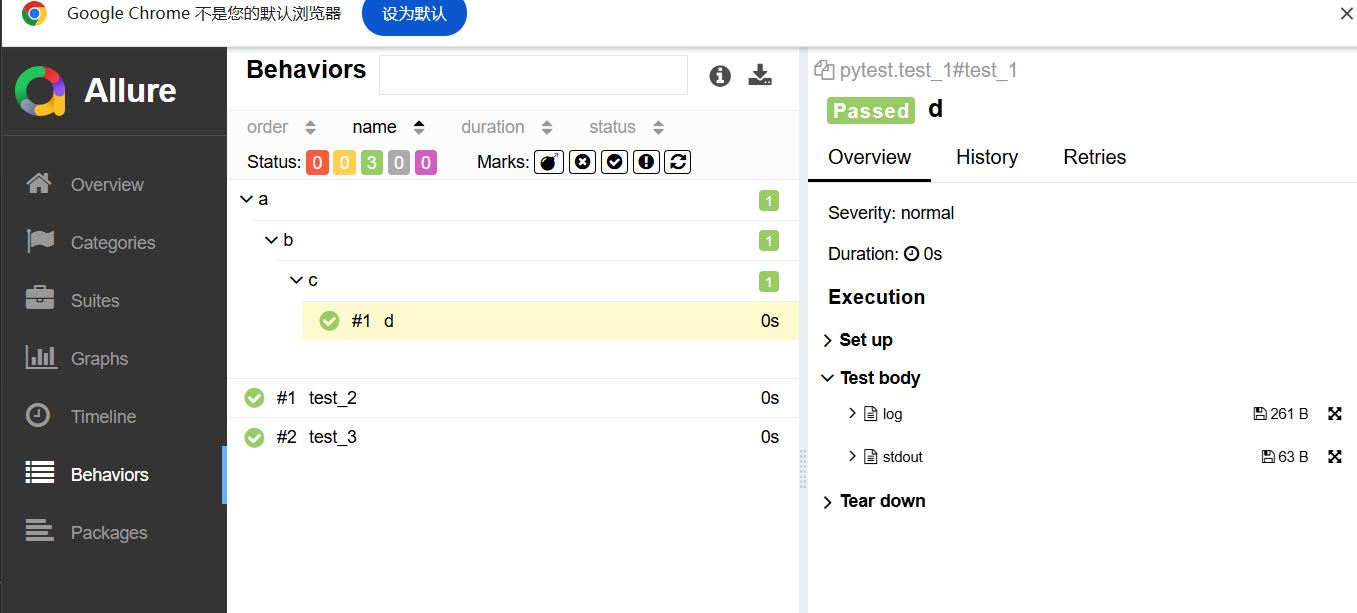
allure支持对用例进行分组和关联(敏捷开发术语)
import allure
@allure.epic  史诗  项目
@allure.feature  主题  模块
@allure.story  故事  功能
@allure.title  标题  用例
修改test_1.py
import allure
@allure.epic("a")
@allure.feature("b")
@allure.story("c")
@allure.title("d")
def test_1():passdef test_2():pass
11. Web自动化测试
pytest 仅进行用例管理,不会控制浏览器,需要借助新的工具:selenium。
- 只了解selenium
- 搜索关于selenium的pytest插件
自己实现类似selenium的功能:
pip install pytest-selenium
关闭杀毒软件
修改pytest.ini对应部分
addopts = --alluredir=temps --clean-alluredir -m web --driver chrome -vs
test_1.py
import allure
import pytest
import time@pytest.mark.web
def test_1(selenium):selenium.get("https://www.baidu.com")print(selenium.title)def test_2():pass
12. 测试框架要封装什么
封装:
- 隐藏细节
- 增加功能
- 优化功能
接口自动化封装:
- 使用yaml作为用例,降低自动化门槛
- 自动请求接口、断言接口
- 自动在日志记录HTTP报文
- 自动生成allure测试报告
13. YAML文件格式
一句话:YAML完全兼容JSON格式,并且支持Python相似写法
重点:
- YAML完全兼容JSON
- 是数据格式,不是编程语言
- 像Python一样容易编辑和阅读
13.1 安装yaml文件
pip install pyyaml
13.2 编写yaml文件
-
#作为注释符号
-
缩进:使用2个空格
-
成员表示
-
-表示列表成员 -
:表示字典成员 -
null表示空值 -
"666"表示字符串 -
[1,2,3,]表示列表 -
{"a":1,"b":2}表示字典
-
-
兜底:完全兼容JSON
13.3 加载yaml文件
y.py
import yaml
def Load_yaml():f=open("baifan.yaml",encoding="utf-8")#打开文件s=f.read()#读取文件内容data =yaml.safe_load(s)print(data)f.close()Load_yaml()
#{'字典的键': [1, -2, 3.3], '字符串': ['123', '456', 'aaaa']}
baifan.yaml
字典的键:- 1- -2- 3.3字符串:- '123'- "456"- aaaa
14. 接口测试用例
14.1 请求接口
外部工具:requests
从HTTP协议抓包角度,请求由三部分组成:
- 行:方法+地址(必填)
- 头:请求头(键值对)
- 体:参数内容
14.2 断言响应
- 响应里有什么
- 响应如何断言
从HTTP协议抓包角度,响应由三部分组成:
- 行:状态码
- 头:响应头(键值对)
- 体:响应内容
14.3 变量的提取
基本原则:
- JSON:JSONPATH
- HTML:XPATH
- 字符串:RE
14.4 框架的落地封装
文件结构,日志,内容
进一步完善:
- YAML用例测试文件上传?
- YAML用例进行数据去掉测试?
- YAML用例进行自定义的断言?
- YAML用例进行数据库查询?
两个方向:
- 自动化测试工程师
- 测试开发工程师
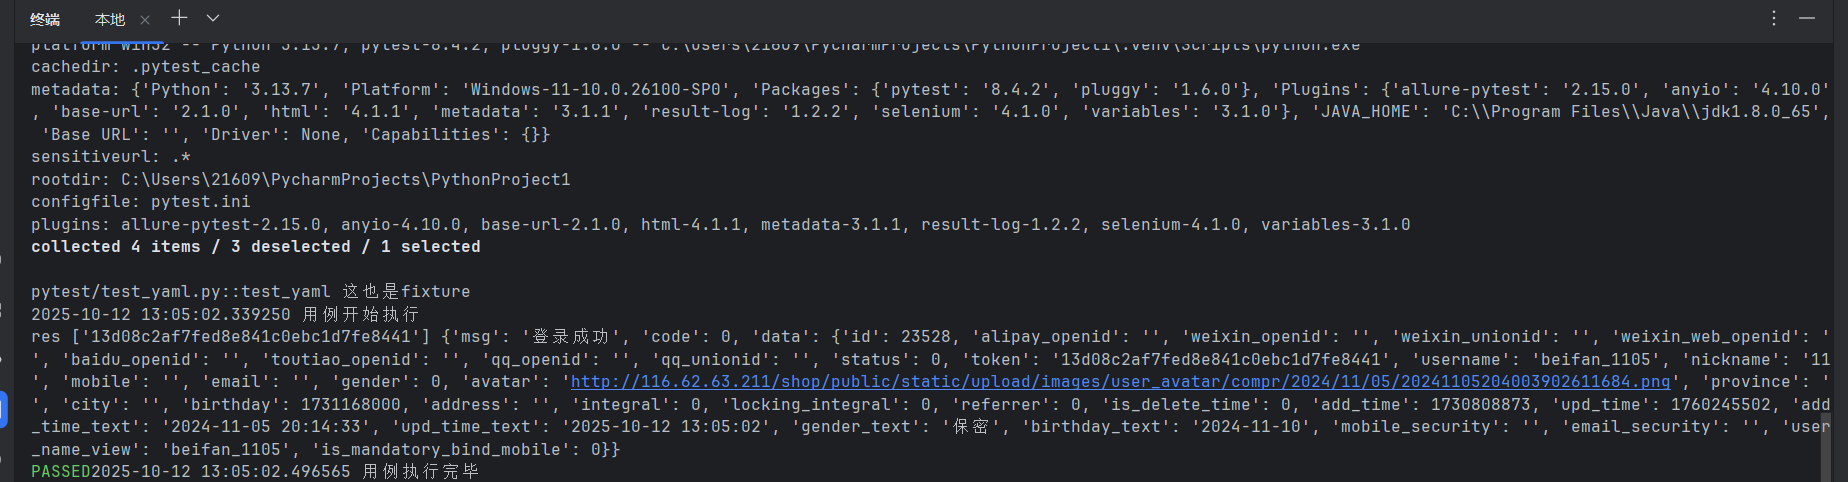
test_api.yaml
name : 登陆成功用例
steps:- request : #发送请求method : POSTurl : http://116.62.63.211/shop/api.php?application=app&application_client_type=weixinparams :s : user/loginjson : {"accounts" : "beifan_1105","pwd" : "beifan_1105","type" : "username"}- response : #断言响应status_code : 200json :code : 0msg : 登录成功data :username : beifan_1105- extract : #提取变量token : [ json , $.data.token ]
test_yaml.py
import json
import re
from unittest import caseimport jsonpath
import requests
import responses_validator
from  responses_validator import validator
import allure
import yaml
import pytest@pytest.mark.api
def test_yaml():my_var={}with open(r"C:\Users\21609\PycharmProjects\PythonProject1\pytest\test_api.yaml",encoding="utf-8") as f:data=yaml.safe_load(f)#打开文件allure.title(data['name'])for step in data['steps']:for k,v in step.items():runner(k,v,my_var)def extract(resp,attr_name,exp):try:resp.json=resp.json()except:resp.json={}#attr_name为jsonattr=json.loads(json.dumps(getattr(resp,attr_name)))#下面的jsonpath需要字符串里面用双引号#json.dumps将字典getattr(resp,attr_name)转为json格式字符串,并替换键或者值单引号字符串'name'为双引号字符串"name"res=jsonpath.jsonpath(attr,exp)print("res",res,resp.json)return res[0]def runner(k,v,my_var):match k:case "request":my_var['resp']=requests.request(**v)case "response":responses_validator.validator(my_var['resp'],**v)#字典使用2个星号case "extract": #变量提取for var_name,var_exp in v.items():value=extract(my_var['resp'],*var_exp)#列表使用一个星号
pytest.ini
[pytest]addopts = --alluredir=temps --clean-alluredir -m api  -vsmarkers =api: 接口web: UI测试Ut: 单元测试login: 登录相关pay: 支付相关ddt: 数据驱动测试log_file =./logs/pytest.log
log_file_level= info
log_file_format =%(levelname)-8s %(asctime)s [%(name)s:%(lineno)s]:%(message)s
log_file_date_format = %Y-%m-%d %H:%M:%S;记录用例执行结果
result_log_enable= 1
;记录用例分制线
result_log_separator= 1
;分制线等级
result_log_level_separator= warning
;异常信息等级
result_log_level_verbose =info
响应包如下
 {'msg': '登录成功', 'code': 0, 'data': {'id': 23528, 'alipay_openid': '', 'weixin_openid': '', 'weixin_unionid': '', 'weixin_web_openid': '
', 'baidu_openid': '', 'toutiao_openid': '', 'qq_openid': '', 'qq_unionid': '', 'status': 0, 'token': '13d08c2af7fed8e841c0ebc1d7fe8441', 'username': 'beifan_1105', 'nickname': '11
', 'mobile': '', 'email': '', 'gender': 0, 'avatar': 'http://116.62.63.211/shop/public/static/upload/images/user_avatar/compr/2024/11/05/20241105204003902611684.png', 'province': '
', 'city': '', 'birthday': 1731168000, 'address': '', 'integral': 0, 'locking_integral': 0, 'referrer': 0, 'is_delete_time': 0, 'add_time': 1730808873, 'upd_time': 1760245502, 'add_time_text': '2024-11-05 20:14:33', 'upd_time_text': '2025-10-12 13:05:02', 'gender_text': '保密', 'birthday_text': '2024-11-10', 'mobile_security': '', 'email_security': '', 'user_name_view': 'beifan_1105', 'is_mandatory_bind_mobile': 0}}
参考
【B站讲的最好的Pytest自动化测试教程,自动化必备之Pytest测试框架训练营,只需一小时速成,学会直接上手实操!】 https://www.bilibili.com/video/BV1rDdHYCEUP/?p=4&share_source=copy_web&vd_source=aeb4f89b7c74bd892c2a834774309409