0.5 数据增强、keras模型保存以及读取、绘制loss过程
进行图像增强,能高效地在模型训练过程中实时生成多样的训练数据,注意事项如下:
1.增强仅用于训练集:验证集和测试集不应进行数据增强,以便准确评估模型在真实数据上的性能。
2.理解增强效果:在开始训练前,建议可视化增强后的图像,确认增强效果符合预期,且未破坏原始标签信息。例如,对于数字识别,随意旋转可能导致"9"变成"6",这就改变了标签语义
【例1】下图是增强前后的图


# 显示原始图像和增强后的图像
import gzip
import osimport tensorflow as tf
from matplotlib import pyplot as pltimport numpy as np
from tf_keras.src.preprocessing.image import ImageDataGeneratormnist = tf.keras.datasets.fashion_mnist
(x_train, y_train), (x_test, y_test) = mnist.load_data()
x_train = x_train.reshape(x_train.shape[0], 28, 28, 1) #给训练集怎加一个维度60000张28x28变为 6000 28 28 1
x_test = x_test.reshape(x_test.shape[0], 28, 28, 1)image_gen_train = ImageDataGenerator(rescale=1. / 255,rotation_range=45,width_shift_range=.15,height_shift_range=.15,horizontal_flip=True,zoom_range=0.5
)
x_train_subset1 = np.squeeze(x_train[:12])
x_train_subset2 = x_train[:12]  # 一次显示12张图片fig = plt.figure(figsize=(20, 2))
plt.set_cmap('gray')
# 显示原始图片
for i in range(0, len(x_train_subset1)):ax = fig.add_subplot(1, 12, i + 1)ax.imshow(x_train_subset1[i])
fig.suptitle('Subset of Original Training Images', fontsize=20)
plt.show()# 显示增强后的图片
fig = plt.figure(figsize=(20, 2))
for x_batch in image_gen_train.flow(x_train_subset2, batch_size=12, shuffle=False):for i in range(0, 12):ax = fig.add_subplot(1, 12, i + 1)ax.imshow(np.squeeze(x_batch[i]))fig.suptitle('Augmented Images', fontsize=20)plt.show()break;
【例2】模型保存以及读取
主要通过:
1. 保存的方法:model.save(best_save_path,overwrite=True)
2.读取模型的方法:
model = keras.models.load_model(best_save_path )
3.注意,读取模型后如果需要继续训练,那么需要配置编译选项,即model.compile这个函数要在load_model后面。
import keras
import tensorflow as tf
import osfrom keras.src.legacy.preprocessing.image import ImageDataGeneratorfashion = tf.keras.datasets.fashion_mnist
(x_train, y_train), (x_test, y_test) = fashion.load_data()
x_train, x_test = x_train / 255.0, x_test / 255.0x_train = x_train.reshape(x_train.shape[0], 28, 28, 1) #给训练集怎加一个维度60000张28x28变为 6000 28 28 1
x_test = x_test.reshape(x_test.shape[0], 28, 28, 1)model = keras.models.Sequential([keras.layers.Flatten(),keras.layers.Dense(128, activation='relu'),keras.layers.Dense(10, activation='softmax')
])image_gen_train = ImageDataGenerator(rescale=1. / 255,rotation_range=45,width_shift_range=.15,height_shift_range=.15,horizontal_flip=True,zoom_range=0.5
)best_save_path = "./checkpoint/best.h5"if os.path.exists(best_save_path):print('-------------load the model-----------------')model = keras.models.load_model(best_save_path               )
model.compile(optimizer='adam',loss=keras.losses.SparseCategoricalCrossentropy(from_logits=False),metrics=['sparse_categorical_accuracy'])history = model.fit( image_gen_train.flow(x_train, y_train, batch_size=32) , epochs=4, validation_data=(x_test, y_test), validation_freq=1)
model.save(best_save_path,overwrite=True)
model.summary()
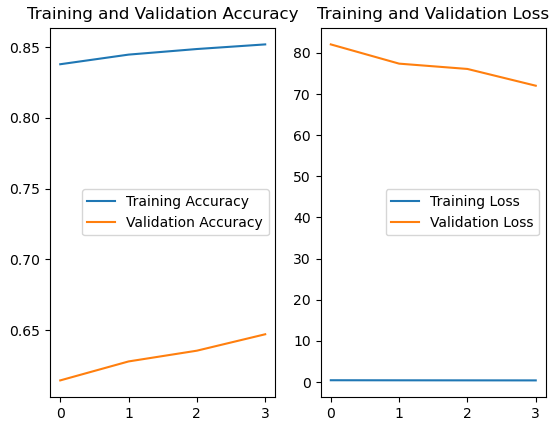
【例3】绘制训练的过程
history = model.fit( image_gen_train.flow(x_train, y_train, batch_size=32) , epochs=4, validation_data=(x_test, y_test), validation_freq=1)
acc = history.history['sparse_categorical_accuracy']
val_acc = history.history['val_sparse_categorical_accuracy']
loss = history.history['loss']
val_loss = history.history['val_loss']
import keras
import numpy as np
import tensorflow as tf
import osfrom keras.src.legacy.preprocessing.image import ImageDataGenerator
from matplotlib import pyplot as pltfashion = tf.keras.datasets.fashion_mnist
(x_train, y_train), (x_test, y_test) = fashion.load_data()
x_train, x_test = x_train / 255.0, x_test / 255.0x_train = x_train.reshape(x_train.shape[0], 28, 28, 1) #给训练集怎加一个维度60000张28x28变为 6000 28 28 1
x_test = x_test.reshape(x_test.shape[0], 28, 28, 1)model = keras.models.Sequential([keras.layers.Flatten(),keras.layers.Dense(128, activation='relu'),keras.layers.Dense(10, activation='softmax')
])image_gen_train = ImageDataGenerator(rescale=1. / 255,#rotation_range=45,#width_shift_range=.15,#height_shift_range=.15,#horizontal_flip=True,#zoom_range=0.5
)best_save_path = "./checkpoint/best.h5"if os.path.exists(best_save_path):print('-------------load the model-----------------')model = keras.models.load_model(best_save_path               )
model.compile(optimizer='adam',loss=keras.losses.SparseCategoricalCrossentropy(from_logits=False),metrics=['sparse_categorical_accuracy'])history = model.fit( image_gen_train.flow(x_train, y_train, batch_size=32) , epochs=4, validation_data=(x_test, y_test), validation_freq=1)
model.save(best_save_path,overwrite=True)
model.summary()resTemp= model.predict( np.expand_dims( x_train[0],0))
result = np.max( np.argmax(resTemp,axis=1))
print("predict:",result,";actual:",y_train[0])# 显示训练集和验证集的acc和loss曲线
acc = history.history['sparse_categorical_accuracy']
val_acc = history.history['val_sparse_categorical_accuracy']
loss = history.history['loss']
val_loss = history.history['val_loss']plt.subplot(1, 2, 1)
plt.plot(acc, label='Training Accuracy')
plt.plot(val_acc, label='Validation Accuracy')
plt.title('Training and Validation Accuracy')
plt.legend()plt.subplot(1, 2, 2)
plt.plot(loss, label='Training Loss')
plt.plot(val_loss, label='Validation Loss')
plt.title('Training and Validation Loss')
plt.legend()
plt.show()