【Docker】基于Ubuntu的Docker的日常使用方法
前言
【Docker】Docker的初步认识以及Ubuntu下的Docker环境安装、配置_ubuntu和docker的关系-CSDN博客
一、Docker安装与卸载
1.1 卸载
# 如果安装过,查看Docker版本
docker --version# 删除旧版本,同时彻底删除Docker相关包及配置
sudo apt-get purge docker docker-engine docker.io containerd runc# 清理无用依赖
sudo apt-get autoremove# 手动彻底删除 Docker 的核心数据目录
sudo rm -rf /var/lib/docker
1.2 安装
1.1.1 USTC 地址版本:
# 需要向系统的软件源配置中添加 Docker 官方仓库的地址信息
# 这样系统的包管理工具(如apt)才能识别并从该仓库中下载 Docker 相关软件
# 使用存储库安装Docker的原因:自动处理依赖关系,避免版本冲突
# 首先就需要其他工具来帮助获取 Docker 官方仓库的地址信息
sudo apt-get install \apt-transport-https \ca-certificates \curl \gnupg-agent \software-properties-common# 查看系统信息
lsb_release -a# 通过国内的镜像源 添加 Docker 的官方 GPG 密钥
curl -fsSL https://mirrors.ustc.edu.cn/docker-ce/linux/ubuntu/gpg -o /etc/apt/keyrings/docker.asc# 需要手动添加 Docker 的 APT 源到系统的apt软件源
echo \"deb [arch=$(dpkg --print-architecture) signed-by=/etc/apt/keyrings/docker.asc] https://mirrors.ustc.edu.cn/docker-ce/linux/ubuntu/ \$(. /etc/os-release && echo "$VERSION_CODENAME") stable" | \sudo tee /etc/apt/sources.list.d/docker.list > /dev/null
sudo apt-get update# 更新软件源
sudo apt update
sudo apt upgrade -y# 查看过往版本
apt-cache madison docker-ce# 安装过往版本示例 例如 5:18.09.1~3-0~ubuntu-xenial
# sudo apt-get install docker-ce=<VERSION_STRING> docker-ce-cli=<VERSION_STRING> containerd.io
# sudo apt-get install docker-ce=5:18.09.1~3-0~ubuntu-xenial docker-ce-cli=5:18.09.1~3-0~ubuntu-xenial containerd.io# 默认安装最新版本
sudo apt-get install docker-ce docker-ce-cli containerd.io# 使用验机镜像指令查看是否成功
sudo docker run hello-world
1.2.2 阿里云地址版本:
# 需要向系统的软件源配置中添加 Docker 官方仓库的地址信息
# 这样系统的包管理工具(如apt)才能识别并从该仓库中下载 Docker 相关软件
# 使用存储库安装Docker的原因:自动处理依赖关系,避免版本冲突
# 首先就需要其他工具来帮助获取 Docker 官方仓库的地址信息
sudo apt-get install \apt-transport-https \ca-certificates \curl \gnupg-agent \software-properties-common# 查看系统信息
lsb_release -a# 通过阿里云镜像源 添加 Docker 的官方 GPG 密钥
curl -fsSL https://mirrors.aliyun.com/docker-ce/linux/ubuntu/gpg -o /etc/apt/keyrings/docker.asc# 需要手动添加 Docker 的 APT 源到系统的apt软件源(使用阿里云镜像)
echo \"deb [arch=$(dpkg --print-architecture) signed-by=/etc/apt/keyrings/docker.asc] https://mirrors.aliyun.com/docker-ce/linux/ubuntu/ \$(. /etc/os-release && echo "$VERSION_CODENAME") stable" | \sudo tee /etc/apt/sources.list.d/docker.list > /dev/null
sudo apt-get update# 更新软件源
sudo apt update
sudo apt upgrade -y# 查看可用版本
apt-cache madison docker-ce# 安装过往版本示例(需替换为阿里云仓库中存在的版本)
# sudo apt-get install docker-ce=<VERSION_STRING> docker-ce-cli=<VERSION_STRING> containerd.io# 默认安装最新版本
sudo apt-get install docker-ce docker-ce-cli containerd.io# 使用验机镜像指令查看是否成功 如果未拉下来则配置镜像加速器(使用提供的仓库源)
sudo docker run hello-world
1.2.3 补充说明:
(1)为什么安装docker-ce docker-ce-cli containerd.io,而不是只安装docker-ce?
在安装 Docker 时需要同时安装 docker-ce、docker-ce-cli 和 containerd.io,是由 Docker 的组件架构和功能分工决定的,三者各司其职、相互依赖,缺一不可。具体原因如下:
1. 各组件的核心作用
-
docker-ce:
全称是 “Docker Community Edition”(Docker 社区版),是 Docker 的核心引擎(daemon),负责容器的创建、运行、管理等核心功能(如镜像构建、容器生命周期管理等)。它是 Docker 的 “运行时核心”,但无法直接与用户交互,也不能独立完成所有容器操作。 -
docker-ce-cli:
是 Docker 的命令行工具(Command Line Interface),提供了用户与 Docker 引擎交互的命令(如docker run、docker ps、docker pull等)。用户通过这些命令向docker-ce引擎发送指令,实现对容器的操作。
如果没有docker-ce-cli,用户将无法通过命令行控制 Docker 引擎。 -
containerd.io:
是容器运行时(container runtime),负责管理容器的底层生命周期(如镜像的拉取、容器的启停、资源隔离等)。它是 Docker 引擎与操作系统之间的 “中间层”,最初是 Docker 内部的一个组件,后来被独立出来成为 CNCF(云原生计算基金会)的项目,具备更高的通用性和稳定性。
docker-ce引擎本身并不直接处理容器的底层运行,而是依赖containerd.io来完成实际的容器创建和管理工作。
2. 为什么不能只装 docker-ce?
docker-ce 作为核心引擎,必须依赖另外两个组件才能正常工作:
- 没有
docker-ce-cli:用户无法通过命令行操作 Docker(没有交互入口); - 没有
containerd.io:docker-ce无法完成容器的底层运行和资源管理(没有执行载体)。
三者是 “协作关系”:docker-ce-cli 接收用户命令 → 传递给 docker-ce 引擎 → docker-ce 调用 containerd.io 执行实际的容器操作。
3. 三者的关系
Docker 这三个组件之间的依赖关系可以简单概括为:docker-ce 直接依赖 containerd.io,而 docker-ce-cli 与 docker-ce 是 “配套使用” 关系。具体来说:
1. docker-ce 对 containerd.io 是强依赖
docker-ce(Docker 引擎)本身不直接处理容器的底层运行逻辑(如镜像拉取、容器启停、资源隔离等),这些核心操作必须通过 containerd.io 来完成。因此,docker-ce 在设计上强制依赖 containerd.io—— 如果没有 containerd.io,docker-ce 根本无法启动和工作。
在实际安装时(比如通过 apt 或 yum 等包管理工具),当你指定安装 docker-ce 时,包管理器会自动检测到它对 containerd.io 的依赖,并自动帮你安装 containerd.io(无需手动显式指定)。
2. docker-ce-cli 与 docker-ce 是 “配套交互” 关系
docker-ce-cli 是用户操作 docker-ce 的 “入口”(提供 docker 命令),但它本身不依赖 docker-ce 或 containerd.io(可以单独安装,但安装后如果没有 docker-ce 引擎,命令会无法执行实际操作)。
反之,docker-ce 引擎的运行不依赖 docker-ce-cli(引擎可以后台单独运行),但用户如果没有 docker-ce-cli,就无法通过命令行与引擎交互(相当于 “有引擎但没遥控器”)。因此,实际使用中通常会将 docker-ce 和 docker-ce-cli 一起安装,确保 “引擎 + 遥控器” 的完整功能。
所以最终的安装逻辑也可以是:显式安装 docker-ce 和 docker-ce-cli 即可,containerd.io 会作为 docker-ce 的依赖被自动安装,三者共同构成完整可用的 Docker 环境。
总结
Docker 的组件拆分(docker-ce、docker-ce-cli、containerd.io)是为了实现 “模块化设计”:让命令交互、核心引擎、底层运行时各司其职,既提高了稳定性,也方便与其他容器生态(如 Kubernetes)兼容。因此,安装时必须同时包含这三个组件,才能保证 Docker 的完整功能。
1.3 后续完善
1.3.1 将当前用户添加到docker组
# 将用户添加到docker组
# sudo usermod -aG docker $USER
sudo usermod -aG docker <your-username>
1.3.2 配置镜像加速器(使用提供的仓库源)
# 配置加速 比较重要
sudo mkdir -p /etc/docker
sudo tee /etc/docker/daemon.json <<-'EOF'
{"registry-mirrors": ["https://do.nark.eu.org","https://dc.j8.work","https://docker.m.daocloud.io","https://dockerproxy.com","https://docker.mirrors.ustc.edu.cn","https://docker.nju.edu.cn"]
}
EOF
sudo systemctl daemon-reload
sudo systemctl restart docker
systemctl status docker
1.4 一键安装式的shell脚本
#!/bin/bash# 确保脚本以root权限运行
if [ "$(id -u)" -ne 0 ]; thenecho "请使用root权限运行此脚本(可添加sudo)" >&2exit 1
fi# 检查是否已安装Docker,若已安装则停止服务并彻底卸载
echo "===== 检查Docker是否已安装 ====="
if command -v docker &> /dev/null; thenecho "检测到已安装Docker,版本信息:"docker --versionecho -e "\n===== 停止Docker服务 ====="sudo systemctl stop docker  # 停止正在运行的Docker服务sudo systemctl disable docker  # 禁用开机自启(可选,彻底清理)echo -e "\n===== 开始卸载Docker ====="# 彻底卸载Docker相关包sudo apt-get purge -y docker-ce docker-ce-cli containerd.io docker-buildx-plugin docker-compose-plugin docker-ce-rootless-extrasecho -e "\n===== 清理残留文件 ====="# 删除Docker数据目录(镜像、容器、配置等)sudo rm -rf /var/lib/dockersudo rm -rf /var/lib/containerdsudo rm -rf /etc/dockersudo rm -rf /etc/apt/keyrings/docker.ascsudo rm -rf /etc/apt/sources.list.d/docker.listecho "Docker已完全卸载,将继续执行安装流程"
elseecho "未检测到Docker,将直接执行安装流程"
fi# 安装必要的依赖包,用于通过HTTPS获取仓库
echo -e "\n===== 安装依赖包 ====="
sudo apt-get install -y \apt-transport-https \ca-certificates \curl \gnupg-agent \software-properties-common# 查看系统信息,确认Ubuntu版本
echo -e "\n===== 系统信息 ====="
lsb_release -a# 通过阿里云镜像源添加Docker的官方GPG密钥
echo -e "\n===== 添加阿里云Docker GPG密钥 ====="
curl -fsSL https://mirrors.aliyun.com/docker-ce/linux/ubuntu/gpg -o /etc/apt/keyrings/docker.asc# 添加Docker的APT源(阿里云镜像,用于安装Docker软件)
echo -e "\n===== 配置阿里云Docker软件源 ====="
echo \"deb [arch=$(dpkg --print-architecture) signed-by=/etc/apt/keyrings/docker.asc] https://mirrors.aliyun.com/docker-ce/linux/ubuntu/ \$(. /etc/os-release && echo "$VERSION_CODENAME") stable" | \sudo tee /etc/apt/sources.list.d/docker.list > /dev/null# 更新软件源索引
echo -e "\n===== 更新软件源 ====="
sudo apt-get update
sudo apt update# 升级系统已安装的包
echo -e "\n===== 升级系统包 ====="
sudo apt upgrade -y# 显示可用的Docker版本
echo -e "\n===== 可用的Docker版本 ====="
apt-cache madison docker-ce# 安装最新版本的Docker
echo -e "\n===== 安装Docker ====="
sudo apt-get install -y docker-ce docker-ce-cli containerd.ioecho -e "\n===== 配置镜像加速器 ====="
sudo mkdir -p /etc/docker
sudo tee /etc/docker/daemon.json <<-'EOF'
{"registry-mirrors": [# 新增国内主流加速源"https://registry.docker-cn.com",         # Docker 中国官方            "https://mirror.ccs.tencentyun.com",      # 腾讯云"https://cr.console.aliyun.com",          # 阿里云(需登录后获取专属地址)"https://mirrors.aliyun.com/docker-library/", # 阿里云公共"https://hub-mirror.c.163.com",           # 网易云"https://mirrors.tuna.tsinghua.edu.cn/docker-images/", # 清华镜像源"https://mirrors.huaweicloud.com",        # 华为云# 保留原有加速源"https://do.nark.eu.org","https://dc.j8.work","https://docker.m.daocloud.io","https://dockerproxy.com","https://docker.mirrors.ustc.edu.cn","https://docker.nju.edu.cn"]
}
EOF
sudo systemctl daemon-reload
sudo systemctl restart docker
systemctl status docker# 查看Docker信息,验证仓库配置
echo -e "\n===== 查看Docker配置信息 ====="
docker info# 拉取hello-world镜像
echo -e "\n===== 拉取hello-world镜像 ====="
sudo docker pull hello-world# 查看镜像列表
echo -e "\n===== 查看Docker镜像 ====="
sudo docker images# 运行hello-world容器
echo -e "\n===== 运行hello-world容器 ====="
sudo docker run hello-world# 提示将用户添加到docker组(可选)
echo -e "\n===== 安装完成 ====="
echo "如果需要非root用户使用Docker,请执行:"
echo "sudo usermod -aG docker <你的用户名>"
echo "执行后请重新登录以使设置生效:"
echo "sudo usermod -aG docker ${USER}"
echo "使用命令查看当前用户所属组:groups或者id"
二、基于Docker+Ubuntu的基础使用
2.1 拉取镜像
sudo docker pull hello-world
zky@zky-virtual-machine:~/ProjectsHub/Docker_Projects$ sudo docker pull hello-world
Using default tag: latest
latest: Pulling from library/hello-world
17eec7bbc9d7: Pull complete
Digest: sha256:54e66cc1dd1fcb1c3c58bd8017914dbed8701e2d8c74d9262e26bd9cc1642d31
Status: Downloaded newer image for hello-world:latest
docker.io/library/hello-world:latest
2.2 查看镜像,基于hello-world镜像创建并运行一个容器
sudo docker imagessudo docker run hello-worldzky@zky-virtual-machine:~/ProjectsHub/Docker_Projects$ sudo docker images
REPOSITORY TAG IMAGE ID CREATED SIZE
hello-world latest 1b44b5a3e06a 7 weeks ago 10.1kB
zky@zky-virtual-machine:~/ProjectsHub/Docker_Projects$ sudo docker run hello-worldHello from Docker!
This message shows that your installation appears to be working correctly.To generate this message, Docker took the following steps:1. The Docker client contacted the Docker daemon.2. The Docker daemon pulled the "hello-world" image from the Docker Hub.(amd64)3. The Docker daemon created a new container from that image which runs theexecutable that produces the output you are currently reading.4. The Docker daemon streamed that output to the Docker client, which sent itto your terminal.To try something more ambitious, you can run an Ubuntu container with:$ docker run -it ubuntu bashShare images, automate workflows, and more with a free Docker ID:https://hub.docker.com/For more examples and ideas, visit:https://docs.docker.com/get-started/
2.3 容器命令
2.3.1 容器运行命令 docker run|stop|start
docker run|stop|start
镜像运行,停止,从停止到运行docker run后,如果容器没有提供服务,会立即停止,退出。
docker run [option] image
# option 参数说明
--name="Name" #对运行的容器定名字,
常用-d #后台方式运行-it #使用交互方式运行,
进入容器查看内容-it = -i + -t
-p #小写 p,指定容器的端口
-P #大写 P,随机指定端口
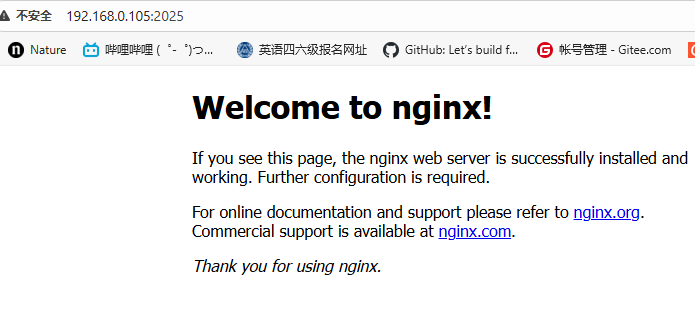
docker run nginx:1.24.0
# 这个 docker run 命令用于在 Docker 中启动一个 Nginx 容器,具体参数解释如下:
# docker run:Docker 的核心命令,用于创建并启动一个容器
# --name="test_web1":为容器指定一个名称 "test_web1",方便后续管理和识别容器
# -p 2025:80:端口映射,将主机的 2025 端口映射到容器的 80 端口(Nginx 默认监听 80 端口)
# 这意味着访问主机的 http://localhost:2025 会转发到容器内的 Nginx 服务
# -d:后台运行容器( detached 模式),容器启动后不会占用当前终端
# nginx:指定要使用的镜像名称,Docker 会从本地或远程仓库拉取最新的 Nginx 镜像
docker run --name="test_web1" -p 2025:80 -d nginx
zky@zky-virtual-machine:~/ProjectsHub/Docker_Projects$ docker pull nginx
Using default tag: latest
latest: Pulling from library/nginx
5c32499ab806: Pull complete
375a694db734: Pull complete
5f825f15e2e0: Pull complete
16d05858bb8d: Pull complete
08cfef42fd24: Pull complete
3cc5fdd1317a: Pull complete
4f4e50e20765: Pull complete
Digest: sha256:8adbdcb969e2676478ee2c7ad333956f0c8e0e4c5a7463f4611d7a2e7a7ff5dc
Status: Downloaded newer image for nginx:latest
docker.io/library/nginx:latest
zky@zky-virtual-machine:~/ProjectsHub/Docker_Projects$ sudo docker images
REPOSITORY TAG IMAGE ID CREATED SIZE
nginx latest 203ad09fc156 7 weeks ago 192MB
hello-world latest 1b44b5a3e06a 7 weeks ago 10.1kB
zky@zky-virtual-machine:~/ProjectsHub/Docker_Projects$ sudo docker run --name="test_web1" -p 2025:80 -d nginx
d6c9f476227b58a34f466c3dc5b70014907e9875b714facfc2b4caab4f569926
zky@zky-virtual-machine:~/ProjectsHub/Docker_Projects$ docker ps -a
CONTAINER ID IMAGE COMMAND CREATED STATUS PORTS NAMES
d6c9f476227b nginx "/docker-entrypoint.…" 53 seconds ago Up 52 seconds 0.0.0.0:2025->80/tcp, [::]:2025->80/tcp test_web1
d98f8b5acdc9 hello-world "/hello" 31 minutes ago Exited (0) 31 minutes ago epic_newton
11a147f878d1 hello-world "/hello" 31 minutes ago Exited (0) 31 minutes ago naughty_visvesvaraya
6f7515977c77 hello-world "/hello" 35 minutes ago Exited (0) 35 minutes ago mystifying_johnson
036cd9de504c hello-world "/hello" 49 minutes ago Exited (0) 49 minutes ago brave_ramanujan
zky@zky-virtual-machine:~/ProjectsHub/Docker_Projects$ ip addr
1: lo: <LOOPBACK,UP,LOWER_UP> mtu 65536 qdisc noqueue state UNKNOWN group default qlen 1000link/loopback 00:00:00:00:00:00 brd 00:00:00:00:00:00inet 127.0.0.1/8 scope host lovalid_lft forever preferred_lft foreverinet6 ::1/128 scope host valid_lft forever preferred_lft forever
2: ens33: <BROADCAST,MULTICAST,UP,LOWER_UP> mtu 1500 qdisc fq_codel state UP group default qlen 1000link/ether 00:0c:29:d2:65:56 brd ff:ff:ff:ff:ff:ffaltname enp2s1inet 192.168.0.105/24 brd 192.168.0.255 scope global dynamic noprefixroute ens33valid_lft 2993sec preferred_lft 2993secinet6 fe80::b501:560f:3981:a8eb/64 scope link noprefixroute valid_lft forever preferred_lft forever
3: docker0: <BROADCAST,MULTICAST,UP,LOWER_UP> mtu 1500 qdisc noqueue state UP group default link/ether 06:74:70:13:32:c4 brd ff:ff:ff:ff:ff:ffinet 172.17.0.1/16 brd 172.17.255.255 scope global docker0valid_lft forever preferred_lft foreverinet6 fe80::474:70ff:fe13:32c4/64 scope link valid_lft forever preferred_lft forever
12: vethd233f56@if2: <BROADCAST,MULTICAST,UP,LOWER_UP> mtu 1500 qdisc noqueue master docker0 state UP group default link/ether 2e:da:ed:57:61:e1 brd ff:ff:ff:ff:ff:ff link-netnsid 0inet6 fe80::2cda:edff:fe57:61e1/64 scope link valid_lft forever preferred_lft forever
zky@zky-virtual-machine:~/ProjectsHub/Docker_Projects$
2.3.2 容器删除命令
# 单个容器删除
docker rm 容器id# 强制删除
docker rm -f <CONTAINER ID 或 CONTAINER NAME># 删除所有已退出的容器
docker container prune
2.3.3 容器管理与查看命令
# 查看所有镜像
docker images -a# 查看所有容器
docker ps -a# 查看运行容器
docker ps# 查看所有容器id
docker ps -aq# 进入容器
docker exec -it 容器id bash
效果:
zky@zky-virtual-machine:~/ProjectsHub/Docker_Projects$ docker exec -it test_web1 bash
root@d6c9f476227b:/#
root@d6c9f476227b:/#
root@d6c9f476227b:/#
root@d6c9f476227b:/#
root@d6c9f476227b:/#
root@d6c9f476227b:/# ls
bin  boot  dev	docker-entrypoint.d  docker-entrypoint.sh  etc	home  lib  lib64  media  mnt  opt  proc  root  run  sbin  srv  sys  tmp  usr  var
root@d6c9f476227b:/# ls -al
total 72
drwxr-xr-x   1 root root 4096 Oct  2 16:38 .
drwxr-xr-x   1 root root 4096 Oct  2 16:38 ..
-rwxr-xr-x   1 root root    0 Oct  2 16:38 .dockerenv
lrwxrwxrwx   1 root root    7 Sep 29 00:00 bin -> usr/bin
drwxr-xr-x   2 root root 4096 Aug 24 16:05 boot
drwxr-xr-x   5 root root  340 Oct  2 16:38 dev
drwxr-xr-x   1 root root 4096 Sep 29 23:55 docker-entrypoint.d
-rwxr-xr-x   1 root root 1620 Sep 29 23:55 docker-entrypoint.sh
drwxr-xr-x   1 root root 4096 Oct  2 16:38 etc
drwxr-xr-x   2 root root 4096 Aug 24 16:05 home
lrwxrwxrwx   1 root root    7 Sep 29 00:00 lib -> usr/lib
lrwxrwxrwx   1 root root    9 Sep 29 00:00 lib64 -> usr/lib64
drwxr-xr-x   2 root root 4096 Sep 29 00:00 media
drwxr-xr-x   2 root root 4096 Sep 29 00:00 mnt
drwxr-xr-x   2 root root 4096 Sep 29 00:00 opt
dr-xr-xr-x 493 root root    0 Oct  2 16:38 proc
drwx------   2 root root 4096 Sep 29 00:00 root
drwxr-xr-x   1 root root 4096 Oct  2 16:38 run
lrwxrwxrwx   1 root root    8 Sep 29 00:00 sbin -> usr/sbin
drwxr-xr-x   2 root root 4096 Sep 29 00:00 srv
dr-xr-xr-x  13 root root    0 Oct  2 16:38 sys
drwxrwxrwt   2 root root 4096 Sep 29 00:00 tmp
drwxr-xr-x   1 root root 4096 Sep 29 00:00 usr
drwxr-xr-x   1 root root 4096 Sep 29 00:00 var
root@d6c9f476227b:/# cd /usr/share/nginx/html
root@d6c9f476227b:/usr/share/nginx/html# ls
50x.html  index.html
root@d6c9f476227b:/usr/share/nginx/html# cat index.html
<!DOCTYPE html>
<html>
<head>
<title>Welcome to nginx!</title>
<style>
html { color-scheme: light dark; }
body { width: 35em; margin: 0 auto;
font-family: Tahoma, Verdana, Arial, sans-serif; }
</style>
</head>
<body>
<h1>Welcome to nginx!</h1>
<p>If you see this page, the nginx web server is successfully installed and
working. Further configuration is required.</p><p>For online documentation and support please refer to
<a href="http://nginx.org/">nginx.org</a>.<br/>
Commercial support is available at
<a href="http://nginx.com/">nginx.com</a>.</p><p><em>Thank you for using nginx.</em></p>
</body>
</html>
root@d6c9f476227b:/usr/share/nginx/html# exit
exit
zky@zky-virtual-machine:~/ProjectsHub/Docker_Projects$
2.3.4 容器数据挂载宿主机命令(将宿主机的文件夹挂载在容器内部的文件夹上,相当于创建软连接)
docker run -d -p 2025:80 -v /home/zky/Docker_Projects/test_web1/html:/usr/share/nginx/html --name test_web1 nginxzky@zky-virtual-machine:~$ docker run -d -p 2025:80 -v /home/zky/Docker_Projects/test_web1/html:/usr/share/nginx/html --name test_web1 nginx
7050c6e6ae7a1b98df3501f9b56e91c711ba972b5aa905ff1ebf7bc63c2995f8
zky@zky-virtual-machine:~$ docker exec -it test_web1
docker: 'docker exec' requires at least 2 argumentsUsage: docker exec [OPTIONS] CONTAINER COMMAND [ARG...]See 'docker exec --help' for more information
zky@zky-virtual-machine:~$ docker exec -it test_web1 bash
root@7050c6e6ae7a:/#
root@7050c6e6ae7a:/# ls
bin boot dev docker-entrypoint.d docker-entrypoint.sh etc home lib lib64 media mnt opt proc root run sbin srv sys tmp usr var
root@7050c6e6ae7a:/# exit
exit
zky@zky-virtual-machine:~$ cd Docker_Projects
zky@zky-virtual-machine:~/Docker_Projects$ ls
test_web1
zky@zky-virtual-machine:~/Docker_Projects$ cd test_web1
zky@zky-virtual-machine:~/Docker_Projects/test_web1$ ls
html
zky@zky-virtual-machine:~/Docker_Projects/test_web1$ cd html
zky@zky-virtual-machine:~/Docker_Projects/test_web1/html$ sudo vim index.html
zky@zky-virtual-machine:~/Docker_Projects/test_web1/html$ cat index.html
hello world
zky@zky-virtual-machine:~/Docker_Projects/test_web1/html$ sudo chmod 777 index.html
zky@zky-virtual-machine:~/Docker_Projects/test_web1/html$ ls -al
总计 12
drwxr-xr-x 2 root root 4096 10月 3 10:32 .
drwxr-xr-x 3 root root 4096 10月 3 10:27 ..
-rwxrwxrwx 1 root root 12 10月 3 10:32 index.html
zky@zky-virtual-machine:~/Docker_Projects/test_web1/html$
运行容器后,查看

创建一个html文件后,写入hello world

2.3.5 容器卷映射命令(将容器内部的数据同步映射到宿主机,位置在docker相关文件夹管理)
提示:如果使用容器数据挂载宿主机命令来在宿主机管理nginx的配置文件,由于宿主机外新建的文件夹导致宿主机管理nginx的配置文件是空的,然后运行容器能看见容器好像启动了但是实际上由于配置文件是空的,使用docker ps查看其实它没有在运行,是有错误的;但是,又怎么把容器内部的配置文件拷贝出来呢?这就需要容器卷映射命令将容器的配置文件映射同步到宿主机来管理。
docker run -d -p 2026:80 -v /home/zky/Docker_Projects/test_web2/html/:/usr/share/nginx/html -v nginx_conf:/etc/nginx --name test_web2 nginx查询命令:
# 直接查询卷名
docker volume inspect nginx_conf# 间接查询容器和卷信息
docker inspect test_web2
具体查询效果:
# 查询效果
zky@zky-virtual-machine:~/Docker_Projects/test_web1/html$ docker ps
CONTAINER ID   IMAGE     COMMAND                   CREATED          STATUS          PORTS                                     NAMES
d6d9810a3197   nginx     "/docker-entrypoint.…"   14 minutes ago   Up 14 minutes   0.0.0.0:2026->80/tcp, [::]:2026->80/tcp   test_web2
7050c6e6ae7a   nginx     "/docker-entrypoint.…"   55 minutes ago   Up 55 minutes   0.0.0.0:2025->80/tcp, [::]:2025->80/tcp   test_web1
zky@zky-virtual-machine:~/Docker_Projects/test_web1/html$ docker volume inspect nginx_conf
[{"CreatedAt": "2025-10-03T11:07:52+08:00","Driver": "local","Labels": null,"Mountpoint": "/var/lib/docker/volumes/nginx_conf/_data","Name": "nginx_conf","Options": null,"Scope": "local"}
]
zky@zky-virtual-machine:~/Docker_Projects/test_web1/html$ docker inspect test_web2
[{"Id": "d6d9810a31972a259ef432aba27285f4e3922f2c44ec975504a040131b2da9ae","Created": "2025-10-03T03:07:52.476021273Z","Path": "/docker-entrypoint.sh","Args": ["nginx","-g","daemon off;"],"State": {"Status": "running","Running": true,"Paused": false,"Restarting": false,"OOMKilled": false,"Dead": false,"Pid": 4958,"ExitCode": 0,"Error": "","StartedAt": "2025-10-03T03:07:52.505249755Z","FinishedAt": "0001-01-01T00:00:00Z"},"Image": "sha256:203ad09fc1566a329c1d2af8d1f219b28fd2c00b69e743bd572b7f662365432d","ResolvConfPath": "/var/lib/docker/containers/d6d9810a31972a259ef432aba27285f4e3922f2c44ec975504a040131b2da9ae/resolv.conf","HostnamePath": "/var/lib/docker/containers/d6d9810a31972a259ef432aba27285f4e3922f2c44ec975504a040131b2da9ae/hostname","HostsPath": "/var/lib/docker/containers/d6d9810a31972a259ef432aba27285f4e3922f2c44ec975504a040131b2da9ae/hosts","LogPath": "/var/lib/docker/containers/d6d9810a31972a259ef432aba27285f4e3922f2c44ec975504a040131b2da9ae/d6d9810a31972a259ef432aba27285f4e3922f2c44ec975504a040131b2da9ae-json.log","Name": "/test_web2","RestartCount": 0,"Driver": "overlay2","Platform": "linux","MountLabel": "","ProcessLabel": "","AppArmorProfile": "docker-default","ExecIDs": null,"HostConfig": {"Binds": ["/home/zky/Docker_Projects/test_web2/html/:/usr/share/nginx/html","nginx_conf:/etc/nginx"],"ContainerIDFile": "","LogConfig": {"Type": "json-file","Config": {}},"NetworkMode": "bridge","PortBindings": {"80/tcp": [{"HostIp": "","HostPort": "2026"}]},"RestartPolicy": {"Name": "no","MaximumRetryCount": 0},"AutoRemove": false,"VolumeDriver": "","VolumesFrom": null,"ConsoleSize": [24,178],"CapAdd": null,"CapDrop": null,"CgroupnsMode": "private","Dns": [],"DnsOptions": [],"DnsSearch": [],"ExtraHosts": null,"GroupAdd": null,"IpcMode": "private","Cgroup": "","Links": null,"OomScoreAdj": 0,"PidMode": "","Privileged": false,"PublishAllPorts": false,"ReadonlyRootfs": false,"SecurityOpt": null,"UTSMode": "","UsernsMode": "","ShmSize": 67108864,"Runtime": "runc","Isolation": "","CpuShares": 0,"Memory": 0,"NanoCpus": 0,"CgroupParent": "","BlkioWeight": 0,"BlkioWeightDevice": [],"BlkioDeviceReadBps": [],"BlkioDeviceWriteBps": [],"BlkioDeviceReadIOps": [],"BlkioDeviceWriteIOps": [],"CpuPeriod": 0,"CpuQuota": 0,"CpuRealtimePeriod": 0,"CpuRealtimeRuntime": 0,"CpusetCpus": "","CpusetMems": "","Devices": [],"DeviceCgroupRules": null,"DeviceRequests": null,"MemoryReservation": 0,"MemorySwap": 0,"MemorySwappiness": null,"OomKillDisable": null,"PidsLimit": null,"Ulimits": [],"CpuCount": 0,"CpuPercent": 0,"IOMaximumIOps": 0,"IOMaximumBandwidth": 0,"MaskedPaths": ["/proc/asound","/proc/acpi","/proc/interrupts","/proc/kcore","/proc/keys","/proc/latency_stats","/proc/timer_list","/proc/timer_stats","/proc/sched_debug","/proc/scsi","/sys/firmware","/sys/devices/virtual/powercap"],"ReadonlyPaths": ["/proc/bus","/proc/fs","/proc/irq","/proc/sys","/proc/sysrq-trigger"]},"GraphDriver": {"Data": {"ID": "d6d9810a31972a259ef432aba27285f4e3922f2c44ec975504a040131b2da9ae","LowerDir": "/var/lib/docker/overlay2/762421dc13711cdeb508331bc89cb991a4e430b5b9e33f4a4fd8a2f34633331b-init/diff:/var/lib/docker/overlay2/f6029dfb70c7a6eebd04e08a08b793bf717d7a27349c1802f9ad0cb3dd14f049/diff:/var/lib/docker/overlay2/8ee89224c3a0511031185bd6db60487881baef74e5584cde37de0e7d61304c0e/diff:/var/lib/docker/overlay2/8adb0517bb33aa017b390656f922acd13dbf60393bf5523ef82c0b18a2ebfdb5/diff:/var/lib/docker/overlay2/87e291b2f300d61839f38cf4b42abc660368226f04e6e8163d2dfd51e72b5807/diff:/var/lib/docker/overlay2/22ad4d13715346a306b7d00627f1cbf933d6cfe532e33ae84ccdc661531f8612/diff:/var/lib/docker/overlay2/595e970753a446f6510df89718aaa3bdf3927566852e8aca4191e04a69cebb71/diff:/var/lib/docker/overlay2/cdb332aa714ac090f4b3ea16bf0f754518936d81ff81733cd47a7309985077d5/diff","MergedDir": "/var/lib/docker/overlay2/762421dc13711cdeb508331bc89cb991a4e430b5b9e33f4a4fd8a2f34633331b/merged","UpperDir": "/var/lib/docker/overlay2/762421dc13711cdeb508331bc89cb991a4e430b5b9e33f4a4fd8a2f34633331b/diff","WorkDir": "/var/lib/docker/overlay2/762421dc13711cdeb508331bc89cb991a4e430b5b9e33f4a4fd8a2f34633331b/work"},"Name": "overlay2"},"Mounts": [{"Type": "bind","Source": "/home/zky/Docker_Projects/test_web2/html","Destination": "/usr/share/nginx/html","Mode": "","RW": true,"Propagation": "rprivate"},{"Type": "volume","Name": "nginx_conf","Source": "/var/lib/docker/volumes/nginx_conf/_data","Destination": "/etc/nginx","Driver": "local","Mode": "z","RW": true,"Propagation": ""}],"Config": {"Hostname": "d6d9810a3197","Domainname": "","User": "","AttachStdin": false,"AttachStdout": false,"AttachStderr": false,"ExposedPorts": {"80/tcp": {}},"Tty": false,"OpenStdin": false,"StdinOnce": false,"Env": ["PATH=/usr/local/sbin:/usr/local/bin:/usr/sbin:/usr/bin:/sbin:/bin","NGINX_VERSION=1.29.1","NJS_VERSION=0.9.1","NJS_RELEASE=1~bookworm","PKG_RELEASE=1~bookworm","DYNPKG_RELEASE=1~bookworm"],"Cmd": ["nginx","-g","daemon off;"],"Image": "nginx","Volumes": null,"WorkingDir": "","Entrypoint": ["/docker-entrypoint.sh"],"OnBuild": null,"Labels": {"maintainer": "NGINX Docker Maintainers <docker-maint@nginx.com>"},"StopSignal": "SIGQUIT"},"NetworkSettings": {"Bridge": "","SandboxID": "6c67893c167156f1c7d0938284fac03d46145f1123478c9033eee1c4333d37d4","SandboxKey": "/var/run/docker/netns/6c67893c1671","Ports": {"80/tcp": [{"HostIp": "0.0.0.0","HostPort": "2026"},{"HostIp": "::","HostPort": "2026"}]},"HairpinMode": false,"LinkLocalIPv6Address": "","LinkLocalIPv6PrefixLen": 0,"SecondaryIPAddresses": null,"SecondaryIPv6Addresses": null,"EndpointID": "95ccdc403058f65eb56164e803fb4adf65a7b94bb4f566ccfafa2c840528e698","Gateway": "172.17.0.1","GlobalIPv6Address": "","GlobalIPv6PrefixLen": 0,"IPAddress": "172.17.0.3","IPPrefixLen": 16,"IPv6Gateway": "","MacAddress": "ca:15:c6:dd:25:12","Networks": {"bridge": {"IPAMConfig": null,"Links": null,"Aliases": null,"MacAddress": "ca:15:c6:dd:25:12","DriverOpts": null,"GwPriority": 0,"NetworkID": "673dc66222dbbb9d8a0f68bba2ca14b70a0e4d88355ae54de305639677d6b930","EndpointID": "95ccdc403058f65eb56164e803fb4adf65a7b94bb4f566ccfafa2c840528e698","Gateway": "172.17.0.1","IPAddress": "172.17.0.3","IPPrefixLen": 16,"IPv6Gateway": "","GlobalIPv6Address": "","GlobalIPv6PrefixLen": 0,"DNSNames": null}}}}
]
zky@zky-virtual-machine:~/Docker_Projects/test_web1/html$ sudo ls /var/lib/docker/volumes/nginx_conf/_data  # 列出目录内容
conf.d	fastcgi_params	mime.types  modules  nginx.conf  scgi_params  uwsgi_params
zky@zky-virtual-machine:~/Docker_Projects/test_web1/html$ 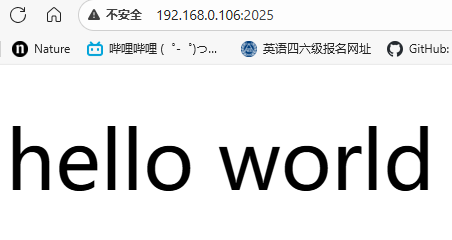

2.3.6 容器网络配置命令
具体命令:
# 1. 列出所有Docker网络
docker network ls
# 输出说明:
# - NETWORK ID: 网络唯一标识
# - NAME: 网络名称(默认包含bridge、host、none三种网络)
# - DRIVER: 网络驱动类型(bridge为默认桥接网络)
# - SCOPE: 网络作用域(local表示本地网络)# 2. 创建自定义网络(最常用)
# 创建一个名为my_network的桥接网络(默认驱动为bridge)
docker network create my_network# 创建指定子网和网关的网络(适合固定IP场景)
docker network create \--driver bridge \                  # 指定网络驱动为桥接模式--subnet 172.20.0.0/16 \           # 设定子网范围--gateway 172.20.0.1 \             # 设定网关地址--ip-range 172.20.1.0/24 \         # 设定IP分配范围my_custom_network                  # 网络名称# 3. 查看网络详细信息
# 查看my_network的详细配置(包括连接的容器、IP范围等)
docker network inspect my_network# 4. 将容器连接到网络
# 将已运行的容器test_web1连接到my_network
docker network connect my_network test_web1# 连接时指定固定IP(需网络已设置子网)
docker network connect \--ip 172.20.1.10 \                 # 为容器指定固定IPmy_custom_network \test_web1# 5. 将容器从网络断开
# 将test_web1从my_network断开(不会删除容器)
docker network disconnect my_network test_web1# 6. 删除网络
# 删除my_network网络(需先断开所有连接的容器)
docker network rm my_network# 批量删除未使用的网络(清理无用网络)
docker network prune -f              # -f表示强制删除,无需确认# 7. 运行容器时指定网络
# 启动容器时直接连接到my_network(不使用默认bridge网络)
docker run -d \--name test_web3 \--network my_network \             # 指定网络-p 2028:80 \nginx# 8. 使用host网络(容器共享宿主机网络栈)
# 容器直接使用宿主机的IP和端口(性能好,但安全性较低)
docker run -d \--name test_web4 \--network host \                   # 使用宿主机网络nginx                              # 此时无需-p端口映射,直接使用容器内端口# 9. 使用none网络(容器禁用网络)
# 创建一个完全隔离、没有网络的容器
docker run -d \--name isolated_container \--network none \                   # 禁用网络nginx
测试效果:
zky@zky-virtual-machine:~/Docker_Projects/test_web1/html$ docker network ls
NETWORK ID     NAME      DRIVER    SCOPE
673dc66222db   bridge    bridge    local
ddc64a266dbf   host      host      local
550e6ae5e19e   none      null      local
zky@zky-virtual-machine:~/Docker_Projects/test_web1/html$ docker ps
CONTAINER ID   IMAGE     COMMAND                   CREATED             STATUS             PORTS                                     NAMES
d6d9810a3197   nginx     "/docker-entrypoint.…"   30 minutes ago      Up 30 minutes      0.0.0.0:2026->80/tcp, [::]:2026->80/tcp   test_web2
7050c6e6ae7a   nginx     "/docker-entrypoint.…"   About an hour ago   Up About an hour   0.0.0.0:2025->80/tcp, [::]:2025->80/tcp   test_web1
zky@zky-virtual-machine:~/Docker_Projects/test_web1/html$ ip addr
1: lo: <LOOPBACK,UP,LOWER_UP> mtu 65536 qdisc noqueue state UNKNOWN group default qlen 1000link/loopback 00:00:00:00:00:00 brd 00:00:00:00:00:00inet 127.0.0.1/8 scope host lovalid_lft forever preferred_lft foreverinet6 ::1/128 scope host valid_lft forever preferred_lft forever
2: ens33: <BROADCAST,MULTICAST,UP,LOWER_UP> mtu 1500 qdisc fq_codel state UP group default qlen 1000link/ether 00:0c:29:d2:65:56 brd ff:ff:ff:ff:ff:ffaltname enp2s1inet 192.168.0.106/24 brd 192.168.0.255 scope global dynamic noprefixroute ens33valid_lft 2591sec preferred_lft 2591secinet6 fe80::b501:560f:3981:a8eb/64 scope link noprefixroute valid_lft forever preferred_lft forever
3: docker0: <BROADCAST,MULTICAST,UP,LOWER_UP> mtu 1500 qdisc noqueue state UP group default link/ether be:57:c6:de:92:ad brd ff:ff:ff:ff:ff:ffinet 172.17.0.1/16 brd 172.17.255.255 scope global docker0valid_lft forever preferred_lft foreverinet6 fe80::bc57:c6ff:fede:92ad/64 scope link valid_lft forever preferred_lft forever
4: vethf08af63@if2: <BROADCAST,MULTICAST,UP,LOWER_UP> mtu 1500 qdisc noqueue master docker0 state UP group default link/ether ba:8d:ce:fa:80:97 brd ff:ff:ff:ff:ff:ff link-netnsid 0inet6 fe80::b88d:ceff:fefa:8097/64 scope link valid_lft forever preferred_lft forever
5: vethea5b32a@if2: <BROADCAST,MULTICAST,UP,LOWER_UP> mtu 1500 qdisc noqueue master docker0 state UP group default link/ether 36:66:d2:fe:8c:67 brd ff:ff:ff:ff:ff:ff link-netnsid 1inet6 fe80::3466:d2ff:fefe:8c67/64 scope link valid_lft forever preferred_lft forever
zky@zky-virtual-machine:~/Docker_Projects/test_web1/html$ docker exec -it test_web2
docker: 'docker exec' requires at least 2 argumentsUsage:  docker exec [OPTIONS] CONTAINER COMMAND [ARG...]See 'docker exec --help' for more information
zky@zky-virtual-machine:~/Docker_Projects/test_web1/html$ docker exec -it test_web2 bash
root@d6d9810a3197:/# curl test_web2
curl: (6) Could not resolve host: test_web2
root@d6d9810a3197:/# exit
exit
zky@zky-virtual-machine:~/Docker_Projects/test_web1/html$ docker network create net_web_chat
8196fc6221d1a4bf90369c371f69df03d284d698cdb67a4551e4d9953edb9f3c
zky@zky-virtual-machine:~/Docker_Projects/test_web1/html$ docker network ls
NETWORK ID     NAME           DRIVER    SCOPE
673dc66222db   bridge         bridge    local
ddc64a266dbf   host           host      local
8196fc6221d1   net_web_chat   bridge    local
550e6ae5e19e   none           null      localzky@zky-virtual-machine:~/Docker_Projects/test_web1/html$ # 查看 test_web1 的网络详情
docker inspect -f '{{json .NetworkSettings.Networks}}' test_web1 | python3 -m json.tool# 查看 test_web2 的网络详情
docker inspect -f '{{json .NetworkSettings.Networks}}' test_web2 | python3 -m json.tool
{"bridge": {"IPAMConfig": null,"Links": null,"Aliases": null,"MacAddress": "ba:64:0f:88:8b:8a","DriverOpts": null,"GwPriority": 0,"NetworkID": "673dc66222dbbb9d8a0f68bba2ca14b70a0e4d88355ae54de305639677d6b930","EndpointID": "6371e9e214ff2d69168af7ac23f85c18bd5aa080a5cf3d61d7e5b0e30e61b8b7","Gateway": "172.17.0.1","IPAddress": "172.17.0.2","IPPrefixLen": 16,"IPv6Gateway": "","GlobalIPv6Address": "","GlobalIPv6PrefixLen": 0,"DNSNames": null}
}
{"bridge": {"IPAMConfig": null,"Links": null,"Aliases": null,"MacAddress": "ca:15:c6:dd:25:12","DriverOpts": null,"GwPriority": 0,"NetworkID": "673dc66222dbbb9d8a0f68bba2ca14b70a0e4d88355ae54de305639677d6b930","EndpointID": "95ccdc403058f65eb56164e803fb4adf65a7b94bb4f566ccfafa2c840528e698","Gateway": "172.17.0.1","IPAddress": "172.17.0.3","IPPrefixLen": 16,"IPv6Gateway": "","GlobalIPv6Address": "","GlobalIPv6PrefixLen": 0,"DNSNames": null}
}
zky@zky-virtual-machine:~/Docker_Projects/test_web1/html$ # 查看 test_web1 的网络详情
docker inspect -f '{{json .NetworkSettings.Networks}}' test_web1 | python3 -m json.tool# 查看 test_web2 的网络详情
docker inspect -f '{{json .NetworkSettings.Networks}}' test_web2 | python3 -m json.tool^C
zky@zky-virtual-machine:~/Docker_Projects/test_web1/html$ docker network ls
NETWORK ID     NAME           DRIVER    SCOPE
673dc66222db   bridge         bridge    local
ddc64a266dbf   host           host      local
8196fc6221d1   net_web_chat   bridge    local
550e6ae5e19e   none           null      local
zky@zky-virtual-machine:~/Docker_Projects/test_web1/html$ docker network connect net_web_chat test_web1
zky@zky-virtual-machine:~/Docker_Projects/test_web1/html$ docker network connect net_web_chat test_web2
zky@zky-virtual-machine:~/Docker_Projects/test_web1/html$ docker exec -it test_web2 bash
root@d6d9810a3197:/# curl test_web1
hello world
root@d6d9810a3197:/#