Unity游戏基础-4(人物移动、相机移动、UI事件处理 代码详解)
本教程开始分享教学内容:Unity游戏基础,部分内容会包括Blender建模基础,Shader基础,动画基础等等,教程面向:建模、技术美术、游戏前端、游戏后端基础,适合美术与设计(数媒、环设、动画、产设、视传、绘画)专业、计算机(计算机科学与技术、软件工程、数媒)的同学学习。
前言
本节来解析前3节的代码(本教程适合新手程序员阅读)
内容枯燥,我会尽量图文结合讲的清清楚楚
一、核心模型与概念解释
在深入流程之前,先理解几个关键模型和概念:
1、角色控制器 (CharacterController)
是什么: Unity提供的一个专门用于角色移动的组件。它本质上是一个胶囊体碰撞器,但提供了更高级的移动控制方法(如.Move()),并内置了与几何体的简单碰撞解析(防止穿墙),但不会受物理力(如重力、推力)的剧烈影响。
与 Rigidbody 的区别: Rigidbody让物理系统完全控制你的物体,适合箱子、球等。CharacterController让你用代码完全控制移动,物理系统只负责简单的碰撞阻挡,更适合需要精确控制的玩家角色。
2、欧拉角 (Euler Angles) 与 四元数 (Quaternion)
欧拉角 (X, Y, Z): 非常直观,表示围绕三个轴(pitch, yaw, roll)的旋转角度。CameraController中的 currentY(pitch) 和 currentX(yaw) 就是欧拉角。
四元数 (X, Y, Z, W): 一种用于表示旋转的数学结构,能有效避免万向节死锁,并进行平滑插值。Unity内部主要使用四元数存储旋转。
转换: 代码中 Quaternion.Euler(currentY, currentX, 0)就是将累积的欧拉角转换为一个四元数旋转。
3、世界空间 (World Space) 与 相机空间 (Camera Space)
世界空间: 场景的绝对坐标。Vector3.forward永远指向世界的Z轴正方向。
相机空间: 以相机为原点的坐标。cameraTransform.forward指向相机镜头的正前方。
核心思想: 玩家的移动输入是在相机空间下理解的(按W是朝着相机面向的方向前进),但最终移动必须应用到世界空间中。这就需要通过相机的旋转矩阵将方向向量从相机空间转换到世界空间。
二、摄像机动作流程 (CameraController.cs)
using System;
using System.Collections;
using System.Collections.Generic;
using Unity.VisualScripting;
using UnityEditor.Rendering;
using UnityEngine;public class CameraController : MonoBehaviour
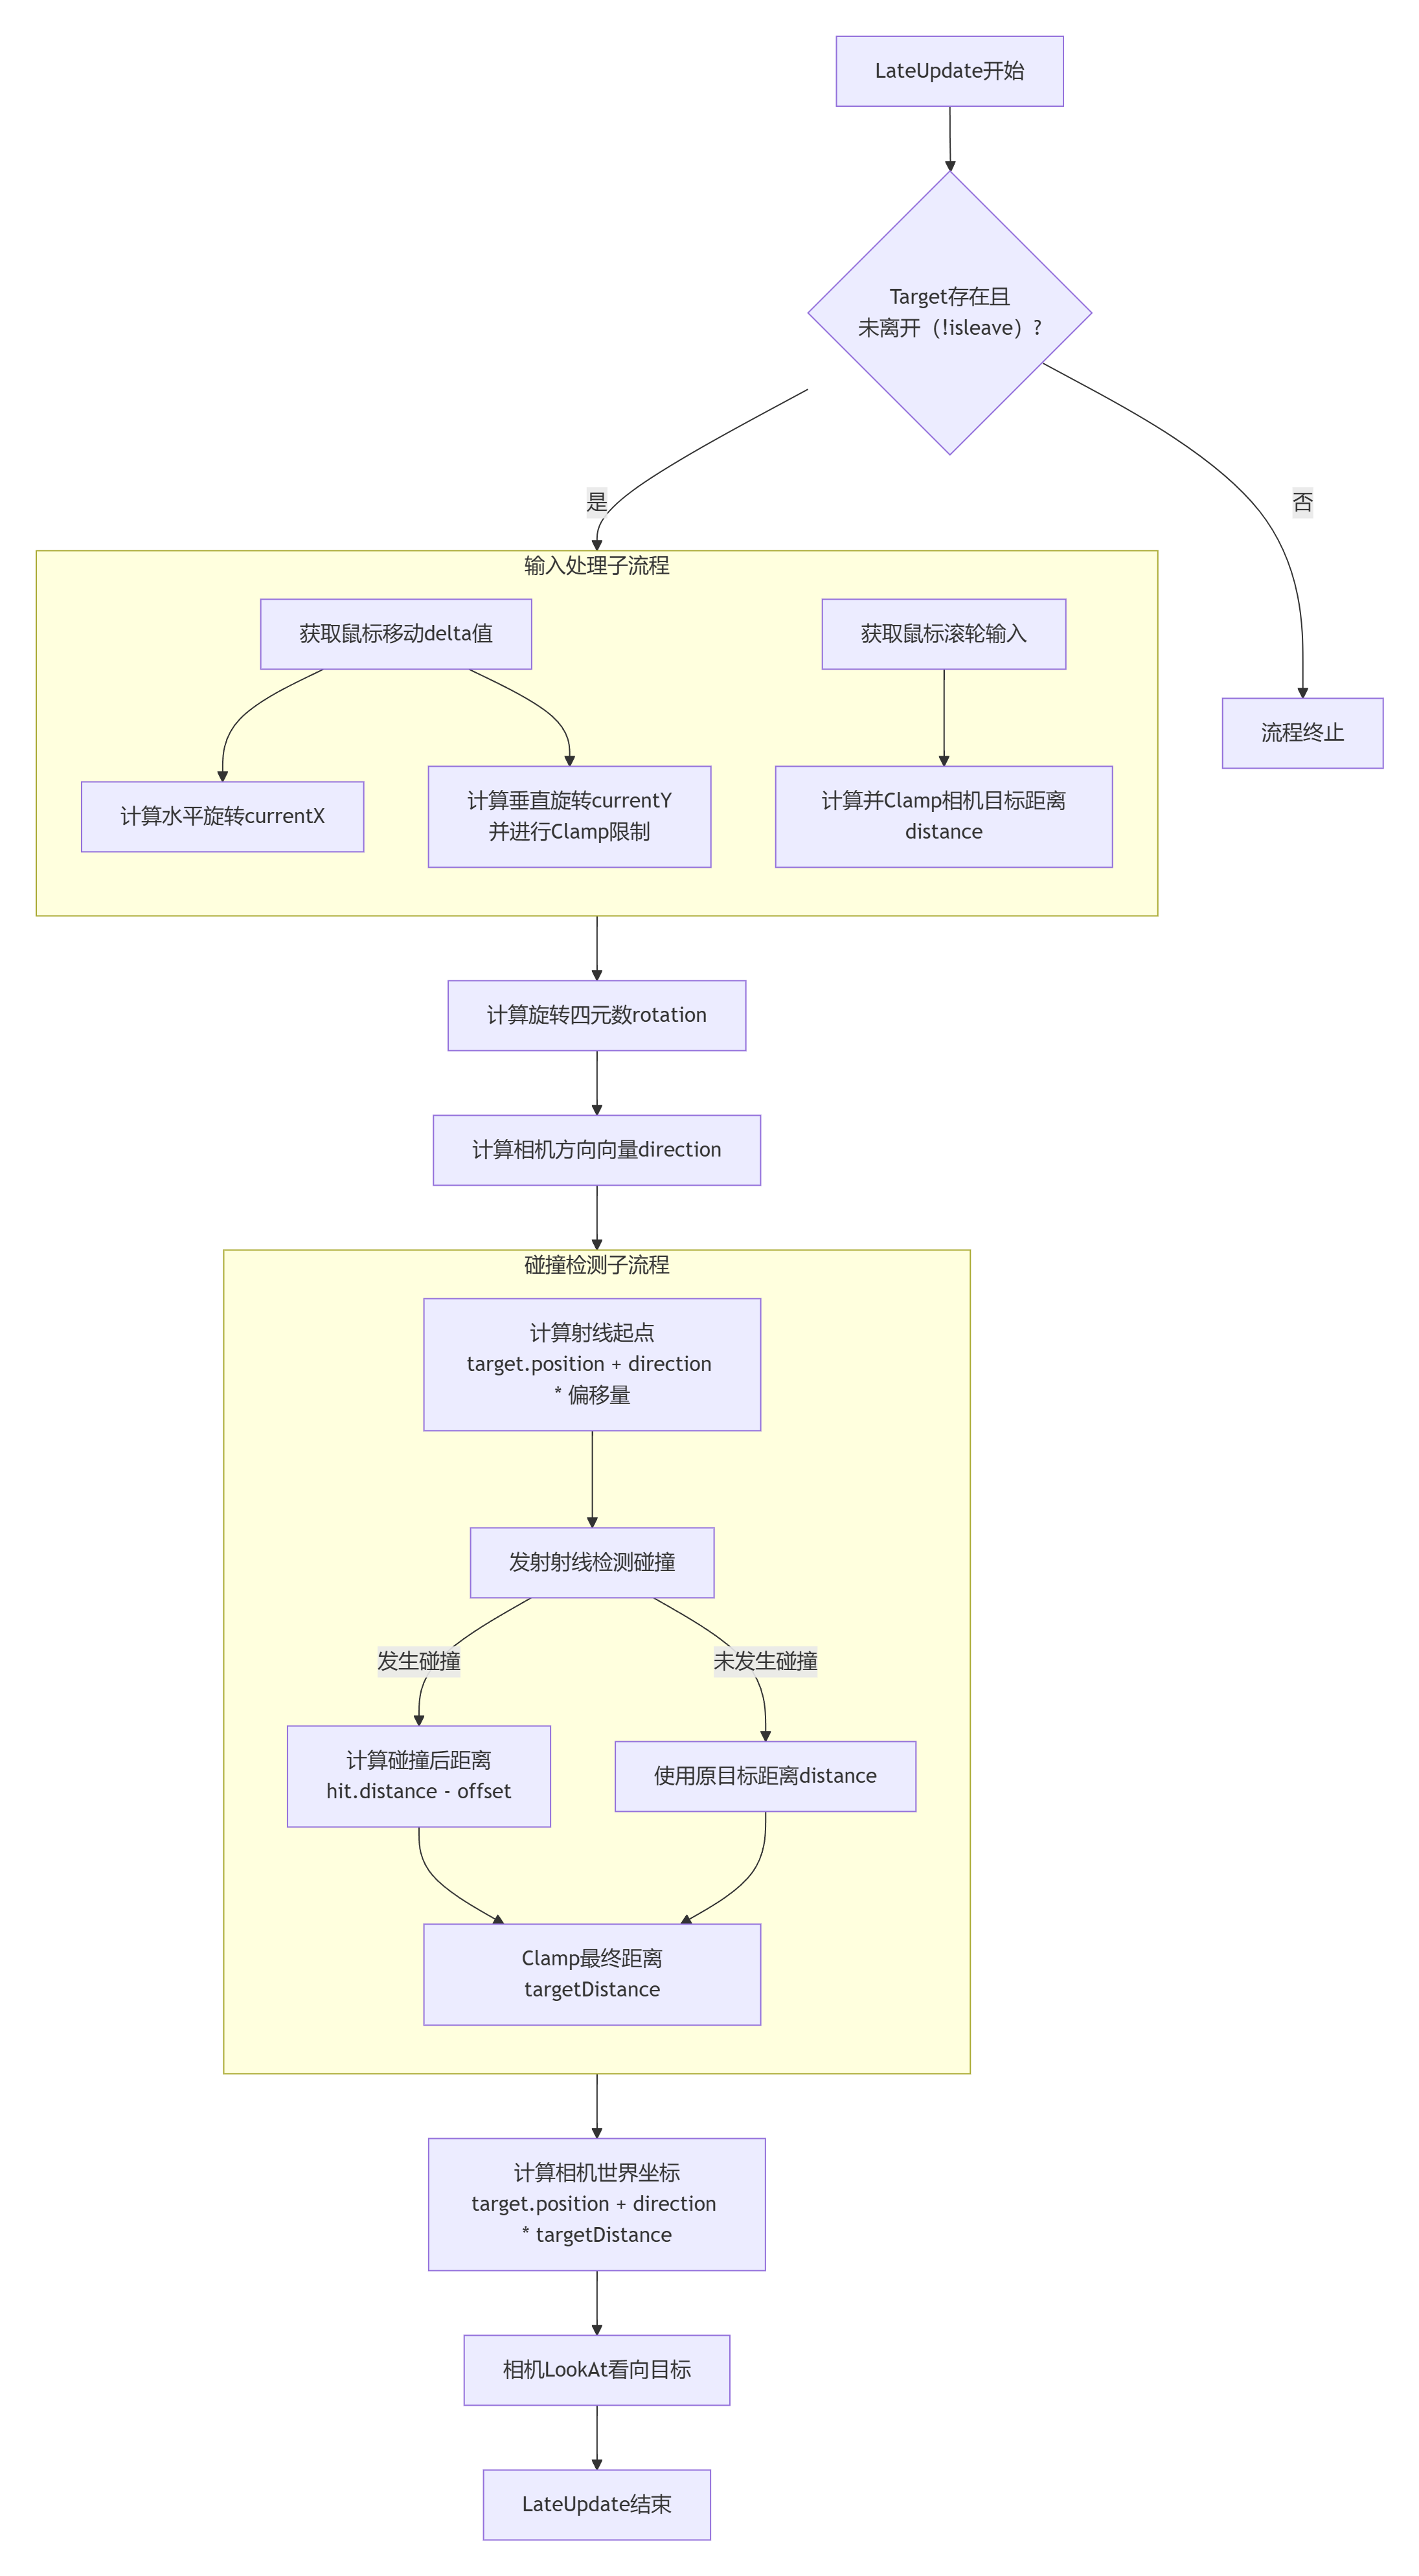
{public Transform target; // 玩家角色public float distance = 5.0f; // 默认相机距离public float minDistance = 1.5f; // 最小相机距离public float maxDistance = 15.0f; // 最大相机距离public float zoomSpeed = 2.0f; // 缩放速度public float rotationSpeed = 5.0f; // 旋转速度public float minVerticalAngle = -20.0f; // 垂直旋转最小角度public float maxVerticalAngle = 80.0f; // 垂直旋转最大角度public float collisionOffset = 0.2f; // 碰撞偏移量public LayerMask collisionLayers = ~0; // 碰撞检测层(默认所有层)public static bool isleave;private float currentX = 0.0f;private float currentY = 0.0f;private float targetDistance;private Vector3 cameraDirection;/// <summary>/// 鼠标/// </summary>private void CursorController(){ // 优先判断:只要UI界面打开,就解锁并显示鼠标if (ButtonsEventHandler.isopen){Cursor.lockState = CursorLockMode.None;isleave = true;return;}if (Input.GetKeyDown(KeyCode.LeftAlt)){Cursor.lockState = CursorLockMode.None;isleave = true;}if (Input.GetKeyUp(KeyCode.LeftAlt)){//Debug.Log(ButtonsEventHandler.isopen);Cursor.lockState = CursorLockMode.Locked;isleave = false;}}void Start(){// 初始化当前旋转角度Cursor.lockState = CursorLockMode.Locked;Vector3 angles = transform.eulerAngles;currentX = angles.y;currentY = angles.x;targetDistance = distance;cameraDirection = (transform.position - target.position).normalized;}void Update(){CursorController();}void LateUpdate(){if (target == null)return;if (isleave)return;// 处理鼠标输入HandleInput();// 计算相机旋转和方向Quaternion rotation = Quaternion.Euler(currentY, currentX, 0);Vector3 direction = rotation * Vector3.back;// 碰撞检测和避免HandleCameraCollision(direction);// 应用相机位置和旋转transform.position = target.position + direction * targetDistance;transform.LookAt(target.position);}void HandleInput(){// 鼠标旋转控制//if (Input.GetMouseButton(0)) // 右键按住旋转//{currentX += Input.GetAxis("Mouse X") * rotationSpeed;currentY -= Input.GetAxis("Mouse Y") * rotationSpeed;currentY = Mathf.Clamp(currentY, minVerticalAngle, maxVerticalAngle);//}// 鼠标滚轮缩放float scroll = Input.GetAxis("Mouse ScrollWheel");if (scroll != 0){distance -= scroll * zoomSpeed;distance = Mathf.Clamp(distance, minDistance, maxDistance);}}void HandleCameraCollision(Vector3 direction){RaycastHit hit;// 定义一个小的偏移量,将射线起点从角色中心向后移动,避免与自身碰撞float selfAvoidanceOffset = 1f;Vector3 rayStartPoint = target.position + direction * selfAvoidanceOffset;float rayLength = distance - selfAvoidanceOffset;// 从调整后的起点发射射线if (Physics.Raycast(rayStartPoint, direction, out hit, rayLength, collisionLayers)){// 如果检测到碰撞,调整相机距离targetDistance = Mathf.Clamp(hit.distance - collisionOffset, minDistance, maxDistance);}else{// 没有碰撞则使用预设距离targetDistance = distance;}}}摄像机的所有操作都在LateUpdate()中执行,以确保在角色移动完毕后再更新相机,避免抖动。
isleave 是鼠标是否离开,我们设定按下Alt解锁鼠标,在UI界面时解锁鼠标,此图为DeepSeek为我绘制的流程图
详解关键步骤:
步骤 1(计算方向向量):
Vector3 direction = rotation * Vector3.back;
解释: Vector3.back是 (0, 0, -1)。想象相机初始在角色身后 (0, 0, 5)的位置。将这个向量 (0, 0, -5)施加一个旋转(比如绕Y轴旋转180度),它就变成了 (0, 0, 5),即相机的新位置。这个运算正是通过四元数 rotation旋转一个方向向量来实现的。
步骤 2(碰撞检测):
射线起点: target.position + direction * selfAvoidanceOffset
为什么? 如果直接从角色中心 target.position发射射线,射线很可能一开始就打在角色自己的碰撞体上。向后偏移一小段距离 (selfAvoidanceOffset),让射线从角色外部开始发射,避免自碰撞。
射线方向: direction。这个方向是从角色指向期望的相机位置的向量。
射线长度: rayLength = distance - selfAvoidanceOffset。因为起点已经向后偏移了,所以射线的有效长度需要减去这个偏移量。
三、角色动作流程 (PlayerMovement.cs)
using System.Collections;
using System.Collections.Generic;
using UnityEditor.Rendering;
using UnityEngine;public class PlayerMovement : MonoBehaviour
{public float moveSpeed = 5f;public float rotateSpeed = 10f;public float jumpHeight = 1f;public float gravity = -9.81f;public float pushPower = 3f;public Transform groundCheck; // 将你在脚底创建的空物体拖拽到这里public float groundCheckRadius = 0.2f; // 检测范围的半径public LayerMask groundMask; // 在Inspector中设置为“Ground”层private CharacterController controller;private Vector3 playerVelocity;private bool isGrounded;private Transform cameraTransform;void Start(){controller = GetComponent<CharacterController>();cameraTransform = Camera.main.transform; // 获取主摄像机变换}void Update(){if (CameraController.isleave)return;// 检查角色是否着地isGrounded = Physics.CheckSphere(groundCheck.position, groundCheckRadius, groundMask);if (controller.isGrounded){HandleJump();CheckSpeed();}HandleMovement();}void CheckSpeed(){if (Input.GetKeyDown(KeyCode.LeftShift)){moveSpeed = 15f;}else if (Input.GetKeyUp(KeyCode.LeftShift)){moveSpeed = 5f;}}void HandleMovement(){// 获取输入float horizontal = Input.GetAxis("Horizontal");float vertical = Input.GetAxis("Vertical");// 根据摄像机方向计算移动方向Vector3 camForward = Vector3.Scale(cameraTransform.forward, new Vector3(1, 0, 1)).normalized; // 忽略摄像机俯仰角Vector3 moveDirection = (camForward * vertical + cameraTransform.right * horizontal).normalized;// 应用移动速度Vector3 movement = moveDirection * moveSpeed * Time.deltaTime;controller.Move(movement);// 如果需要角色朝向移动方向,可以取消注释下面的代码if (moveDirection.magnitude > 0.1f){Quaternion targetRotation = Quaternion.LookRotation(moveDirection);transform.rotation = Quaternion.Slerp(transform.rotation, targetRotation, rotateSpeed * Time.deltaTime);}// 应用重力playerVelocity.y += gravity * Time.deltaTime;controller.Move(playerVelocity * Time.deltaTime);}void OnControllerColliderHit(ControllerColliderHit hit){Rigidbody hitRigidbody = hit.collider.attachedRigidbody;// 如果碰撞的对象没有刚体、是运动学刚体,或者被卡在下面,则不推动if (hitRigidbody == null || hitRigidbody.isKinematic || hit.moveDirection.y < -0.3f){return;}// 计算推动方向(主要在X和Z轴)Vector3 pushDir = new Vector3(hit.moveDirection.x, 0, hit.moveDirection.z);// 给被碰撞的刚体一个速度来实现推动效果hitRigidbody.velocity = pushDir * pushPower;}void HandleJump(){if (Input.GetButtonDown("Jump") && isGrounded){playerVelocity.y = Mathf.Sqrt(jumpHeight * -1f * gravity); // 计算跳跃速度}}}
角色的移动逻辑在 Update()中执行。

详解关键步骤:
步骤 1 (计算相机前向向量):
Vector3 camForward = Vector3.Scale(cameraTransform.forward, new Vector3(1, 0, 1)).normalized;
Vector3.Scale的作用: 这是整个相对移动的核心。相机的 forward向量是带Y分量的(相机朝下看,forward的Y就是负的)。如果我们直接用这个向量,按W前进时,角色不仅会向前走,还会向地下走(因为Y分量是负的)。
解决方案: 用 Scale将相机前向向量的Y分量强制归零(new Vector3(1, 0, 1)),然后再归一化 (normalized) 保证其长度为1。这样就得到了一个纯粹的水平方向向量,它代表了相机面向的水平方向。这样,无论相机如何俯仰,按W永远是在水平面上前进。
步骤 2 (跳跃初速度公式):
playerVelocity.y = Mathf.Sqrt(jumpHeight * -1f * gravity);
物理公式推导(基于动能定理):
在跳跃最高点,速度 v = 0。
位移 s = jumpHeight。
加速度 a = gravity(重力,为负值)。
公式: v² = u² + 2as(v是末速度,u是初速度,a是加速度,s是位移)
代入: 0² = u² + 2 * gravity * jumpHeight
推导: u² = -2 * gravity * jumpHeight
因此: u = √(-2 * gravity * jumpHeight)
这个公式能让你通过直观地设置jumpHeight(你想跳多高)来自动计算出所需的初始速度,非常巧妙和实用。
四、两大系统的协同工作流程
这两个脚本通过帧序列和状态变量完美协同:
using System;
using System.Collections;
using System.Collections.Generic;
using TMPro;
using Unity.VisualScripting;
using UnityEngine;
using UnityEngine.UI;[Serializable]
public class Config
{private static int SelectIndex;private static bool isfull;
}public class ButtonsEventHandler : MonoBehaviour
{public static Config cfg;public  TMP_Dropdown resolutionDropdown; // 在Inspector中关联你的ResolutionDropdownpublic Toggle fullscreenToggle; // 在Inspector中关联你的FullscreenTogglepublic GameObject SeetingForm;/// <summary>/// 指示设置窗口是否开启/// </summary>public static bool isopen = false;private static int SelectIndex = 0;private static bool isfull = false;/// <summary>/// 获取所有支持的分辨率/// </summary>private static List<Resolution> sizes = new List<Resolution>();// Start is called before the first frame updatevoid Start(){        SeetingForm.SetActive(false);LoadSize();resolutionDropdown.onValueChanged.RemoveListener(OnDropdownValueChanged);resolutionDropdown.onValueChanged.AddListener(OnDropdownValueChanged);fullscreenToggle.onValueChanged.RemoveListener(onToggleValueChanged);fullscreenToggle.onValueChanged.AddListener(onToggleValueChanged);}private void onToggleValueChanged(bool check){isfull = check;}private void OnDropdownValueChanged(int newIndex){SelectIndex = newIndex;}void LoadSize()//加载所有分辨率{resolutionDropdown.ClearOptions();//清空列表sizes.Clear();List<string> size1 = new List<string>();foreach (var s in Screen.resolutions){sizes.Add(s);size1.Add(s.width + "x" + s.height + " " + s.refreshRateRatio);Debug.Log(s.width + "x" + s.height + " " + s.refreshRateRatio);}resolutionDropdown.AddOptions(size1);//全部加载分辨率}// Update is called once per framevoid Update(){if (Input.GetKeyDown(KeyCode.Escape)){OnButtonPress();}}public void OnButtonPress()//打开或关闭设置界面,打开就加载分辨率{if (isopen){SeetingForm.SetActive(false);isopen = false;Cursor.lockState = CursorLockMode.Locked;CameraController.isleave = false;}else{SeetingForm.SetActive(true);isopen = true;Cursor.lockState = CursorLockMode.None;CameraController.isleave = true;LoadSize();}}public void Apply(){FullScreenMode mode;if (isfull){mode = FullScreenMode.FullScreenWindow;}else{mode = FullScreenMode.Windowed;}Screen.SetResolution(sizes[SelectIndex].width, sizes[SelectIndex].height, mode, sizes[SelectIndex].refreshRateRatio);}public void Cancel(){SeetingForm.SetActive(false);isopen = false;}public void Close(){Application.Quit();}}
Update循环 (PlayerMovement):
玩家读取输入(键盘、鼠标)。
根据当前帧的相机朝向计算移动方向。
CharacterController执行移动,角色位置改变。
LateUpdate循环 (CameraController):
相机读取输入(鼠标)。
根据输入计算新的相机旋转和距离。
以角色当前的位置(target.position,已经是PlayerMovement移动后的新位置)为基准,计算相机的新位置。
相机看向角色的新位置。
状态同步:
当UI打开 (ButtonsEventHandler.isopen = true) 时,CameraController检测到 isleave为true,会直接返回,不处理任何输入,相机被冻结。
PlayerMovement同样检测 CameraController.isleave,如果为true,也直接返回,不处理移动输入,角色被冻结。
这样就实现了打开菜单时,游戏操作(移动和视角)全部暂停的功能。
五、其他流程解析
1、UI分辨率问题
ButtonsEventHandler.cs(游戏设置/UI控制脚本)
这个脚本主要负责游戏内设置菜单(通常按 Esc键呼出)的UI交互逻辑,包括分辨率切换、全屏设置和退出游戏。
核心原理与详解:UI 控制与状态管理
SeetingForm: 一个GameObject,代表整个设置面板。
isopen: 一个静态布尔变量,用于记录设置面板的当前状态(打开或关闭)。因为它被定义为 static,所以其他脚本(如 CameraController)可以直接通过 ButtonsEventHandler.isopen来访问它,从而知道UI是否处于打开状态,并据此决定是否响应游戏输入。
分辨率管理 (LoadSize方法)
原理: Unity 的 Screen.resolutions属性返回一个数组,包含了当前显示器支持的所有分辨率。
流程:
resolutionDropdown.ClearOptions(): 清空下拉框现有选项。
遍历 Screen.resolutions,将每个分辨率信息(宽、高、刷新率)格式化成字符串(如 "1920x1080 60Hz"),并同时存入一个字符串列表 size1和一个Resolution列表 sizes。
resolutionDropdown.AddOptions(size1): 将字符串列表添加到下拉框中作为可选选项。
注意: 存储原始Resolution列表 sizes至关重要,因为下拉框的索引 (SelectIndex) 需要与这个列表的索引对应,以便在应用设置时能获取到正确的Resolution对象。
应用设置 (Apply方法)
核心API: Screen.SetResolution(int width, int height, FullScreenMode fullscreenMode, RefreshRate refreshRate)
公式/逻辑:
分辨率: 从之前存储的 sizes列表中,根据用户选择的索引 SelectIndex获取对应的宽和高。
全屏模式: 根据Toggle的状态 isfull,决定使用 FullScreenMode.FullScreenWindow(全屏)还是 FullScreenMode.Windowed(窗口化)。
刷新率: 同样从 sizes[SelectIndex]中获取。
输入检测 (Update方法)
监听 Esc键按下,调用 OnButtonPress方法来切换设置菜单的开关状态。同时控制鼠标光标的锁定与释放(Cursor.lockState)。
2、脚本内静态变量的作用
在Unity游戏开发中,静态变量(Static Variables)是实现脚本间通信、管理全局状态的关键工具。它们属于类本身,而非类的某个实例,因此所有对象共享同一份数据,因此在游戏开发中,多线程多类就成为了最头疼的也是最难的问题,谁先执行谁后执行是有讲究的