从零开始:MCP数据库助手(一)- 基础搭建
MCP是什么?为什么要用它?
MCP全称Model Context Protocol,简单说就是让AI助手能够调用外部工具的标准协议。想象一下,如果AI只能聊天,那就像一个很聪明但没有手的人。MCP就是给AI装上了"手",让它能够真正操作数据库、文件系统等等。
对于数据库操作来说,MCP的优势特别明显:
- 一问即答:直接问AI就能获取数据库信息
- 安全可控:AI只能调用你预设的工具函数
- 智能分析:AI能理解数据关系,给出有用的建议
第一步:项目结构搭建
咱们先把项目的骨架搭起来。
v1/
├── pyproject.toml            # uv 项目配置
├── README.md                # 项目说明
├── src/
│   └── mcp_datatools/       # 主包
│       ├── __init__.py
│       ├── server.py        # MCP 服务器
│       └── database.py      # 数据库管理
├── data/
│   ├── init_sqlite_db.py   # 初始化 SQLite 数据库脚本
│   └── test.db             # SQLite 测试数据库
└── tests/                  # 测试文件目录
为什么这样设计?
- 使用
uv作为包管理器,更现代更快速 src/目录让代码结构更清晰data/存放测试数据和初始化脚本tests/目录为后续单元测试预留- 配置文件简洁,专注核心功能
第二步:环境配置和依赖
咱们使用现代的 uv 包管理器来管理依赖:
# 安装 uv (如果还没有安装)
curl -LsSf https://astral.sh/uv/install.sh | sh# 进入项目目录
cd v1# 安装依赖
uv sync
pyproject.toml 文件内容:
[project]
name = "mcp-datatools"
version = "0.1.0"
description = "A MCP server that connects to your database"
requires-python = ">=3.10"dependencies = ["mcp>=1.0.0","sqlalchemy>=2.0.0",
][build-system]
requires = ["hatchling"]
build-backend = "hatchling.build"
为什么选择 uv?
- 速度极快:比 pip 快 10-100 倍
- 依赖解析:更智能的依赖管理
- 项目隔离:自动创建虚拟环境
- 现代标准:支持最新的 Python 包管理标准
第三步:数据库连接管理
数据库连接是整个项目的基础,咱们先把这部分搞定。我设计了一个DatabaseManager类来管理连接:
"""
database.py - 数据库管理模块
"""import os
from typing import List
from contextlib import contextmanager
from sqlalchemy import create_engine,inspect,text
from sqlalchemy.exc import SQLAlchemyError
from mcp.server.fastmcp.utilities.logging import get_loggerlogger = get_logger(__name__)class DatabaseManager:"""数据库管理器"""def __init__(self):"""初始化数据库管理器"""self.database_url = os.getenv("DB_URL")self.engine = Noneself._connect()def _connect(self) -> None:"""连接数据库"""try:self.engine = create_engine(self.database_url, echo=False)logger.info(f"成功连接到数据库: {self.database_url}")except Exception as e:logger.error(f"连接数据库时出错: {str(e)}")raise@contextmanagerdef get_connection(self):"""获取数据库连接的上下文管理器"""if not self.engine:raise RuntimeError("数据库未连接")conn = self.engine.connect()try:yield connfinally:conn.close()def get_table_names(self) -> List[str]:"""获取数据库中的所有表名"""try:with self.get_connection() as conn:inspector = inspect(conn)table_names = inspector.get_table_names()return table_namesexcept SQLAlchemyError as e:logger.error(f"获取表名失败: {e}")raisedef test_connection(self) -> bool:"""测试数据库连接"""try:with self.get_connection() as conn:result = conn.execute(text("SELECT 1")).scalar()return result == 1except Exception as e:logger.error(f"测试数据库连接时出错: {str(e)}")return Falsedef get_db_info(self) -> str:try:tables = self.get_table_names()return f"数据库URL: {self.database_url}\n共有 {len(tables)} 个表"except Exception:return f"数据库URL: {self.database_url}\n数据库连接失败"def close(self) -> None:"""关闭数据库连接"""if self.engine:self.engine.dispose()logger.info("数据库连接已关闭")
第四步:第一个MCP工具函数
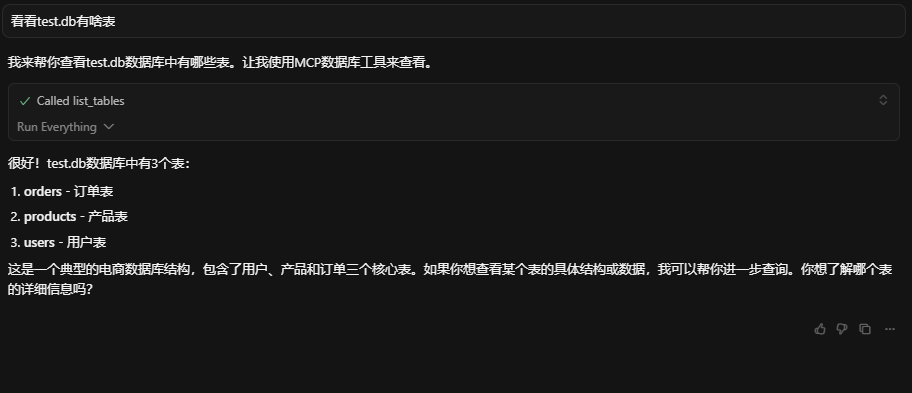
现在是最重要的部分 - 实现第一个MCP工具函数list_tables()!
"""
server.py - MCP服务器主文件
"""import os
from mcp.server.fastmcp import FastMCP
from mcp.server.fastmcp.utilities.logging import get_logger
from .database import DatabaseManagermcp = FastMCP("MCP DataTools")
logger = get_logger(__name__)
db_manager = Nonedef get_database_manager():"""获取数据库管理器实例"""global db_managerif db_manager is None:db_manager = DatabaseManager()return db_manager@mcp.tool(description="查询数据库中的所有表")
def list_tables() -> str:"""获取数据库表列表"""try:db_mgr = get_database_manager()tables = db_mgr.get_table_names()if tables:table_list = ",".join(tables)result = f"数据库中共有 {len(tables)} 个表:\n\n"for i,table in enumerate(tables,1):result += f"{i}. {table}\n"logger.info(f"成功返回 {len(tables)} 个表: {table_list}")return resultelse:return "数据库中没有表"except Exception as e:error_msg = f"获取数据库表列表失败: {str(e)}"logger.error(error_msg)return f"{error_msg}\n\n请检查数据库连接。"def main():try:logger.info("启动MCP DataTools服务器")db_mgr = get_database_manager()if db_mgr.test_connection():logger.info("数据库连接测试成功")else:logger.warning("数据库连接测试失败,但服务器仍会启动")logger.info("提示:运行 'python data/init_sqlite_db.py' 创建测试数据库")logger.info("当前功能:list_tables() - 获取数据库表列表")logger.info("MCP服务器启动成功,等待客户端连接...")mcp.run()except Exception as e:logger.error(f"服务器启动失败: {str(e)}")raiseif __name__ == "__main__":main()
第五步:测试数据准备
光有工具还不行,得有数据来测试。第1周我们创建一个超级简单的测试数据库,重点是能让list_tables()功能工作:
"""
data/init_sqlite_db.py - 初始化 SQLite 数据库
"""import sqlite3
import os
from pathlib import Pathdef create_simple_test_database():"""创建简单测试数据库"""data_dir = Path(__file__).parent.parent / "data"db_path = data_dir / "test.db"print(" 测试数据库创建器")print(f"数据库路径: {db_path}")if db_path.exists():os.remove(db_path)print("删除旧数据库文件")conn = sqlite3.connect(db_path)cursor = conn.cursor()try:print("创建基础表结构...")# 创建用户表cursor.execute("""CREATE TABLE users (id INTEGER PRIMARY KEY,name VARCHAR(50) NOT NULL,email VARCHAR(100) NOT NULL)""")# 创建产品表cursor.execute("""CREATE TABLE products (id INTEGER PRIMARY KEY,name VARCHAR(100) NOT NULL,price DECIMAL(10, 2) NOT NULL)""")# 创建订单表cursor.execute("""CREATE TABLE orders (id INTEGER PRIMARY KEY,user_id INTEGER,total_amount DECIMAL(10, 2))""")print("插入测试数据...")# 插入测试数据cursor.execute("INSERT INTO users (name, email) VALUES ('Alice', 'alice@test.com')")cursor.execute("INSERT INTO users (name, email) VALUES ('Bob', 'bob@test.com')")cursor.execute("INSERT INTO products (name, price) VALUES ('笔记本电脑', 5999.99)")cursor.execute("INSERT INTO products (name, price) VALUES ('鼠标', 129.99)")cursor.execute("INSERT INTO orders (user_id, total_amount) VALUES (1, 6129.98)")cursor.execute("INSERT INTO orders (user_id, total_amount) VALUES (2, 129.99)")conn.commit()print("测试数据库创建成功!")print("数据库包含表:")print("  1. users - 用户表 (2条记录)")print("  2. products - 产品表 (2条记录)")print("  3. orders - 订单表 (2条记录)")except Exception as e:print(f"创建数据库时出错: {e}")conn.rollback()raisefinally:conn.close()if __name__ == "__main__":create_simple_test_database()
运行这个脚本:
python data/init_sqlite_db.py
你就会得到一个包含3个基础表的测试数据库。
第六步:Cursor 集成测试
配置 Cursor
在 Cursor 的 MCP 配置中添加我们的服务器。打开 Cursor 设置,找到 MCP 配置部分:
{"mcpServers": {"mcp-datatools": {"command": "uv","args": ["run", "--project", "/path", "python", "-m", "mcp_datatools.server"],"env": {"DB_URL": "sqlite:///data/test.db"}}}
}
正常来说是能开启的:

测试功能

总结与预告
第1章我们成功搭建了MCP数据库智能助手的基础,下一章将实现更多的工具函数。
