QT6中Column View与QUndoView功能与用法
一.QColumnView
1.简介
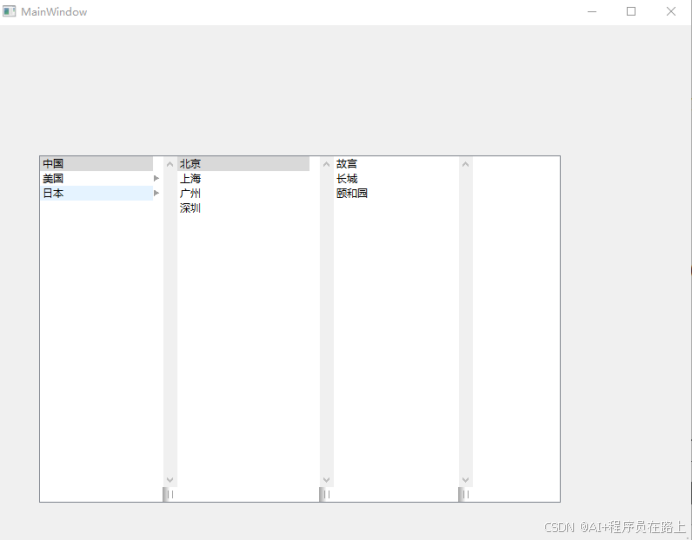
QColumnView 是 Qt 框架中用于展示层级数据的视图控件,其主要特点和功能包括:
层级数据展示:以多列形式展示树形结构数据,每一列代表一个层级
交互式浏览:点击某一项时,会在右侧自动创建新列显示其子项
模型 - 视图架构:与 Qt 的模型类(如 QStandardItemModel)配合使用,实现数据与视图分离
灵活定制:可自定义列宽、样式等外观属性
2.代码示例
// 创建QColumnView
QColumnView *columnView = new QColumnView(this);
columnView->setGeometry(50, 150, 600, 400); //控件绝对位置,长、宽
// 设置列宽
columnView->setColumnWidths({200, 180, 160});
// 创建数据模型
QStandardItemModel *model = new QStandardItemModel();
// 第一层数据 - 国家
QStandardItem *country1 = new QStandardItem("中国");
QStandardItem *country2 = new QStandardItem("美国");
QStandardItem *country3 = new QStandardItem("日本");
model->appendRow(country1);
model->appendRow(country2);
model->appendRow(country3);
// 第二层数据 - 城市
// 中国城市
country1->appendRow(new QStandardItem("北京"));
country1->appendRow(new QStandardItem("上海"));
country1->appendRow(new QStandardItem("广州"));
country1->appendRow(new QStandardItem("深圳"));
// 美国城市
country2->appendRow(new QStandardItem("纽约"));
country2->appendRow(new QStandardItem("洛杉矶"));
country2->appendRow(new QStandardItem("芝加哥"));
// 日本城市
country3->appendRow(new QStandardItem("东京"));
country3->appendRow(new QStandardItem("大阪"));
country3->appendRow(new QStandardItem("京都"));
// 第三层数据 - 景点
// 北京景点
country1->child(0)->appendRow(new QStandardItem("故宫"));
country1->child(0)->appendRow(new QStandardItem("长城"));
country1->child(0)->appendRow(new QStandardItem("颐和园"));
// 东京景点
country3->child(0)->appendRow(new QStandardItem("东京塔"));
country3->child(0)->appendRow(new QStandardItem("浅草寺"));
// 将模型设置到视图
columnView->setModel(model);
3.运行界面
二.QUndoView
1.简介
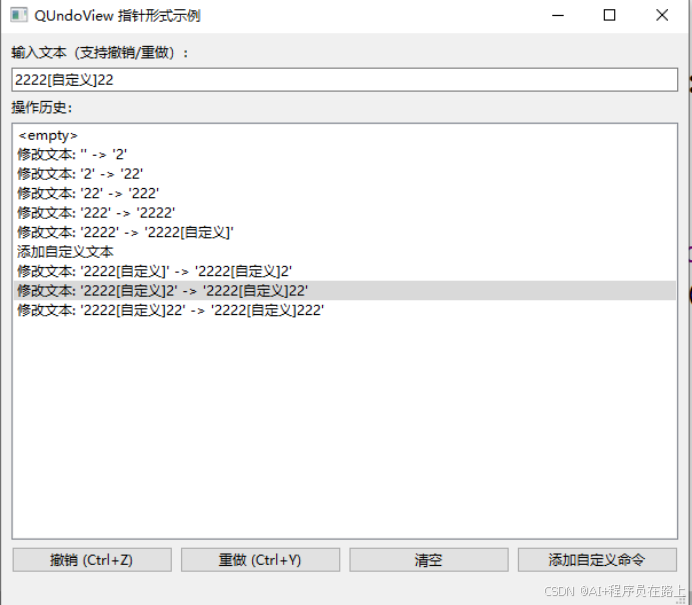
QUndoView 是 Qt 框架中用于可视化展示撤销 / 重做历史的控件,主要功能包括:
操作历史展示:以列表形式显示所有推入 QUndoStack 的命令,直观呈现操作序列
撤销 / 重做交互:支持通过双击列表项直接跳转到对应操作状态
与撤销栈绑定:需与 QUndoStack 配合使用,自动同步命令栈的变化
轻量化集成:可直接嵌入界面或作为独立窗口显示
2.核心组件协作关系
QUndoView 的使用需配合以下三个核心组件:
QUndoStack:管理命令的栈结构,负责存储、撤销、重做命令
QUndoCommand:抽象命令基类,自定义命令需继承此类并实现 undo () 和 redo () 方法
QUndoView:可视化展示 QUndoStack 中的命令历史
3.代码示例
#include <QApplication>
#include <QUndoView>
#include <QUndoStack>
#include <QUndoCommand>
#include <QMainWindow>
#include <QVBoxLayout>
#include <QHBoxLayout>
#include <QWidget>
#include <QPushButton>
#include <QLineEdit>
#include <QLabel>
// 自定义撤销命令类,处理文本编辑操作
class TextEditCommand : public QUndoCommand
{
public:
// 构造函数:保存编辑器指针、新旧文本和操作描述
TextEditCommand(QLineEdit* editor, const QString& oldText, const QString& newText,
const QString& description, QUndoCommand* parent = nullptr)
: QUndoCommand(description, parent), m_editor(editor),
m_oldText(oldText), m_newText(newText)
{
}
// 撤销操作:恢复旧文本
void undo() override
{
m_editor->setText(m_oldText);
}
// 重做操作:应用新文本
void redo() override
{
m_editor->setText(m_newText);
}
private:
QLineEdit* m_editor; // 文本编辑器指针
QString m_oldText; // 旧文本
QString m_newText; // 新文本
};
// 主窗口类
class MainWindow : public QMainWindow
{
Q_OBJECT
public:
MainWindow(QWidget* parent = nullptr) : QMainWindow(parent), m_isUndoRedoInProgress(false)
{
// 设置窗口基本属性
setWindowTitle("QUndoView 指针形式示例");
setGeometry(100, 100, 600, 500);
// 创建中心部件和主布局
QWidget* centralWidget = new QWidget(this);
setCentralWidget(centralWidget);
QVBoxLayout* mainLayout = new QVBoxLayout(centralWidget);
// 1. 创建撤销栈(核心组件)
m_undoStack = new QUndoStack(this);
// 2. 创建文本编辑区域
mainLayout->addWidget(new QLabel("输入文本(支持撤销/重做):"));
m_textEdit = new QLineEdit();
m_textEdit->setPlaceholderText("在此输入文本...");
mainLayout->addWidget(m_textEdit);
// 3. 创建QUndoView(指针形式定义)
mainLayout->addWidget(new QLabel("操作历史:"));
QUndoView* undoView = new QUndoView(m_undoStack, this); // 指针形式定义
undoView->setMinimumHeight(200);
undoView->setWindowTitle("操作历史");
mainLayout->addWidget(undoView);
// 4. 创建操作按钮
QHBoxLayout* buttonLayout = new QHBoxLayout();
QPushButton* undoBtn = new QPushButton("撤销 (Ctrl+Z)");
connect(undoBtn, &QPushButton::clicked, this, &MainWindow::performUndo);
buttonLayout->addWidget(undoBtn);
QPushButton* redoBtn = new QPushButton("重做 (Ctrl+Y)");
connect(redoBtn, &QPushButton::clicked, this, &MainWindow::performRedo);
buttonLayout->addWidget(redoBtn);
QPushButton* clearBtn = new QPushButton("清空");
connect(clearBtn, &QPushButton::clicked, this, &MainWindow::clearText);
buttonLayout->addWidget(clearBtn);
QPushButton* addCustomBtn = new QPushButton("添加自定义命令");
connect(addCustomBtn, &QPushButton::clicked, this, &MainWindow::addCustomCommand);
buttonLayout->addWidget(addCustomBtn);
mainLayout->addLayout(buttonLayout);
// 连接文本变化信号
connect(m_textEdit, &QLineEdit::textChanged, this, &MainWindow::onTextChanged);
m_prevText = m_textEdit->text();
// 连接撤销栈的信号
connect(m_undoStack, &QUndoStack::cleanChanged, this, &MainWindow::onCleanChanged);
}
private slots:
// 执行撤销操作
void performUndo()
{
m_isUndoRedoInProgress = true;
m_undoStack->undo();
m_isUndoRedoInProgress = false;
m_prevText = m_textEdit->text(); // 更新prevText
}
// 执行重做操作
void performRedo()
{
m_isUndoRedoInProgress = true;
m_undoStack->redo();
m_isUndoRedoInProgress = false;
m_prevText = m_textEdit->text(); // 更新prevText
}
// 文本变化时创建撤销命令
void onTextChanged(const QString& text)
{
// 如果是在撤销/重做过程中,不创建新命令
if (m_isUndoRedoInProgress)
return;
// 避免空文本的初始变化
if (text == m_prevText)
return;
// 创建命令并推入撤销栈
TextEditCommand* cmd = new TextEditCommand(
m_textEdit, m_prevText, text,
QString("修改文本: '%1' -> '%2'").arg(m_prevText).arg(text)
);
m_undoStack->push(cmd);
m_prevText = text;
}
// 清空文本并创建撤销命令
void clearText()
{
if (!m_textEdit->text().isEmpty())
{
TextEditCommand* cmd = new TextEditCommand(
m_textEdit, m_textEdit->text(), "", "清空文本"
);
m_undoStack->push(cmd);
m_prevText = ""; // 更新prevText
}
}
// 添加自定义命令
void addCustomCommand()
{
QString currentText = m_textEdit->text();
QString newText = currentText + "[自定义]";
TextEditCommand* cmd = new TextEditCommand(
m_textEdit, currentText, newText, "添加自定义文本"
);
m_undoStack->push(cmd);
m_prevText = newText; // 更新prevText
}
// 清理状态变化
void onCleanChanged(bool clean)
{
qDebug() << "撤销栈清理状态:" << (clean ? "已清理" : "未清理");
}
private:
QUndoStack* m_undoStack; // 撤销栈
QLineEdit* m_textEdit; // 文本编辑器
QString m_prevText; // 保存上一次文本
bool m_isUndoRedoInProgress; // 标记是否正在执行撤销/重做操作
};
#include "main.moc"
int main(int argc, char* argv[])
{
QApplication app(argc, argv);
MainWindow window;
window.show();
return app.exec();
}
4.运行界面