SpringBoot+QQ 邮箱邮件开发指南:环境配置、功能实现、异常处理一站式搞定
SpringBoot 整合 QQ 邮箱发送邮件
摘要:本文详细讲解 SpringBoot 整合 QQ 邮箱发送邮件的完整流程。首先说明 QQ 邮箱 SMTP 服务开启步骤与关键参数,进行项目搭建和参数配置;其次分别介绍了实现纯文本邮件、HTML 格式邮件、带附件邮件的功能;之后还演示用 Thymeleaf 模板发送动态邮件;最后,提供实际开发优化方案,以及常见问题排查方法,所有代码可直接复用,希望这这篇文章可以帮助到您。
一、前置知识与环境准备
1. 核心概念
- SMTP 协议:简单邮件传输协议,用于从发件人邮箱服务器向收件人邮箱服务器发送邮件(QQ 邮箱默认支持 SMTP)
- 授权码:QQ 邮箱为第三方应用(如 SpringBoot)提供的专用登录凭证,替代邮箱密码(避免直接暴露密码)
- JavaMailSender:Spring 提供的邮件发送工具类,封装了复杂的邮件协议细节,直接调用即可
2. 开发环境
- JDK 17+(SpringBoot 推荐版本)
- 开发工具:IntelliJ IDEA / Eclipse
- 构建工具:Maven
- SpringBoot 版本: 3.4.5( 2.x.x 用法一致)
二、QQ 邮箱前期配置(关键步骤)
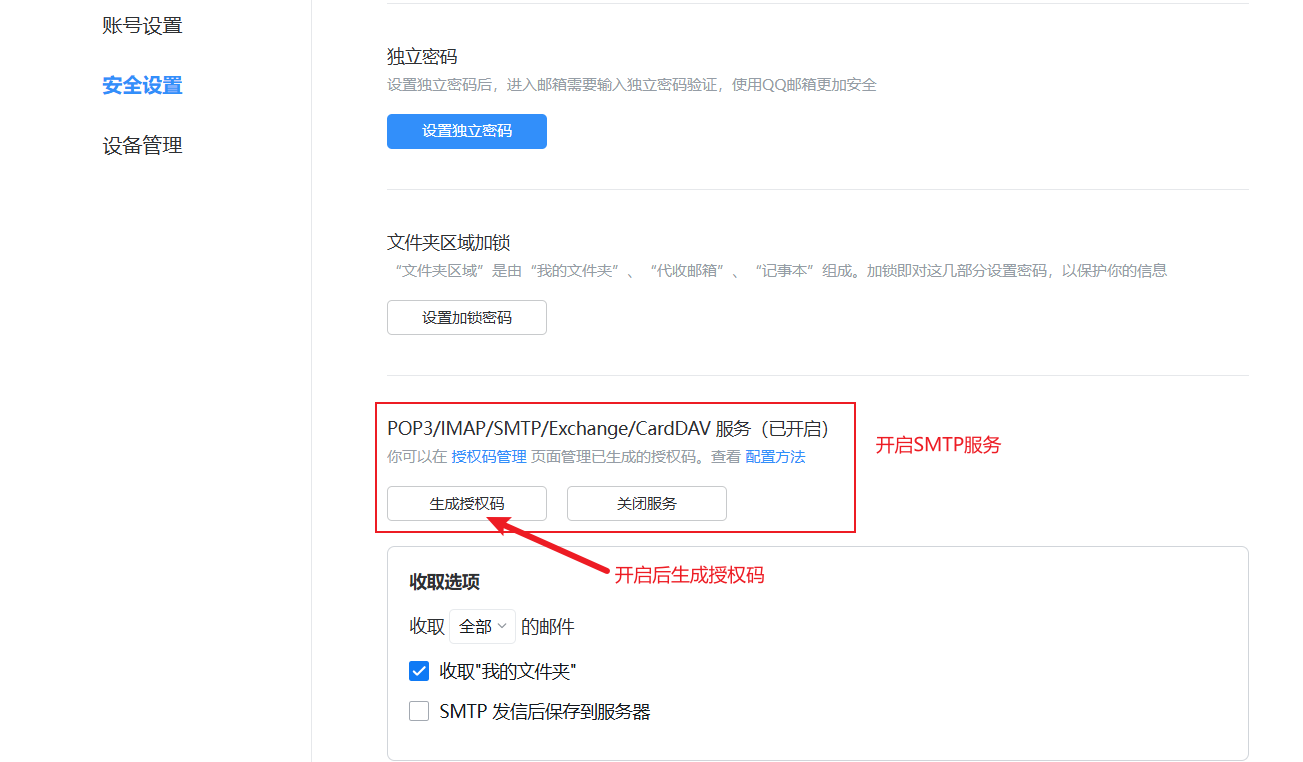
1. 开启 SMTP 服务
- 登录 QQ 邮箱网页版
- 点击顶部「设置」→ 左侧「账户」
- 下拉找到「POP3/IMAP/SMTP/Exchange/CardDAV/CalDAV 服务」
- 开启「SMTP 服务」(点击「开启」后,会要求发送短信验证)
- 验证通过后,系统会生成 16 位授权码(务必复制保存!后续配置用,刷新页面会消失)
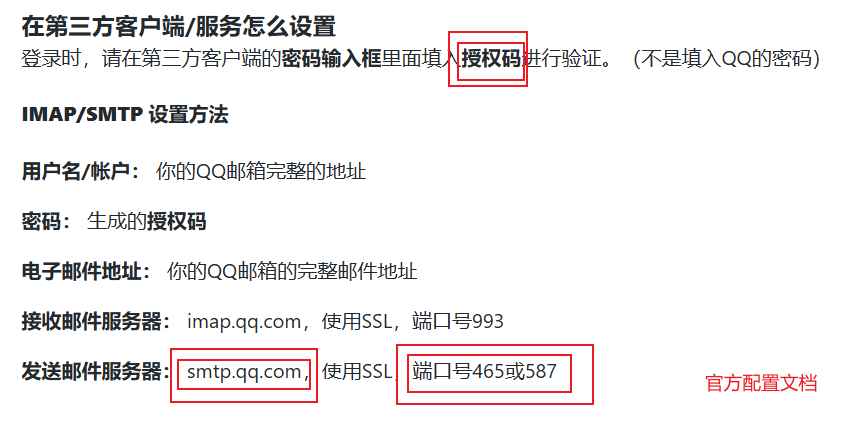
2. 记住 QQ 邮箱 SMTP 关键参数
| 参数 | 数值 | 说明 |
|---|---|---|
| SMTP 服务器 | smtp.qq.com | QQ 邮箱固定 SMTP 地址 |
| 端口(SSL) | 465 | 推荐用 SSL 加密端口,安全 |
| 发件人邮箱 | 你的 QQ 邮箱(如 123456@qq.com) | 必须与开启 SMTP 的邮箱一致 |
| 密码 | 上述生成的 16 位授权码 | 不是 QQ 密码! |
QQ官方配置SMTP/IMAP服务
三、SpringBoot 项目搭建与配置
1. 创建 SpringBoot 项目
- 方式 1:IDEA 中直接创建(New Project → Spring Initializr)
- 方式 2:Spring 官网生成(下载后导入 IDEA)
- 核心依赖:Spring Mail Starter(必须选),其他可按需选(如 Web、Thymeleaf)
2. 添加依赖(Maven 示例)
若创建项目时没选依赖,手动在 pom.xml 中添加:
<!-- 邮件核心依赖 -->
<dependency><groupId>org.springframework.boot</groupId><artifactId>spring-boot-starter-mail</artifactId>
</dependency><!-- Web 依赖(用于写接口测试,可选但推荐) -->
<dependency><groupId>org.springframework.boot</groupId><artifactId>spring-boot-starter-web</artifactId>
</dependency><!-- Thymeleaf 依赖(用于邮件模板,实际开发常用) -->
<dependency><groupId>org.springframework.boot</groupId><artifactId>spring-boot-starter-thymeleaf</artifactId>
</dependency>
3. 配置邮件参数(application.yml)
在 src/main/resources/application.yml 中添加配置(比 properties 更简洁):
spring:mail:# QQ 邮箱 SMTP 服务器地址host: smtp.qq.com# 发件人邮箱(你的 QQ 邮箱)username: 123456@qq.com# 16 位授权码(不是 QQ 密码!)password: abcdefghijklmnop# 端口(SSL 加密用 465,非加密用 25,但 25 常被屏蔽)port: 465# 编码格式default-encoding: UTF-8# SSL 相关配置(必须开启,否则发送失败)properties:mail:smtp:ssl:enable: true# 信任 QQ 邮箱服务器(避免证书验证问题)trust: smtp.qq.com# 开启身份验证(必须 true)auth: true# 超时时间(避免发送卡住)timeout: 30000connectiontimeout: 30000writetimeout: 30000
四、核心功能实现(从基础到高级)
1. 基础:发送纯文本邮件
步骤 1:写邮件服务类(核心逻辑)
创建 service/MailService.java,封装发送逻辑:
import org.springframework.mail.SimpleMailMessage;
import org.springframework.mail.javamail.JavaMailSender;
import org.springframework.stereotype.Service;import javax.annotation.Resource;@Service // 标记为服务类,让 Spring 管理
public class MailService {// 注入 Spring 自动配置的 JavaMailSender(无需自己创建)@Resourceprivate JavaMailSender javaMailSender;// 发件人邮箱(与配置文件中 spring.mail.username 一致,可写死或配置)private static final String SENDER = "123456@qq.com";/*** 发送纯文本邮件* @param to 收件人邮箱(如 654321@qq.com)* @param subject 邮件主题(标题)* @param content 邮件内容(纯文本)*/public void sendSimpleTextMail(String to, String subject, String content) {// 1. 创建简单邮件消息对象SimpleMailMessage message = new SimpleMailMessage();// 2. 设置邮件参数message.setFrom(SENDER); // 发件人message.setTo(to);       // 收件人(可传数组,支持多个收件人:new String[]{"a@qq.com", "b@qq.com"})message.setSubject(subject); // 主题message.setText(content);   // 纯文本内容// 3. 发送邮件javaMailSender.send(message);}
}
步骤 2:写接口测试(Web 方式)
创建 controller/MailController.java,通过接口触发邮件发送:
import org.springframework.web.bind.annotation.PostMapping;
import org.springframework.web.bind.annotation.RequestParam;
import org.springframework.web.bind.annotation.RestController;import javax.annotation.Resource;@RestController // 标记为接口控制器,返回 JSON/字符串
public class MailController {@Resourceprivate MailService mailService;/*** 测试发送纯文本邮件接口* 访问方式:Postman 发 POST 请求到 http://localhost:8080/mail/simple* 参数:to(收件人)、subject(主题)、content(内容)*/@PostMapping("/mail/simple")public String sendSimpleMail(@RequestParam String to,        // 必传参数:收件人邮箱@RequestParam String subject,   // 必传参数:邮件主题@RequestParam String content    // 必传参数:邮件内容) {try {// 调用服务类发送邮件mailService.sendSimpleTextMail(to, subject, content);return "纯文本邮件发送成功!";} catch (Exception e) {// 捕获异常,返回错误信息(实际开发可加日志)return "发送失败:" + e.getMessage();}}
}
步骤 3:测试
- 启动 SpringBoot 项目(运行启动类,如
DemoApplication.java) - 打开 Postman:
- 方法:POST
- 地址:http://localhost:8080/mail/simple
- 参数(Body → x-www-form-urlencoded):
- to:填写你的另一个邮箱(如 654321@qq.com)
- subject:测试纯文本邮件
- content:这是 SpringBoot 发送的纯文本邮件,Hello World!
- 点击发送,查看返回结果,同时检查收件人邮箱是否收到邮件。
2. 常用:发送 HTML 格式邮件
实际开发中,邮件常带样式(如注册验证、订单通知),需用 HTML 格式。
步骤 1:在 MailService 中添加方法
import org.springframework.mail.javamail.MimeMessageHelper;
import javax.mail.MessagingException;
import javax.mail.internet.MimeMessage;// 继续在 MailService 类中添加
/*** 发送 HTML 格式邮件* @param to 收件人邮箱* @param subject 主题* @param htmlContent HTML 内容(如带链接、样式的页面)* @throws MessagingException 邮件发送异常*/
public void sendHtmlMail(String to, String subject, String htmlContent) throws MessagingException {// 1. 创建 MimeMessage(支持复杂邮件格式,如 HTML、附件)MimeMessage mimeMessage = javaMailSender.createMimeMessage();// 2. 创建 MimeMessageHelper(简化 MimeMessage 操作,true 表示支持多部分内容)MimeMessageHelper helper = new MimeMessageHelper(mimeMessage, true, "UTF-8");// 3. 设置参数helper.setFrom(SENDER);helper.setTo(to);helper.setSubject(subject);// 关键:第二个参数 true 表示内容是 HTML 格式helper.setText(htmlContent, true);// 4. 发送javaMailSender.send(mimeMessage);
}
步骤 2:添加测试接口(MailController 中)
@PostMapping("/mail/html")
public String sendHtmlMail(@RequestParam String to,@RequestParam String subject
) {try {// 1. 构建 HTML 内容(可写复杂样式,如表格、按钮)String htmlContent = "<!DOCTYPE html>" +"<html lang=\"zh-CN\">" +"<head><meta charset=\"UTF-8\"><title>HTML 邮件测试</title></head>" +"<body>" +"<h1 style=\"color: #2E86AB;\">欢迎注册我的网站!</h1>" +"<p>请点击下方按钮完成验证:</p>" +"<a href=\"https://www.baidu.com\" style=\"" +"display: inline-block; padding: 10px 20px; " +"background-color: #A23B72; color: white; " +"text-decoration: none; border-radius: 5px;\">" +"立即验证</a>" +"<p style=\"color: #999; margin-top: 20px;\">若不是您操作,请忽略此邮件</p>" +"</body></html>";// 2. 调用服务发送mailService.sendHtmlMail(to, subject, htmlContent);return "HTML 邮件发送成功!";} catch (Exception e) {return "发送失败:" + e.getMessage();}
}
步骤 3:测试
用 Postman 发 POST 请求到 http://localhost:8080/mail/html,参数:
- to:收件人邮箱
- subject:HTML 邮件测试
发送后,收件人会收到带样式的邮件(点击链接可跳转)。
3. 进阶:发送带附件的邮件
实际开发中,可能需要发送带附件的邮件(如报表、合同)。
步骤 1:在 MailService 中添加方法
import org.springframework.core.io.FileSystemResource;
import java.io.File;// 继续在 MailService 类中添加
/*** 发送带附件的邮件* @param to 收件人邮箱* @param subject 主题* @param content 邮件内容(纯文本或 HTML,这里用纯文本示例)* @param filePath 附件路径(如 D:/test.pdf)* @throws MessagingException 异常*/
public void sendMailWithAttachment(String to, String subject, String content, String filePath) throws MessagingException {// 1. 创建 MimeMessage 和 HelperMimeMessage mimeMessage = javaMailSender.createMimeMessage();MimeMessageHelper helper = new MimeMessageHelper(mimeMessage, true, "UTF-8");// 2. 设置基础参数helper.setFrom(SENDER);helper.setTo(to);helper.setSubject(subject);helper.setText(content); // 纯文本内容(也可传 HTML,需加 true)// 3. 处理附件File file = new File(filePath);if (file.exists()) {// 创建文件资源对象FileSystemResource resource = new FileSystemResource(file);// 添加附件:第一个参数是附件显示名称,第二个是文件资源helper.addAttachment(resource.getFilename(), resource);// 支持多个附件:重复调用 addAttachment 即可// helper.addAttachment("附件2.pdf", new FileSystemResource(new File("D:/test2.pdf")));} else {throw new RuntimeException("附件文件不存在:" + filePath);}// 4. 发送javaMailSender.send(mimeMessage);
}
步骤 2:添加测试接口(MailController 中)
@PostMapping("/mail/attachment")
public String sendMailWithAttachment(@RequestParam String to,@RequestParam String subject,@RequestParam String content,@RequestParam String filePath // 附件路径,如 D:/test.pdf
) {try {mailService.sendMailWithAttachment(to, subject, content, filePath);return "带附件邮件发送成功!";} catch (Exception e) {return "发送失败:" + e.getMessage();}
}
步骤 3:测试
- 准备一个测试文件(如 D:/test.pdf,确保文件存在)
- Postman 发 POST 请求到
http://localhost:8080/mail/attachment,参数:- to:收件人邮箱
- subject:带附件的邮件
- content:这封邮件包含附件,请查收!
- filePath:D:/test.pdf
- 收件人收到邮件后,可下载附件验证。
4. 实战:用 Thymeleaf 模板发送动态邮件
实际开发中,邮件内容常需动态替换(如订单号、用户名),用 Thymeleaf 模板更灵活(类似 HTML 模板,支持变量渲染)。
步骤 1:创建 Thymeleaf 邮件模板
在 src/main/resources/templates 目录下创建 mail/order-notice.html(templates 是 Thymeleaf 默认模板目录):
<!DOCTYPE html>
<html lang="zh-CN" xmlns:th="http://www.thymeleaf.org">
<!-- 引入 Thymeleaf 命名空间,才能用 th:xxx 语法 -->
<head><meta charset="UTF-8"><title>订单通知</title><style>.container { width: 600px; margin: 0 auto; border: 1px solid #eee; padding: 20px; }.title { color: #E64A19; font-size: 18px; }.content { margin: 20px 0; line-height: 1.8; }.footer { color: #999; font-size: 14px; margin-top: 30px; }</style>
</head>
<body><div class="container"><h2 class="title">您有新的订单通知</h2><div class="content"><p>尊敬的用户,您好!</p><p>您的订单已创建成功,详情如下:</p><p>订单号:<span th:text="${orderId}"></span></p> <!-- 动态变量:订单号 --><p>订单金额:<span th:text="${amount} + ' 元'"></span></p> <!-- 动态变量:金额 --><p>下单时间:<span th:text="${createTime}"></span></p> <!-- 动态变量:时间 --></div><div class="footer"><p>此邮件为系统自动发送,请勿回复</p></div></div>
</body>
</html>
步骤 2:在 MailService 中添加模板邮件方法
import org.thymeleaf.TemplateEngine;
import org.thymeleaf.context.Context;import javax.annotation.Resource;// 注入 Thymeleaf 模板引擎(SpringBoot 自动配置,无需手动配置)
@Resource
private TemplateEngine templateEngine;// 继续在 MailService 类中添加
/*** 用 Thymeleaf 模板发送动态邮件* @param to 收件人邮箱* @param subject 主题* @param orderId 订单号(动态参数)* @param amount 订单金额(动态参数)* @param createTime 下单时间(动态参数)* @throws MessagingException 异常*/
public void sendTemplateMail(String to, String subject, String orderId, String amount, String createTime) throws MessagingException {// 1. 创建 Thymeleaf 上下文(用于传递动态参数到模板)Context context = new Context();// 往上下文放参数(key 要和模板中 ${xxx} 的 xxx 一致)context.setVariable("orderId", orderId);context.setVariable("amount", amount);context.setVariable("createTime", createTime);// 2. 渲染模板:将模板(mail/order-notice.html)和上下文参数结合,生成 HTML 内容String htmlContent = templateEngine.process("mail/order-notice", context);// 3. 发送 HTML 邮件(直接复用之前的 sendHtmlMail 方法)sendHtmlMail(to, subject, htmlContent);
}
步骤 3:添加测试接口(MailController 中)
import java.text.SimpleDateFormat;
import java.util.Date;@PostMapping("/mail/template")
public String sendTemplateMail(@RequestParam String to,@RequestParam String subject,@RequestParam String orderId,@RequestParam String amount
) {try {// 生成当前时间(作为下单时间)String createTime = new SimpleDateFormat("yyyy-MM-dd HH:mm:ss").format(new Date());// 调用服务发送模板邮件mailService.sendTemplateMail(to, subject, orderId, amount, createTime);return "模板邮件发送成功!";} catch (Exception e) {return "发送失败:" + e.getMessage();}
}
步骤 4:测试
Postman 发 POST 请求到 http://localhost:8080/mail/template,参数:
- to:收件人邮箱
- subject:新订单通知
- orderId:ORDER20240520001
- amount:99.9
发送后,收件人会收到包含动态订单信息的邮件(订单号、金额、时间都是传入的参数)。
五、实际开发必备:异常处理与优化
1. 全局异常处理
避免每个接口都写 try-catch,用 Spring 的全局异常处理器统一处理:
创建 exception/GlobalExceptionHandler.java:
import org.springframework.web.bind.annotation.ExceptionHandler;
import org.springframework.web.bind.annotation.RestControllerAdvice;import javax.mail.MessagingException;// 全局异常处理器,处理所有 @RestController 的异常
@RestControllerAdvice
public class GlobalExceptionHandler {// 处理邮件发送相关异常(MessagingException)@ExceptionHandler(MessagingException.class)public String handleMailException(MessagingException e) {return "邮件发送失败:" + e.getMessage();}// 处理其他所有异常@ExceptionHandler(Exception.class)public String handleOtherException(Exception e) {return "系统异常:" + e.getMessage();}
}
之后,接口中可以去掉 try-catch,异常会自动被捕获并返回友好信息。
2. 异步发送邮件
发送邮件是耗时操作(需连接邮箱服务器),若同步发送会阻塞接口响应,实际开发中建议用异步发送:
步骤 1:开启异步支持
在 SpringBoot 启动类上添加 @EnableAsync 注解:
import org.springframework.boot.SpringApplication;
import org.springframework.boot.autoconfigure.SpringBootApplication;
import org.springframework.scheduling.annotation.EnableAsync;@SpringBootApplication
@EnableAsync // 开启异步支持
public class DemoApplication {public static void main(String[] args) {SpringApplication.run(DemoApplication.class, args);}
}
步骤 2:给邮件方法加异步注解
在 MailService 中需要异步的方法上添加 @Async 注解:
// 示例:异步发送模板邮件
@Async // 加上此注解,方法会异步执行
public void sendTemplateMail(String to, String subject, String orderId, String amount, String createTime) throws MessagingException {// 原逻辑不变...
}
此时调用该方法,会立即返回,邮件发送逻辑在后台线程执行,不阻塞接口。
3. 安全优化:避免硬编码
- 授权码、发件人邮箱等敏感信息,不要硬编码在代码中(如
private static final String SENDER = "123456@qq.com"),应放在配置文件中:# application.yml 中添加自定义配置 custom:mail:sender: 123456@qq.com - 在服务类中通过
@Value注入:@Value("${custom.mail.sender}") private String sender; // 替代之前的硬编码 - 生产环境中,敏感信息(如授权码)建议用配置中心(Nacos/Apollo)或环境变量存储,避免提交到代码仓库。
六、常见问题排查
- 授权码错误:报错
535 Login Fail. Please enter your authorization code to login→ 重新生成授权码,确保配置文件中的 password 是 16 位授权码(不是 QQ 密码)。 - 端口或 SSL 配置错误:报错
Could not connect to SMTP host: smtp.qq.com, port: 25→ 改用 465 端口,并确保spring.mail.properties.mail.smtp.ssl.enable=true。 - 附件路径错误:报错
附件文件不存在→ 检查 filePath 是否正确(如 Windows 路径是D:/test.pdf,不是D:\test.pdf),且文件确实存在。 - Thymeleaf 模板找不到:报错
Template parsing error→ 确保模板路径正确(如mail/order-notice.html在templates目录下),且命名空间xmlns:th="http://www.thymeleaf.org"已添加。
七、总结
本文从初学者角度,覆盖了 SpringBoot 整合 QQ 邮箱的全流程:
- 环境准备 → 2. QQ 邮箱 SMTP 配置 → 3. 项目搭建与参数配置 → 4. 核心功能(纯文本/HTML/附件/模板邮件)→ 5. 实际开发优化(异常/异步/安全)→ 6. 问题排查。
所有代码均可直接复制使用,只需替换成自己的 QQ 邮箱和授权码,即可快速上手。实际开发中,可根据需求选择对应的邮件类型(如注册用 HTML 邮件,订单通知用模板邮件),并结合异步和异常处理提升系统稳定性。