2025年Spring Security OAuth2实现github授权码模式登录
Spring Security OAuth2实现github登录
本文简述使用spring security OAuth2实现github授权码模式登录,从流程分析、github注册应用、依赖引入、代码实现和效果展示依次叙述。前端使用themleaf 进行简单演示。
流程分析
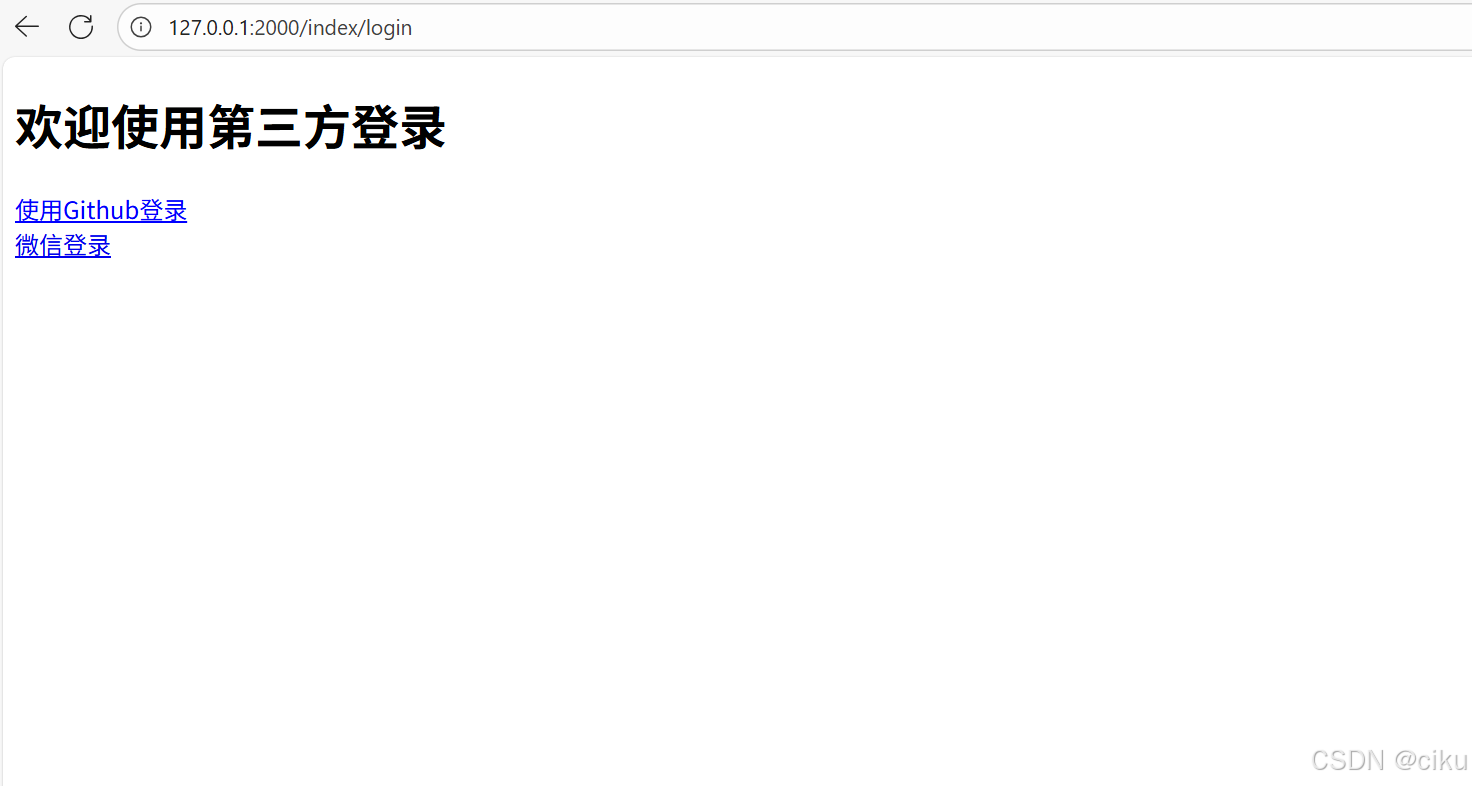
1.用户访问登录页面,点击github登录
2.跳转到github登录页面,输入github账号密码
3.github登录成功后,跳转到授权页面
4.点击授权,回调本地方法,携带code核心参数
5.本地回调方法根据code,调用https://github.com/login/oauth/access_token 获取token
6.github返回的json解析出access_token
7.根据access_token,调用https://api.github.com/user,获取用户信息,完成登录
github应用注册
1.创建OAthu app https://github.com/settings/developers
注意:授权回调地址必须与配置一致
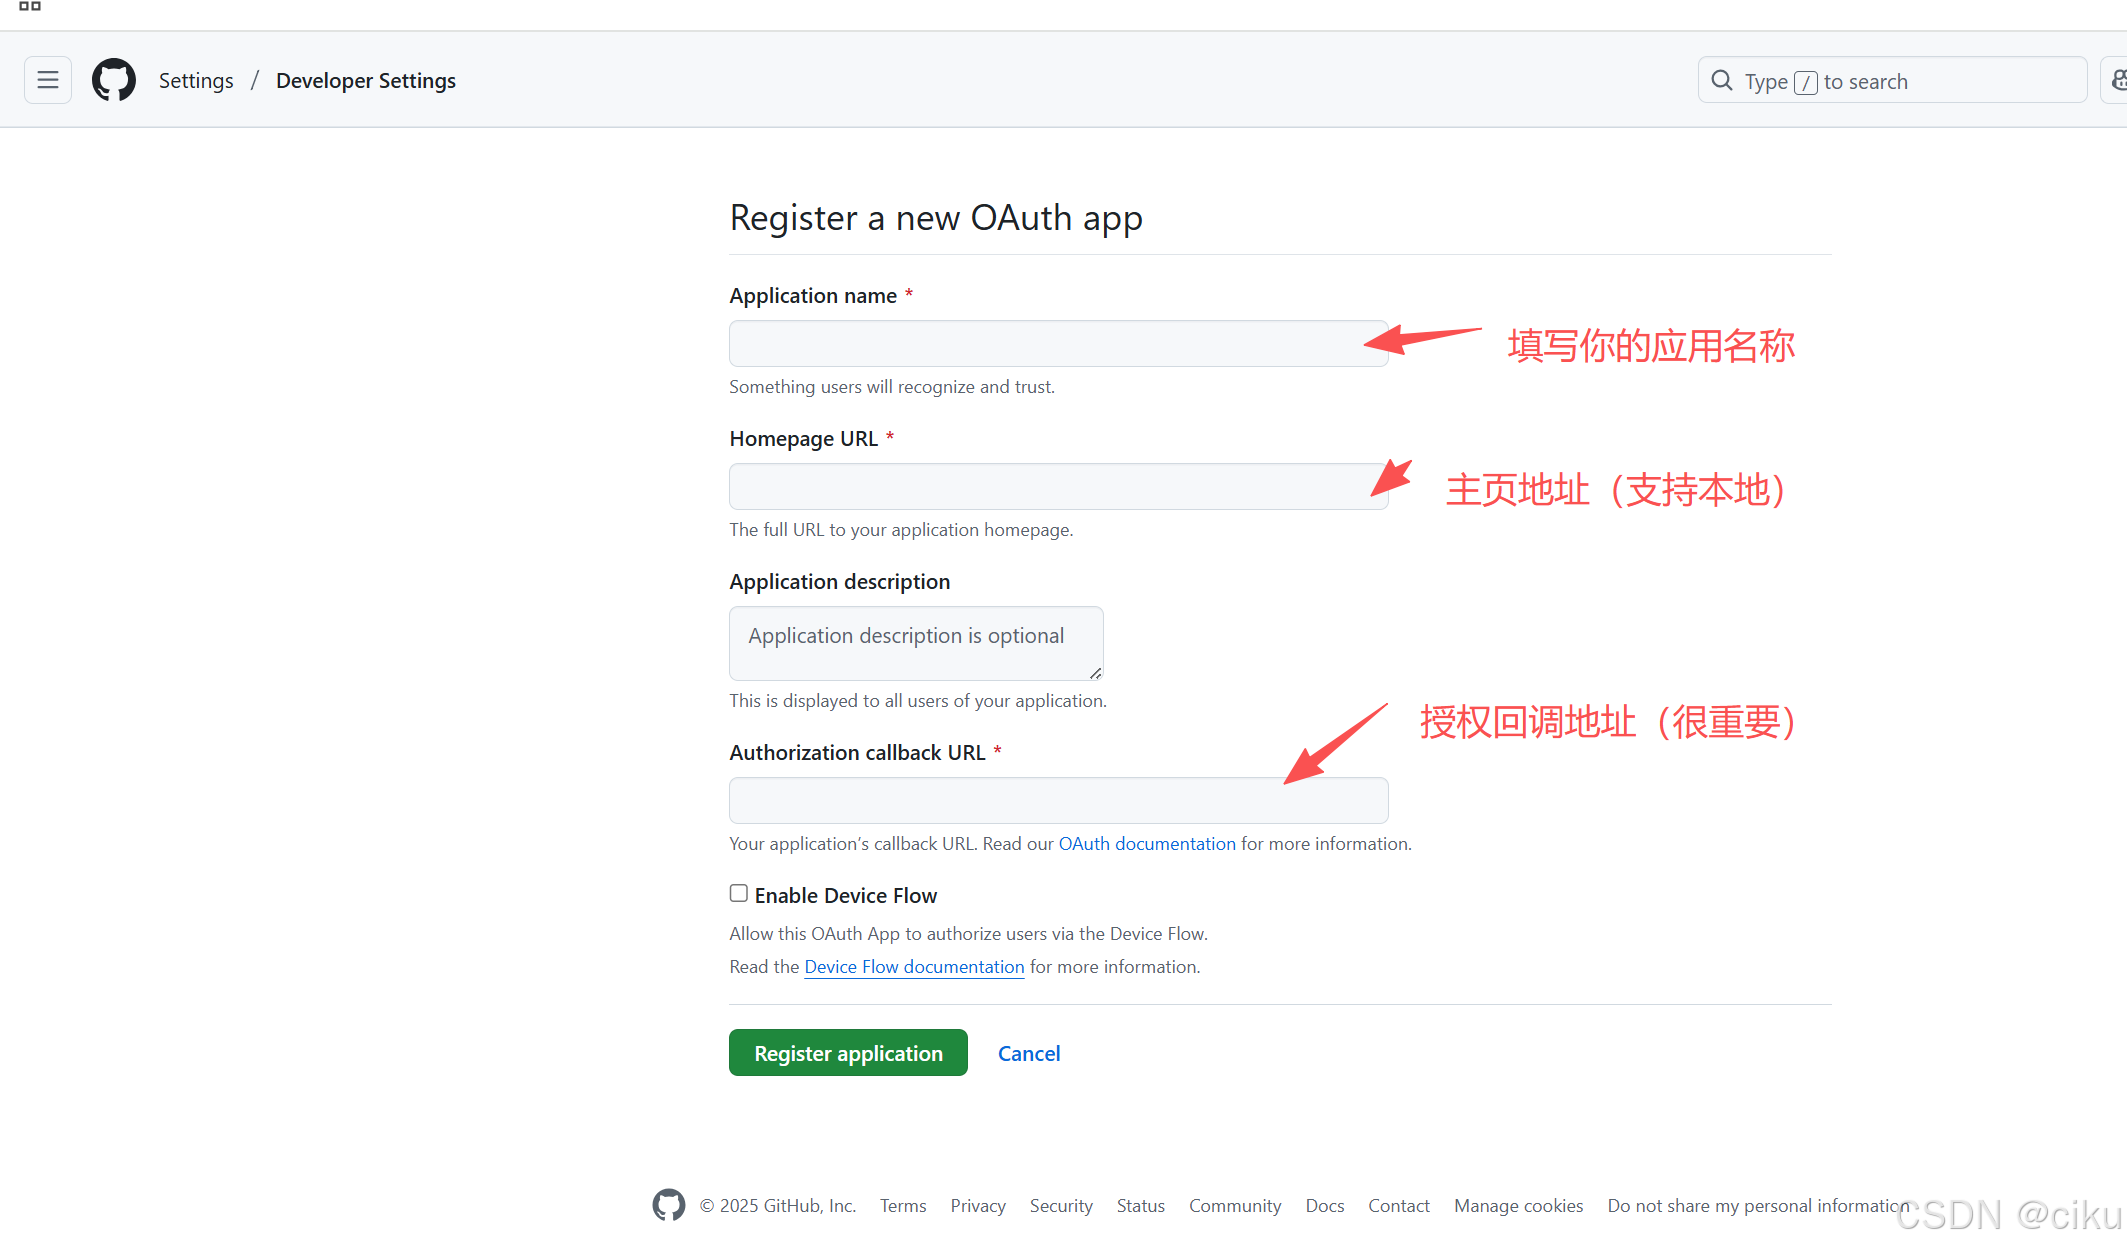
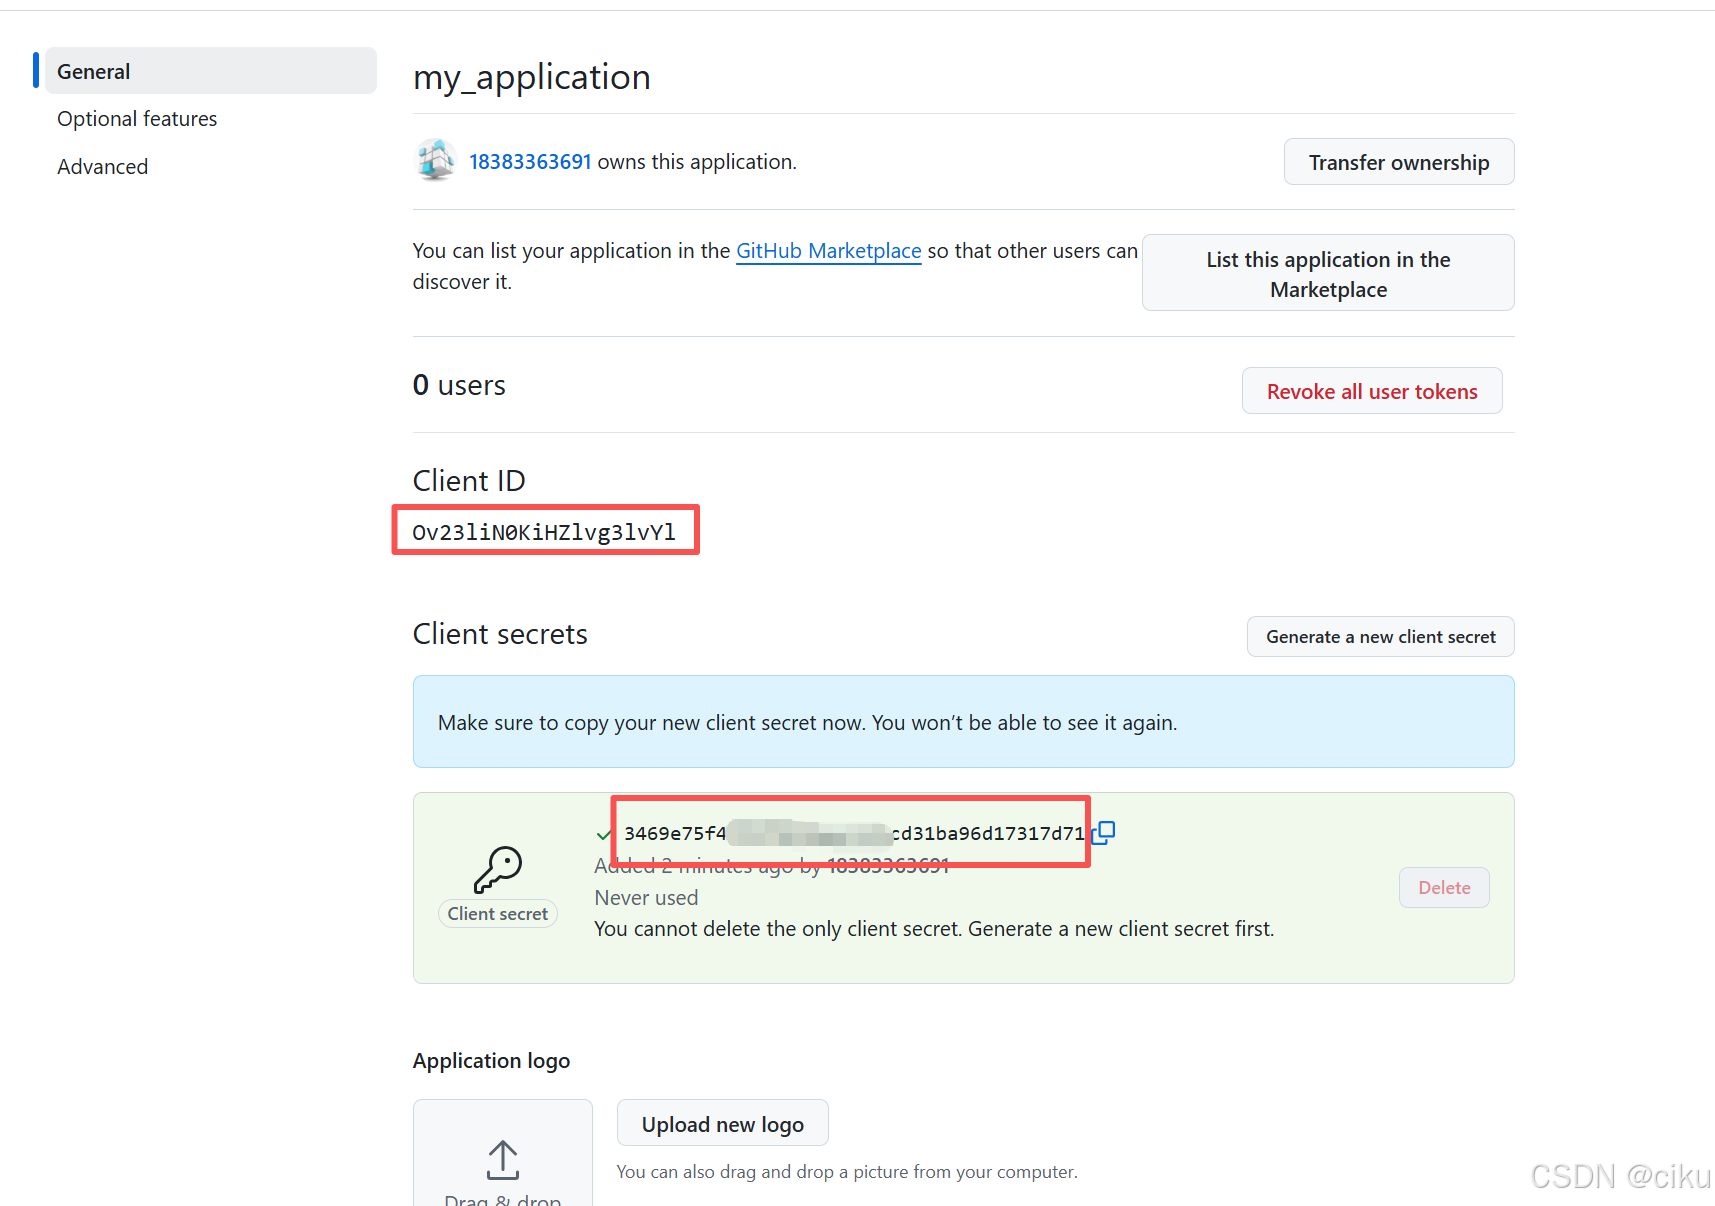
2.创建client secret,把client id和Client secret、Authorization callback URL拷贝下来,在配置中会使用
代码实现
1.依赖引入
<dependency><groupId>org.springframework.boot</groupId><artifactId>spring-boot-starter-security</artifactId></dependency><!--oauth2相关依赖--><dependency><groupId>org.springframework.boot</groupId><artifactId>spring-boot-starter-oauth2-client</artifactId></dependency><!--web一依赖--><dependency><groupId>org.springframework.boot</groupId><artifactId>spring-boot-starter-web</artifactId></dependency><dependency><groupId>org.springframework.boot</groupId><artifactId>spring-boot-starter-test</artifactId><scope>test</scope></dependency><dependency><groupId>io.jsonwebtoken</groupId><artifactId>jjwt-api</artifactId><version>0.11.5</version></dependency><dependency><groupId>org.projectlombok</groupId><artifactId>lombok</artifactId></dependency><!--thymeleaf依赖--><dependency><groupId>org.springframework.boot</groupId><artifactId>spring-boot-starter-thymeleaf</artifactId></dependency><dependency><groupId>org.apache.httpcomponents</groupId><artifactId>httpclient</artifactId><version>4.5.13</version></dependency>
2.配置文件
spring:application:name: SpringSecurity-oauth2thymeleaf:prefix: classpath:/templates/suffix: .htmlsecurity:oauth2:client:provider:github:authorization-uri: https://github.com/login/oauth/authorize  #授权地址(github提供的)token-uri: https://github.com/login/oauth/access_token #获取access_token地址(github提供的)user-info-uri: https://api.github.com/user  #获取用户信息user-name-attribute: login registration:github:  #registrationidclient-id: ${github.app-id}client-secret: ${github.app-secret}scope: read:user,user:emailclient-name: githubredirect-uri: ${github.redirect-uri}github:app-id: Ov23li6cxRxxxATmrLqw    #此处配置刚才保存的Client idapp-secret: b48b4079261370xxx726189ace816145e1e15  #此处配置刚才保存的Client secretredirect-uri: http://127.0.0.1:2000/index/auth/github/callback  #与Authorization callback URL一致
server:port: 2000
注意: client-id、 client-secret和redirect-uri要与github注册应用的地址一致
3.创建Security 配置类
package com.example.springsecurityoauth2;import com.example.springsecurityoauth2.config.CustomStateAuthorizationRequestRepository;
import com.example.springsecurityoauth2.entity.CustomOAuthUser;
import org.springframework.beans.factory.annotation.Autowired;
import org.springframework.context.annotation.Bean;
import org.springframework.context.annotation.Configuration;
import org.springframework.security.config.annotation.web.builders.HttpSecurity;
import org.springframework.security.config.annotation.web.configuration.EnableWebSecurity;
import org.springframework.security.config.http.SessionCreationPolicy;
import org.springframework.security.oauth2.client.InMemoryOAuth2AuthorizedClientService;
import org.springframework.security.oauth2.client.OAuth2AuthorizedClientService;
import org.springframework.security.oauth2.client.registration.ClientRegistrationRepository;
import org.springframework.security.oauth2.client.userinfo.DefaultOAuth2UserService;
import org.springframework.security.oauth2.client.userinfo.OAuth2UserRequest;
import org.springframework.security.oauth2.client.userinfo.OAuth2UserService;
import org.springframework.security.oauth2.client.web.AuthorizationRequestRepository;
import org.springframework.security.oauth2.core.endpoint.OAuth2AuthorizationRequest;
import org.springframework.security.oauth2.core.user.OAuth2User;
import org.springframework.security.web.SecurityFilterChain;
import org.springframework.security.web.authentication.AuthenticationFailureHandler;
import org.springframework.security.web.authentication.AuthenticationSuccessHandler;
import org.springframework.security.web.authentication.SavedRequestAwareAuthenticationSuccessHandler;
import org.springframework.security.web.authentication.logout.SecurityContextLogoutHandler;
import org.springframework.security.web.csrf.CookieCsrfTokenRepository;
import org.springframework.web.cors.CorsConfiguration;
import org.springframework.web.cors.CorsConfigurationSource;
import org.springframework.web.cors.UrlBasedCorsConfigurationSource;import java.util.Arrays;/*** @ClassName:SercurityConfig* @Author: xuli* @Date: 2025/9/12 17:19* @Description: 必须描述类做什么事情, 实现什么功能*/
@Configuration
@EnableWebSecurity
public class SercurityConfig {@Autowiredprivate CustomOAuth2UserService userService;@BeanSecurityFilterChain securityFilterChain(HttpSecurity http) throws Exception {http.csrf(csrf -> csrf.csrfTokenRepository(CookieCsrfTokenRepository.withHttpOnlyFalse())).cors(cors -> cors.configurationSource(configurationSource())).authorizeHttpRequests(auth -> auth.requestMatchers("/", "/index/**","/login/**").permitAll().anyRequest().authenticated()).oauth2Login(oauth2 -> oauth2.loginPage("/index/login")  //登录页面.defaultSuccessUrl("/index/home", true) // 强制跳转避免二次验证.successHandler(successHandler())//成功处理器.failureHandler(authenticationFailureHandler()) //失败处理器.failureUrl("/index/error").authorizationEndpoint(auth -> auth.authorizationRequestRepository(cookieAuthRepository())).userInfoEndpoint(userInfo -> userInfo.userService(oauth2UserService()))).sessionManagement(session->session.sessionCreationPolicy(SessionCreationPolicy.IF_REQUIRED).maximumSessions(1).expiredUrl("/index/login?expired") ).logout(logout -> logout.logoutUrl("/index/logout")  // 自定义退出端点//.logoutSuccessUrl("/index/login?logout")  // 退出后跳转地址.addLogoutHandler(new SecurityContextLogoutHandler())  // 清除认证上下文.invalidateHttpSession(true)  // 使Session失效.deleteCookies("JSESSIONID")  // 删除Cookie);return http.build();}@Beanpublic AuthenticationFailureHandler authenticationFailureHandler() {return new CustomAuthenticationFailureHandler();}@Beanpublic AuthenticationSuccessHandler successHandler() {SavedRequestAwareAuthenticationSuccessHandler successHandler =new SavedRequestAwareAuthenticationSuccessHandler();return successHandler;}private OAuth2UserService<OAuth2UserRequest, OAuth2User> oauth2UserService() {DefaultOAuth2UserService delegate = new DefaultOAuth2UserService();return request -> {OAuth2User user = delegate.loadUser(request);// 可以在此处将OAuth2用户信息转换为本地用户实体return new CustomOAuthUser(user);};}private AuthorizationRequestRepository<OAuth2AuthorizationRequest> cookieAuthRepository() {return new CustomStateAuthorizationRequestRepository();}@Beanpublic OAuth2AuthorizedClientService auth2AuthorizedClientService(ClientRegistrationRepository registrationRepository) {return new InMemoryOAuth2AuthorizedClientService(registrationRepository);// 2. JDBC存储(适合生产环境)// return new JdbcOAuth2AuthorizedClientService(//     jdbcTemplate, clientRegistrationRepository);// 3. Redis存储(适合分布式系统)// return new RedisOAuth2AuthorizedClientService(//     redisConnectionFactory, clientRegistrationRepository);}/*** 设置跨域访问** @return*/private CorsConfigurationSource configurationSource() {CorsConfiguration configuration = new CorsConfiguration();configuration.setAllowedOrigins(Arrays.asList("http://127.0.0.1:2000"));configuration.setAllowedMethods(Arrays.asList("GET", "POST", "PUT"));configuration.setAllowedHeaders(Arrays.asList("Authorization", "Content-Type"));configuration.setAllowCredentials(true);configuration.setMaxAge(3600L);UrlBasedCorsConfigurationSource source = new UrlBasedCorsConfigurationSource();source.registerCorsConfiguration("/**", configuration);return source;}}
CustomStateAuthorizationRequestRepository 用于存储state保证一次登录sate唯一
package com.example.springsecurityoauth2.config;import jakarta.servlet.http.HttpServletRequest;
import jakarta.servlet.http.HttpServletResponse;
import jakarta.servlet.http.HttpSession;
import org.slf4j.Logger;
import org.slf4j.LoggerFactory;
import org.springframework.security.oauth2.client.web.AuthorizationRequestRepository;
import org.springframework.security.oauth2.core.endpoint.OAuth2AuthorizationRequest;
import org.springframework.util.StringUtils;import java.time.Instant;
import java.util.UUID;/*** @ClassName:CustomStateAuthorizationRequestRepository* @Author: xuli* @Date: 2025/9/21 20:38* @Description: 用于处理state,保证唯一性*/
public class CustomStateAuthorizationRequestRepositoryimplements AuthorizationRequestRepository<OAuth2AuthorizationRequest> {
Logger logger= LoggerFactory.getLogger(CustomStateAuthorizationRequestRepository.class);@Overridepublic OAuth2AuthorizationRequest loadAuthorizationRequest(HttpServletRequest request) {HttpSession session = request.getSession(false);return session != null ?(OAuth2AuthorizationRequest) session.getAttribute("OAUTH2_AUTH_REQUEST") : null;}@Overridepublic void saveAuthorizationRequest(OAuth2AuthorizationRequest authorizationRequest, HttpServletRequest request, HttpServletResponse response) {if (authorizationRequest == null) {removeAuthorizationRequest(request, response);return;}String state = authorizationRequest.getState();if (!StringUtils.hasText(state)) {String  getState=request.getSession().getAttribute("OAUTH2_AUTH_STATE")==null?"":request.getSession().getAttribute("OAUTH2_AUTH_STATE").toString();if(io.micrometer.common.util.StringUtils.isBlank(getState)){getState = state;}authorizationRequest = OAuth2AuthorizationRequest.from(authorizationRequest).state(getState).build();request.getSession().setAttribute("OAUTH2_AUTH_REQUEST", authorizationRequest);request.getSession().setAttribute("OAUTH2_AUTH_STATE", getState);}}@Overridepublic OAuth2AuthorizationRequest removeAuthorizationRequest(HttpServletRequest request, HttpServletResponse response) {HttpSession session = request.getSession(false);if (session != null) {OAuth2AuthorizationRequest authRequest =(OAuth2AuthorizationRequest) session.getAttribute("OAUTH2_AUTH_REQUEST");session.removeAttribute("OAUTH2_AUTH_REQUEST");return authRequest;}return null;}private String generateSecureState() {String state=UUID.randomUUID().toString() + "-" + Instant.now().toEpochMilli();logger.info("生成了新的state,值为:"+state);return state;}
}
4.编写登录方法和页面
方法:
@Controller
@RequestMapping("/index")
public class HomeController {@Value("${github.app-id}")private String appId;@Value("${github.app-secret}")private String appSecret;@Value("${github.redirect-uri}")private String redirectUri;Logger logger= LoggerFactory.getLogger(HomeController.class);@Autowiredprivate RestTemplate restTemplate;private final OAuth2AuthorizedClientService authorizedClientService;public HomeController(OAuth2AuthorizedClientService authorizedClientService) {this.authorizedClientService = authorizedClientService;}/*** 跳转登录页面* @param request* @return*/@GetMapping("/login")public String login(HttpServletRequest request){System.out.println("调用页面");Object oauth2AuthState = request.getSession().getAttribute("OAUTH2_AUTH_STATE");if(oauth2AuthState==null||StringUtils.isBlank(oauth2AuthState.toString())){oauth2AuthState = UUID.randomUUID().toString()+"-"+ Instant.now().toEpochMilli();request.getSession().setAttribute("OAUTH2_AUTH_STATE",oauth2AuthState);}logger.info("当前state的值为:"+oauth2AuthState);return "index";}}
页面index.html:
放在src/main/resources/templates下面
<!DOCTYPE html>
<html lang="en" xmlns:th="http://www.thymeleaf.org">
<head><meta charset="UTF-8"><title>Login</title>
</head>
<style>#github_login{text-decoration: underline;color: blue;cursor: pointer;}
</style><script src="https://code.jquery.com/jquery-3.6.0.min.js"></script>
<script type="text/javascript">var redirect_uri="http://127.0.0.1:2000/index/auth/github/callback";var client_id="Ov23li6cxRSf7ATmrLqw";$(document).ready(function() {state=$("#state").val()})//跳转到授权页function gotoGithubPage(){// 确保每次授权生成唯一statewindow.location.href = `https://github.com/login/oauth/authorize?response_type=code&state=${encodeURIComponent(state)}&client_id=${client_id}&scope=user:email&redirect_uri=${redirect_uri}`;}
</script>
<body><h1>欢迎使用第三方登录</h1>
<!---->
<a id="github_login" th:onclick="'javascript:gotoGithubPage()'">使用Github登录 </a><br/>
<a href="/auth/wechat/qrcode">微信登录</a><input type="hidden" id="state" th:value="${session.OAUTH2_AUTH_STATE}">
</body>
</html>
5.编写github回调方法
github点击确认认证时,回调该方法,根据code获取access_token;再根据access_token获取用户信息,跳转登录成功页面。
@GetMapping("/auth/github/callback")public String githubCallback(HttpServletRequest request, HttpServletResponse response) throws Exception {// 1. 验证state参数String stateParam = request.getParameter("state");Object oauth2AuthState = request.getSession().getAttribute("OAUTH2_AUTH_STATE");String getSate="";if(oauth2AuthState!=null){getSate=oauth2AuthState.toString();}System.out.println("收到state:"+stateParam);if(stateParam == null ||!stateParam.equals(getSate)) {response.sendError(HttpServletResponse.SC_UNAUTHORIZED, "Invalid state parameter");return null;}request.getSession().removeAttribute("OAUTH2_AUTH_STATE");// 2. 获取授权码String code = request.getParameter("code");System.out.println("获取授权码code:"+code);if(code == null) {response.sendError(HttpServletResponse.SC_BAD_REQUEST, "Authorization code not found");return null;}SSLContext sslContext = SSLContext.getInstance("TLS");sslContext.init(null, new TrustManager[] {new X509TrustManager() {public void checkClientTrusted(X509Certificate[] chain, String authType) {}public void checkServerTrusted(X509Certificate[] chain, String authType) {}public X509Certificate[] getAcceptedIssuers() { return null; }}}, null);HttpsURLConnection.setDefaultSSLSocketFactory(sslContext.getSocketFactory());// 3. 使用授权码获取access tokenHttpClient client = HttpClient.newBuilder().version(HttpClient.Version.HTTP_2).sslContext(sslContext).connectTimeout(Duration.ofSeconds(10)).build();HttpRequest tokenRequest = HttpRequest.newBuilder().uri(URI.create("https://github.com/login/oauth/access_token")).header("Accept", "application/json").header("Content-Type", "application/x-www-form-urlencoded").POST(HttpRequest.BodyPublishers.ofString("client_id=" + appId +"&client_secret=" + appSecret +"&code=" + code +"&state="+ stateParam +"&redirect_uri="+redirectUri)).build();HttpResponse<String> tokenResponse = client.send(tokenRequest, HttpResponse.BodyHandlers.ofString());// 4. 解析access tokenJsonObject tokenJson = JsonParser.parseString(tokenResponse.body()).getAsJsonObject();if(!tokenJson.has("access_token")) {response.sendError(HttpServletResponse.SC_UNAUTHORIZED, "Failed to obtain access token");return null;}String accessToken = tokenJson.get("access_token").getAsString();// 5. 使用access token获取用户信息HttpRequest userRequest = HttpRequest.newBuilder().uri(URI.create("https://api.github.com/user")).header("Authorization", "token " + accessToken).build();HttpResponse<String> userResponse = client.send(userRequest, HttpResponse.BodyHandlers.ofString());JsonObject userJson = JsonParser.parseString(userResponse.body()).getAsJsonObject();// 6. 提取用户信息String githubId = userJson.get("id").getAsString();String username = userJson.get("login").getAsString();JsonElement jsonElement=null;if(userJson.has("email")){jsonElement= userJson.get("email");}String email = jsonElement==null ? "" : jsonElement.toString();//获取头像url地址String avatarUrl = userJson.has("avatar_url") ? userJson.get("avatar_url").getAsString() : null;logger.info(avatarUrl);// 7. 创建用户会话(示例)request.getSession().setAttribute("avatar_url", avatarUrl);request.getSession().setAttribute("githubUser", username);request.getSession().setAttribute("githubEmail", email);request.getSession().removeAttribute("OAUTH2_AUTH_STATE");return "/home";}
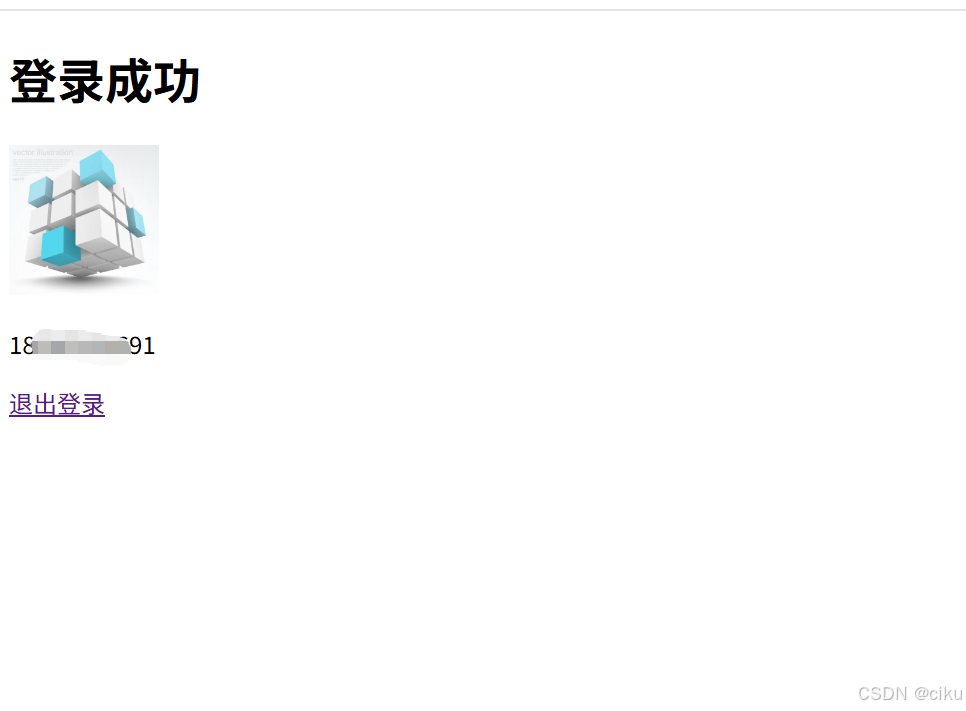
登录成功页面home.html:
<!DOCTYPE html>
<html lang="en" xmlns:th="http://www.thymeleaf.org">
<head><meta charset="UTF-8"><title>Home</title>
</head>
<body>
<h1>登录成功</h1>
<div><img th:src="${session.avatar_url}" width="100" height="100"><p th:text="${session.githubUser} ?: '匿名用户'"></p><a th:href="@{/index/logout}">退出登录</a></div></body>
</html>
6.增加配置处理类
JacksonConfig.java 处理OAuth2AccessToken的module
import com.example.springsecurityoauth2.OAuth2TokenDeserializer;
import com.fasterxml.jackson.databind.Module;
import com.fasterxml.jackson.databind.module.SimpleModule;
import org.springframework.context.annotation.Bean;
import org.springframework.context.annotation.Configuration;
import org.springframework.security.oauth2.core.OAuth2AccessToken;/*** @ClassName:JacksonConfig* @Author: xuli* @Date: 2025/9/18 13:33* @Description: access_token解析器*/
@Configuration
public class JacksonConfig {@Beanpublic Module oauth2TokenModule() {SimpleModule module = new SimpleModule();module.addDeserializer(OAuth2AccessToken.class, new OAuth2TokenDeserializer());return module;}
}
WebConfig.java 资源处理器注册访问路径以及RestTemplate 跳过ssl校验
@Configuration
public class WebConfig implements WebMvcConfigurer {@Overridepublic void addResourceHandlers(ResourceHandlerRegistry registry) {registry.addResourceHandler("/index/login","/index/home","index/auth/github/callback");}@Beanpublic RestTemplate restTemplate(ObjectMapper objectMapper) throws Exception {// 禁用FAIL_ON_EMPTY_BEANS特性objectMapper.configure(SerializationFeature.FAIL_ON_EMPTY_BEANS, false);// 创建不验证SSL的请求工厂SimpleClientHttpRequestFactory requestFactory = new SimpleClientHttpRequestFactory() {@Overrideprotected void prepareConnection(HttpURLConnection connection, String httpMethod) {if (connection instanceof HttpsURLConnection) {((HttpsURLConnection) connection).setHostnameVerifier((hostname, session) -> true);try {((HttpsURLConnection) connection).setSSLSocketFactory(trustAllSslContext().getSocketFactory());super.prepareConnection(connection, httpMethod);} catch (Exception e) {throw new RuntimeException(e);}}}};RestTemplate restTemplate = new RestTemplate(requestFactory);// 替换默认的消息转换器restTemplate.getMessageConverters().removeIf(c -> c instanceof MappingJackson2HttpMessageConverter);restTemplate.getMessageConverters().add(new MappingJackson2HttpMessageConverter(objectMapper));return restTemplate;}private SSLContext trustAllSslContext() throws Exception {TrustManager[] trustAllCerts = new TrustManager[]{new X509TrustManager() {public X509Certificate[] getAcceptedIssuers() { return null; }public void checkClientTrusted(X509Certificate[] certs, String authType) {}public void checkServerTrusted(X509Certificate[] certs, String authType) {}}};SSLContext sslContext = SSLContext.getInstance("SSL");sslContext.init(null, trustAllCerts, new java.security.SecureRandom());return sslContext;}
}
效果展示
1.访问登录页面
注意后端是否成功生成state值,如下:

2.点击使用Github登录
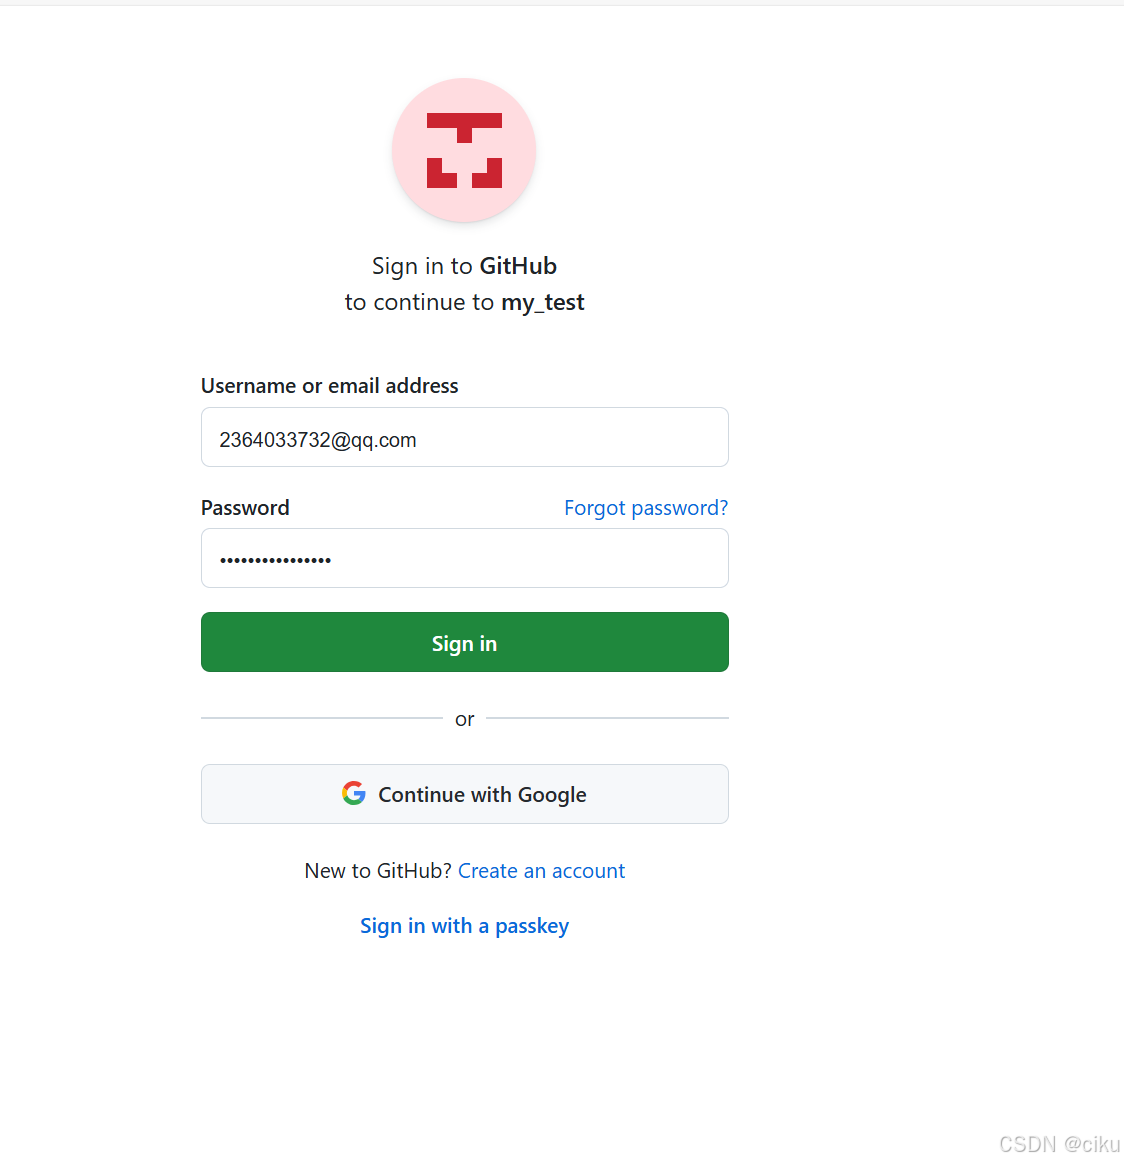
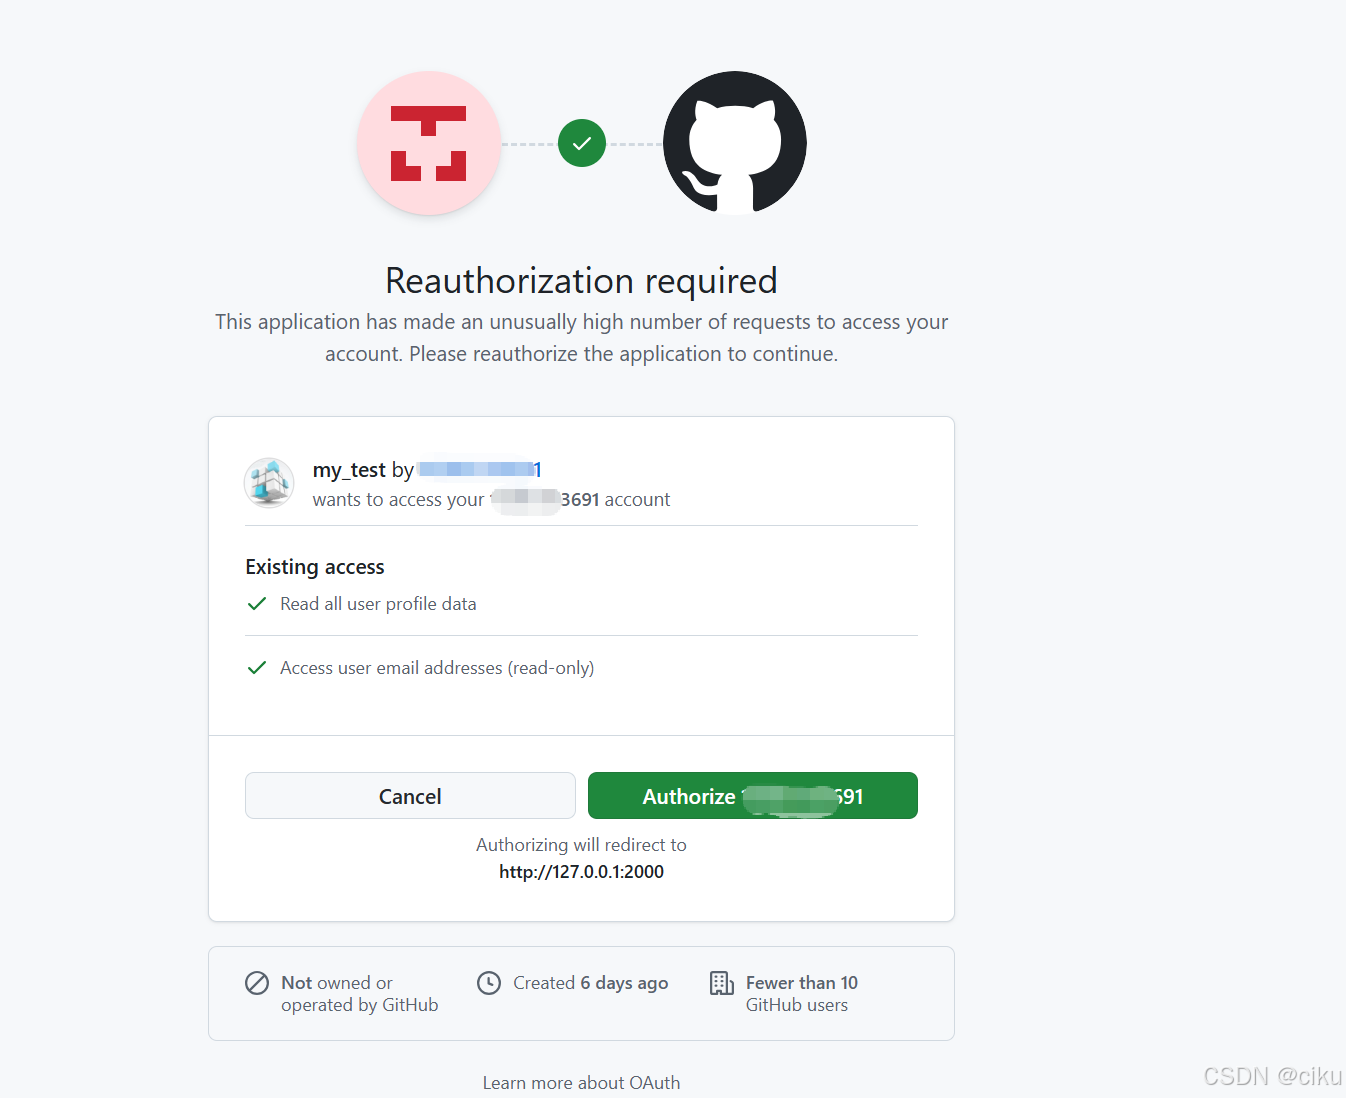
3.确认授权,点击Authrize,会回调github配置的callback地址
4.跳转到登录成功页面。获取到用户名和头像url
特别注意:整个登录过程中,需要保持state的一致,如果不一致,会导致回调调用多次,github出现too many request 或者本地应用报错回调次数过多
以上内容仅供参考,一切以实际为准。第三方授权学习记录,如有不当之处请多包涵,若有其他高见请不吝赐教!