第13章 智能监测-设备数据处理
第13章 智能监测-设备数据处理
AMQP简介
AMQP(Advanced Message Queuing Protocol)的定义:
- 是一种网络协议,用于在应用程序之间传递消息。
- 是一种开放标准的消息传递协议,可以在不同的系统之间实现可靠、安全、高效的消息传递。
应用场景:实现包括多种消息队列软件
- RabbitMQ
- Apache ActiveMQ
- Apache Qpid等。
这些软件提供了可靠、高效的消息传递服务,广泛应用于分布式系统、云计算、物联网等领域。
如何应用AMQP消费IOT中设备上报的数据
在项目中用broker即中间件组件,就可以实现了应用AMQP消费IOT中设备上报的数据。
- IOT本身相当于是一个队列
- 如果有多个消费者都要接收同一类消息,可以设置多个消费者,称为消费者组
官网Java SDK接入
在IOT官方文档中,已经提供了对应的数据转发的解决方案,如下链接:AMQP转发。
Java SDK接入实例项目:
-
下载地址:https://developer.obs.myhuaweicloud.com/manage/amqp/amqp-demo.zip。
-
官网说明参考:https://support.huaweicloud.com/usermanual-iothub/iot_01_00100_3.html。
环境集成-Apache Qpid实现消息队列
1)在zzyl-nursing-platform模块中导入依赖,参考官网提供的pom依赖,如下:
<!-- amqp 1.0 qpid client -->
<dependency><groupId>org.apache.qpid</groupId><artifactId>qpid-jms-client</artifactId><version>0.61.0</version>
</dependency>
2)在application.yml文件添加iot配置
# IoTDA
huaweicloud:ak: HPUAQ7WNFIS8OY8SKVK2sk: 5WbWnQZUu1EqIN0ZmvOaP9aD5LBmqpzDGuNZFTxt#如果是上海一,请填写"cn-east-3";如果是北京四,请填写"cn-north-4";regionId: cn-south-1endpoint: ba5420b08b.st1.iotda-app.cn-south-1.myhuaweicloud.comprojectId: 41174c83d71549f0be1be1d15a109c6d#amqp相关配置 - 接收设备数据使用host: ba5420b08b.st1.iotda-app.cn-south-1.myhuaweicloud.comaccessKey: S9FOMeNCaccessCode: zLSwJ69dtpi3yIgZRoRO41w00o0etGNoqueueName: DefaultQueue   #默认无需改动
3)实现ApplicationRunner接口之后的AmqpClient,可监听数据变化。
package com.zzyl.nursing.task;import cn.hutool.core.text.CharSequenceUtil;
import cn.hutool.core.util.ObjectUtil;
import cn.hutool.json.JSONObject;
import cn.hutool.json.JSONUtil;
import com.zzyl.framework.config.properties.HuaWeiIotConfigProperties;
import com.zzyl.nursing.service.IDeviceDataService;
import com.zzyl.nursing.vo.IotMsgNotifyData;
import lombok.extern.slf4j.Slf4j;
import org.apache.qpid.jms.*;
import org.apache.qpid.jms.message.JmsInboundMessageDispatch;
import org.apache.qpid.jms.transports.TransportOptions;
import org.apache.qpid.jms.transports.TransportSupport;
import org.springframework.beans.factory.annotation.Autowired;
import org.springframework.boot.ApplicationArguments;
import org.springframework.boot.ApplicationRunner;
import org.springframework.scheduling.concurrent.ThreadPoolTaskExecutor;
import org.springframework.stereotype.Component;import javax.jms.*;
import java.net.InetAddress;
import java.net.URI;
import java.net.UnknownHostException;
import java.text.MessageFormat;
import java.util.HashMap;
import java.util.Map;
import java.util.UUID;
import java.util.stream.Collectors;/*** @author itcast*/
@Slf4j
@Component
public class AmqpClient implements ApplicationRunner {@Autowiredprivate HuaWeiIotConfigProperties huaWeiIotConfigProperties;// 业务处理异步线程池,线程池参数可以根据您的业务特点调整,或者您也可以用其他异步方式处理接收到的消息。@Autowiredprivate ThreadPoolTaskExecutor threadPoolTaskExecutor;// 控制台服务端订阅中消费组状态页客户端ID一栏将显示clientId参数。// 建议使用机器UUID、MAC地址、IP等唯一标识等作为clientId。便于您区分识别不同的客户端。private static String clientId;static {try {clientId = InetAddress.getLocalHost().getHostAddress();} catch (UnknownHostException e) {e.printStackTrace();}}@Overridepublic void run(ApplicationArguments args) throws Exception {start();}public void start() throws Exception {// 参数说明,请参见AMQP客户端接入说明文档。for (int i = 0; i < huaWeiIotConfigProperties.getConnectionCount(); i++) {// 创建amqp连接Connection connection = getConnection();// 加入监听者((JmsConnection) connection).addConnectionListener(myJmsConnectionListener);// 创建会话。// Session.CLIENT_ACKNOWLEDGE: 收到消息后,需要手动调用message.acknowledge()。// Session.AUTO_ACKNOWLEDGE: SDK自动ACK(推荐)。Session session = connection.createSession(false, Session.AUTO_ACKNOWLEDGE);connection.start();// 创建Receiver连接。MessageConsumer consumer = newConsumer(session, connection, huaWeiIotConfigProperties.getQueueName());consumer.setMessageListener(messageListener);}log.info("amqp  is started successfully, and will exit after server shutdown ");}/*** 创建amqp连接** @return amqp连接*/private Connection getConnection() throws Exception {String connectionUrl = generateConnectUrl();JmsConnectionFactory cf = new JmsConnectionFactory(connectionUrl);// 信任服务端TransportOptions to = new TransportOptions();to.setTrustAll(true);cf.setSslContext(TransportSupport.createJdkSslContext(to));String userName = "accessKey=" + huaWeiIotConfigProperties.getAccessKey();cf.setExtension(JmsConnectionExtensions.USERNAME_OVERRIDE.toString(), (connection, uri) -> {// IoTDA的userName组成格式如下:“accessKey=${accessKey}|timestamp=${timestamp}”String newUserName = userName;if (connection instanceof JmsConnection) {newUserName = ((JmsConnection) connection).getUsername();}return newUserName + "|timestamp=" + System.currentTimeMillis();});// 创建连接。return cf.createConnection(userName, huaWeiIotConfigProperties.getAccessCode());}/*** 生成amqp连接地址** @return amqp连接地址*/public String generateConnectUrl() {String uri = MessageFormat.format("{0}://{1}:{2}",(huaWeiIotConfigProperties.isUseSsl() ? "amqps" : "amqp"),huaWeiIotConfigProperties.getHost(),String.valueOf(huaWeiIotConfigProperties.getPort()));Map<String, String> uriOptions = new HashMap<>();uriOptions.put("amqp.vhost", huaWeiIotConfigProperties.getVhost());uriOptions.put("amqp.idleTimeout", String.valueOf(huaWeiIotConfigProperties.getIdleTimeout()));uriOptions.put("amqp.saslMechanisms", huaWeiIotConfigProperties.getSaslMechanisms());Map<String, String> jmsOptions = new HashMap<>();jmsOptions.put("jms.prefetchPolicy.queuePrefetch", String.valueOf(huaWeiIotConfigProperties.getQueuePrefetch()));if (CharSequenceUtil.isNotBlank(clientId)) {jmsOptions.put("jms.clientID", clientId);} else {jmsOptions.put("jms.clientID", UUID.randomUUID().toString());}jmsOptions.put("failover.reconnectDelay", String.valueOf(huaWeiIotConfigProperties.getReconnectDelay()));jmsOptions.put("failover.maxReconnectDelay", String.valueOf(huaWeiIotConfigProperties.getMaxReconnectDelay()));if (huaWeiIotConfigProperties.getMaxReconnectAttempts() > 0) {jmsOptions.put("failover.maxReconnectAttempts", String.valueOf(huaWeiIotConfigProperties.getMaxReconnectAttempts()));}if (huaWeiIotConfigProperties.getExtendedOptions() != null) {for (Map.Entry<String, String> option : huaWeiIotConfigProperties.getExtendedOptions().entrySet()) {if (option.getKey().startsWith("amqp.") || option.getKey().startsWith("transport.")) {uriOptions.put(option.getKey(), option.getValue());} else {jmsOptions.put(option.getKey(), option.getValue());}}}StringBuilder stringBuilder = new StringBuilder();stringBuilder.append(uriOptions.entrySet().stream().map(option -> MessageFormat.format("{0}={1}", option.getKey(), option.getValue())).collect(Collectors.joining("&", "failover:(" + uri + "?", ")")));stringBuilder.append(jmsOptions.entrySet().stream().map(option -> MessageFormat.format("{0}={1}", option.getKey(), option.getValue())).collect(Collectors.joining("&", "?", "")));return stringBuilder.toString();}/*** 创建消费者** @param session    session* @param connection amqp连接* @param queueName  队列名称* @return 消费者*/public MessageConsumer newConsumer(Session session, Connection connection, String queueName) throws Exception {if (connection == null || !(connection instanceof JmsConnection) || ((JmsConnection) connection).isClosed()) {throw new Exception("create consumer failed,the connection is disconnected.");}return session.createConsumer(new JmsQueue(queueName));}private final MessageListener messageListener = message -> {try {// 异步处理收到的消息,确保onMessage函数里没有耗时逻辑threadPoolTaskExecutor.submit(() -> processMessage(message));} catch (Exception e) {log.error("submit task occurs exception ", e);}};@Autowiredprivate IDeviceDataService deviceDataService;/*** 在这里处理您收到消息后的具体业务逻辑。*/private void processMessage(Message message) {String contentStr;try {contentStr = message.getBody(String.class);String topic = message.getStringProperty("topic");String messageId = message.getStringProperty("messageId");log.info("receive message,\n topic = {},\n messageId = {},\n content = {}", topic, messageId, contentStr);} catch (JMSException e) {throw new RuntimeException("服务器错误");}// 将JSON转换为JSONObject,数据为空,则返回JSONObject jsonMsg = JSONUtil.parseObj(contentStr);if (ObjectUtil.isEmpty(jsonMsg)){return;}// 取出notify_data部分的数据,数据为空,则返回JSONObject jsonNotifyData = jsonMsg.getJSONObject("notify_data");if (ObjectUtil.isEmpty(jsonNotifyData)){return;}// jsonObject 转换为值对象,数据为空,则返回IotMsgNotifyData iotMsgNotifyData = JSONUtil.toBean(jsonNotifyData, IotMsgNotifyData.class);if (ObjectUtil.isEmpty(iotMsgNotifyData.getBody()) || ObjectUtil.isEmpty(iotMsgNotifyData.getBody().getServices())){return;}// 批量保存设备数据deviceDataService.batchInsertDeviceData(iotMsgNotifyData);}private final JmsConnectionListener myJmsConnectionListener = new JmsConnectionListener() {/*** 连接成功建立。*/@Overridepublic void onConnectionEstablished(URI remoteURI) {log.info("onConnectionEstablished, remoteUri:{}", remoteURI);}/*** 尝试过最大重试次数之后,最终连接失败。*/@Overridepublic void onConnectionFailure(Throwable error) {log.error("onConnectionFailure, {}", error.getMessage());}/*** 连接中断。*/@Overridepublic void onConnectionInterrupted(URI remoteURI) {log.info("onConnectionInterrupted, remoteUri:{}", remoteURI);}/*** 连接中断后又自动重连上。*/@Overridepublic void onConnectionRestored(URI remoteURI) {log.info("onConnectionRestored, remoteUri:{}", remoteURI);}@Overridepublic void onInboundMessage(JmsInboundMessageDispatch envelope) {}@Overridepublic void onSessionClosed(Session session, Throwable cause) {}@Overridepublic void onConsumerClosed(MessageConsumer consumer, Throwable cause) {}@Overridepublic void onProducerClosed(MessageProducer producer, Throwable cause) {}};
}
processMessage方法:在这里编写您收到消息后如何处理的具体业务逻辑。
Spring线程池ThreadPoolTaskExecutor
在若依项目中,线程池参数可以根据您的业务特点调整:
package com.zzyl.framework.config;import com.zzyl.common.utils.Threads;
import org.apache.commons.lang3.concurrent.BasicThreadFactory;
import org.springframework.context.annotation.Bean;
import org.springframework.context.annotation.Configuration;
import org.springframework.scheduling.concurrent.ThreadPoolTaskExecutor;
import java.util.concurrent.ScheduledExecutorService;
import java.util.concurrent.ScheduledThreadPoolExecutor;
import java.util.concurrent.ThreadPoolExecutor;/*** 线程池配置** @author ruoyi**/
@Configuration
public class ThreadPoolConfig
{// 核心线程池大小private int corePoolSize = 50;// 最大可创建的线程数private int maxPoolSize = 200;// 队列最大长度private int queueCapacity = 1000;// 线程池维护线程所允许的空闲时间private int keepAliveSeconds = 300;@Bean(name = "threadPoolTaskExecutor")public ThreadPoolTaskExecutor threadPoolTaskExecutor(){ThreadPoolTaskExecutor executor = new ThreadPoolTaskExecutor();executor.setMaxPoolSize(maxPoolSize);executor.setCorePoolSize(corePoolSize);executor.setQueueCapacity(queueCapacity);executor.setKeepAliveSeconds(keepAliveSeconds);// 线程池对拒绝任务(无线程可用)的处理策略executor.setRejectedExecutionHandler(new ThreadPoolExecutor.CallerRunsPolicy());return executor;}/*** 执行周期性或定时任务*/@Bean(name = "scheduledExecutorService")protected ScheduledExecutorService scheduledExecutorService(){return new ScheduledThreadPoolExecutor(corePoolSize,new BasicThreadFactory.Builder().namingPattern("schedule-pool-%d").daemon(true).build(),new ThreadPoolExecutor.CallerRunsPolicy()){@Overrideprotected void afterExecute(Runnable r, Throwable t){super.afterExecute(r, t);Threads.printException(r, t);}};}
}
线程池核心参数和原理
- corePoolSize 核心线程数目
- 到底多少合适?
- 对于IO密集型的项目,一般设置核心线程数为:CPU核数 * 2
- 对于计算密集型的项目,一般设置核心线程数为: CPU核数 + 1
- 到底多少合适?
- maximumPoolSize 最大线程数目 = (核心线程+临时线程的最大数目)
- keepAliveTime 生存时间 - 临时线程的生存时间,生存时间内没有新任务,此线程资源会释放
- unit 时间单位 - 临时线程的生存时间单位,如秒、毫秒等
- workQueue - 当没有空闲核心线程时,新来任务会加入到此队列排队,队列满会创建临时线程执行任务
- threadFactory 线程工厂 - 可以定制线程对象的创建,例如设置线程名字、是否是守护线程等
- handler 拒绝策略 - 当所有线程都在繁忙,workQueue 也放满时,会触发拒绝策略
- AbortPolicy:直接抛出异常,默认策略;
- CallerRunsPolicy:用调用者所在的线程来执行任务;
- DiscardOldestPolicy:丢弃阻塞队列中靠最前的任务,并执行当前任务;
- DiscardPolicy:直接丢弃任务;
- 执行流程(原理)
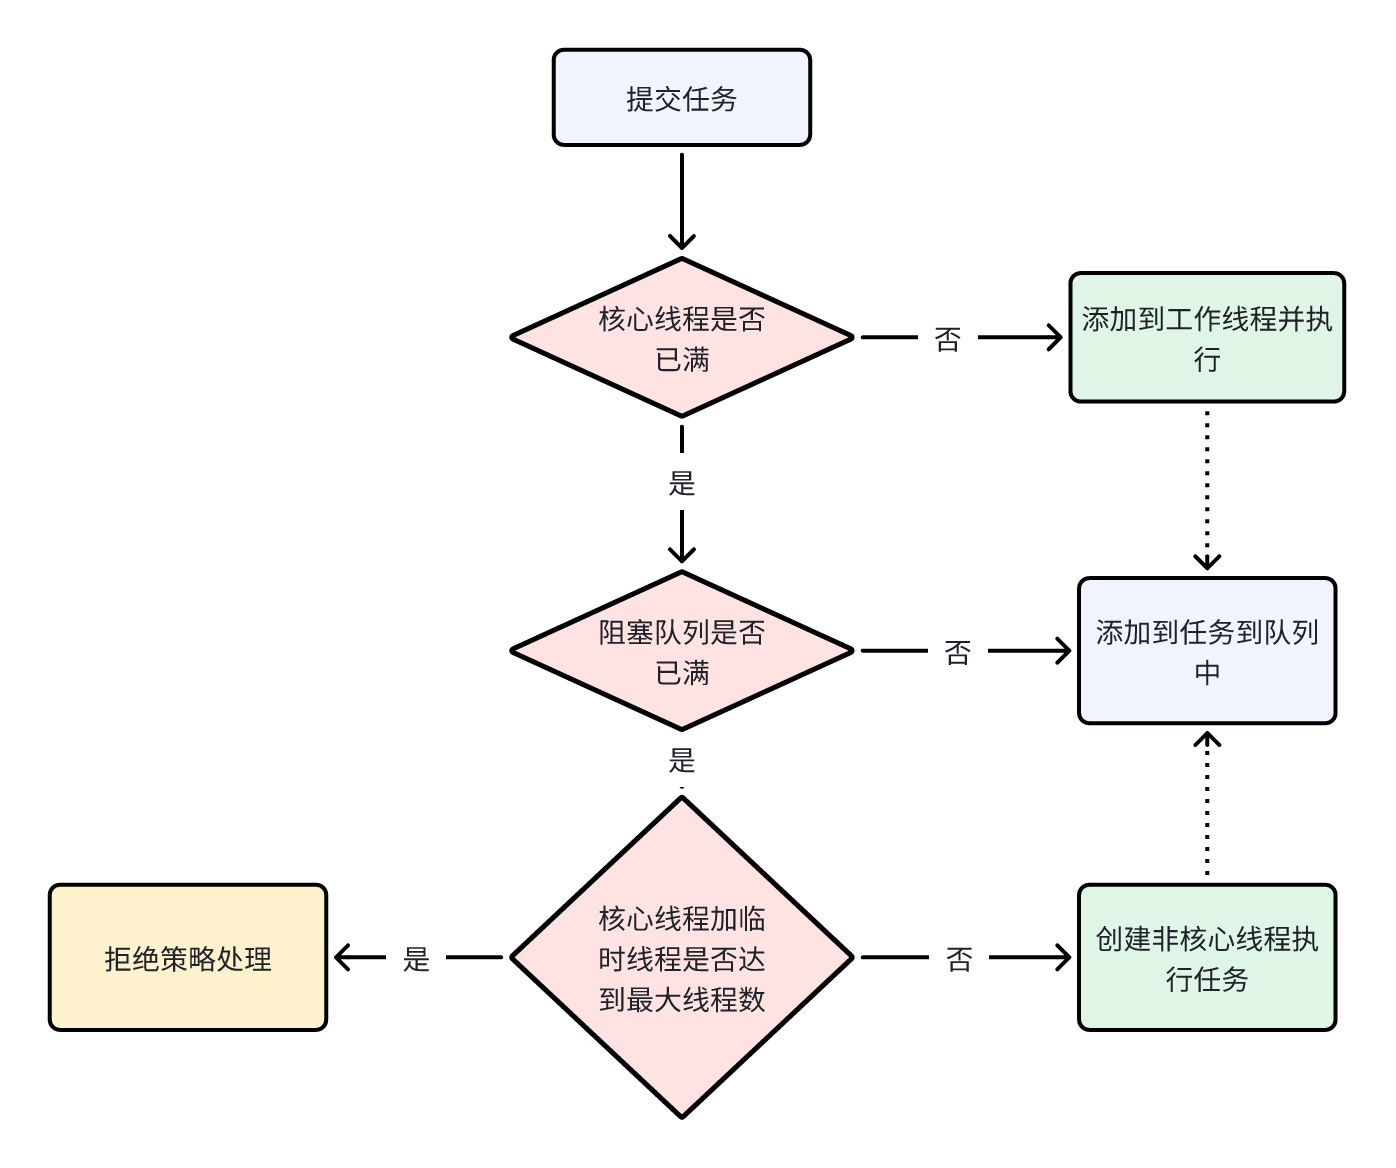
一般用 CallerRunsPolicy 拒绝策略,当线程到达最大线程数并且队列塞满任务,主线程会处理队列中的任务。
获取CPU的逻辑处理器核数
/*** 线程池配置** @author ruoyi**/
@Configuration
public class ThreadPoolConfig
{// 核心线程池大小: 50private int corePoolSize = Runtime.getRuntime().availableProcessors() * 2;// 最大可创建的线程数private int maxPoolSize = 200;// 队列最大长度private int queueCapacity = 1000;// 线程池维护线程所允许的空闲时间private int keepAliveSeconds = 300;
}
Runtime.getRuntime().availableProcessors():可获取你的处理器核数,可跟据这个配置线程池核心参数。
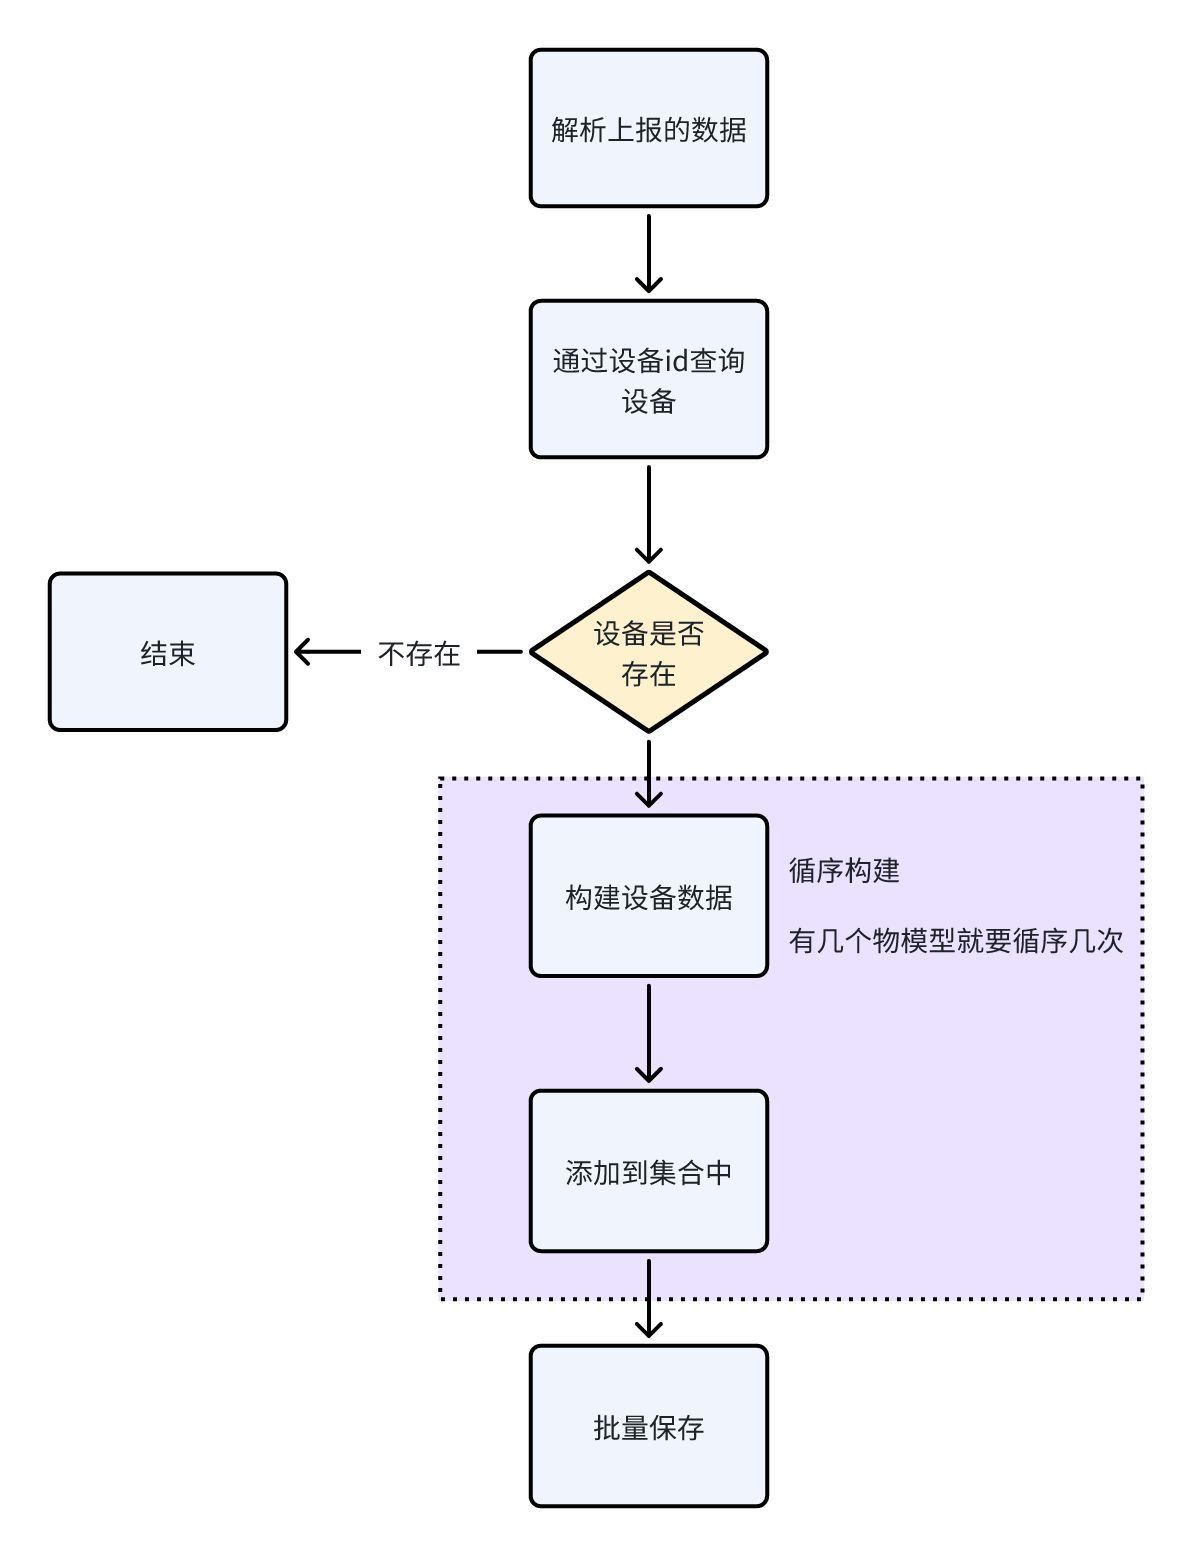
功能实现
后台接收设备端数据
思路流程
可能的Bug:非请求线程依赖 RequestContextHolder 的组件
分析方法:
1)用断点调试的方式一步步到达抛出异常的点。
2)抛出异常后,用idea的评估表达式捕获异常。
3)将异常交由AI或者用搜索引擎找解决方案。
AI分析报错信息的Prompt:
报错场景 + 报错信息
示例:
在MyBatisPlus调用saveBatch方法时报错:org.apache.ibatis.exceptions.PersistenceException:
### Error updating database.  Cause: java.lang.IllegalStateException: No thread-bound request found: Are you referring to request attributes outside of an actual web request, or processing a request outside of the originally receiving thread? If you are actually operating within a web request and still receive this message, your code is probably running outside of DispatcherServlet: In this case, use RequestContextListener or RequestContextFilter to expose the current request.
### The error may exist in com/zzyl/nursing/mapper/DeviceDataMapper.java (best guess)
### The error may involve com.zzyl.nursing.mapper.DeviceDataMapper.insert
### The error occurred while executing an update
### Cause: java.lang.IllegalStateException: No thread-bound request found: Are you referring to request attributes outside of an actual web request, or processing a request outside of the originally receiving thread? If you are actually operating within a web request and still receive this message, your code is probably running outside of DispatcherServlet: In this case, use RequestContextListener or RequestContextFilter to expose the current request.
解决方案:检查自动填充逻辑(最常见原因)
如果你使用了 @TableField(fill = FieldFill.INSERT) 或 FieldFill.INSERT_UPDATE,并实现了 MetaObjectHandler,请检查是否在其中使用了 RequestContextHolder。
解决问题后的代码:
package com.zzyl.framework.interceptor;import com.baomidou.mybatisplus.core.handlers.MetaObjectHandler;
import com.baomidou.mybatisplus.core.toolkit.ObjectUtils;
import com.zzyl.common.core.domain.model.LoginUser;
import com.zzyl.common.utils.DateUtils;
import com.zzyl.common.utils.SecurityUtils;
import lombok.SneakyThrows;
import org.apache.ibatis.reflection.MetaObject;
import org.springframework.beans.factory.annotation.Autowired;
import org.springframework.stereotype.Component;import javax.servlet.http.HttpServletRequest;
import java.net.http.HttpRequest;
import java.util.Date;@Component
public class MyMetaObjectHandler implements MetaObjectHandler {@Autowiredprivate HttpServletRequest request;@SneakyThrowspublic boolean isExclude() {try {String requestURI = request.getRequestURI();if(requestURI.startsWith("/member")) {return true;}} catch (Exception e) {// 批量保存设备数据信息时,异步的消息队列线程,使用了依赖于 RequestContextHolder 的组件return true;}return false;}@Overridepublic void insertFill(MetaObject metaObject) {if (!isExclude()){this.strictInsertFill(metaObject, "createBy", String.class, String.valueOf(getLoginUserId()));}this.strictInsertFill(metaObject, "createTime", Date.class, DateUtils.getNowDate());}@Overridepublic void updateFill(MetaObject metaObject) {this.setFieldValByName("updateTime", new Date(), metaObject);if (!isExclude()){this.setFieldValByName("updateBy", String.valueOf(getLoginUserId()), metaObject);}
//        this.strictInsertFill(metaObject, "updateBy", String.class, String.valueOf(getLoginUserId()));
//        this.strictUpdateFill(metaObject, "updateTime", Date.class, DateUtils.getNowDate());}public Long getLoginUserId() {try {// 获取到当前登录人的信息LoginUser loginUser = SecurityUtils.getLoginUser();if (ObjectUtils.isNotEmpty(loginUser)) {return loginUser.getUserId();}return 1L;} catch (Exception e) {return 1L;}}}
加空值判断,避免在非 Web 环境下报错。
查询设备的物模型数据 - 接口实现
这次用的是MyBatisPlus的分页操作。
编码实现
Service 层的示例代码:
/*** 查询设备数据列表** @param dto 设备数据* @return 设备数据*/
@Override
public TableDataInfo selectDeviceDataList(DeviceDataPageReqDto dto) {IPage<DeviceData> page = new Page<>(dto.getPageNum(), dto.getPageSize());page = page(page, Wrappers.<DeviceData>lambdaQuery().like(StringUtils.isNotEmpty(dto.getDeviceName()), DeviceData::getDeviceName, dto.getDeviceName()).eq(StringUtils.isNotEmpty(dto.getFunctionId()), DeviceData::getFunctionId, dto.getFunctionId()).between(ObjectUtil.isNotEmpty(dto.getStartTime()) && ObjectUtil.isNotEmpty(dto.getEndTime()),DeviceData::getAlarmTime, dto.getStartTime(), dto.getEndTime()));return getTableDataInfo(page);
}/*** 获取分页数据* @param page* @return*/
private TableDataInfo getTableDataInfo(IPage<DeviceData> page) {TableDataInfo tableDataInfo = new TableDataInfo<>();tableDataInfo.setCode(HttpStatus.SUCCESS);tableDataInfo.setMsg("查询成功");tableDataInfo.setRows(page.getRecords());tableDataInfo.setTotal(page.getTotal());return tableDataInfo;
}