JAVA后端面试笔记(二)
《关于并发编程的面试笔记》
1.Synchronized和Volatile关键词
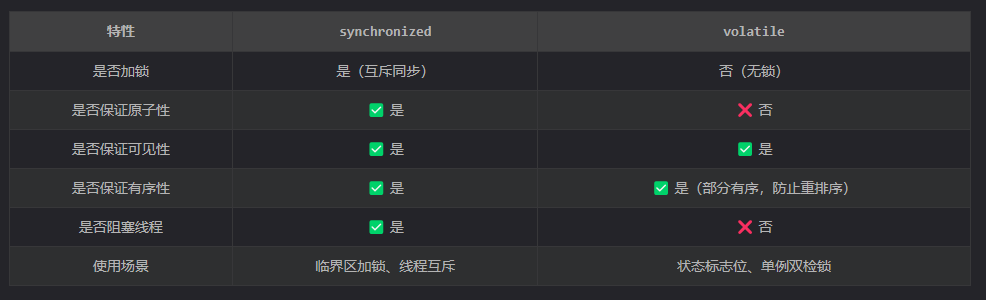
1.1 Synchronized和Volatile的异同
同:都是Java中的关键词,都可实现线程同步
异:
①volatile 关键字只能用于单个变量,而synchronized适用于方法及代码块
②volatile 关键字能保证数据的可见性,但不能保证数据的原子性。synchronized 关键字两者都能保证。
③volatile 关键字主要用于解决单个变量在多个线程之间的可见性,而 synchronized 关键字解决的是多线程之间的资源同步
1.2 volatile的使用原理
volatile 可以确保对某个变量的更新对其他线程马上可见 ,一个变量被声明为volatile时,线程在写入变量时不会把值缓存在寄存器或者其他地方,而是会把值刷新回主内存,当其他线程读取该共享变量,会从主内存获取最新值,而不是使用当前线程的本地内存值。
1.3 用途区别
synchronized用于控制代码块/方法的线程安全访问,使用于资源共享
volatile用于状态控制(如线程停止标志)
2.多线程实现的四种方式?
根据是否可获取返回值分为两种!
不可获取返回值:继承Thread类,实现Runnable接口(本质都是重写run()方法)
可获取返回值:实现Callable接口,线程池
2.1 继承Thread类
public class MyThread extends Thread {public void run() {while (true) {System.out.println(this.getName() + " is running");try {Thread.sleep(1000);} catch (InterruptedException e) {e.printStackTrace();}}}public static void main(String[] args) {MyThread t1 = new MyThread();MyThread t2 = new MyThread();MyThread t3 = new MyThread();t1.start();t2.start();t3.start();}}
2.2 实现Runnable接口
实现Runnable接口的实现类的实例对象作为Thread构造函数的target
public class TicketSailTask implements Runnable {public static int number = 100;//总共100张票public Object lock = new Object();//创建锁@Overridepublic void run() {while (true) {try {Thread.sleep(100);} catch (InterruptedException e) {e.printStackTrace();}synchronized(lock) {if (number > 0) {System.out.println(Thread.currentThread().getName() + "正在卖第" + number + "张票");number--;} else {break;}}}}public static void main(String[] args) {TicketSailTask ticketSailTask = new TicketSailTask();// 三个线程ticketSailTask,共用一个锁对象new Thread(ticketSailTask,"小志").start();// 使用锁对象:ticketSailTask.classnew Thread(ticketSailTask,"小庄").start();// 使用锁对象:ticketSailTask.classnew Thread(ticketSailTask,"小王").start();// 使用锁对象:ticketSailTask.class}}
2.3 Callable和Future Task
特点:可获取到返回值!FutureTask通常只能被执行一次
FutureTask的get()用于阻塞主线程,直至获取到执行结果
public class CallableImpl implements Callable<String> {String acceptStr;public CallableImpl(String acceptStr) {this.acceptStr = acceptStr;}@Overridepublic String call() throws Exception {// 任务阻塞一秒Thread.sleep(1000);return this.acceptStr+"添加字段并返回";}public static void main(String[] args) throws ExecutionException, InterruptedException {CallableImpl myTest1 = new CallableImpl("线程1");CallableImpl myTest2 = new CallableImpl("线程2");CallableImpl myTest3 = new CallableImpl("线程3");FutureTask<String> task1 = new FutureTask<>(myTest1);FutureTask<String> task2 = new FutureTask<>(myTest2);FutureTask<String> task3 = new FutureTask<>(myTest3);long beginTime = System.currentTimeMillis();// 创建线程new Thread(task1,"线程1").start();new Thread(task2,"线程2").start();new Thread(task3,"线程3").start();List resultList = new ArrayList<>();// 调用get()阻塞主线程,反之,线程不会阻塞String result1 = task1.get();String result2 = task2.get();String result3 = task3.get();resultList.add(result1);resultList.add(result2);resultList.add(result3);long endTime = System.currentTimeMillis();System.out.println("开始: " + resultList);System.out.println("用时 : " + (endTime - beginTime)/1000 + "s");}
}
开始: [线程1添加字段并返回, 线程2添加字段并返回, 线程3添加字段并返回]
用时 : 1s
2.4 线程池创建线程
注意:线程池记得使用后关闭,避免造成资源泄漏
public class ThreadPool {// 定义要创建的线程数private static int THREAD_NUM=10;public static void main(String[] args) throws InterruptedException {// 线程池有5个固定线程ExecutorService executorService = Executors.newFixedThreadPool(5);for (int i = 0; i < THREAD_NUM; i++) {RunnableThread thread = new RunnableThread();Thread.sleep(1000);executorService.execute(thread);}// todo 关闭线程池executorService.shutdown();}static class RunnableThread implements Runnable{@Overridepublic void run() {System.out.println("通过线程池方式创建的线程:" + Thread.currentThread().getName() + " ");}}
}
3. 项目中哪些地方用到了多线程?
略......
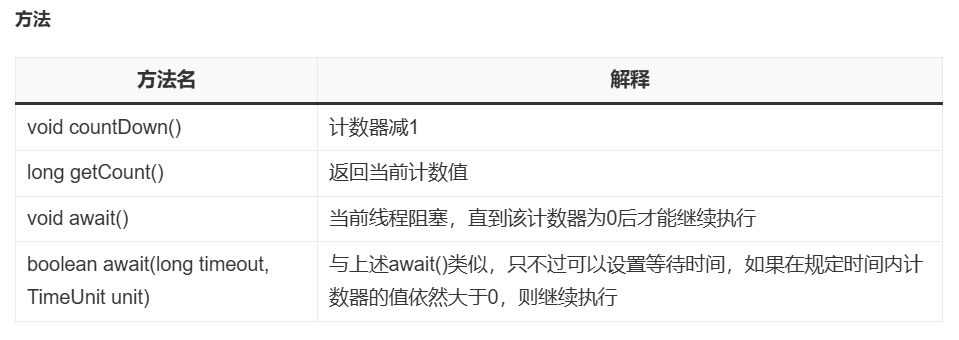
3.1 CountDownLatch的用法
原理:多线程进行递减计数,等到计数到0的时候等待即不再阻塞,从而向下执行。
await()当前线程阻塞,直至计数器到0主线程才可以启动。
/*** @author zzp* @date 2025/9/15/周一 10:42* @description: 主线程主动阻塞等待子线程执行结束再继续执行的案例 -- 使用CountDownLatch()*/public class CountDownLatchDemo {// 创建一个CountDownLatch实例private static volatile CountDownLatch countDownLatch = new CountDownLatch(2);public static void main(String[] args) throws InterruptedException {Thread thread1 = new Thread(new Runnable() {public void run() {try{Thread.sleep(1000);System.out.println("线程1结束");}catch (Exception e){e.printStackTrace();}finally {countDownLatch.countDown();}}});Thread thread2 = new Thread(new Runnable() {public void run() {try {Thread.sleep(1000);System.out.println("线程2结束");}catch (Exception e){e.printStackTrace();}finally {countDownLatch.countDown();}}});// 开启两个子线程thread1.start();thread2.start();System.out.println("主线程等待子线程结束...");countDownLatch.await();System.out.println("所有子线程结束......");}}
主线程等待子线程结束...
线程2结束
线程1结束
所有子线程结束......
CountdownLatch实现多线程并可获取到返回值
异步多线程实现导出写表操作,使用CountDownLatch.await( )实现子线程执行完毕,主线程结束阻塞操作......
@Overridepublic void exportToExcel(HttpServletResponse response, HbCusReportDto hrd, Map<String, Object> headMap, String fileNamePrefix, String exportFormat) {// TODO 获取数据数量 totalDataSize// TODO 计算需要多少批次 numPages // TODO 获取表头// TODO 设置导出文件名// TODO 根据导出的文件格式-设置响应头信息// 创建线程池,最大线程数为 numPages,假设每个分页查询由一个线程处理// 用于存放查询结果的列表,使用一个 Map 保证顺序 -- allDataListMapMap<Integer, List<List<Object>>> allDataListMap = new TreeMap<>();try (ExcelWriter writer = EasyExcel.write(response.getOutputStream()).excelType(ExcelTypeEnum.XLSX).build()) {// 使用 CountDownLatch 等待所有线程执行完成CountDownLatch latch = new CountDownLatch((int) numPages);// 使用线程提交分页查询任务for (int pageIndex = 0; pageIndex < numPages; pageIndex++) {final int finalPageIndex = pageIndex + 1;long finalPageSize = pageSize;myThreadPool.submit(() -> {try {Map<String, Object> map = selectPageByCondition(hrd.getId(), hrd.getSqlStr(), hrd.getFieldList(), hrd.getParamsList(), (int) finalPageIndex, finalPageSize, hrd.getUserId(), hrd.getWarehouse());IPage<Map<String, String>> iPage = (IPage<Map<String, String>>) map.get("data");List<List<Object>> dataList = ExcelUnits.convertToDataList(iPage.getRecords(), headMap);// 保证按页号顺序存储allDataListMap.put(finalPageIndex, dataList);} catch (Exception e) {log.error("Error during page query for page {}", finalPageIndex, e);} finally {latch.countDown();}});}latch.await(); // ***等待所有分页任务完成***// 按照页号顺序处理查询结果并写入 Excelint currentSheetIndex = 0;int currentSheetDataCount = 0;for (List<List<Object>> dataList : allDataListMap.values()) {if (currentSheetDataCount + dataList.size() > maxRowsPerSheet) {currentSheetIndex++;currentSheetDataCount = 0;}String sheetName = "Sheet" + (currentSheetIndex + 1);WriteSheet writeSheet = EasyExcel.writerSheet(sheetName).head(headList).registerWriteHandler(new CustomWidthStyleStrategy(1)).build();writer.write(dataList, writeSheet);currentSheetDataCount += dataList.size();}} catch (IOException | InterruptedException e) {log.error("Error during export process.", e);Thread.currentThread().interrupt(); // 恢复线程中断状态}}3.2 使用阻塞队列实现顺序消费
案例:(手机)生产-打包-发运-消费 的顺序执行
--------------------------------------------------Phone手机实体类--------------------------------------------------
public class Phone {/*** 手机的状态* PRODUCED:已生产* PACKED:已打包* DELIVERED:已发货*/public enum Status{PRODUCED,PACKED,DELIVERED}// 默认状态--已生产private Status status = Status.PRODUCED;private final int id;public Phone(int id) {this.id = id;}public void pack(){status = Status.PACKED;}public void deliver(){status = Status.DELIVERED;}public int getId(){return id;}public Status getStatus(){return status;}@Overridepublic String toString() {return "Phone id: " + id + ", status: " + status;    }
}
--------------------------------------------------阻塞队列Queue--------------------------------------------------
public class PhoneQueue extends LinkedBlockingQueue<Phone> {
}
--------------------------------------------------生产手机的任务线程--------------------------------------------------
public class Producer implements Runnable {private PhoneQueue phoneQueue;private int count = 0;private Random random = new Random(47);public Producer(PhoneQueue phoneQueue) {this.phoneQueue = phoneQueue;}@Overridepublic void run() {try {while (!Thread.interrupted()) {TimeUnit.MICROSECONDS.sleep(300 + random.nextInt(500));// 生产有序的手机Phone phone = new Phone(count++);System.out.println(phone);phoneQueue.add(phone);}}catch (InterruptedException e) {throw new RuntimeException(e);}System.out.println("Producer is off");}}
--------------------------------------------------打包手机的任务线程--------------------------------------------------
take(): 获取并移除此队列的头部,在元素变得可用之前一直等待 。queue的长度 == 0 的时候,一直阻塞,直到获取到元素值,程序继续......
public class Packer implements Runnable{private PhoneQueue producedQueue;private PhoneQueue packedQueue;public Packer(PhoneQueue producedQueue, PhoneQueue packedQueue) {this.producedQueue = producedQueue;this.packedQueue = packedQueue;}@Overridepublic void run() {try{while(!Thread.interrupted()){// 在取得下一个手机之前会一直阻塞Phone phone = producedQueue.take();phone.pack();System.out.println(phone);packedQueue.put(phone);}}catch(InterruptedException e){System.out.println("Packer thread interrupted");}System.out.println("Packer done");}
}
--------------------------------------------------发运手机的任务线程--------------------------------------------------
public class Delivery implements Runnable {private PhoneQueue packedQueue;private PhoneQueue finishQueue;public Delivery(PhoneQueue packedQueue, PhoneQueue finishQueue) {this.packedQueue = packedQueue;this.finishQueue = finishQueue;}@Overridepublic void run() {try{while (!Thread.interrupted()) {Phone phone = packedQueue.take();phone.deliver();System.out.println(phone);finishQueue.put(phone);}}catch (InterruptedException e){System.out.println("Delivery interrupted");}System.out.println("Delivery off");}
}
--------------------------------------------------消费手机的任务线程--------------------------------------------------
public class Consumer implements Runnable {private PhoneQueue finishedQueue;private int count = 0;public Consumer(PhoneQueue finishedQueue) {this.finishedQueue = finishedQueue;}@Overridepublic void run() {try{while (!Thread.interrupted()) {Phone phone = finishedQueue.take();if (phone.getId() != count++|| phone.getStatus() != Phone.Status.DELIVERED){System.out.println("Error -> " + phone);System.exit(-1);}else {System.out.println(phone + " -> User");}}}catch (InterruptedException e){System.out.println("Consumer interrupted");}System.out.println("Consumer off");}
}
-----------------------------------------------------------主线程-------------------------------------------------------------
public class ConsumerMain {public static void main(String[] args) {PhoneQueue producedQueue = new PhoneQueue();PhoneQueue packedQueue = new PhoneQueue();PhoneQueue deliveredQueue = new PhoneQueue();ExecutorService executor = Executors.newCachedThreadPool();executor.execute(new Producer(producedQueue));executor.execute(new Packer(producedQueue,packedQueue));executor.execute(new Delivery(packedQueue,deliveredQueue));executor.execute(new Consumer(deliveredQueue));try{TimeUnit.SECONDS.sleep(5);}catch (InterruptedException e){e.printStackTrace();}executor.shutdown();}
}
================================结果====================================
Phone id: 0, status: PRODUCED
Phone id: 0, status: PACKED
Phone id: 0, status: DELIVERED
Phone id: 0, status: DELIVERED -> User
Phone id: 1, status: PRODUCED
Phone id: 1, status: PACKED
Phone id: 1, status: DELIVERED
Phone id: 1, status: DELIVERED -> User
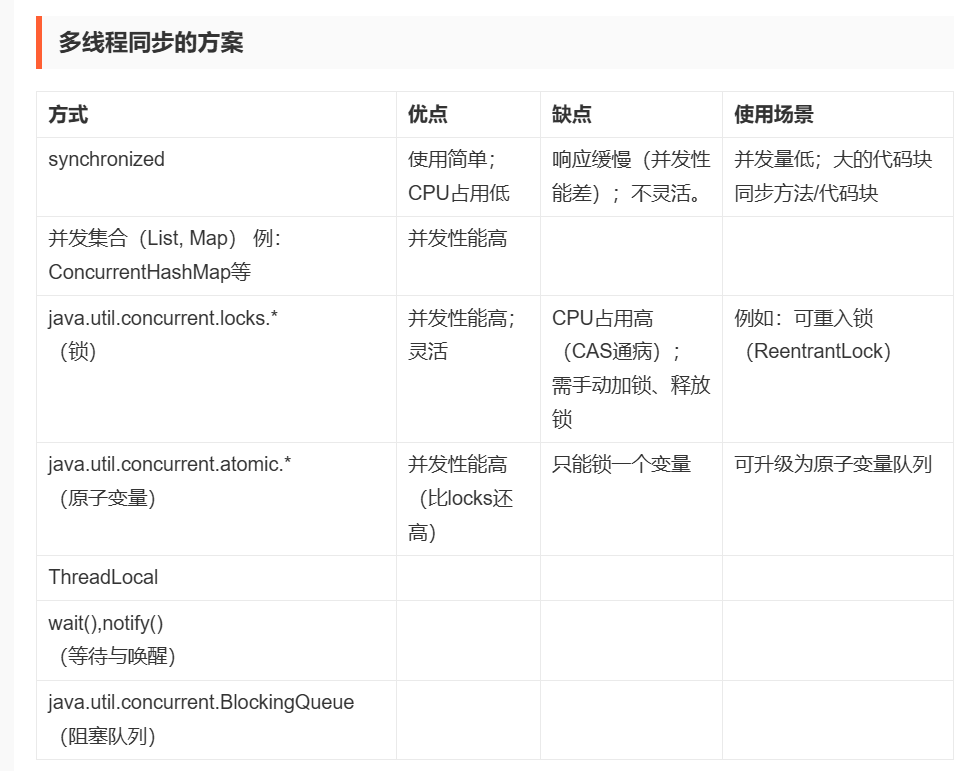
......4. 多线程同步的方案
synchronized关键词:
5. 为什么使用线程池?线程池的优缺点?
-- 避免频繁创建线程和销毁线程(使线程复用)
线程池的优点:
1.降低资源消耗-通过重复利用已创建的线程降低线程创建和销毁造成的资源消耗
2.提高响应速度-任务可以不需要等待线程创建就能立刻执行
3.提高线程的可管理性-线程池可以进行统一的分配,调优和监控
缺点:多线程会占CPU,使用多线程的地方并发量比较高时会导致其他功能响应很慢。