【项目】 :C++ - 仿mudou库one thread one loop式并发服务器实现(模块划分)
【项目】 :C++ - 仿mudou库one thread one loop式并发服务器实现
- 一、HTTP 服务器与 Reactor 模型
- 1.1、HTTP 服务器
- 概念
- 实现步骤
- 难点
- 1.2、Reactor 模型
- 概念
- 分类
- 1. 单 Reactor 单线程
- 2. 单 Reactor 多线程
- 3. 多 Reactor 多线程
- 目标定位
- 总结
- 二、功能模块划分
- 2.1、SERVER 模块
- 子模块
- Buffer 模块
- Socket 模块
- Channel 模块
- Connection 模块
- Acceptor 模块
- TimerQueue 模块
- Poller 模块
- EventLoop 模块
- TcpServer 模块
- 模块关系图:
- 2.2、HTTP 协议模块
- 模块划分
- **Util 模块**(工具模块)
- **HttpRequest 模块**(HTTP 请求数据模块)
- **HttpResponse 模块**(HTTP 响应数据模块)
- **HttpContext 模块**(HTTP 上下文模块)
- **HttpServer 模块**(HTTP 服务器模块)
- 三、C++11 技术点与功能用例
- 3.1 bind 概念
- 示例 1:绑定固定参数或预留参数
- 示例 2:任务池中的应用
- 总结
- 3.2 Linux 定时器 timerfd
- 创建定时器
- 设置定时器时间
- 示例:每隔 3 秒触发一次
- 3.3 时间轮思想
- 问题
- 原理
- 延迟任务 + 智能指针
- 定时任务类设计
- 时间轮实现
- 使用示例
- 总结
- 3.4 C++ 正则库(<regex>)的简单使用
- HTTP 请求首行解析
- 完整示例
- 总结
- 3.5 C++ 通用类型 Any 的实现与使用
- Any 类型的简单实现
- 测试Any类型
- C++17 中的 std::any 使用
通过实现的高并发服务器组件,可以简洁快速的完成一个高性能的服务器搭建。并且,通过组件内提供的不同应用层协议支持,也可以快速完成一个高性能应用服务器的搭建(当前为了便于项目的演示,项目中提供HTTP协议组件的支持)。在这里,要明确的是咱们要实现的是一个高并发服务器组件,因此当前的项目中并不包含实际的业务内容。
代码仓库:https://gitee.com/rxrw/server
一、HTTP 服务器与 Reactor 模型
1.1、HTTP 服务器
概念
HTTP(Hyper Text Transfer Protocol,超文本传输协议)是应用层协议,属于 请求-响应协议:
- 客户端发送请求,服务器提供服务,完成后关闭连接。
- HTTP 协议运行在 TCP 协议之上。
因此,HTTP 服务器本质上就是 TCP 服务器,只是在应用层基于 HTTP 协议格式进行数据组织和解析来完成业务处理。
实现步骤
- 搭建一个 TCP 服务器,接收客户端请求。
- 按照 HTTP 协议格式解析请求数据,明确客户端目的。
- 根据客户端请求提供对应服务。
- 将服务结果按照 HTTP 协议格式组织并返回给客户端。
难点
- 实现一个简单 HTTP 服务器并不复杂。
- 难点在于如何实现高性能的服务器。
- 本单元将基于 Reactor 模式 实现高性能服务器。
目标:构建一个 高性能服务器基础库,作为通用组件,而不是具体的业务服务器。
1.2、Reactor 模型
概念
Reactor 模式是一种 事件驱动处理模式:
- 通过 I/O 多路复用 统一监听事件。
- 当事件触发时,将其分发(Dispatch)给对应的处理线程执行。
- 又称 Dispatcher 模式。
这是编写高性能网络服务器的核心技术之一。
分类
1. 单 Reactor 单线程
- 模型特点:单 I/O 多路复用 + 业务处理(同线程完成)
- 流程:
- I/O 多路复用监控客户端请求。
- 事件触发:
- 新连接 → 加入多路复用监控。
- 数据通信 → 读数据 → 处理 → 响应。
- 优点:实现简单,无线程间通信。
- 缺点:无法利用多核 CPU,性能瓶颈明显。
- 适用场景:少量客户端,快速处理场景。
2. 单 Reactor 多线程
- 模型特点:单 I/O 多路复用 + 线程池(业务处理)
- 流程:
- Reactor 线程监控请求。
- 新连接 → Reactor 处理并加入监控。
- 数据通信 → Reactor 读数据 → 分发给 Worker 线程池。
- Worker 处理完成 → Reactor 返回响应。
- 优点:利用多核 CPU。
- 缺点:多线程同步复杂,Reactor 本身可能成为瓶颈。
3. 多 Reactor 多线程
- 模型特点:主从 Reactor 分工 + 线程池
- 流程:
- 主 Reactor:只处理新连接请求,并分发给子 Reactor。
- 子 Reactor:监控通信事件。
- Worker 线程池:处理业务逻辑,并由子 Reactor 返回结果。
- 优点:充分利用多核 CPU,主从职责清晰,性能强大。
- 缺点:设计复杂。
目标定位
- One Thread One Loop 主从 Reactor 模型:
- 主 Reactor 仅监控监听套接字,负责高效接入新连接。
- 子 Reactor 负责通信事件处理。
- 每个线程绑定一个 EventLoop,保证线程安全。
- Worker 线程池是否使用,由组件调用方决定。
总结
- HTTP 服务器的核心是 基于 TCP + HTTP 协议解析。
- 高性能服务器的关键在于 Reactor 模型 的合理应用。
- 最终实现是一个 主从 Reactor 高性能服务器框架,并将功能拆分为模块化组件,便于扩展和复用。
二、功能模块划分
为了实现一个带有协议支持的 Reactor 高性能服务器,项目分为两大模块:
- SERVER 模块:实现 Reactor 模型的 TCP 服务器。
- 协议模块:为服务器提供应用层协议支持。
2.1、SERVER 模块
负责对连接和线程进行管理,分为三个方向:
- 监听连接管理
- 通信连接管理
- 超时连接管理
子模块
Buffer 模块
- 通信缓冲区,提供用户态接收和发送缓冲区。
Socket 模块
- 封装套接字操作。
Channel 模块
- 管理描述符的 I/O 事件(读、写、错误等)。
- 与 Poller 配合,触发事件时回调相应处理函数。
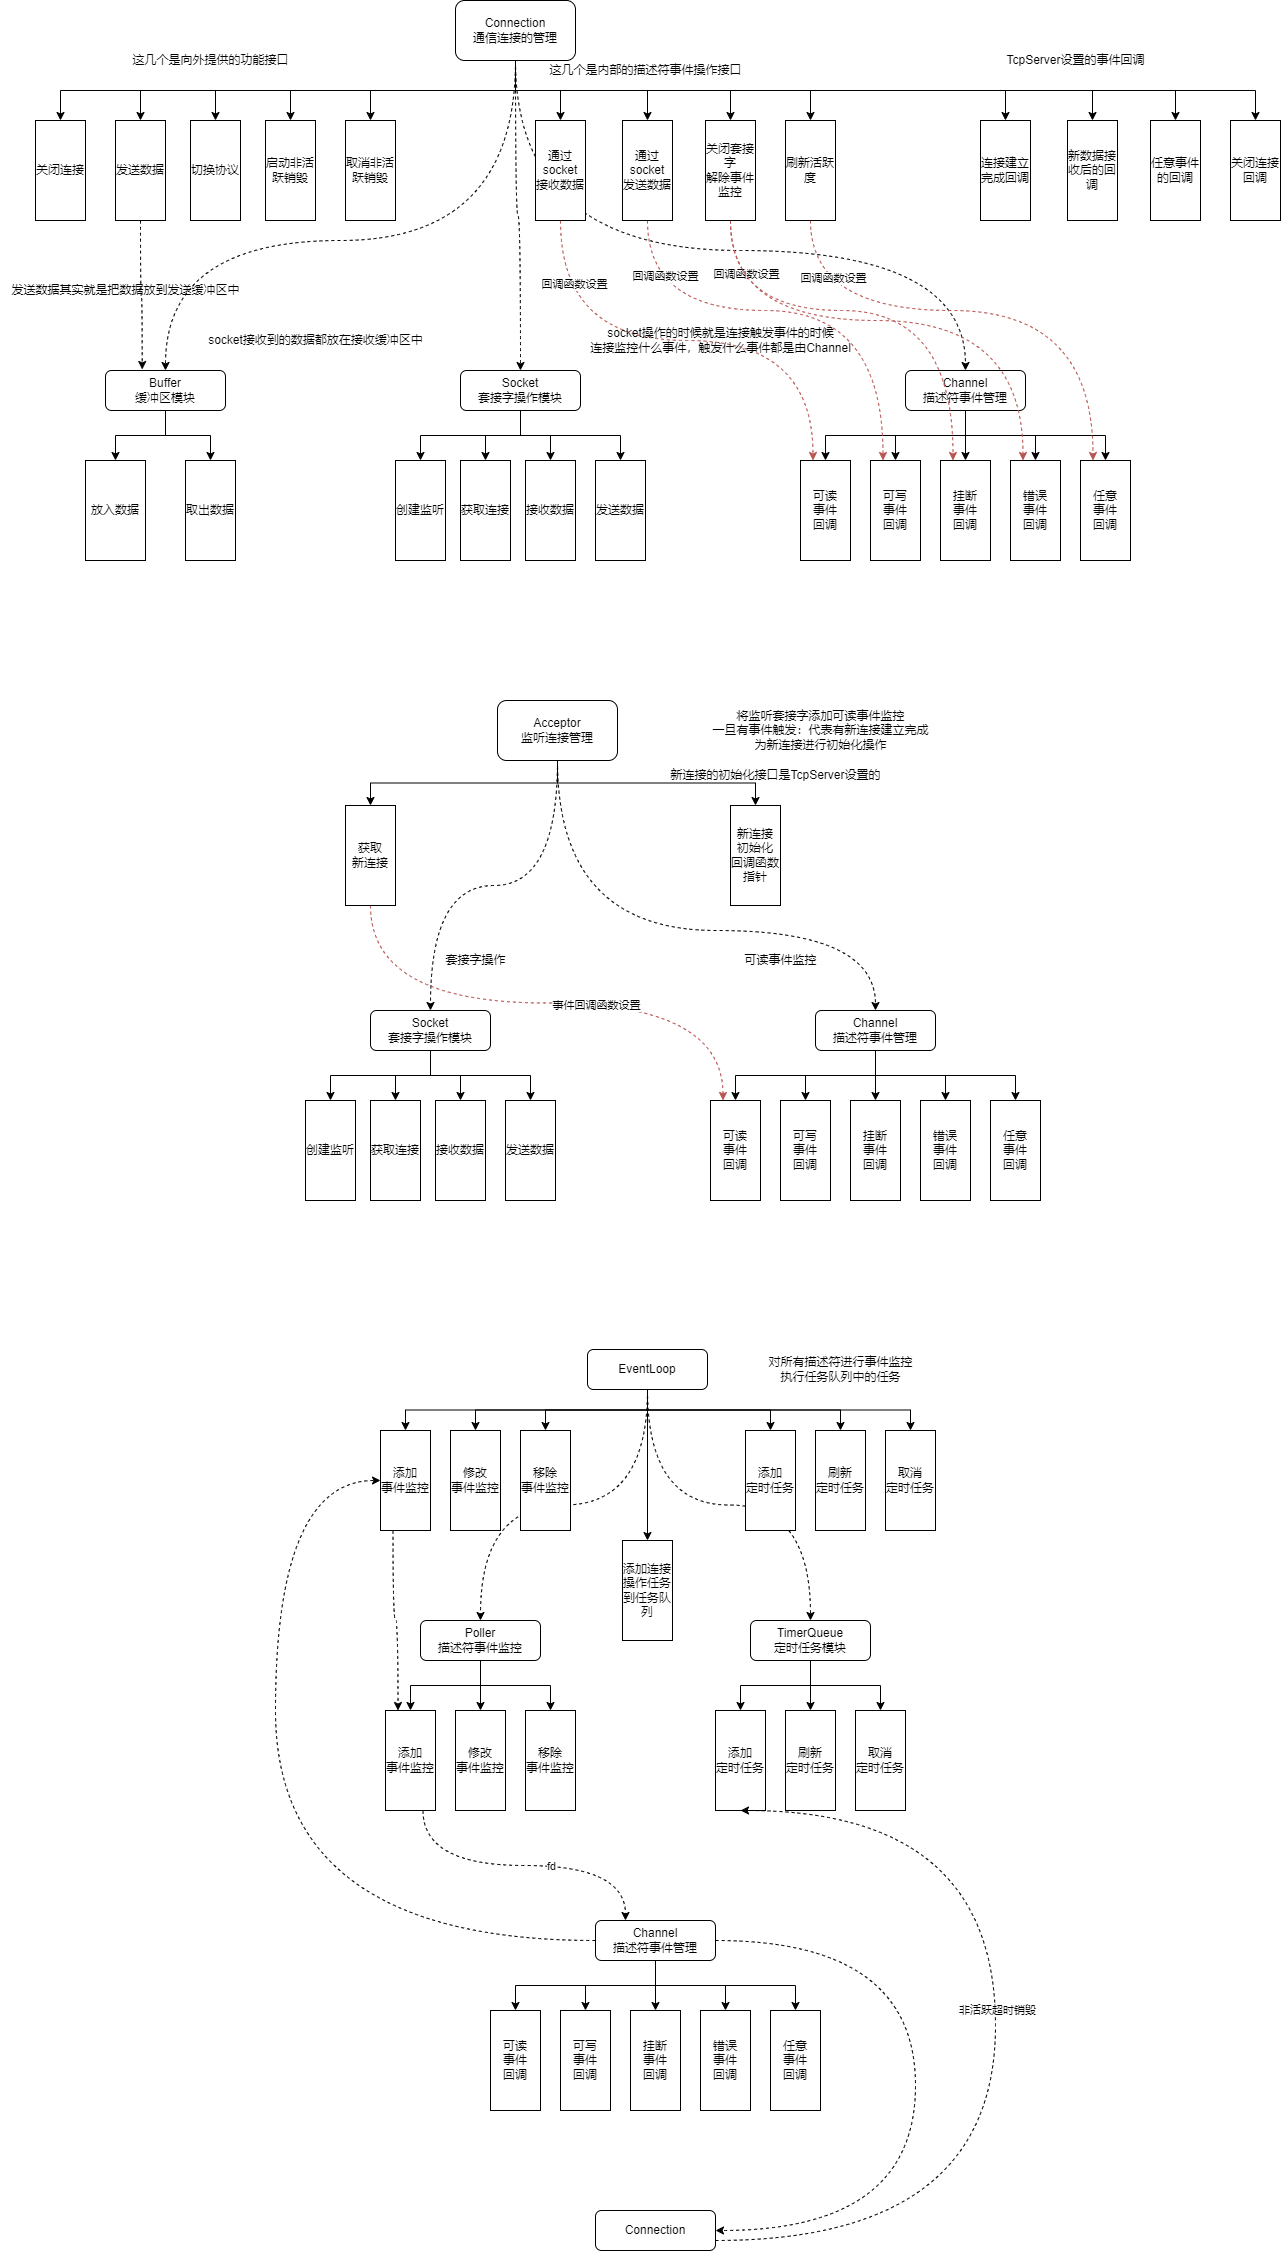
Connection 模块
- 封装 Buffer、Socket、Channel,管理一个通信套接字。
- 每个新连接由一个 Connection 管理。
- 提供:
- 回调函数(连接建立、事件、新数据、关闭)。
- 接口(数据发送、连接关闭)。
- 用户态缓冲区(接收 + 发送)。
- 处理流程:
- 注册 Channel 回调并加入 Poller 监控。
- IO 可读 → 读数据到用户缓冲区 → 调用业务回调。
- 业务处理完 → 写数据到发送缓冲区。
- Poller 通知可写 → 调用写回调 → 数据发送到内核。
Acceptor 模块
- 管理监听套接字。
- 负责获取新连接,为其创建 Connection 对象。
TimerQueue 模块
- 定时任务管理器。
- 管理 Connection 生命周期,释放超时连接。
- 基于
timerfd+Channel实现。
Poller 模块
- 封装 epoll,管理 IO 事件(添加、修改、删除、获取活跃事件)。
EventLoop 模块
- 核心 Reactor 单元,一个线程一个 EventLoop。
- 管理 Poller、TimerQueue、任务队列。
- 保证所有 Connection 操作都在其绑定线程内完成。
- 机制:
eventfd用于任务队列唤醒 epoll 阻塞。- 处理顺序:Poller 就绪事件 → Channel 回调 → 任务队列执行。
TcpServer 模块
- 封装整个 TCP 服务器:
- BaseLoop(主 Reactor)。
- EventLoopThreadPool(子 Reactor 池)。
- Acceptor(监听套接字)。
- Hash 表(管理所有 Connection)。
- 处理流程:
- 实例化时初始化 BaseLoop、Acceptor、线程池和连接表。
- Acceptor 接收新连接 → 创建 Connection → 设置回调 → 加入哈希表 → 分配 EventLoop → 设置定时销毁任务 → 加入 Poller。
- 启动 BaseLoop。
模块关系图:
2.2、HTTP 协议模块
HTTP 协议模块用于为高并发服务器提供协议支持,简化 HTTP 服务器的搭建过程。
它由多个子模块组成,每个模块负责不同的功能。
模块划分
Util 模块(工具模块)
- 作用:提供常用的工具函数,避免重复造轮子。
- 功能示例:
- URL 编解码(encode/decode)
- 文件读写操作(读取静态资源文件)
- 字符串处理(分割、去空格、大小写转换等)
➡️ 可以认为是 基础支撑库。
HttpRequest 模块(HTTP 请求数据模块)
- 作用:负责存储和管理 解析后的 HTTP 请求信息。
- 核心字段:
- 请求行(method、URL、version)
- 请求头部(headers)
- 请求正文(body,可能是 JSON/表单数据)
- 职责:
- 解析原始请求字符串
- 提供统一接口让上层业务获取请求内容
➡️ 相当于 HTTP 请求的 数据结构。
HttpResponse 模块(HTTP 响应数据模块)
- 作用:负责生成和管理 HTTP 响应数据。
- 核心字段:
- 状态行(version、status code、reason phrase)
- 响应头部(headers)
- 响应正文(body,HTML/JSON/文件内容)
- 职责:
- 设置响应码、响应头、响应体
- 将结构化数据拼装成完整的 HTTP 响应字符串
➡️ 相当于 HTTP 响应的 数据结构 + 序列化器。
HttpContext 模块(HTTP 上下文模块)
- 作用:解决 请求接收的不完整性 问题。
- 问题场景:
- TCP 是流式协议,一次
recv可能拿到的是半个请求,或者多个请求拼在一起。
- TCP 是流式协议,一次
- 职责:
- 缓存未完整的请求数据
- 持续解析,直到完整请求被解析成
HttpRequest - 管理请求解析状态(正在解析头部/正在解析 body/解析完成)
➡️ 可以理解为 请求的粘包拆包处理器。
HttpServer 模块(HTTP 服务器模块)
- 作用:对外暴露简单接口,开发者只需要关注“注册路由 + 处理逻辑”。
- 内部结构:
- TcpServer 对象:负责底层 TCP 连接、收发数据。
- 两个接口(供 TcpServer 回调):
- 连接建立成功 → 设置 HttpContext
- 数据到来 → 调用解析逻辑并触发业务回调
- 请求-处理函数映射表(hash-map):
- key: 路径(URL)或方法+路径组合
- value: 业务处理函数
- 职责:
- 接收请求
- 匹配路由
- 调用对应的业务处理函数
- 将业务结果封装成
HttpResponse并返回
➡️ 开发者只需要写业务逻辑,比如:
server.Get("/hello", [](const HttpRequest& req, HttpResponse* resp){resp->SetBody("Hello World!");resp->SetStatus(200);
});
三、C++11 技术点与功能用例
3.1 bind 概念
std::bind是通用的函数适配器。- 接受函数对象和参数,返回一个新的函数对象。
- 新函数对象的参数可以:
- 已经绑定(固定值)
- 或使用占位符
std::placeholders::_1, _2...预留,调用时传入。
函数原型
template <class Fn, class... Args>
bind(Fn&& fn, Args&&... args);
示例 1:绑定固定参数或预留参数
#include <iostream>
#include <functional>
#include <unistd.h>class Test {
public:Test() { std::cout << "构造" << std::endl; }~Test() { std::cout << "析构" << std::endl; }
};void del(const Test *t, int num) {std::cout << num << std::endl;delete t;
}int main() {Test *t = new Test;// 第1个参数固定为 t,第2个参数预留std::function<void(int)> cb = std::bind(del, t, std::placeholders::_1);cb(10); // 调用绑定函数while(1) sleep(1);return 0;
}
输出:
构造
10
析构
示例 2:任务池中的应用
#include <iostream>
#include <string>
#include <vector>
#include <functional>void print(const std::string &str) {std::cout << str << std::endl;
}int main() {using Functor = std::function<void()>;std::vector<Functor> task_pool;task_pool.push_back(std::bind(print, "我是"));task_pool.push_back(std::bind(print, "大"));task_pool.push_back(std::bind(print, "帅哥"));for (auto &functor : task_pool) {functor();}return 0;
}
输出:
我是
大
帅哥
总结
-
std::bind 用于生成可调用对象并绑定参数。
-
占位符 _1, _2… 用于预留参数。
-
在任务池/线程池中,可用 bind 将函数任务封装,降低耦合度。
这种格式特点:
- 标题层次分明(概念 → 示例 → 总结)
- 示例代码独立清晰
- 输出结果紧跟代码块
- 便于快速查阅和复制
3.2 Linux 定时器 timerfd
创建定时器
Linux 提供timerfd_create 创建定时器:
#include <sys/timerfd.h>int timerfd_create(int clockid, int flags);
-
clockid-
CLOCK_REALTIME:系统实时时间,修改系统时间会影响定时器。 -
CLOCK_MONOTONIC:从开机到现在的相对时间,不受系统时间修改影响。
-
-
flags:通常为 0(阻塞模式)。
设置定时器时间
int timerfd_settime(int fd, int flags, struct itimerspec *new_value, struct itimerspec *old_value);
-
fd:timerfd_create 返回的文件描述符 -
flags:0 表示相对时间,1 表示绝对时间 -
struct itimerspec:
struct timespec {time_t tv_sec;   // 秒long tv_nsec;    // 纳秒
};struct itimerspec {struct timespec it_interval; // 第一次之后的超时间隔struct timespec it_value;    // 第一次超时时间
};
当定时器超时时,会在 fd 写入 8 字节整数,表示自上次读取后超时次数。
示例:每隔 3 秒触发一次
#include <iostream>
#include <unistd.h>
#include <sys/timerfd.h>int main() {int timerfd = timerfd_create(CLOCK_MONOTONIC, 0);struct itimerspec itm;itm.it_value.tv_sec = 3;itm.it_value.tv_nsec = 0;itm.it_interval.tv_sec = 3;itm.it_interval.tv_nsec = 0;timerfd_settime(timerfd, 0, &itm, NULL);time_t start = time(NULL);while (1) {uint64_t tmp;int ret = read(timerfd, &tmp, sizeof(tmp));if (ret < 0) return -1;std::cout << tmp << " " << time(NULL) - start << std::endl;}close(timerfd);return 0;
}
输出:
1 3
1 6
1 9
1 12
3.3 时间轮思想
问题
遍历所有连接判断超时,效率低。
解决方法:
-
小根堆
-
时间轮
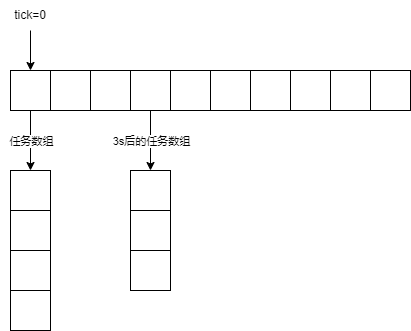
原理
-
类似钟表:
-
数组表示时间槽,每秒 tick 向后走一步。
-
将任务放入 (tick + delay) 的槽位。
-
-
同一时间槽可以有多个任务。
-
支持多层时间轮(秒轮、分轮、时轮),但 30 秒以内的定时任务通常只需单层时间轮。
延迟任务 + 智能指针
-
利用 shared_ptr 管理任务:
-
刷新任务时增加计数,旧任务失效。
-
计数为 0 时真正析构,执行定时任务。
-
定时任务类设计
using OnTimerCallback = std::function<void()>;
using ReleaseCallback = std::function<void()>;class Timer {
private:int _timeout;bool _canceled = false;uint64_t _timer_id;OnTimerCallback _timer_callback;ReleaseCallback _release_callback;public:Timer(uint64_t timer_id, int timeout): _timer_id(timer_id), _timeout(timeout) {}~Timer() {if (_release_callback) _release_callback();if (_timer_callback && !_canceled) _timer_callback();}int delay_time() { return _timeout; }void canceled() { _canceled = true; }void set_on_time_callback(const OnTimerCallback &cb) { _timer_callback = cb; }void set_release_callback(const ReleaseCallback &cb) { _release_callback = cb; }
};
时间轮实现
#define MAX_TIMEOUT 60class TimerQueue {
private:using PtrTimer = std::shared_ptr<Timer>;using WeakTimer = std::weak_ptr<Timer>;using Bucket = std::vector<PtrTimer>;using BucketList = std::vector<Bucket>;int _tick = 0;int _capacity = MAX_TIMEOUT;BucketList _conns;std::unordered_map<uint64_t, WeakTimer> _timers;public:TimerQueue(): _tick(0), _capacity(MAX_TIMEOUT), _conns(_capacity) {}bool has_timer(uint64_t id) {return _timers.find(id) != _timers.end();}void timer_add(const OnTimerCallback &cb, int delay, uint64_t id) {if (delay <= 0 || delay > _capacity) return;PtrTimer timer(new Timer(id, delay));timer->set_on_time_callback(cb);timer->set_release_callback(std::bind(&TimerQueue::remove_weaktimer_from_timerqueue, this, id));_timers[id] = WeakTimer(timer);_conns[(_tick + delay) % _capacity].push_back(timer);}void timer_refresh(uint64_t id) {auto it = _timers.find(id);assert(it != _timers.end());int delay = it->second.lock()->delay_time();_conns[(_tick + delay) % _capacity].push_back(it->second.lock());}void timer_cancel(uint64_t id) {auto it = _timers.find(id);assert(it != _timers.end());if (auto pt = it->second.lock()) pt->canceled();}void remove_weaktimer_from_timerqueue(uint64_t id) {_timers.erase(id);}void run_ontime_task() {_tick = (_tick + 1) % _capacity;_conns[_tick].clear();}
};
使用示例
class TimerTest {
private:int _data;
public:TimerTest(int data): _data(data) { std::cout << "test 构造!\n"; }~TimerTest() { std::cout << "test 析构!\n"; }
};void del(TimerTest *t) { delete t; }int main() {TimerQueue tq;TimerTest *t = new TimerTest(10);int id = 3;tq.timer_add(std::bind(del, t), 5, id);// 刷新定时任务for (int i = 0; i < 5; i++) {sleep(1);tq.timer_refresh(id);std::cout << "刷新了1下定时任务!\n";tq.run_ontime_task();}std::cout << "刷新停止, 5s后释放任务将被执行\n";while (1) {sleep(1);tq.run_ontime_task();if (!tq.has_timer(id)) {std::cout << "定时任务已执行完毕!\n";break;}}return 0;
}
输出:
test 构造!
刷新了1下定时任务!
刷新了1下定时任务!
刷新了1下定时任务!
刷新了1下定时任务!
刷新了1下定时任务!
刷新停止, 5s后释放任务将被执行
test 析构!
总结
-
利用 timerfd 可以实现秒级定时器。
-
单层时间轮高效管理大量定时任务。
-
利用 shared_ptr 延迟任务析构,实现刷新任务逻辑。
-
适合高并发服务器中处理连接超时问题。
3.4 C++ 正则库()的简单使用
正则表达式(Regular Expression)是一种描述字符串匹配模式的工具。它可以用来:
-
检查字符串是否包含某种子串
-
替换匹配的子串
-
提取符合条件的子串
在 HTTP 请求解析中,正则表达式可以让程序逻辑更简洁灵活。不过需要注意,正则表达式通常比直接字符串处理效率低。
HTTP 请求首行解析
下面示例演示如何使用正则表达式解析 HTTP 请求首行:
#include <iostream>
#include <string>
#include <regex>void req_line() {std::cout << "------------------first line start-----------------\n";std::string str = "GET /hello?a=b&c=d HTTP/1.1\r\n";std::regex re("(GET|HEAD|POST|PUT|DELETE) (([^?]+)(?:\\?(.*?))?) (HTTP/1\\.[01])(?:\r\n|\n)");std::smatch matches;std::regex_match(str, matches, re);for (int i = 0; i < matches.size(); ++i) {std::cout << i << ": " << matches[i] << std::endl;}if (matches[4].length() > 0) {std::cout << "have param!\n";} else {std::cout << "have not param!\n";}std::cout << "------------------first line end-----------------\n";
}int main() {req_line();return 0;
}
输出示例:
------------------first line start-----------------
0: GET /hello?a=b&c=d HTTP/1.1
1: GET
2: /hello?a=b&c=d
3: /hello
4: a=b&c=d
5: HTTP/1.1
have param!
------------------first line end-----------------matches 的存储说明:
matches[0]:整体首行
matches[1]:请求方法
matches[2]:整体 URL
matches[3]:路径(? 之前)
matches[4]:查询字符串
matches[5]:HTTP 协议版本
提取请求方法
void method_match(const std::string str) {std::cout << "------------------method start-----------------\n";std::regex re("(GET|HEAD|POST|PUT|DELETE) .*");std::smatch matches;std::regex_match(str, matches, re);std::cout << matches[0] << std::endl; // 整行std::cout << matches[1] << std::endl; // 方法std::cout << "------------------method over------------------\n";
}
提取请求路径
void path_match(const std::string str) {std::cout << "------------------path start------------------\n";std::regex re("([^?]+).*");  // 匹配 ? 前的路径std::smatch matches;std::regex_match(str, matches, re);std::cout << matches[0] << std::endl;std::cout << matches[1] << std::endl;std::cout << "------------------path over------------------\n";
}
提取查询字符串
void query_match(const std::string str) {std::cout << "------------------query start------------------\n";std::regex re("(?:\\?(.*?))? .*"); std::smatch matches;std::regex_match(str, matches, re);std::cout << matches[0] << std::endl;std::cout << matches[1] << std::endl;std::cout << "------------------query over------------------\n";
}
(\\?(.*?))? 表示匹配以 ? 开头的查询字符串(可能没有)。
提取协议版本
void version_match(const std::string str) {std::cout << "------------------version start------------------\n";std::regex re("(HTTP/1\\.[01])(?:\r\n|\n)");std::smatch matches;std::regex_match(str, matches, re);std::cout << matches[0] << std::endl;std::cout << matches[1] << std::endl;std::cout << "------------------version over------------------\n";
}
完整示例
int main() {req_line();method_match("GET /s");path_match("/search?name=bitejiuyeke ");query_match("?name=xiaoming&age=19 HTTP/1.1");version_match("HTTP/1.1\r\n");return 0;
}
输出示例:
------------------first line start-----------------
0: GET /bitejiuyeke?a=b&c=d HTTP/1.1
1: GET
2: /bitejiuyeke?a=b&c=d
3: /bitejiuyeke
4: a=b&c=d
5: HTTP/1.1
have param!
------------------first line end-----------------
------------------method start-----------------
GET /s
GET
------------------method over------------------
------------------path start------------------
/search?name=bitejiuyeke
/search
------------------path over------------------
------------------query start------------------
?name=xiaoming&age=19 HTTP/1.1
name=xiaoming&age=19
------------------query over------------------
------------------version start------------------
HTTP/1.1
HTTP/1.1
------------------version over------------------
总结
-
可以方便地解析 HTTP 请求首行、路径、查询字符串和版本号。
-
捕获组 () 可以获取匹配的子字符串。
-
非捕获组 (?:…) 用于匹配但不捕获。
-
懒惰匹配 *? 可以确保只匹配第一次出现的内容。
-
正则表达式虽然灵活,但性能通常低于直接字符串操作。
3.5 C++ 通用类型 Any 的实现与使用
在网络编程中,每个 Connection 对象都需要管理协议处理的上下文。为了降低耦合度,上下文不能依赖具体协议,需要一个通用类型来存储任意数据结构。
在 C 语言中,可以使用 void*,但在 C++ 中,我们可以使用 C++17 提供的 std::any,或者自己实现一个简单的 Any 类型。
Any 类型的简单实现
原理:
-
定义一个基类 placeholder,提供虚函数 type() 和 clone()。
-
定义模板子类 holder 保存实际类型的数据。
-
Any 类持有 placeholder*,在运行时管理不同类型的数据。
#include <iostream>
#include <string>
#include <cassert>
#include <typeinfo>class Any {
public:Any() : _content(nullptr) {}template<typename T>Any(const T &val) : _content(new holder<T>(val)) {}Any(const Any &other) : _content(other._content ? other._content->clone() : nullptr) {}~Any() { if (_content) delete _content; }const std::type_info &type() { return _content ? _content->type() : typeid(void); }template<typename T>T* get() {assert(typeid(T) == _content->type());return &((holder<T>*)_content)->val;}template<typename T>Any& operator=(const T &val) {Any(val).swap(*this);return *this;}Any& operator=(Any other) {other.swap(*this);return *this;}private:class placeholder {public:virtual ~placeholder() {}virtual const std::type_info &type() = 0;virtual placeholder *clone() = 0;};template <typename T>class holder : public placeholder {public:holder(const T &v) : val(v) {}const std::type_info &type() { return typeid(T); }placeholder *clone() { return new holder(val); }T val;};void swap(Any &other) { std::swap(_content, other._content); }placeholder *_content;
};
测试Any类型
class Test {
public:std::string _data;Test(const std::string &data) : _data(data) { std::cout << "构造" << _data << std::endl; }Test(const Test &other) { _data = other._data; std::cout << "拷贝" << _data << std::endl; }~Test() { std::cout << "析构" << _data << std::endl; }
};int main() {// 基本类型Any any_a = 10;Any any_b = 20.5f;Any any_c = std::string("Hello World");std::cout << *any_a.get<int>() << std::endl;std::cout << *any_b.get<float>() << std::endl;std::cout << *any_c.get<std::string>() << std::endl;// 对象类型Test d("Leihou");Any any_d = d;Any any_e(d);Any any_f(any_d);Any any_g = any_d;// 不同类型的赋值Any any_h;any_h = 33;std::cout << *any_h.get<int>() << std::endl;any_h = std::string("Hello Any");std::cout << *any_h.get<std::string>() << std::endl;any_h = Any(Test("test"));std::cout << any_h.get<Test>()->_data << std::endl;return 0;
}
输出示例:
10
20.5
Hello World
构造Leihou
拷贝Leihou
拷贝Leihou
拷贝Leihou
拷贝Leihou
析构Leihou
析构Leihou
析构Leihou
析构Leihou
析构Leihou
33
Hello Any
构造test
拷贝test
析构test
test
析构test
C++17 中的 std::any 使用
C++17 提供了标准的 std::any,使用起来更简洁,不需要手动实现:
#include <iostream>
#include <string>
#include <any>class Test {
public:std::string _data;Test(const std::string &data) : _data(data) { std::cout << "构造" << _data << std::endl; }Test(const Test &other) { _data = other._data; std::cout << "拷贝" << _data << std::endl; }~Test() { std::cout << "析构" << _data << std::endl; }
};int main() {std::any a = 10;std::any b = 88.88;std::any c = std::string("bitejiuyeke");std::cout << *std::any_cast<int>(&a) << std::endl;std::cout << *std::any_cast<double>(&b) << std::endl;std::cout << *std::any_cast<std::string>(&c) << std::endl;Test d("Leihou");std::any any_d = d;std::any any_f;any_f = 33;std::cout << *std::any_cast<int>(&any_f) << std::endl;std::string s = "Hello World";any_f = s;std::cout << *std::any_cast<std::string>(&any_f) << std::endl;any_f = std::any(Test("test"));std::cout << std::any_cast<Test>(&any_f)->_data << std::endl;return 0;
}
注意:使用 std::any 需要 C++17 支持,推荐 g++ 7.3 及以上版本。