详解mcp以及agent java应用架构设计与实现
文章目录
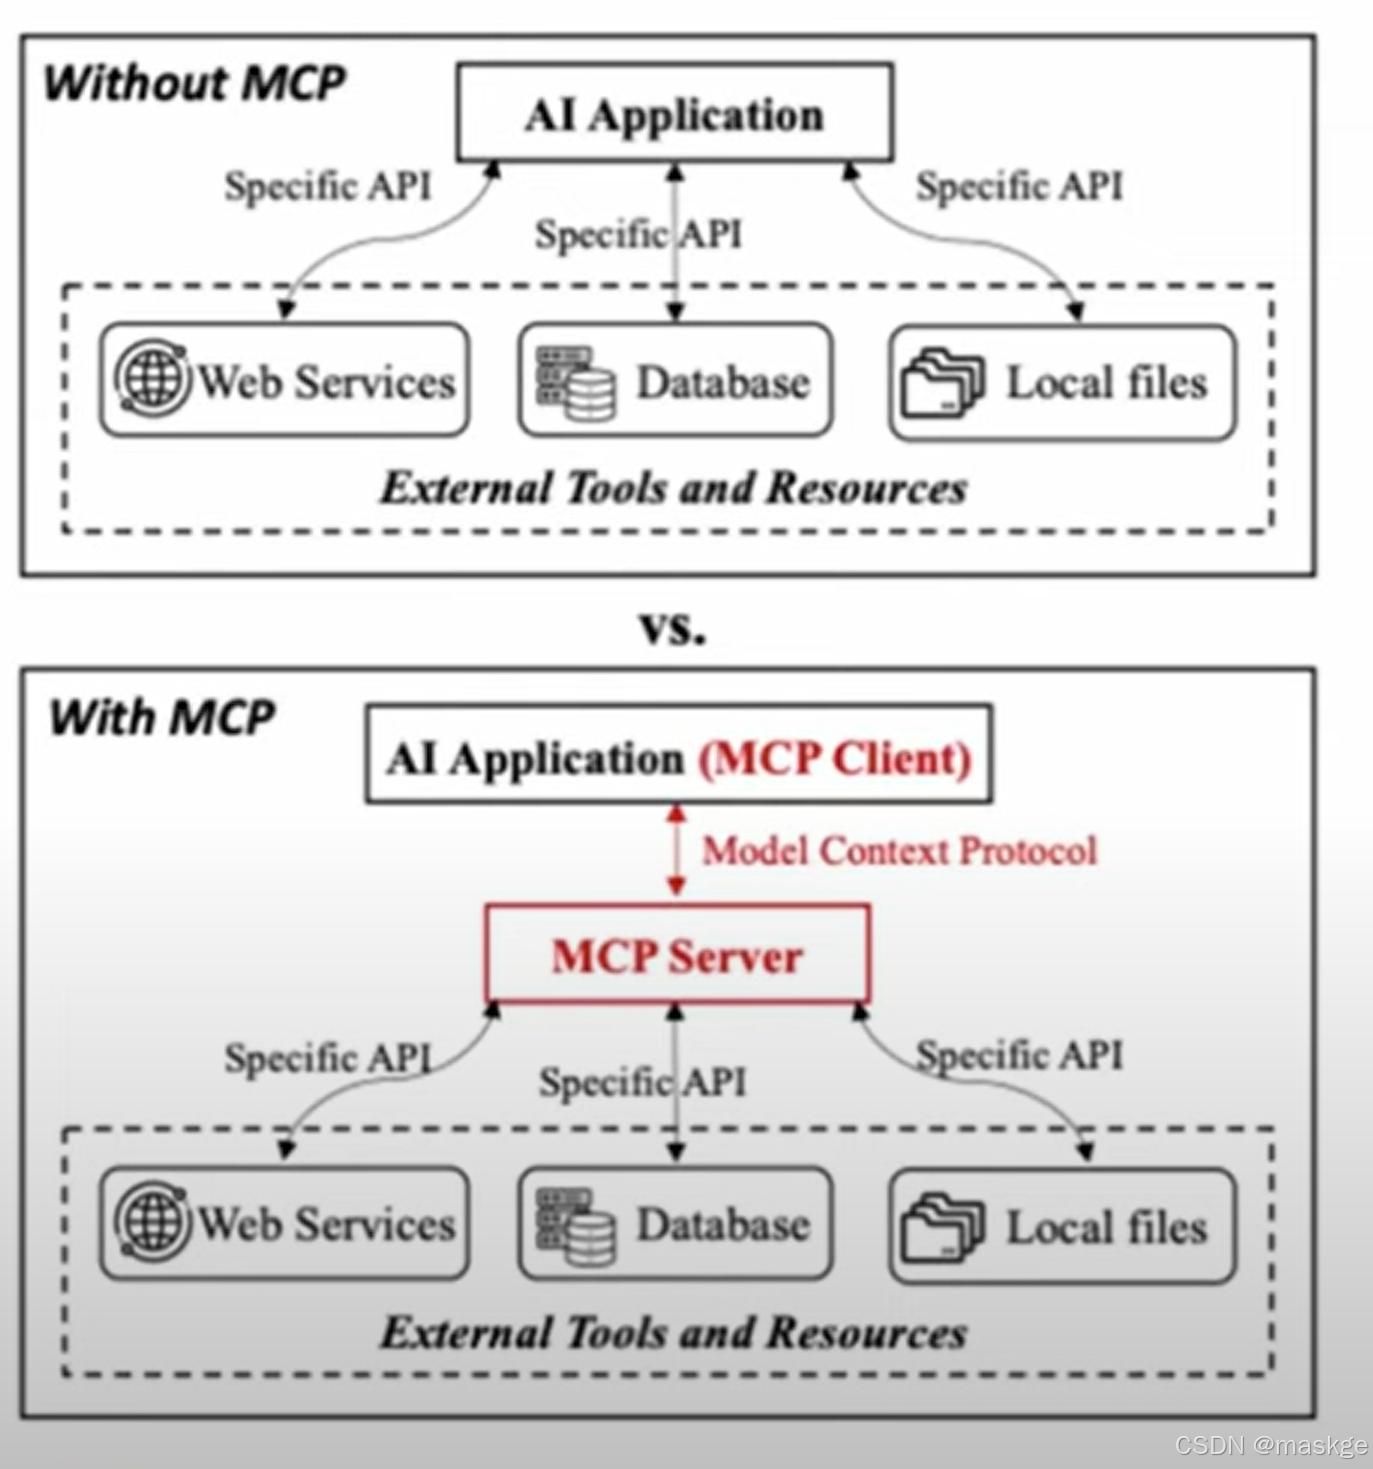
- 1.MCP概念
- 2.MCP服务端主要能力
- 3.MCP技术生态
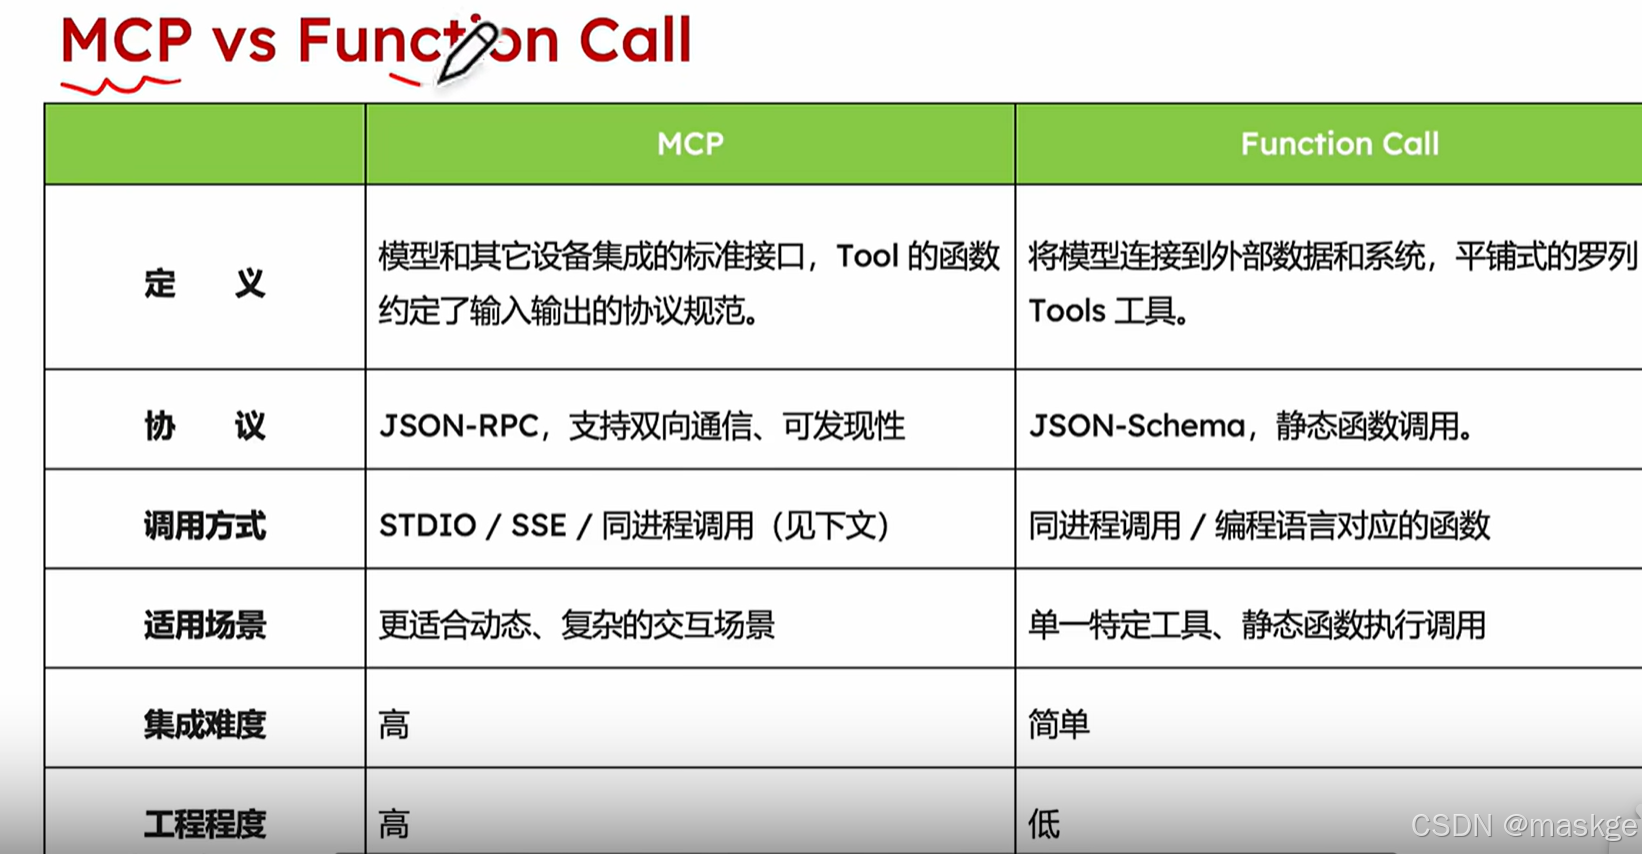
- 4.MCP与Function call区别
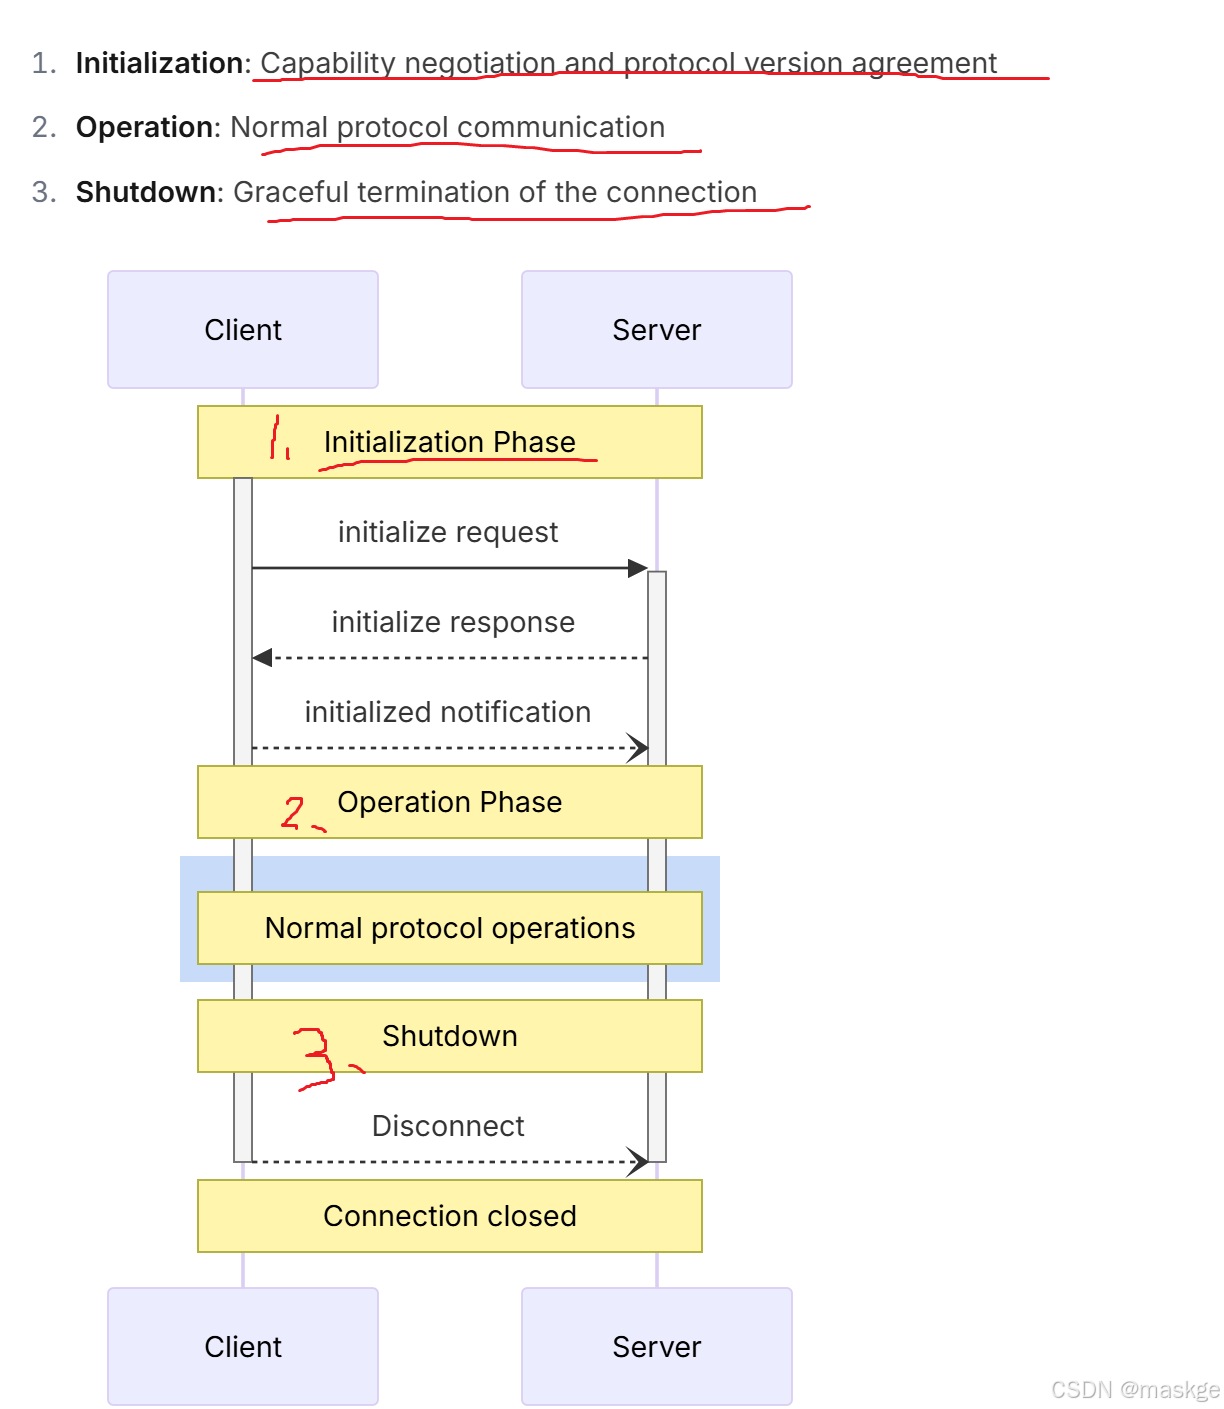
- 5.MCP生命周期
- 6.MCP java SDK
- 7.MCP应用场景
- 8.基于springAI+ollma+阿里qianwen+mcp设计私有AIAgent应用实现
- 9.AI java项目落地技术选型
- 10.构建AI Agent四大模块
- 11.LLM(大模型)与MCP之间关系
- 12.A2A、MCP、Kafka、Flink协同工作方法
- 13.事件驱动多智能体
- 14.flink+kafka+MCP+LLM(gemini Ai ) 应用架构demo:使用Gemini AI Agent进行实时数据处理
1.MCP概念
-
MCP(模型上下文协议):
-
mcpserver
-
mcp client
-
tools
-
Communication&tools
-
-
提供标准方式的连接AI模型
2.MCP服务端主要能力
- Resources: 可被客户端读取的类文件数据(如 API 响应或文件内容)
- Tools: 大语言模型(需获得用户许可)可调用的函数
- Prompts: 有助于用户完成特定任务的预写模板
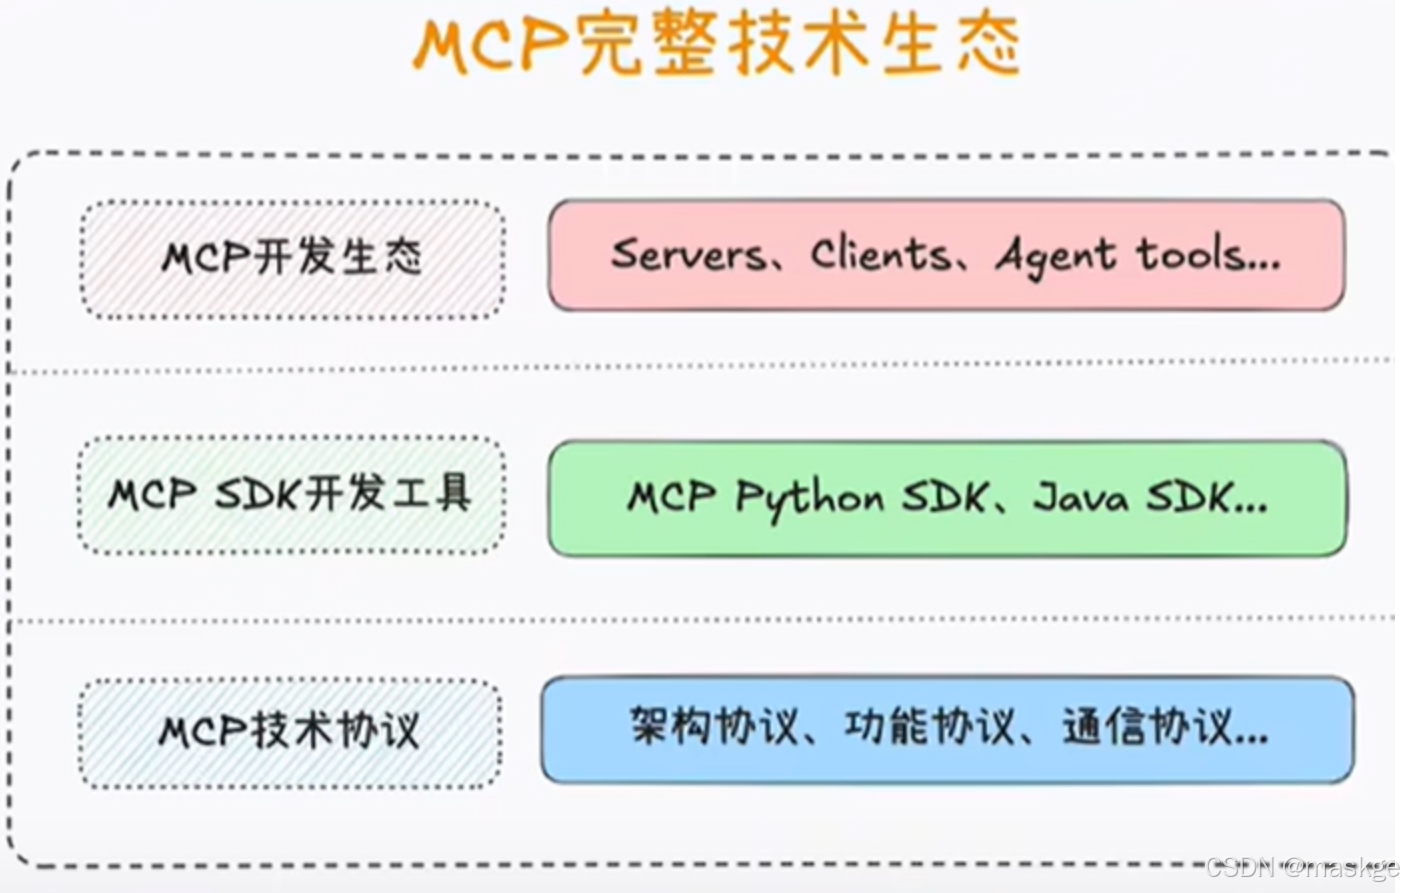
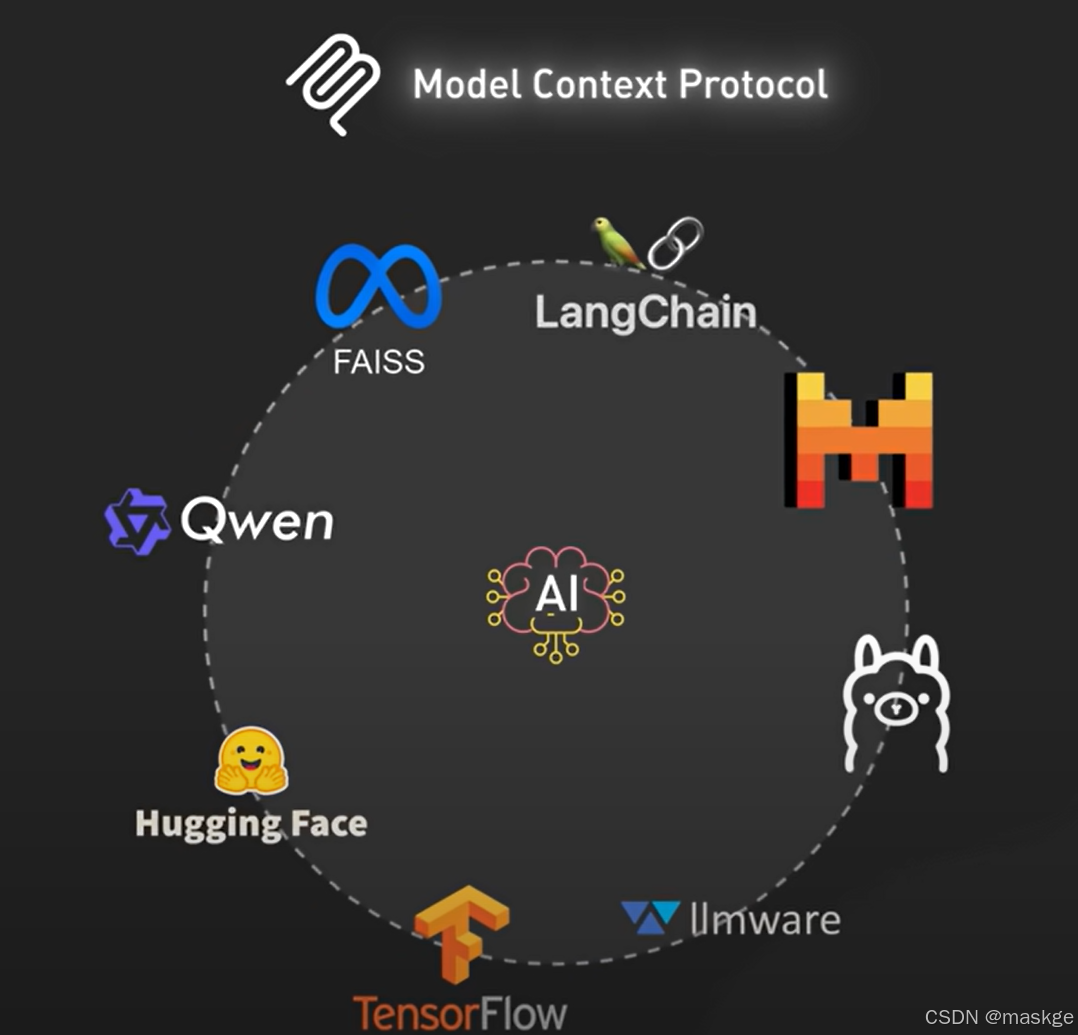
3.MCP技术生态
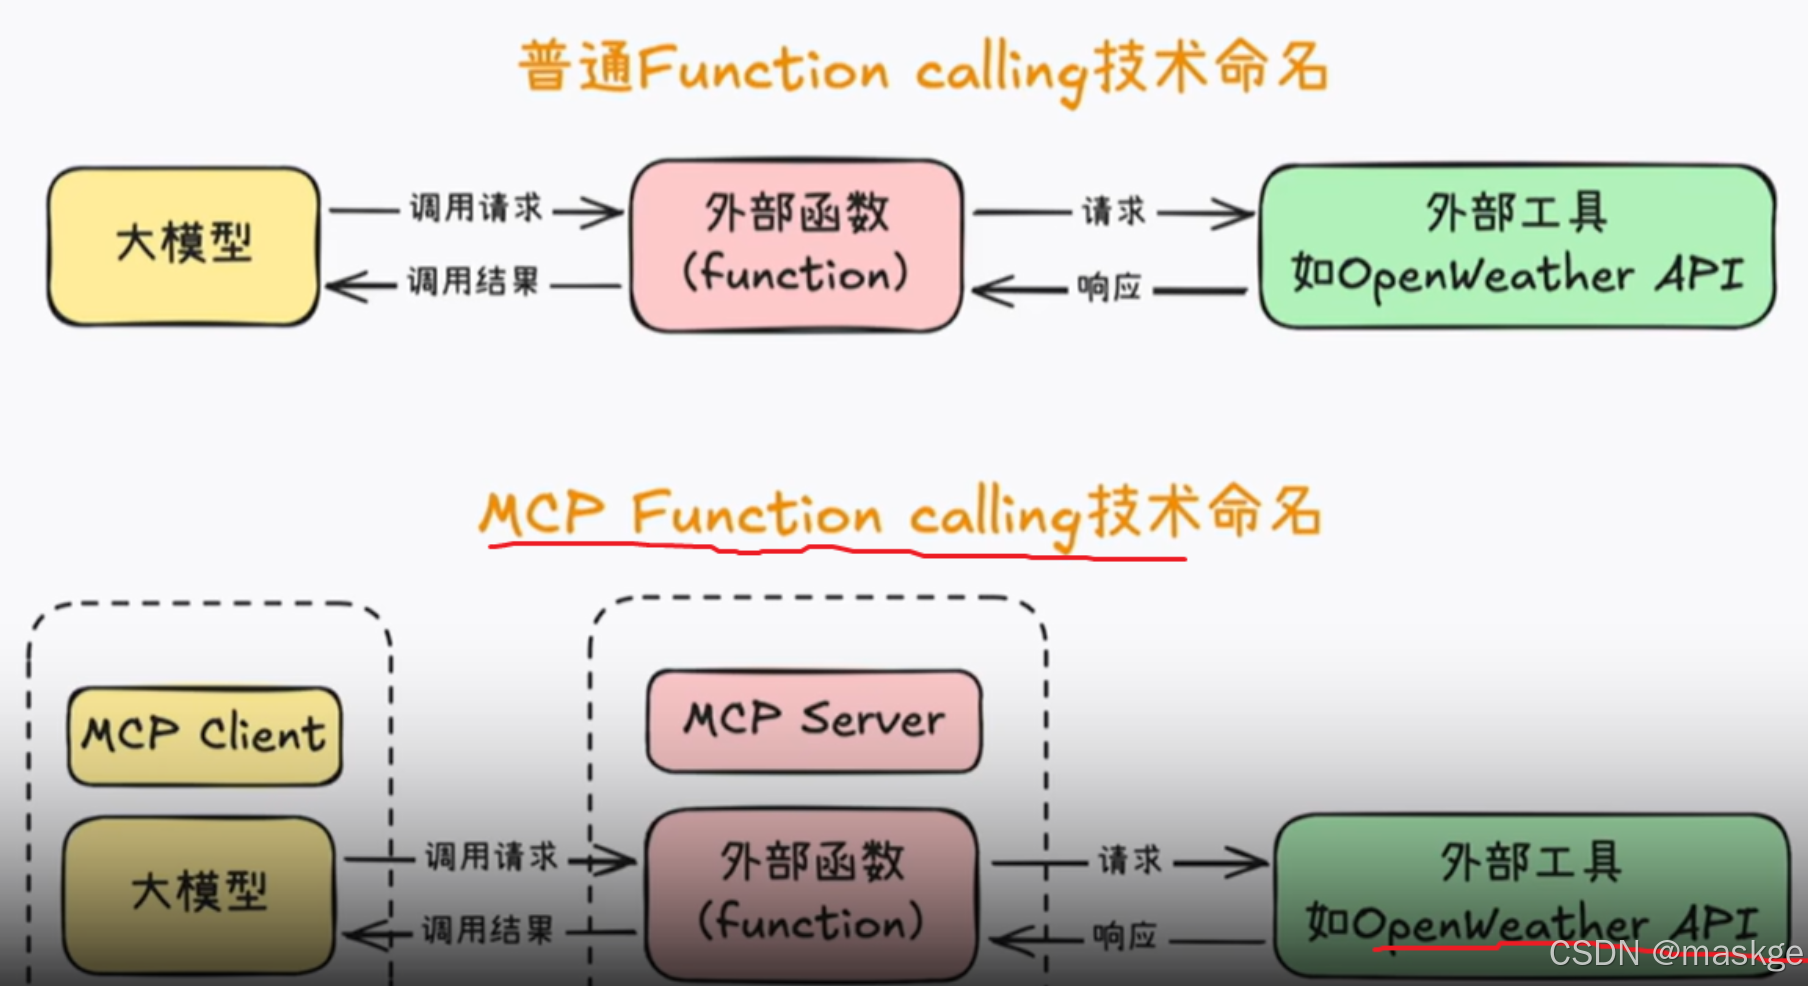
4.MCP与Function call区别
5.MCP生命周期
6.MCP java SDK
https://github.com/modelcontextprotocol/java-sdk
支持以下功能:
- Creating MCP servers that expose tools, resources, and prompts
- Building MCP clients that can connect to any MCP server
- Local and Remote transport protocols
- Protocol compliance with type safety
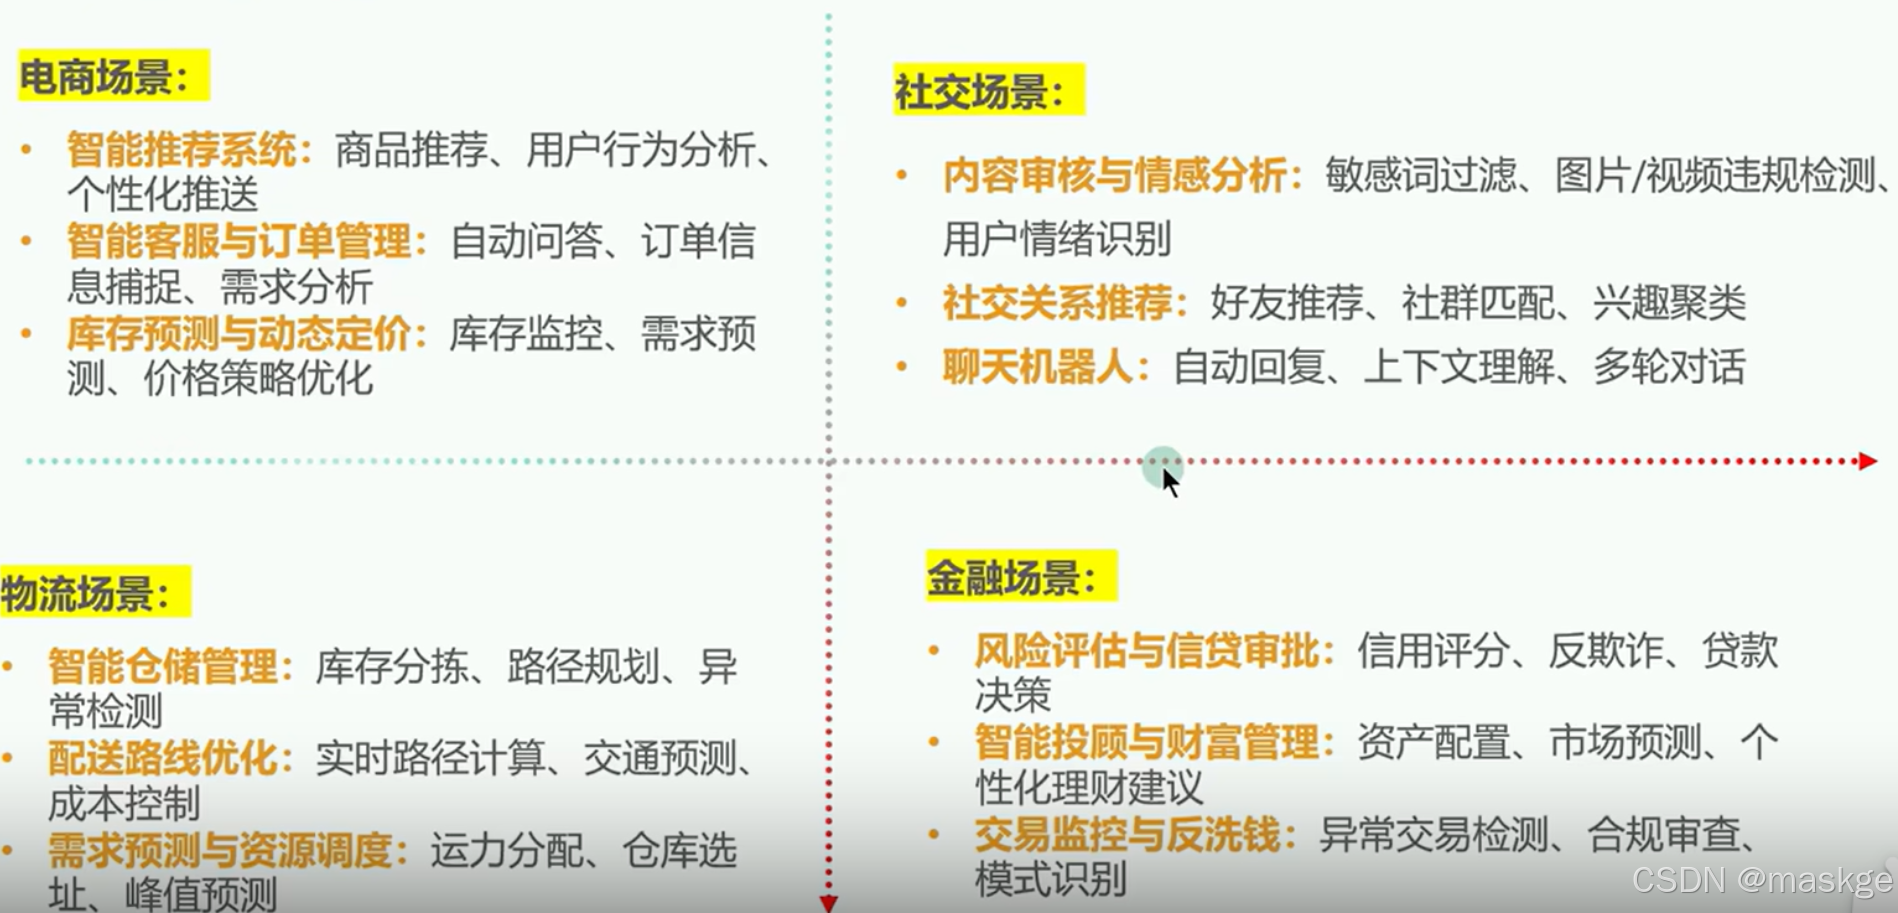
7.MCP应用场景
- 自动预约
- 更新客户记录
- 接入database
- 发送文件
- 处理在线支付
- 处理邮件
8.基于springAI+ollma+阿里qianwen+mcp设计私有AIAgent应用实现
1.安装本地ollama,基于ollma拉取qianwen大模型,详见关于利用ollama 与deepseek r1大模型搭建本地知识库
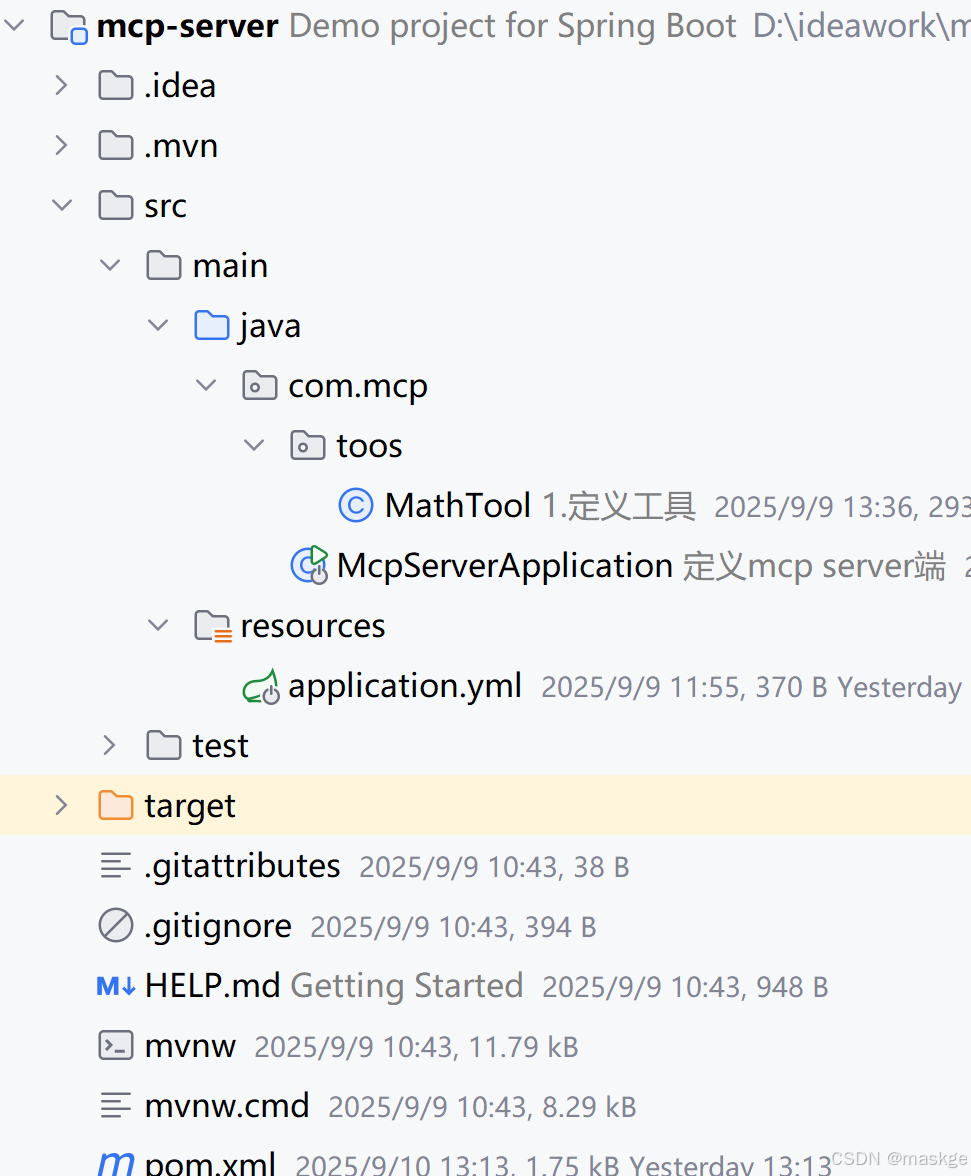
2.搭建mcp客户端与服务端
mcp服务端代码实现:
server端pom.xml配置如下:
<?xml version="1.0" encoding="UTF-8"?>
<project xmlns="http://maven.apache.org/POM/4.0.0" xmlns:xsi="http://www.w3.org/2001/XMLSchema-instance"xsi:schemaLocation="http://maven.apache.org/POM/4.0.0 https://maven.apache.org/xsd/maven-4.0.0.xsd"><modelVersion>4.0.0</modelVersion><parent><groupId>org.springframework.boot</groupId><artifactId>spring-boot-starter-parent</artifactId><version>3.5.5</version><relativePath/> <!-- lookup parent from repository --></parent><groupId>com.mcp</groupId><artifactId>mcp-server</artifactId><version>0.0.1-SNAPSHOT</version><name>mcp-server</name><description>Demo project for Spring Boot</description><url/><licenses><license/></licenses><developers><developer/></developers><scm><connection/><developerConnection/><tag/><url/></scm><properties><java.version>17</java.version><spring-ai.version>1.0.1</spring-ai.version></properties><dependencies><!--配置springAI mcpserver--><dependency><groupId>org.springframework.ai</groupId><artifactId>spring-ai-starter-mcp-server-webmvc</artifactId></dependency><dependency><groupId>org.springframework.boot</groupId><artifactId>spring-boot-starter-test</artifactId><scope>test</scope></dependency></dependencies><dependencyManagement><dependencies><dependency><groupId>org.springframework.ai</groupId><artifactId>spring-ai-bom</artifactId><version>${spring-ai.version}</version><type>pom</type><scope>import</scope></dependency></dependencies></dependencyManagement><build><plugins><plugin><groupId>org.springframework.boot</groupId><artifactId>spring-boot-maven-plugin</artifactId></plugin></plugins></build></project>
java代码实现如下:
package com.mcp.toos;import org.springframework.ai.tool.annotation.Tool;/*** 1.定义工具*/public class MathTool {@Tool(name = "数字计算工具", description = "两个数字相加")public  Integer add(Integer a,Integer b){return  a+b;}
}package com.mcp;import com.mcp.toos.MathTool;
import org.springframework.ai.tool.ToolCallbackProvider;
import org.springframework.ai.tool.method.MethodToolCallbackProvider;
import org.springframework.boot.SpringApplication;
import org.springframework.boot.autoconfigure.SpringBootApplication;
import org.springframework.context.annotation.Bean;/*** 定义mcp server端*/
@SpringBootApplication
public class McpServerApplication {public static void main(String[] args) {SpringApplication.run(McpServerApplication.class, args);}/*** 2.注册MathTool到spring容器中* @return*/@Beanpublic ToolCallbackProvider mathTool(){return MethodToolCallbackProvider.builder().toolObjects(new MathTool()).build();}}
application.yml
spring:application:name: mcp-serverai:mcp:server:enabled: truename: mcp-serverversion: 1.0.0sse-endpoint: /api/v1/ssesse-message-endpoint: /api/v1/mcpcapabilities:tool: true
logging:level:io.modelcontextprotocol: TRACEorg.springframework.ai.mcp: TRACE
mcp客户端代码实现如下:
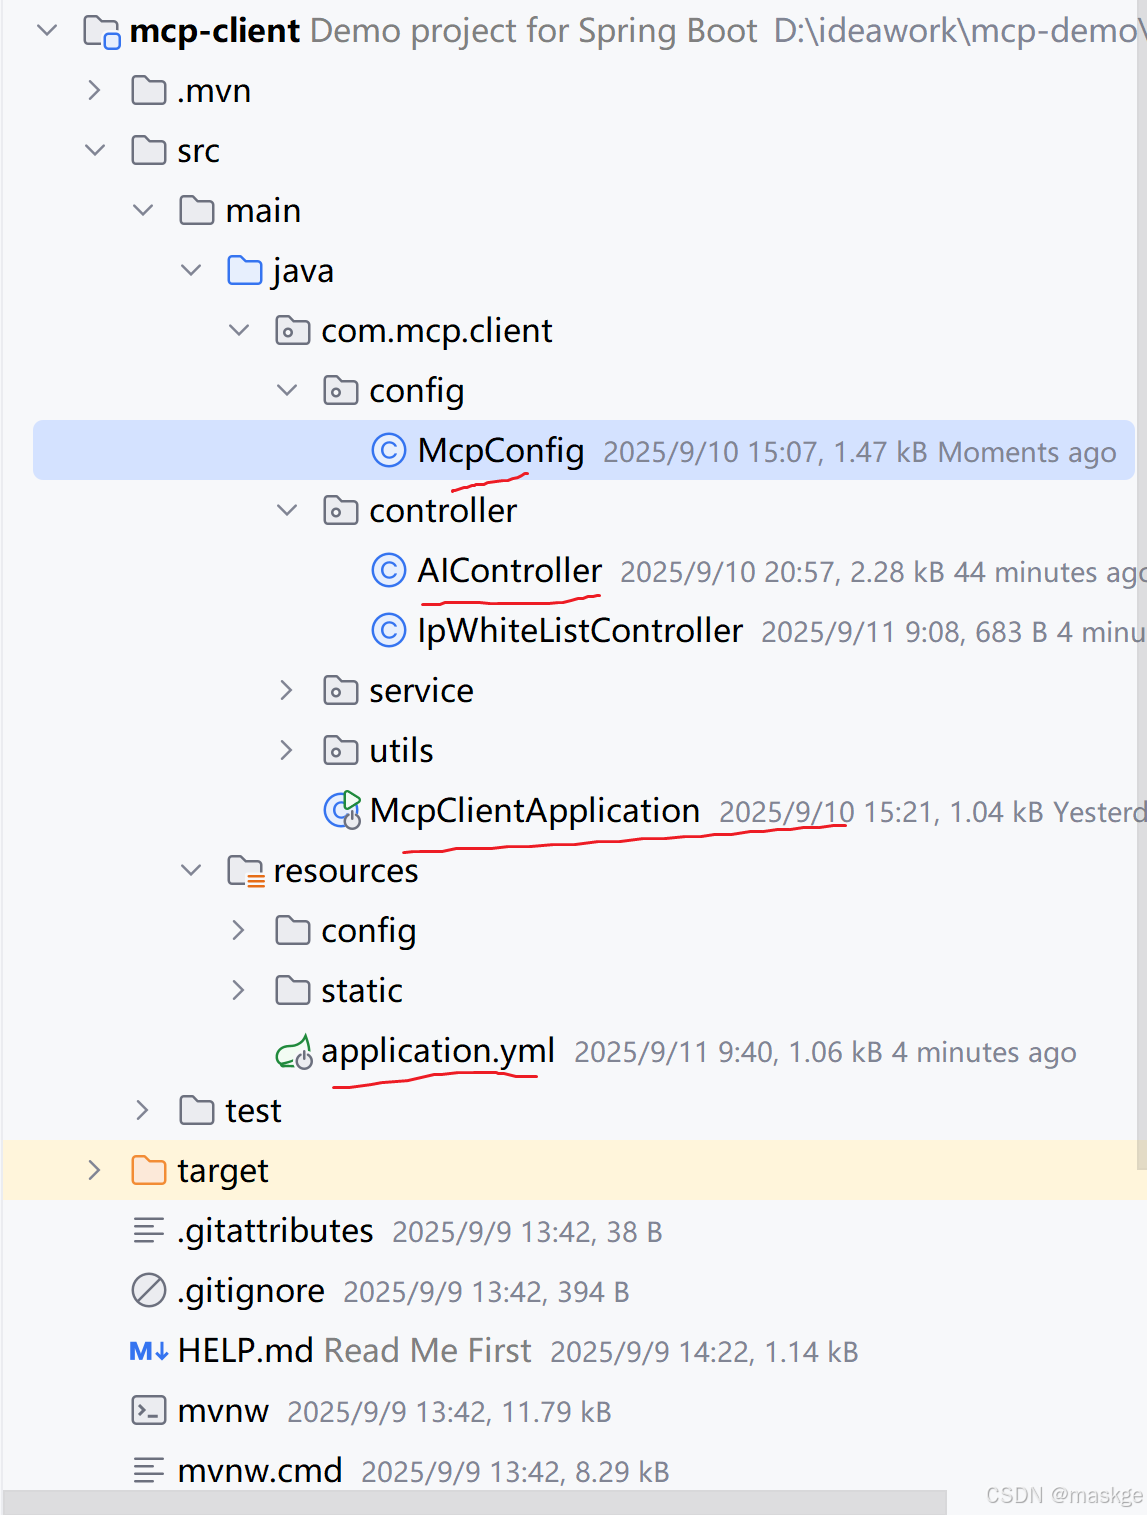
客户端pom.xml配置如下:
<?xml version="1.0" encoding="UTF-8"?>
<project xmlns="http://maven.apache.org/POM/4.0.0" xmlns:xsi="http://www.w3.org/2001/XMLSchema-instance"xsi:schemaLocation="http://maven.apache.org/POM/4.0.0 https://maven.apache.org/xsd/maven-4.0.0.xsd"><modelVersion>4.0.0</modelVersion><parent><groupId>org.springframework.boot</groupId><artifactId>spring-boot-starter-parent</artifactId><version>3.4.5</version><relativePath/> <!-- lookup parent from repository --></parent><groupId>com.mcp</groupId><artifactId>mcp-client</artifactId><version>0.0.1-SNAPSHOT</version><name>mcp-client</name><description>Demo project for Spring Boot</description><url/><licenses><license/></licenses><developers><developer/></developers><scm><connection/><developerConnection/><tag/><url/></scm><properties><java.version>17</java.version><spring-ai.version>1.0.0-M6</spring-ai.version></properties><dependencies><!-- spring-web --><dependency><groupId>org.springframework.boot</groupId><artifactId>spring-boot-starter-web</artifactId></dependency><dependency><groupId>org.springframework.boot</groupId><artifactId>spring-boot-starter-actuator</artifactId></dependency><dependency><groupId>org.springframework.ai</groupId><artifactId>spring-ai-spring-boot-autoconfigure</artifactId></dependency><!-- 如果需要集成OpenAI,还需添加对应依赖 -->
<!--		<dependency>-->
<!--			<groupId>org.springframework.ai</groupId>-->
<!--			<artifactId>spring-ai-openai-spring-boot-starter</artifactId>-->
<!--		</dependency>--><!--mcp client--><dependency><groupId>org.springframework.ai</groupId><artifactId>spring-ai-starter-mcp-client</artifactId><version>1.0.1</version></dependency><dependency><groupId>io.modelcontextprotocol.sdk</groupId><artifactId>mcp</artifactId><version>0.10.0</version></dependency><!--本地部署调用--><dependency><groupId>org.springframework.ai</groupId><artifactId>spring-ai-ollama-spring-boot-starter</artifactId></dependency><dependency><groupId>org.lionsoul</groupId><artifactId>ip2region</artifactId><version>2.7.0</version></dependency><dependency><groupId>org.springframework.boot</groupId><artifactId>spring-boot-devtools</artifactId><optional>true</optional></dependency><dependency><groupId>org.springframework.boot</groupId><artifactId>spring-boot-starter-thymeleaf</artifactId></dependency><!-- lombok --><dependency><groupId>org.projectlombok</groupId><artifactId>lombok</artifactId><optional>true</optional></dependency><dependency><groupId>org.springframework.boot</groupId><artifactId>spring-boot-starter-test</artifactId><scope>test</scope></dependency></dependencies><dependencyManagement><dependencies><dependency><groupId>org.springframework.ai</groupId><artifactId>spring-ai-bom</artifactId><version>${spring-ai.version}</version><type>pom</type><scope>import</scope></dependency></dependencies></dependencyManagement><build><plugins><plugin><groupId>org.springframework.boot</groupId><artifactId>spring-boot-maven-plugin</artifactId></plugin><plugin><artifactId>maven-resources-plugin</artifactId><configuration><nonFilteredFileExtensions><nonFilteredFileExtension>db</nonFilteredFileExtension></nonFilteredFileExtensions></configuration></plugin></plugins></build><repositories><repository><id>public</id><url>https://maven.aliyun.com/repository/public</url><releases><enabled>true</enabled></releases><snapshots><enabled>true</enabled></snapshots></repository><repository><id>central</id><url>https://maven.aliyun.com/repository/central</url><releases><enabled>true</enabled></releases><snapshots><enabled>true</enabled></snapshots></repository><repository><id>spring-snapshots</id><name>Spring Snapshots</name><url>https://repo.spring.io/snapshot</url><releases><enabled>false</enabled></releases></repository><repository><name>Central Portal Snapshots</name><id>central-portal-snapshots</id><url>https://central.sonatype.com/repository/maven-snapshots/</url><releases><enabled>false</enabled></releases><snapshots><enabled>true</enabled></snapshots></repository><repository><id>maven-central</id><url>https://repo.maven.apache.org/maven2/</url><snapshots><enabled>false</enabled></snapshots><releases><enabled>true</enabled></releases></repository></repositories></project>
java代码实现如下:
package com.mcp.client.config;import org.springframework.ai.autoconfigure.chat.client.ChatClientBuilderConfigurer;
import org.springframework.ai.chat.client.ChatClient;
import org.springframework.ai.chat.client.advisor.MessageChatMemoryAdvisor;
import org.springframework.ai.chat.client.advisor.SimpleLoggerAdvisor;
import org.springframework.ai.chat.memory.ChatMemory;
import org.springframework.ai.chat.memory.InMemoryChatMemory;
import org.springframework.ai.tool.ToolCallbackProvider;
import org.springframework.context.annotation.Bean;
import org.springframework.context.annotation.Configuration;
/*** 2.配置chatCleint*/@Configuration
public class McpConfig {@Beanpublic ChatMemory chatMemory() {return new InMemoryChatMemory();//使用内存记忆策略}@Beanpublic ChatClient chatClient(ChatClient.Builder builder, ChatMemory chatMemory, ToolCallbackProvider tools){return builder.defaultSystem("hi,我这个agent可以进行数字计算!").defaultTools(tools).defaultAdvisors(new SimpleLoggerAdvisor(),//打印日志new MessageChatMemoryAdvisor(chatMemory)//会话记忆).build();}// 手动注册 ChatClientBuilderConfigurer Bean@Beanpublic ChatClientBuilderConfigurer chatClientBuilderConfigurer() {return new ChatClientBuilderConfigurer();}}package com.mcp.client.controller;import lombok.extern.slf4j.Slf4j;
import org.springframework.ai.chat.client.ChatClient;
import org.springframework.web.bind.annotation.GetMapping;
import org.springframework.web.bind.annotation.RestController;
/*** 3.实现Ai聊天agent api*/
@Slf4j
@RestController
public class AIController {private final ChatClient chatClient;public AIController(ChatClient chatClient) {this.chatClient = chatClient;}/*** 处理聊天请求,使用AI和MCP工具进行响应*/@GetMapping("/api/v1/caculate")public String caculate() {// 使用ChatClient与LLM交互
//        String message = "8+9等于多少?";String message = "mcp数字计算都有哪些功能?";// 使用API调用聊天
//        String content = chatClient.prompt(message)
//                .call()
//                .content();String content=chatClient.prompt().user(message).call().content();System.out.println(">>> 问题: " + message);System.out.println(">>> 回答:" + content);return content;}}package com.mcp.client;import org.springframework.ai.chat.client.ChatClient;
import org.springframework.ai.tool.ToolCallbackProvider;
import org.springframework.boot.CommandLineRunner;
import org.springframework.boot.SpringApplication;
import org.springframework.boot.autoconfigure.SpringBootApplication;
import org.springframework.context.annotation.Bean;/*** 1.定义mcp客户端*/
@SpringBootApplication
public class McpClientApplication {public static void main(String[] args) {SpringApplication.run(McpClientApplication.class, args);}@Beanpublic CommandLineRunner predefinedQuestions(ChatClient.Builder chatClientBuilder,ToolCallbackProvider tools) {return args -> {// 构建ChatClient并注入MCP工具var chatClient = chatClientBuilder.defaultTools(tools).build();// 使用ChatClient与LLM交互String userInput = "8+9等于多少?";System.out.println("\n>>> QUESTION: " + userInput);System.out.println("\n>>> ASSISTANT: " + chatClient.prompt(userInput).call().content());};}}
application.yml配置如下:
server:port: 8081servlet:encoding:charset: utf-8enabled: trueforce: truespring:application:name: mcp-clientmain:allow-bean-definition-overriding: trueweb-application-type: servletai:ollama:base-url: http://localhost:11434chat:model: qwen2.5:7bmcp:client:enabled: truename: mcp-clientversion: 1.0.0request-timeout: 30stype: syncsse:connections:server1:url: http://localhost:8080sse-endpoint: /api/v1/ssetoolcallback:enabled: trueroot-change-notification: truechat:client:observations:log-prompt: falsemandatory-file-encoding: UTF-8logging:level:io:modelcontextprotocol:client: DEBUGspec: DEBUGorg.springframework.ai.model.tool: DEBUG# IP 白名单相关配置
ip-white-list:enabled: trueips: 127.0.0.1,192.168.1.100# 其他相关配置项
9.AI java项目落地技术选型
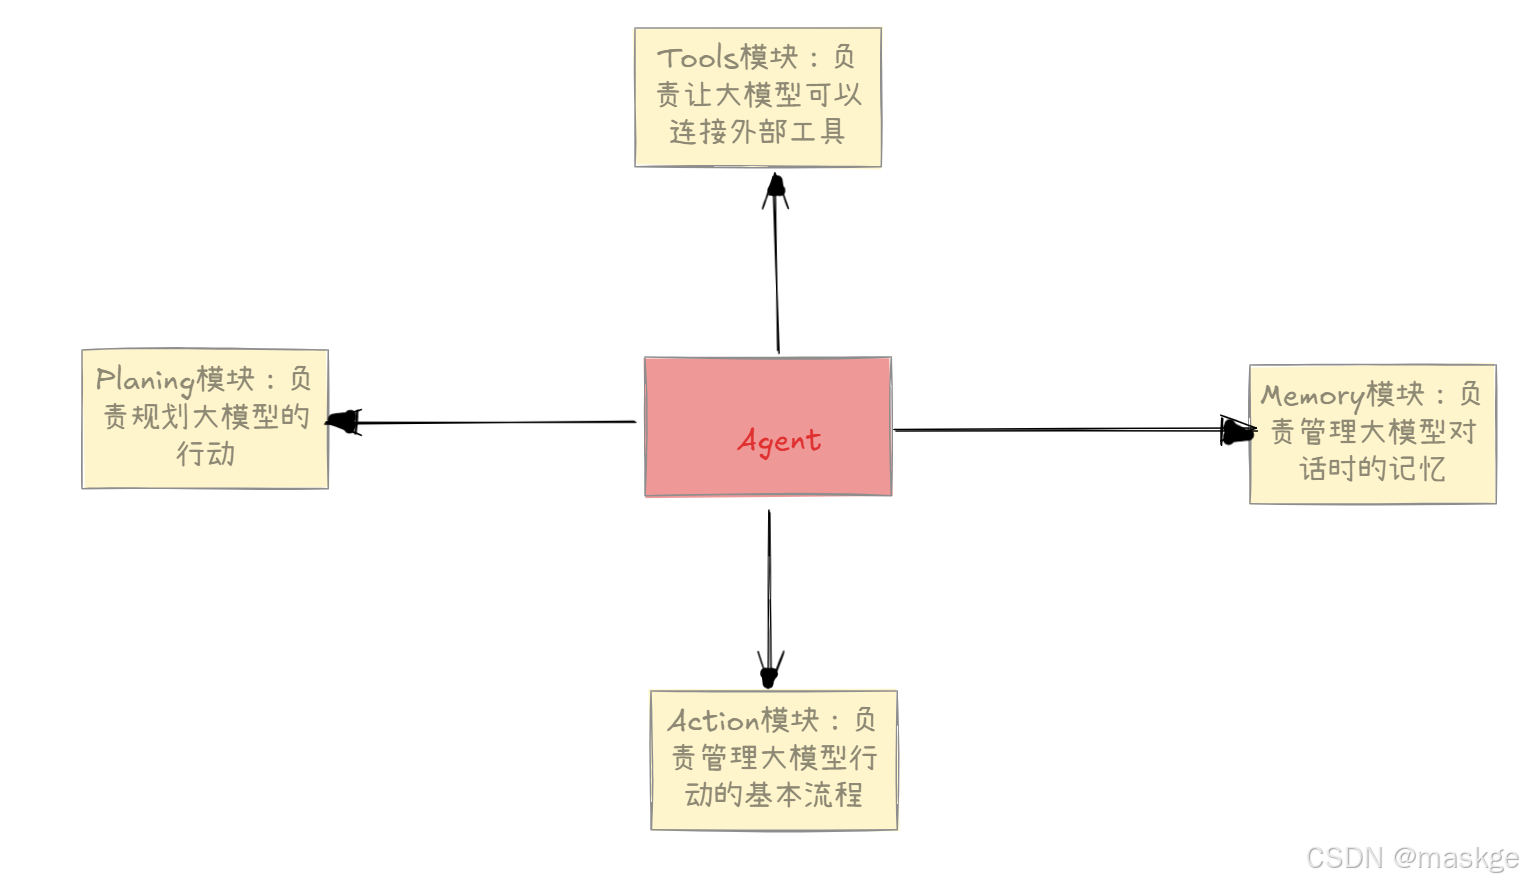
10.构建AI Agent四大模块
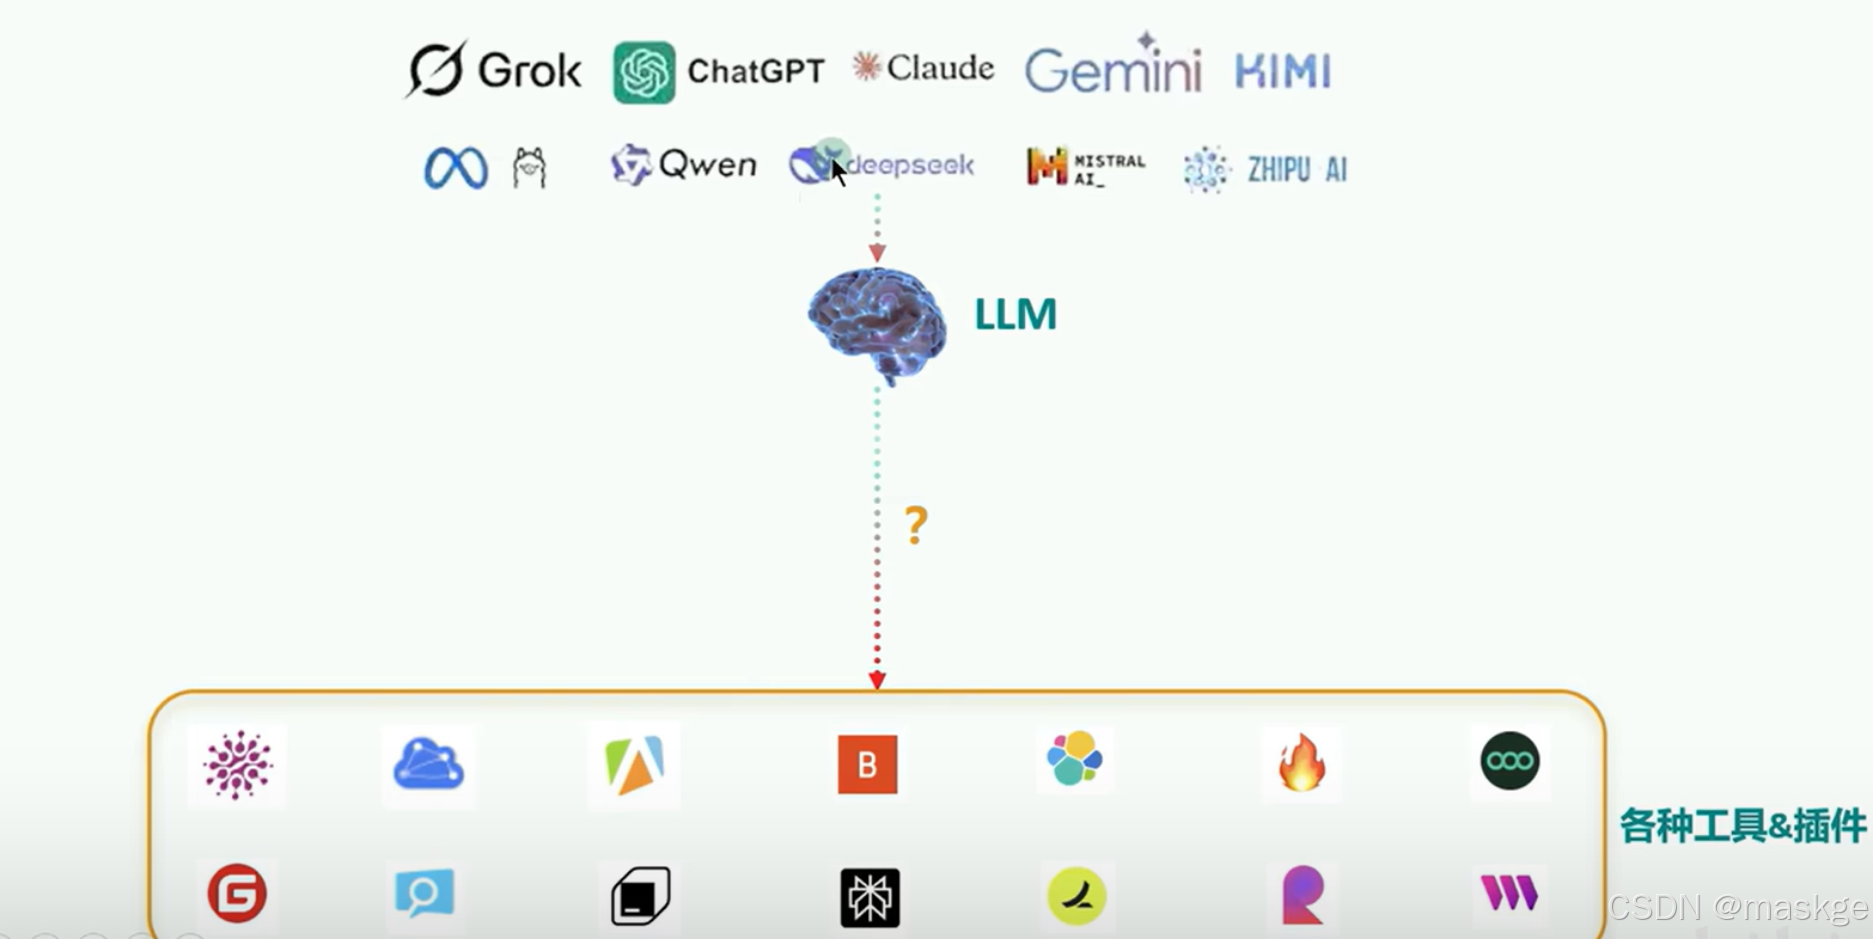
11.LLM(大模型)与MCP之间关系
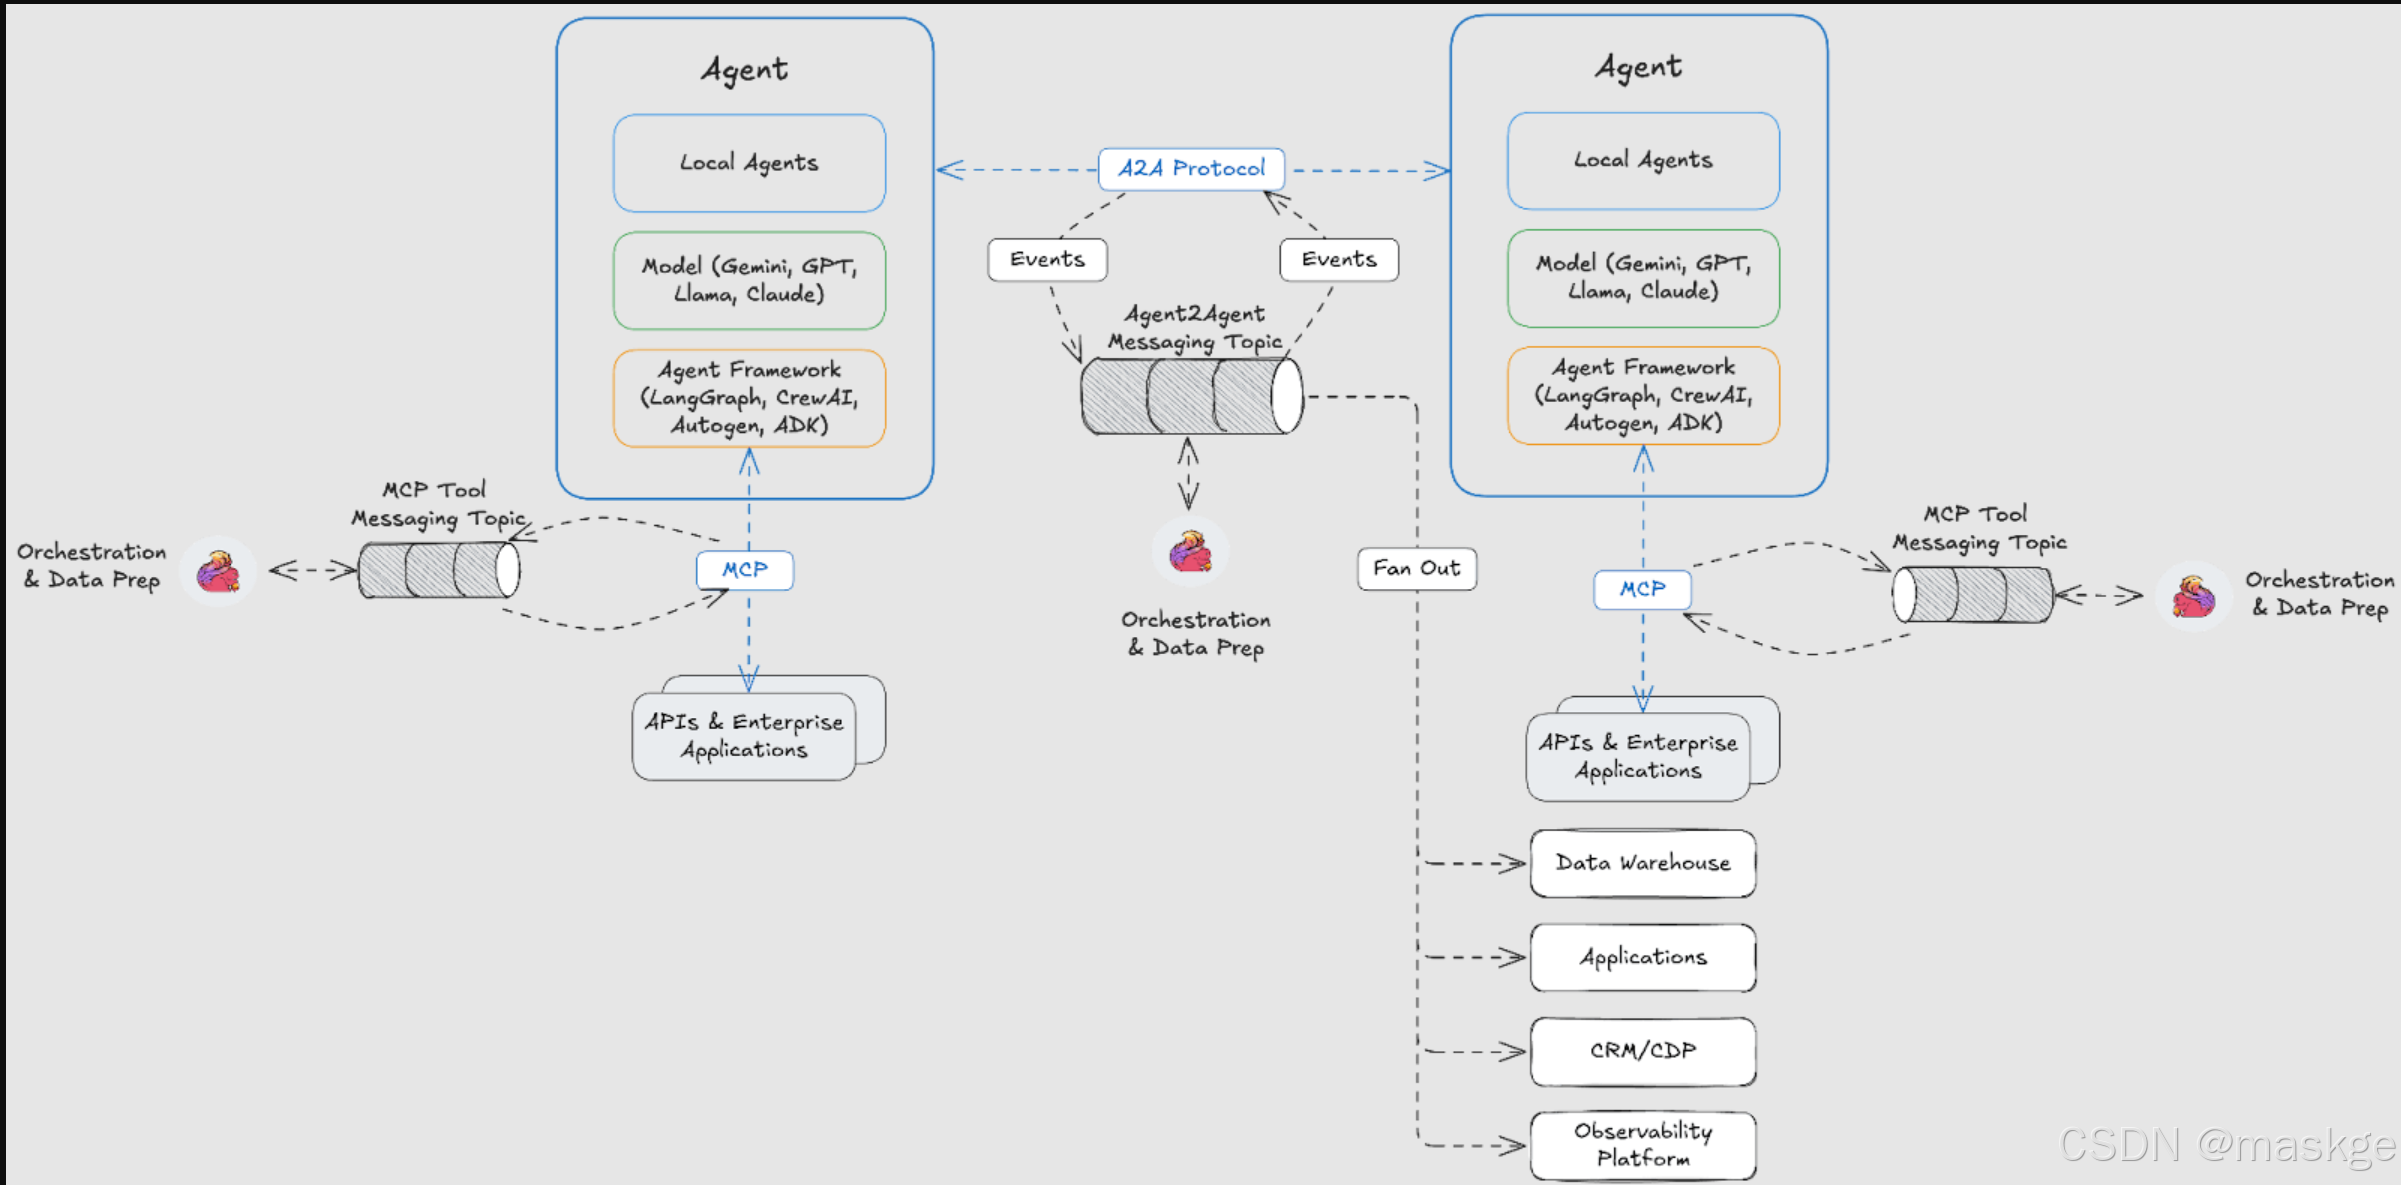
12.A2A、MCP、Kafka、Flink协同工作方法
Kafka负责数据的流动,而 Flink 负责在数据流经系统时对其进行转换、丰富、监控和编排。
Kafka和Flink构成了事件驱动的基础,可以支持可扩展的agent通信和计算。它们解决了直接的点对点通信无法解决的问题:
- 解耦:使用Kafka,agent不需要知道谁将消费它们的输出。它们将事件(例如,
"TaskCompleted","InsightGenerated")发布到主题;任何感兴趣的agent或系统都可以订阅。 - 可观测性和可重放性:Kafka维护每个事件的持久、按时间排序的日志,使agent行为完全可追溯、可审计和可重放。
- 实时决策:Flink使agent 能够实时响应事件流,根据动态条件过滤、丰富、连接或触发操作。
- 弹性和扩展:Flink作业可以独立扩展、从故障中恢复并在长时间运行的工作流中保持状态。这对于执行复杂的多步骤任务的agent至关重要。
- 流原生协调:agen可以通过事件流进行协调,发布更新、订阅工作流并协同推进状态,而不是等待同步响应。
A2A、MCP、Kafka、Flink 、mongodb协同工作方法:
为了充分实现企业级、可互操作的AI agent的愿景,需要四个层次:
- 协议:A2A(实现AI代理之间的无缝通信和协作,打破agent鼓捣、促进互操性), MCP(让LLM能够访问数据和工具) – 定义什么
- 框架:LangGraph, CrewAI, ADK(智能体开发套件) – 定义如何
- 消息传递基础设施:Apache Kafka – 支持流动
- 实时计算:Apache Flink – 支持思考
13.事件驱动多智能体
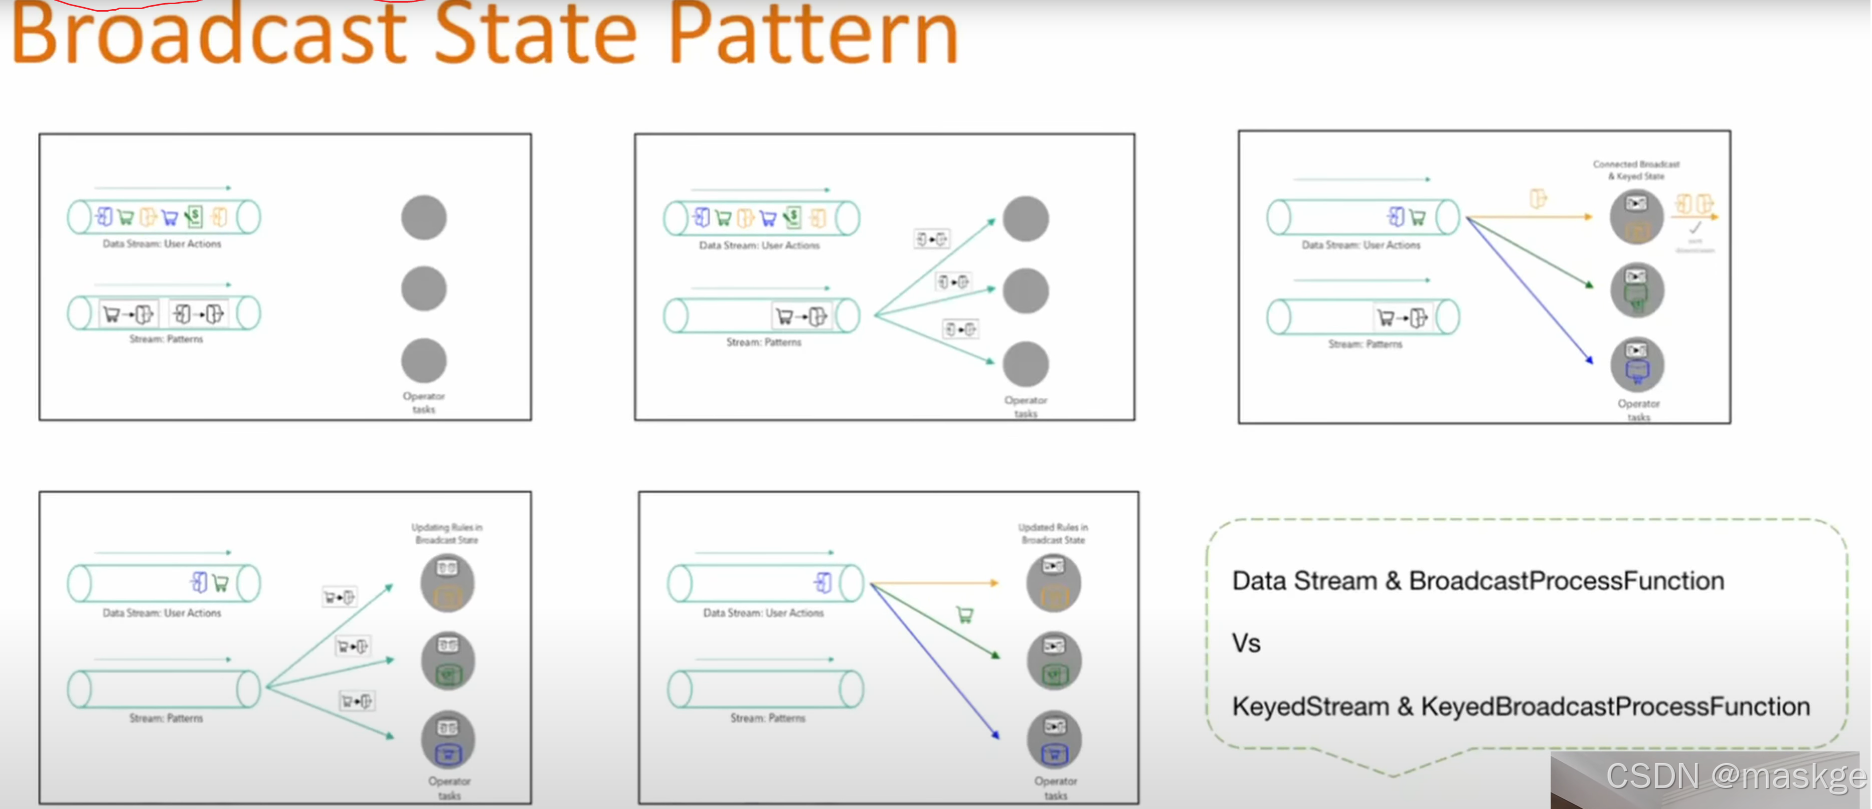
使用Apache Flink和 Apache Kafka为多智能体系统构建一个事件驱动的编排器,利用Flink来解析和路由消息,同时将Kafka用作系统的短期共享内存。
任何多智能体系统的核心都在于智能体如何进行通信。
请求/响应模型虽然在概念上很简单,但当系统需要演进、适应新信息或在不可预测的环境中运行时,往往会失效。这就是为什么由 Apache Kafka 和Apache Flink等技术支持的事件驱动消息传递通常是企业应用程序的更佳模型。
事件驱动智能体
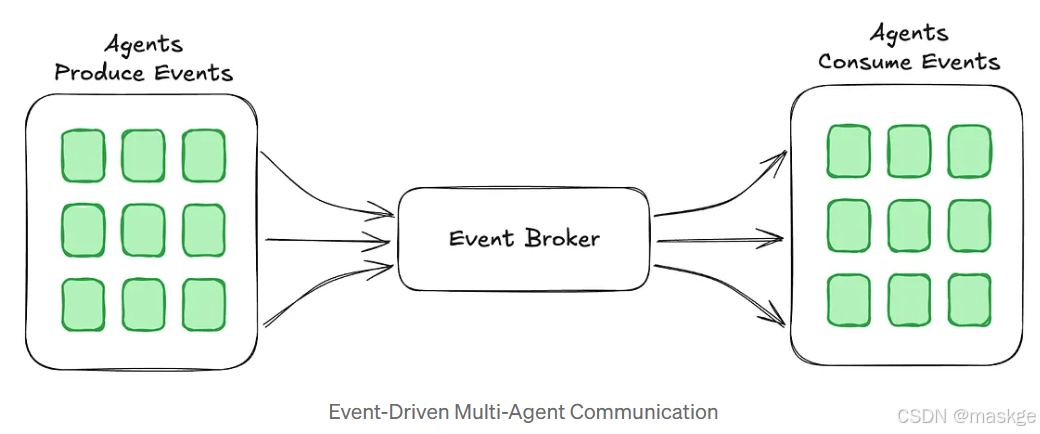
事件驱动架构允许智能体动态通信,无需严格的依赖关系,这使它们更具自主性和韧性。智能体不再硬编码关系,而是对事件做出反应,从而实现了更高的灵活性、并行性和容错能力。
就像事件驱动架构为微服务和团队提供解耦一样,它们在构建多智能体系统时也能带来同样的优势。智能体本质上是一个带有 “大脑”的有状态微服务,因此,许多用于构建可靠分布式系统的模式同样适用于智能体。
此外,流治理能够验证消息结构,防止格式错误的数据干扰系统。这一点在当今现有的多智能体框架中往往缺失,这使得事件驱动架构更具吸引力。
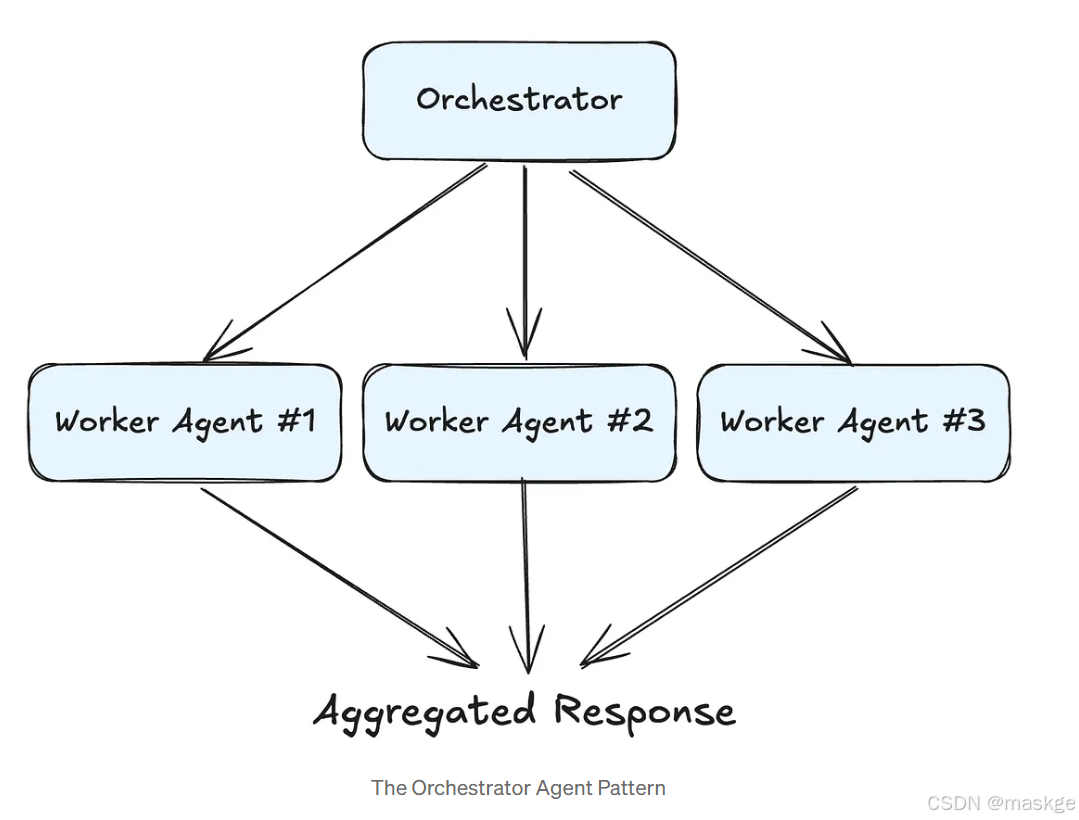
编排:协调智能体工作流
现实世界中的应用需要多个智能体协作,承担不同的职责,同时共享上下文。这带来了任务依赖、故障恢复和通信效率方面的挑战。
编排器模式通过引入一个主导智能体(即编排器)来解决这些问题,该智能体指导其他智能体进行问题解决。与传统微服务那样的静态工作流不同,智能体生成动态执行计划,分解任务并实时调整。
灵活性带来的挑战:
- 任务激增 —— 智能体可能会生成数量不受限制的任务,这就需要进行资源管理。
- 监控与恢复 —— 智能体需要一种方法来跟踪进度、发现故障并重新规划。
- 可扩展性 —— 系统必须能够处理不断增加的智能体交互,且不会出现瓶颈。
事件驱动架构比较擅长处理上面这些问题。
借助流式处理的核心架构,智能体能够立即对新数据做出反应,高效追踪依赖关系,并从容地从故障中恢复,所有这些都不会出现集中式瓶颈。
智能体系统本质上是动态的、有状态的和自适应的 —— 这意味着事件驱动架构是一种天然的契合。
事件驱动的多智能体系统的参考架构**,使用 Apache Flink 和Apache Kafka实现编排器模式**,为大规模的实时智能体决策提供支持。
使用flink进行多智能体编排
构建可扩展的多智能体系统需要实时决策以及智能体之间消息的动态路由。这是Apache Flink发挥关键作用的地方
Apache Flink是一个流处理引擎,旨在对无界数据流进行有状态计算。与批处理框架不同,Flink 能够实时处理事件,使其成为编排多智能体交互的理想工具。
编排器模式(Orchestrator Pattern)
多智能体系统需要一个协调器来决定哪个智能体应该处理给定的任务。不同于智能体做出临时决定,协调器会接收消息,使用大语言模型(LLM)对其进行解读,然后将消息路由到合适的智能体。
为了在 Flink中支持这种编排模式,Kafka被用作消息骨干,而Flink则作为处理引擎:
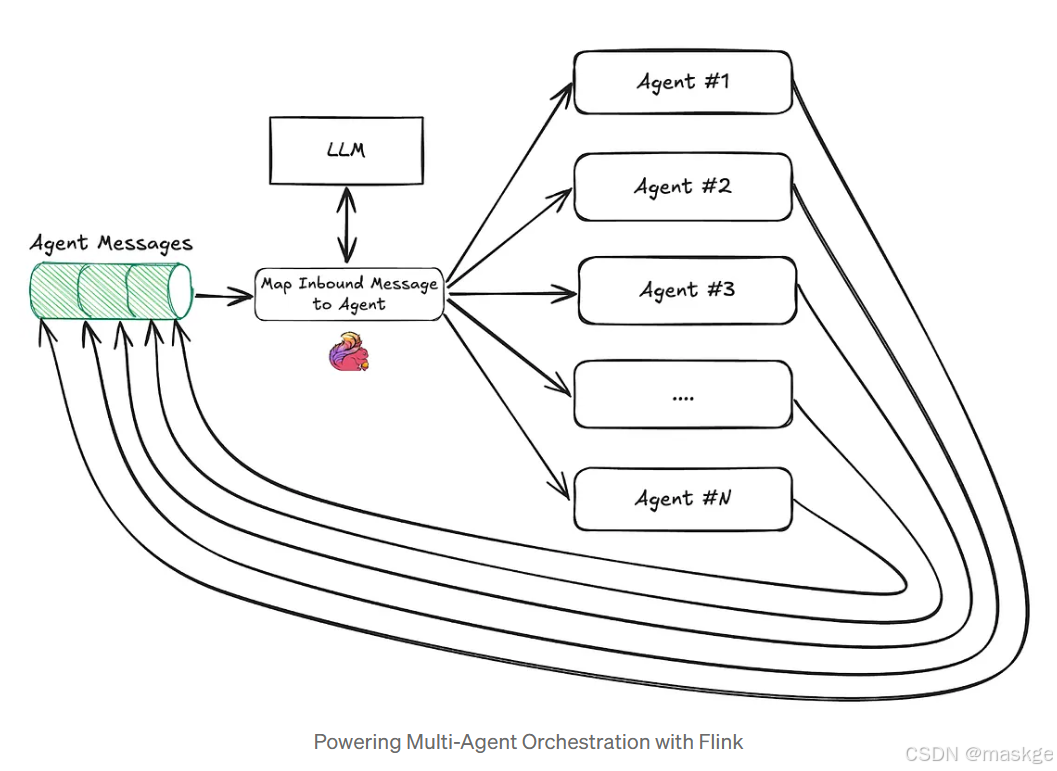
- 消息生成:
- 代理向Kafka主题生成消息
- 每条消息都包含与某个代理相关的原始上下文数据
- Flink Processing & Routing:
- Flink job 监听kafka中新消息
- 新消息被传递给一个大语言模型(LLM),该模型会确定处理这条信息的最合适的代理。
- 大语言模型(LLM的)决策基于结构化的智能体定义,该定义包括
– Agent Name — 代理的唯一标识符
– Description — 代理主要功能.
– Input — 由数据契约强制规定的智能体处理的预期数据格式
– Output — 智能体生成的结果
-
决策输出与路由
一旦大语言模型LLM选择了合适的代理,Flink就会将消息发布到与已识别代理相关联的HTTP 端点。
-
代理执行与继续
- 代理处理该消息,并将更新写回代理消息主题
- Flink job会检测到这些更新,重新评估是否需要额外处理,并继续路由消息,直到代理工作流完成
闭环
这种事件驱动的反馈循环使多智能体系统能够自主且高效地运行,确保:
- 实时决策,无需硬编码工作流。
- 具有去中心化智能体交互的可扩展执行。
- 对新输入和系统变化的无缝适应性。
实现构建一个事件驱动的多智能体系统:销售开发代表(SDR:sales development representative)系统,它能够自主管理销售线索。
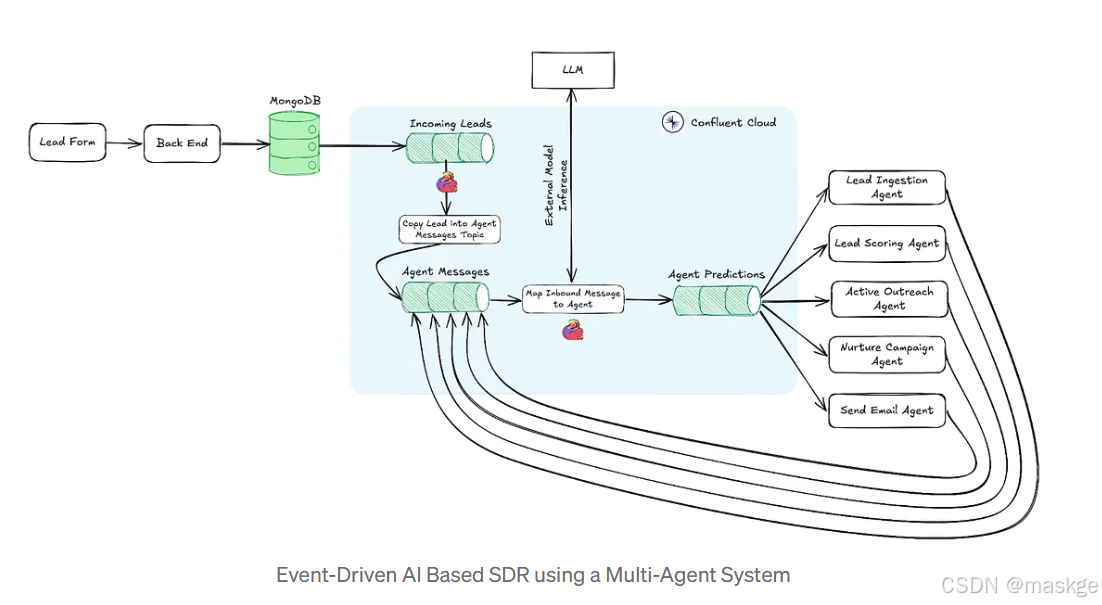
AI销售开发代表多智能体系统
该系统由多个专门的代理组成,这些代理负责潜在客户资格认定和参与流程的不同阶段。每个代理都有明确的角色,并在事件驱动的流程中独立运作。
AI SDR系统中的代理:
- Lead Ingestion Agent(潜在客户摄入代理): 捕获原始的潜在客户数据,通过额外研究对其进行充实,并生成潜在客户档案。
- Lead Scoring Agent(销售线索评分代理): 分析潜在客户数据,以分配优先级分数并确定最佳的参与策略。
- Active Outreach Agent: 利用潜在客户的详细信息和评分生成个性化的外展信息.
- Nurture Campaign Agent(培育活动代理): 根据潜在客户的来源地及其兴趣动态创建一系列电子邮件。
- Send Email Agent: 接收电子邮件并设置营销活动以发送这些邮件。
这些代理之间没有明确的依赖关系。它们只是独立地生成和消费事件
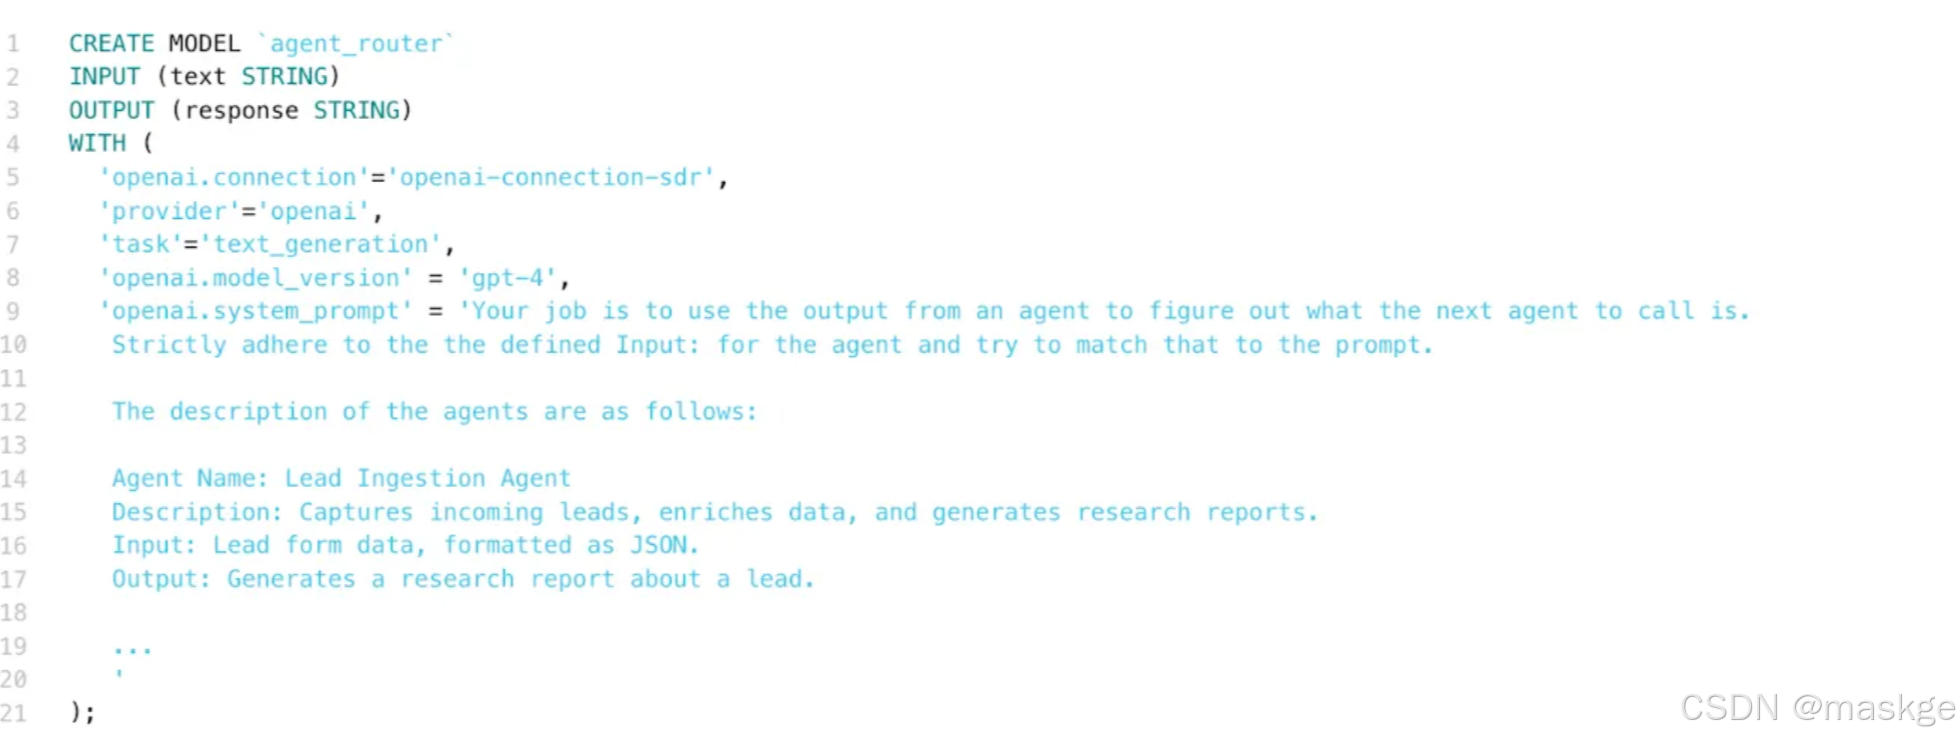
Flink SQL中编排工作的方法:
1. 创建模型
用于设置模型的Flink SQL语句如下所示,其中包含用于执行映射操作的提示词的简化版本。
2.创建Flink job使用模型去处理接入的消息并且分配他们正确的代理:
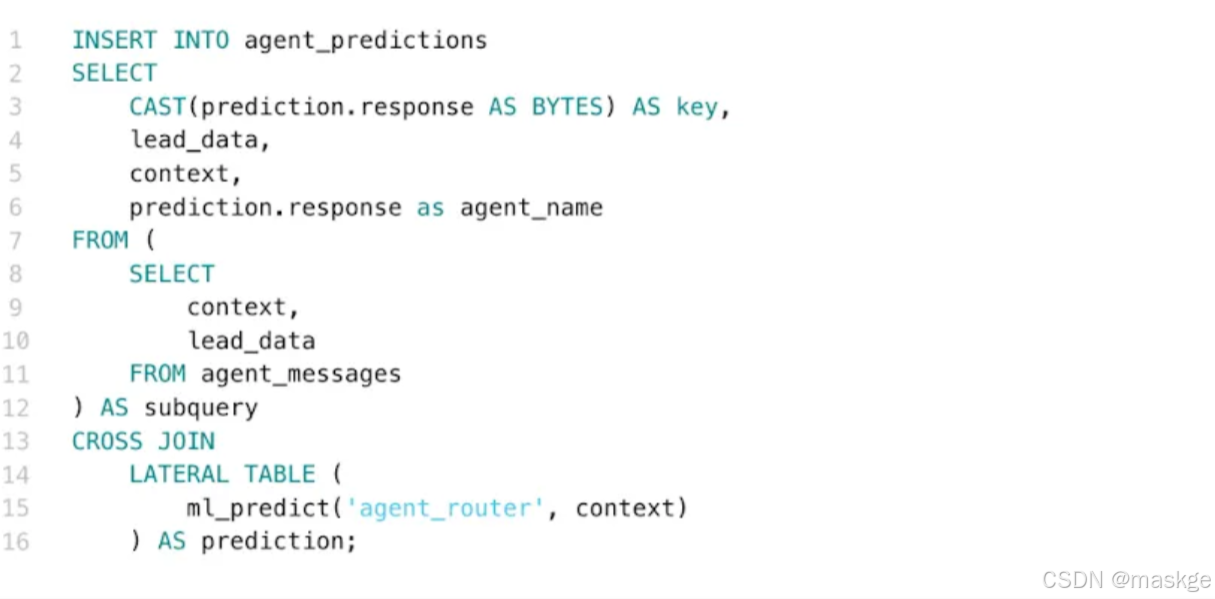
Executing the Orchestrator as a Flink Job
这会自动将消息路由到相应的代理,确保实现无缝、智能的工作流程。每个代理处理其任务,并将更新写回 Kafka,以便流程中的下一个代理采取行动。
总结:事件驱动型多智能体系统的未来
AI SDR 系统展示了事件驱动架构如何使多智能体系统高效运行,无需僵化的工作流程即可做出实时决策。通过利用 Flink进行消息处理和路由,以及Kafka 作为短期共享内存,实现了一个可扩展、自主的编排框架,使智能体能够动态协作。
关键要点是:智能体本质上是带有 “大脑” 的有状态微服务,而那些使微服务得以扩展的事件驱动原则同样适用于多智能体系统。不再采用静态的、预定义的工作流程,而是让系统和团队实现解耦,能够动态适应,在新数据到来时做出反应。
虽然本篇博客文章重点讨论了编排器模式,但值得注意的是,其他模式也可以得到支持。在某些情况下,智能体之间需要更明确的依赖关系,以确保可靠性、一致性或满足特定领域的约束。例如,某些工作流程可能需要智能体严格按顺序执行,以保证事务完整性或合规性。关键在于根据应用需求在灵活性和控制力之间找到恰当的平衡。
14.flink+kafka+MCP+LLM(gemini Ai ) 应用架构demo:使用Gemini AI Agent进行实时数据处理
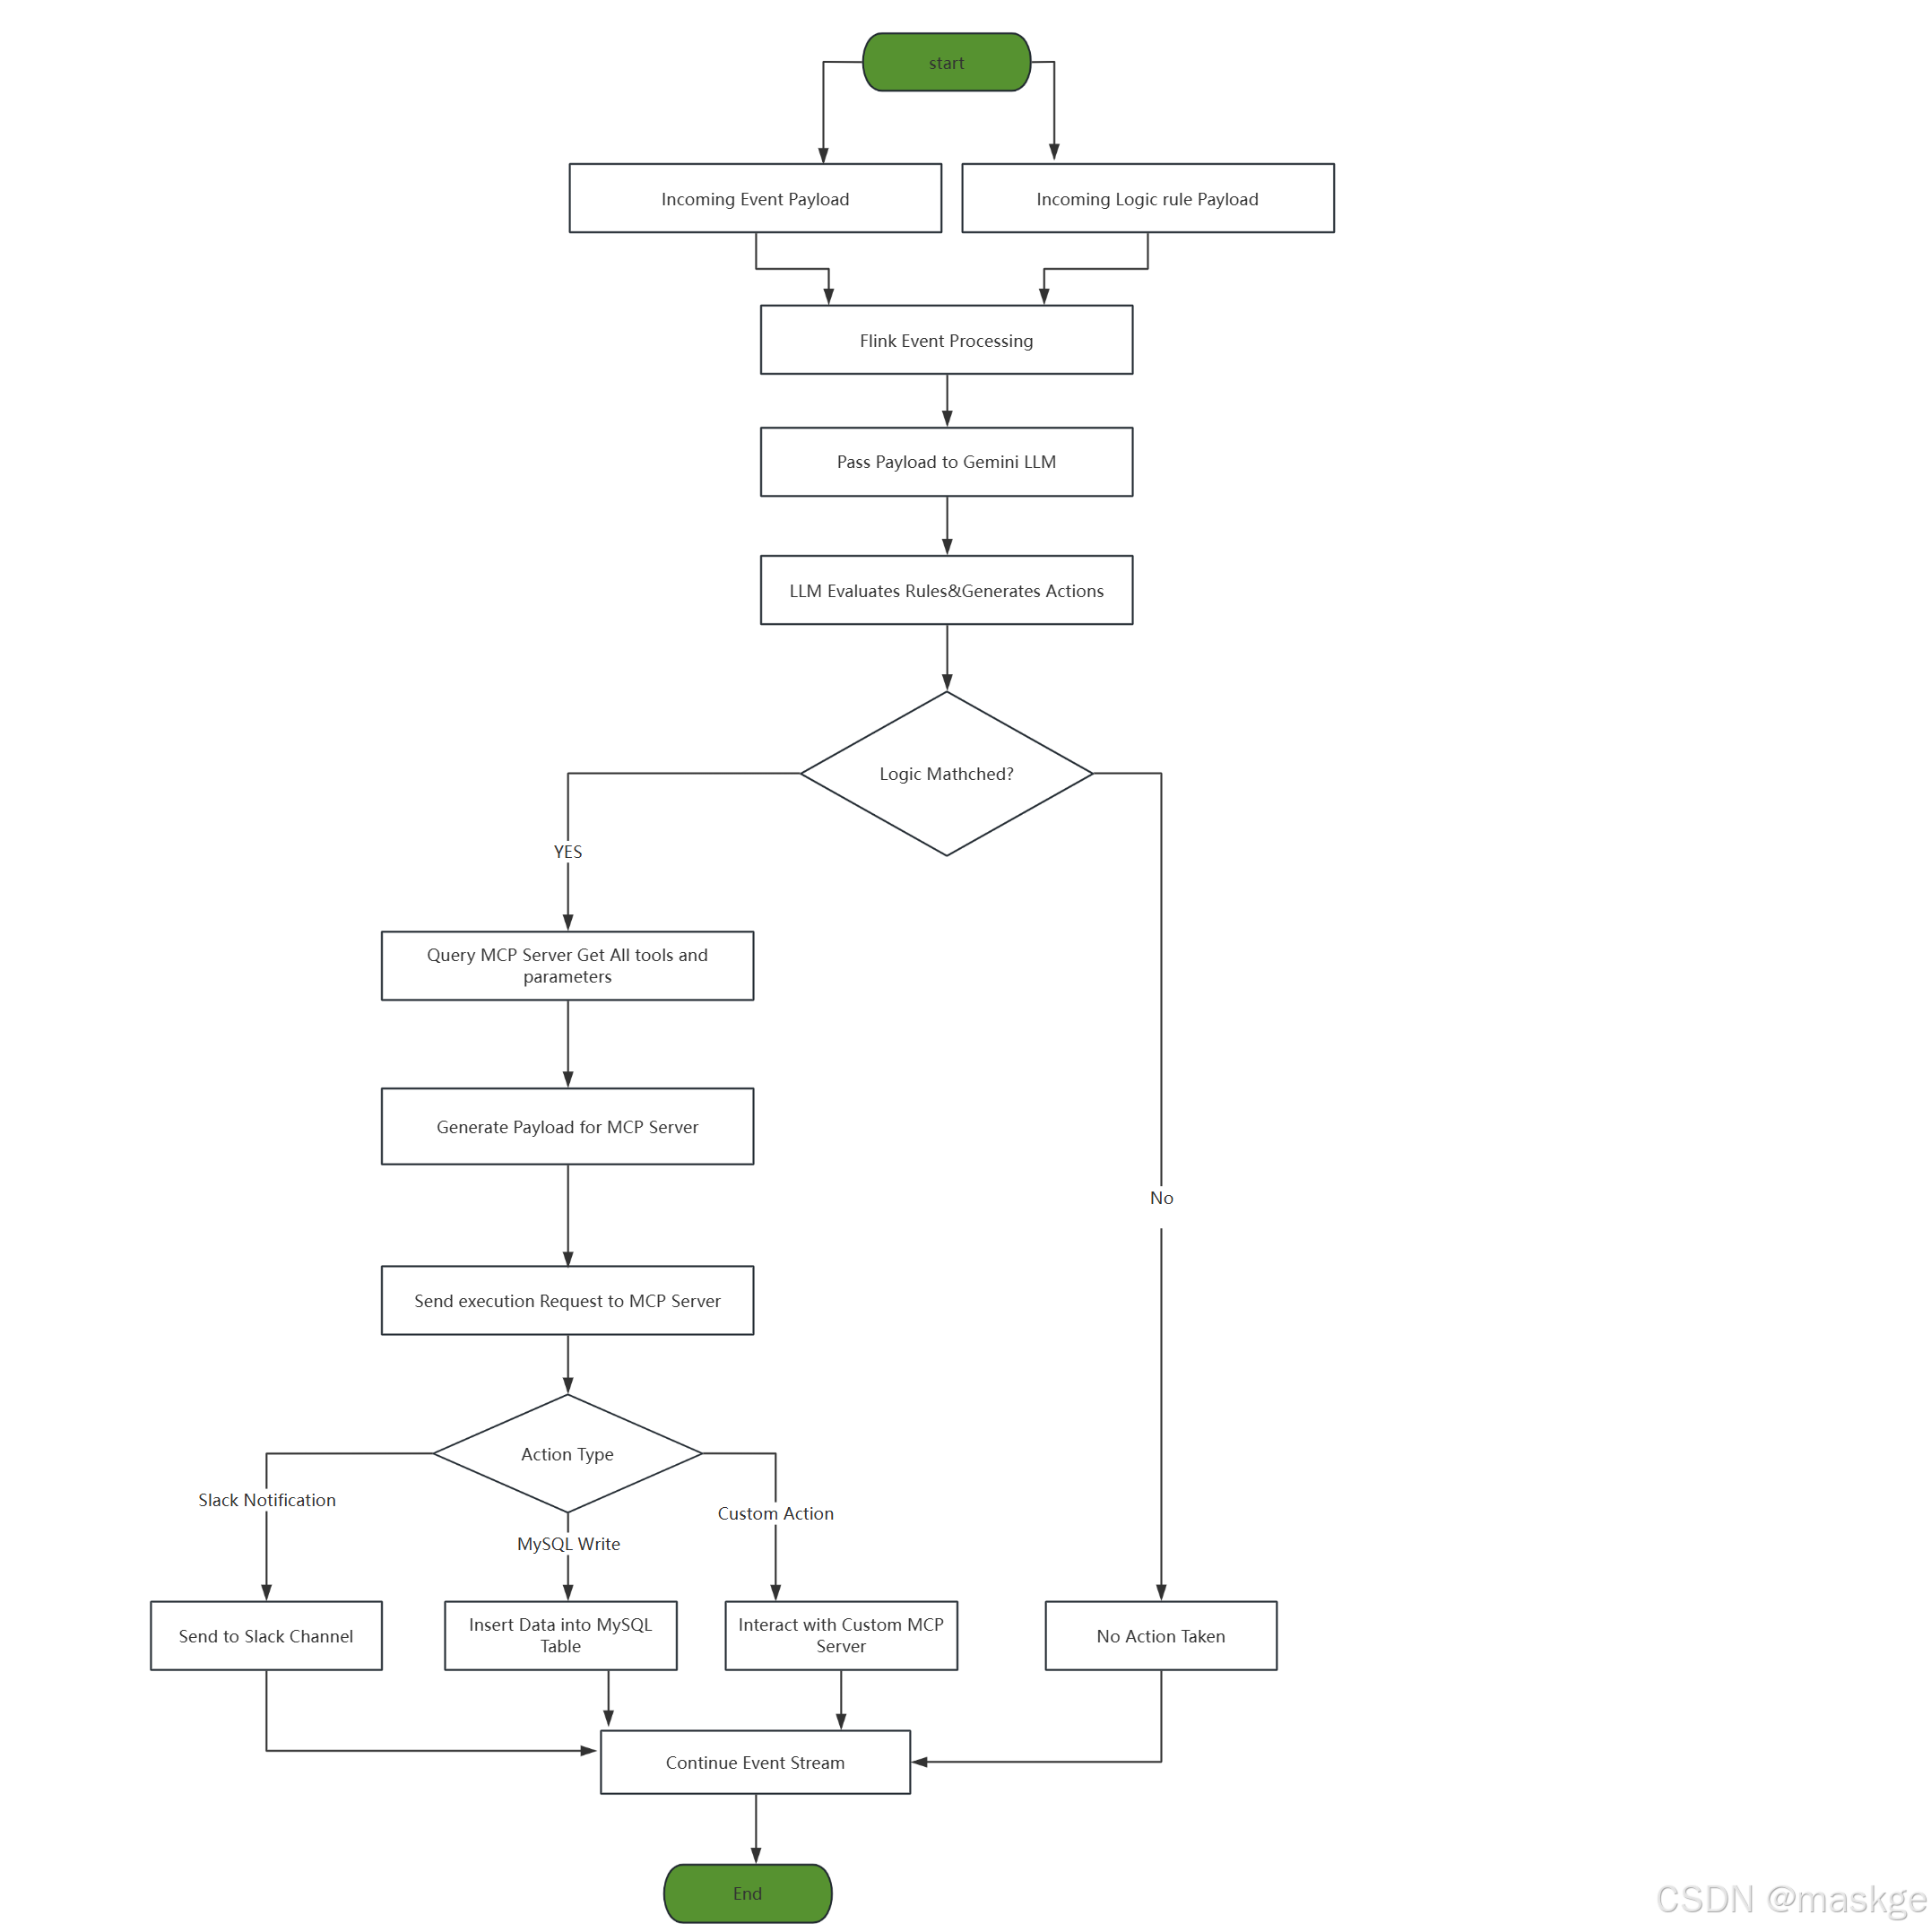
提示词 payload 是json格式,通过kafka发送schema (json),然后交由flink进行处理
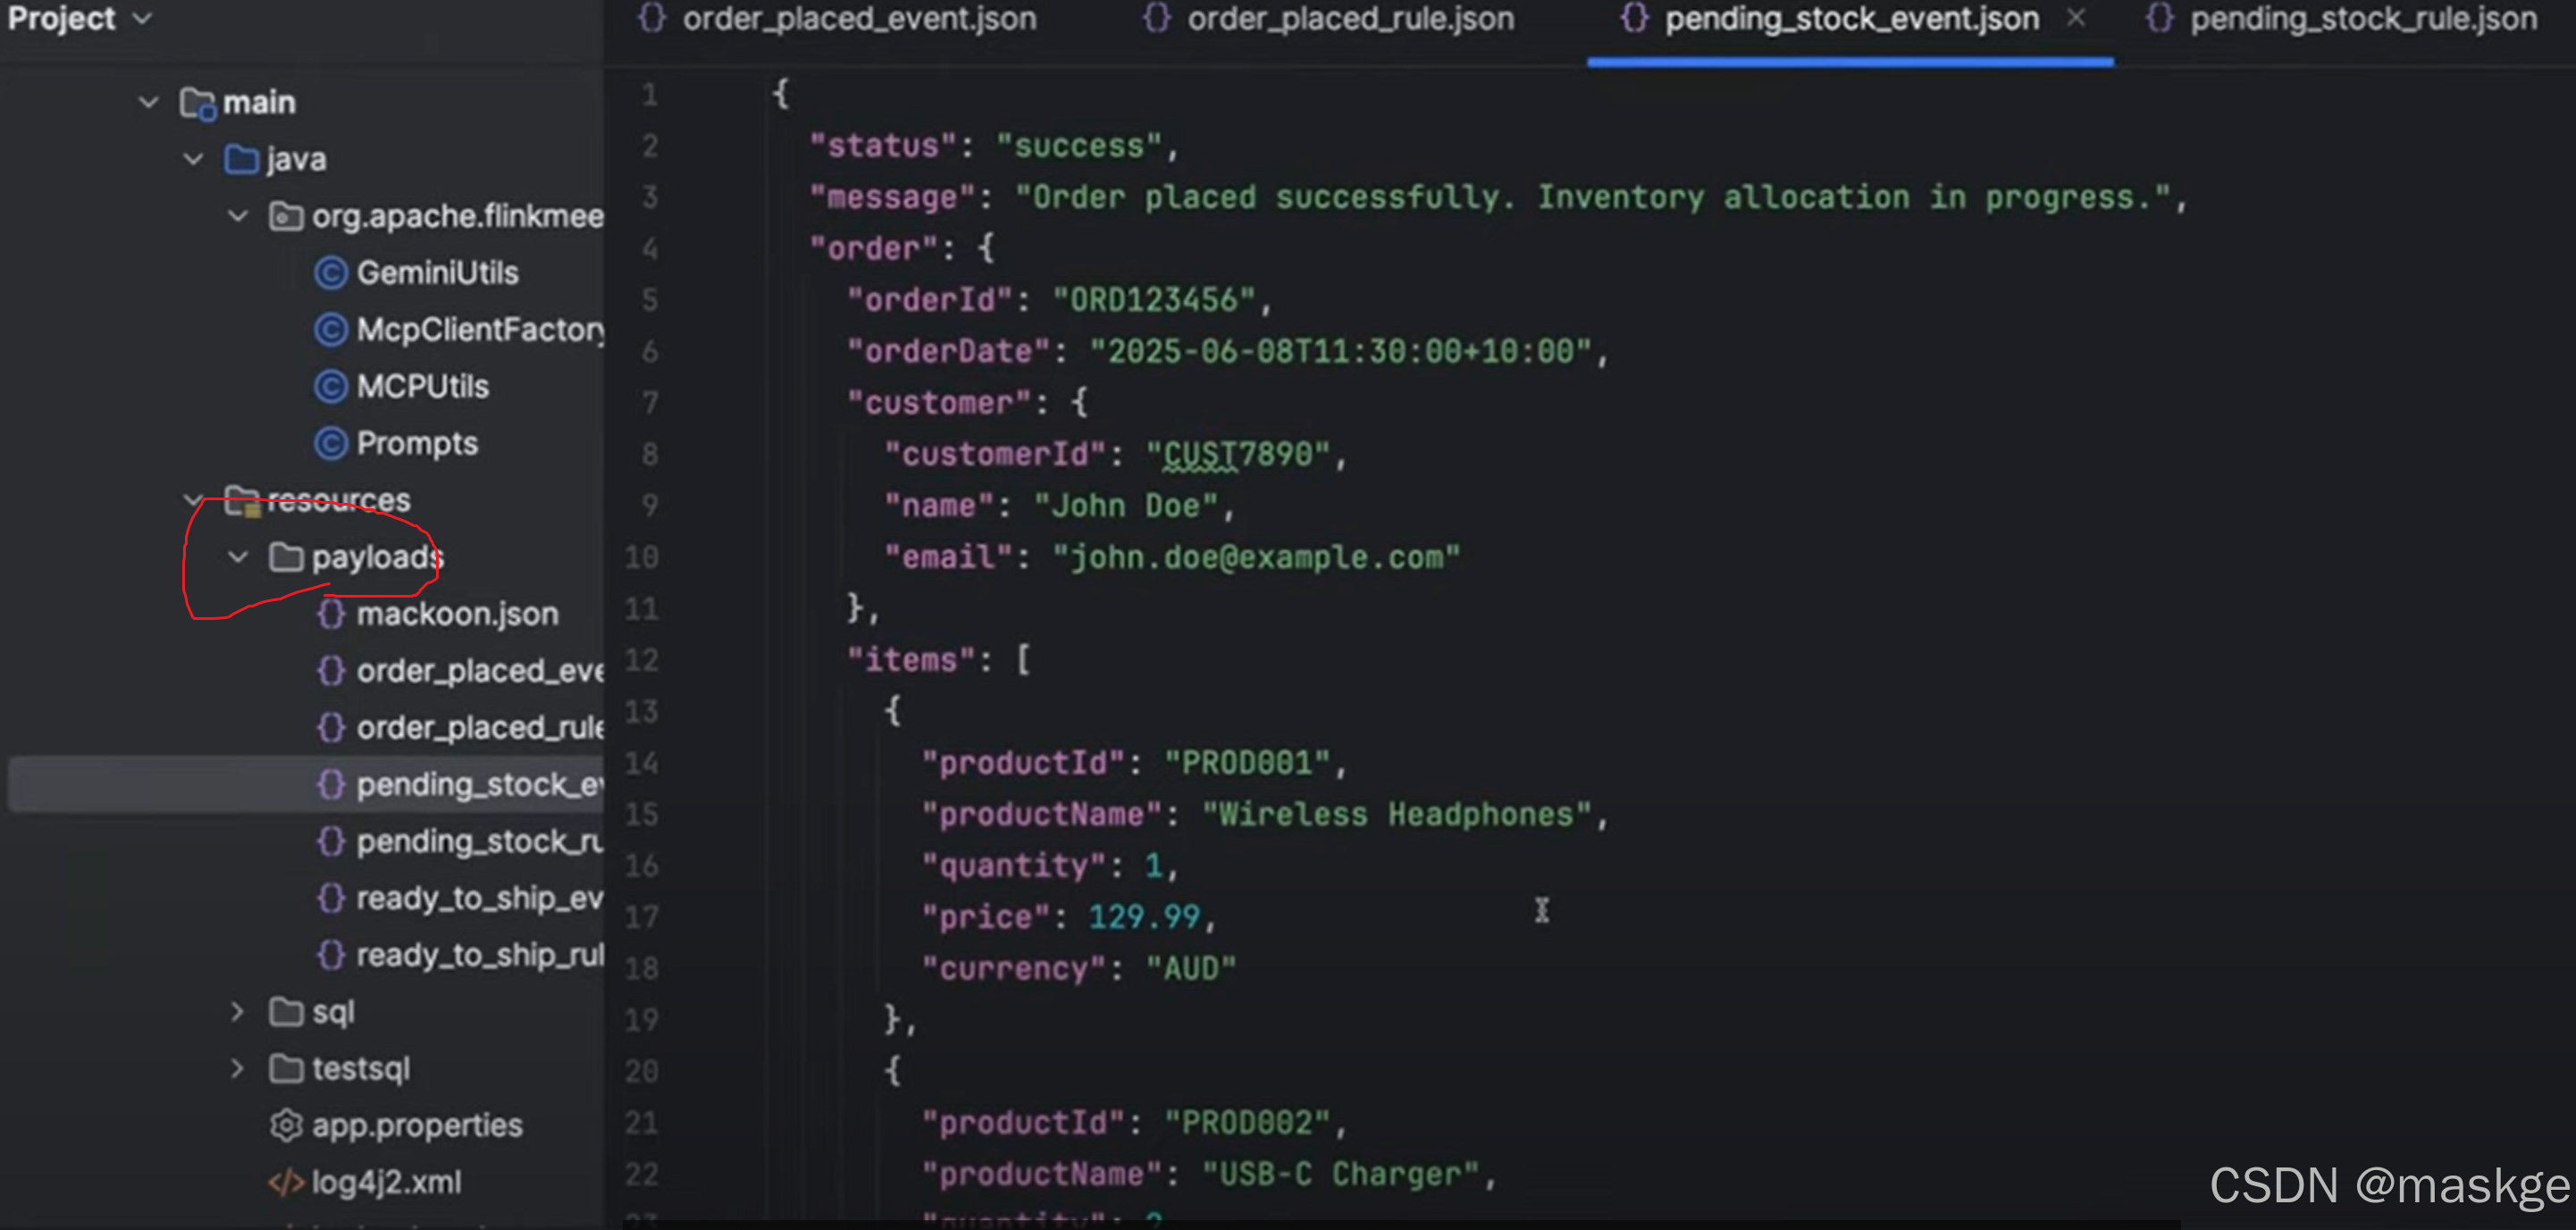

通过AI发布json消息到kafka topic,可用的topics如下:
- kafka
- rule
- event
- agg-transactions
AI Agent架构过程