在uniapp/vue项目中全局挂载component
在项目中,将components目录下手写的组件全局注册,以便在任何地方无需导入即可直接使用:
方法一:在main.js中逐个注册(实用组件较少的情况)
实用app.component()方法进行注册
// main.js 或 main.ts
import { createApp } from 'vue'
import App from './App.vue'// 1. 引入你的全局组件
import MyButton from '@/components/MyButton.vue'
import MyCard from '@/components/MyCard.vue'
import UserAvatar from '@/components/UserAvatar.vue'const app = createApp(App)// 2. 全局注册组件
// 第一个参数是将来在模板中使用的组件名,第二个参数是组件对象
app.component('MyButton', MyButton)
app.component('MyCard', MyCard)
app.component('UserAvatar', UserAvatar)app.mount('#app')性能:即使某些页面用不到这些组件,它们仍然会被打包进项目。如果全局注册的组件过多,可能会增加初始包体积。
方法二:使用插件方式批量注册(实用组件较多的情况)
步骤:
在
components目录下创建一个index.js文件。使用
require.context或import.meta.glob自动导入所有组件。定义一个插件,在插件中循环注册所有组件。
在
main.js中使用这个插件。
示例 (components/index.js):
// components/index.js// 用于自动导入的 Vue 插件
export default {install(app) {// Vite 构建工具的使用方式 (推荐)// import.meta.glob 是 Vite 提供的特性const modules = import.meta.glob('./*.vue', { eager: true })for (const path in modules) {// 获取组件配置const componentConfig = modules[path]// 获取组件的 PascalCase 命名// ./MyButton.vue -> MyButtonconst componentName = path.replace(/^\.\//, '').replace(/\.\w+$/, '')// 全局注册组件app.component(componentName, componentConfig.default || componentConfig)}// 如果你使用的是 Vue CLI(Webpack环境),可以使用以下方式:// const requireComponent = require.context(//   '.', // 在当前目录下查找//   false, // 不遍历子目录//   /\.vue$/ // 正则匹配,只找以.vue结尾的文件// )// requireComponent.keys().forEach(fileName => {//   const componentConfig = requireComponent(fileName)//   const componentName = fileName.replace(/^\.\/(.*)\.\w+$/, '$1')//   app.component(componentName, componentConfig.default || componentConfig)// })}
}
3.在main.js中导入并使用这个插件
// main.js
import { createApp } from 'vue'
import App from './App.vue'
// 导入我们刚刚创建的插件
import componentsPlugin from '@/components'const app = createApp(App)// 使用插件,这会自动调用插件对象的 install 方法并传入 app
app.use(componentsPlugin)app.mount('#app')方法三:uniapp框架有一个强大且常用的功能:easycom自动导入规则。easycom是uniapp提供的一种组件自动引入机制。要符合一定的目录和命名规则。
在pages.json中配置详解
"easycom": {"autoscan": true, // 启用自动扫描"custom": {// 自定义规则 1"^com-(.*)-(.*)": "@/components/$1/$2.vue",// 自定义规则 2 (uni-ui官方库的规则)"^uni-(.*)": "@dcloudio/uni-ui/lib/uni-$1/uni-$1.vue"}
}规则一:"^com-(.*)-(.*)": "@/components/$1/$2.vue"
这行代码定义了一条规则:
匹配模式(正则表达式):
^com-(.*)-(.*)^com-:匹配以com-开头的组件标签名。(.*):这是一个捕获组,可以匹配任意字符(除了换行符)。这里有两个(.*)。
替换路径:
@/components/$1/$2.vue$1和$2是反向引用,分别对应第一个和第二个(.*)捕获组匹配到的内容。@/是项目根目录的别名。
示例:
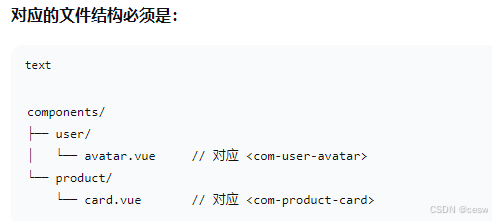
假如你在vue文件中使用了组件:<com-user-avatar />
匹配:
easycom发现标签名<com-user-avatar>匹配规则^com-(.*)-(.*)。第一个
(.*)捕获到user第二个
(.*)捕获到avatar
解析路径:将
$1替换为user,$2替换为avatar,得到最终路径:@/components/user/avatar.vue。自动导入:uni-app 会自动帮你完成
import ComUserAvatar from '@/components/user/avatar.vue'和注册的操作。
规则二:"^uni-(.*)": "@dcloudio/uni-ui/lib/uni-$1/uni-$1.vue"
这是 uni-app 官方 UI 组件库 uni-ui 的默认规则。它的原理完全相同:
当你使用
<uni-badge>组件时,easycom会自动去@dcloudio/uni-ui/lib/uni-badge/uni-badge.vue路径查找并引入它。
优势:这种方式是按需引入的,只有你在模板中实际使用的组件才会被打包,可以有效控制项目体积,比在 main.js 中全局注册所有组件性能更好。