C++在控制台打印不同颜色的文本:让日志输出更炫酷
文章目录
- 1. 概述
- 2. ANSI颜色编码的核心语法
- 3. 基础文本属性
- 4. 颜色代码详解
- 基础8色系统
- 16色扩展系统
- 5. 颜色与属性的组合规则
- 6. 使用ANSI打印不同的颜色
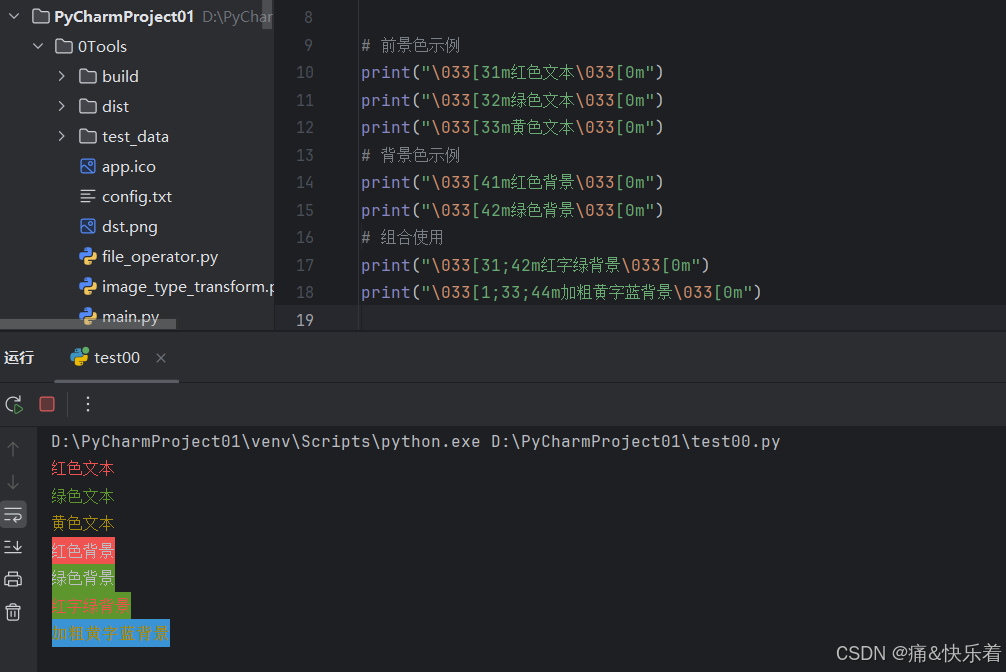
- 7. python输出示例
- 8. 注意事项
ANSI escape sequences are a standard for in-band signaling to control cursor location, color, font styling, and other options on video text terminals and terminal emulators. Certain sequences of bytes, most starting with an ASCII escape character and a bracket character, are embedded into text. The terminal interprets these sequences as commands, rather than text to display verbatim.
ANSI sequences were introduced in the 1970s to replace vendor-specific sequences and became widespread in the computer equipment market by the early 1980s. Although hardware text terminals have become increasingly rare in the 21st century, the relevance of the ANSI standard persists because a great majority of terminal emulators and command consoles interpret at least a portion of the ANSI standard.
1. 概述
ANSI颜色编码系统诞生于20世纪70年代,最初是为早期计算机终端设计的控制序列。这套系统最初出现在VT100终端上,由数字设备公司(DEC)开发,后来被采纳为行业标准。在个人计算机革命之前,这些编码是计算机与用户交互的主要方式。
尽管如今图形用户界面成为主流,但在服务器管理中,管理员通过命令行远程管理服务器时,ANSI 颜色可用于区分不同类型的信息,如红色表示错误、绿色表示成功等,方便快速识别。在开发者工具中,例如编译器的输出结果、代码编辑器的语法高亮等也常使用 ANSI 颜色来增强可读性和区分度。在命令行应用中,如一些文本处理工具、系统监控工具等,ANSI 颜色能使输出信息更加直观和易于理解,所以它在这些领域确实保持着不可替代的地位。
在ANSI(通常指的是ANSI转义序列,用于控制终端输出的文本格式,如颜色、光标位置等)中打印不同颜色,通常是通过在文本中嵌入特定的控制代码来实现的。这些代码通常以ESC(即\033或\e)开头,后跟一系列的字符来指定颜色或格式。支持ANSI转义序列的语言包括python、C、C++、Java等编程语言。
2. ANSI颜色编码的核心语法
\033[代码1;代码2;…代码n m
其中:
• \033是转义字符(ASCII 27),也可写作 \e 或 \x1b
• [ 是控制序列引导符
• 数字代码定义各种显示属性
• m是终止字符
3. 基础文本属性
#include <stdio.h>
int main() {
printf("\033[1m加粗文本\033[0m\n");
printf("\033[3m斜体文本\033[0m\n");
printf("\033[4m下划线文本\033[0m\n");
printf("\033[5m闪烁文本\033[0m\n");
printf("\033[7m反色文本\033[0m\n");
printf("\033[9m删除线文本\033[0m\n");
// 组合使用
printf("\033[1;3;4m加粗+斜体+下划线\033[0m\n");
return 0;}

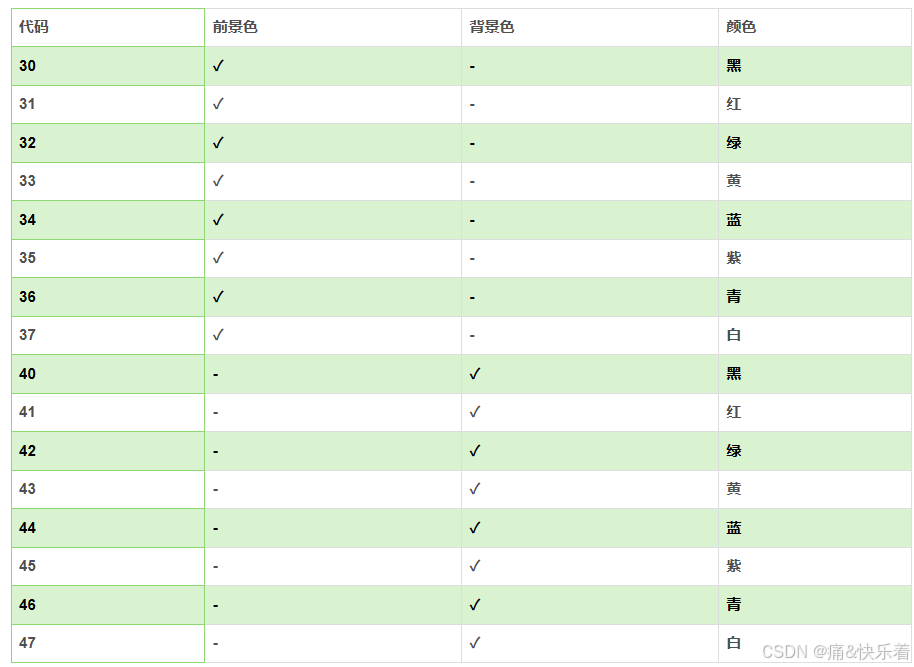
4. 颜色代码详解
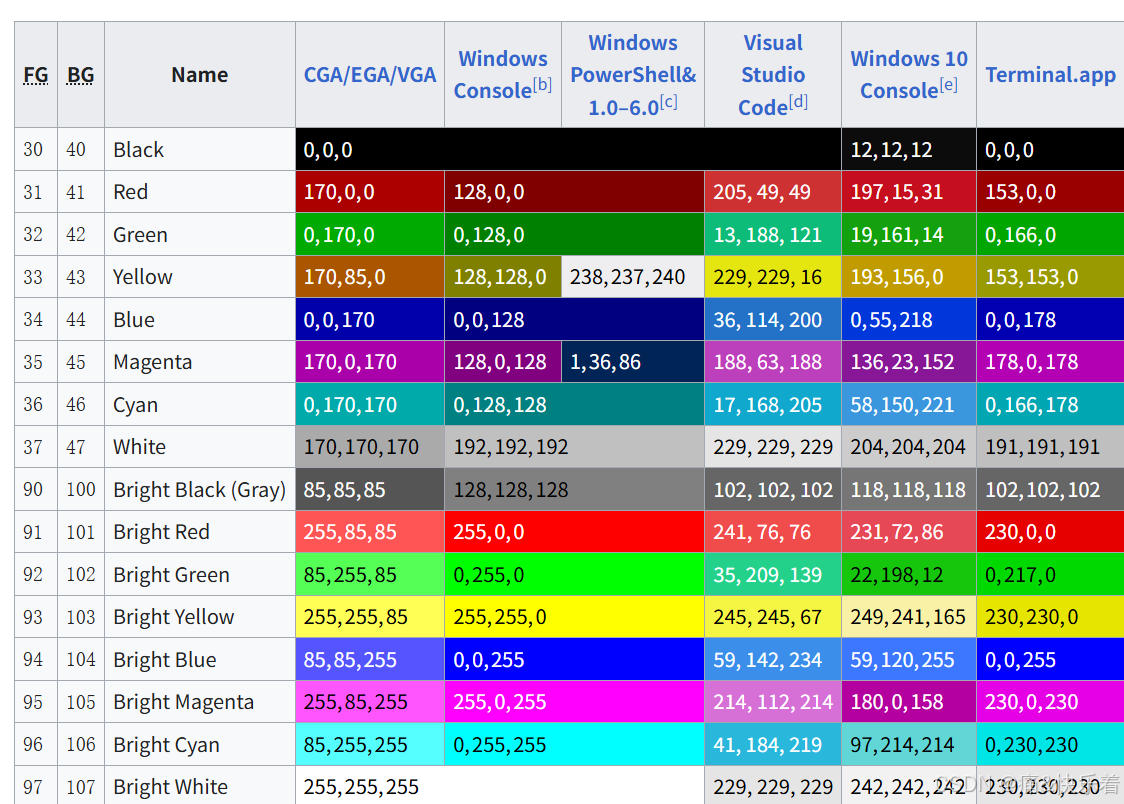
基础8色系统
代码示例:
#include <stdio.h>
int main() {
// 前景色示例
printf("\033[31m红色文本\033[0m\n");
printf("\033[32m绿色文本\033[0m\n");
printf("\033[33m黄色文本\033[0m\n");
// 背景色示例
printf("\033[41m红色背景\033[0m\n");
printf("\033[42m绿色背景\033[0m\n");// 组合使用
printf("\033[31;42m红字绿背景\033[0m\n");
printf("\033[1;33;44m加粗黄字蓝背景\033[0m\n");return 0;}
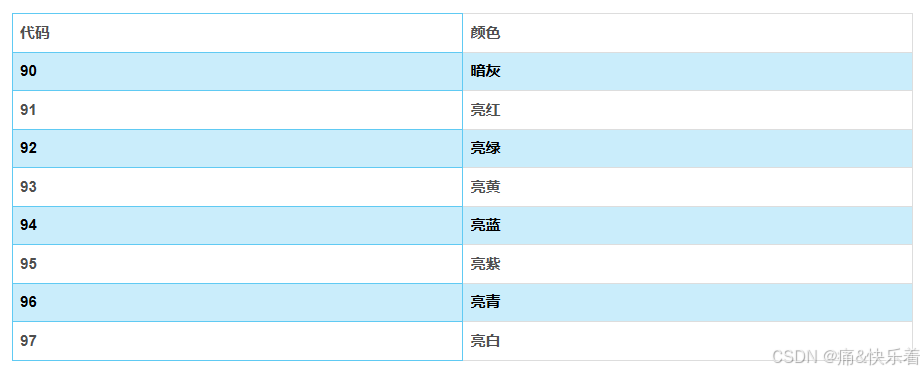
16色扩展系统
5. 颜色与属性的组合规则
1.顺序无关性:\033[1;31m 和 \033[31;1m 效果相同
2.重置需求:必须使用\033[0m重置,否则效果会持续
3.叠加效果:多个属性会同时生效
4.颜色覆盖:后设置的颜色会覆盖前一个颜色设置
6. 使用ANSI打印不同的颜色
输出示例1:
#include#define ANSI_COLOR_RED "\x1b[31m"
#define ANSI_COLOR_GREEN "\x1b[32m"
#define ANSI_COLOR_YELLOW "\x1b[33m"
#define ANSI_COLOR_BLUE "\x1b[34m"
#define ANSI_COLOR_MAGENTA "\x1b[35m"
#define ANSI_COLOR_CYAN "\x1b[36m"
#define ANSI_COLOR_RESET "\x1b[0m"int main (int argc, char const *argv[]) {printf(ANSI_COLOR_RED "This text is RED!" ANSI_COLOR_RESET "\r\n");
printf(ANSI_COLOR_GREEN "This text is GREEN!" ANSI_COLOR_RESET "\r\n");
printf(ANSI_COLOR_YELLOW "This text is YELLOW!" ANSI_COLOR_RESET "\r\n");
printf(ANSI_COLOR_BLUE "This text is BLUE!" ANSI_COLOR_RESET "\r\n");
printf(ANSI_COLOR_MAGENTA "This text is MAGENTA!" ANSI_COLOR_RESET "\r\n");
printf(ANSI_COLOR_CYAN "This text is CYAN!" ANSI_COLOR_RESET "\r\n");return 0;
}
输出示例2:
#include <iostream>
#include <string>
#include <windows.h> // 用于Windows系统的Sleep函数
// ANSI颜色代码定义
namespace Color {
const std::string RESET = "\033[0m";
const std::string BLACK = "\033[30m";
const std::string RED = "\033[31m";
const std::string GREEN = "\033[32m";
const std::string YELLOW = "\033[33m";
const std::string BLUE = "\033[34m";
const std::string MAGENTA = "\033[35m";
const std::string CYAN = "\033[36m";
const std::string WHITE = "\033[37m";
const std::string BOLD = "\033[1m";
const std::string UNDERLINE = "\033[4m";
// 背景色
const std::string BG_BLACK = "\033[40m";
const std::string BG_RED = "\033[41m";
const std::string BG_GREEN = "\033[42m";
const std::string BG_YELLOW = "\033[43m";
const std::string BG_BLUE = "\033[44m";
const std::string BG_MAGENTA = "\033[45m";
const std::string BG_CYAN = "\033[46m";
const std::string BG_WHITE = "\033[47m";}
// 彩色输出函数
void printColored(const std::string& text, const std::string& color) {
std::cout << color << text << Color::RESET;
}
// 打印颜色示例
void printColorExamples() {
std::cout << "可用的颜色示例:\n";
printColored("这是黑色文本\n", Color::BLACK);
printColored("这是红色文本\n", Color::RED);
printColored("这是绿色文本\n", Color::GREEN);
printColored("这是黄色文本\n", Color::YELLOW);
printColored("这是蓝色文本\n", Color::BLUE);
printColored("这是洋红色文本\n", Color::MAGENTA);
printColored("这是青色文本\n", Color::CYAN);
printColored("这是白色文本\n", Color::WHITE);
printColored("这是粗体文本\n", Color::BOLD);
printColored("这是下划线文本\n", Color::UNDERLINE);
std::cout << "\n背景色示例:\n";
printColored("黑色背景", Color::WHITE + Color::BG_BLACK);
std::cout << " ";
printColored("红色背景", Color::BLACK + Color::BG_RED);
std::cout << " ";
printColored("绿色背景", Color::BLACK + Color::BG_GREEN);
std::cout << " ";
printColored("黄色背景", Color::BLACK + Color::BG_YELLOW);
std::cout << " ";
printColored("蓝色背景", Color::WHITE + Color::BG_BLUE);
std::cout << " ";
printColored("洋红色背景", Color::WHITE + Color::BG_MAGENTA);
std::cout << " ";
printColored("青色背景", Color::BLACK + Color::BG_CYAN);
std::cout << " ";
printColored("白色背景", Color::BLACK + Color::BG_WHITE);
std::cout << "\n\n";}
// 彩色进度条
void printProgressBar(int progress, int total, int barWidth = 50) {
float percentage = static_cast<float>(progress) / total;
int pos = barWidth * percentage;
std::cout << "[";
for (int i = 0; i < barWidth; ++i) {if (i < pos) {printColored("=", Color::GREEN + Color::BOLD);}else if (i == pos) {printColored(">", Color::YELLOW + Color::BOLD);}else {std::cout << " ";}
}
std::cout << "] " << int(percentage * 100.0) << " %\r";
std::cout.flush();}
int main() {
// 检查是否在Windows上运行,如果是则启用ANSI转义序列
#ifdef _WIN32
HANDLE hOut = GetStdHandle(STD_OUTPUT_HANDLE);
if (hOut != INVALID_HANDLE_VALUE) {
DWORD dwMode = 0;
if (GetConsoleMode(hOut, &dwMode)) {
dwMode |= ENABLE_VIRTUAL_TERMINAL_PROCESSING;
SetConsoleMode(hOut, dwMode);
}
}
#endif
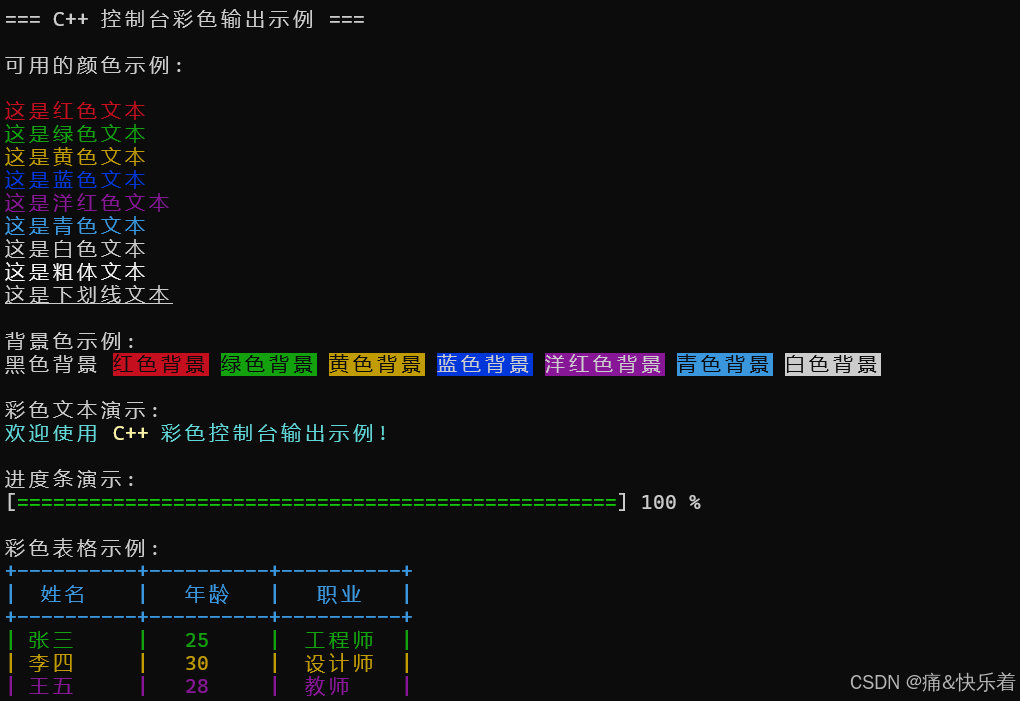
std::cout << "=== C++ 控制台彩色输出示例 ===\n\n";// 显示颜色示例
printColorExamples();// 彩色文本演示
std::cout << "彩色文本演示:\n";
printColored("欢迎使用", Color::BOLD + Color::CYAN);
printColored(" C++ ", Color::BOLD + Color::YELLOW);
printColored("彩色控制台输出示例!\n\n", Color::BOLD + Color::CYAN);// 模拟进度条
std::cout << "进度条演示:\n";
for (int i = 0; i <= 100; i++) {printProgressBar(i, 100);Sleep(30); // 稍微延迟以便观察进度
}
std::cout << "\n\n";// 彩色表格示例
std::cout << "彩色表格示例:\n";
printColored("+----------+----------+----------+\n", Color::CYAN);
printColored("| 姓名 | 年龄 | 职业 |\n", Color::CYAN);
printColored("+----------+----------+----------+\n", Color::CYAN);
printColored("| 张三 | 25 | 工程师 |\n", Color::GREEN);
printColored("| 李四 | 30 | 设计师 |\n", Color::YELLOW);
printColored("| 王五 | 28 | 教师 |\n", Color::MAGENTA);
printColored("+----------+----------+----------+\n", Color::CYAN);std::cout << "\n";// 警告和错误消息示例
printColored("警告: 这是一个警告消息!\n", Color::BOLD + Color::YELLOW);
printColored("错误: 这是一个错误消息!\n", Color::BOLD + Color::RED);
printColored("成功: 操作成功完成!\n", Color::BOLD + Color::GREEN);
printColored("信息: 这是一个信息消息。\n", Color::BOLD + Color::BLUE);std::cout << "\n";
return 0;}
7. python输出示例
8. 注意事项
在window上运行一定要加上下面的语句
// 检查是否在Windows上运行,如果是则启用ANSI转义序列
#ifdef _WIN32
HANDLE hOut = GetStdHandle(STD_OUTPUT_HANDLE);
if (hOut != INVALID_HANDLE_VALUE) {
DWORD dwMode = 0;
if (GetConsoleMode(hOut, &dwMode)) {
dwMode |= ENABLE_VIRTUAL_TERMINAL_PROCESSING;
SetConsoleMode(hOut, dwMode);
}
}
#endif