kotlin - 平板分屏,左右拖动,2个Activity计算宽度,使用ActivityOptions、Rect(三)
kotlin - 平板分屏,左右拖动,2个Activity计算宽度,使用ActivityOptions、Rect
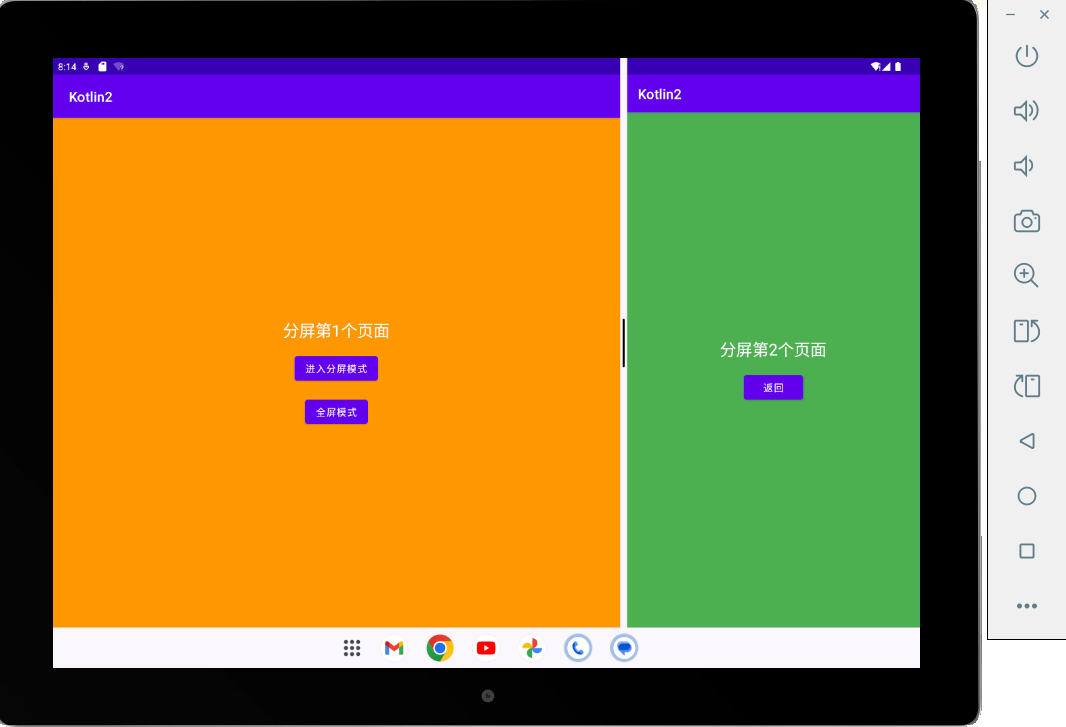
使用平板,api33才支持,可以左右拖动,分屏第一个页面 , 思考:分屏后,对整个app的影响,包括屏幕旋转android:configChanges,点击跳转,传递参数,屏幕变小后的布局、影响。
分屏有3种方式(这里实现第一种):
一:任务栈中有Main,A页面,A打开全新的B页面分屏,A左边, B右边
二:任务栈中有Main,A页面,Main和A页面分屏,Main在左边,A在右边
三:任务栈中只有Main页面,分屏左右2部分(left,right),把右部分的view缓存到新打开的A页面显示。分屏后Main页面显示left的视图,A页面显示right的视图
package com.example.androidkotlindemo2.pad.splitscreen;import android.app.ActivityOptions;
import android.content.Intent;
import android.graphics.Rect;
import android.os.Build;
import android.os.Bundle;
import android.util.DisplayMetrics;
import android.widget.Button;import androidx.appcompat.app.AppCompatActivity;import com.example.androidkotlindemo2.R;
import com.example.androidkotlindemo2.utils.LogUtils;/*** Author : wn* Email : maoning20080808@163.com* Date : 2025/8/10 10:24* Description :  使用平板,api33才支持,可以左右拖动,分屏第一个页面 , 思考:分屏后,对整个app的影响,包括屏幕旋转android:configChanges,点击跳转,传递参数,屏幕变小后的布局、影响。* 分屏有3种方式(这里实现第一种):* 一:任务栈中有Main,A页面,A打开全新的B页面分屏,A左边, B右边* 二:任务栈中有Main,A页面,Main和A页面分屏,Main在左边,A在右边* 三:任务栈中只有Main页面,分屏左右2部分(left,right),把右部分的view缓存到新打开的A页面显示。分屏后Main页面显示left的视图,A页面显示right的视图* 官方分屏窗口:https://github.com/googlearchive/android-MultiWindowPlayground*/
public class SplitScreenAActivity extends AppCompatActivity {@Overrideprotected void onCreate(Bundle savedInstanceState) {super.onCreate(savedInstanceState);setContentView(R.layout.split_screen_a);Button btnSplitScreen = findViewById(R.id.btn_split_screen_a);Button btnFullScreen = findViewById(R.id.btn_full_screen_a);btnSplitScreen.setOnClickListener(v -> {// 启动分屏模式if (isInMultiWindowMode()) {LogUtils.Companion.d("启动分屏if");// 如果已经在分屏模式,直接启动SplitScreenAActivitystartActivity(new Intent(this, SplitScreenAActivity.class));} else {LogUtils.Companion.d("启动分屏else");// 进入分屏模式并启动SplitScreenAActivityenterSplitScreen();}});btnFullScreen.setOnClickListener(v -> {// 退出分屏模式(如果正在分屏)if (isInMultiWindowMode()) {exitSplitScreen();}});}private void enterSplitScreen() {if (Build.VERSION.SDK_INT >= Build.VERSION_CODES.N) {// 1. 首先进入多窗口模式if (!isInMultiWindowMode()) {LogUtils.Companion.d("enterSplitScreen 11");// 启动自己进入多窗口模式Intent selfIntent = new Intent(this, SplitScreenAActivity.class);selfIntent.addFlags(Intent.FLAG_ACTIVITY_LAUNCH_ADJACENT |Intent.FLAG_ACTIVITY_NEW_TASK);DisplayMetrics metrics = new DisplayMetrics();getWindowManager().getDefaultDisplay().getMetrics(metrics);// 配置SecondaryActivity的边界(右侧)Rect leftBounds = new Rect(0, 0, metrics.widthPixels/2, metrics.heightPixels);ActivityOptions options = ActivityOptions.makeBasic();options.setLaunchBounds(leftBounds);startActivity(selfIntent, options.toBundle());//return;}// 2. 现在已经在多窗口模式,启动第二个ActivityDisplayMetrics metrics = new DisplayMetrics();getWindowManager().getDefaultDisplay().getMetrics(metrics);int halfWidth = metrics.widthPixels / 2;// 配置SecondaryActivity的边界(右侧)Rect rightBounds = new Rect(halfWidth, 0, metrics.widthPixels, metrics.heightPixels);ActivityOptions options = ActivityOptions.makeBasic();options.setLaunchBounds(rightBounds);LogUtils.Companion.d("enterSplitScreen 22");Intent secondaryIntent = new Intent(this, SplitScreenBActivity.class);secondaryIntent.addFlags(Intent.FLAG_ACTIVITY_LAUNCH_ADJACENT |Intent.FLAG_ACTIVITY_NEW_TASK);startActivity(secondaryIntent, options.toBundle());} else {// 不支持分屏的设备,简单启动ActivitystartActivity(new Intent(this, SplitScreenBActivity.class));}}private void exitSplitScreen() {SplitScreenBActivity.mActivity.finish();/*// 关闭SplitScreenBActivityIntent intent = new Intent(this, SplitScreenBActivity.class);//intent.addFlags(Intent.FLAG_ACTIVITY_CLEAR_TOP |Intent.FLAG_ACTIVITY_SINGLE_TOP);intent.addFlags(Intent.FLAG_ACTIVITY_NEW_TASK | Intent.FLAG_ACTIVITY_CLEAR_TOP);startActivity(intent);//finish();*/}
}
package com.example.androidkotlindemo2.pad.splitscreen;import android.content.res.Configuration;
import android.os.Bundle;
import android.widget.Button;import androidx.appcompat.app.AppCompatActivity;import com.example.androidkotlindemo2.R;/*** Author : wn* Email : maoning20080808@163.com* Date : 2025/8/10 10:24* Description :*/
public class SplitScreenBActivity extends AppCompatActivity {//这里简单使用,可以使用广播,获取任务栈的方式实现。public static SplitScreenBActivity mActivity;@Overrideprotected void onCreate(Bundle savedInstanceState) {super.onCreate(savedInstanceState);setContentView(R.layout.split_screen_b);mActivity = this;Button btnBack = findViewById(R.id.btn_back);btnBack.setOnClickListener(v -> finish());}@Overridepublic void onMultiWindowModeChanged(boolean isInMultiWindowMode, Configuration newConfig) {super.onMultiWindowModeChanged(isInMultiWindowMode, newConfig);}@Overrideprotected void onStop() {super.onStop();// 当ActivityB停止时(例如用户退出分屏),可以执行一些清理操作}
}
split_screen_a.xml布局<?xml version="1.0" encoding="utf-8"?> <LinearLayout xmlns:android="http://schemas.android.com/apk/res/android"android:layout_width="match_parent"android:layout_height="match_parent"android:orientation="vertical"android:gravity="center"android:background="#FF9800"><TextViewandroid:layout_width="wrap_content"android:layout_height="wrap_content"android:text="分屏第1个页面"android:textSize="24sp"android:textColor="#FFFFFF"/><Buttonandroid:id="@+id/btn_split_screen_a"android:layout_width="wrap_content"android:layout_height="wrap_content"android:layout_marginTop="16dp"android:text="进入分屏模式"/><Buttonandroid:id="@+id/btn_full_screen_a"android:layout_width="wrap_content"android:layout_height="wrap_content"android:layout_marginTop="16dp"android:text="全屏模式"/></LinearLayout>
split_screen_b.xml布局<?xml version="1.0" encoding="utf-8"?> <LinearLayout xmlns:android="http://schemas.android.com/apk/res/android"android:layout_width="match_parent"android:layout_height="match_parent"android:orientation="vertical"android:gravity="center"android:background="#4CAF50"><TextViewandroid:layout_width="wrap_content"android:layout_height="wrap_content"android:text="分屏第2个页面"android:textSize="24sp"android:textColor="#FFFFFF"/><Buttonandroid:id="@+id/btn_back"android:layout_width="wrap_content"android:layout_height="wrap_content"android:layout_marginTop="16dp"android:text="返回"/></LinearLayout>