[bat-cli] 打印机 | `src/printer.rs`
前文传送:[OS_8] 终端和 UNIX Shell | 会话和进程组 | sigaction | dash
第八章:打印机
在上一章行范围处理中,我们学习了bat如何智能地过滤和高亮文件中的特定行。
现在,假设我们已经选定了这些行,可能还设置了首选颜色主题并启用了行号。bat是如何将这些内容精确地绘制到屏幕上,细致地应用颜色、行号和其他视觉效果的?
这就是打印机组件的作用
打印机解决了什么问题?
将Printer视为bat的高级排版师和平面设计师。
它的工作是接收原始文本内容,结合配置(Config)的指令和高亮资源的"语法书",将其转换为格式精美的逐行输出,准备显示。
它负责所有我们看到的视觉细节:
- 语法高亮:为关键字、注释、字符串等应用正确的颜色
- 行号:在每行旁边添加编号标签
- Git修改标记:根据Git标记已添加、修改或删除的行
- 文本换行:将长行断开以适应终端宽度
- 制表符扩展:将制表符(
\t)转换为正确数量的空格 - 非打印字符显示:为空格、制表符或控制字符等显示特殊符号
- 页眉和页脚:显示文件名、大小和装饰边框
Printer是将bat的愿景变为现实的艺术家,确保每行都以正确的样式和视觉元素排列,然后才发送到屏幕或分页器。
打印机的工具集:特质与实现
bat中的Printer不只是一个单一实体;它是一个蓝图(Printer特质),针对不同需求有多种实现:
Printer特质:这是基本契约,定义了bat中任何打印机必须能够执行的操作(如print_line、print_header、print_footer)SimplePrinter:这是一个非常基础的打印机,仅输出原始文本行。适用于我们只想查看内容而不需要bat特定格式的场景InteractivePrinter:这是主角!它是功能齐全的打印机,应用所有语法高亮、行号、Git标记、换行和其他视觉装饰。从命令行运行bat时看到的大部分内容都来自InteractivePrinter
InteractivePrinter配备了一套丰富的工具和辅助组件:
- 装饰:这些是显示在代码左侧的小型视觉元素,如行号、Git变更标记和垂直网格边框。它们由
src/decorations.rs模块管理 - 颜色:这个内部结构体(
Colors)保存了所有定义各种元素(网格、行号、Git标记)实际使用的前景和背景颜色的nu_ansi_term::Style对象 - 高亮器:
syntect的HighlightLines实例,接收语法定义和主题并将语法高亮应用到文本行 - 预处理器:函数(
expand_tabs、replace_nonprintable、strip_ansi)在突出显示或显示前修改原始文本内容(例如将制表符扩展为空格,为非打印字符显示特殊符号)。这些位于src/preprocessor.rs
如何间接指导打印机
作为bat用户或库使用者,我们通常不直接创建或调用SimplePrinter或InteractivePrinter的方法。而是通过配置(Config)对象(由PrettyPrinter帮助我们设置)来配置bat的行为。控制器然后根据我们的Config决定使用哪个Printer实现以及如何初始化它。
看看PrettyPrinter上的设置如何影响InteractivePrinter的输出:
use bat::{PrettyPrinter, PagingMode, WrappingMode, NonprintableNotation, HighlightingAssets};
use std::path::Path;fn main() {let code = b"fn main() {\n\t// 带制表符的行\n    println!(\"Hello World!\");\n}\n";println!("--- 带行号和语法的基本显示 ---");PrettyPrinter::new().input_from_bytes(code).name("main.rs") // Rust语法提示.line_numbers(true) // 启用LineNumberDecoration.theme("TwoDark") // 配置syntect高亮器.print().unwrap();println!("\n--- 显示非打印字符和制表符 ---");PrettyPrinter::new().input_from_bytes(code).name("main.rs").show_nonprintable(true) // 启用replace_nonprintable.nonprintable_notation(NonprintableNotation::Unicode) // 配置符号.tab_width(4) // 配置expand_tabs.print().unwrap();println!("\n--- 长行换行 ---");let long_line_code = b"const VERY_LONG_VARIABLE_NAME: u32 = 0xDEADC0DEBEEFCAFE; // 这是一行可能超出终端宽度的超长文本\n";PrettyPrinter::new().input_from_bytes(long_line_code).name("long.rs").line_numbers(true).wrapping_mode(WrappingMode::Char) // 启用基于字符的换行逻辑.term_width(40) // 模拟窄终端进行演示.print().unwrap();
}
说明:
line_numbers(true):Config中的这个设置告诉InteractivePrinter实例化并使用LineNumberDecorationtheme("TwoDark"):InteractivePrinter使用这个主题名称从HighlightingAssets加载正确的语法高亮调色板show_nonprintable(true)和nonprintable_notation(NonprintableNotation::Unicode):这些配置InteractivePrinter运行src/preprocessor.rs中的replace_nonprintable函数,将空格转换为·,制表符转换为├─┤等tab_width(4):告诉InteractivePrinter使用src/preprocessor.rs中的expand_tabs函数,确保制表符渲染为4个空格wrapping_mode(WrappingMode::Char)和term_width(40):这些指示InteractivePrinter激活其换行逻辑,在字符边界断开行以适应指定的term_width
每个这些调用都会修改Config对象,然后InteractivePrinter读取该对象以执行其复杂的格式化任务。
🎢ANSI转义序列
控制终端显示格式(如颜色、光标位置等)的特殊字符组合,以\033[开头。例如\033[31m会让后续文字变红色。
打印机的内部工作原理
Printer通常由控制器调用以处理每个输入文件。以下是InteractivePrinter运行的简化视图:
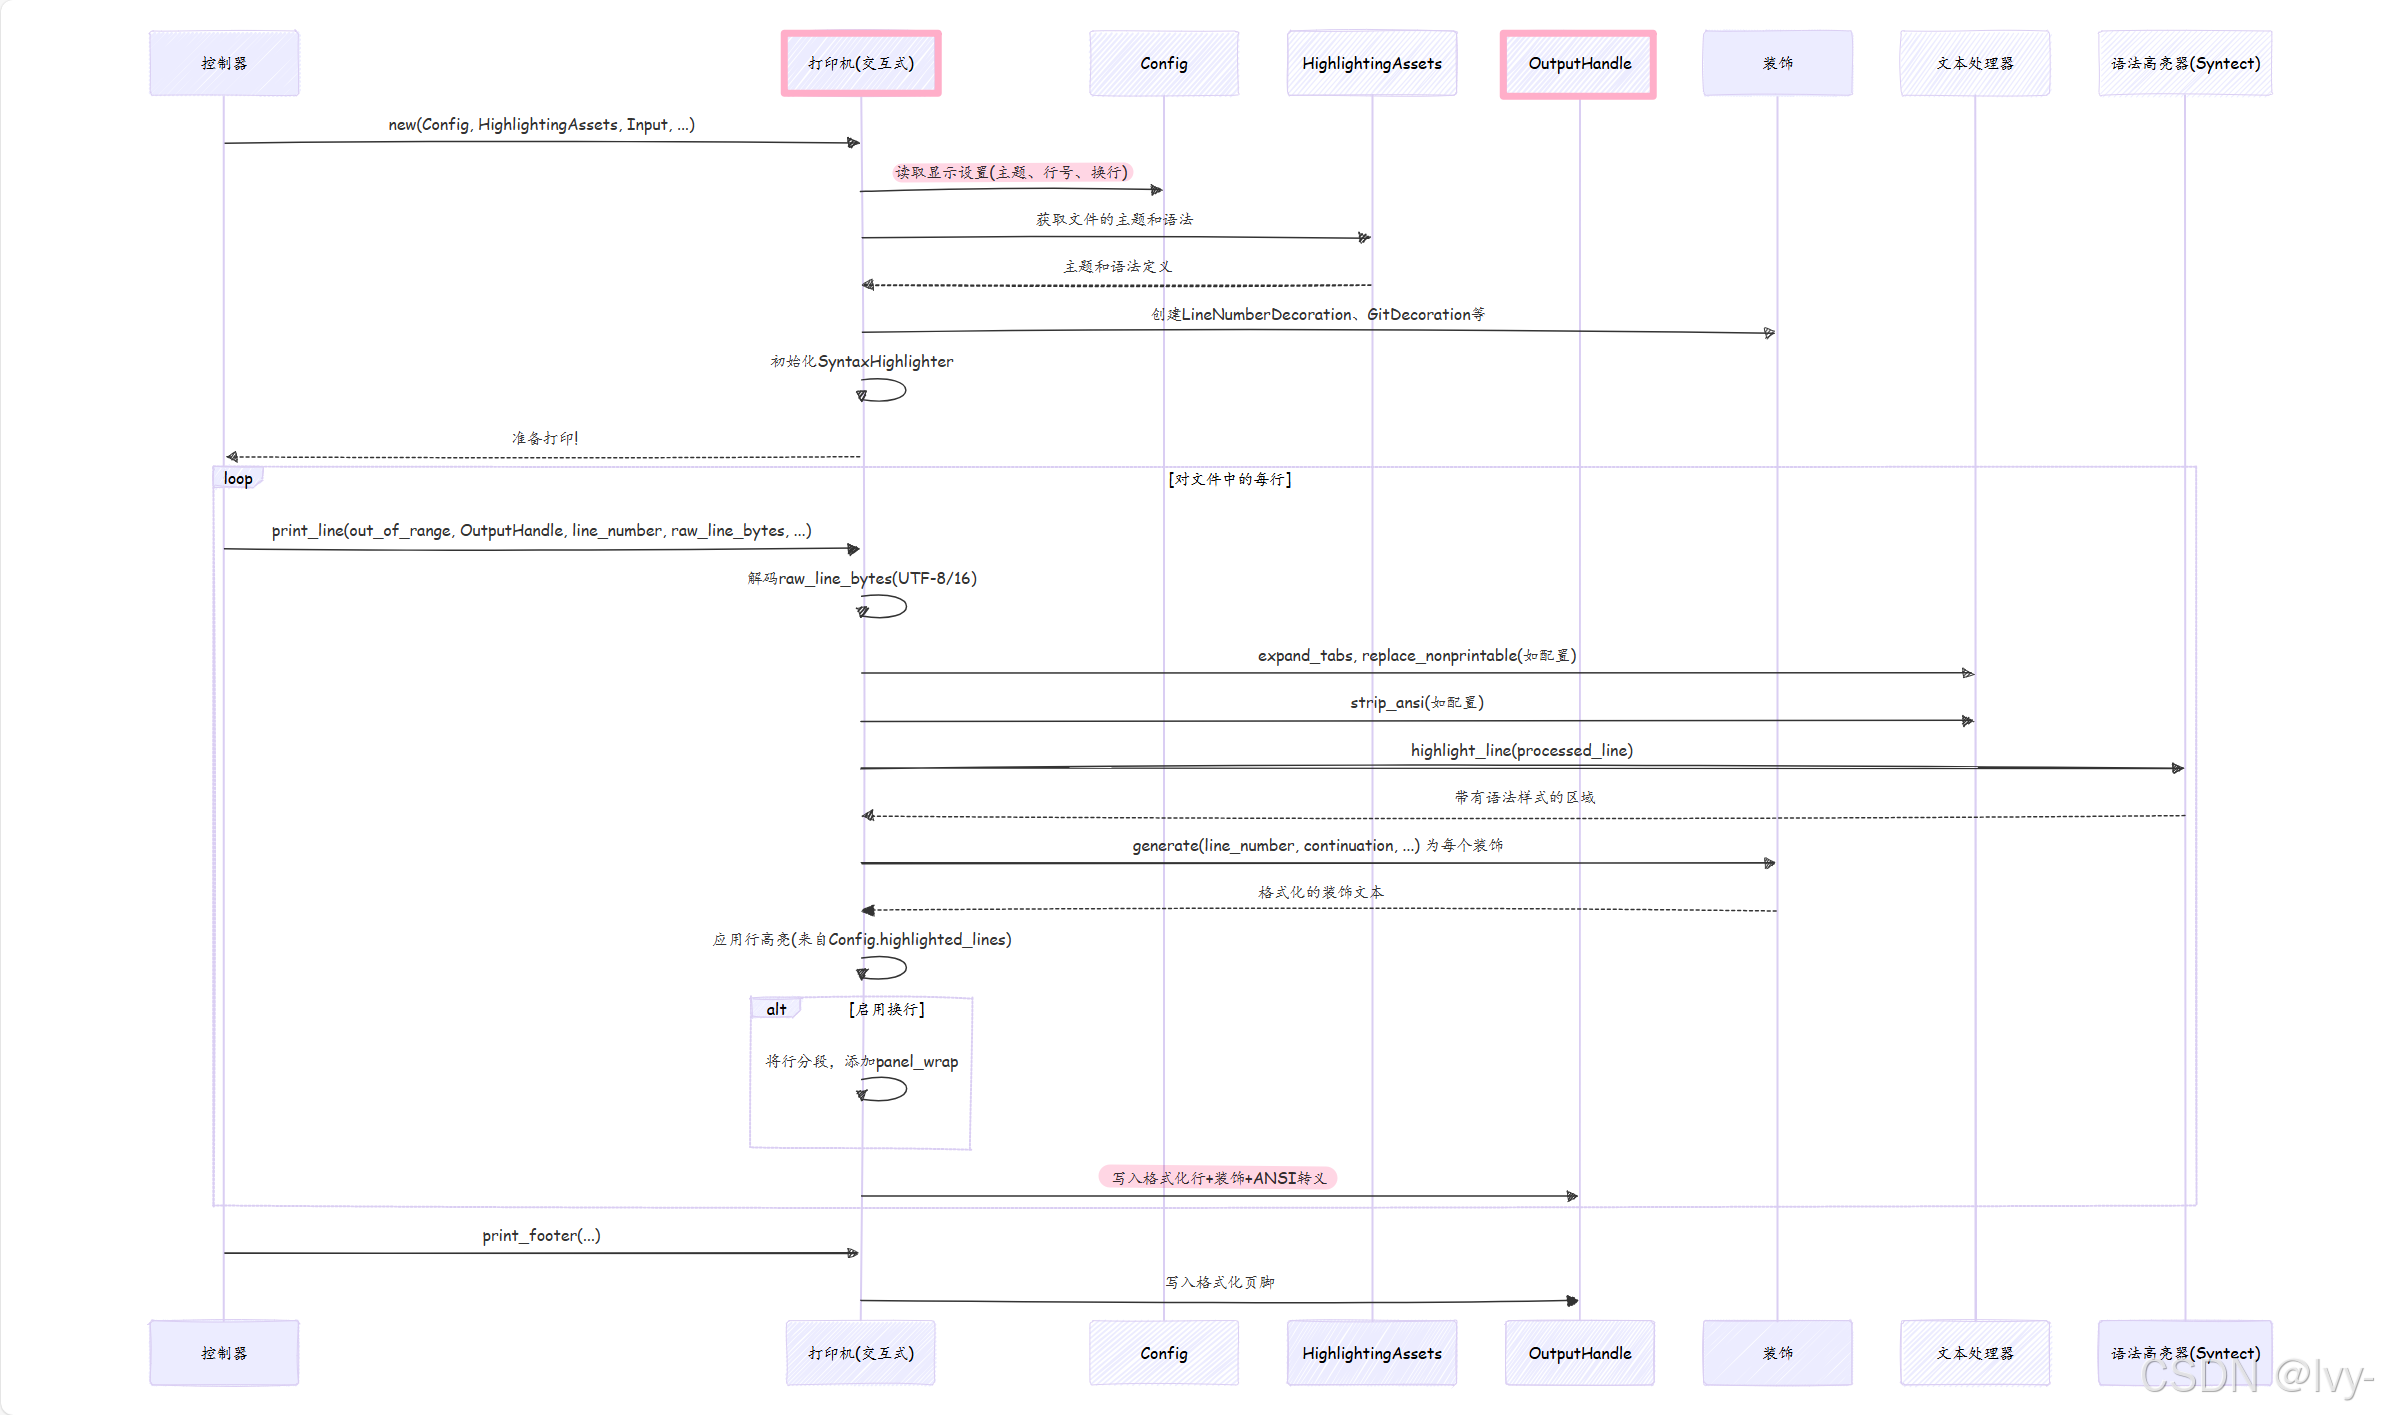
当控制器调用InteractivePrinter::new时,打印机会设置自身:
- 它从
Config读取各种设置(如theme、line_numbers、wrapping_mode) - 它向高亮资源请求指定
Theme和当前文件确定的SyntaxReference - 它基于
Config设置创建所有必要的Decoration对象(如LineNumberDecoration、LineChangesDecoration、GridBorderDecoration) - 它初始化
syntect的HighlightLines对象
然后,对于控制器的print_file_ranges方法处理的每一行:
InteractivePrinter::print_line方法接收原始行内容- 它首先将
line_buffer从字节解码为String,如果检测到UTF-16则处理(来自输入管理) - 如果配置了,它调用
strip_ansi(来自src/preprocessor.rs)移除任何现有的ANSI转义序列 - 它将行传递给
syntect(highlight_regions_for_line)以获取"区域"列表,其中每个区域是具有关联语法Style的行的一部分 - 它检查行是否应该被跳过(由于行范围处理的
out_of_range)或被压缩(如果squeeze_lines激活) - 它确定行是否应该有特殊背景色(来自
Config.highlighted_lines,如行范围处理所述) - 然后它遍历
decorations,要求每个generate其文本(例如行号、Git标记)并将其写入OutputHandle - 最后,它遍历
regions(代码的实际突出显示部分)。对于每个区域,它应用制表符扩展(expand_tabs来自src/preprocessor.rs),处理换行(如果wrapping_mode启用),并使用as_terminal_escaped(来自src/terminal.rs)和AnsiStyle(来自src/vscreen.rs)将syntect的样式转换为实际的ANSI转义序列,并将样式化文本写入OutputHandle
深入代码:src/printer.rs及相关文件
让我们看看bat代码库中说明这些概念的关键片段。
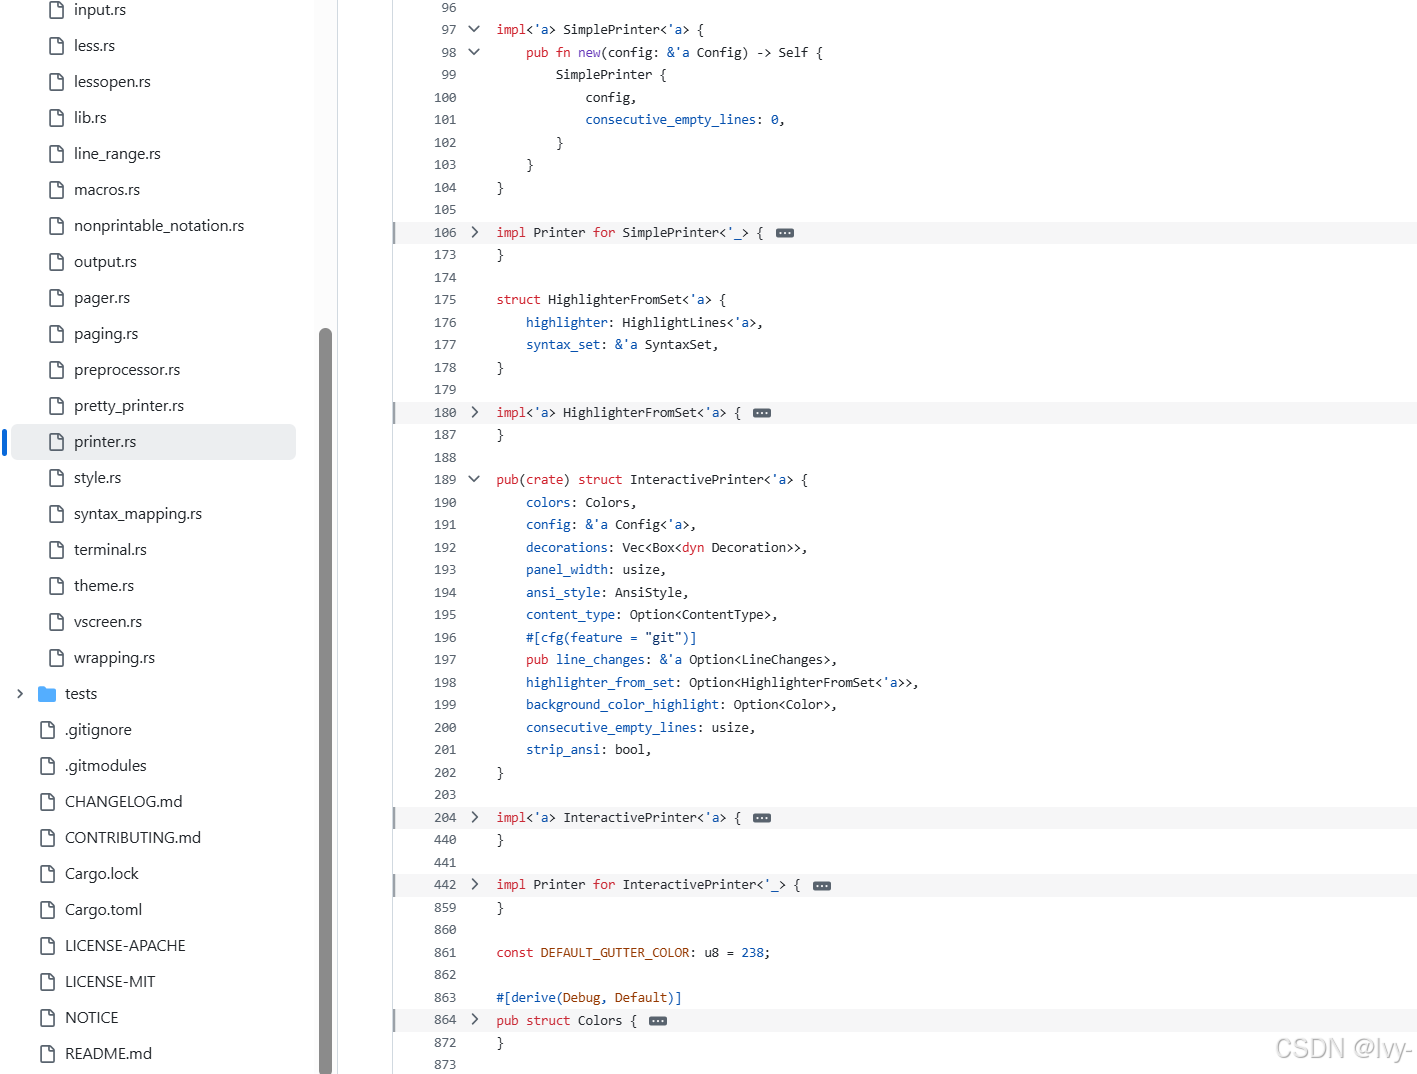
首先,src/printer.rs中的Printer特质和InteractivePrinter结构体:
// src/printer.rs
pub(crate) trait Printer {// ... 方法如print_header、print_footer、print_snip ...fn print_line(&mut self,out_of_range: bool, // 来自行范围处理,确定行是否可见handle: &mut OutputHandle,line_number: usize,line_buffer: &[u8],max_buffered_line_number: MaxBufferedLineNumber,) -> Result<()>;
}pub(crate) struct InteractivePrinter<'a> {colors: Colors,config: &'a Config<'a>,decorations: Vec<Box<dyn Decoration>>, // 行号、Git标记等的集合panel_width: usize, // 所有装饰的总宽度ansi_style: AnsiStyle, // 跟踪当前ANSI状态content_type: Option<ContentType>,#[cfg(feature = "git")]pub line_changes: &'a Option<LineChanges>, // 来自差异模块的Git变更highlighter_from_set: Option<HighlighterFromSet<'a>>, // syntect高亮器background_color_highlight: Option<Color>, // 高亮行的特殊背景consecutive_empty_lines: usize,strip_ansi: bool,
}
说明:
Printer特质定义了print_line方法,这是逐行处理的核心InteractivePrinter保存所有必要的状态和配置:colors、全局config的引用、decorations列表、syntect的highlighter_from_set等
接下来,简化版的InteractivePrinter::new:
// src/printer.rs
impl<'a> InteractivePrinter<'a> {pub(crate) fn new(config: &'a Config,assets: &'a HighlightingAssets,input: &mut OpenedInput,#[cfg(feature = "git")] line_changes: &'a Option<LineChanges>,) -> Result<Self> {let theme = assets.get_theme(&config.theme); // 从HighlightingAssets加载主题let colors = if config.colored_output {Colors::colored(theme, config.true_color) // 基于主题初始化Colors} else {Colors::plain()};let mut decorations: Vec<Box<dyn Decoration>> = Vec::new();if config.style_components.numbers() { // 检查Config中的行号decorations.push(Box::new(LineNumberDecoration::new(&colors)));}#[cfg(feature = "git")]{if config.style_components.changes() { // 检查Config中的Git变更decorations.push(Box::new(LineChangesDecoration::new(&colors)));}}// ... (添加GridBorderDecoration并计算panel_width) ...let highlighter_from_set = if needs_to_match_syntax {// 确定并从HighlightingAssets获取正确的语法// (使用Config.language和Config.syntax_mapping)// ... 然后创建HighlighterFromSet::new(syntax, theme)Some(HighlighterFromSet::new(syntax_in_set, theme))} else {None};Ok(InteractivePrinter {panel_width, colors, config, decorations, // ... 其他字段 ...highlighter_from_set, // ...})}// ... 其他方法 ...
}
说明:
new方法是设置阶段。
它加载颜色theme,初始化colors辅助结构体,基于config.style_components添加decorations,并使用检测到的语法设置syntect的highlighter_from_set。
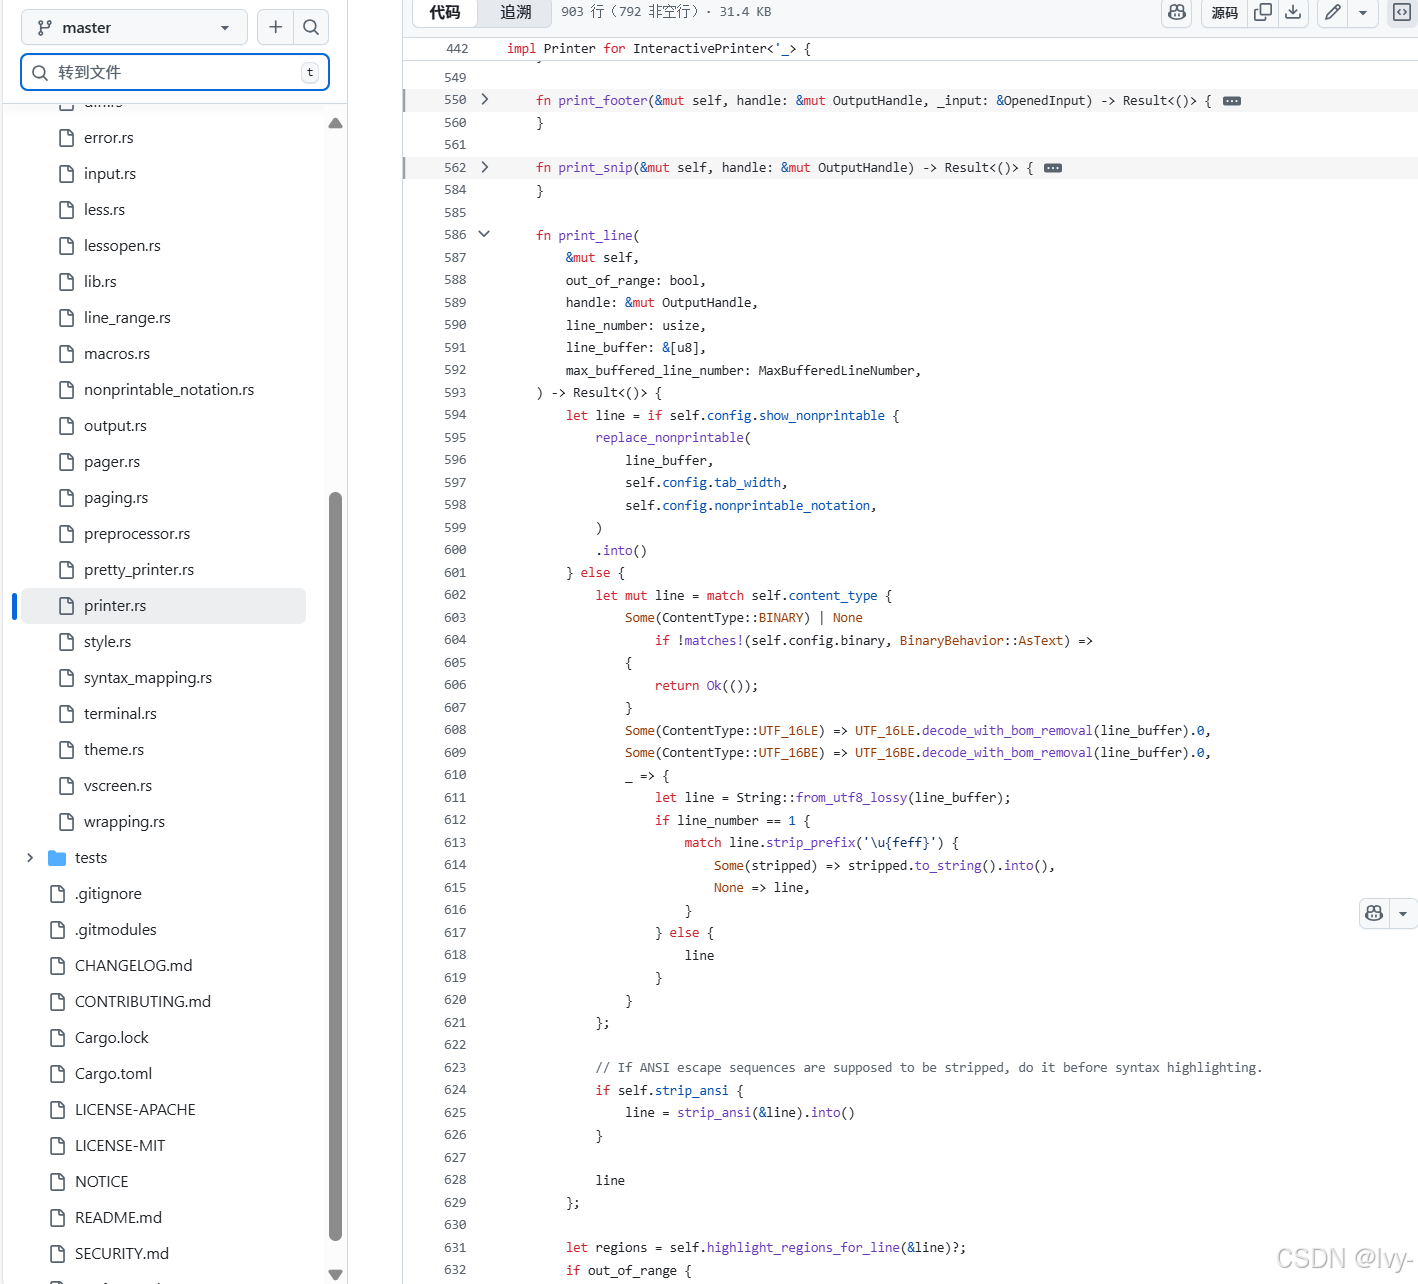
现在,让我们看看高度简化的InteractivePrinter::print_line方法的流程:
// src/printer.rs (简化版InteractivePrinter::print_line)
impl Printer for InteractivePrinter<'_> {fn print_line(&mut self,out_of_range: bool,handle: &mut OutputHandle,line_number: usize,line_buffer: &[u8],max_buffered_line_number: MaxBufferedLineNumber,) -> Result<()> {// 1. 解码和预处理行let mut line = if self.config.show_nonprintable {replace_nonprintable(line_buffer, self.config.tab_width, self.config.nonprintable_notation).into()} else {// ... 解码UTF-8/UTF-16,处理BOM ...let line_decoded = String::from_utf8_lossy(line_buffer);if self.strip_ansi { strip_ansi(&line_decoded).into() } else { line_decoded }};// 2. 使用syntect进行语法高亮let regions = self.highlight_regions_for_line(&line)?;// 如果行超出范围(来自行范围处理)或被压缩,我们在此停止if out_of_range || /* 压缩行检查 */ false { return Ok(()); }// 3. 检查行高亮(特殊背景色)let highlight_this_line = self.config.highlighted_lines.0.check(line_number, max_buffered_line_number) == RangeCheckResult::InRange;let background_color = self.background_color_highlight.filter(|_| highlight_this_line);// 4. 打印装饰(行号、Git标记、网格)if self.panel_width > 0 {for deco in self.decorations.iter() {write!(handle, "{} ", deco.generate(line_number, false, self).text)?;}}// 5. 打印行内容,应用样式并处理换行if matches!(self.config.wrapping_mode, WrappingMode::NoWrapping(_)) {// 遍历高亮区域,将syntect样式转换为ANSI// 并写入OutputHandle// 如果tab_width > 0,也调用self.preprocess扩展制表符for &(style, region) in ®ions {write!(handle, "{}", as_terminal_escaped(style, region, self.config.true_color, self.config.colored_output,self.config.use_italic_text, background_color))?;}writeln!(handle)?; // 添加换行} else {// 基于term_width的复杂换行字符逻辑// ...writeln!(handle)?; // 添加换行}Ok(())}
}
说明:
print_line方法从行解码和文本预处理开始(replace_nonprintable、strip_ansi)- 然后它委托给
highlight_regions_for_line(使用syntect)获取样式化区域 - 它执行
out_of_range(来自行范围处理)和行压缩检查 - 它检查
config.highlighted_lines获取特殊背景色 - 它遍历
self.decorations(LineNumberDecoration、LineChangesDecoration、GridBorderDecoration对象)并调用它们的generate方法获取格式化文本,然后将其写入handle - 最后,它遍历
regions(实际代码),调用self.preprocess(用于制表符)和as_terminal_escaped(来自src/terminal.rs)将syntect的高亮样式转换为ANSI转义序列并将文本写入OutputHandle。换行逻辑也在这里处理
这种复杂的编排确保了我们代码的每个字符都以像素级精度显示,并带有bat提供的所有丰富的视觉信息。
关键辅助模块:
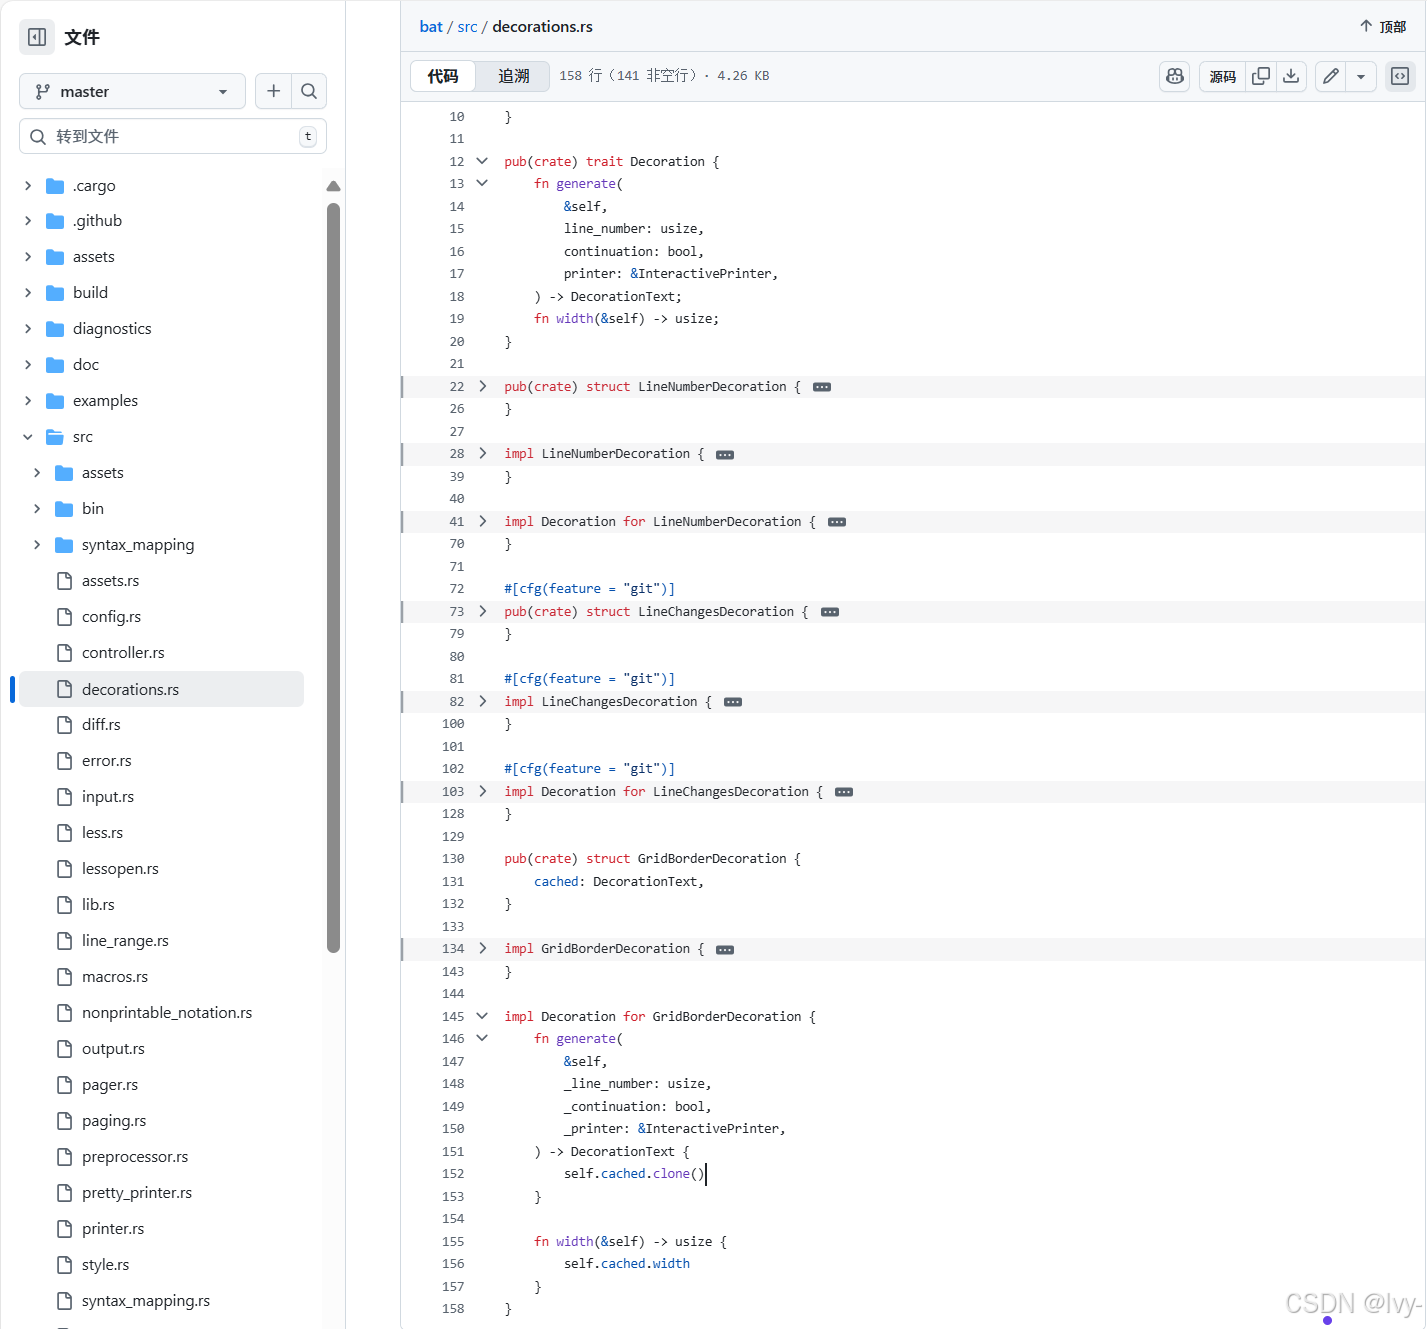
-
src/decorations.rs:定义Decoration特质和具体实现如LineNumberDecoration、LineChangesDecoration和GridBorderDecoration。每个装饰知道如何generate其文本表示。// src/decorations.rs (简化版) pub(crate) trait Decoration {fn generate(&self,line_number: usize,continuation: bool, // 如果行是换行则为Trueprinter: &InteractivePrinter,) -> DecorationText;fn width(&self) -> usize; }pub(crate) struct LineNumberDecoration { /* ... */ } impl Decoration for LineNumberDecoration {fn generate(&self,line_number: usize,continuation: bool,_printer: &InteractivePrinter,) -> DecorationText {if continuation {// 为换行返回空格DecorationText { text: self.color.paint(" ".repeat(self.width())).to_string(), width: self.width() }} else {// 格式化并绘制实际行号let plain: String = format!("{line_number:4}");DecorationText { width: plain.len(), text: self.color.paint(plain).to_string(), }}}fn width(&self) -> usize { 4 } } // ... LineChangesDecoration和GridBorderDecoration实现 ... -
src/preprocessor.rs:包含函数如expand_tabs(将制表符替换为空格)、replace_nonprintable(将控制字符和空格/制表符转换为视觉符号)和strip_ansi(移除ANSI转义)。InteractivePrinter基于Config调用这些 -
src/terminal.rs:提供to_ansi_color(将syntect的Color转换为nu_ansi_term::Color)和as_terminal_escaped(接收syntect的Style和文本,并将其转换为终端的ANSI转义字符串)。这是实际生成颜色代码的地方 -
src/vscreen.rs:管理AnsiStyle结构体,跟踪终端的当前ANSI样式状态。这对于确保样式正确应用和重置,以及处理嵌套ANSI序列非常重要
结论
本章我们探讨了打印机,bat专门用于格式化和渲染内容的组件。
我们了解到InteractivePrinter是主力,基于配置(Config)设置精心应用语法高亮、行号、Git标记、文本换行和其他视觉装饰。从解码原始字节到生成复杂的ANSI转义序列,Printer确保我们的代码始终以美观和信息丰富的方式显示。
这完成了我们对bat核心组件的探索之旅~我们涵盖了从协调流程的中心控制器,到如何管理输入、处理输出、应用配置、加载高亮资源、映射语法、处理行范围,最后到Printer如何渲染最终输出的所有内容。
现在我们已经可以了解是什么让bat成为如此强大且备受喜爱的代码查看工具啦
END ★,°:.☆( ̄▽ ̄)/:.°★ 。