K8S的部署与常用管理
一.k8s简介
kubernetes的本质是一组服务器集群,它可以在集群的每个节点上运行特定的程序,来对节点中的容器进行管理。目的是实现资源管理的自动化,主要提供了如下的主要功能:
自我修复:一旦某一个容器崩溃,能够在1秒中左右迅速启动新的容器
弹性伸缩:可以根据需要,自动对集群中正在运行的容器数量进行调整
服务发现:服务可以通过自动发现的形式找到它所依赖的服务
负载均衡:如果一个服务起动了多个容器,能够自动实现请求的负载均衡
版本回退:如果发现新发布的程序版本有问题,可以立即回退到原来的版本
存储编排:可以根据容器自身的需求自动创建存储卷
1.1 设计架构
一个kubernetes集群主要是由控制节点(master)、工作节点(node)构成,每个节点上都会安装不同的组件
1 master:集群的控制平面,负责集群的决策
ApiServer : 资源操作的唯一入口,接收用户输入的命令,提供认证、授权、API注册和发现等机制
Scheduler : 负责集群资源调度,按照预定的调度策略将Pod调度到相应的node节点上
ControllerManager : 负责维护集群的状态,比如程序部署安排、故障检测、自动扩展、滚动更新等
Etcd :负责存储集群中各种资源对象的信息
2 node:集群的数据平面,负责为容器提供运行环境
kubelet:负责维护容器的生命周期,同时也负责Volume(CVI)和网络(CNI)的管理
Container runtime:负责镜像管理以及Pod和容器的真正运行(CRI)
kube-proxy:负责为Service提供cluster内部的服务发现和负载均衡
1.2 各组件之间调用关系
当我们要运行一个web服务时
kubernetes环境启动之后,master和node都会将自身的信息存储到etcd数据库中
web服务的安装请求会首先被发送到master节点的apiServer组件
apiServer组件会调用scheduler组件来决定到底应该把这个服务安装到哪个node节点上
在此时,它会从etcd中读取各个node节点的信息,然后按照一定的算法进行选择,并将结果告知apiServer
apiServer调用controller-manager去调度Node节点安装web服务
kubelet接收到指令后,会通知docker,然后由docker来启动一个web服务的pod
如果需要访问web服务,就需要通过kube-proxy来对pod产生访问的代理
1.3 常用名词概念
Master:集群控制节点,每个集群需要至少一个master节点负责集群的管控
Node:工作负载节点,由master分配容器到这些node工作节点上,然后node节点上的
Pod:kubernetes的最小控制单元,容器都是运行在pod中的,一个pod中可以有1个或者多个容器
Controller:控制器,通过它来实现对pod的管理,比如启动pod、停止pod、伸缩pod的数量等等
Service:pod对外服务的统一入口,下面可以维护者同一类的多个pod
Label:标签,用于对pod进行分类,同一类pod会拥有相同的标签
NameSpace:命名空间,用来隔离pod的运行环境
1.4 k8s的分层架构
核心层:Kubernetes最核心的功能,对外提供API构建高层的应用,对内提供插件式应用执行环境
应用层:部署(无状态应用、有状态应用、批处理任务、集群应用等)和路由(服务发现、DNS解析等)
管理层:系统度量(如基础设施、容器和网络的度量),自动化(如自动扩展、动态Provision等)以及策略管理(RBAC、Quota、PSP、NetworkPolicy等)
接口层:kubectl命令行工具、客户端SDK以及集群联邦
生态系统:在接口层之上的庞大容器集群管理调度的生态系统,可以划分为两个范畴
Kubernetes外部:日志、监控、配置管理、CI、CD、Workflow、FaaS、OTS应用、ChatOps等
Kubernetes内部:CRI、CNI、CVI、镜像仓库、Cloud Provider、集群自身的配置和管理等
二.k8s集群环境搭建
2.1 集群环境初始化
所有节点执行以下步骤:
禁用swap和编写本地解析
# systemctl mask swap.target
]# swapoff -a
]# vim /etc/fstab#
# /etc/fstab
# Created by anaconda on Sun Feb 19 17:38:40 2023
#
# Accessible filesystems, by reference, are maintained under '/dev/disk'
# See man pages fstab(5), findfs(8), mount(8) and/or blkid(8) for more info
#
/dev/mapper/rhel-root   /                       xfs     defaults        0 0
UUID=ddb06c77-c9da-4e92-afd7-53cd76e6a94a /boot                   xfs     defaults        0 0
#/dev/mapper/rhel-swap   swap                    swap    defaults        0 0
/dev/cdrom      /media  iso9660 defaults        0 0[root@k8s-master ~]# vim /etc/hosts
127.0.0.1   localhost localhost.localdomain localhost4 localhost4.localdomain4
::1         localhost localhost.localdomain localhost6 localhost6.localdomain6
172.25.254.100      k8s-master.timinglee.org
172.25.254.10       k8s-node1.timinglee.org
172.25.254.20       k8s-node2.timinglee.org
172.25.254.254      reg.timinglee.org
安装docker
[root@k8s-master ~]# vim /etc/yum.repos.d/docker.repo
[docker]
name=docker
baseurl=https://mirrors.aliyun.com/docker-ce/linux/rhel/9/x86_64/stable/
gpgcheck=0[root@k8s-master ~]# dnf install docker-ce -y
所有节点设定docker的资源管理模式为systemd
[root@k8s-master ~]# vim /etc/docker/daemon.json
{"registry-mirrors": ["https://reg.timinglee.org"],"exec-opts": ["native.cgroupdriver=systemd"],"log-driver": "json-file","log-opts": {"max-size": "100m"},"storage-driver": "overlay2"
}
所有节点复制harbor仓库中的证书并启动docker
[root@k8s-master ~]# ls -l /etc/docker/certs.d/reg.timinglee.org/ca.crt
[root@k8s-master ~]# systemctl enable --now docker#登陆harbor仓库
[root@k8s-master ~]# docker login reg.timinglee.org
[root@k8s-master ~]# docker info
Client: Docker Engine - CommunityVersion:    27.1.2Context:    defaultDebug Mode: falsePlugins:buildx: Docker Buildx (Docker Inc.)Version:  v0.16.2Path:     /usr/libexec/docker/cli-plugins/docker-buildxcompose: Docker Compose (Docker Inc.)Version:  v2.29.1Path:     /usr/libexec/docker/cli-plugins/docker-composeServer:Containers: 0Running: 0Paused: 0Stopped: 0Images: 0Server Version: 27.1.2Storage Driver: overlay2Backing Filesystem: xfsSupports d_type: trueUsing metacopy: falseNative Overlay Diff: trueuserxattr: falseLogging Driver: json-fileCgroup Driver: systemd			#资源管理更改为systemdCgroup Version: 2Plugins:Volume: localNetwork: bridge host ipvlan macvlan null overlayLog: awslogs fluentd gcplogs gelf journald json-file local splunk syslogSwarm: inactiveRuntimes: io.containerd.runc.v2 runcDefault Runtime: runcInit Binary: docker-initcontainerd version: 8fc6bcff51318944179630522a095cc9dbf9f353runc version: v1.1.13-0-g58aa920init version: de40ad0Security Options:seccompProfile: builtincgroupnsKernel Version: 5.14.0-427.13.1.el9_4.x86_64Operating System: Red Hat Enterprise Linux 9.4 (Plow)OSType: linuxArchitecture: x86_64CPUs: 1Total Memory: 736.3MiBName: k8s-master.timinglee.orgID: f3c291bf-287d-4cf6-8e69-5f21c79fa7c6Docker Root Dir: /var/lib/dockerDebug Mode: falseExperimental: falseInsecure Registries:127.0.0.0/8Registry Mirrors:https://reg.westos.org/			#认证harbor仓库Live Restore Enabled: false
2.2 安装部署工具
部署软件仓库,添加k8s源
[root@k8s-master ~]# vim /etc/yum.repos.d/k8s.repo
[k8s]
name=k8s
baseurl=https://mirrors.aliyun.com/kubernetes-new/core/stable/v1.30/rpm
gpgcheck=0#安装软件
[root@k8s-master ~]# dnf install kubelet-1.30.0 kubeadm-1.30.0 kubectl-1.30.0 -y
设置kubectl命令补齐功能
[root@k8s-master ~]# dnf install bash-completion -y
[root@k8s-master ~]# echo "source <(kubectl completion bash)" >> ~/.bashrc
[root@k8s-master ~]# source  ~/.bashrc
所有节点安装cri-docker
[root@k8s-master ~]# dnf install libcgroup-0.41-19.el8.x86_64.rpm \
> cri-dockerd-0.3.14-3.el8.x86_64.rpm -y[root@k8s-master ~]# vim /lib/systemd/system/cri-docker.service
[Unit]
Description=CRI Interface for Docker Application Container Engine
Documentation=https://docs.mirantis.com
After=network-online.target firewalld.service docker.service
Wants=network-online.target
Requires=cri-docker.socket[Service]
Type=notify#指定网络插件名称及基础容器镜像
ExecStart=/usr/bin/cri-dockerd --container-runtime-endpoint fd:// --network-plugin=cni --pod-infra-container-image=reg.timinglee.org/k8s/pause:3.9ExecReload=/bin/kill -s HUP $MAINPID
TimeoutSec=0
RestartSec=2
Restart=always[root@k8s-master ~]# systemctl daemon-reload
[root@k8s-master ~]# systemctl start cri-docker
[root@k8s-master ~]# ll /var/run/cri-dockerd.sock
srw-rw---- 1 root docker 0  8月 26 22:14 /var/run/cri-dockerd.sock		#cri-dockerd的套接字文件
在master节点拉取k8s所需镜像,上传harbor仓库
#拉取k8s集群所需要的镜像
[root@k8s-master ~]# kubeadm config images pull \
--image-repository registry.aliyuncs.com/google_containers \
--kubernetes-version v1.30.0 \
--cri-socket=unix:///var/run/cri-dockerd.sock#上传镜像到harbor仓库
[root@k8s-master ~]# docker images | awk '/google/{ print $1":"$2}' \
| awk -F "/" '{system("docker tag "$0" reg.timinglee.org/k8s/"$3)}'[root@k8s-master ~]# docker images  | awk '/k8s/{system("docker push "$1":"$2)}'
2.3 集群初始化
#启动kubelet服务
[root@k8s-master ~]# systemctl status kubelet.service#执行初始化命令
[root@k8s-master ~]# kubeadm init --pod-network-cidr=10.244.0.0/16 \
--image-repository reg.timinglee.org/k8s \
--kubernetes-version v1.30.0 \
--cri-socket=unix:///var/run/cri-dockerd.sock#指定集群配置文件变量
[root@k8s-master ~]# echo "export KUBECONFIG=/etc/kubernetes/admin.conf" >> ~/.bash_profile#当前节点没有就绪,因为还没有安装网络插件,容器没有运行
[root@k8s-master ~]# kubectl get node
NAME                       STATUS     ROLES           AGE     VERSION
k8s-master.timinglee.org   NotReady   control-plane   4m25s   v1.30.0
root@k8s-master ~]# kubectl get pod -A
NAMESPACE     NAME                                               READY   STATUS    RESTARTS   AGE
kube-system   coredns-647dc95897-2sgn8                           0/1     Pending   0          6m13s
kube-system   coredns-647dc95897-bvtxb                           0/1     Pending   0          6m13s
kube-system   etcd-k8s-master.timinglee.org                      1/1     Running   0          6m29s
kube-system   kube-apiserver-k8s-master.timinglee.org            1/1     Running   0          6m30s
kube-system   kube-controller-manager-k8s-master.timinglee.org   1/1     Running   0          6m29s
kube-system   kube-proxy-fq85m                                   1/1     Running   0          6m14s
kube-system   kube-scheduler-k8s-master.timinglee.org            1/1     Running   0          6m29s
2.4 安装flannel网络插件
#下载flannel的yaml部署文件
[root@k8s-master ~]# wget https://github.com/flannel-io/flannel/releases/latest/download/kube-flannel.yml#下载镜像:
[root@k8s-master ~]# docker pull docker.io/flannel/flannel:v0.25.5
[root@k8s-master ~]# docekr docker.io/flannel/flannel-cni-plugin:v1.5.1-flannel1#上传镜像到仓库
[root@k8s-master ~]# docker tag flannel/flannel:v0.25.5 \
reg.timinglee.org/flannel/flannel:v0.25.5
[root@k8s-master ~]# docker push reg.timinglee.org/flannel/flannel:v0.25.5[root@k8s-master ~]# docker tag flannel/flannel-cni-plugin:v1.5.1-flannel1 \
reg.timinglee.org/flannel/flannel-cni-plugin:v1.5.1-flannel1
[root@k8s-master ~]# docker push reg.timinglee.org/flannel/flannel-cni-plugin:v1.5.1-flannel1#编辑kube-flannel.yml 修改镜像下载位置
[root@k8s-master ~]# vim kube-flannel.yml#需要修改以下几行
[root@k8s-master ~]# grep -n image kube-flannel.yml
146:        image: reg.timinglee.org/flannel/flannel:v0.25.5
173:        image: reg.timinglee.org/flannel/flannel-cni-plugin:v1.5.1-flannel1
184:        image: reg.timinglee.org/flannel/flannel:v0.25.5#安装flannel网络插件
[root@k8s-master ~]# kubectl apply -f kube-flannel.yml
2.5 节点扩容
将节点加入集群
[root@k8s-node1 & 2 ~]# kubeadm join 172.25.254.100:6443 --token 5hwptm.zwn7epa6pvatbpwf --discovery-token-ca-cert-hash sha256:52f1a83b70ffc8744db5570288ab51987ef2b563bf906ba4244a300f61e9db23 --cri-socket=unix:///var/run/cri-dockerd.sock在master查看所有node状态
[root@k8s-master ~]# kubectl get nodes
NAME                       STATUS   ROLES           AGE   VERSION
k8s-master.timinglee.org   Ready    control-plane   98m   v1.30.0
k8s-node1.timinglee.org    Ready    <none>          21m   v1.30.0
k8s-node2.timinglee.org    Ready    <none>          21m   v1.30.0
测试集群运行情况
#建立一个pod
[root@k8s-master ~]# kubectl run test --image nginx#查看pod状态
[root@k8s-master ~]# kubectl get pods
NAME   READY   STATUS    RESTARTS   AGE
test   1/1     Running   0          6m29s#删除pod
root@k8s-master ~]# kubectl delete pod
这样环境就部署完成了!
三.k8s的pod管理和优化
3.1 资源管理介绍
在kubernetes中,所有的内容都抽象为资源,用户需要通过操作资源来管理kubernetes。
kubernetes的本质上就是一个集群系统,用户可以在集群中部署各种服务
所谓的部署服务,其实就是在kubernetes集群中运行一个个的容器,并将指定的程序跑在容器中。
kubernetes的最小管理单元是pod而不是容器,只能将容器放在
Pod中,kubernetes一般也不会直接管理Pod,而是通过
Pod控制器来管理Pod的。Pod中服务的访问是由kubernetes提供的
Service资源来实现。Pod中程序的数据需要持久化是由kubernetes提供的各种存储系统来实现
3.2 资源管理方式
命令式对象管理:直接使用命令去操作kubernetes资源
kubectl run nginx-pod --image=nginx:latest --port=80命令式对象配置:通过命令配置和配置文件去操作kubernetes资源
kubectl create/patch -f nginx-pod.yaml声明式对象配置:通过apply命令和配置文件去操作kubernetes资源
kubectl apply -f nginx-pod.yaml
3.2.1运行和调试命令示例
运行pod
[root@yifanhu ~]# kubectl run testpod --image busyboxplus
pod/testpod created
[root@yifanhu ~]# kubectl get pods
NAME                          READY   STATUS      RESTARTS     AGE
test1                         1/1     Running     0            9d
testpod                       0/1     Completed   1 (8s ago)   9s    #这里就是刚才创建的
webcluster-7c584f774b-dk2fs   1/1     Running     0            10d
webcluster-7c584f774b-xb94h   1/1     Running     0            10d
yufanhu-58c86fcf46-cwmzj      1/1     Running     0            9d
yufanhu-58c86fcf46-grd9d      1/1     Running     0            9d
端口暴露
[root@yifanhu ~]# kubectl get services
NAME                          TYPE        CLUSTER-IP       EXTERNAL-IP   PORT(S)   AGE
kubernetes                    ClusterIP   10.96.0.1        <none>        443/TCP   10d
webcluster-7c584f774b-7wmc9   ClusterIP   10.107.250.3     <none>        80/TCP    10d
yufanhu                       ClusterIP   10.105.248.129   <none>        80/TCP    9d
[root@yifanhu ~]# kubectl expose pod testpod --port 80 --target-port 80
service/testpod exposed
[root@yifanhu ~]# kubectl get services
NAME                          TYPE        CLUSTER-IP       EXTERNAL-IP   PORT(S)   AGE
kubernetes                    ClusterIP   10.96.0.1        <none>        443/TCP   10d
testpod                       ClusterIP   10.102.109.140   <none>        80/TCP    4s #这里就可以查看到testpod了!!
webcluster-7c584f774b-7wmc9   ClusterIP   10.107.250.3     <none>        80/TCP    10d
yufanhu                       ClusterIP   10.105.248.129   <none>        80/TCP    9d
运行交互pod
[root@yifanhu ~]# kubectl run -it testpod --image busyboxplus
If you don't see a command prompt, try pressing enter.
/ #
运行非交互式
[root@yifanhu ~]# kubectl run  testpod --image busyboxplus
pod/testpod created
[root@yifanhu ~]#
在已经运行的pod中运行指定命令
[root@yifanhu ~]# kubectl exec -it test1 -- /bin/bash
root@test1:/#
四.pod
Pod是可以创建和管理Kubernetes计算的最小可部署单元
一个Pod代表着集群中运行的一个进程,每个pod都有一个唯一的ip。
一个pod类似一个豌豆荚,包含一个或多个容器(通常是docker)
多个容器间共享IPC、Network和UTC namespace。
4.1 创建自主式pod
优点:
灵活性高:
可以精确控制 Pod 的各种配置参数,包括容器的镜像、资源限制、环境变量、命令和参数等,满足特定的应用需求。
学习和调试方便:
对于学习 Kubernetes 的原理和机制非常有帮助,通过手动创建 Pod 可以深入了解 Pod 的结构和配置方式。在调试问题时,可以更直接地观察和调整 Pod 的设置。
适用于特殊场景:
在一些特殊情况下,如进行一次性任务、快速验证概念或在资源受限的环境中进行特定配置时,手动创建 Pod 可能是一种有效的方式。
缺点:
管理复杂:
如果需要管理大量的 Pod,手动创建和维护会变得非常繁琐和耗时。难以实现自动化的扩缩容、故障恢复等操作。
缺乏高级功能:
无法自动享受 Kubernetes 提供的高级功能,如自动部署、滚动更新、服务发现等。这可能导致应用的部署和管理效率低下。
可维护性差:
手动创建的 Pod 在更新应用版本或修改配置时需要手动干预,容易出现错误,并且难以保证一致性。相比之下,通过声明式配置或使用 Kubernetes 的部署工具可以更方便地进行应用的维护和更新。
查看所有pod
[root@yifanhu ~]# kubectl get pods
NAME                          READY   STATUS             RESTARTS   AGE
test1                         1/1     Running            0          9d
webcluster-7c584f774b-dk2fs   1/1     Running            0          10d
webcluster-7c584f774b-xb94h   1/1     Running            0          10d
yifanhhu                      0/1     ImagePullBackOff   0          15m
yifanhu                       0/1     ImagePullBackOff   0          15m
yufanhu-58c86fcf46-cwmzj      1/1     Running            0          9d
yufanhu-58c86fcf46-grd9d      1/1     Running            0          9d
建立一个名为taeyeon的pod
[root@yifanhu ~]# kubectl run taeyeon --image myapp
pod/taeyeon created
[root@yifanhu ~]# kubectl get pods
NAME                          READY   STATUS             RESTARTS   AGE
taeyeon                       0/1     ErrImagePull       0          10s
test1                         1/1     Running            0          9d
webcluster-7c584f774b-dk2fs   1/1     Running            0          10d
webcluster-7c584f774b-xb94h   1/1     Running            0          10d
yifanhhu                      0/1     ImagePullBackOff   0          16m
yifanhu                       0/1     ImagePullBackOff   0          16m
yufanhu-58c86fcf46-cwmzj      1/1     Running            0          9d
yufanhu-58c86fcf46-grd9d      1/1     Running            0          9d
显示pod的较为详细的信息
[root@yifanhu ~]# kubectl get pods -o wide
NAME                          READY   STATUS             RESTARTS   AGE   IP            NODE    NOMINATED NODE   READINESS GATES
taeyeon                       0/1     ImagePullBackOff   0          68s   10.244.1.17   node1   <none>           <none>
test1                         1/1     Running            0          9d    10.244.2.9    node2   <none>           <none>
webcluster-7c584f774b-dk2fs   1/1     Running            0          10d   10.244.2.5    node2   <none>           <none>
webcluster-7c584f774b-xb94h   1/1     Running            0          10d   10.244.1.3    node1   <none>           <none>
yifanhhu                      0/1     ImagePullBackOff   0          17m   10.244.1.12   node1   <none>           <none>
yifanhu                       0/1     ImagePullBackOff   0          17m   10.244.1.13   node1   <none>           <none>
yufanhu-58c86fcf46-cwmzj      1/1     Running            0          9d    10.244.2.7    node2   <none>           <none>
yufanhu-58c86fcf46-grd9d      1/1     Running            0          9d    10.244.1.5    node1   <none>
4.2 利用控制器管理pod
高可用性和可靠性:
自动故障恢复:如果一个 Pod 失败或被删除,控制器会自动创建新的 Pod 来维持期望的副本数量。确保应用始终处于可用状态,减少因单个 Pod 故障导致的服务中断。
健康检查和自愈:可以配置控制器对 Pod 进行健康检查(如存活探针和就绪探针)。如果 Pod 不健康,控制器会采取适当的行动,如重启 Pod 或删除并重新创建它,以保证应用的正常运行。
可扩展性:
轻松扩缩容:可以通过简单的命令或配置更改来增加或减少 Pod 的数量,以满足不同的工作负载需求。例如,在高流量期间可以快速扩展以处理更多请求,在低流量期间可以缩容以节省资源。
水平自动扩缩容(HPA):可以基于自定义指标(如 CPU 利用率、内存使用情况或应用特定的指标)自动调整 Pod 的数量,实现动态的资源分配和成本优化。
版本管理和更新:
滚动更新:对于 Deployment 等控制器,可以执行滚动更新来逐步替换旧版本的 Pod 为新版本,确保应用在更新过程中始终保持可用。可以控制更新的速率和策略,以减少对用户的影响。
回滚:如果更新出现问题,可以轻松回滚到上一个稳定版本,保证应用的稳定性和可靠性。
声明式配置:
简洁的配置方式:使用 YAML 或 JSON 格式的声明式配置文件来定义应用的部署需求。这种方式使得配置易于理解、维护和版本控制,同时也方便团队协作。
期望状态管理:只需要定义应用的期望状态(如副本数量、容器镜像等),控制器会自动调整实际状态与期望状态保持一致。无需手动管理每个 Pod 的创建和删除,提高了管理效率。
服务发现和负载均衡:
自动注册和发现:Kubernetes 中的服务(Service)可以自动发现由控制器管理的 Pod,并将流量路由到它们。这使得应用的服务发现和负载均衡变得简单和可靠,无需手动配置负载均衡器。
流量分发:可以根据不同的策略(如轮询、随机等)将请求分发到不同的 Pod,提高应用的性能和可用性。
多环境一致性:
一致的部署方式:在不同的环境(如开发、测试、生产)中,可以使用相同的控制器和配置来部署应用,确保应用在不同环境中的行为一致。这有助于减少部署差异和错误,提高开发和运维效率。
建立控制器并自动运行pod
[root@yifanhu ~]# kubectl create deployment taeyeon --image myapp
deployment.apps/taeyeon created
[root@yifanhu ~]# kubectl get pods
NAME                          READY   STATUS             RESTARTS   AGE
taeyeon                       0/1     ImagePullBackOff   0          3m33s
taeyeon-57df9758c-r6gtd       0/1     ErrImagePull       0          10s
test1                         1/1     Running            0          9d
webcluster-7c584f774b-dk2fs   1/1     Running            0          10d
webcluster-7c584f774b-xb94h   1/1     Running            0          10d
yifanhhu                      0/1     ImagePullBackOff   0          20m
yifanhu                       0/1     ImagePullBackOff   0          20m
yufanhu-58c86fcf46-cwmzj      1/1     Running            0          9d
yufanhu-58c86fcf46-grd9d      1/1     Running            0          9d
为taeyeon扩容和缩容
[root@yifanhu ~]# kubectl scale deployment taeyeon --replicas 6
deployment.apps/taeyeon scaled
[root@yifanhu ~]# kubectl get pods
NAME                          READY   STATUS              RESTARTS   AGE
taeyeon                       0/1     ImagePullBackOff    0          5m14s
taeyeon-57df9758c-6lnkh       0/1     ContainerCreating   0          8s
taeyeon-57df9758c-h48z8       0/1     ContainerCreating   0          8s
taeyeon-57df9758c-mhs8x       0/1     ContainerCreating   0          8s
taeyeon-57df9758c-p5wx4       0/1     ContainerCreating   0          8s
taeyeon-57df9758c-r6gtd       0/1     ImagePullBackOff    0          111s
taeyeon-57df9758c-st9kx       0/1     ContainerCreating   0          8s
test1                         1/1     Running             0          9d
webcluster-7c584f774b-dk2fs   1/1     Running             0          10d
webcluster-7c584f774b-xb94h   1/1     Running             0          10d
yifanhhu                      0/1     ImagePullBackOff    0          21m
yifanhu                       0/1     ImagePullBackOff    0          21m
yufanhu-58c86fcf46-cwmzj      1/1     Running             0          9d
yufanhu-58c86fcf46-grd9d      1/1     Running             0          9d
[root@yifanhu ~]# kubectl scale deployment taeyeon --replicas 2deployment.apps/taeyeon scaled
[root@yifanhu ~]#
[root@yifanhu ~]# kubectl get pods
NAME                          READY   STATUS             RESTARTS   AGE
taeyeon                       0/1     ImagePullBackOff   0          5m49s
taeyeon-57df9758c-mhs8x       0/1     ImagePullBackOff   0          43s
taeyeon-57df9758c-p5wx4       0/1     Terminating        0          43s
taeyeon-57df9758c-r6gtd       0/1     ImagePullBackOff   0          2m26s
test1                         1/1     Running            0          9d
webcluster-7c584f774b-dk2fs   1/1     Running            0          10d
webcluster-7c584f774b-xb94h   1/1     Running            0          10d
yifanhhu                      0/1     ErrImagePull       0          22m
yifanhu                       0/1     ImagePullBackOff   0          22m
yufanhu-58c86fcf46-cwmzj      1/1     Running            0          9d
yufanhu-58c86fcf46-grd9d      1/1     Running            0          9d
4.3 利用yaml文件部署应用
优点:
声明式配置:
清晰表达期望状态:以声明式的方式描述应用的部署需求,包括副本数量、容器配置、网络设置等。这使得配置易于理解和维护,并且可以方便地查看应用的预期状态。
可重复性和版本控制:配置文件可以被版本控制,确保在不同环境中的部署一致性。可以轻松回滚到以前的版本或在不同环境中重复使用相同的配置。
团队协作:便于团队成员之间共享和协作,大家可以对配置文件进行审查和修改,提高部署的可靠性和稳定性。
灵活性和可扩展性:
丰富的配置选项:可以通过 YAML 文件详细地配置各种 Kubernetes 资源,如 Deployment、Service、ConfigMap、Secret 等。可以根据应用的特定需求进行高度定制化。
组合和扩展:可以将多个资源的配置组合在一个或多个 YAML 文件中,实现复杂的应用部署架构。同时,可以轻松地添加新的资源或修改现有资源以满足不断变化的需求。
与工具集成:
与 CI/CD 流程集成:可以将 YAML 配置文件与持续集成和持续部署(CI/CD)工具集成,实现自动化的应用部署。例如,可以在代码提交后自动触发部署流程,使用配置文件来部署应用到不同的环境。
命令行工具支持:Kubernetes 的命令行工具
kubectl对 YAML 配置文件有很好的支持,可以方便地应用、更新和删除配置。同时,还可以使用其他工具来验证和分析 YAML 配置文件,确保其正确性和安全性
4.3.1 编写示例
利用命令获取yaml模板
[root@yifanhu ~]# kubectl run yifanhu --image myapp:v1 --dry-run=client -o yaml >pod.yml
[root@yifanhu ~]# cat pod.yml
apiVersion: v1
kind: Pod
metadata:creationTimestamp: nulllabels:run: yifanhuname: yifanhu
spec:containers:- image: myapp:v1name: yifanhuresources: {}dnsPolicy: ClusterFirstrestartPolicy: Always
status: {}
运行多个容器Pod
pod "yifanhu" deleted
[root@yifanhu ~]# kubectl apply -f pod.yml
pod/yifanhu created
[root@yifanhu ~]# cat pod.yml
apiVersion: v1
kind: Pod
metadata:labels:run: yifanhuname: yifanhu
spec:containers:- image: myapp:v1name: yifanhu- image: myapp:v2name: yifanhu1
pod间的网络整合
同一个pod中的容器公用一个网络
[root@yifanhu ~]# kubectl apply -f pod.yml
pod/test created
[root@yifanhu ~]# kubectl get pods
NAME                          READY   STATUS             RESTARTS      AGE
taeyeon                       0/1     ImagePullBackOff   0             17m
taeyeon-57df9758c-mhs8x       0/1     ImagePullBackOff   0             12m
taeyeon-57df9758c-r6gtd       0/1     ImagePullBackOff   0             14m
test                          2/2     Running            0             8s
test1                         1/1     Running            0             9d
webcluster-7c584f774b-dk2fs   1/1     Running            0             10d
webcluster-7c584f774b-xb94h   1/1     Running            0             10d
yifanhhu                      0/1     ImagePullBackOff   0             34m
yifanhu                       1/2     CrashLoopBackOff   5 (85s ago)   4m23s
yufanhu-58c86fcf46-cwmzj      1/1     Running            0             9d
yufanhu-58c86fcf46-grd9d      1/1     Running            0             9d
[root@yifanhu ~]# kubectl exec test -c busyboxplus -- curl -s localhost
Hello MyApp | Version: v1 | <a href="hostname.html">Pod Name</a>
[root@yifanhu ~]# cat pod.yml
apiVersion: v1
kind: Pod
metadata:labels:run: yifanhuname: test
spec:containers:- image: myapp:v1name: myapp1- image: busyboxplus:latestname: busyboxpluscommand: ["/bin/sh","-c","sleep 10000"]
端口映射
[root@yifanhu ~]# vim pod.yml
[root@yifanhu ~]# kubectl apply -f pod.yml
pod/test2 created
[root@yifanhu ~]# kubectl get pods -o wide
NAME                          READY   STATUS             RESTARTS       AGE     IP            NODE    NOMINATED NODE   READINESS GATES
taeyeon                       0/1     ImagePullBackOff   0              21m     10.244.1.17   node1   <none>           <none>
taeyeon-57df9758c-mhs8x       0/1     ImagePullBackOff   0              16m     10.244.1.20   node1   <none>           <none>
taeyeon-57df9758c-r6gtd       0/1     ImagePullBackOff   0              18m     10.244.2.10   node2   <none>           <none>
test                          2/2     Running            0              4m33s   10.244.2.13   node2   <none>           <none>
test1                         1/1     Running            0              9d      10.244.2.9    node2   <none>           <none>
test2                         1/1     Running            0              15s     10.244.1.22   node1   <none>           <none>
webcluster-7c584f774b-dk2fs   1/1     Running            0              10d     10.244.2.5    node2   <none>           <none>
webcluster-7c584f774b-xb94h   1/1     Running            0              10d     10.244.1.3    node1   <none>           <none>
yifanhhu                      0/1     ImagePullBackOff   0              38m     10.244.1.12   node1   <none>           <none>
yifanhu                       1/2     CrashLoopBackOff   6 (3m6s ago)   8m48s   10.244.1.21   node1   <none>           <none>
yufanhu-58c86fcf46-cwmzj      1/1     Running            0              9d      10.244.2.7    node2   <none>           <none>
yufanhu-58c86fcf46-grd9d      1/1     Running            0              9d      10.244.1.5    node1   <none>           <none>
[root@yifanhu ~]# curl  k8s-node1.timinglee.org
Hello MyApp | Version: v1 | <a href="hostname.html">Pod Name</a>
[root@yifanhu ~]# cat pod.yml
apiVersion: v1
kind: Pod
metadata:labels:run: yifanhuname: test2
spec:containers:- image: myapp:v1name: myapp1ports:- name: httpcontainerPort: 80hostPort: 80protocol: TCP
资源限制
[root@yifanhu ~]# cat pod.yml
apiVersion: v1
kind: Pod
metadata:labels:run: yifanhuname: test3
spec:containers:- image: myapp:v1name: myapp1resources:limits:cpu: 500mmemory: 100Mrequests:cpu: 500mmemory: 100M[root@yifanhu ~]# kubectl describe pods test3Limits:cpu:     500mmemory:  100MRequests:cpu:        500mmemory:     100MEnvironment:  <none>
选择运行节点
[root@yifanhu ~]# cat pod.yml
apiVersion: v1
kind: Pod
metadata:labels:run: yifanhuname: test1
spec:nodeSelector:kubernetes.io/hostname: k8s-node1restartPolicy: Alwayscontainers:- image: myapp:v1name: myapp1[root@yifanhu ~]# kubectl get pods -o widetest1                         0/1     Pending            0             9s    <none>        <none>   <none>           <none>
4.4 pod的生命周期
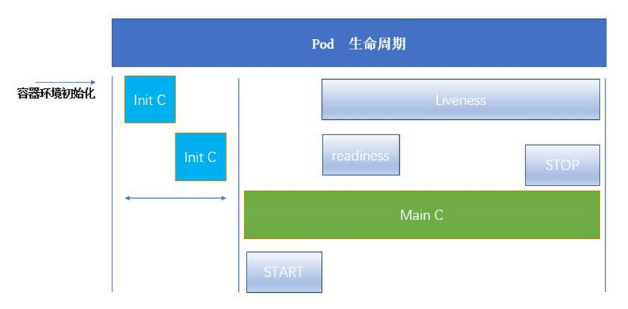
Pod 可以包含多个容器,应用运行在这些容器里面,同时 Pod 也可以有一个或多个先于应用容器启动的 Init 容器。
Init 容器与普通的容器非常像,除了如下两点:
它们总是运行到完成
init 容器不支持 Readiness,因为它们必须在 Pod 就绪之前运行完成,每个 Init 容器必须运行成功,下一个才能够运行。
如果Pod的 Init 容器失败,Kubernetes 会不断地重启该 Pod,直到 Init 容器成功为止。但是,如果 Pod 对应的 restartPolicy 值为 Never,它不会重新启动。
4.4.1 INIT容器的功能
Init 容器可以包含一些安装过程中应用容器中不存在的实用工具或个性化代码。
Init 容器可以安全地运行这些工具,避免这些工具导致应用镜像的安全性降低。
应用镜像的创建者和部署者可以各自独立工作,而没有必要联合构建一个单独的应用镜像。
Init 容器能以不同于Pod内应用容器的文件系统视图运行。因此,Init容器可具有访问 Secrets 的权限,而应用容器不能够访问。
由于 Init 容器必须在应用容器启动之前运行完成,因此 Init 容器提供了一种机制来阻塞或延迟应用容器的启动,直到满足了一组先决条件。一旦前置条件满足,Pod内的所有的应用容器会并行启动。
示例:
[root@yifanhu ~]# cat pod.yml
apiVersion: v1
kind: Pod
metadata:labels:run: initpodname: initpod
spec:containers:- image: myapp:v1name: myappinitContainers:- name: init-myserviceimage: busyboxpluscommand: ["sh","-c","until test -e /testfile;do echo wating for myservice; sleep 2; done"]
[root@yifanhu ~]# kubectl get pods
NAME                          READY   STATUS             RESTARTS       AGE
initpod                       0/1     Init:0/1           0              5s[root@yifanhu ~]# kubectl logs pods/initpod
Defaulted container "myapp" out of: myapp, init-myservice (init)
Error from server (BadRequest): container "myapp" in pod "initpod" is waiting to start: PodInitializing[root@yifanhu ~]# kubectl exec pods/initpod -c init-myservice -- /bin/sh -c "touch /testfile"
[root@yifanhu ~]# kubectl get pods
NAME                          READY   STATUS             RESTARTS        AGE
initpod                       1/1     Running            0               2m23s
4.4.2 探针
探针是由 kubelet 对容器执行的定期诊断:
ExecAction:在容器内执行指定命令。如果命令退出时返回码为 0 则认为诊断成功。
TCPSocketAction:对指定端口上的容器的 IP 地址进行 TCP 检查。如果端口打开,则诊断被认为是成功的。
HTTPGetAction:对指定的端口和路径上的容器的 IP 地址执行 HTTP Get 请求。如果响应的状态码大于等于200 且小于 400,则诊断被认为是成功的。
每次探测都将获得以下三种结果之一:
成功:容器通过了诊断。
失败:容器未通过诊断。
未知:诊断失败,因此不会采取任何行动。
Kubelet 可以选择是否执行在容器上运行的三种探针执行和做出反应:
livenessProbe:指示容器是否正在运行。如果存活探测失败,则 kubelet 会杀死容器,并且容器将受到其重启策略的影响。如果容器不提供存活探针,则默认状态为 Success。
readinessProbe:指示容器是否准备好服务请求。如果就绪探测失败,端点控制器将从与 Pod 匹配的所有 Service 的端点中删除该 Pod 的 IP 地址。初始延迟之前的就绪状态默认为 Failure。如果容器不提供就绪探针,则默认状态为 Success。
startupProbe: 指示容器中的应用是否已经启动。如果提供了启动探测(startup probe),则禁用所有其他探测,直到它成功为止。如果启动探测失败,kubelet 将杀死容器,容器服从其重启策略进行重启。如果容器没有提供启动探测,则默认状态为成功Success。
ReadinessProbe 与 LivenessProbe 的区别
ReadinessProbe 当检测失败后,将 Pod 的 IP:Port 从对应的 EndPoint 列表中删除。
LivenessProbe 当检测失败后,将杀死容器并根据 Pod 的重启策略来决定作出对应的措施
StartupProbe 与 ReadinessProbe、LivenessProbe 的区别
如果三个探针同时存在,先执行 StartupProbe 探针,其他两个探针将会被暂时禁用,直到 pod 满足 StartupProbe 探针配置的条件,其他 2 个探针启动,如果不满足按照规则重启容器。
另外两种探针在容器启动后,会按照配置,直到容器消亡才停止探测,而 StartupProbe 探针只是在容器启动后按照配置满足一次后,不在进行后续的探测。
探针示例:
[root@yifanhu ~]# cat pod.yml
apiVersion: v1
kind: Pod
metadata:labels:run: livenessname: liveness
spec:containers:- image: myapp:v1name: myapplivenessProbe:tcpSocket:port: 80initialDelaySeconds: 3periodSeconds: 1timeoutSeconds: 1[root@yifanhu ~]# kubectl describe pods
Events:Type     Reason     Age                   From               Message----     ------     ----                  ----               -------Normal   Scheduled  57m                   default-scheduler  Successfully assigned default/taeyeon to node1Warning  Failed     57m                   kubelet            Failed to pull image "myapp": Error response from daemon: Get "https://registry-1.docker.io/v2/": read tcp 172.25.254.10:53562->35.174.146.239:443: read: connection reset by peerWarning  Failed     56m                   kubelet            Failed to pull image "myapp": Error response from daemon: Get "https://registry-1.docker.io/v2/": read tcp 172.25.254.10:55198->54.87.112.248:443: read: connection reset by peerWarning  Failed     56m                   kubelet            Failed to pull image "myapp": Error response from daemon: Get "https://registry-1.docker.io/v2/": read tcp 172.25.254.10:43574->3.226.118.171:443: read: connection reset by peerNormal   Pulling    55m (x4 over 57m)     kubelet            Pulling image "myapp"Warning  Failed     55m (x4 over 57m)     kubelet            Error: ErrImagePullWarning  Failed     55m                   kubelet            Failed to pull image "myapp": Error response from daemon: Get "https://registry-1.docker.io/v2/": context deadline exceededWarning  Failed     54m (x6 over 57m)     kubelet            Error: ImagePullBackOffNormal   BackOff    108s (x230 over 57m)  kubelet            Back-off pulling image "myapp"
就绪探针示例:
[root@yifanhu ~]# cat pod.yml
apiVersion: v1
kind: Pod
metadata:labels:run: readinessname: readiness
spec:containers:- image: myapp:v1name: myapplivenessProbe:httpGet:path: /test.htmlport: 80initialDelaySeconds: 1periodSeconds: 3timeoutSeconds: 1[root@yifanhu ~]# kubectl expose pod readiness --port 80 --target-port 80[root@yifanhu ~]# kubectl describe services readiness
Name:              readiness
Namespace:         default
Labels:            run=readiness
Annotations:       <none>
Selector:          run=readiness
Type:              ClusterIP
IP Family Policy:  SingleStack
IP Families:       IPv4
IP:                10.110.17.167
IPs:               10.110.17.167
Port:              <unset>  80/TCP
TargetPort:        80/TCP
Endpoints:                        #没有暴露端口,就绪探针不满足暴露条件
Session Affinity:  None
Events:            <none>
五.k8s中控制器的使用
5.1 什么是控制器
控制器也是管理pod的一种手段
自主式pod:pod退出或意外关闭后不会被重新创建
控制器管理的 Pod:在控制器的生命周期里,始终要维持 Pod 的副本数目
Pod控制器是管理pod的中间层,使用Pod控制器之后,只需要告诉Pod控制器,想要多少个什么样的Pod就可以了,它会创建出满足条件的Pod并确保每一个Pod资源处于用户期望的目标状态。如果Pod资源在运行中出现故障,它会基于指定策略重新编排Pod
当建立控制器后,会把期望值写入etcd,k8s中的apiserver检索etcd中我们保存的期望状态,并对比pod的当前状态,如果出现差异代码自驱动立即恢复
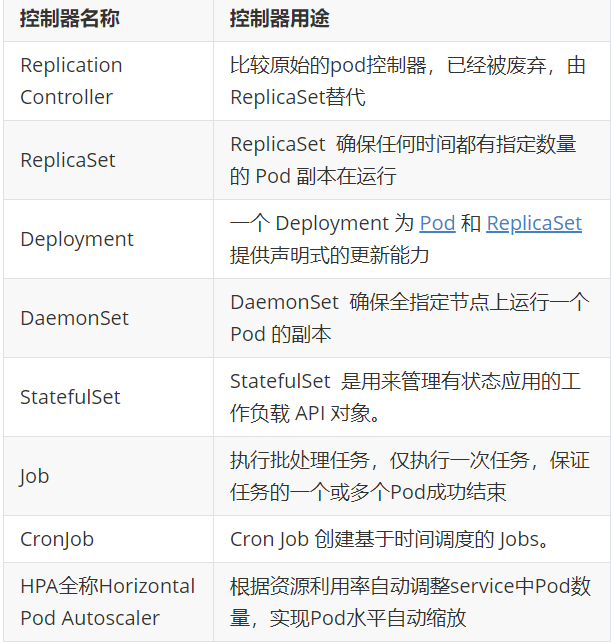
5.1.1 控制器常用类型
5.2 replicaset控制器
ReplicaSet 是下一代的 Replication Controller,官方推荐使用ReplicaSet
ReplicaSet和Replication Controller的唯一区别是选择器的支持,ReplicaSet支持新的基于集合的选择器需求
ReplicaSet 确保任何时间都有指定数量的 Pod 副本在运行
虽然 ReplicaSets 可以独立使用,但今天它主要被Deployments 用作协调 Pod 创建、删除和更新的机制
示例:
[root@yifanhu ~]# cat replicaset.yml
apiVersion: apps/v1
kind: ReplicaSet
metadata:name: replicaset
spec:replicas: 2selector:matchLabels:app: myapptemplate:metadata:labels:app: myappspec:containers:- image: myapp:v1name: myapp[root@yifanhu ~]# kubectl apply -f replicaset.yml
replicaset.apps/replicaset created
[root@yifanhu ~]# kubectl get pods --show-labels
replicaset-2dts4              1/1     Running            0                13s   app=myapp
replicaset-rcprt              1/1     Running            0                13s   app=myapp
#replicaset是通过标签匹配pod
[root@yifanhu ~]# kubectl label pod replicaset-2dts4 app=timinglee --overwrite
pod/replicaset-2dts4 labeled
[root@yifanhu ~]# kubectl get pods --show-labels
replicaset-2dts4              1/1     Running            0                2m52s   app=timinglee
replicaset-rcprt              1/1     Running            0                2m52s   app=myapp
replicaset-sfhqd              1/1     Running            0                14s     app=myapp
#这是新开启的
移除标签
[root@yifanhu ~]# kubectl label pod replicaset-sfhqd app-
pod/replicaset-sfhqd unlabeled
[root@yifanhu ~]# kubectl get pod --show-labels
replicaset-sfhqd              1/1     Running            0                4m11s   <none>
replicaset自动控制副本数量,pod可以自愈
[root@yifanhu ~]# kubectl delete pods replicaset-sfhqd
pod "replicaset-sfhqd" deleted
[root@yifanhu ~]# kubectl get pods --show-labels
replicaset-2dts4              1/1     Running            0              8m55s   app=timinglee
replicaset-h2m4w              1/1     Running            0              3m2s    app=myapp
replicaset-rcprt              1/1     Running            0              8m55s   app=myapp
#可以看到这里又重新生成了一个
5.3 deployment控制器
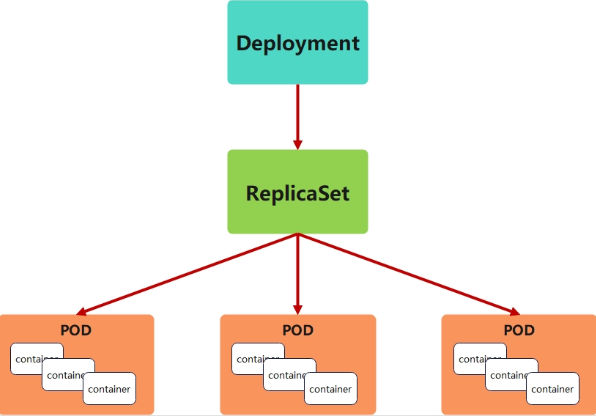
为了更好的解决服务编排的问题,kubernetes在V1.2版本开始,引入了Deployment控制器。
Deployment控制器并不直接管理pod,而是通过管理ReplicaSet来间接管理Pod
Deployment管理ReplicaSet,ReplicaSet管理Pod
Deployment 为 Pod 和 ReplicaSet 提供了一个申明式的定义方法
在Deployment中ReplicaSet相当于一个版本
典型的应用场景:
用来创建Pod和ReplicaSet
滚动更新和回滚
扩容和缩容
暂停与恢复
示例:
先生成yaml文件,并建立pod
[root@yifanhu ~]# cat deployment.yml
apiVersion: apps/v1
kind: Deployment
metadata:name: deployment
spec:replicas: 4selector:matchLabels:app: myapptemplate:metadata:labels:app: myappspec:containers:- image: myapp:v1name: myapp
[root@yifanhu ~]# kubectl apply -f deployment.yml
deployment.apps/deployment created
[root@yifanhu ~]# kubectl get pods --show-labels
deployment-5d886954d4-jbtqk   1/1     Running            0                37s    app=myapp,pod-template-hash=5d886954d4
deployment-5d886954d4-jgpc8   1/1     Running            0                37s    app=myapp,pod-template-hash=5d886954d4
deployment-5d886954d4-jxmwc   1/1     Running            0                37s    app=myapp,pod-template-hash=5d886954d4
deployment-5d886954d4-r2g5g   1/1     Running            0                37s    app=myapp,pod-template-hash=5d886954d4
5.3.1 暂停和恢复
在实际生产环境中我们做的变更可能不止一处,当修改了一处后,如果执行变更就直接触发了
我们期望的触发时当我们把所有修改都搞定后一次触发
暂停,避免触发不必要的线上更新
apiVersion: apps/v1
kind: Deployment
metadata:name: deployment-example
spec:minReadySeconds: 5strategy:rollingUpdate:maxSurge: 1maxUnavailable: 0replicas: 6				selector:matchLabels:app: myapptemplate:metadata:labels:app: myappspec:containers:- name: myappimage: nginxresources:limits:cpu: 0.5memory: 200Mirequests:cpu: 0.5memory: 200Mi
更新镜像和修改资源没有触发更新
[root@yifanhu ~]#  kubectl rollout history deployment deployment-example
deployment.apps/deployment-example
REVISION  CHANGE-CAUSE
1         <none>
恢复后才会触发更新
#恢复后开始触发更新
[root@k8s2 pod]# kubectl rollout resume deployment deployment-example[root@k8s2 pod]# kubectl rollout history  deployment deployment-example
deployment.apps/deployment-example
REVISION  CHANGE-CAUSE
3         <none>
4         <none>
5         <none>
5.4 daemonset
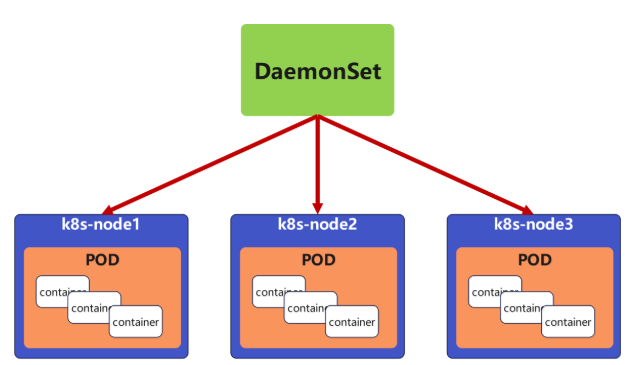
DaemonSet 确保全部(或者某些)节点上运行一个 Pod 的副本。当有节点加入集群时, 也会为他们新增一个 Pod ,当有节点从集群移除时,这些 Pod 也会被回收。删除 DaemonSet 将会删除它创建的所有 Pod
DaemonSet 的典型用法:
在每个节点上运行集群存储 DaemonSet,例如 glusterd、ceph。
在每个节点上运行日志收集 DaemonSet,例如 fluentd、logstash。
在每个节点上运行监控 DaemonSet,例如 Prometheus Node Exporter、zabbix agent等
一个简单的用法是在所有的节点上都启动一个 DaemonSet,将被作为每种类型的 daemon 使用
一个稍微复杂的用法是单独对每种 daemon 类型使用多个 DaemonSet,但具有不同的标志, 并且对不同硬件类型具有不同的内存、CPU 要求
[root@k8s2 pod]# cat daemonset-example.yml
apiVersion: apps/v1
kind: DaemonSet
metadata:name: daemonset-example
spec:selector:matchLabels:app: nginxtemplate:metadata:labels:app: nginxspec:tolerations:		#对于污点节点的容忍- effect: NoScheduleoperator: Existscontainers:- name: nginximage: nginx[root@k8s-master ~]# kubectl get pods  -o wide
NAME              READY   STATUS    RESTARTS   AGE   IP            NODE         NOMINATED NODE   READINESS GATES
daemonset-87h6s   1/1     Running   0          47s   10.244.0.8    k8s-master   <none>           <none>
daemonset-n4vs4   1/1     Running   0          47s   10.244.2.38   k8s-node2    <none>           <none>
daemonset-vhxmq   1/1     Running   0          47s   10.244.1.40   k8s-node1    <none>           <none>
5.5 job控制器
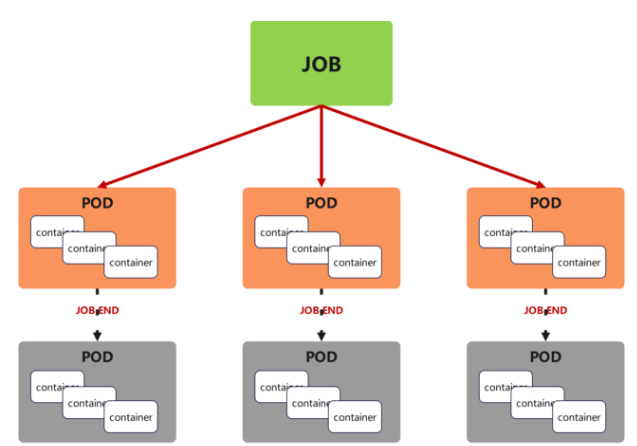
Job,主要用于负责批量处理(一次要处理指定数量任务)短暂的一次性(每个任务仅运行一次就结束)任务
Job特点如下:
当Job创建的pod执行成功结束时,Job将记录成功结束的pod数量
当成功结束的pod达到指定的数量时,Job将完成执行
[root@k8s2 pod]# vim job.yml
apiVersion: batch/v1
kind: Job
metadata:name: pi
spec:completions: 6		#一共完成任务数为6		parallelism: 2		#每次并行完成2个template:spec:containers:- name: piimage: perl:5.34.0command: ["perl",  "-Mbignum=bpi", "-wle", "print bpi(2000)"]	计算Π的后2000位restartPolicy: Never						#关闭后不自动重启backoffLimit: 4								#运行失败后尝试4重新运行[root@k8s2 pod]# kubectl apply -f job.yml
5.6 cronjob 控制器
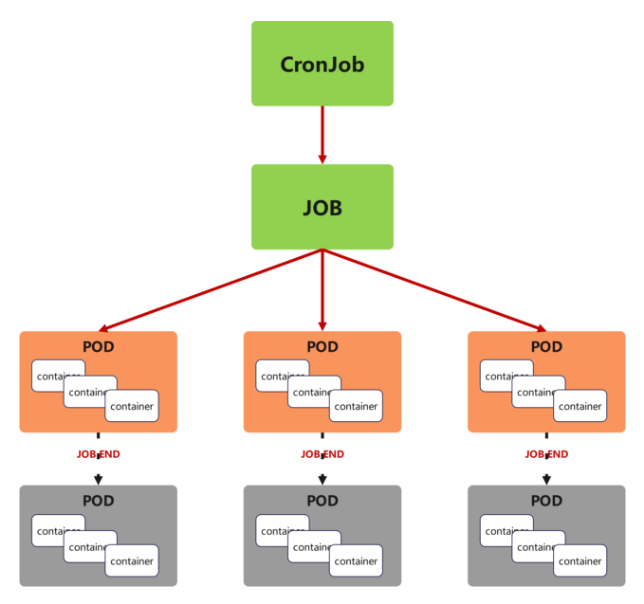
Cron Job 创建基于时间调度的 Jobs。
CronJob控制器以Job控制器资源为其管控对象,并借助它管理pod资源对象,
CronJob可以以类似于Linux操作系统的周期性任务作业计划的方式控制其运行时间点及重复运行的方式。
CronJob可以在特定的时间点(反复的)去运行job任务。
[root@k8s2 pod]# vim cronjob.yml
apiVersion: batch/v1
kind: CronJob
metadata:name: hello
spec:schedule: "* * * * *"jobTemplate:spec:template:spec:containers:- name: helloimage: busyboximagePullPolicy: IfNotPresentcommand:- /bin/sh- -c- date; echo Hello from the Kubernetes clusterrestartPolicy: OnFailure[root@k8s2 pod]# kubectl apply -f cronjob.yml
六. k8s中的微服务
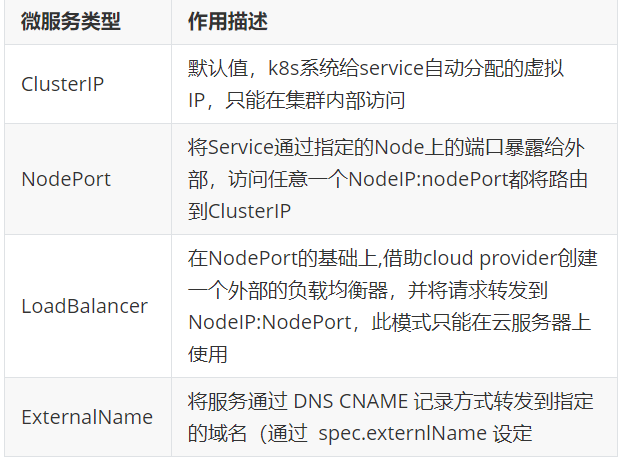
用控制器来完成集群的工作负载,那么应用如何暴漏出去?需要通过微服务暴漏出去后才能被访问
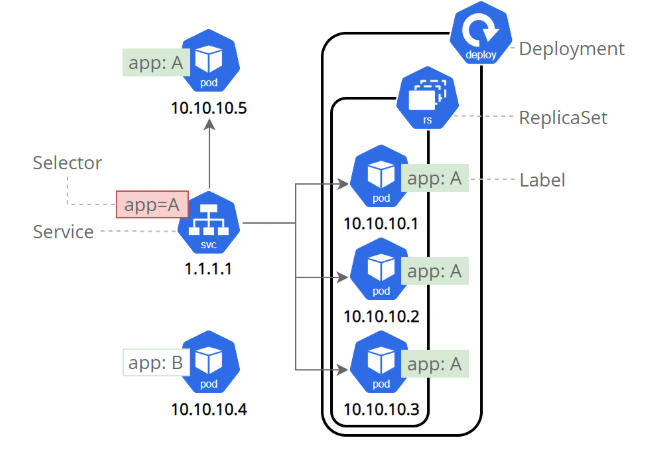
Service是一组提供相同服务的Pod对外开放的接口。
借助Service,应用可以实现服务发现和负载均衡。
service默认只支持4层负载均衡能力,没有7层功能。(可以通过Ingress实现)
6.1 微服务的类型
示例:
生成控制器文件并建立控制器;生成微服务yaml追加到已有的yaml中
[root@yifanhu ~]# kubectl create deployment timinglee --image myapp:v1  --replicas 2 --dry-run=client -o yaml >                   timinglee.yaml
[root@yifanhu ~]#  kubectl expose deployment deployment --port 80 --target-port 80 --dry-run=client -o yaml >> ti                  minglee.yaml
[root@yifanhu ~]# cat timinglee.yaml
apiVersion: apps/v1
kind: Deployment
metadata:creationTimestamp: nulllabels:app: timingleename: timinglee
spec:replicas: 2selector:matchLabels:app: timingleestrategy: {}template:metadata:creationTimestamp: nulllabels:app: timingleespec:containers:- image: myapp:v1name: myappresources: {}
status: {}
apiVersion: v1
kind: Service
metadata:creationTimestamp: nullname: deployment
spec:ports:- port: 80protocol: TCPtargetPort: 80selector:app: myapp
status:loadBalancer: {}
[root@yifanhu ~]# kubectl apply -f timinglee.yaml
service/deployment created
[root@yifanhu ~]# kubectl get services
NAME                          TYPE        CLUSTER-IP       EXTERNAL-IP   PORT(S)   AGE
deployment                    ClusterIP   10.98.161.196    <none>        80/TCP    21s
微服务默认使用iptables调度
6.2 ipvs模式配置方式
在所有节点安装ipvsadm
修改master节点的代理配置
[root@yifanhu ~]# kubectl -n kube-system edit cm kube-proxy
configmap/kube-proxy edited
:
metricsBindAddress: ""mode: "ipvs"nftables:masqueradeAll: false
重启pod,在pod运行时配置文件中采用默认配置,当改变配置文件后已经运行的pod状态不会变化,所以要重启pod
 kubectl -n kube-system get  pods   | awk '/kube-proxy/{system("kubectl -n kube-system delete pods "$1)}'        pod "kube-proxy-gcm8f" deleted
pod "kube-proxy-p5rgq" deleted
pod "kube-proxy-t9mqc" deleted
6.3 微服务类型详解
6.3.1 clusterip
特点:
clusterip模式只能在集群内访问,并对集群内的pod提供健康检测和自动发现功能
示例(创建后集群DNS提供解析):
[root@k8s2 service]# vim myapp.yml
---
apiVersion: v1
kind: Service
metadata:labels:app: timingleename: timinglee
spec:ports:- port: 80protocol: TCPtargetPort: 80selector:app: timingleetype: ClusterIP
dig  timinglee.default.svc.cluster.local @10.96.0.10
; <<>> DiG 9.16.23-RH <<>> timinglee.default.svc.cluster.local @10.96.0.10
;; global options: +cmd
;; Got answer:
;; WARNING: .local is reserved for Multicast DNS
;; You are currently testing what happens when an mDNS query is leaked to DNS
;; ->>HEADER<<- opcode: QUERY, status: NXDOMAIN, id: 46221
;; flags: qr aa rd; QUERY: 1, ANSWER: 0, AUTHORITY: 1, ADDITIONAL: 1
;; WARNING: recursion requested but not available;; OPT PSEUDOSECTION:
; EDNS: version: 0, flags:; udp: 4096
; COOKIE: 3df0bfe7e1e1f649 (echoed)
;; QUESTION SECTION:
;timinglee.default.svc.cluster.local. IN        A;; AUTHORITY SECTION:
cluster.local.          30      IN      SOA     ns.dns.cluster.local. hostmaster.cluster.local. 1755757548 7200 1800 86400 30;; Query time: 90 msec
;; SERVER: 10.96.0.10#53(10.96.0.10)
;; WHEN: Thu Aug 21 14:28:02 CST 2025
;; MSG SIZE  rcvd: 169
ClusterIP中的特殊模式headless
headless(无头服务)
对于无头 Services 并不会分配 Cluster IP,kube-proxy不会处理它们, 而且平台也不会为它们进行负载均衡和路由,集群访问通过dns解析直接指向到业务pod上的IP,所有的调度有dns单独完成
[root@k8s-master ~]# vim timinglee.yaml
---
apiVersion: v1
kind: Service
metadata:labels:app: timingleename: timinglee
spec:ports:- port: 80protocol: TCPtargetPort: 80selector:app: timingleetype: ClusterIPclusterIP: None[root@k8s-master ~]# kubectl delete -f timinglee.yaml
[root@k8s-master ~]# kubectl apply -f timinglee.yaml
deployment.apps/timinglee created#测试
[root@k8s-master ~]# kubectl get services timinglee
NAME        TYPE        CLUSTER-IP   EXTERNAL-IP   PORT(S)   AGE
timinglee   ClusterIP   None         <none>        80/TCP    6s[root@k8s-master ~]# dig  timinglee.default.svc.cluster.local @10.96.0.10
;; ANSWER SECTION:
timinglee.default.svc.cluster.local. 30 IN A    10.244.2.16
开启一个busyboxplus的pod测试
[root@k8s-master ~]# kubectl run  test --image busyboxplus -it
If you don't see a command prompt, try pressing enter.
/ # nslookup timinglee-service
Server:    10.96.0.10
Address 1: 10.96.0.10 kube-dns.kube-system.svc.cluster.localName:      timinglee-service
Address 1: 10.244.2.16 10-244-2-16.timinglee-service.default.svc.cluster.local
Address 2: 10.244.2.17 10-244-2-17.timinglee-service.default.svc.cluster.local
Address 3: 10.244.1.22 10-244-1-22.timinglee-service.default.svc.cluster.local
Address 4: 10.244.1.21 10-244-1-21.timinglee-service.default.svc.cluster.local
/ # curl timinglee-service
Hello MyApp | Version: v1 | <a href="hostname.html">Pod Name</a>
/ # curl timinglee-service/hostname.html
timinglee-c56f584cf-b8t6m
6.3.2 nodeport
通过ipvs暴漏端口从而使外部主机通过master节点的对外ip:<port>来访问pod业务
示例:
vim timinglee.yamlapiVersion: v1
kind: Service
metadata:labels:app: timinglee-servicename: timinglee-service
spec:ports:- port: 80protocol: TCPtargetPort: 80selector:app: timingleetype: NodePort [root@yifanhu ~]# kubectl get services timinglee-service
NAME                TYPE       CLUSTER-IP       EXTERNAL-IP   PORT(S)        AGE
timinglee-service   NodePort   10.109.119.244   <none>        80:31598/TCP   15s在集群节点上绑定端口,一个端口对应一个服务
[root@yifanhu ~]# for i in {1..5};do curl 172.25.254.100:31598/hostname.html;done
replicaset-2dts4
replicaset-2dts4
replicaset-2dts4
replicaset-2dts4
replicaset-2dts4
还有metalLB和externalname两种,这里就不多解释
6.4 Ingress-nginx
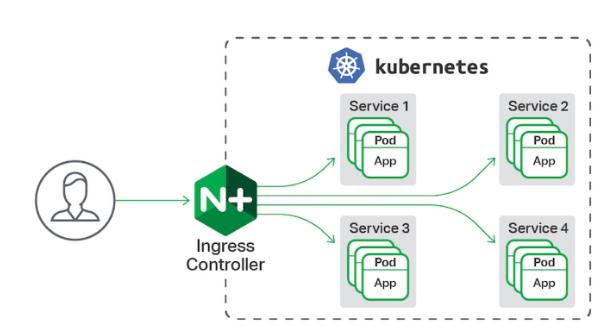
一种全局的、为了代理不同后端 Service 而设置的负载均衡服务,支持7层
Ingress由两部分组成:Ingress controller和Ingress服务
Ingress Controller 会根据你定义的 Ingress 对象,提供对应的代理能力。
业界常用的各种反向代理项目,比如 Nginx、HAProxy、Envoy、Traefik 等,都已经为Kubernetes 专门维护了对应的 Ingress Controller。
6.4.1 部署ingress
下载部署文件(自备文件)
上传ingress所需镜像到harbor
[root@yifanhu ~]# docker tag reg.timinglee.org/ingress-nginx/controller:v1.11.2 reg.timinglee.org/ingress-nginx/controller:v1.11.2
[root@yifanhu ~]# docker tag reg.timinglee.org/ingress-nginx/kube-webhook-certgen:v1.4.3 reg.timinglee.org/ingress-nginx/kube-webhook-certgen:v1.4.3
[root@yifanhu ~]# docker push reg.timinglee.org/ingress-nginx/controller:v1.11.2
The push refers to repository [reg.timinglee.org/ingress-nginx/controller]
[root@yifanhu ~]# docker push reg.timinglee.org/ingress-nginx/kube-webhook-certgen:v1.4.3
The push refers to repository [reg.timinglee.org/ingress-nginx/kube-webhook-certgen]

安装ingress
[root@yifanhu ~]# kubectl -n ingress-nginx get pods
NAME                                       READY   STATUS      RESTARTS   AGE
ingress-nginx-admission-create-r4mq7       0/1     Completed   0          11s
ingress-nginx-admission-patch-72xsg        0/1     Completed   1          11s
ingress-nginx-controller-bb7d8f97c-jttq6   0/1     Running     0          11s
[root@yifanhu ~]# kubectl -n ingress-nginx get svc
NAME                                 TYPE        CLUSTER-IP       EXTERNAL-IP   PORT(S)                      AGE
ingress-nginx-controller             NodePort    10.97.52.210     <none>        80:30602/TCP,443:30149/TCP   30s
ingress-nginx-controller-admission   ClusterIP   10.100.179.101   <none>        443/TCP                      30s修改微服务为Loadbalancer
[root@k8s-master ~]# kubectl -n ingress-nginx edit svc ingress-nginx-controller
49   type: LoadBalancer
[root@yifanhu ~]# kubectl -n ingress-nginx get services
NAME                                 TYPE           CLUSTER-IP       EXTERNAL-IP   PORT(S)                      AGE
ingress-nginx-controller             LoadBalancer   10.97.52.210     <pending>     80:30602/TCP,443:30149/TCP   2m51s
ingress-nginx-controller-admission   ClusterIP      10.100.179.101   <none>        443/TCP                      2m51s
测试ingress
#生成yaml文件
[root@k8s-master ~]# kubectl create ingress webcluster --rule '*/=timinglee-svc:80' --dry-run=client -o yaml > timinglee-ingress.yml[root@k8s-master ~]# vim timinglee-ingress.yml
aapiVersion: networking.k8s.io/v1
kind: Ingress
metadata:name: test-ingress
spec:ingressClassName: nginxrules:- http:paths:- backend:service:name: timinglee-svcport:number: 80path: /pathType: Prefix	[root@yifanhu ~]# kubectl apply -f timinglee-ingress.yml
ingress.networking.k8s.io/test-ingress created
[root@yifanhu ~]# kubectl get ingress
NAME           CLASS   HOSTS   ADDRESS         PORTS   AGE
test-ingress   nginx   *       172.25.254.20   80      21m
[root@yifanhu ~]# kubectl -n ingress-nginx get svc
NAME                                 TYPE           CLUSTER-IP       EXTERNAL-IP     PORT(S)                      AGE
ingress-nginx-controller             LoadBalancer   10.97.52.210     172.25.254.50   80:30602/TCP,443:30149/TCP   28m
ingress-nginx-controller-admission   ClusterIP      10.100.179.101   <none>          443/TCP [root@yifanhu ~]# for i in {1..5};do curl 172.25.254.50/hostname.html;done
<html>
<head><title>503 Service Temporarily Unavailable</title></head>
<body>
6.4.2 ingress的高级用法
基于路径的访问
建立用于测试的控制器myapp
[root@yifanhu ~]# cat myapp-v1.yaml
apiVersion: apps/v1
kind: Deployment
metadata:labels:app: myapp-v1name: myapp-v1
spec:replicas: 1selector:matchLabels:app: myapp-v1strategy: {}template:metadata:labels:app: myapp-v1spec:containers:- image: myapp:v1name: myapp---apiVersion: apps/v1
kind: Deployment
metadata:labels:app: myapp-v1name: myapp-v1
spec:replicas: 1selector:matchLabels:app: myapp-v1strategy: {}template:metadata:labels:app: myapp-v1spec:containers:- image: myapp:v1name: myapp[root@yifanhu ~]# cat myapp-v2.yaml
apiVersion: apps/v1
kind: Deployment
metadata:labels:app: myapp-v2name: myapp-v2
spec:replicas: 1selector:matchLabels:app: myapp-v2strategy: {}template:metadata:labels:app: myapp-v2spec:containers:- image: myapp:v2name: myapp[root@k8s-master app]# kubectl expose deployment myapp-v1 --port 80 --target-port 80 --dry-run=client -o yaml >> myapp-v1.yaml[root@k8s-master app]# kubectl expose deployment myapp-v2 --port 80 --target-port 80 --dry-run=client -o yaml >> myapp-v1.yaml
[root@yifanhu ~]# kubectl get services
NAME                          TYPE        CLUSTER-IP       EXTERNAL-IP   PORT(S)        AGE
myapp-v1                      ClusterIP   10.111.123.136   <none>        80/TCP         3m59s
myapp-v2                      ClusterIP   10.106.139.68    <none>        80/TCP         4m17s
建立ingress的yaml
[root@yifanhu ~]# cat ingress1.yml
apiVersion: networking.k8s.io/v1
kind: Ingress
metadata:annotations:nginx.ingress.kubernetes.io/rewrite-target: /               #访问路径后加任何内容都被定向到/name: ingress1
spec:ingressClassName: nginxrules:- host: www.timinglee.orghttp:paths:- backend:service:name: myapp-v1port:number: 80path: /v1pathType: Prefix- backend:service:name: myapp-v2port:number: 80path: /v2pathType: Prefix
测试结果:
[root@yifanhu ~]# kubectl apply -f ingress1.yml
ingress.networking.k8s.io/ingress1 created
[root@yifanhu ~]# echo 172.25.254.50 www.timinglee.org >> /etc/hosts
[root@yifanhu ~]# curl www.timinglee.org/v1
Hello MyApp | Version: v1 | <a href="hostname.html">Pod Name</a>
[root@yifanhu ~]# curl www.timinglee.org/v2
Hello MyApp | Version: v2 | <a href="hostname.html">Pod Name</a>
基于域名的访问
(1)在测试主机中设定解析
myappv1.timinglee.org myappv2.timinglee.org
[root@yifanhu ~]# cat ingress2.yml
apiVersion: networking.k8s.io/v1
kind: Ingress
metadata:annotations:nginx.ingress.kubernetes.io/rewrite-target: /name: ingress2
spec:ingressClassName: nginxrules:- host: myappv1.timinglee.orghttp:paths:- backend:service:name: myapp-v1port:number: 80path: /pathType: Prefix- host: myappv2.timinglee.orghttp:paths:- backend:service:name: myapp-v2port:number: 80path: /pathType: Prefix
测试:
[root@yifanhu ~]# curl www.timinglee.org/v1
Hello MyApp | Version: v1 | <a href="hostname.html">Pod Name</a>
[root@yifanhu ~]# curl www.timinglee.org/v2
Hello MyApp | Version: v2 | <a href="hostname.html">Pod Name</a>
6.4.3 建立tls加密
建立证书:
[root@yifanhu ~]# openssl req -newkey rsa:2048 -nodes -keyout tls.key -x509 -days 365 -subj "/CN=nginxsvc/O=nginxsvc" -out tls.crt
...+..+...+....+...+.....+....+......+.........+.....+.+..+.......+...+...+.....+....+.....+................+.........+...+.....+.+......+.........+++++++++++++++++++++++++++++++++++++++++++++++++++++++++++++++++*....+.+......+......+.....+...+++++++++++++++++++++++++++++++++++++++++++++++++++++++++++++++++*.+......+....+............+....................+....+..+............+......+.........+...+...................+.....+.............+..+...+......+.+...+..+.+...+...........+...+...+.......+.....+.+.....+.+.....................+...+.....+.........+............+.+.........+...+...+...+...............+.........+.....+.+..+.............+..+.......+..+.........+......+.........+............+...+............+...+....+...+.......................+....+...+..+.+......+........+.+.....+.......+..+.+......+...+..+...+.......+...+..+.............+..+...+.+..+.......+........+...+..........+..+...+.+........+.......+.....+.............+..+.+........+......+...............+...+................+......+...+.....+...............+......+.........+.+............+.....+....+...+........+.........+....+......+...........+..........+..+......+....+.....+............+......+...+.+........+.......+......+.....+...+..........+......+...+......+......+......+.........+........+.............+...+..+...+....+...+........+.+...+..+......+.......+..+...+.+++++++++++++++++++++++++++++++++++++++++++++++++++++++++++++++++
.+..+.+++++++++++++++++++++++++++++++++++++++++++++++++++++++++++++++++*.+...+.....+...+++++++++++++++++++++++++++++++++++++++++++++++++++++++++++++++++*...+..+...+......+.+.....+......+...+....+++++++++++++++++++++++++++++++++++++++++++++++++++++++++++++++++
-----
建立加密资源类型secret
 kubectl create secret tls  web-tls-secret --key tls.key --cert tls.crt
secret/web-tls-secret created
secret/web-tls-secret createdkubectl get secrets
NAME             TYPE                DATA   AGE
web-tls-secret   kubernetes.io/tls   2      3m13s
建立ingress3基于tls认证的yml文件
#建立ingress3基于tls认证的yml文件
[root@k8s-master app]# vim ingress3.yml
apiVersion: networking.k8s.io/v1
kind: Ingress
metadata:annotations:nginx.ingress.kubernetes.io/rewrite-target: /name: ingress3
spec:tls:- hosts:- myapp-tls.timinglee.orgsecretName: web-tls-secretingressClassName: nginxrules:- host: myapp-tls.timinglee.orghttp:paths:- backend:service:name: myapp-v1port:number: 80path: /pathType: Prefix#测试
[root@reg ~]# curl -k https://myapp-tls.timinglee.org
Hello MyApp | Version: v1 | <a href="hostname.html">Pod Name</a>
七.k8s中的存储管理
7.1 configmap
configMap用于保存配置数据,以键值对形式存储。
configMap 资源提供了向 Pod 注入配置数据的方法。
镜像和配置文件解耦,以便实现镜像的可移植性和可复用性。
etcd限制了文件大小不能超过1M
使用场景
填充环境变量的值
设置容器内的命令行参数
填充卷的配置文件
创建方式
[root@yifanhu ~]# kubectl create cm lee-config --from-literal fname=timing --from-literal name=lee
configmap/lee-config created
[root@yifanhu ~]# kubectl describe cm lee-config
Name:         lee-config
Namespace:    default
Labels:       <none>
Annotations:  <none>Data
====
fname:
----
timing
name:
----
leeBinaryData
====Events:  <none>
通过文件创建
[root@yifanhu ~]# vim /etc/resolv.conf
[root@yifanhu ~]# kubectl create cm lee2-config --from-file /etc/resolv.conf
configmap/lee2-config created
[root@yifanhu ~]# kubectl describe cm lee2-config
Name:         lee2-config
Namespace:    default
Labels:       <none>
Annotations:  <none>Data
====
resolv.conf:
----
# Generated by NetworkManager
nameserver 114.114.114.114BinaryData
====Events:  <none>
还可以通过目录和yaml文件创建
7.2 secret配置管理
Secret 对象类型用来保存敏感信息,例如密码、OAuth 令牌和 ssh key。
敏感信息放在 secret 中比放在 Pod 的定义或者容器镜像中来说更加安全和灵活
Pod 可以用两种方式使用 secret:
作为 volume 中的文件被挂载到 pod 中的一个或者多个容器里。
当 kubelet 为 pod 拉取镜像时使用。
Secret的类型:
Service Account:Kubernetes 自动创建包含访问 API 凭据的 secret,并自动修改 pod 以使用此类型的 secret。
Opaque:使用base64编码存储信息,可以通过base64 --decode解码获得原始数据,因此安全性弱。
kubernetes.io/dockerconfigjson:用于存储docker registry的认证信息
secret的创建
从文件创建:
[root@yifanhu ~]# echo -n timinglee > username.txt
[root@yifanhu ~]# echo -n lee > password.txt
[root@yifanhu ~]# kubectl create secret generic userlist --from-file username.txt --from-file password.txt
secret/userlist created
[root@yifanhu ~]# kubectl  get secrets userlist -o yaml
apiVersion: v1
data:password.txt: bGVlusername.txt: dGltaW5nbGVl
kind: Secret
metadata:creationTimestamp: "2025-08-22T03:14:28Z"name: userlistnamespace: defaultresourceVersion: "98186"uid: 32606dad-1b51-434e-96c0-7e4cc25f06e6
type: Opaque
编写yaml文件
[root@yifanhu ~]# echo -n timinglee | base64
dGltaW5nbGVl
[root@yifanhu ~]# echo -n lee | base64
bGVl
[root@yifanhu ~]# kubectl create secret generic userlist --dry-run=client -o yaml > userlist.yml
[root@yifanhu ~]# vim userlist.yml
[root@yifanhu ~]# cat userlist.yml
apiVersion: v1
kind: Secret
metadata:creationTimestamp: nullname: userlist
type: Opaque
data:username: dGltaW5nbGVlpassword: bGVl
[root@yifanhu ~]# kubectl apply -f userlist.yml
Warning: resource secrets/userlist is missing the kubectl.kubernetes.io/last-applied-configuration annotation which is required by kubectl apply. kubectl apply should only be used on resources created declaratively by either kubectl create --save-config or kubectl apply. The missing annotation will be patched automatically.
secret/userlist configured
[root@yifanhu ~]# kubectl describe secrets userlist
Name:         userlist
Namespace:    default
Labels:       <none>
Annotations:  <none>Type:  OpaqueData
====
password:      3 bytes
password.txt:  3 bytes
username:      9 bytes
username.txt:  9 bytes
7.2.1 secret的使用方法
将Secret挂载到Volume中
[root@k8s-master secrets]# kubectl run  nginx --image nginx --dry-run=client -o yaml > pod1.yaml
#向固定路径映射
[root@k8s-master secrets]# vim pod1.yaml
apiVersion: v1
kind: Pod
metadata:labels:run: nginxname: nginx
spec:containers:- image: nginxname: nginxvolumeMounts:- name: secretsmountPath: /secretreadOnly: truevolumes:- name: secretssecret:secretName: userlist[root@yifanhu ~]# kubectl apply -f  pod1.yaml
pod/nginx created
[root@yifanhu ~]# kubectl exec pods/nginx -it -- /bin/bash
root@nginx:/# cat /secret/
cat: /secret/: Is a directory
root@nginx:/# cd /secret/
root@nginx:/secret# ls
password  password.txt  username  username.txt
root@nginx:/secret# cat password
leeroot@nginx:/secret# cat username
timingleeroot@nginx:/secret#
7.3 volumes配置管理
kubernets支持的卷的类型
awsElasticBlockStore 、azureDisk、azureFile、cephfs、cinder、configMap、csi
downwardAPI、emptyDir、fc (fibre channel)、flexVolume、flocker
gcePersistentDisk、gitRepo (deprecated)、glusterfs、hostPath、iscsi、local、
nfs、persistentVolumeClaim、projected、portworxVolume、quobyte、rbd
scaleIO、secret、storageos、vsphereVolume
7.3.1 emptyDir卷
功能:
当Pod指定到某个节点上时,首先创建的是一个emptyDir卷,并且只要 Pod 在该节点上运行,卷就一直存在。卷最初是空的。 尽管 Pod 中的容器挂载 emptyDir 卷的路径可能相同也可能不同,但是这些容器都可以读写 emptyDir 卷中相同的文件。 当 Pod 因为某些原因被从节点上删除时,emptyDir 卷中的数据也会永久删除
emptyDir 的使用场景:
缓存空间,例如基于磁盘的归并排序。
耗时较长的计算任务提供检查点,以便任务能方便地从崩溃前状态恢复执行。
在 Web 服务器容器服务数据时,保存内容管理器容器获取的文件。
7.3.2 hostpath卷
功能:
hostPath 卷能将主机节点文件系统上的文件或目录挂载到您的 Pod 中,不会因为pod关闭而被删除
hostPath 的一些用法
运行一个需要访问 Docker 引擎内部机制的容器,挂载 /var/lib/docker 路径。
在容器中运行 cAdvisor(监控) 时,以 hostPath 方式挂载 /sys。
允许 Pod 指定给定的 hostPath 在运行 Pod 之前是否应该存在,是否应该创建以及应该以什么方式存在
hostPath的安全隐患
具有相同配置(例如从 podTemplate 创建)的多个 Pod 会由于节点上文件的不同而在不同节点上有不同的行为。
当 Kubernetes 按照计划添加资源感知的调度时,这类调度机制将无法考虑由 hostPath 使用的资源。
基础主机上创建的文件或目录只能由 root 用户写入。您需要在 特权容器 中以 root 身份运行进程,或者修改主机上的文件权限以便容器能够写入 hostPath 卷。
7.3.3 nfs卷
NFS 卷允许将一个现有的 NFS 服务器上的目录挂载到 Kubernetes 中的 Pod 中。这对于在多个 Pod 之间共享数据或持久化存储数据非常有用
例如,如果有多个容器需要访问相同的数据集,或者需要将容器中的数据持久保存到外部存储,NFS 卷可以提供一种方便的解决方案。
部署一台nfs共享主机并在所有k8s节点中安装nfs-utils
#部署nfs主机
[root@reg ~]# dnf install nfs-utils -y
[root@reg ~]# systemctl enable --now nfs-server.service[root@reg ~]# vim /etc/exports
/nfsdata   *(rw,sync,no_root_squash)[root@reg ~]# exportfs -rv
exporting *:/nfsdata[root@reg ~]# showmount  -e
Export list for reg.timinglee.org:
/nfsdata *#在k8s所有节点中安装nfs-utils
[root@k8s-master & node1 & node2  ~]# dnf install nfs-utils -y
部署nfs卷
[root@k8s-master volumes]# vim pod3.yml
apiVersion: v1
kind: Pod
metadata:name: vol1
spec:containers:- image: nginx:latestname: vm1volumeMounts:- mountPath: /usr/share/nginx/htmlname: cache-volvolumes:- name: cache-volnfs:server: 172.25.254.250path: /nfsdata[root@k8s-master volumes]# kubectl apply -f pod3.yml
pod/vol1 created#测试
[root@k8s-master volumes]# kubectl get pods   -o wide
NAME   READY   STATUS    RESTARTS   AGE    IP            NODE        NOMINATED NODE   READINESS GATES
vol1   1/1     Running   0          100s   10.244.2.50   k8s-node2   <none>           <none>
[root@k8s-master volumes]# curl  10.244.2.50
<html>
<head><title>403 Forbidden</title></head>
<body>
<center><h1>403 Forbidden</h1></center>
<hr><center>nginx/1.27.1</center>
</body>
</html>##在nfs主机中
[root@reg ~]# echo timinglee > /nfsdata/index.html
[root@k8s-master volumes]# curl  10.244.2.50
timinglee
7.3.4 PersistentVolume持久卷
PersistentVolume(持久卷,简称PV)
pv是集群内由管理员提供的网络存储的一部分。
PV也是集群中的一种资源。是一种volume插件,
但是它的生命周期却是和使用它的Pod相互独立的。
PV这个API对象,捕获了诸如NFS、ISCSI、或其他云存储系统的实现细节
pv有两种提供方式:静态和动态
静态PV:集群管理员创建多个PV,它们携带着真实存储的详细信息,它们存在于Kubernetes API中,并可用于存储使用
动态PV:当管理员创建的静态PV都不匹配用户的PVC时,集群可能会尝试专门地供给volume给PVC。这种供给基于StorageClass
PersistentVolumeClaim(持久卷声明,简称PVC)
是用户的一种存储请求
它和Pod类似,Pod消耗Node资源,而PVC消耗PV资源
Pod能够请求特定的资源(如CPU和内存)。PVC能够请求指定的大小和访问的模式持久卷配置
PVC与PV的绑定是一对一的映射。没找到匹配的PV,那么PVC会无限期得处于unbound未绑定状态
volumes访问模式
ReadWriteOnce -- 该volume只能被单个节点以读写的方式映射
ReadOnlyMany -- 该volume可以被多个节点以只读方式映射
ReadWriteMany -- 该volume可以被多个节点以读写的方式映射
在命令行中,访问模式可以简写为:
RWO - ReadWriteOnce
ROX - ReadOnlyMany
RWX – ReadWriteMany
volumes回收策略
Retain:保留,需要手动回收
Recycle:回收,自动删除卷中数据(在当前版本中已经废弃)
Delete:删除,相关联的存储资产,如AWS EBS,GCE PD,Azure Disk,or OpenStack Cinder卷都会被删除
volumes状态说明
Available 卷是一个空闲资源,尚未绑定到任何申领
Bound 该卷已经绑定到某申领
Released 所绑定的申领已被删除,但是关联存储资源尚未被集群回收
Failed 卷的自动回收操作失败
静态PV实例:
#在nfs主机中建立实验目录
[root@reg ~]# mkdir  /nfsdata/pv{1..3}#编写创建pv的yml文件,pv是集群资源,不在任何namespace中
[root@k8s-master pvc]# vim pv.yml
apiVersion: v1
kind: PersistentVolume
metadata:name: pv1
spec:capacity:storage: 5GivolumeMode: FilesystemaccessModes:- ReadWriteOncepersistentVolumeReclaimPolicy: RetainstorageClassName: nfsnfs:path: /nfsdata/pv1server: 172.25.254.250---
apiVersion: v1
kind: PersistentVolume
metadata:name: pv2
spec:capacity:storage: 15GivolumeMode: FilesystemaccessModes:- ReadWriteManypersistentVolumeReclaimPolicy: RetainstorageClassName: nfsnfs:path: /nfsdata/pv2server: 172.25.254.250
---
apiVersion: v1
kind: PersistentVolume
metadata:name: pv3
spec:capacity:storage: 25GivolumeMode: FilesystemaccessModes:- ReadOnlyManypersistentVolumeReclaimPolicy: RetainstorageClassName: nfsnfs:path: /nfsdata/pv3server: 172.25.254.250[root@k8s-master pvc]# kubectl get  pv
NAME   CAPACITY   ACCESS MODES   RECLAIM POLICY   STATUS      CLAIM   STORAGECLASS   VOLUMEATTRIBUTESCLASS   REASON   AGE
pv1    5Gi        RWO            Retain           Available           nfs            <unset>                          4m50s
pv2    15Gi       RWX            Retain           Available           nfs            <unset>                          4m50s
pv3    25Gi       ROX            Retain           Available           nfs            <unset>                          4m50s#建立pvc,pvc是pv使用的申请,需要保证和pod在一个namesapce中
[root@k8s-master pvc]# vim pvc.ym
apiVersion: v1
kind: PersistentVolumeClaim
metadata:name: pvc1
spec:storageClassName: nfsaccessModes:- ReadWriteOnceresources:requests:storage: 1Gi---
apiVersion: v1
kind: PersistentVolumeClaim
metadata:name: pvc2
spec:storageClassName: nfsaccessModes:- ReadWriteManyresources:requests:storage: 10Gi---
apiVersion: v1
kind: PersistentVolumeClaim
metadata:name: pvc3
spec:storageClassName: nfsaccessModes:- ReadOnlyManyresources:requests:storage: 15Gi
[root@k8s-master pvc]# kubectl get pvc
NAME   STATUS   VOLUME   CAPACITY   ACCESS MODES   STORAGECLASS   VOLUMEATTRIBUTESCLASS   AGE
pvc1   Bound    pv1      5Gi        RWO            nfs            <unset>                 5s
pvc2   Bound    pv2      15Gi       RWX            nfs            <unset>                 4s
pvc3   Bound    pv3      25Gi       ROX            nfs            <unset>                 4s#在其他namespace中无法应用
[root@k8s-master pvc]# kubectl -n kube-system  get pvc
No resources found in kube-system namespace.
在pod中使用pvc
[root@k8s-master pvc]# vim pod.ymlapiVersion: v1kind: Podmetadata: name: timingleespec: containers: - image: nginx name: nginx volumeMounts: - mountPath: /usr/share/nginx/html name: vol1 volumes: - name: vol1 persistentVolumeClaim: claimName: pvc1[root@k8s-master pvc]# kubectl get pods -o wideNAME READY STATUS RESTARTS AGE IP NODE NOMINATED NODE READINESS GATEStiminglee 1/1 Running 0 83s 10.244.2.54 k8s-node2 <none> <none>[root@k8s-master pvc]# kubectl exec -it pods/timinglee -- /bin/bashroot@timinglee:/# curl localhost<html><head><title>403 Forbidden</title></head><body><center><h1>403 Forbidden</h1></center><hr><center>nginx/1.27.1</center></body></html>root@timinglee:/# cd /usr/share/nginx/root@timinglee:/usr/share/nginx# lshtmlroot@timinglee:/usr/share/nginx# cd html/root@timinglee:/usr/share/nginx/html# ls[root@reg ~]# echo timinglee > /data/pv1/index.html[root@k8s-master pvc]# kubectl exec -it pods/timinglee -- /bin/bashroot@timinglee:/# cd /usr/share/nginx/html/root@timinglee:/usr/share/nginx/html# lsindex.html7.3.5 存储类storageclass
StorageClass提供了一种描述存储类(class)的方法,不同的class可能会映射到不同的服务质量等级和备份策略或其他策略等。
每个 StorageClass 都包含 provisioner、parameters 和 reclaimPolicy 字段, 这些字段会在StorageClass需要动态分配 PersistentVolume 时会使用到
属性:
Provisioner(存储分配器):用来决定使用哪个卷插件分配 PV,该字段必须指定。可以指定内部分配器,也可以指定外部分配器。外部分配器的代码地址为: kubernetes-incubator/external-storage,其中包括NFS和Ceph等。
Reclaim Policy(回收策略):通过reclaimPolicy字段指定创建的Persistent Volume的回收策略,回收策略包括:Delete 或者 Retain,没有指定默认为Delete。
存储分配器NFS Client Provisioner:
NFS Client Provisioner是一个automatic provisioner,使用NFS作为存储,自动创建PV和对应的PVC,本身不提供NFS存储,需要外部先有一套NFS存储服务。
PV以 ${namespace}-${pvcName}-${pvName}的命名格式提供(在NFS服务器上)
PV回收的时候以 archieved-${namespace}-${pvcName}-${pvName} 的命名格式(在NFS服务器上)
部署NFS Client Provisioner
(1)创建sa并授权
[root@k8s-master storageclass]# vim rbac.yml
apiVersion: v1
kind: Namespace
metadata:name: nfs-client-provisioner
---
apiVersion: v1
kind: ServiceAccount
metadata:name: nfs-client-provisionernamespace: nfs-client-provisioner
---
kind: ClusterRole
apiVersion: rbac.authorization.k8s.io/v1
metadata:name: nfs-client-provisioner-runner
rules:- apiGroups: [""]resources: ["nodes"]verbs: ["get", "list", "watch"]- apiGroups: [""]resources: ["persistentvolumes"]verbs: ["get", "list", "watch", "create", "delete"]- apiGroups: [""]resources: ["persistentvolumeclaims"]verbs: ["get", "list", "watch", "update"]- apiGroups: ["storage.k8s.io"]resources: ["storageclasses"]verbs: ["get", "list", "watch"]- apiGroups: [""]resources: ["events"]verbs: ["create", "update", "patch"]
---
kind: ClusterRoleBinding
apiVersion: rbac.authorization.k8s.io/v1
metadata:name: run-nfs-client-provisioner
subjects:- kind: ServiceAccountname: nfs-client-provisionernamespace: nfs-client-provisioner
roleRef:kind: ClusterRolename: nfs-client-provisioner-runnerapiGroup: rbac.authorization.k8s.io
---
kind: Role
apiVersion: rbac.authorization.k8s.io/v1
metadata:name: leader-locking-nfs-client-provisionernamespace: nfs-client-provisioner
rules:- apiGroups: [""]resources: ["endpoints"]verbs: ["get", "list", "watch", "create", "update", "patch"]
---
kind: RoleBinding
apiVersion: rbac.authorization.k8s.io/v1
metadata:name: leader-locking-nfs-client-provisionernamespace: nfs-client-provisioner
subjects:- kind: ServiceAccountname: nfs-client-provisionernamespace: nfs-client-provisioner
roleRef:kind: Rolename: leader-locking-nfs-client-provisionerapiGroup: rbac.authorization.k8s.io#查看rbac信息
[root@k8s-master storageclass]# kubectl apply -f rbac.yml
namespace/nfs-client-provisioner created
serviceaccount/nfs-client-provisioner created
clusterrole.rbac.authorization.k8s.io/nfs-client-provisioner-runner created
clusterrolebinding.rbac.authorization.k8s.io/run-nfs-client-provisioner created
role.rbac.authorization.k8s.io/leader-locking-nfs-client-provisioner created
rolebinding.rbac.authorization.k8s.io/leader-locking-nfs-client-provisioner created
[root@k8s-master storageclass]# kubectl -n nfs-client-provisioner get sa
NAME                     SECRETS   AGE
default                  0         14s
nfs-client-provisioner   0         14s
(2)部署应用
[root@k8s-master storageclass]# vim deployment.yml
apiVersion: apps/v1
kind: Deployment
metadata:name: nfs-client-provisionerlabels:app: nfs-client-provisionernamespace: nfs-client-provisioner
spec:replicas: 1strategy:type: Recreateselector:matchLabels:app: nfs-client-provisionertemplate:metadata:labels:app: nfs-client-provisionerspec:serviceAccountName: nfs-client-provisionercontainers:- name: nfs-client-provisionerimage: sig-storage/nfs-subdir-external-provisioner:v4.0.2volumeMounts:- name: nfs-client-rootmountPath: /persistentvolumesenv:- name: PROVISIONER_NAMEvalue: k8s-sigs.io/nfs-subdir-external-provisioner- name: NFS_SERVERvalue: 172.25.254.250- name: NFS_PATHvalue: /nfsdatavolumes:- name: nfs-client-rootnfs:server: 172.25.254.250path: /nfsdata[root@k8s-master storageclass]# kubectl -n nfs-client-provisioner get deployments.apps nfs-client-provisioner
NAME                     READY   UP-TO-DATE   AVAILABLE   AGE
nfs-client-provisioner   1/1     1            1           86s
(4)创建存储类
[root@k8s-master storageclass]# vim class.yaml
apiVersion: storage.k8s.io/v1
kind: StorageClass
metadata:name: nfs-client
provisioner: k8s-sigs.io/nfs-subdir-external-provisioner
parameters:archiveOnDelete: "false"[root@k8s-master storageclass]# kubectl apply -f class.yaml
storageclass.storage.k8s.io/nfs-client created
[root@k8s-master storageclass]# kubectl get storageclasses.storage.k8s.io
NAME         PROVISIONER                                   RECLAIMPOLICY   VOLUMEBINDINGMODE   ALLOWVOLUMEEXPANSION   AGE
nfs-client   k8s-sigs.io/nfs-subdir-external-provisioner   Delete          Immediate           false                  9s
(5)创建测试pod
[root@k8s-master storageclass]# vim pod.yml
kind: Pod
apiVersion: v1
metadata:name: test-pod
spec:containers:- name: test-podimage: busyboxcommand:- "/bin/sh"args:- "-c"- "touch /mnt/SUCCESS && exit 0 || exit 1"volumeMounts:- name: nfs-pvcmountPath: "/mnt"restartPolicy: "Never"volumes:- name: nfs-pvcpersistentVolumeClaim:claimName: test-claim[root@k8s-master storageclass]# kubectl apply -f pod.yml[root@reg ~]# ls /data/default-test-claim-pvc-b1aef9cc-4be9-4d2a-8c5e-0fe7716247e2/
SUCCESS
(6)设置默认存储类
在未设定默认存储类时pvc必须指定使用类的名称
在设定存储类后创建pvc时可以不用指定storageClassName
#一次性指定多个pvc
[root@k8s-master pvc]# vim pvc.yml
apiVersion: v1
kind: PersistentVolumeClaim
metadata:name: pvc1
spec:storageClassName: nfs-clientaccessModes:- ReadWriteOnceresources:requests:storage: 1Gi---
apiVersion: v1
kind: PersistentVolumeClaim
metadata:name: pvc2
spec:storageClassName: nfs-clientaccessModes:- ReadWriteManyresources:requests:storage: 10Gi---
apiVersion: v1
kind: PersistentVolumeClaim
metadata:name: pvc3
spec:storageClassName: nfs-clientaccessModes:- ReadOnlyManyresources:requests:storage: 15Giroot@k8s-master pvc]# kubectl apply -f pvc.yml
persistentvolumeclaim/pvc1 created
persistentvolumeclaim/pvc2 created
persistentvolumeclaim/pvc3 created
[root@k8s-master pvc]# kubectl get pvc
NAME         STATUS   VOLUME                                     CAPACITY   ACCESS MODES   STORAGECLASS   VOLUMEATTRIBUTESCLASS   AGE
pvc1         Bound    pvc-25a3c8c5-2797-4240-9270-5c51caa211b8   1Gi        RWO            nfs-client     <unset>                 4s
pvc2         Bound    pvc-c7f34d1c-c8d3-4e7f-b255-e29297865353   10Gi       RWX            nfs-client     <unset>                 4s
pvc3         Bound    pvc-5f1086ad-2999-487d-88d2-7104e3e9b221   15Gi       ROX            nfs-client     <unset>                 4s
test-claim   Bound    pvc-b1aef9cc-4be9-4d2a-8c5e-0fe7716247e2   1Gi        RWX            nfs-client     <unset>                 9m9s
[root@k8s-master storageclass]# kubectl edit sc nfs-client
apiVersion: storage.k8s.io/v1
kind: StorageClass
metadata:annotations:kubectl.kubernetes.io/last-applied-configuration: |{"apiVersion":"storage.k8s.io/v1","kind":"StorageClass","metadata":{"annotations":{},"name":"nfs-client"},"parameters":{"archiveOnDelete":"false"},"provisioner":"k8s-sigs.io/nfs-subdir-external-provisioner"}storageclass.kubernetes.io/is-default-class: "true"		#设定默认存储类creationTimestamp: "2024-09-07T13:49:10Z"name: nfs-clientresourceVersion: "218198"uid: 9eb1e144-3051-4f16-bdec-30c472358028
parameters:archiveOnDelete: "false"
provisioner: k8s-sigs.io/nfs-subdir-external-provisioner
reclaimPolicy: Delete
volumeBindingMode: Immediate#测试,未指定storageClassName参数
[root@k8s-master storageclass]# vim pvc.yml
kind: PersistentVolumeClaim
apiVersion: v1
metadata:name: test-claim
spec:accessModes:- ReadWriteManyresources:requests:storage: 1Gi[root@k8s-master storageclass]# kubectl apply -f pvc.yml
persistentvolumeclaim/test-claim created
[root@k8s-master storageclass]# kubectl get pvc
NAME         STATUS   VOLUME                                     CAPACITY   ACCESS MODES   STORAGECLASS   VOLUMEATTRIBUTESCLASS   AGE
test-claim   Bound    pvc-b96c6983-5a4f-440d-99ec-45c99637f9b5   1Gi        RWX            nfs-client     <unset>
八.k8s网络通信
8.1 k8s通信整体架构
k8s通过CNI接口接入其他插件来实现网络通讯。目前比较流行的插件有flannel,calico等
CNI插件存放位置:# cat /etc/cni/net.d/10-flannel.conflist
插件使用的解决方案如下
虚拟网桥,虚拟网卡,多个容器共用一个虚拟网卡进行通信。
多路复用:MacVLAN,多个容器共用一个物理网卡进行通信。
硬件交换:SR-LOV,一个物理网卡可以虚拟出多个接口,这个性能最好。
容器间通信:
同一个pod内的多个容器间的通信,通过lo即可实现pod之间的通信
同一节点的pod之间通过cni网桥转发数据包。
不同节点的pod之间的通信需要网络插件支持
pod和service通信: 通过iptables或ipvs实现通信,ipvs取代不了iptables,因为ipvs只能做负载均衡,而做不了nat转换
pod和外网通信:iptables的MASQUERADE
Service与集群外部客户端的通信;(ingress、nodeport、loadbalancer)
8.2 flannel网络插件
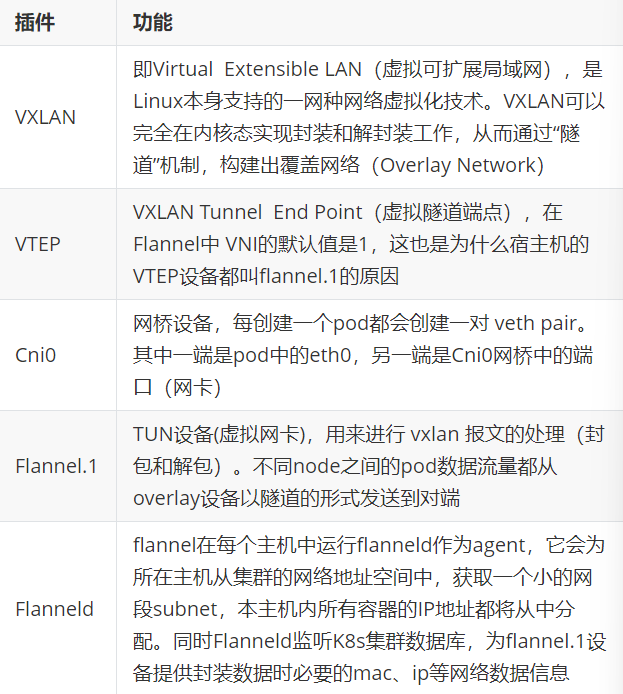
8.2.1 flannel跨主机通信原理
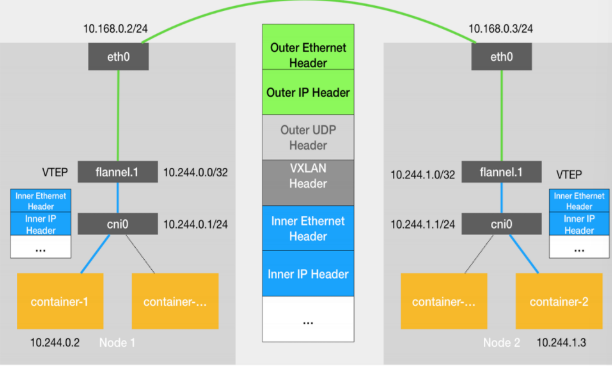
当容器发送IP包,通过veth pair 发往cni网桥,再路由到本机的flannel.1设备进行处理。
VTEP设备之间通过二层数据帧进行通信,源VTEP设备收到原始IP包后,在上面加上一个目的MAC地址,封装成一个内部数据帧,发送给目的VTEP设备。
内部数据桢,并不能在宿主机的二层网络传输,Linux内核还需要把它进一步封装成为宿主机的一个普通的数据帧,承载着内部数据帧通过宿主机的eth0进行传输。
Linux会在内部数据帧前面,加上一个VXLAN头,VXLAN头里有一个重要的标志叫VNI,它是VTEP识别某个数据桢是不是应该归自己处理的重要标识。
flannel.1设备只知道另一端flannel.1设备的MAC地址,却不知道对应的宿主机地址是什么。在linux内核里面,网络设备进行转发的依据,来自FDB的转发数据库,这个flannel.1网桥对应的FDB信息,是由flanneld进程维护的。
linux内核在IP包前面再加上二层数据帧头,把目标节点的MAC地址填进去,MAC地址从宿主机的ARP表获取。
此时flannel.1设备就可以把这个数据帧从eth0发出去,再经过宿主机网络来到目标节点的eth0设备。目标主机内核网络栈会发现这个数据帧有VXLAN Header,并且VNI为1,Linux内核会对它进行拆包,拿到内部数据帧,根据VNI的值,交给本机flannel.1设备处理,flannel.1拆包,根据路由表发往cni网桥,最后到达目标容器。
8.2.2 flannel支持的后端模式
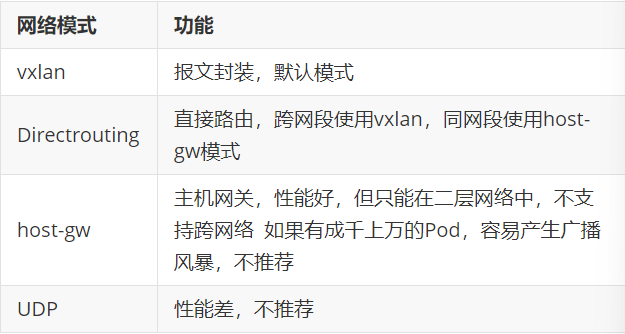
8.3 calico网络插件
纯三层的转发,中间没有任何的NAT和overlay,转发效率最好。
Calico 仅依赖三层路由可达。Calico 较少的依赖性使它能适配所有 VM、Container、白盒或者混合环境场景。
8.3.1 网络架构
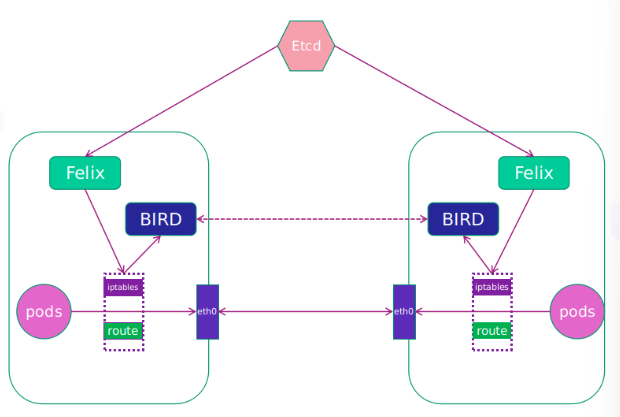
Felix:监听ECTD中心的存储获取事件,用户创建pod后,Felix负责将其网卡、IP、MAC都设置好,然后在内核的路由表里面写一条,注明这个IP应该到这张网卡。同样如果用户制定了隔离策略,Felix同样会将该策略创建到ACL中,以实现隔离。
BIRD:一个标准的路由程序,它会从内核里面获取哪一些IP的路由发生了变化,然后通过标准BGP的路由协议扩散到整个其他的宿主机上,让外界都知道这个IP在这里,路由的时候到这里
部署calico
(1)删除flannel
[root@k8s-master ~]# kubectl delete -f kube-flannel.yml(2)删除所有节点上的flannel配置文件
[root@k8s-master & node1-2 ~]# rm -rf /etc/cni/net.d/10-flannel.conflist(3)下载部署文件
[root@k8s-master calico]# curl https://raw.githubusercontent.com/projectcalico/calico/v3.28.1/manifests/calico-typha.yaml -o calico.yaml(4)下载镜像上传到仓库
[root@k8s-master ~]# docker pull docker.io/calico/cni:v3.28.1
[root@k8s-master ~]# docker pull docker.io/calico/node:v3.28.1
[root@k8s-master ~]# docker pull docker.io/calico/kube-controllers:v3.28.1
[root@k8s-master ~]# docker pull docker.io/calico/typha:v3.28.1
(5)更改yml设置
[root@k8s-master calico]# vim calico.yaml
4835           image: calico/cni:v3.28.1
4835           image: calico/cni:v3.28.1
4906           image: calico/node:v3.28.1
4932           image: calico/node:v3.28.1
5160           image: calico/kube-controllers:v3.28.1
5249         - image: calico/typha:v3.28.14970             - name: CALICO_IPV4POOL_IPIP
4971               value: "Never"4999             - name: CALICO_IPV4POOL_CIDR
5000               value: "10.244.0.0/16"
5001             - name: CALICO_AUTODETECTION_METHOD
5002               value: "interface=eth0"[root@k8s-master calico]# kubectl apply -f calico.yaml
[root@k8s-master calico]# kubectl -n kube-system get pods
NAME                                       READY   STATUS    RESTARTS       AGE
calico-kube-controllers-6849cb478c-g5h5p   1/1     Running   0              75s
calico-node-dzzjp                          1/1     Running   0              75s
calico-node-ltz7n                          1/1     Running   0              75s
calico-node-wzdnq                          1/1     Running   0              75s
calico-typha-fff9df85f-vm5ks               1/1     Running   0              75s
coredns-647dc95897-nchjr                   1/1     Running   1 (139m ago)   4d7h
coredns-647dc95897-wjbg2                   1/1     Running   1 (139m ago)   4d7h
etcd-k8s-master                            1/1     Running   1 (139m ago)   4d7h
kube-apiserver-k8s-master                  1/1     Running   1 (139m ago)   3d10h
kube-controller-manager-k8s-master         1/1     Running   3 (139m ago)   4d7h
kube-proxy-9g5z2                           1/1     Running   1 (139m ago)   3d10h
kube-proxy-cd5wk                           1/1     Running   1 (139m ago)   3d10h
kube-proxy-mvq4c                           1/1     Running   1 (139m ago)   3d10h
kube-scheduler-k8s-master                  1/1     Running   3 (139m ago)   4d7h
测试
[root@k8s-master calico]# kubectl run  web --image myapp:v1
pod/web created
[root@k8s-master calico]# kubectl get pods  -o wide
NAME   READY   STATUS    RESTARTS   AGE   IP               NODE        NOMINATED NODE   READINESS GATES
web    1/1     Running   0          5s    10.244.169.129   k8s-node2   <none>           <none>
[root@k8s-master calico]# curl  10.244.169.129
Hello MyApp | Version: v1 | <a href="hostname.html">Pod Name</a>
8.4 k8s调度
调度是指将未调度的Pod自动分配到集群中的节点的过程
调度器通过 kubernetes 的 watch 机制来发现集群中新创建且尚未被调度到 Node 上的 Pod
调度器会将发现的每一个未调度的 Pod 调度到一个合适的 Node 上来运行
原理:
创建Pod
用户通过Kubernetes API创建Pod对象,并在其中指定Pod的资源需求、容器镜像等信息。
调度器监视Pod
Kubernetes调度器监视集群中的未调度Pod对象,并为其选择最佳的节点。
选择节点
调度器通过算法选择最佳的节点,并将Pod绑定到该节点上。调度器选择节点的依据包括节点的资源使用情况、Pod的资源需求、亲和性和反亲和性等。
绑定Pod到节点
调度器将Pod和节点之间的绑定信息保存在etcd数据库中,以便节点可以获取Pod的调度信息。
节点启动Pod
节点定期检查etcd数据库中的Pod调度信息,并启动相应的Pod。如果节点故障或资源不足,调度器会重新调度Pod,并将其绑定到其他节点上运行。
调度器种类:
默认调度器(Default Scheduler):
是Kubernetes中的默认调度器,负责对新创建的Pod进行调度,并将Pod调度到合适的节点上。
自定义调度器(Custom Scheduler):
是一种自定义的调度器实现,可以根据实际需求来定义调度策略和规则,以实现更灵活和多样化的调度功能。
扩展调度器(Extended Scheduler):
是一种支持调度器扩展器的调度器实现,可以通过调度器扩展器来添加自定义的调度规则和策略,以实现更灵活和多样化的调度功能。
kube-scheduler是kubernetes中的默认调度器,在kubernetes运行后会自动在控制节点运行
常用调度方法
nodename:
nodeName 是节点选择约束的最简单方法,但一般不推荐
如果 nodeName 在 PodSpec 中指定了,则它优先于其他的节点选择方法
使用 nodeName 来选择节点的一些限制
如果指定的节点不存在。
如果指定的节点没有资源来容纳 pod,则pod 调度失败。
云环境中的节点名称并非总是可预测或稳定的
#建立pod文件
[[root@k8s-master scheduler]# kubectl run  testpod  --image myapp:v1 --dry-run=client -o yaml > pod1.yml#设置调度
[root@k8s-master scheduler]# vim pod1.yml
apiVersion: v1
kind: Pod
metadata:labels:run: testpodname: testpod
spec:nodeName: k8s-node2containers:- image: myapp:v1name: testpod#建立pod
[root@k8s-master scheduler]# kubectl apply -f pod1.yml
pod/testpod created[root@k8s-master scheduler]# kubectl get pods  -o wide
NAME      READY   STATUS    RESTARTS   AGE   IP               NODE        NOMINATED NODE   READINESS GATES
testpod   1/1     Running   0          18s   10.244.169.130   k8s-node2   <none>           <none>
nodeselector(通过标签控制节点)
nodeSelector 是节点选择约束的最简单推荐形式
给选择的节点添加标签:
可以给多个节点设定相同标签
#查看节点标签
[root@k8s-master scheduler]# kubectl get nodes --show-labels
NAME         STATUS   ROLES           AGE    VERSION   LABELS
k8s-master   Ready    control-plane   5d3h   v1.30.0   beta.kubernetes.io/arch=amd64,beta.kubernetes.io/os=linux,kubernetes.io/arch=amd64,kubernetes.io/hostname=k8s-master,kubernetes.io/os=linux,node-role.kubernetes.io/control-plane=,node.kubernetes.io/exclude-from-external-load-balancers=
k8s-node1    Ready    <none>          5d3h   v1.30.0   beta.kubernetes.io/arch=amd64,beta.kubernetes.io/os=linux,kubernetes.io/arch=amd64,kubernetes.io/hostname=k8s-node1,kubernetes.io/os=linux
k8s-node2    Ready    <none>          5d3h   v1.30.0   beta.kubernetes.io/arch=amd64,beta.kubernetes.io/os=linux,kubernetes.io/arch=amd64,kubernetes.io/hostname=k8s-node2,kubernetes.io/os=linux#设定节点标签
[root@k8s-master scheduler]# kubectl label nodes k8s-node1 lab=timinglee
node/k8s-node1 labeled
[root@k8s-master scheduler]# kubectl get nodes k8s-node1 --show-labels
NAME        STATUS   ROLES    AGE    VERSION   LABELS
k8s-node1   Ready    <none>   5d3h   v1.30.0   beta.kubernetes.io/arch=amd64,beta.kubernetes.io/os=linux,kubernetes.io/arch=amd64,kubernetes.io/hostname=k8s-node1,kubernetes.io/os=linux,lab=timinglee#调度设置
[root@k8s-master scheduler]# vim pod2.yml
apiVersion: v1
kind: Pod
metadata:labels:run: testpodname: testpod
spec:nodeSelector:lab: timingleecontainers:- image: myapp:v1name: testpod[root@k8s-master scheduler]# kubectl apply -f pod2.yml
pod/testpod created
[root@k8s-master scheduler]# kubectl get pods  -o wide
NAME      READY   STATUS    RESTARTS   AGE   IP             NODE        NOMINATED NODE   READINESS GATES
testpod   1/1     Running   0          4s    10.244.36.65   k8s-node1   <none>           <none>
affinity(亲和性)
nodeSelector 提供了一种非常简单的方法来将 pod 约束到具有特定标签的节点上。亲和/反亲和功能极大地扩展了你可以表达约束的类型。
使用节点上的 pod 的标签来约束,而不是使用节点本身的标签,来允许哪些 pod 可以或者不可以被放置在一起。
nodeAfiinity节点亲和
那个节点服务指定条件就在那个节点运行
requiredDuringSchedulingIgnoredDuringExecution 必须满足,但不会影响已经调度
preferredDuringSchedulingIgnoredDuringExecution 倾向满足,在无法满足情况下也会调度pod
IgnoreDuringExecution 表示如果在Pod运行期间Node的标签发生变化,导致亲和性策略不能满足,则继续运行当前的Pod。
nodeaffinity还支持多种规则匹配条件的配置如
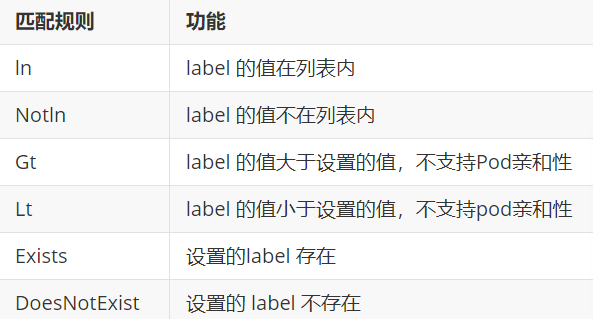
示例:
#示例1
[root@k8s-master scheduler]# vim pod3.yml
apiVersion: v1
kind: Pod
metadata:name: node-affinity
spec:containers:- name: nginximage: nginxaffinity:nodeAffinity:requiredDuringSchedulingIgnoredDuringExecution:nodeSelectorTerms:- matchExpressions:- key: diskoperator: In | NotIn			#两个结果相反values:- ssd
podaffinity(pod的亲和)
那个节点有符合条件的POD就在那个节点运行
podAffinity 主要解决POD可以和哪些POD部署在同一个节点中的问题
podAntiAffinity主要解决POD不能和哪些POD部署在同一个节点中的问题。它们处理的是Kubernetes集群内部POD和POD之间的关系。
Pod 间亲和与反亲和在与更高级别的集合(例如 ReplicaSets,StatefulSets,Deployments 等)一起使用时,
Pod 间亲和与反亲和需要大量的处理,这可能会显著减慢大规模集群中的调度。
示例:
[root@k8s-master scheduler]# vim example4.yml
apiVersion: apps/v1
kind: Deployment
metadata:name: nginx-deploymentlabels:app: nginx
spec:replicas: 3selector:matchLabels:app: nginxtemplate:metadata:labels:app: nginxspec:containers:- name: nginximage: nginxaffinity:podAffinity:requiredDuringSchedulingIgnoredDuringExecution:- labelSelector:matchExpressions:- key: appoperator: Invalues:- nginxtopologyKey: "kubernetes.io/hostname"[root@k8s-master scheduler]# kubectl get pods  -o wide
NAME                               READY   STATUS    RESTARTS   AGE   IP               NODE        NOMINATED NODE   READINESS GATES
nginx-deployment-658496fff-d58bk   1/1     Running   0          39s   10.244.169.133   k8s-node2   <none>           <none>
nginx-deployment-658496fff-g25nq   1/1     Running   0          39s   10.244.169.134   k8s-node2   <none>           <none>
nginx-deployment-658496fff-vnlxz   1/1     Running   0          39s   10.244.169.135   k8s-node2   <none>           <none>
Podantiaffinity(pod反亲和)
[root@k8s-master scheduler]# vim example5.yml
apiVersion: apps/v1
kind: Deployment
metadata:name: nginx-deploymentlabels:app: nginx
spec:replicas: 3selector:matchLabels:app: nginxtemplate:metadata:labels:app: nginxspec:containers:- name: nginximage: nginxaffinity:podAntiAffinity:		#反亲和requiredDuringSchedulingIgnoredDuringExecution:- labelSelector:matchExpressions:- key: appoperator: Invalues:- nginxtopologyKey: "kubernetes.io/hostname"[root@k8s-master scheduler]# kubectl get pods  -o wide
NAME                                READY   STATUS    RESTARTS   AGE   IP               NODE        NOMINATED NODE   READINESS GATES
nginx-deployment-5f5fc7b8b9-hs9kz   1/1     Running   0          6s    10.244.169.136   k8s-node2   <none>           <none>
nginx-deployment-5f5fc7b8b9-ktzsh   0/1     Pending   0          6s    <none>           <none>      <none>           <none>
nginx-deployment-5f5fc7b8b9-txdt9   1/1     Running   0          6s    10.244.36.67     k8s-node1   <none>           <none>
九.k8s认证授权
Authentication(认证)
认证方式现共有8种,可以启用一种或多种认证方式,只要有一种认证方式通过,就不再进行其它方式的认证。通常启用X509 Client Certs和Service Accout Tokens两种认证方式。
Kubernetes集群有两类用户:由Kubernetes管理的Service Accounts (服务账户)和(Users Accounts) 普通账户。k8s中账号的概念不是我们理解的账号,它并不真的存在,它只是形式上存在。
Authorization(授权)
必须经过认证阶段,才到授权请求,根据所有授权策略匹配请求资源属性,决定允许或拒绝请求。授权方式现共有6种,AlwaysDeny、AlwaysAllow、ABAC、RBAC、Webhook、Node。默认集群强制开启RBAC。
Admission Control(准入控制)
用于拦截请求的一种方式,运行在认证、授权之后,是权限认证链上的最后一环,对请求API资源对象进行修改和校验。
9.1 UserAccount与ServiceAccount
用户账户是针对人而言的。 服务账户是针对运行在 pod 中的进程而言的。
用户账户是全局性的。 其名称在集群各 namespace 中都是全局唯一的,未来的用户资源不会做 namespace 隔离, 服务账户是 namespace 隔离的。
集群的用户账户可能会从企业数据库进行同步,其创建需要特殊权限,并且涉及到复杂的业务流程。 服务账户创建的目的是为了更轻量,允许集群用户为了具体的任务创建服务账户 ( 即权限最小化原则 )。
ServiceAccount
服务账户控制器(Service account controller)
服务账户管理器管理各命名空间下的服务账户
每个活跃的命名空间下存在一个名为 “default” 的服务账户
服务账户准入控制器(Service account admission controller)
相似pod中 ServiceAccount默认设为 default。
保证 pod 所关联的 ServiceAccount 存在,否则拒绝该 pod。
如果pod不包含ImagePullSecrets设置那么ServiceAccount中的ImagePullSecrets 被添加到pod中
将挂载于 /var/run/secrets/kubernetes.io/serviceaccount 的 volumeSource 添加到 pod 下的每个容器中
将一个包含用于 API 访问的 token 的 volume 添加到 pod 中
示例:
建立名为admin的ServiceAccount
[root@k8s-master ~]# kubectl create sa timinglee
serviceaccount/timinglee created
[root@k8s-master ~]# kubectl describe  sa timinglee
Name:                timinglee
Namespace:           default
Labels:              <none>
Annotations:         <none>
Image pull secrets:  <none>
Mountable secrets:   <none>
Tokens:              <none>
Events:              <none>
建立secrets,并将其注入到sa
[root@k8s-master ~]# kubectl create secret docker-registry docker-login --docker-username admin --docker-password lee --docker-server reg.timinglee.org --docker-email lee@timinglee.org
secret/docker-login created
[root@k8s-master ~]# kubectl describe secrets docker-login
Name:         docker-login
Namespace:    default
Labels:       <none>
Annotations:  <none>Type:  kubernetes.io/dockerconfigjsonData
====
.dockerconfigjson:  119 bytes[root@k8s-master ~]# kubectl edit sa timinglee
apiVersion: v1
imagePullSecrets:
- name: docker-login
kind: ServiceAccount
metadata:creationTimestamp: "2024-09-08T15:44:04Z"name: timingleenamespace: defaultresourceVersion: "262259"uid: 7645a831-9ad1-4ae8-a8a1-aca7b267ea2d[root@k8s-master ~]# kubectl describe sa timinglee
Name:                timinglee
Namespace:           default
Labels:              <none>
Annotations:         <none>
Image pull secrets:  docker-login
Mountable secrets:   <none>
Tokens:              <none>
Events:              <none>
建立私有仓库并且利用Pod访问私有仓库
[root@k8s-master auth]# vim example1.yml
[root@k8s-master auth]# kubectl apply -f example1.yml
pod/testpod created
[root@k8s-master auth]# kubectl describe pod testpodWarning  Failed     5s               kubelet            Failed to pull image "reg.timinglee.org/lee/nginx:latest": Error response from daemon: unauthorized: unauthorized to access repository: lee/nginx, action: pull: unauthorized to access repository: lee/nginx, action: pullWarning  Failed     5s               kubelet            Error: ErrImagePullNormal   BackOff    3s (x2 over 4s)  kubelet            Back-off pulling image "reg.timinglee.org/lee/nginx:latest"Warning  Failed     3s (x2 over 4s)  kubelet            Error: ImagePullBackOff
pod绑定sa
[root@k8s-master auth]# vim example1.yml
apiVersion: v1
kind: Pod
metadata:name: testpod
spec:serviceAccountName: timingleecontainers:- image: reg.timinglee.org/lee/nginx:latestname: testpod[root@k8s-master auth]# kubectl apply -f example1.yml
pod/testpod created
[root@k8s-master auth]# kubectl get pods
NAME      READY   STATUS    RESTARTS   AGE
testpod   1/1     Running   0          2s
8.2 认证
创建UserAccount
#建立证书
[root@k8s-master auth]# cd /etc/kubernetes/pki/
[root@k8s-master pki]# openssl genrsa -out timinglee.key 2048
[root@k8s-master pki]# openssl req  -new -key timinglee.key -out timinglee.csr -subj "/CN=timinglee"
[root@k8s-master pki]# openssl x509 -req  -in timinglee.csr -CA ca.crt -CAkey ca.key -CAcreateserial  -out timinglee.crt -days 365
Certificate request self-signature ok[root@k8s-master pki]# openssl x509 -in timinglee.crt -text -noout
Certificate:Data:Version: 1 (0x0)Serial Number:
8.2.1 RBAC(Role Based Access Control)
基于角色访问控制授权
允许管理员通过Kubernetes API动态配置授权策略。RBAC就是用户通过角色与权限进行关联。
RBAC只有授权,没有拒绝授权,所以只需要定义允许该用户做什么即可
RBAC的三个基本概念
Subject:被作用者,它表示k8s中的三类主体, user, group, serviceAccount
Role:角色,它其实是一组规则,定义了一组对 Kubernetes API 对象的操作权限。
RoleBinding:定义了“被作用者”和“角色”的绑定关系
RBAC包括四种类型:Role、ClusterRole、RoleBinding、ClusterRoleBinding
Role 和 ClusterRole
Role是一系列的权限的集合,Role只能授予单个namespace 中资源的访问权限。
ClusterRole 跟 Role 类似,但是可以在集群中全局使用。
Kubernetes 还提供了四个预先定义好的 ClusterRole 来供用户直接使用
cluster-amdin、admin、edit、view
role授权实施
#生成role的yaml文件
[root@k8s-master rbac]# kubectl create role myrole --dry-run=client --verb=get --resource pods -o yaml > myrole.yml#更改文件内容
[root@k8s-master rbac]# vim myrole.yml
apiVersion: rbac.authorization.k8s.io/v1
kind: Role
metadata:creationTimestamp: nullname: myrole
rules:
- apiGroups:- ""resources:- podsverbs:- get- watch- list- create- update- path- delete#创建role
[root@k8s-master rbac]# kubectl apply -f  myrole.yml
[root@k8s-master rbac]# kubectl describe role myrole
Name:         myrole
Labels:       <none>
Annotations:  <none>
PolicyRule:Resources  Non-Resource URLs  Resource Names  Verbs---------  -----------------  --------------  -----pods       []                 []              [get watch list create update path delete]
#建立角色绑定
[root@k8s-master rbac]# kubectl create rolebinding timinglee --role myrole --namespace default --user timinglee --dry-run=client -o yaml  > rolebinding-myrole.yml[root@k8s-master rbac]# vim rolebinding-myrole.yml
apiVersion: rbac.authorization.k8s.io/v1
kind: RoleBinding
metadata:name: timingleenamespace: default		#角色绑定必须指定namespace
roleRef:apiGroup: rbac.authorization.k8s.iokind: Rolename: myrole
subjects:
- apiGroup: rbac.authorization.k8s.iokind: Username: timinglee[root@k8s-master rbac]# kubectl apply -f rolebinding-myrole.yml
rolebinding.rbac.authorization.k8s.io/timinglee created
[root@k8s-master rbac]# kubectl get rolebindings.rbac.authorization.k8s.io timinglee
NAME        ROLE          AGE
timinglee   Role/myrole   9s
#切换用户测试授权
[root@k8s-master rbac]# kubectl config use-context timinglee@kubernetes
Switched to context "timinglee@kubernetes".[root@k8s-master rbac]# kubectl get pods
No resources found in default namespace.
[root@k8s-master rbac]# kubectl get svc			#只针对pod进行了授权,所以svc依然不能操作
Error from server (Forbidden): services is forbidden: User "timinglee" cannot list resource "services" in API group "" in the namespace "default"#切换回管理员
[root@k8s-master rbac]# kubectl config use-context kubernetes-admin@kubernetes
Switched to context "kubernetes-admin@kubernetes".
clusterrole授权实施
#建立集群角色
[root@k8s-master rbac]# kubectl create clusterrole myclusterrole --resource=deployment --verb get --dry-run=client -o yaml > myclusterrole.yml
[root@k8s-master rbac]# vim myclusterrole.yml
apiVersion: rbac.authorization.k8s.io/v1
kind: ClusterRole
metadata:name: myclusterrole
rules:
- apiGroups:- appsresources:- deploymentsverbs:- get- list- watch- create- update- path- delete
- apiGroups:- ""resources:- podsverbs:- get- list- watch- create- update- path- delete[root@k8s-master rbac]# kubectl describe clusterrole myclusterrole
Name:         myclusterrole
Labels:       <none>
Annotations:  <none>
PolicyRule:Resources         Non-Resource URLs  Resource Names  Verbs---------         -----------------  --------------  -----deployments.apps  []                 []              [get list watch create update path delete]pods.apps         []                 []              [get list watch create update path delete]#建立集群角色绑定
[root@k8s-master rbac]# kubectl create clusterrolebinding  clusterrolebind-myclusterrole --clusterrole myclusterrole  --user timinglee --dry-run=client -o yaml > clusterrolebind-myclusterrole.yml
[root@k8s-master rbac]# vim clusterrolebind-myclusterrole.yml
apiVersion: rbac.authorization.k8s.io/v1
kind: ClusterRoleBinding
metadata:name: clusterrolebind-myclusterrole
roleRef:apiGroup: rbac.authorization.k8s.iokind: ClusterRolename: myclusterrole
subjects:
- apiGroup: rbac.authorization.k8s.iokind: Username: timinglee[root@k8s-master rbac]# kubectl describe clusterrolebindings.rbac.authorization.k8s.io clusterrolebind-myclusterrole
Name:         clusterrolebind-myclusterrole
Labels:       <none>
Annotations:  <none>
Role:Kind:  ClusterRoleName:  myclusterrole
Subjects:Kind  Name       Namespace----  ----       ---------User  timinglee#测试:
[root@k8s-master rbac]# kubectl get pods  -A
[root@k8s-master rbac]# kubectl get deployments.apps -A
[root@k8s-master rbac]# kubectl get svc -A
Error from server (Forbidden): services is forbidden: User "timinglee" cannot list resource "services" in API group "" at the cluster scope
服务账户的自动化
服务账户准入控制器(Service account admission controller)
如果该 pod 没有 ServiceAccount 设置,将其 ServiceAccount 设为 default。
保证 pod 所关联的 ServiceAccount 存在,否则拒绝该 pod。
如果 pod 不包含 ImagePullSecrets 设置,那么 将 ServiceAccount 中的 ImagePullSecrets 信息添加到 pod 中。
将一个包含用于 API 访问的 token 的 volume 添加到 pod 中。
将挂载于 /var/run/secrets/kubernetes.io/serviceaccount 的 volumeSource 添加到 pod 下的每个容器中。
服务账户控制器(Service account controller)
服务账户管理器管理各命名空间下的服务账户,并且保证每个活跃的命名空间下存在一个名为 “default” 的服务账户
