det_cam_visualizer.py 函数逐行解读记录
DetCAMModel 类
class DetCAMModel(nn.Module):"""Wrap the mmdet model class to facilitate handling of non-tensor situations during inference."""
class DetCAMModel(nn.Module):: 定义了一个名为 DetCAMModel 的新类,它继承自 PyTorch 的 nn.Module 类。这意味着 DetCAMModel 本身可以被视为一个神经网络模块,可以包含其他模块(如模型)并利用 nn.Module 提供的功能(如参数管理、设备移动等)。
“”“Wrap the mmdet model class to facilitate handling of non-tensor situations during inference.”“”: 这是一个文档字符串(docstring),说明了这个类的主要目的:封装 MMDetection (mmdet) 的模型类,以方便处理在推理过程中非张量(non-tensor)数据的情况。这暗示了原始的 mmdet 模型在处理某些输入(如直接的 numpy 数组图像)时可能需要复杂的预处理流程,而这个封装类旨在简化这个过程。
def __init__(self, cfg, checkpoint, score_thr, device='cuda:1'):super().__init__()self.cfg = cfgself.device = deviceself.score_thr = score_thrself.checkpoint = checkpointself.detector = self.build_detector()self.return_loss = Falseself.input_data = Noneself.img = Nonedef init(self, cfg, checkpoint, score_thr, device=‘cuda:1’):: 定义了类的构造函数(初始化方法)。它接收以下参数:
-
- cfg: MMDetection 配置对象,包含模型结构、数据集、训练/测试设置等信息。
-
- checkpoint: 模型检查点文件的路径,用于加载预训练权重。
-
- score_thr: 检测结果的置信度分数阈值,低于此阈值的预测框将被过滤。
-
- device: 模型运行的设备,默认为 ‘cuda:1’ (GPU 1)。
super().init(): 调用父类 nn.Module 的构造函数,这是继承时必须的。
self.cfg = cfg: 将传入的配置对象保存为实例属性。
self.device = device: 将设备信息保存为实例属性。
self.score_thr = score_thr: 将置信度阈值保存为实例属性。
self.checkpoint = checkpoint: 将检查点路径保存为实例属性。
self.detector = self.build_detector(): 调用 build_detector 方法(见下文)来构建实际的 MMDetection 检测器模型,并将其赋值给 self.detector 属性。
self.return_loss = False: 初始化一个标志,用于控制模型是返回损失(通常用于训练或CAM计算)还是返回检测结果(用于推理)。初始值为 False,表示默认进行推理。
self.input_data = None: 初始化一个属性,用于存储经过预处理、符合模型输入格式的数据。
self.img = None: 初始化一个属性,用于存储原始输入图像(通常是 numpy 数组)。
def build_detector(self):cfg = copy.deepcopy(self.cfg)detector = build_detector(cfg.model,train_cfg=cfg.get('train_cfg'),test_cfg=cfg.get('test_cfg'))def build_detector(self):: 定义一个方法,用于构建和初始化检测器。
cfg = copy.deepcopy(self.cfg): 对原始配置 self.cfg 进行深度拷贝。这是为了避免在修改配置时影响原始的 cfg 对象。
detector = build_detector(…): 使用 MMDetection 提供的 build_detector 函数,根据配置中的 model、train_cfg 和 test_cfg 信息来构建检测器模型实例。
if self.checkpoint is not None:checkpoint = load_checkpoint(detector, self.checkpoint, map_location='cpu')if 'CLASSES' in checkpoint.get('meta', {}):detector.CLASSES = checkpoint['meta']['CLASSES']else:import warningswarnings.simplefilter('once')warnings.warn('Class names are not saved in the checkpoint\'s ''meta data, use COCO classes by default.')detector.CLASSES = get_classes('coco')if self.checkpoint is not None:: 检查是否提供了检查点路径。
checkpoint = load_checkpoint(detector, self.checkpoint, map_location=‘cpu’): 使用 load_checkpoint 函数将预训练权重从检查点文件加载到 detector 模型中。
map_location=‘cpu’ 表示先将权重加载到CPU内存,然后再根据需要移动到GPU,这是一种避免设备不匹配错误的常见做法。
if ‘CLASSES’ in checkpoint.get(‘meta’, {}):: 检查加载的检查点元数据(meta data)中是否包含类别名称(CLASSES)。
detector.CLASSES = checkpoint[‘meta’][‘CLASSES’]: 如果元数据中有类别名称,则将其赋值给检测器的 CLASSES 属性。
else:: 如果没有找到类别名称,则:
-
- 发出一个警告,提示用户类别名称未保存,将默认使用 COCO 数据集的类别。
-
- 调用 get_classes(‘coco’) 获取 COCO 数据集的类别名称列表,并赋值给 detector.CLASSES。
detector.to(self.device)detector.eval()return detectordetector.to(self.device): 将构建好的检测器模型移动到指定的设备(如 GPU)上。
detector.eval(): 将模型设置为评估(推理)模式。这会关闭模型中的一些训练特定行为,如 Dropout 和 BatchNorm 的更新。
return detector: 返回构建并初始化好的检测器模型。
def set_return_loss(self, return_loss):self.return_loss = return_lossdef set_return_loss(self, return_loss):: 定义一个方法,用于设置 return_loss 标志。
self.return_loss = return_loss: 将传入的布尔值 return_loss 直接赋值给实例属性 self.return_loss。这允许外部代码动态地改变模型的行为(是返回损失还是返回结果)
def set_input_data(self, img, bboxes=None, labels=None):self.img = imgcfg = copy.deepcopy(self.cfg)def set_input_data(self, img, bboxes=None, labels=None):: 定义一个关键方法,用于设置模型的输入数据。它接收图像 img,以及可选的真实边界框 bboxes 和真实标签 labels(主要用于计算损失)。
self.img = img: 保存原始输入图像。
cfg = copy.deepcopy(self.cfg): 再次对配置进行深度拷贝,因为接下来需要修改其数据预处理流水线(pipeline)。
if self.return_loss:assert bboxes is not Noneassert labels is not Nonecfg.data.test.pipeline[0].type = 'LoadImageFromWebcam'cfg.data.test.pipeline = replace_ImageToTensor(cfg.data.test.pipeline)cfg.data.test.pipeline[1].transforms[-1] = dict(type='Collect', keys=['img', 'gt_bboxes', 'gt_labels'])test_pipeline = Compose(cfg.data.test.pipeline)if self.return_loss:: 如果当前模式是返回损失(return_loss=True),则需要准备包含真实标注(ground truth)的数据。
assert bboxes is not None; assert labels is not None: 断言必须提供真实边界框和标签,否则无法计算损失。
cfg.data.test.pipeline[0].type = ‘LoadImageFromWebcam’: 修改数据预处理流水线的第一步,将其类型改为 ‘LoadImageFromWebcam’。这通常意味着流水线会期望输入是原始的图像数据(如 numpy 数组),而不是文件路径。
cfg.data.test.pipeline = replace_ImageToTensor(cfg.data.test.pipeline): 将流水线中的 ImageToTensor 操作替换为 ToTensor(或类似操作,具体取决于 replace_ImageToTensor 的实现)。ImageToTensor 通常用于数据加载器,而 ToTensor 更适合直接处理内存中的图像。
cfg.data.test.pipeline[1].transforms[-1] = dict(type=‘Collect’, keys=[‘img’, ‘gt_bboxes’, ‘gt_labels’]): 修改流水线第二步(通常是一个 MultiScaleFlipAug 或类似增强)的最后一个变换,将其设置为 Collect,并且明确指定需要收集的键(keys)为 ‘img’, ‘gt_bboxes’, ‘gt_labels’。这确保了预处理后的数据会包含图像张量、真实边界框和真实标签。
test_pipeline = Compose(cfg.data.test.pipeline): 使用修改后的流水线配置创建一个 Compose 对象,该对象可以按顺序执行流水线中的所有预处理步骤。
# TODO: support maskdata = dict(img=self.img,gt_bboxes=bboxes,gt_labels=labels.astype(np.int64),bbox_fields=['gt_bboxes'])data = test_pipeline(data)data = collate([data], samples_per_gpu=1)#TODO: support mask: 一个待办事项注释,提醒未来需要支持分割掩码(mask)。
data = dict(…): 创建一个字典 data,作为预处理流水线的输入。它包含: img: 原始图像。gt_bboxes: 真实边界框。gt_labels: 真实标签(转换为 int64 类型)。bbox_fields: 一个列表,告诉流水线哪些字段包含边界框信息,以便进行坐标变换(如翻转、缩放)。
data = test_pipeline(data): 将 data 字典送入 test_pipeline 进行预处理。流水线会执行图像加载(或直接使用内存数据)、归一化、格式转换等操作。
data = collate([data], samples_per_gpu=1): 使用 collate 函数将单个样本 data 组合成一个批次。samples_per_gpu=1 表示每个GPU处理一个样本。collate 会将数据包装成 DataContainer 对象,这是 MMDetection 中用于处理不同数据类型(如张量、列表)的标准方式。
# just get the actual data from DataContainerdata['img_metas'] = [img_metas.data[0][0] for img_metas in data['img_metas']]data['img'] = [img.data[0] for img in data['img']]data['gt_bboxes'] = [gt_bboxes.data[0] for gt_bboxes in data['gt_bboxes']]data['gt_labels'] = [gt_labels.data[0] for gt_labels in data['gt_labels']]#just get the actual data from DataContainer: 注释说明接下来的操作是从 DataContainer 中提取实际的数据。这几行代码遍历 data 字典中的各项(img_metas, img, gt_bboxes, gt_labels),这些项目前是 DataContainer 列表。通过 [item.data[0] for item in data[key]] 的列表推导式,提取出 DataContainer 内部的实际数据(data[0]),并重新赋值给 data 字典。这一步是为了将数据从 MMDetection 的内部格式转换为更直接可用的格式(如普通的张量或numpy数组列表)。
if next(self.detector.parameters()).is_cuda:# scatter to specified GPUdata = scatter(data, [self.device])[0]data['img'] = data['img'][0]data['gt_bboxes'] = data['gt_bboxes'][0]data['gt_labels'] = data['gt_labels'][0]if next(self.detector.parameters()).is_cuda:: 检查检测器模型是否在CUDA(GPU)上。next(self.detector.parameters()) 获取模型的第一个参数,然后检查它是否在GPU上。
data = scatter(data, [self.device])[0]: 如果模型在GPU上,则使用 scatter 函数将 data 分发(scatter)到指定的 self.device 上。[0] 是因为 scatter 通常返回一个列表,这里我们只需要第一个元素。
data[‘img’] = data[‘img’][0] (以及 gt_bboxes, gt_labels): 由于之前 collate 产生的是单样本批次,这里通过取 [0] 来去掉批次维度,将列表中的单个元素提取出来,使 data[‘img’] 等直接指向张量或数组。
else:# set loading pipeline typecfg.data.test.pipeline[0].type = 'LoadImageFromWebcam'data = dict(img=self.img)cfg.data.test.pipeline = replace_ImageToTensor(cfg.data.test.pipeline)test_pipeline = Compose(cfg.data.test.pipeline)data = test_pipeline(data)data = collate([data], samples_per_gpu=1)else:: 如果当前模式是返回检测结果(return_loss=False),即进行推理。cfg.data.test.pipeline[0].type = ‘LoadImageFromWebcam’: 同样,将流水线第一步改为 ‘LoadImageFromWebcam’。
data = dict(img=self.img): 创建输入字典,此时只需要图像数据。
cfg.data.test.pipeline = replace_ImageToTensor(…): 同样进行 ImageToTensor 的替换。
test_pipeline = Compose(…): 创建预处理流水线。data = test_pipeline(data): 执行预处理。
data = collate([data], samples_per_gpu=1): 将单个样本组成批次。
# just get the actual data from DataContainerdata['img_metas'] = [img_metas.data[0] for img_metas in data['img_metas']]data['img'] = [img.data[0] for img in data['img']]与 return_loss 模式类似,从 DataContainer 中提取 img_metas 和 img 的实际数据。
if next(self.detector.parameters()).is_cuda:# scatter to specified GPUdata = scatter(data, [self.device])[0]else:for m in self.detector.modules():assert not isinstance(m, RoIPool), 'CPU inference with RoIPool is not supported currently.'if next(…).is_cuda:: 如果模型在GPU上,同样使用 scatter 将数据分发到指定GPU。
else:: 如果模型在CPU上: 遍历检测器模型的所有子模块。
assert not isinstance(m, RoIPool): …: 断言模型中不能包含 RoIPool 层。因为注释说明,当前不支持在CPU上使用 RoIPool 进行推理。
RoIPool 或 RoIAlign 是Faster R-CNN等两阶段检测器的关键操作,通常在GPU上实现。如果在CPU上运行且模型包含这些层,会抛出断言错误。
data['img'] = data['img'][0]去掉批次维度,将 data[‘img’] 指向实际的图像张量。
self.input_data = dataself.input_data = data: 将经过预处理、格式化并可能已移动到正确设备上的最终输入数据 data 保存为实例属性 self.input_data。这个属性将被 call 方法使用。
def __call__(self, *args, **kwargs):assert self.input_data is not Nonedef call(self, *args, **kwargs):: 定义了类的 call 方法,这使得 DetCAMModel 的实例可以像函数一样被调用(例如 model())。
assert self.input_data is not None: 断言 self.input_data 必须已经通过 set_input_data 方法设置好了,否则无法进行前向传播。
if self.return_loss:loss = self.detector(return_loss=True, **self.input_data)return [loss]if self.return_loss:: 如果 return_loss 标志为 True。
loss = self.detector(return_loss=True, **self.input_data): 调用内部的 detector 模型,传入 return_loss=True 和预处理好的 input_data。模型会执行前向传播并计算损失。
return [loss]: 返回一个包含损失字典的列表。返回列表格式是为了与后续处理(如 main 函数中的调用)保持一致。
else:with torch.no_grad():results = self.detector(return_loss=False, rescale=True, **self.input_data)[0]else:: 如果 return_loss 为 False,即进行推理。
with torch.no_grad():: 使用 torch.no_grad() 上下文管理器,禁用梯度计算,以节省内存并加速推理。results = self.detector(…): 调用 detector 模型,传入 return_loss=False(表示返回检测结果)和 rescale=True(表示将预测的边界框坐标从模型输入尺寸反归一化回原始图像尺寸)。[0] 是因为 collate 产生的是批次,这里取第一个样本的结果。
if isinstance(results, tuple):bbox_result, segm_result = resultsif isinstance(segm_result, tuple):segm_result = segm_result[0] # ms rcnnelse:bbox_result, segm_result = results, None检查 results 的类型。MMDetection 的模型输出可能是一个元组(包含边界框结果和分割结果)或一个列表(仅包含边界框结果)。
如果是元组,则解包为 bbox_result 和 segm_result。对于像 Mask R-CNN 这样的多尺度模型,segm_result 本身可能也是一个元组,这里取第一个元素。
如果不是元组,则 bbox_result 就是 results,segm_result 为 None。
bboxes = np.vstack(bbox_result)labels = [np.full(bbox.shape[0], i, dtype=np.int32)for i, bbox in enumerate(bbox_result)]labels = np.concatenate(labels)bboxes = np.vstack(bbox_result): bbox_result 是一个列表,其中每个元素对应一个类别的预测框(每个框包含4个坐标+1个分数)。np.vstack 将这些不同类别的框垂直堆叠成一个大的二维数组 bboxes,每一行代表一个预测框(5个值:x1, y1, x2, y2, score)。
labels = […]: 创建一个列表,其中每个元素是一个数组,数组的长度等于对应类别预测框的数量,数组的值是该类别的索引 i。
labels = np.concatenate(labels): 将所有类别的标签数组连接成一个一维数组 labels,其顺序与 bboxes 数组中的框顺序一一对应。
segms = Noneif segm_result is not None and len(labels) > 0: # non emptysegms = mmcv.concat_list(segm_result)if isinstance(segms[0], torch.Tensor):segms = torch.stack(segms, dim=0).detach().cpu().numpy()else:segms = np.stack(segms, axis=0)segms = None: 初始化 segms 为 None。
if segm_result is not None and len(labels) > 0:: 如果存在分割结果且有检测到的目标(labels 非空)。segms = mmcv.concat_list(segm_result): segm_result 也是一个按类别组织的列表。mmcv.concat_list 将其展平为一个包含所有分割掩码的列表。
if isinstance(segms[0], torch.Tensor):: 检查第一个掩码是张量还是 numpy 数组。 如果是张量,则使用 torch.stack 将它们堆叠成一个张量,然后 detach() 断开梯度,cpu() 移动到CPU,最后 numpy() 转换为 numpy 数组。否则是 numpy 数组,则直接用 np.stack 堆叠。
if self.score_thr > 0:assert bboxes is not None and bboxes.shape[1] == 5scores = bboxes[:, -1]inds = scores > self.score_thrbboxes = bboxes[inds, :]labels = labels[inds]if segms is not None:segms = segms[inds, ...]if self.score_thr > 0:: 如果设置了置信度阈值。
assert bboxes is not None and bboxes.shape[1] == 5: 确保 bboxes 存在且每行有5列(4坐标+1分数)。
scores = bboxes[:, -1]: 提取所有预测框的分数(最后一列)。
inds = scores > self.score_thr: 创建一个布尔索引数组,表示分数大于阈值的框。
bboxes = bboxes[inds, :]: 使用布尔索引过滤 bboxes,只保留高置信度的框。
labels = labels[inds]: 同样过滤 labels,保持与 bboxes 的对应关系。
if segms is not None: segms = segms[inds, …]: 如果存在分割掩码,也进行同样的过滤。
return [{'bboxes': bboxes, 'labels': labels, 'segms': segms}]return [{‘bboxes’: bboxes, ‘labels’: labels, ‘segms’: segms}]: 将处理后的结果(过滤后的边界框、标签、分割掩码)打包成一个字典,并放入一个列表中返回。返回列表格式是为了与 return_loss 分支的返回格式统一。
DetCAMModel 类总结:
DetCAMModel 类是一个强大的封装器,它通过 set_input_data 方法灵活地处理原始图像和真实标注,并根据 return_loss 标志决定模型是返回损失还是检测结果。它简化了 MMDetection 模型在不同模式(推理 vs. 损失计算)下的数据预处理流程,为上层应用(如CAM可视化)提供了统一且便捷的接口。 # 如果当前模式是返回损失(return_loss=True),则需要准备包含真实标注(ground truth)的数据。
DetAblationLayer 类
DetAblationLayer类是专门为处理特征金字塔网络(Feature Pyramid Network, FPN)这类产生多个尺度特征图(通常表示为一个列表或元组)的目标检测模型而设计的消融层。
class DetAblationLayer(AblationLayer):def __init__(self):super(DetAblationLayer, self).__init__()self.activations = None
def init(self):: 定义构造函数。super(DetAblationLayer, self).init(): 调用父类 AblationLayer 的构造函数,进行必要的初始化。self.activations = None: 初始化一个实例属性 self.activations,用于存储当前批次的输入激活数据。它将被设置为一个列表,列表中的每个元素对应FPN网络中一层的特征图张量。
def set_next_batch(self, input_batch_index, activations,num_channels_to_ablate):"""Extract the next batch member from activations, and repeat itnum_channels_to_ablate times."""if isinstance(activations, torch.Tensor):return super(DetAblationLayer,self).set_next_batch(input_batch_index, activations,num_channels_to_ablate)self.activations = []for activation in activations:activation = activation[input_batch_index, :, :, :].clone().unsqueeze(0)self.activations.append(activation.repeat(num_channels_to_ablate, 1, 1, 1))
def set_next_batch(…):: 定义一个方法,用于为消融过程设置下一个要处理的批次数据。这是 AblationLayer 的核心方法之一,DetAblationLayer 重写了它以处理多尺度激活。
“”“Extract the next batch member…”“”: 文档字符串说明该方法的作用:提取激活数据中的下一个批次成员,并将其重复 num_channels_to_ablate 次。重复是为了在消融不同通道时创建不同的输入。
if isinstance(activations, torch.Tensor):: 检查输入的 activations 是否是一个单一的 torch.Tensor。
return super(…): 如果是单一张量,说明模型不是FPN结构,可以直接调用父类 AblationLayer 的 set_next_batch 方法来处理。这保证了 DetAblationLayer 也能兼容非FPN的模型。
self.activations = []: 初始化 self.activations 为空列表,准备存储处理后的多层激活。
for activation in activations:: 遍历 activations 列表中的每一个元素(即FPN的每一层特征图)。
activation = activation[input_batch_index, :, :, :].clone().unsqueeze(0): activation[input_batch_index, :, :, :]: 从批次中提取索引为 input_batch_index 的单个样本的特征图。
.clone(): 创建一个副本,避免后续操作修改原始数据。
.unsqueeze(0): 在最前面增加一个维度(batch dimension),使其形状变为 (1, C, H, W)。self.activations.append(activation.repeat(num_channels_to_ablate, 1, 1, 1)): 将处理后的单个样本特征图沿着批次维度(第一个维度)重复 num_channels_to_ablate 次。这样,self.activations 中的每个元素现在都是一个形状为 (num_channels_to_ablate, C, H, W) 的张量,代表了要对 num_channels_to_ablate 个不同通道进行消融时,该层特征图的输入。
def __call__(self, x):"""Go over the activation indices to be ablated, stored inself.indices.Map between every activation index to the tensor in the Ordered Dictfrom the FPN layer."""result = self.activationsif isinstance(result, torch.Tensor):return super(DetAblationLayer, self).__call__(x)channel_cumsum = np.cumsum([r.shape[1] for r in result])num_channels_to_ablate = result[0].size(0) # batchfor i in range(num_channels_to_ablate):pyramid_layer = bisect.bisect_right(channel_cumsum,self.indices[i])if pyramid_layer > 0:index_in_pyramid_layer = self.indices[i] - channel_cumsum[pyramid_layer - 1]else:index_in_pyramid_layer = self.indices[i]result[pyramid_layer][i, index_in_pyramid_layer, :, :] = -1000return result
def call(self, x):: 重写了 call 方法。当这个层被调用时(通常在前向传播中),会执行此方法。x 是来自模型的原始输入(特征图)。
“”“Go over the activation indices…”“”: 文档字符串说明该方法的作用:遍历存储在 self.indices 中的、需要被消融的通道索引,并将这些全局索引映射到FPN层有序字典中的具体张量。
result = self.activations: 将之前 set_next_batch 方法设置好的 self.activations 列表赋值给 result。result 现在是一个列表,每个元素是 (num_channels_to_ablate, C, H, W) 的张量。
if isinstance(result, torch.Tensor):: 再次检查 result 是否为单一张量。return super(…): 如果是,则直接调用父类的 call 方法。这与 set_next_batch 中的逻辑对应,处理非FPN模型的情况。
channel_cumsum = np.cumsum([…]): 计算一个累积和数组 channel_cumsum。
[r.shape[1] for r in result]: 遍历 result 列表,获取每一层特征图的通道数 C,形成一个列表,例如 [256, 512, 1024]。
np.cumsum(…): 计算这个列表的累积和,得到 [256, 768, 1792]。这个数组非常重要,它定义了全局通道索引到具体哪一层的映射边界。例如,索引 0-255 属于第0层,256-767 属于第1层,768-1791 属于第2层。
num_channels_to_ablate = result[0].size(0): 获取需要消融的通道总数 num_channels_to_ablate。它等于 result 中任意一个张量的第一个维度(batch size),因为所有层的张量在这个维度上都是重复了相同次数的。
for i in range(num_channels_to_ablate):: 循环遍历每一个需要被消融的通道(i 从 0 到 num_channels_to_ablate-1)。i 也对应着 result 中张量的批次索引。
pyramid_layer = bisect.bisect_right(channel_cumsum, self.indices[i]): self.indices[i]: 获取第 i 个要消融的全局通道索引。bisect.bisect_right(channel_cumsum, self.indices[i]): 使用二分查找,在 channel_cumsum 数组中找到第一个大于 self.indices[i] 的元素的索引。这个索引 pyramid_layer 就是全局索引 self.indices[i] 所对应的FPN层的索引。例如,如果 self.indices[i] 是 300,bisect_right 会返回 1(因为 300 < 768),表示它属于第1层。
if pyramid_layer > 0: … else: …: 计算该全局索引在目标FPN层内的局部通道索引。 如果 pyramid_layer > 0,说明它不在第一层,需要用全局索引减去前一层的累积通道数:index_in_pyramid_layer = self.indices[i] - channel_cumsum[pyramid_layer - 1]。如果 pyramid_layer == 0,说明它在第一层,局部索引就等于全局索引。
result[pyramid_layer][i, index_in_pyramid_layer, :, :] = -1000: result[pyramid_layer]: 选中对应的FPN层的特征图张量。[i, index_in_pyramid_layer, :, :]: 在这个张量中,定位到第 i 个消融样本(批次维度)和第 index_in_pyramid_layer 个通道。
= -1000: 将该通道的所有空间位置(:, :)的值设置为一个非常大的负数(-1000)。在ReLU等激活函数之后,这等效于将该通道的激活值置零(消融),因为负数会被截断。这是消融的核心操作。
return result: 返回经过消融修改后的 result 列表。这个列表将作为修改后的输入传递给模型的后续层进行前向传播,从而计算出消融特定通道后的输出(如损失或分数),用于评估该通道的重要性。
DetAblationLayer总结
DetAblationLayer 的核心创新在于处理了多尺度特征图(如FPN的输出)。它通过 set_next_batch 方法将多层激活组织成可处理的格式,并在 call 方法中利用累积和 channel_cumsum 和二分查找 bisect_right,巧妙地将一个全局的通道索引映射到具体的FPN层和该层内的局部通道索引,然后执行消融操作。这使得像Grad-CAM++这样的消融类CAM方法能够应用于复杂的、多分支的目标检测模型。
reshape_transform函数说明
这个函数是为 CAM (Class Activation Mapping) 可视化设计的,特别是当目标模型(如 FPN)输出多个不同尺度的特征图时,需要将它们统一处理以便后续计算 CAM。
定义函数 reshape_transform,接收三个参数:
- feats: 输入的特征图。可以是一个单独的张量,也可以是一个包含多个张量的列表/元组(例如 FPN 的 P3, P4, P5 输出)。
- max_shape: 期望的目标形状(高度, 宽度)。所有特征图都将被插值(缩放)到这个尺寸。默认为 (20, 20)。
- is_need_grad: 一个标志,指示当前是否在基于梯度的方法(如 Grad-CAM)中使用。这会影响对多层特征图输入的处理。
def reshape_transform(feats, max_shape=(20, 20), is_need_grad=False):"""Reshape and aggregate feature maps when the input is a multi-layerfeature map.函数的核心功能:当输入是多层特征图时,将它们重塑(调整大小)并聚合(通常是拼接)成一个单一的特征图。Takes these tensors with different sizes, resizes them to a common shape,and concatenates them."""# 如果 max_shape 只提供了一个值(例如 (20,)),则将其复制一份,变成 (20, 20)。确保 max_shape 始终是一个包含两个元素(高和宽)的元组。if len(max_shape) == 1:max_shape = max_shape * 2# 检查 feats 是否是一个单一的 PyTorch 张量。如果是,则将其包装成一个列表。这样做的目的是统一处理逻辑,无论输入是单个张量还是多个张量的列表,后续代码都可以将其视为一个列表来遍历。if isinstance(feats, torch.Tensor):feats = [feats]#如果 feats 不是单个张量(即它已经是列表或元组)。#if is_need_grad:: 检查是否在基于梯度的方法中。#raise NotImplementedError(...): 如果在基于梯度的方法中且输入是多层特征图,则抛出异常。 #重点说明:这行代码揭示了一个重要的设计限制。它明确指出,这个 reshape_transform 函数的当前实现不支持在 Grad-CAM 这类需要计算梯度的方法中处理多层特征图的输入。这可能是因为在多层输入和复杂的 reshape/interpolate 操作中,梯度的回传路径可能存在问题或未被正确实现。该函数主要设计用于像 AblationCAM 这样的无梯度方法。else:if is_need_grad:raise NotImplementedError('The `grad_base` method does not support output multi-activation layers')#计算所有输入特征图中的最大高度 (max_h) 和最大宽度 (max_w)。im.shape[-2] 是倒数第二维(高度),im.shape[-1] 是最后一维(宽度)。使用负索引可以安全地处理不同维度的张量(如 BxCxHxW)。max_h = max([im.shape[-2] for im in feats])max_w = max([im.shape[-1] for im in feats])#处理 max_shape 中的特殊值 -1。if -1 in max_shape:: 如果 max_shape 中包含 -1(例如 (-1, -1) 或 (20, -1))。 max_shape = (max_h, max_w): 则将目标形状直接设置为所有特征图中的最大尺寸 (max_h, max_w)。这通常用于希望保留最高分辨率的情况。else:: 如果 max_shape 不包含 -1。 max_shape = (min(max_h, max_shape[0]), min(max_w, max_shape[1])): 将目标形状的高和宽分别设置为 max_h 与 max_shape[0] 的最小值,以及 max_w 与 max_shape[1] 的最小值。这确保了最终的目标尺寸不会超过用户指定的 max_shape,即使输入特征图更大。if -1 in max_shape:max_shape = (max_h, max_w)else:max_shape = (min(max_h, max_shape[0]), min(max_w, max_shape[1]))#初始化一个空列表 activations,用于存储经过处理(取绝对值、插值)后的各个特征图。activations = []#遍历 feats 列表中的每一个特征图 feat。torch.abs(feat): 对特征图取绝对值。这是一个关键步骤。CAM 关注的是特征图的“重要性”或“激活强度”,而不仅仅是正值。取绝对值确保了负的激活(在 ReLU 之后通常很少,但可能存在于某些层)也能被考虑,避免它们在后续操作中被忽略或产生负面影响。torch.nn.functional.interpolate(..., max_shape, mode='bilinear'): 使用双线性插值(bilinear)将取过绝对值的特征图 feat缩放(resize)到统一的目标尺寸 max_shape。activations.append(...): 将缩放后的特征图添加到 activations 列表中。for feat in feats:activations.append(torch.nn.functional.interpolate(torch.abs(feat), max_shape, mode='bilinear'))#聚合操作:使用 torch.cat 沿着通道维度(axis=1,对于 BxCxHxW 格式)将列表 activations 中的所有特征图拼接(concatenate) 起来。例如,如果有 3 个特征图,每个缩放后是 1x64x20x20,拼接后会变成 1x192x20x20。这创建了一个单一的、通道数增加的特征图,包含了所有原始层的信息。activations = torch.cat(activations, axis=1)#返回最终聚合后的特征图张量。这个张量的形状是 (Batch_Size, Total_Channels, Resized_Height, Resized_Width),可以作为 CAM 算法(如 AblationCAM)的输入。return activations
reshape_transform 总结
reshape_transform 函数的核心作用是将 MMDetection 模型(尤其是使用 FPN 的模型)输出的多尺度、多层特征图,通过以下步骤转换成一个单一层、固定尺寸的特征图,以便进行 CAM 可视化:
- 统一输入格式:将单个张量包装成列表。
- 限制梯度方法:明确禁止在 Grad-CAM 等需要梯度的方法中使用多层输入。
- 确定目标尺寸:根据输入特征图的最大尺寸和用户指定的 max_shape(或 -1 特殊值)计算最终的缩放目标。
- 处理与缩放:对每层特征图取绝对值以保留激活强度信息,然后使用双线性插值缩放到统一尺寸。
- 聚合:沿通道维度将所有缩放后的特征图拼接成一个大的特征图。
这个函数是实现对复杂检测模型(如 Faster R-CNN with FPN)进行有效 CAM 可视化的关键预处理步骤。
DetCAMVisualizer(重要)
这个类是专门为 MMDetection (mmdet) 模型设计的 CAM (Class Activation Mapping) 可视化工具,它封装了底层的 pytorch_grad_cam 库,使其更易于与 mmdet 模型集成。
class DetCAMVisualizer:"""mmdet cam visualization class.Args:method: CAM method. Currently supports`ablationcam`,`eigencam` and `featmapam`.model (nn.Module): MMDet model.target_layers (list[torch.nn.Module]): The target layersyou want to visualize.reshape_transform (Callable, optional): Function of Reshapeand aggregate feature maps. Defaults to None."""class DetCAMVisualizer:: 定义了一个名为 DetCAMVisualizer 的新类。
“”“mmdet cam visualization class…”“”: 文档字符串说明了这个类的用途:一个用于 MMDetection 模型的 CAM 可视化类。
- Args:: 列出了构造函数的参数及其说明。
-
- method: CAM 方法名称(但实际代码中用的是 method_class)。
-
- model: MMDet 模型实例。
-
- target_layers: 一个 torch.nn.Module 对象的列表,表示你想要可视化其特征图的目标层(通常是骨干网络的最后几层或FPN的输出层)。
-
- reshape_transform: 一个可选的函数,用于重塑(reshape)和聚合(aggregate)特征图。这对于处理FPN等多尺度输出或自定义特征聚合非常有用。默认为 None。
def __init__(self,method_class,model,target_layers,reshape_transform=None,is_need_grad=False,extra_params=None):def init(…): 定义构造函数,接收以下参数:
- method_class: 一个 CAM 方法的类(如 AblationCAM, EigenCAM 等),而不是方法名字符串。
- model: 传入的 MMDet模型(通常是 DetCAMModel 的实例)。
- target_layers: 目标层列表。
- reshape_transform:重塑变换函数。
- is_need_grad: 一个布尔标志,指示是否需要计算梯度。这对于像 GradCAM 这样依赖梯度的方法是必需的,但对于
EigenCAM 或 AblationCAM 可能不是。 - extra_params: 一个字典,用于传递特定于某些CAM方法的额外参数。
self.target_layers = target_layersself.reshape_transform = reshape_transformself.is_need_grad = is_need_grad将传入的 target_layers, reshape_transform, is_need_grad 保存为实例属性。
if method_class.__name__ == 'AblationCAM':batch_size = extra_params.get('batch_size', 1)ratio_channels_to_ablate = extra_params.get('ratio_channels_to_ablate', 1.)self.cam = AblationCAM(model,target_layers,# use_cuda=True if 'cuda' in model.device else False,reshape_transform=reshape_transform,batch_size=batch_size,ablation_layer=extra_params['ablation_layer'],ratio_channels_to_ablate=ratio_channels_to_ablate)if method_class.name == ‘AblationCAM’:: 检查传入的方法是否是 AblationCAM。AblationCAM 需要特殊的配置和参数。
batch_size = extra_params.get(‘batch_size’, 1): 从 extra_params 中获取 batch_size,用于控制消融时并行处理的通道数。如果未提供,则默认为 1。ratio_channels_to_ablate = extra_params.get(‘ratio_channels_to_ablate’, 1.): 获取要消融的通道比例。默认为 1.0,表示消融所有通道。
self.cam = AblationCAM(…): 创建 AblationCAM 实例。这里传入了:
- model: MMDet 模型。
- target_layers: 目标层。
- reshape_transform: 重塑变换。
- batch_size: 消融批次大小。
- ablation_layer: 一个关键参数!这里传入了自定义的 DetAblationLayer 实例(或其他自定义消融层),用于处理FPN等多尺度特征图的消融。这是支持复杂检测模型的关键。
- ratio_channels_to_ablate: 通道消融比例。
else:self.cam = method_class(model,target_layers,# use_cuda=True if 'cuda' in model.device else False,reshape_transform=reshape_transform,)if self.is_need_grad:self.cam.activations_and_grads.release()else:: 如果不是 AblationCAM,则处理其他CAM方法(如 EigenCAM, GradCAM 等)。
self.cam = method_class(…): 使用传入的 method_class 创建相应的 CAM 实例。传入 model, target_layers, reshape_transform。
if self.is_need_grad:: 检查是否需要梯度。
** self.cam.activations_and_grads.release(): 如果 is_need_grad 为 True,但这里却调用了 release(),这看起来可能是个逻辑错误。通常,如果需要梯度,应该保留activations_and_grads。正确的逻辑可能应该是 if not self.is_need_grad: self.cam.activations_and_grads.release(),即不需要梯度时才释放。或者,is_need_grad 的含义可能相反。请注意这个潜在的逻辑问题 **
self.classes = model.detector.CLASSESself.COLORS = np.random.uniform(0, 255, size=(len(self.classes), 3))self.classes = model.detector.CLASSES: 从传入的 model(DetCAMModel 实例)中获取类别名称列表 CLASSES,并保存为 self.classes。这用于在可视化时显示类别标签。
self.COLORS = np.random.uniform(0, 255, size=(len(self.classes), 3)): 为每个类别随机生成一个 RGB 颜色(在 0-255 范围内),存储在 self.COLORS 数组中。这样每个类别的边界框和标签都会有不同的颜色。
def switch_activations_and_grads(self, model):self.cam.model = modelif self.is_need_grad is True:self.cam.activations_and_grads = ActivationsAndGradients(model, self.target_layers, self.reshape_transform)self.is_need_grad = Falseelse:self.cam.activations_and_grads.release()self.is_need_grad = Truedef switch_activations_and_grads(self, model):: 定义一个方法,用于切换模型和梯度记录状态。这在需要动态改变模型或其梯度需求时可能有用。
self.cam.model = model: 将 CAM 实例内部的模型引用更新为传入的新 model。
if self.is_need_grad is True:: 检查当前的 is_need_grad 状态。
- self.cam.activations_and_grads = …: 如果为 True,则重新创建 ActivationsAndGradients 实例,用于记录新模型的激活和梯度。
- self.is_need_grad = False: 并将状态切换为 False。
else:: 如果当前为 False。 - self.cam.activations_and_grads.release(): 释放现有的 activations_and_grads,停止梯度记录。
- self.is_need_grad = True: 并将状态切换为 True。
** 注意:这个方法的逻辑似乎与 init 中的初始化逻辑相反。init 中 is_need_grad=True 时释放了 activations_and_grads,而这里 is_need_grad=True 时又创建了它。这表明 is_need_grad 标志的语义可能需要仔细审查,或者存在代码不一致。**
def __call__(self, img, targets, aug_smooth=False, eigen_smooth=False):img = torch.from_numpy(img)[None].permute(0, 3, 1, 2)return self.cam(img, targets, aug_smooth, eigen_smooth)[0, :]- def call(self, img, targets, aug_smooth=False, eigen_smooth=False):: 使 DetCAMVisualizer 实例可以像函数一样被调用。接收:
- -img: 输入图像(numpy 数组,HxWxC)。
-
- targets: CAM 目标,通常是 DetBoxScoreTarget 实例,定义了要关注的类别和边界框。
-
- aug_smooth, eigen_smooth: 是否启用平滑技术(如多次增强或特征值分解平滑)。
- img = torch.from_numpy(img)[None].permute(0, 3, 1, 2):
-
- torch.from_numpy(img): 将 numpy 图像转换为 PyTorch 张量。
-
- [None]: 增加一个批次维度,形状从 (H, W, C) 变为 (1, H, W, C)。
-
- .permute(0, 3, 1, 2): 重新排列维度,从 (1, H, W, C) 变为 (1, C, H, W),这是 PyTorch 模型的标准输入格式。
- return self.cam(img, targets, aug_smooth, eigen_smooth)[0, :]:
-
- self.cam(…): 调用底层的 CAM 实例(如 AblationCAM)进行计算,生成 CAM 图。
-
- [0, :]: self.cam 返回的是一个批次的结果。[0, :] 取出第一个(也是唯一一个)样本的 CAM 图(形状为 (H, W)),并返回它。
def show_cam(self,image,boxes,labels,grayscale_cam,with_norm_in_bboxes=False):"""Normalize the CAM to be in the range [0, 1] inside every boundingboxes, and zero outside of the bounding boxes."""def show_cam(…): 定义一个方法,用于将计算出的 CAM 图与原始图像、检测框和标签一起可视化。
“”“Normalize the CAM…”“”: 文档字符串说明了其核心功能:可以将 CAM 图在每个边界框内部进行归一化到 [0,1] 范围,而在边界框外部置零。
if with_norm_in_bboxes is True:boxes = boxes.astype(np.int32)renormalized_cam = np.zeros(grayscale_cam.shape, dtype=np.float32)images = []for x1, y1, x2, y2 in boxes:img = renormalized_cam * 0img[y1:y2,x1:x2] = scale_cam_image(grayscale_cam[y1:y2,x1:x2].copy())images.append(img)if with_norm_in_bboxes is True:: 如果启用了“在框内归一化”。
boxes = boxes.astype(np.int32): 将边界框坐标转换为整数,便于索引。
renormalized_cam = np.zeros(…): 初始化一个与 CAM 图同形状的全零数组,用于存储重新归一化后的结果。
images = []: 初始化一个列表,用于存储每个边界框对应的局部归一化CAM。
for x1, y1, x2, y2 in boxes:: 遍历每一个检测到的边界框。
img = renormalized_cam * 0: 创建一个全零的临时图像。
img[y1:y2, x1:x2] = scale_cam_image(…): grayscale_cam[y1:y2, x1:x2].copy(): 提取当前边界框区域内的CAM值。
scale_cam_image(…): 将这个局部区域的CAM值缩放到 [0, 1] 范围。将缩放后的值赋回 img 的对应区域。
images.append(img): 将处理后的局部CAM图加入列表。
renormalized_cam = np.max(np.float32(images), axis=0)renormalized_cam = scale_cam_image(renormalized_cam)renormalized_cam = np.max(np.float32(images), axis=0): 将所有局部归一化的CAM图(images 列表)在空间维度(axis=0)上取最大值。这确保了每个像素的最终值是覆盖该像素的所有边界框中最大的局部归一化值。结果赋给 renormalized_cam。
renormalized_cam = scale_cam_image(renormalized_cam): 对合并后的 renormalized_cam 再次进行全局缩放,确保其值在 [0,1] 范围内。这一步可能有些冗余,取决于 scale_cam_image 的实现,但可以保证最终范围。
else:renormalized_cam = grayscale_cam
else:: 如果没有启用“在框内归一化”,则直接使用原始的 grayscale_cam。
cam_image_renormalized = show_cam_on_image(image / 255, renormalized_cam, use_rgb=False)cam_image_renormalized = show_cam_on_image(…): 调用 pytorch_grad_cam 的 show_cam_on_image 函数,将归一化后的 CAM 图 renormalized_cam 叠加到原始图像 image 上。
image / 255: 将原始图像像素值归一化到 [0, 1] 范围。
use_rgb=False: 指定输入图像为 BGR 格式(OpenCV 默认格式),函数内部会处理到RGB的转换。
image_with_bounding_boxes = self._draw_boxes(boxes, labels,cam_image_renormalized)return image_with_bounding_boxesimage_with_bounding_boxes = self._draw_boxes(…): 调用私有方法 _draw_boxes,在叠加了CAM的图像 cam_image_renormalized 上绘制检测边界框和类别标签。
return image_with_bounding_boxes: 返回最终的可视化结果图像。
def _draw_boxes(self, boxes, labels, image):for i, box in enumerate(boxes):label = labels[i]color = self.COLORS[label]cv2.rectangle(image, (int(box[0]), int(box[1])),(int(box[2]), int(box[3])), color, 2)cv2.putText(image,self.classes[label], (int(box[0]), int(box[1] - 5)),cv2.FONT_HERSHEY_SIMPLEX,0.5,color,1,lineType=cv2.LINE_AA)return imagedef _draw_boxes(self, boxes, labels, image):: 私有方法,用于在图像上绘制边界框和标签。
for i, box in enumerate(boxes):: 遍历每一个边界框和其对应的标签。
label = labels[i]: 获取当前框的类别标签。
color = self.COLORS[label]: 根据类别标签获取预定义的颜色。
cv2.rectangle(…): 使用 cv2.rectangle 在图像上绘制矩形框。color 是BGR格式的元组。
cv2.putText(…): 使用 cv2.putText 在框的上方绘制类别名称文本。
self.classes[label]: 获取类别名称字符串。
(int(box[0]), int(box[1] - 5)): 文本的起始位置(框的左上角上方一点)。
cv2.FONT_HERSHEY_SIMPLEX: 字体类型。
0.5: 字体大小。color: 文本颜色。1: 线条粗细。
lineType=cv2.LINE_AA: 启用抗锯齿,使文本更平滑。
return image: 返回绘制了框和标签的图像。
DetCAMVisualizer总结:
DetCAMVisualizer 是一个高度集成的工具,它:
- 封装CAM方法:简化了 pytorch_grad_cam 的使用,特别是对 AblationCAM 的特殊配置。
- 支持mmdet模型:通过 DetCAMModel 和 DetAblationLayer,能够处理MMDetection模型的复杂输入/输出和FPN结构。
- 提供高级可视化:不仅生成CAM图,还能将其与检测结果(框、标签)叠加,并提供“在框内归一化”等高级可视化选项。
- 管理状态:提供了切换模型和梯度状态的方法(尽管 is_need_grad 的逻辑可能存在疑问)。
它极大地简化了在目标检测任务中应用和可视化CAM技术的流程。
DetBoxScoreTarget
这个类定义了在使用 Grad-CAM 或 Ablation-CAM 等梯度/消融方法时,CAM 算法应该关注什么(即优化目标)。
class DetBoxScoreTarget:定义一个名为 DetBoxScoreTarget 的类,用于为目标检测模型的 CAM 方法设定目标分数计算规则。
def init(self, bboxes, labels, segms=None, match_iou_thr=0.5, device=‘cuda:1’):构造函数,初始化目标检测框、标签等信息。
assert len(bboxes) == len(labels): 确保提供的检测框数量和标签数量一致。
self.focal_bboxes = torch.from_numpy(bboxes).to(device=device): 将输入的原始检测框(bboxes)转换为 PyTorch 张量并移动到指定设备(如 GPU)。
self.focal_labels = labels: 保存原始检测框对应的类别标签。
if segms is not None: … else: …: 处理实例分割掩码(segms)。 如果提供了掩码,则转换为张量并保存。如果没有提供,则为每个标签创建一个 None 值的列表。
self.match_iou_thr = match_iou_thr: 设置匹配的 IoU 阈值。只有预测框与原始框的 IoU 超过此阈值,才认为是有效匹配。self.device = device: 保存设备信息。
def call(self, results):使该类实例可被调用,接收模型的输出 results 并计算一个标量分数,该分数将作为 CAM 的目标。
output = torch.tensor([0.], device=self.device): 初始化输出分数为 0,并放在指定设备上。
if 'loss_cls' in results or 's0.loss_cls' in results:for loss_key, loss_value in results.items():if 'loss' not in loss_key:continueif isinstance(loss_value, list):output += sum(loss_value)else:output += loss_valuereturn outputif ‘loss_cls’ in results or ‘s0.loss_cls’ in results:: 检查 results 中是否包含分类损失(loss_cls)。这是区分“基于梯度的方法”和“无梯度方法”的关键逻辑。
#grad_base_method: 注释表明,如果存在损失项,则进入“基于梯度的方法”分支。
for loss_key, loss_value in results.items():: 遍历 results 字典中的所有项。
if ‘loss’ not in loss_key: continue: 只处理键名中包含 ‘loss’ 的项(即各种损失)。
if isinstance(loss_value, list): … else: …: 对损失值求和。 如果损失值是列表(如某些模型的损失是分阶段的列表),则对列表中的所有元素求和。否则,直接加到 output 上。
return output: 返回所有损失的总和。在基于梯度的方法中,CAM 的目标是 最小化 这个总损失(即让 output 变小)。梯度会指向减少损失的方向,而 CAM 会高亮对减少该损失贡献最大的区域。
else:# grad_free_methodif len(results['bboxes']) == 0:return outputpred_bboxes = torch.from_numpy(results['bboxes']).to(self.device)pred_labels = results['labels']pred_segms = results['segms']if pred_segms is not None:pred_segms = torch.from_numpy(pred_segms).to(self.device)for focal_box, focal_label, focal_segm in zip(self.focal_bboxes, self.focal_labels, self.focal_segms):ious = torchvision.ops.box_iou(focal_box[None], pred_bboxes[..., :4])index = ious.argmax()if ious[0, index] > self.match_iou_thr and pred_labels[index] == focal_label:# TODO: Adaptive adjustment of weights based on algorithmsscore = ious[0, index] + pred_bboxes[..., 4][index]output = output + scoreif focal_segm is not None and pred_segms is not None:segms_score = (focal_segm * pred_segms[index]).sum() / (focal_segm.sum() + pred_segms[index].sum() + 1e-7)output = output + segms_scorereturn outputelse:: 如果 results 中没有损失项(如 loss_cls),则进入“无梯度方法”分支。
#grad_free_method: 注释表明这是“无梯度方法”。
if len(results[‘bboxes’])==0: return output: 如果模型没有检测到任何框,则直接返回 0。
pred_bboxes = …: 将模型预测的框、标签、掩码转换为张量(如果需要)。
for focal_box, focal_label, focal_segm in zip(…):: 遍历每一个“关注的”原始检测框(focal_box)及其标签和掩码。 - - - - - -ious=torchvision.ops.box_iou(…): 计算当前原始框与所有预测框的 IoU。
-
- index = ious.argmax(): 找到与当前原始框 IoU 最大的预测框的索引。
-
- if ious[0, index] > self.match_iou_thr and pred_labels[index]==focal_label:: 核心匹配条件:只有当最大 IoU 超过阈值 match_iou_thr且 预测的类别与原始框的类别相同时,才认为匹配成功。
-
- score = ious[0, index] + pred_bboxes[…, 4][index]: 计算匹配分数。这是无梯度方法的核心。分数由两部分组成:
-
-
- IoU 分数:ious[0, index],衡量框的位置重合度。
-
-
-
- 置信度分数:pred_bboxes[…, 4][index],即预测框的置信度得分。
-
-
- output = output + score: 将这个匹配的分数加到总分 output 上。
- if focal_segm is not None and pred_segms is not None:: 如果提供了掩码,则计算掩码 IoU 作为额外分数。
-
- segms_score = (focal_segm * pred_segms[index]).sum() / (focal_segm.sum() + pred_segms[index].sum() + 1e-7): 计算两个掩码的 Dice 系数(一种近似 Mask IoU 的方法),并加到总分上。
return output: 返回所有成功匹配的检测框的分数总和。在无梯度方法(如 AblationCAM)中,CAM 的目标是 最大化 这个总分(即让 output 变大)。消融过程会寻找那些被移除后导致这个分数显著下降的特征通道,这些通道就是对检测结果最重要的。
- segms_score = (focal_segm * pred_segms[index]).sum() / (focal_segm.sum() + pred_segms[index].sum() + 1e-7): 计算两个掩码的 Dice 系数(一种近似 Mask IoU 的方法),并加到总分上。
DetBoxScoreTarget总结
DetBoxScoreTarget 是连接 CAM 算法和目标检测任务的桥梁。
- 基于梯度的方法(如 Grad-CAM):通过最小化总损失(loss_cls, loss_bbox 等)来工作。call 返回损失总和。
- 无梯度的方法(如 AblationCAM, EigenCAM):通过最大化一个自定义的“好”的分数来工作。call 返回一个由 IoU + 置信度 + (可选) Mask IoU 构成的分数总和。
这个类的设计使得 CAM 能够关注到模型输出中与特定检测实例(框、类别、掩码)最相关的特征。
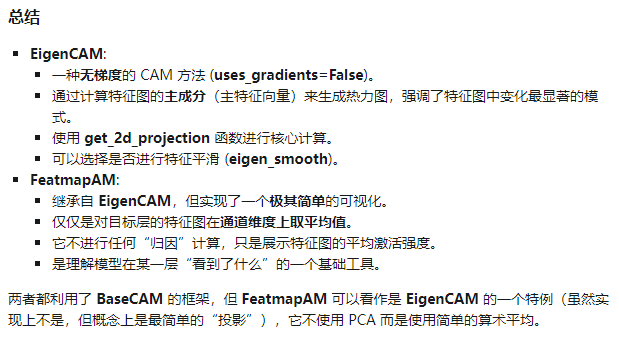
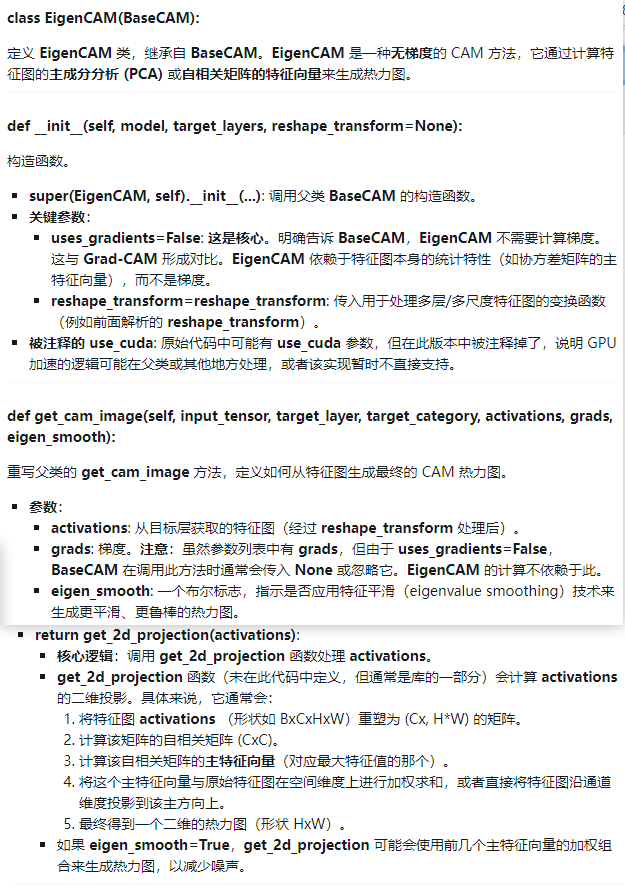
EigenCAM
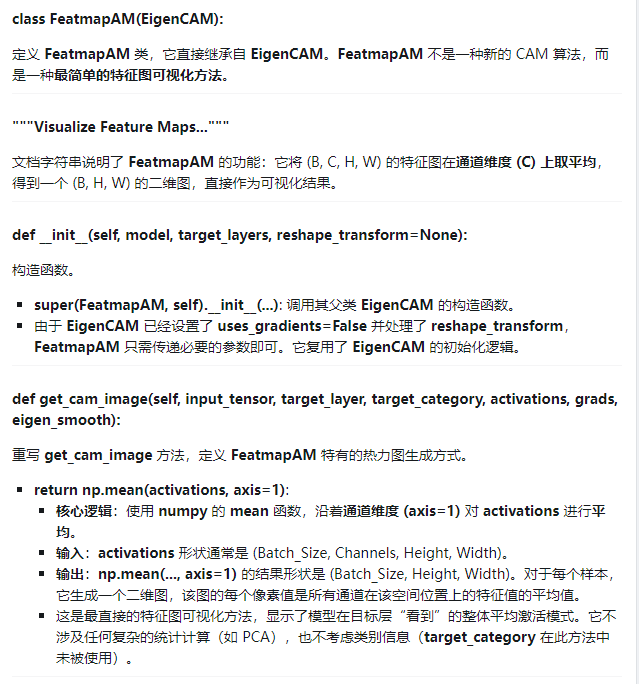
FeatmapAM