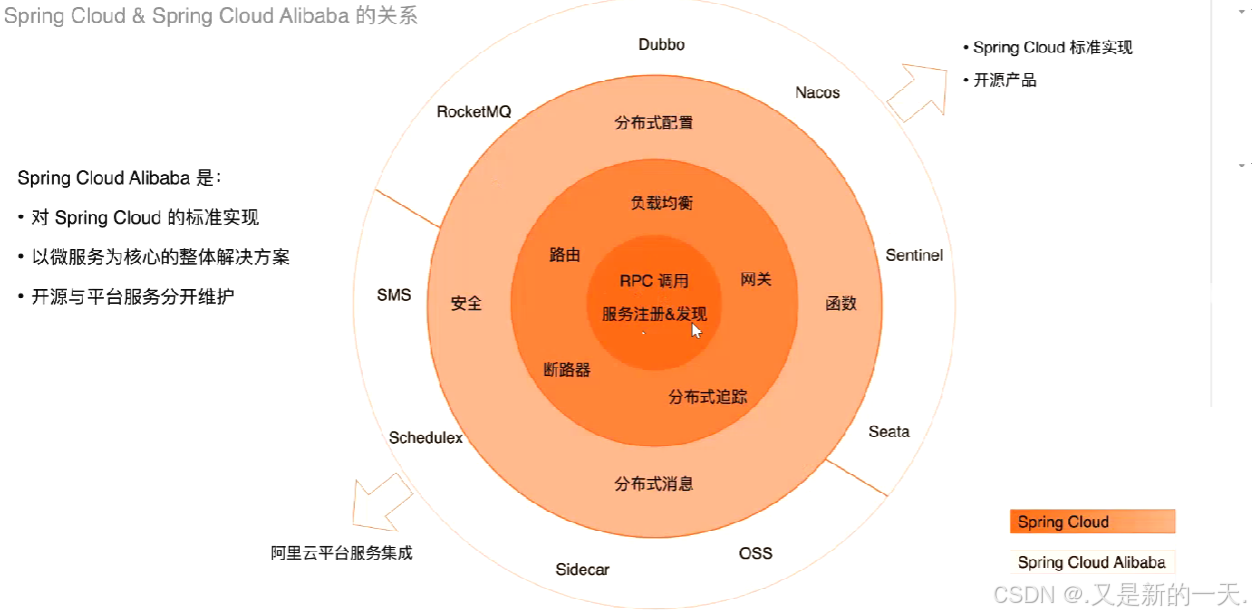
微服务介绍及Nacos中间件
微服务的优点:
- 高可用
- 负载均衡
一个节点就是一台服务器 ,每个项目都需要部署到节点上
微服务是一种架构模式
一 、Nacos(中间件) 单机模式部署
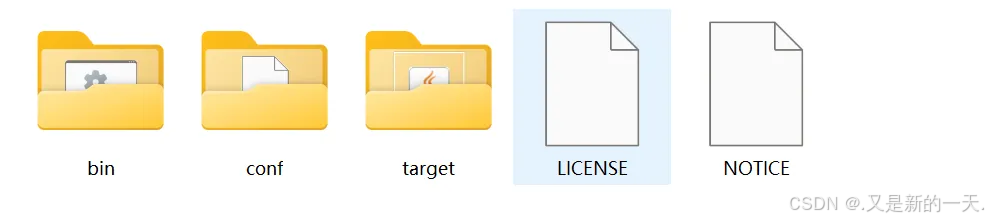
解压缩 nacos-server-3.0.2.zip,本教程示例使用 3.0.2 版本,其它版本的部署过程可参考此文档。
1、 配置使用 MySQL 数据库及权限认证
进入到 nacos 下的 conf 目录,会发现配置文件为 application.properties,表明 nacos 本身就是一个 springboot 应用。
使用文本编辑器打开 application.properties,可自定义配置的选项包括:端口号、数据库连接、认证鉴权等。
默认 nacos 的数据只存储在内存中,而不是存储在数据库中。
配置使用 MySQL 存储 nacos 的业务数据
在主机上安装配置 MySQL 8.4.5。
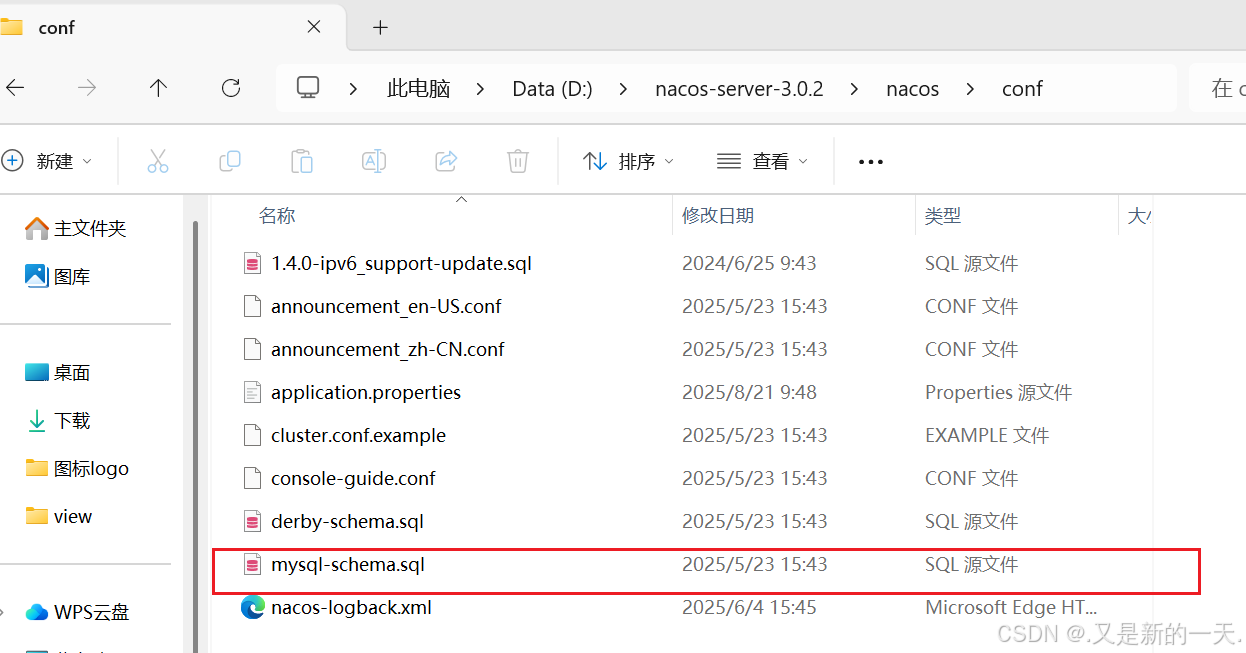
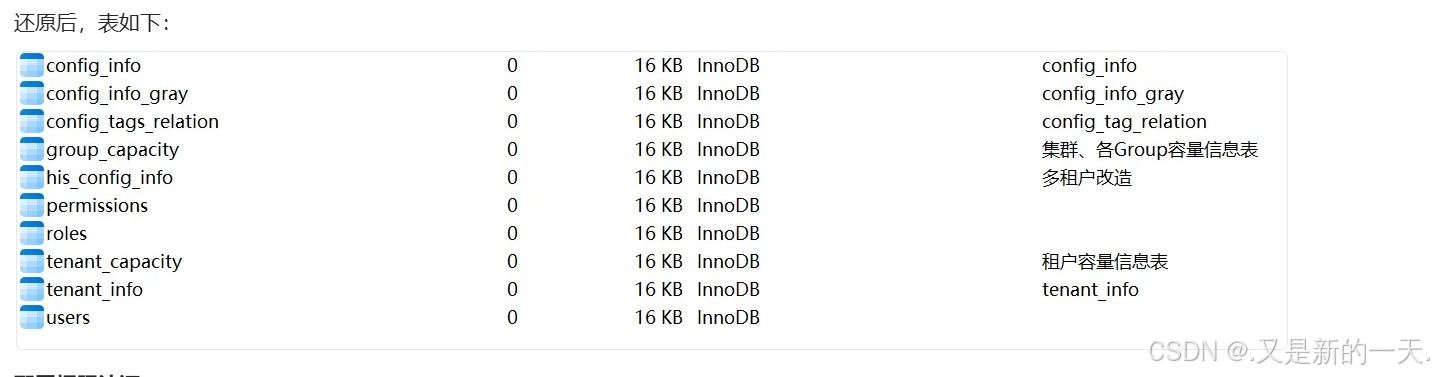
创建数据库,名称为 nacos,文件编码使用 utf8mb4。注:nacos 的 sql 脚本在 conf 目录下,名称为 mysql-schema.sql。创建数据库,使用此文件还原即可。
更改 application.properties 中的配置,将数据库连接相关配置前的 # 去掉,并修改对应的数据库连接配置。如下示例:
#*************** Datasource Related Configurations ***************#
### nacos.plugin.datasource.log.enabled=true
spring.sql.init.platform=mysql
### Count of DB:
db.num=1### Connect URL of DB:
db.url.0=jdbc:mysql://127.0.0.1:3306/nacos?characterEncoding=utf8&connectTimeout=1000&socketTimeout=3000&autoReconnect=true&useUnicode=true&useSSL=false&serverTimezone=Asia/Shanghai&allowPublicKeyRetrieval=true
db.user=root
db.password=123456
注意:数据库连接字符串添加参数 serverTimezone=Asia/Shanghai&allowPublicKeyRetrieval=true
配置权限认证:
开启用户认证和鉴权功能。详见:https://nacos.io/zh-cn/docs/auth.html,在配置文件中找到 Auth Plugin Related Configurations 部分,如下:
#在nacos 3.0.x版本中,权限认证被划分为三个模块,独立进行设置
### If turn on auth system:
# Whether open nacos server API auth system
# nacos的服务端api是否开启权限认证,即spring cloud项目在进行服务注册和发现时,需要通过服务器api访问nacos服务器,使用8848端口
nacos.core.auth.enabled=true
# Whether open nacos admin API auth system
nacos.core.auth.admin.enabled=true
# Whether open nacos console API auth system
# nacos的图形界面管理,是否开启权限认证
nacos.core.auth.console.enabled=true### Turn on/off caching of auth information. By turning on this switch, the update of auth information would have a 15 seconds delay.
nacos.core.auth.caching.enabled=true#值不可为空,在集群配置时,所有节点配置必须一致
### worked when nacos.core.auth.enabled=true
### The two properties is the white list for auth and used by identity the request from other server.
nacos.core.auth.server.identity.key=1
nacos.core.auth.server.identity.value=1### worked when nacos.core.auth.system.type=nacos or nacos.core.auth.console.enabled=true
### The token expiration in seconds:
nacos.core.auth.plugin.nacos.token.cache.enable=false
nacos.core.auth.plugin.nacos.token.expire.seconds=18000#可以示例是任意自定义密钥的Base64串
### The default token (Base64 string):
#nacos.core.auth.plugin.nacos.token.secret.key=VGhpc0lzTXlDdXN0b21TZWNyZXRLZXkwMTIzNDU2Nzg=
nacos.core.auth.plugin.nacos.token.secret.key=Zjg5MWZlNTEtZmZmNS00MzExLTkxMjktYzA1YzAzOTVkNGMw
注意:此处需要将 nacos.core.auth.enabled 设置为 true。理论上说,三个认证是互相独立的,互不影响,但实测给 console 设定权限认证之后,server 端 api 也需要认证。
以下代码示例生成 secret.key,使用了一个随机的 UUID 作为密钥。
String uuid = UUID.randomUUID().toString();
System.out.println(uuid);
Base64.Encoder base64 = Base64.getEncoder();
byte[] b = base64.encode(uuid.getBytes(StandardCharsets.UTF_8));
String result = new String(b);
System.out.println(result);
f891fe51-fff5-4311-9129-c05c0395d4c0
Zjg5MWZlNTEtZmZmNS00MzExLTkxMjktYzA1YzAzOTVkNGMw
以上配置,详见:https://nacos.io/zh-cn/docs/auth.html
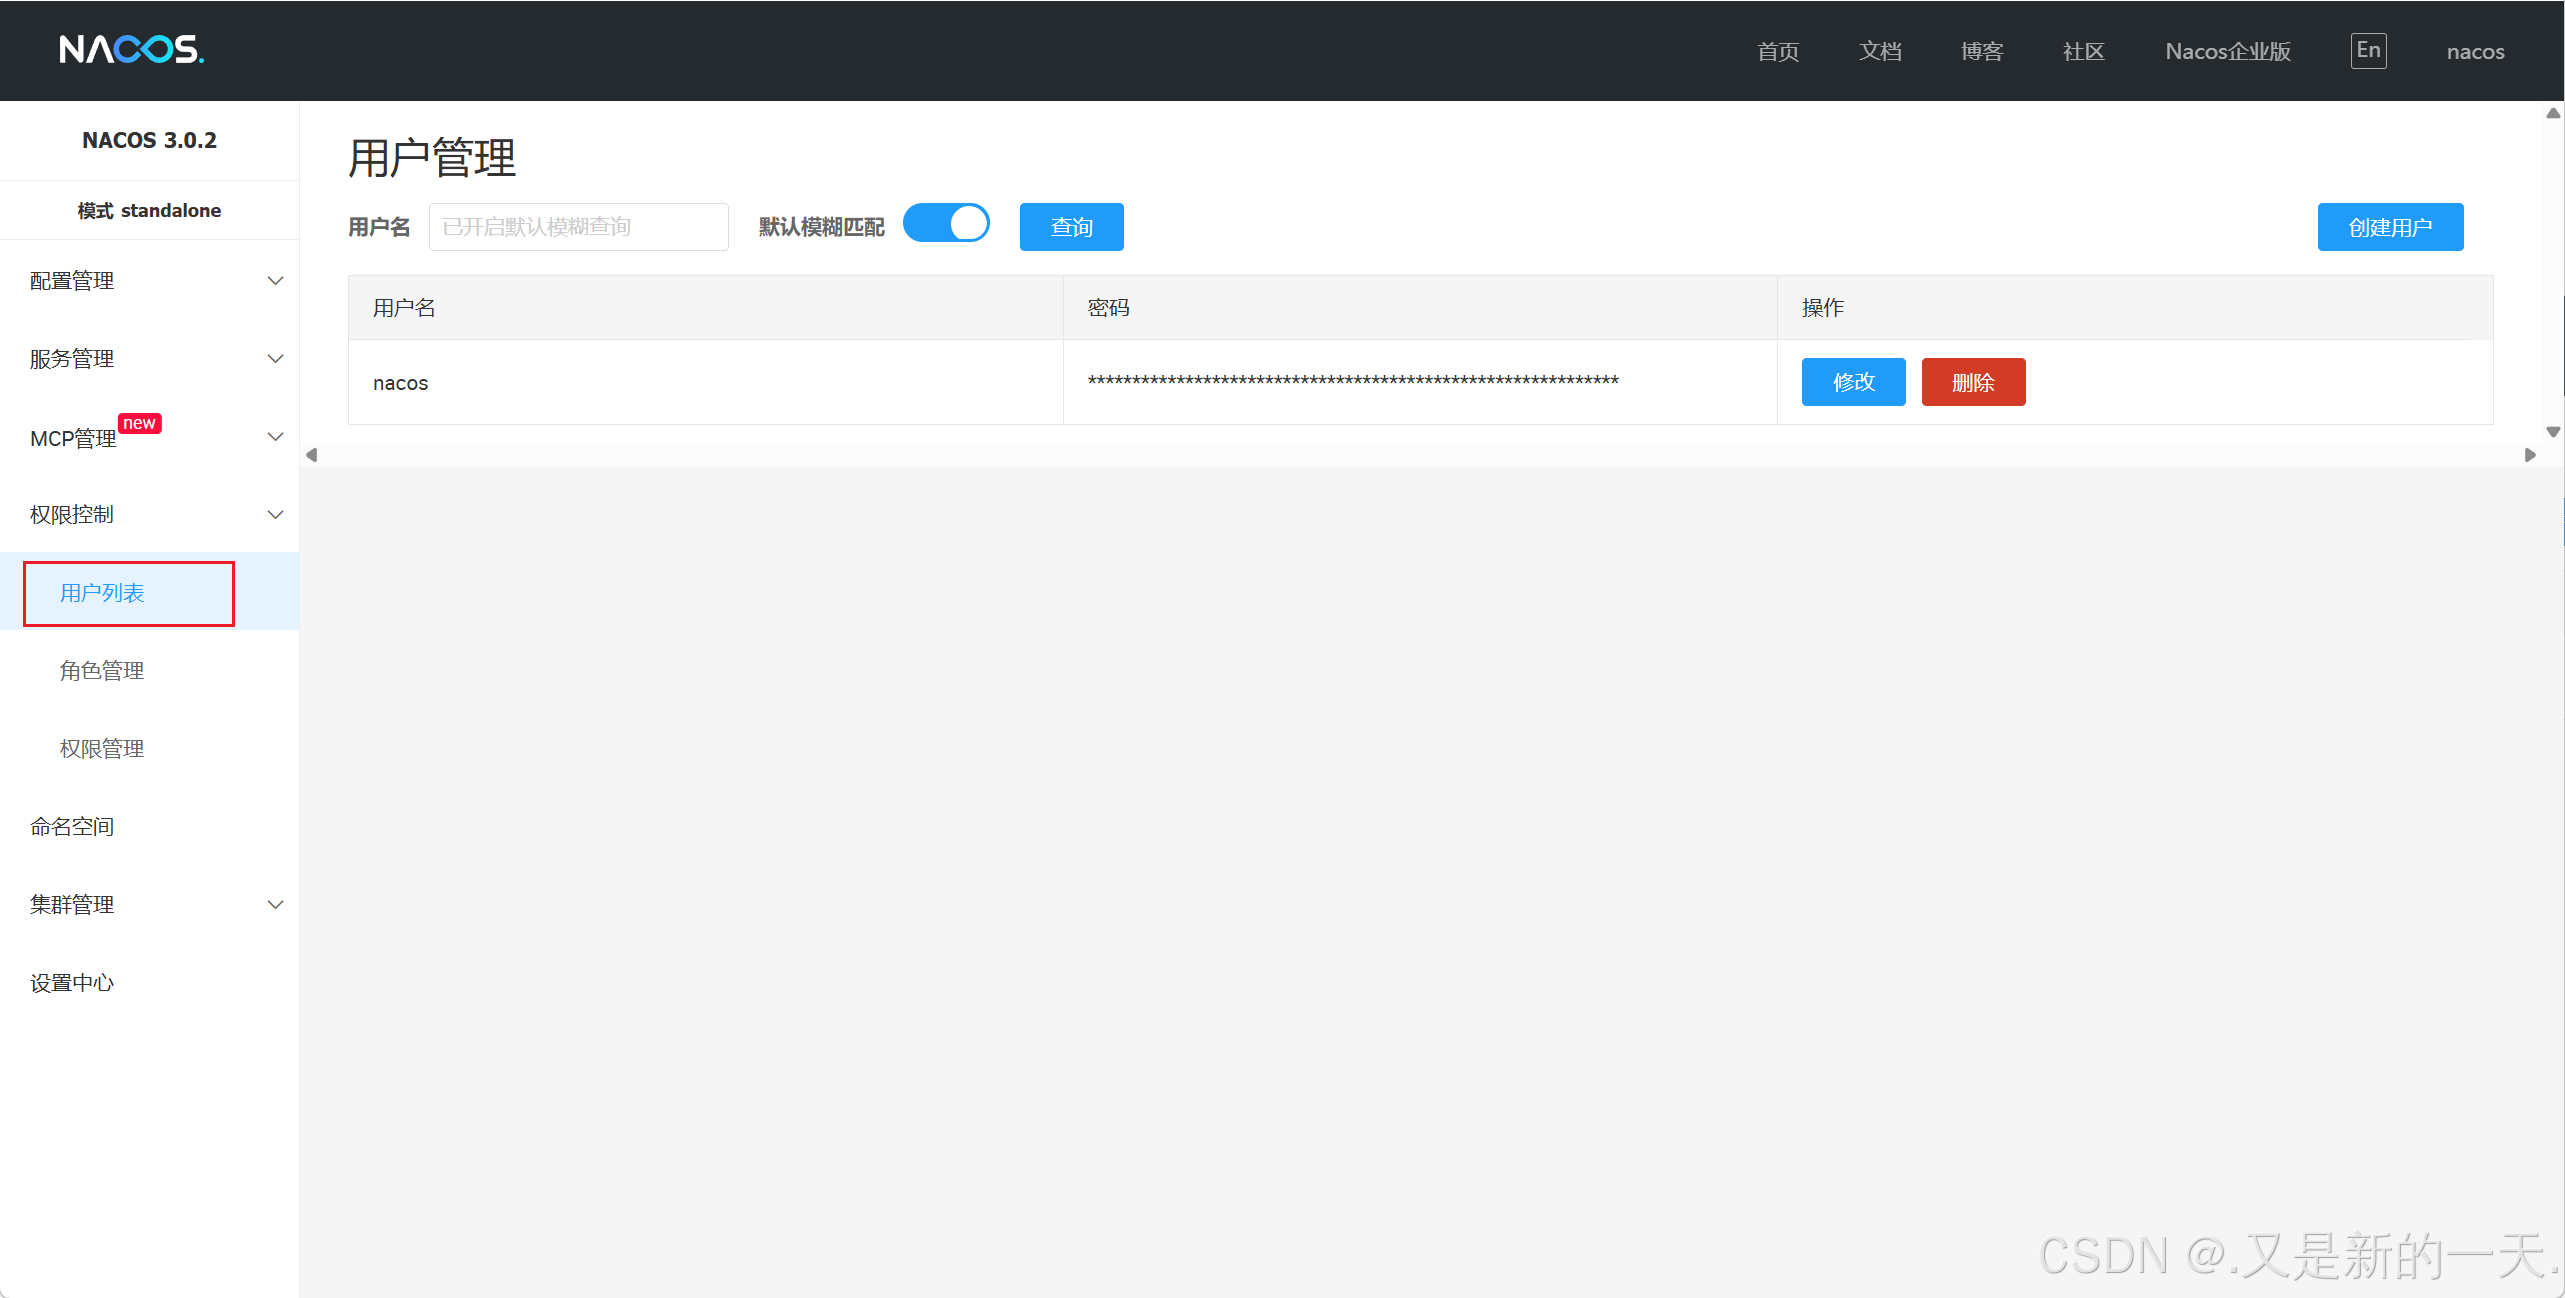
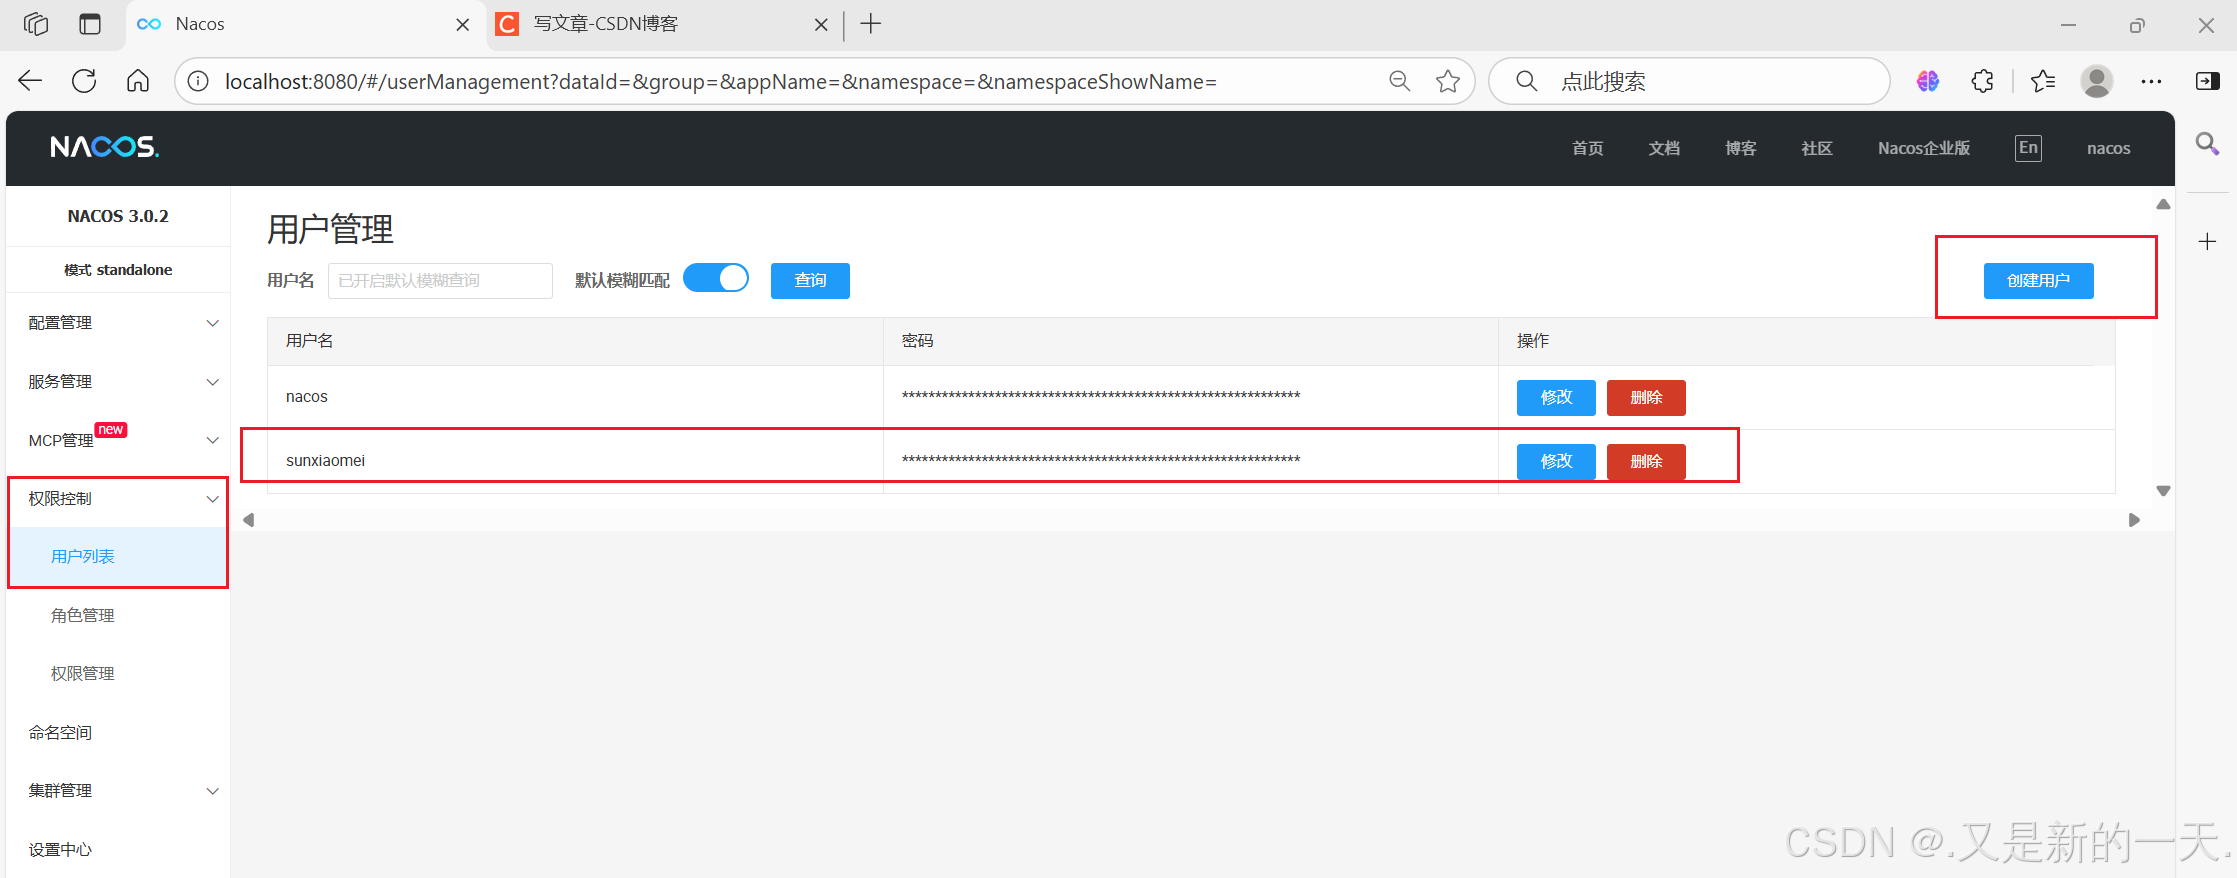
注:配置鉴权后,控制台界面会增加一个“权限控制”模块(需要使用 nacos 账户以及密码 nacos 登录),在其下可以进行用户管理、角色管理和权限管理。
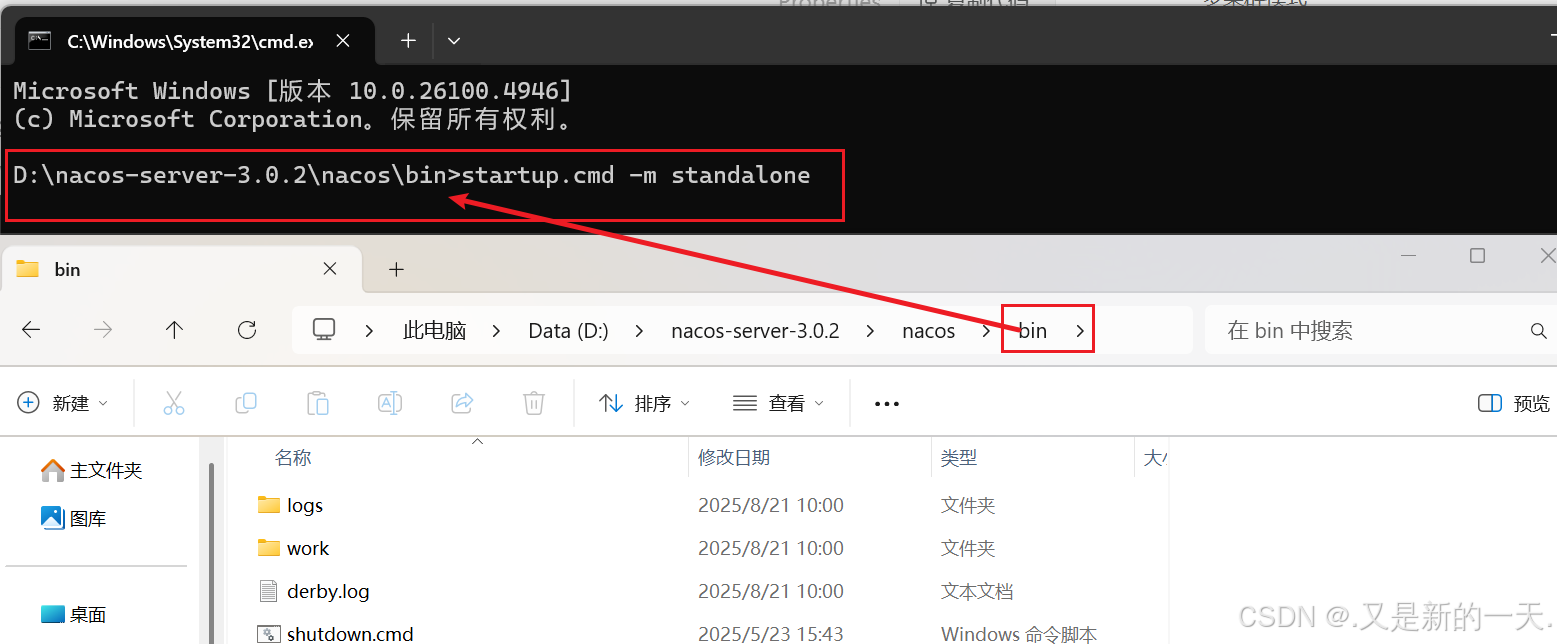
配置完成后,进入 bin 目录下,执行:
startup.cmd -m standalone
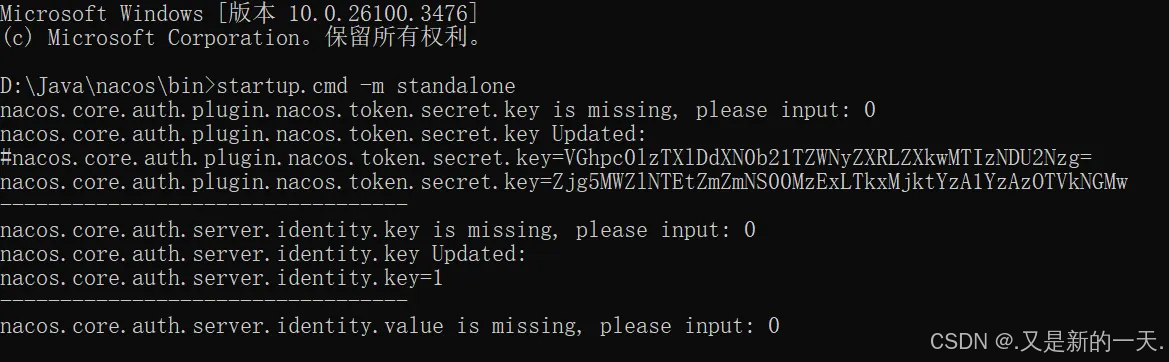
注意:在 3.0.0 版本中,即便对nacos.core.auth.plugin.nacos.token.secret.key、nacos.core.auth.server.identity.key、nacos.core.auth.server.identity.value 已经进行了配置,在启动命令行后,仍提示要求用户输入,任意输入即可,并不影响在配置文件中配置的值。这其实应该是一个 Bug。
从 nacos 3.0.0 开始,对模块进行了划分,在启动时,启动了三个模块,分别是:Nacos Server、Nacos Server API 和 Nacos Console,这和以前的版本是完全不同的。
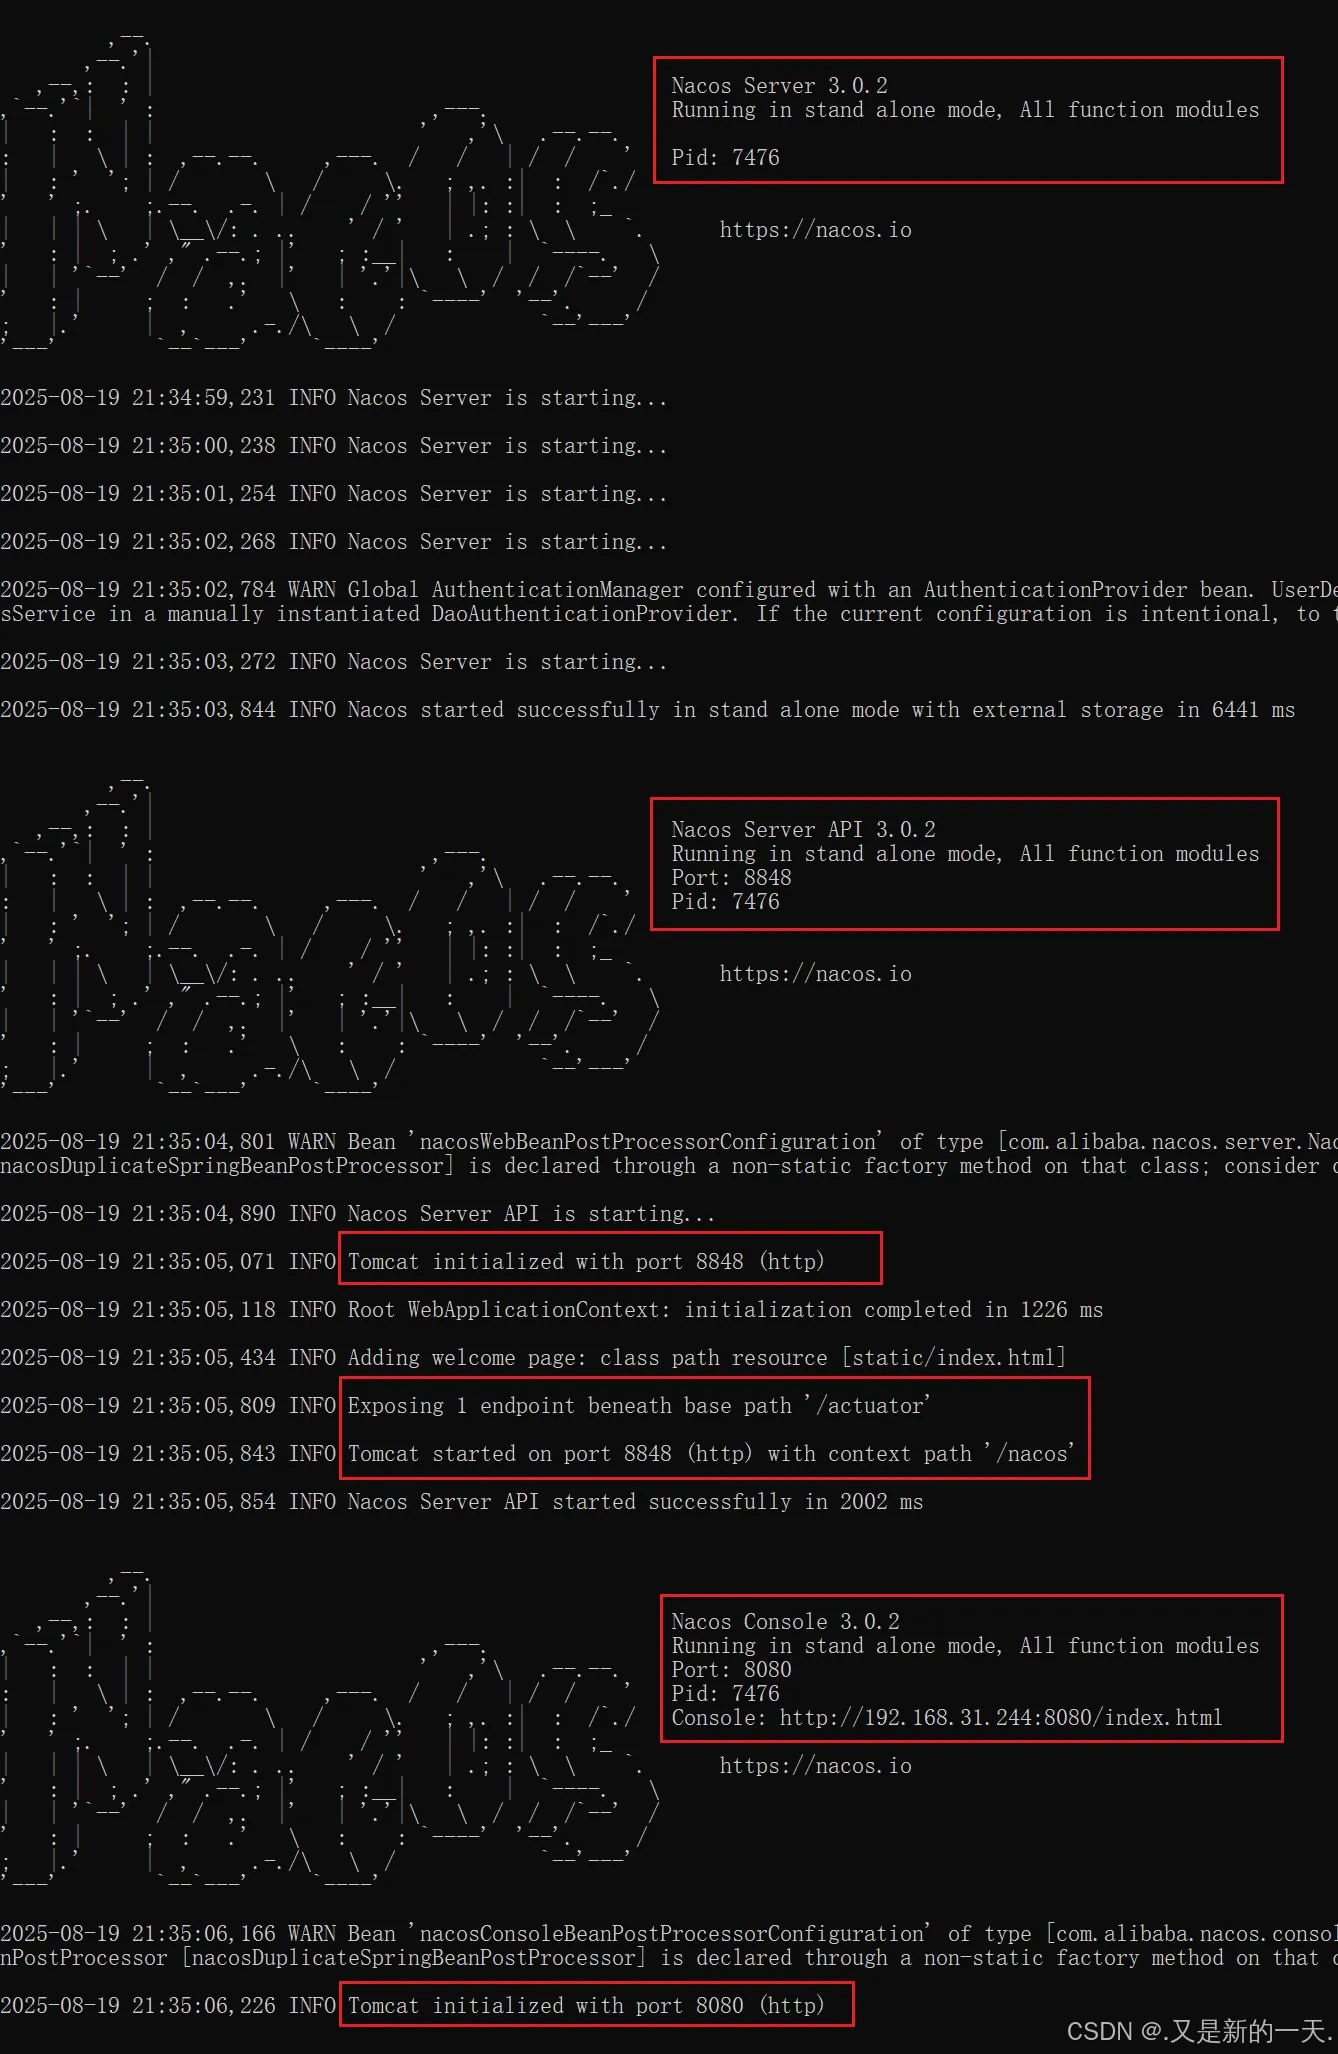
启动完成之后,访问 http://localhost:8080/ 即可进入控制台,这和以前的版本是不同的。在 3.0.0 以后的版本中,8848 是作为 Server API 的端口,而客户端界面的端口更改为 8080。
注意:这些端口在配置文件中可自定义配置。在 Nacos Console Related Configurations 段进行配置。如下:
#*************** Nacos Console Related Configurations ***************#
### Nacos Console Main port
nacos.console.port=9090
### Nacos Server Web context path:
nacos.console.contextPath=/nacos
点击一下登录表单的提交,会弹出对话框,创建一个初始随机密码。如果输入了自定义密码,则将密码自动初始化为输入的密码。
第一次需要两次登录:也就是第一次是创建密码,第二次 使用创建的用户和密码进入

使用此密码登录成功后,可随时更改密码。
执行 bin 目录下的 shutdown.cmd 可以关闭 nacos 服务。
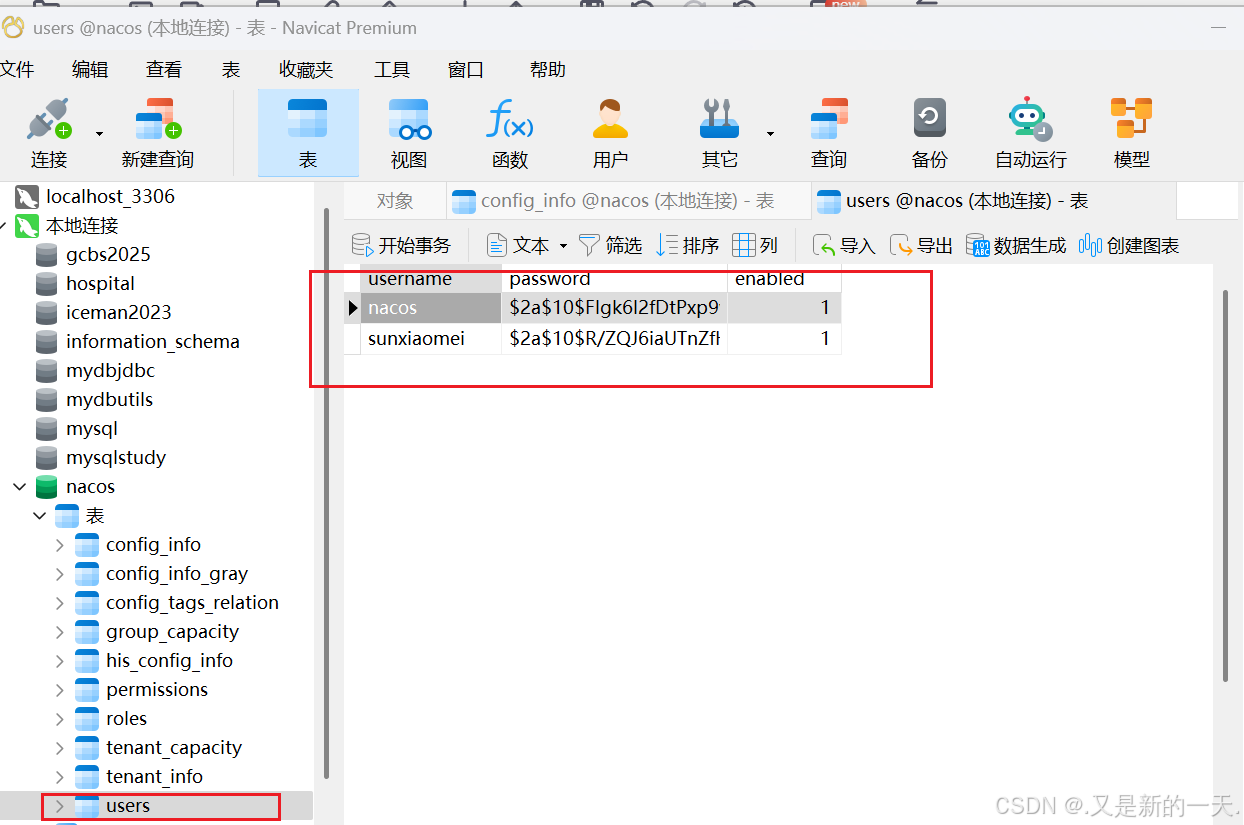
2、测试是否安装成功,及数据是否存储到数据库
任意创建一个用户,然后在 nacos 数据库的表 users 中查看,是否有新创建的用户,如果存在,则表示数据库配置成功。
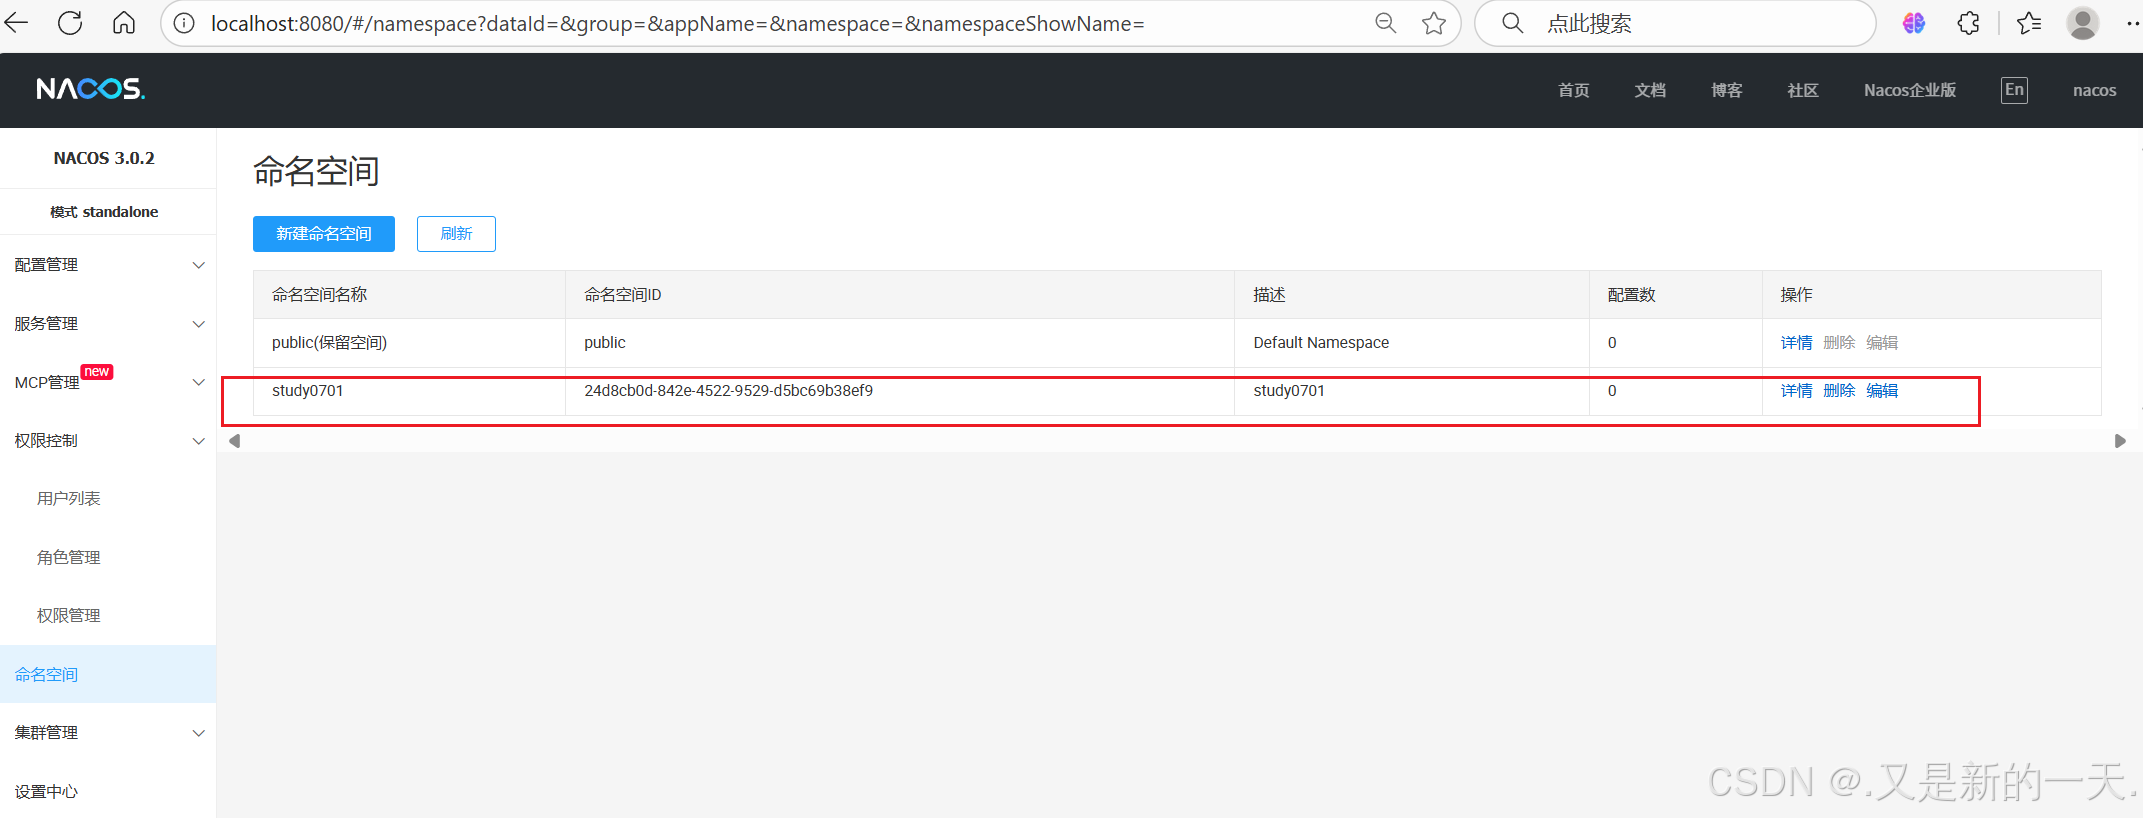
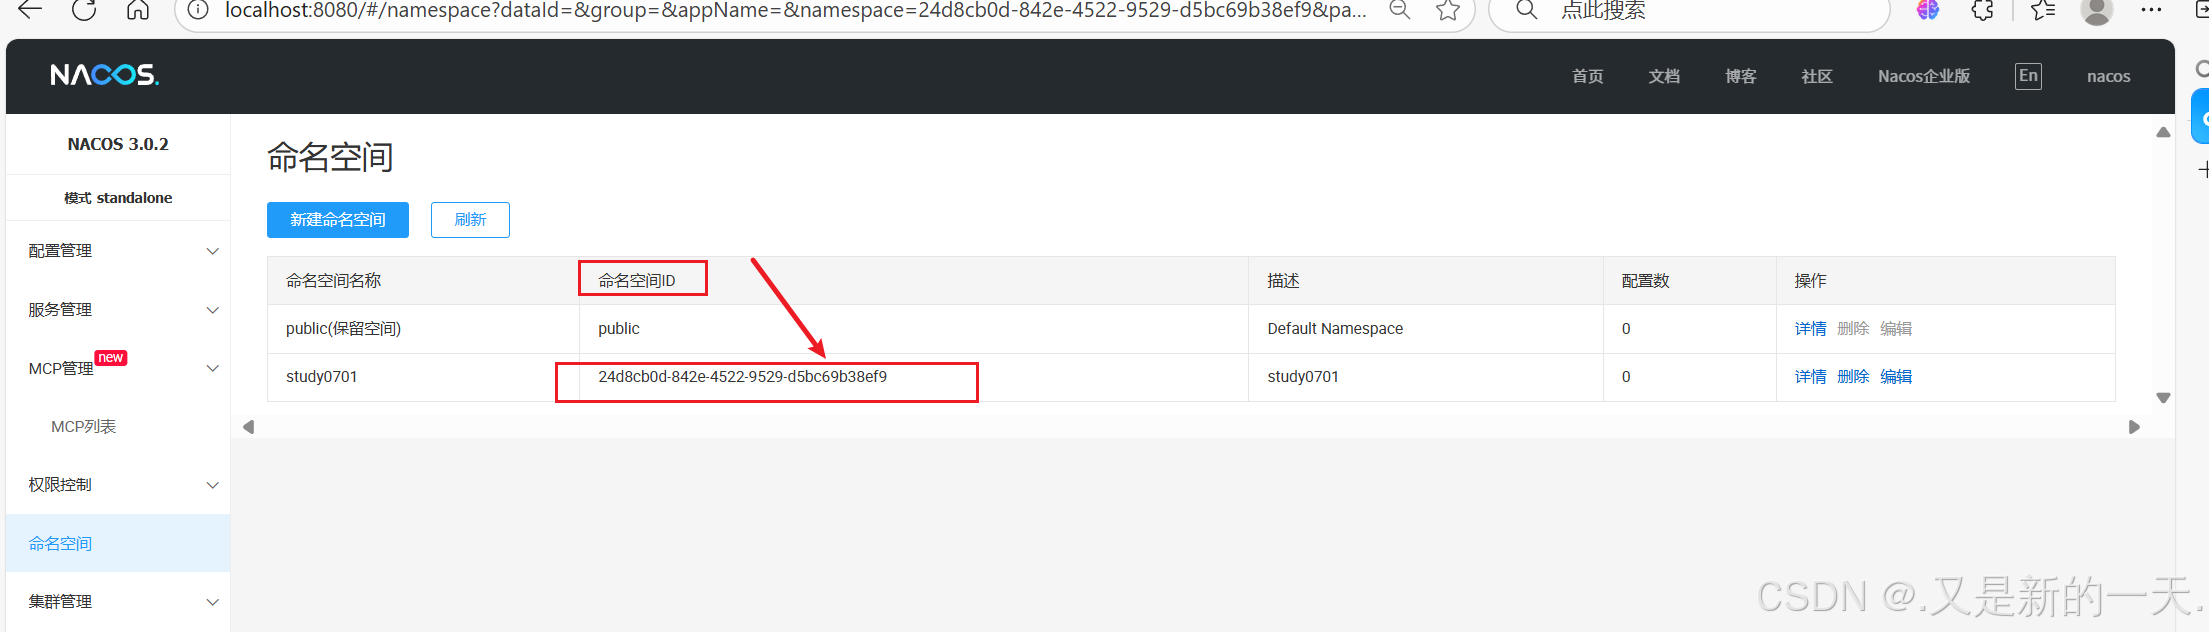
创建命名空间 :
接下来就是创建项目写代码,中间件已经运行了,程序员写微服务注册到上面 。
springboot是项目脚手架–快速创建项目 ,springcloud是定义微服务的开发标准,二者并不冲突 。
二、创建Maven父子项目:
父子项目:父项目是管理子项目 ,不需要运行。子项目才是真正运行的。
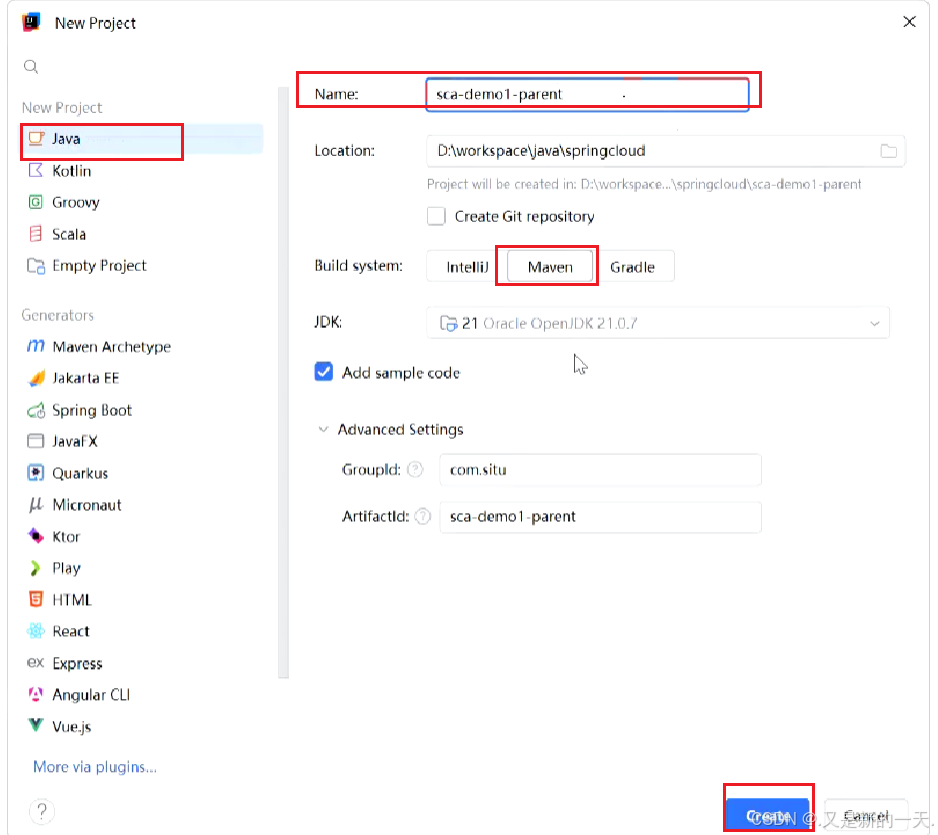
1.创建父项目
业界规范,项目名称最后是parent
父项目需要加
(1)打包方式:<packaging>
<packaging>pom</packaging>
表示这个父项目仅仅是配置文件,仅仅用于维护,不打成Jar包或者是 war包。打包完只有pom文件,其他都没有。
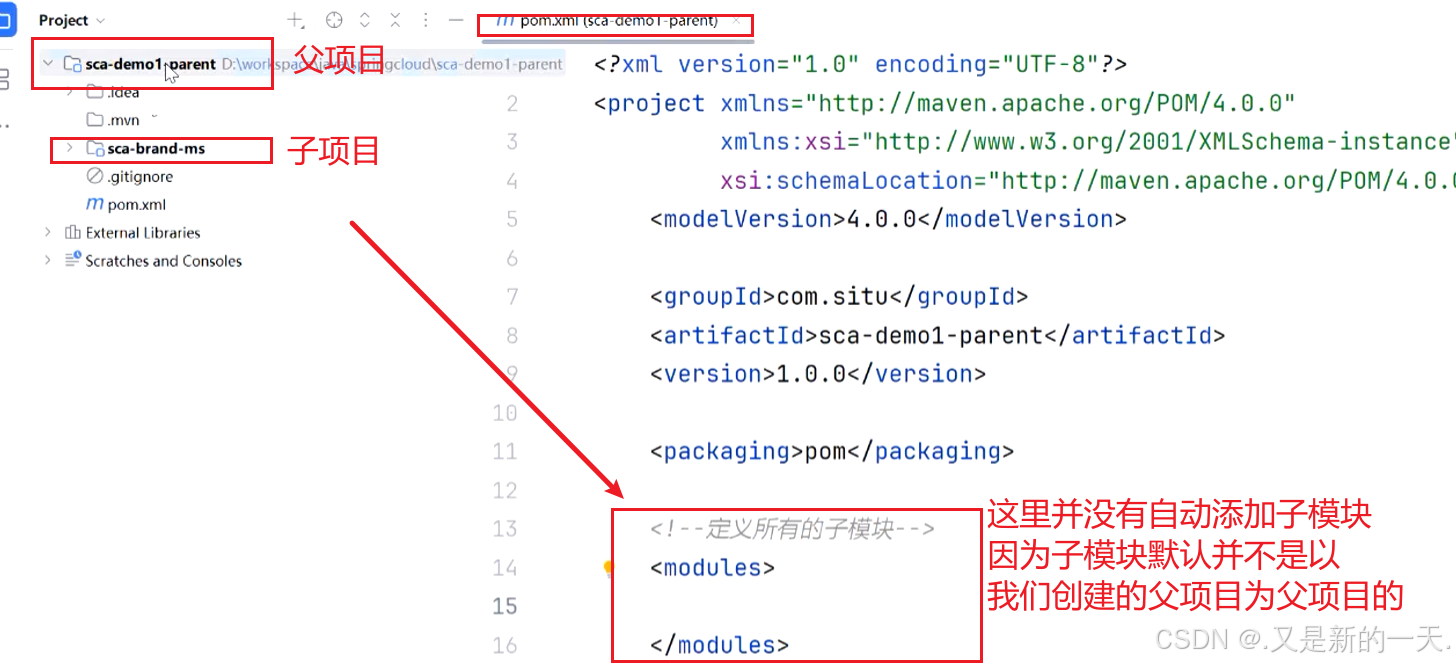
(2)定义所有的子模块: <module>
<!-- 定义所有的子模块(子项目):-->
<modules>写了子模块之后把子模块引入 :比如 下面这个:<module>sca-brand-ms</module>
</modules>
(3)替子项目管理依赖:(父项目不能运行 ):提前把依赖声明,子项目直接继承 <dependencyManagement>
springcloud最常用的三个依赖 :
每个依赖里面加上下面这个部分 :
<type>pom</type> <scope>import</scope>//把spring-cloud-alibaba这种对应的中所有的依赖导入
<!-- 替子项目管理依赖:(父项目不能运行 )--><dependencyManagement><dependencies><dependency><!-- springboot依赖:--><groupId>org.springframework.boot</groupId><artifactId>spring-boot-dependencies</artifactId><version>3.4.8</version><type>pom</type><scope>import</scope></dependency><!--导入spring-cloud依赖 --><dependency><groupId>org.springframework.cloud</groupId><artifactId>spring-cloud-dependencies</artifactId><version>2024.0.2</version><type>pom</type><scope>import</scope></dependency><!--导入阿里巴巴依赖--><!--导入spring-cloud-alibaba依赖--><dependency><groupId>com.alibaba.cloud</groupId><artifactId>spring-cloud-alibaba-dependencies</artifactId><version>2023.0.3.3</version><type>pom</type><scope>import</scope></dependency><!--mybatis-plus--><dependency><groupId>com.baomidou</groupId><artifactId>mybatis-plus-spring-boot3-starter</artifactId><version>3.5.12</version></dependency><!--mybatis分页插件--><dependency><groupId>com.baomidou</groupId><artifactId>mybatis-plus-jsqlparser</artifactId><version>3.5.12</version></dependency></dependencies></dependencyManagement>
导入什么依赖取决于子项目需要什么依赖 。另外在父项目中的依赖必须写上版本号,子项目不需要写 ,因为父项目帮子项目管理。
2.创建子项目
在父项目上面右键创建module:创建子项目。子项目名字可以任意 ,但是一般都要和父项目有所联系比较好。

创建后的:
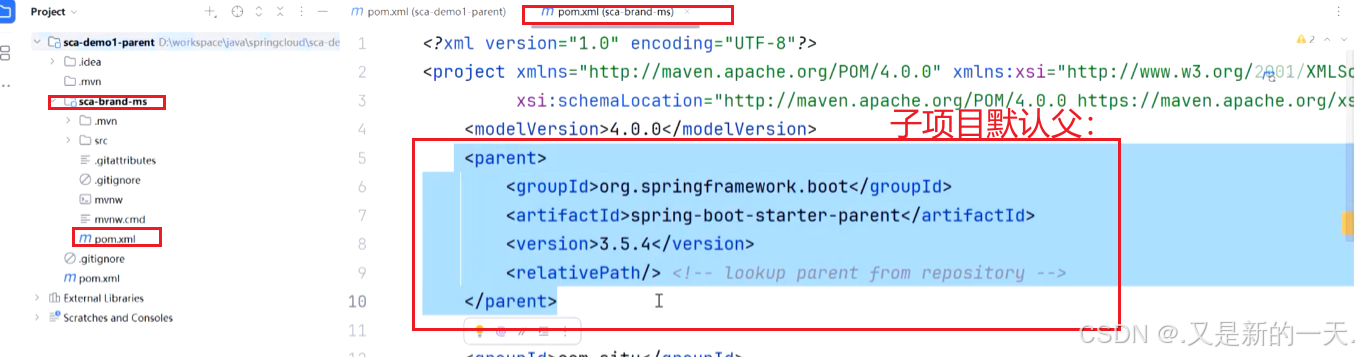
所以需要我们自己改造:(1)子项目改造成我们自己的项目为父:

<!-- 父项目:改成自己的:--><parent><groupId>com.study</groupId><artifactId>sca-demo1-parent</artifactId><version>1.0.0</version><relativePath/> <!-- lookup parent from repository --></parent><!-- 子项目自己的部分:--><artifactId>sca-brand-ms</artifactId><version>1.0.0</version><packaging>jar</packaging><!-- 子项目说明和描述 :--><name>sca-brand-ms</name><description>品牌管理微服务</description>
关于子项目中的依赖 :不需要写版本号,用哪个依赖直接写名字引入就行了 。因为版本号父项目中已经定义提供了(import直接导入了全部的 ),替我们管理。子项目直接用就行了。
(2) 父项目中在modules里面引入子项目 ,这样父子就建立了联系。
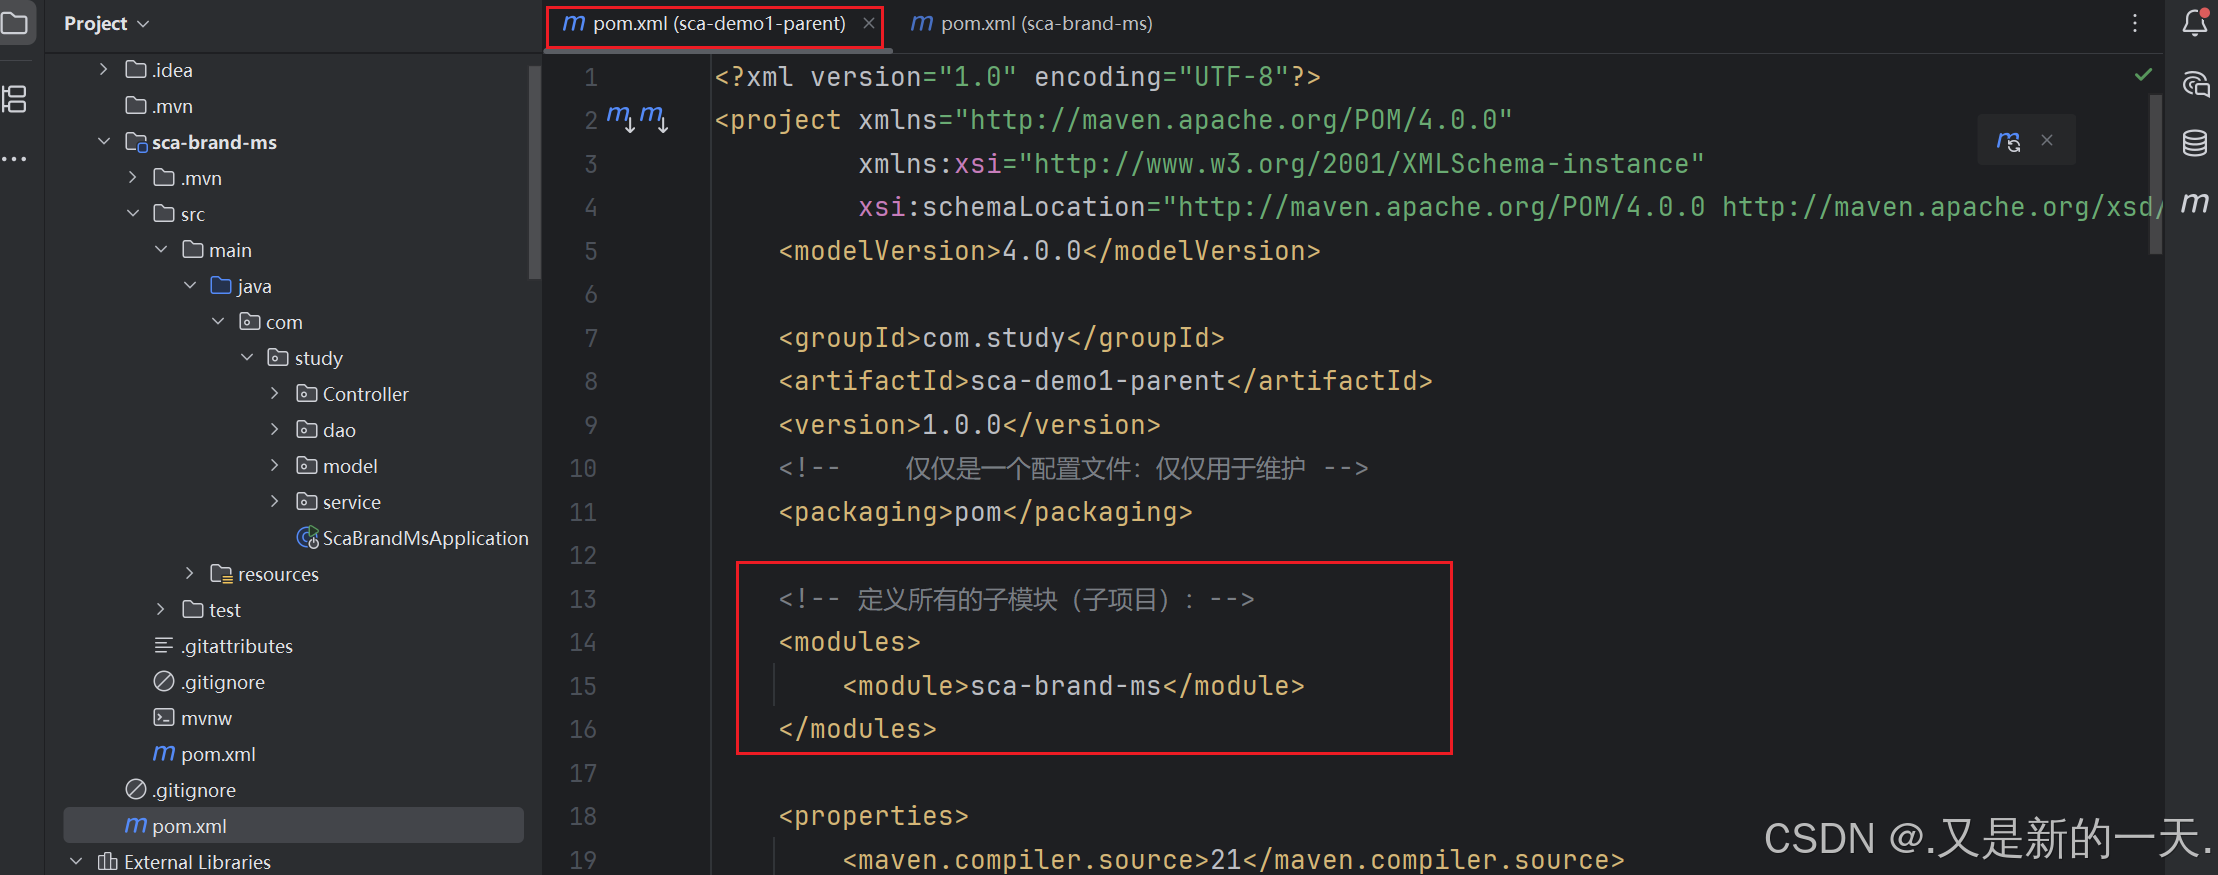
总结:父项目的pom里面modules里面定义子模块,子项目的pom文件 里面指定父项目,从而实现关联。
关于构键插件:build
在父项目里面复制粘贴进来子项目的插件,子项目中不需要有:
<build><pluginManagement><plugins>
这部分了,交给父项目管理了。
但是这样写有雷。有bug:
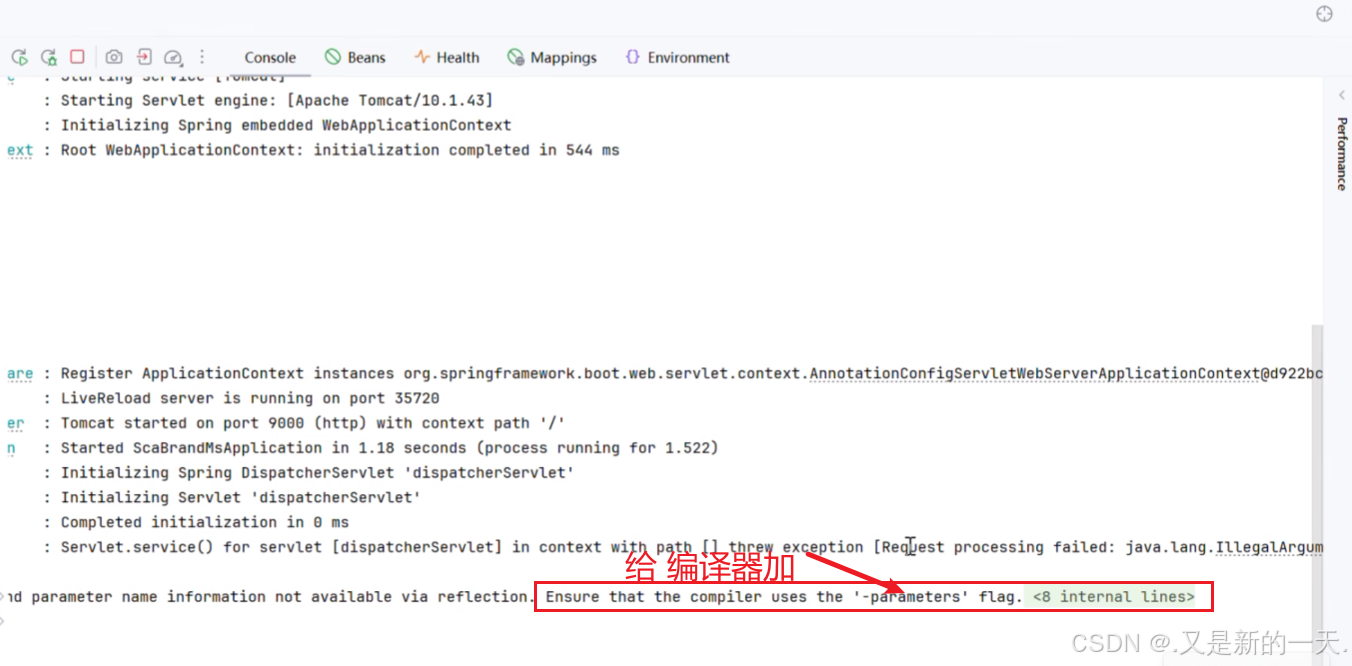
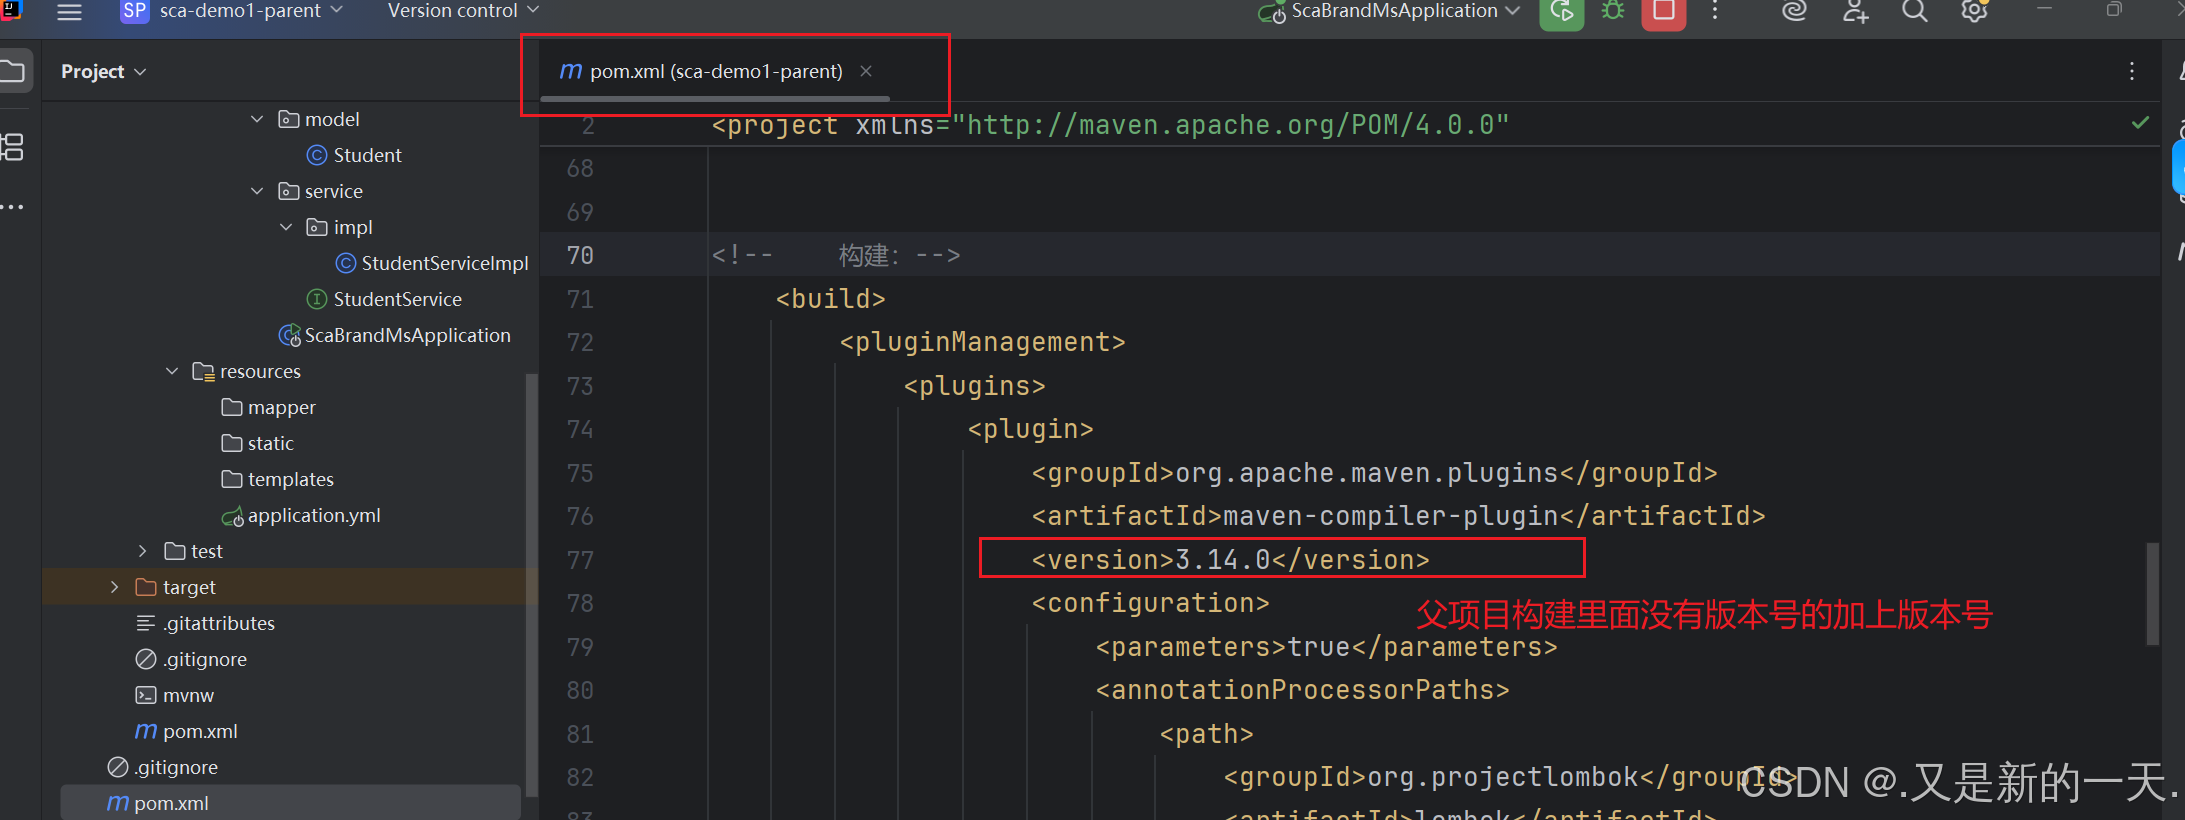
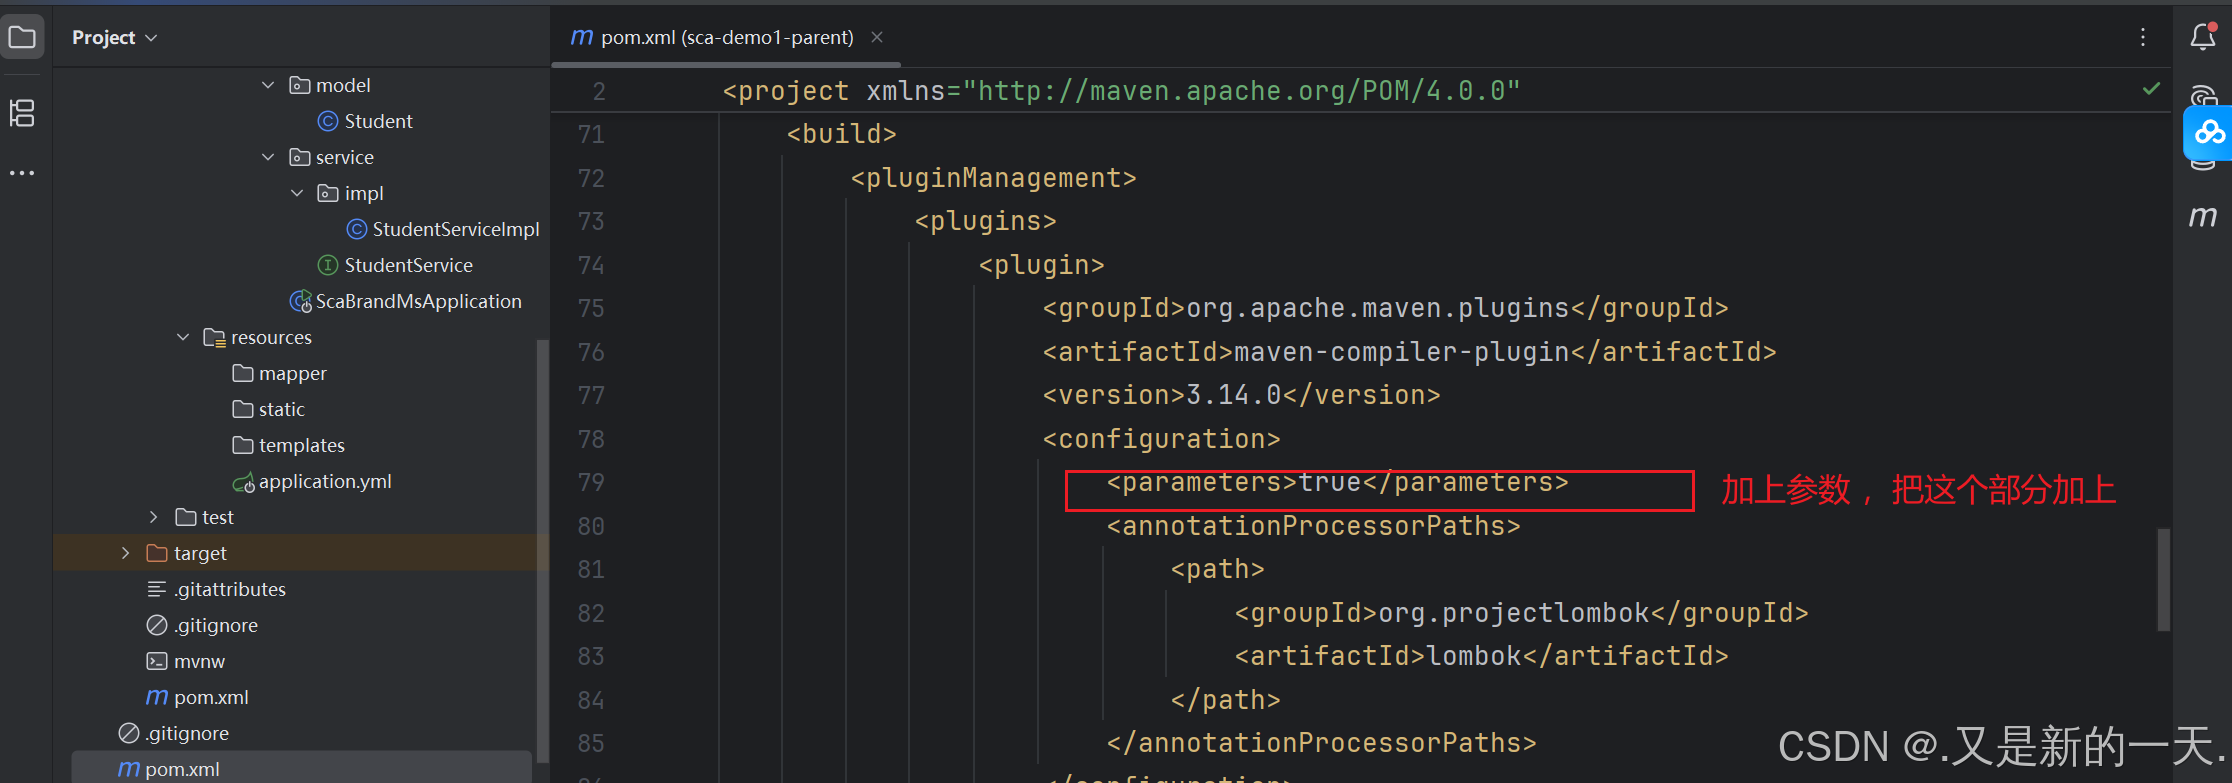
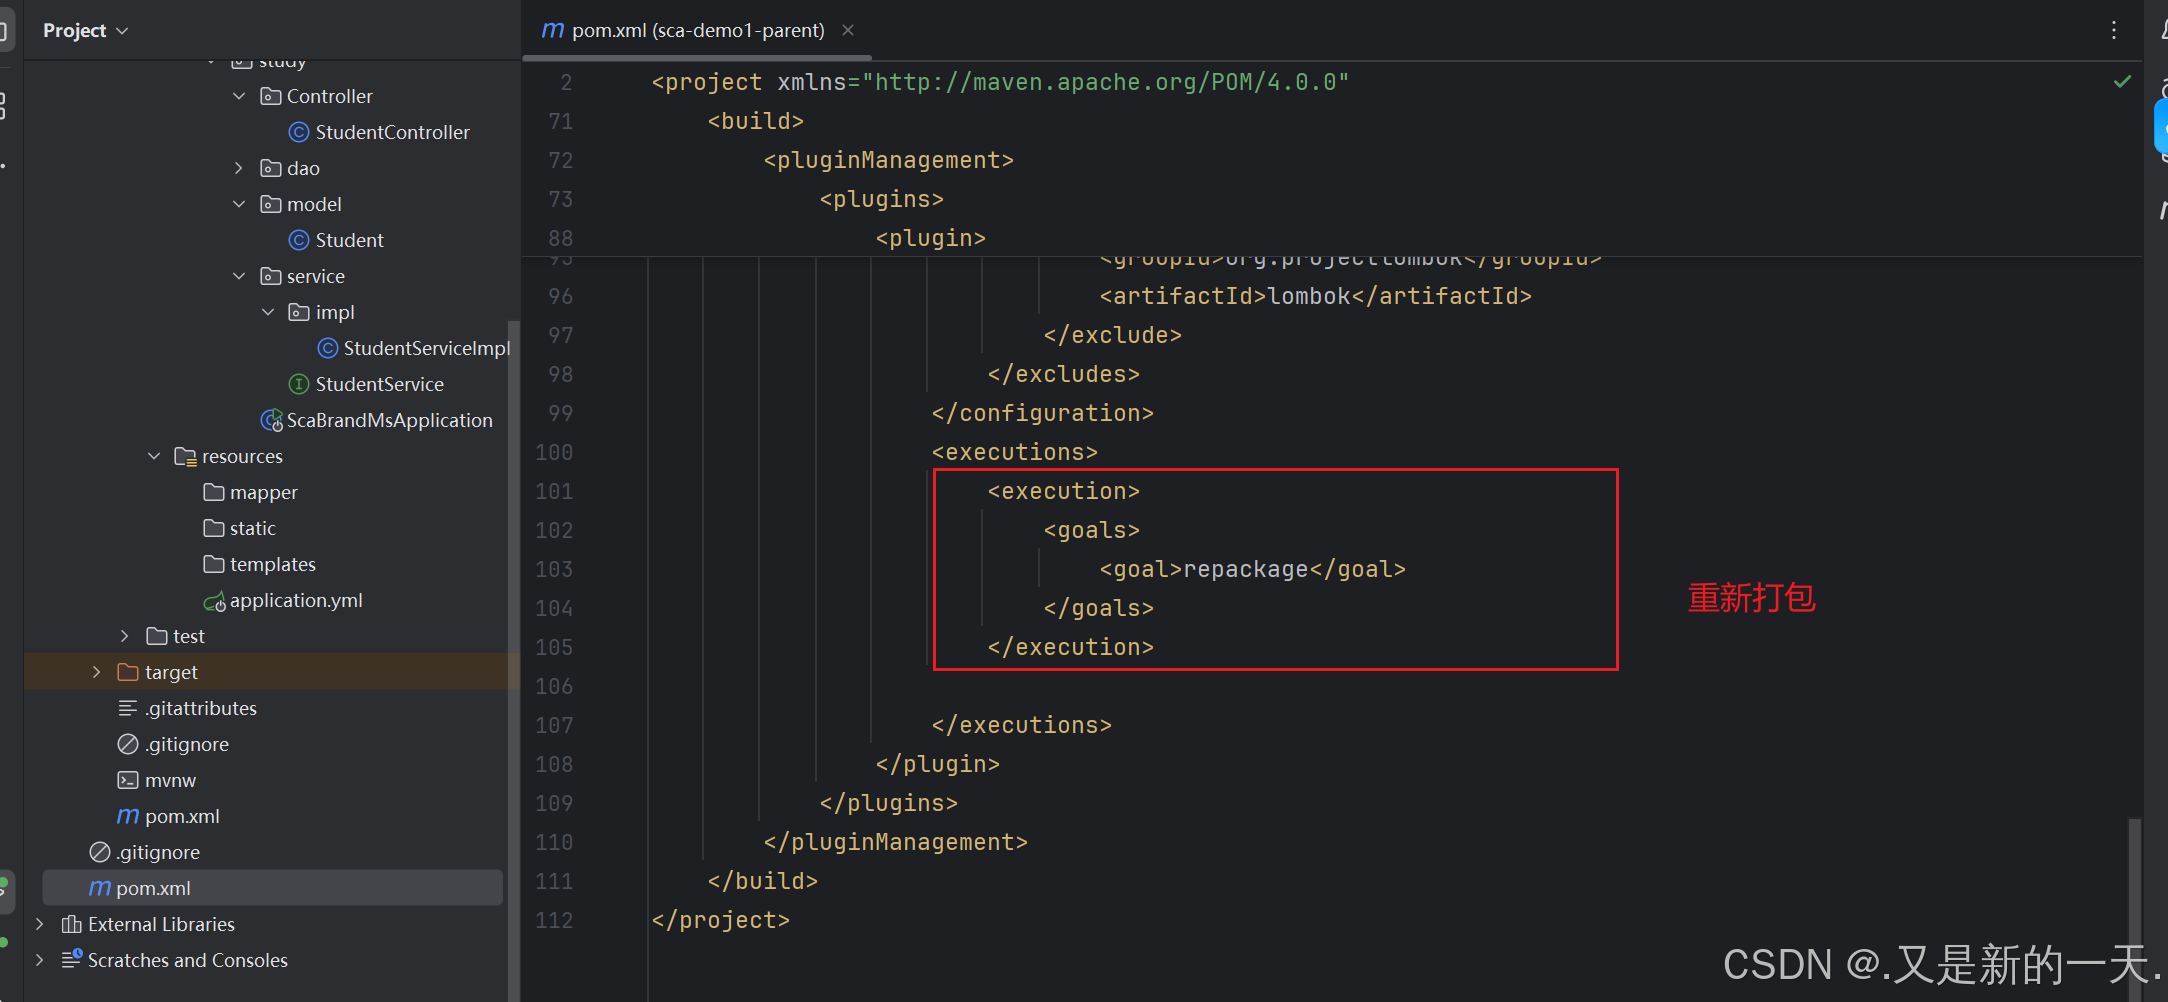
原因:我们之前的构建:关于构键插件:build在父项目里面复制粘贴进来子项目的插件,子项目中不需要有。但是这个部分子项目里面的以前是在spring-boot-start里面继承的,现在父项目里面是没有的版本号的 ,所以在父项目里面构建里面加入版本号
关于依赖和插件是否可以继承的问题:
管理 Management里面的东西,不能继承
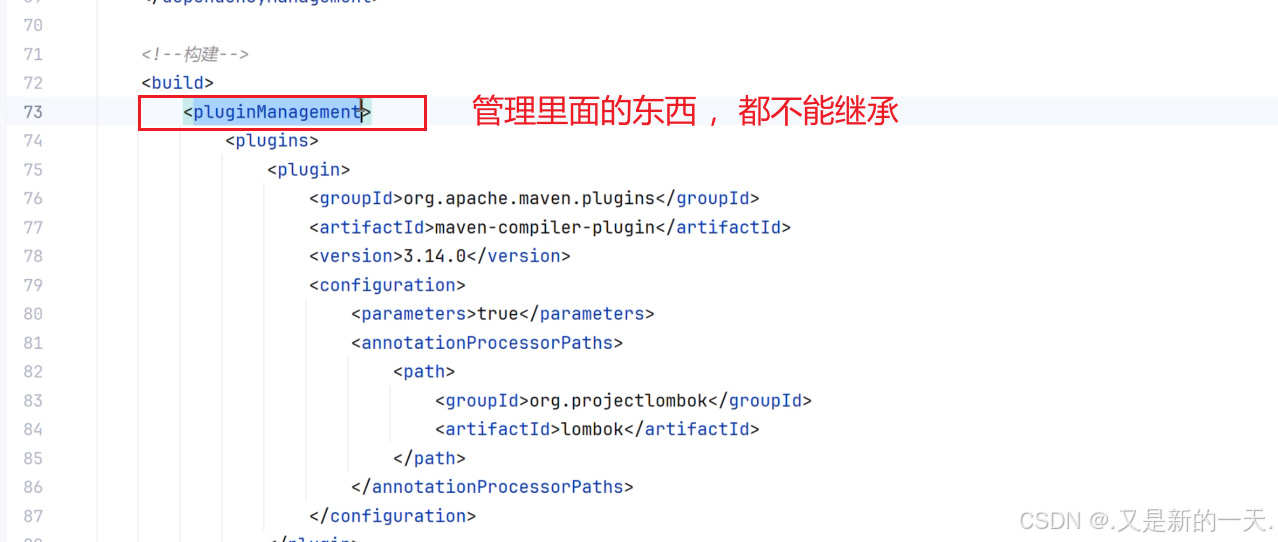
要想实现继承,不能放到Management里面,可以在Mangement外面
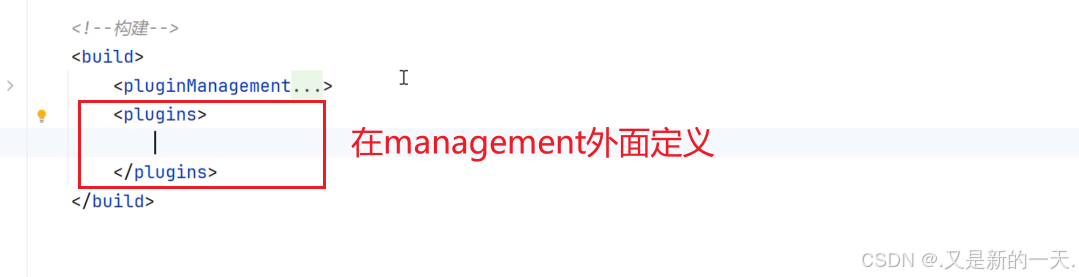
把插件复制到这里面。然后修改 :在管理里面单纯保存版本号,在plugins里面存放 依赖(不需要有版本号 )
父项目:
<?xml version="1.0" encoding="UTF-8"?>
<project xmlns="http://maven.apache.org/POM/4.0.0" xmlns:xsi="http://www.w3.org/2001/XMLSchema-instance"xsi:schemaLocation="http://maven.apache.org/POM/4.0.0 https://maven.apache.org/xsd/maven-4.0.0.xsd"><modelVersion>4.0.0</modelVersion><!--    父项目:改成自己的:--><parent><groupId>com.study</groupId><artifactId>sca-demo1-parent</artifactId><version>1.0.0</version><relativePath/> <!-- lookup parent from repository --></parent><!--    子项目自己的部分:--><artifactId>sca-brand-ms</artifactId><version>1.0.0</version><packaging>jar</packaging><!--    子项目说明和描述 :--><name>sca-brand-ms</name><description>品牌管理微服务</description><url/><licenses><license/></licenses><developers><developer/></developers><scm><connection/><developerConnection/><tag/><url/></scm><properties><java.version>21</java.version></properties><dependencies><dependency><groupId>org.springframework.boot</groupId><artifactId>spring-boot-starter-web</artifactId></dependency><dependency><groupId>org.springframework.boot</groupId><artifactId>spring-boot-devtools</artifactId><scope>runtime</scope><optional>true</optional></dependency><dependency><groupId>com.mysql</groupId><artifactId>mysql-connector-j</artifactId><scope>runtime</scope></dependency><dependency><groupId>org.projectlombok</groupId><artifactId>lombok</artifactId><optional>true</optional></dependency><dependency><groupId>org.springframework.boot</groupId><artifactId>spring-boot-starter-test</artifactId><scope>test</scope></dependency></dependencies></project>
子项目中公用的配置可以放到父项目中。
三 、SCA-Nacos 实现微服务的注册
Nacos是管理微服务的 。
Nacos 的核心功能之一就是作为微服务的注册中心和配置中心,对微服务进行管理。因此,说 Nacos 是用于管理微服务的工具。
常见的服务治理组件:
- Eureka:Eureka 是 Spring Cloud Netflix 的核心组件,由 Netflix 开发,支持服务注册与发现。其特点包括:
● 高可用性:通过多实例部署和相互注册实现高可用。
● 自我保护机制:在网络异常时避免误删服务实例,保障服务列表稳定性。
● 简单集成:通过 @EnableEurekaServer 和 @EnableEurekaClient 注解即可快速配置。
● 适用场景:适用于中小型微服务架构,但对动态配置管理和多数据中心支持较弱。 - Consul:Consul 是 HashiCorp 开发的服务网格解决方案,支持服务注册与发现、健康检查、KV 存储等功能:
● 多数据中心支持:天然支持跨数据中心的同步与灾备。
● 健康检查:提供 HTTP/TCP 等多种健康检查机制,确保服务可用性。
● 动态配置:与 Spring Cloud Config 结合可实现配置的集中管理。
● 适用场景:适用于需要强一致性和多环境管理的复杂系统。 - Zookeeper:Zookeeper 是 Apache 的分布式协调服务,常用于服务注册与发现:
● 强一致性:基于 ZAB 协议保证数据一致性,适合对一致性要求高的场景。
● 临时节点:服务实例注册为临时节点,宕机后自动清除,避免脏数据。
● 适用场景:适合与 Dubbo 等框架结合使用,但配置复杂度较高。 - Nacos:阿里巴巴开源的一站式服务注册与发现、配置管理平台。
特点:
● 服务注册与发现:支持 AP(高可用)和 CP(强一致)模式自由切换,可灵活应对不同场景。
● 动态配置管理:内置配置中心,支持秒级推送更新和多环境隔离(开发/测试/生产)。
● 健康检查:结合客户端心跳(临时实例)和服务端主动探测(永久实例),精准判断服务状态。
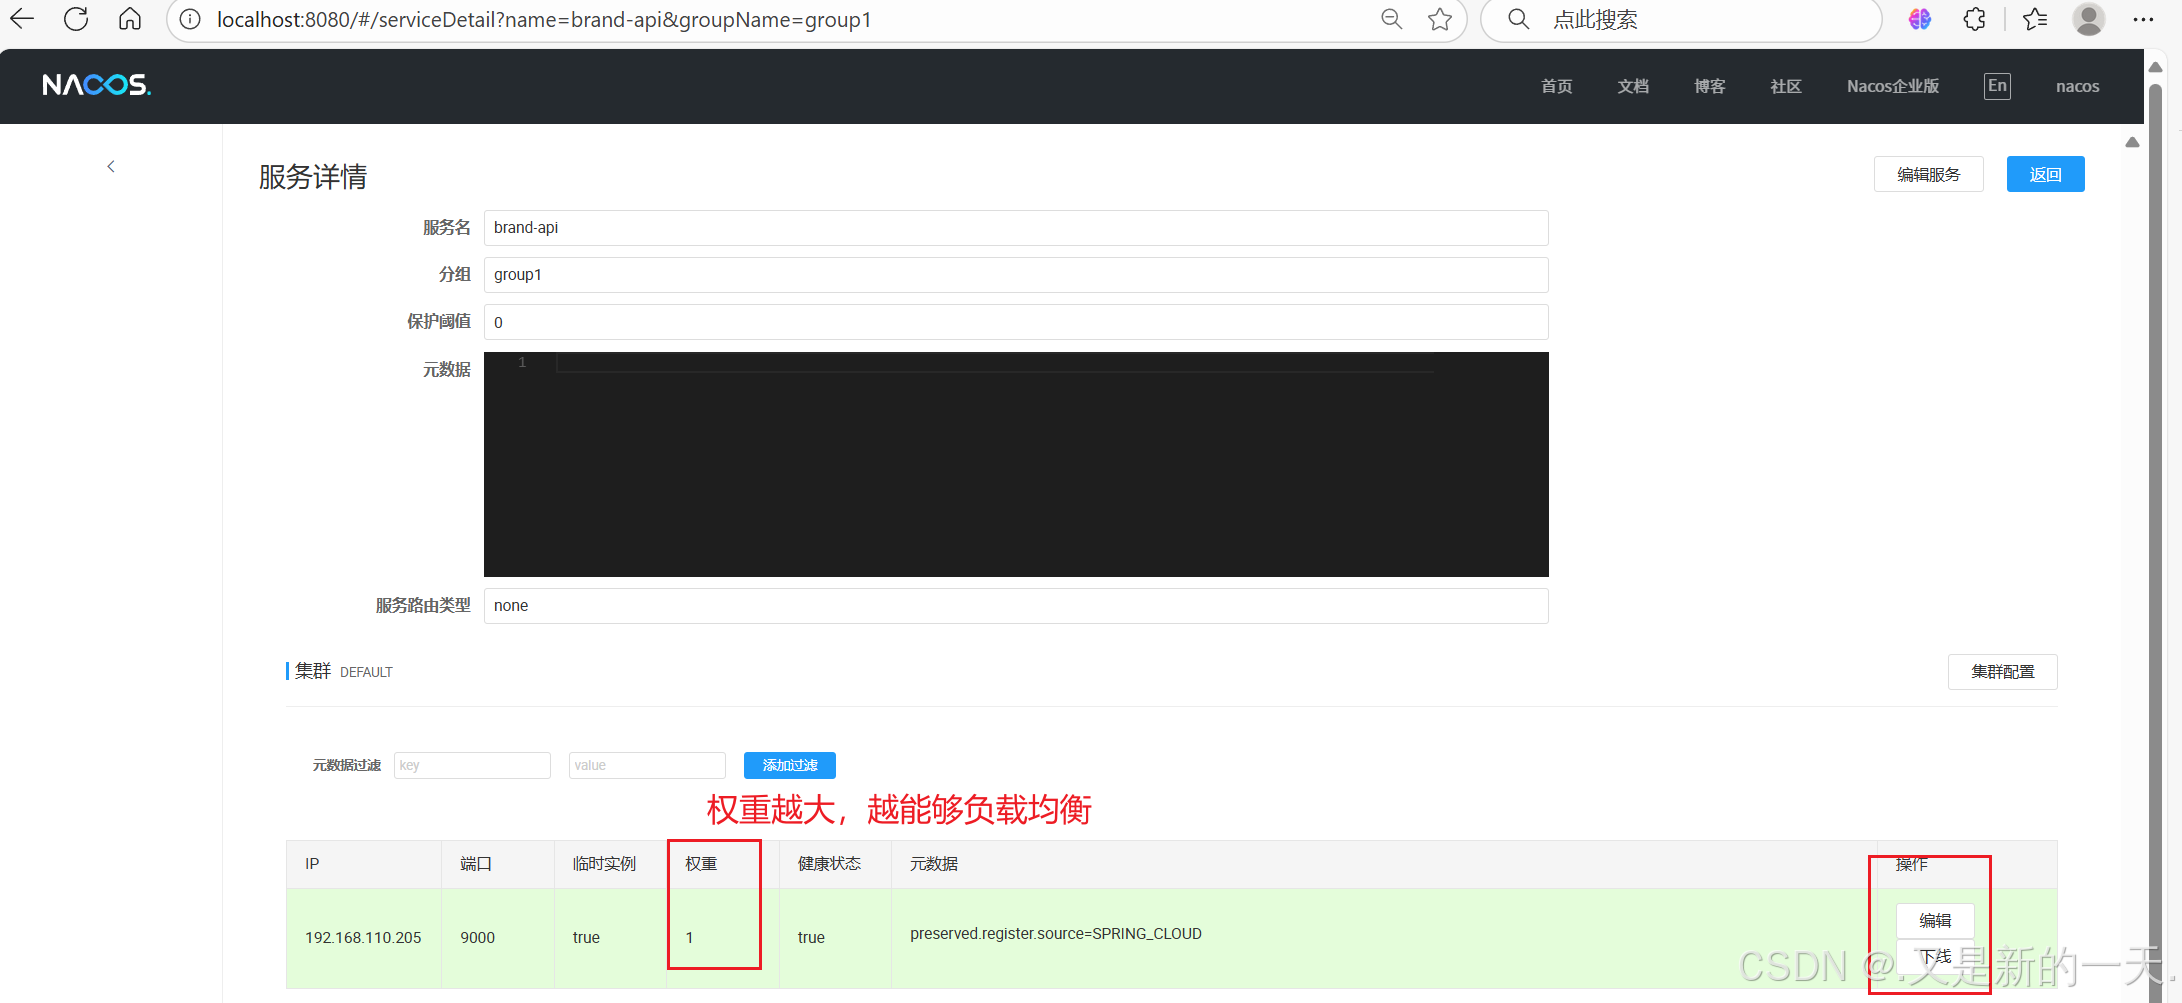
● 流量治理:提供权重路由、保护阈值等功能,支持灰度发布和容灾策略。
● 多生态集成:无缝兼容 Spring Cloud、Dubbo、Kubernetes,提供可视化控制台。
适用场景:
● 全功能微服务架构: 需要同时管理服务注册、配置中心、流量控制的系统。
● 云原生应用: 适合与 Kubernetes、Service Mesh 结合,简化多云环境部署。
● 混合一致性需求: 如金融业务部分模块需强一致,其他模块优先高可用。
1. 首先引入依赖
父项目的pom.xml里面 :
<!-- nacos的服务注册与发现--><dependency><groupId>com.alibaba.cloud</groupId><artifactId>spring-cloud-starter-alibaba-nacos-discovery</artifactId></dependency>
2. 进行微服务的配置
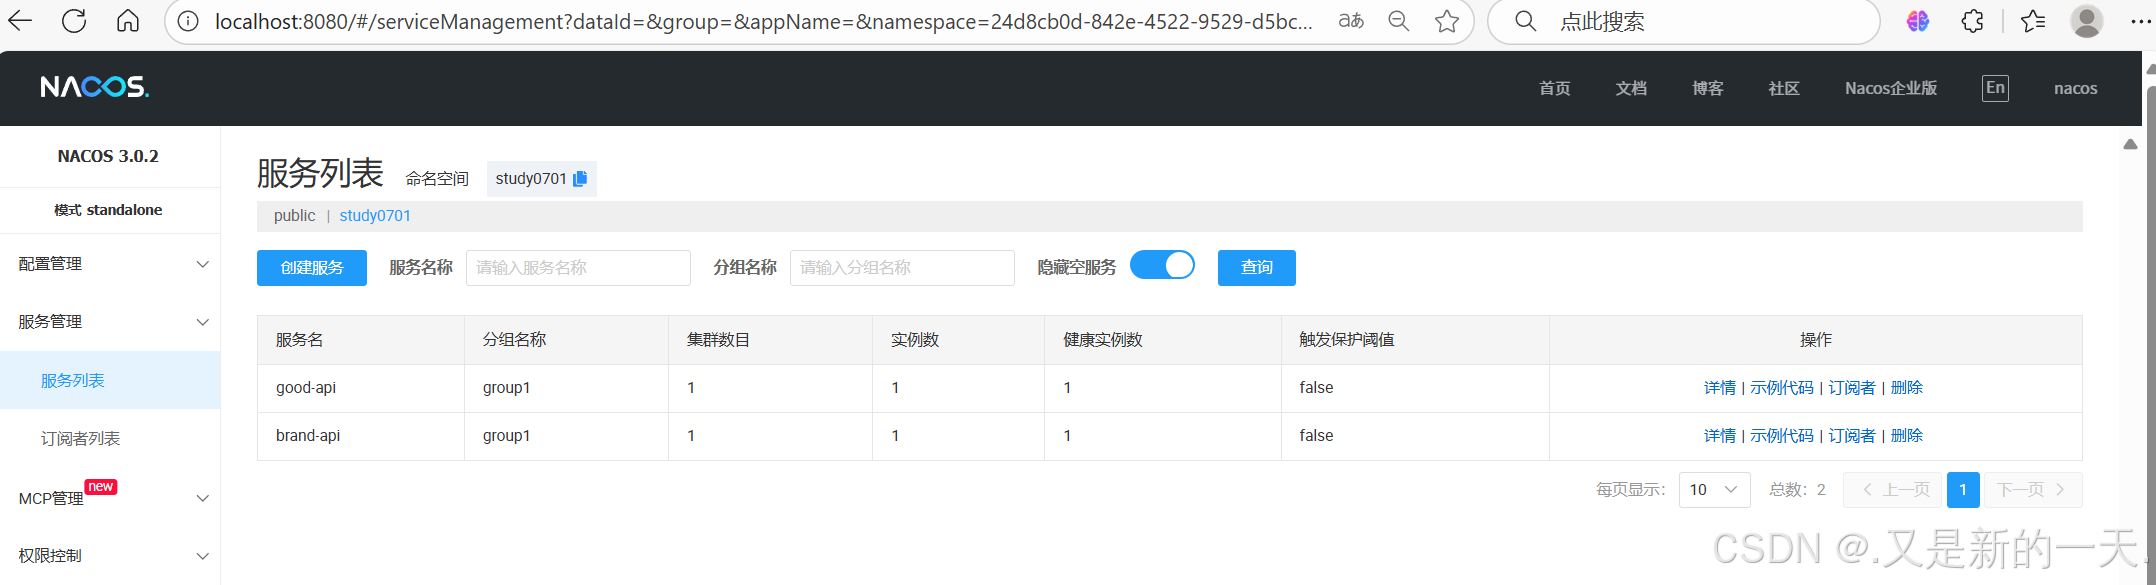
nacos服务中心配置 :namespace对应的就是命名空间里面的id:
# 微服务的名字:
spring:application:name: brand-api#liverserve端口:devtools:livereload:port: 35720#nacos服务中心配置 :cloud:nacos:discovery:server-addr: localhost:8848username: nacospassword: 123456    #命名空间:idnamespace: 24d8cb0d-842e-4522-9529-d5bc69b38ef9group: group1# 微服务自身ip:ip: 192.168.110.205#端口:当前微服务自身的端口:port: 9000#  数据库配置datasource:driver-class-name: com.mysql.cj.jdbc.Driverurl: jdbc:mysql://localhost:3306/students2025?characterEncoding=UTF-8&useSSL=false&autoReconnect=true&serverTimezone=Asia/Shanghai&allowPublicKeyRetrieval=trueusername: rootpassword: 123456#微服务端口:
server:port: 9000#  mybatis-plus配置
mybatis-plus:configuration:log-prefix: mybatis.log-impl: org.apache.ibatis.logging.stdout.StdOutImpllazy-loading-enabled: truecache-enabled: falsetype-aliases-package: com.study.modelmapper-locations: classpath*:/mapper/**/*.xml
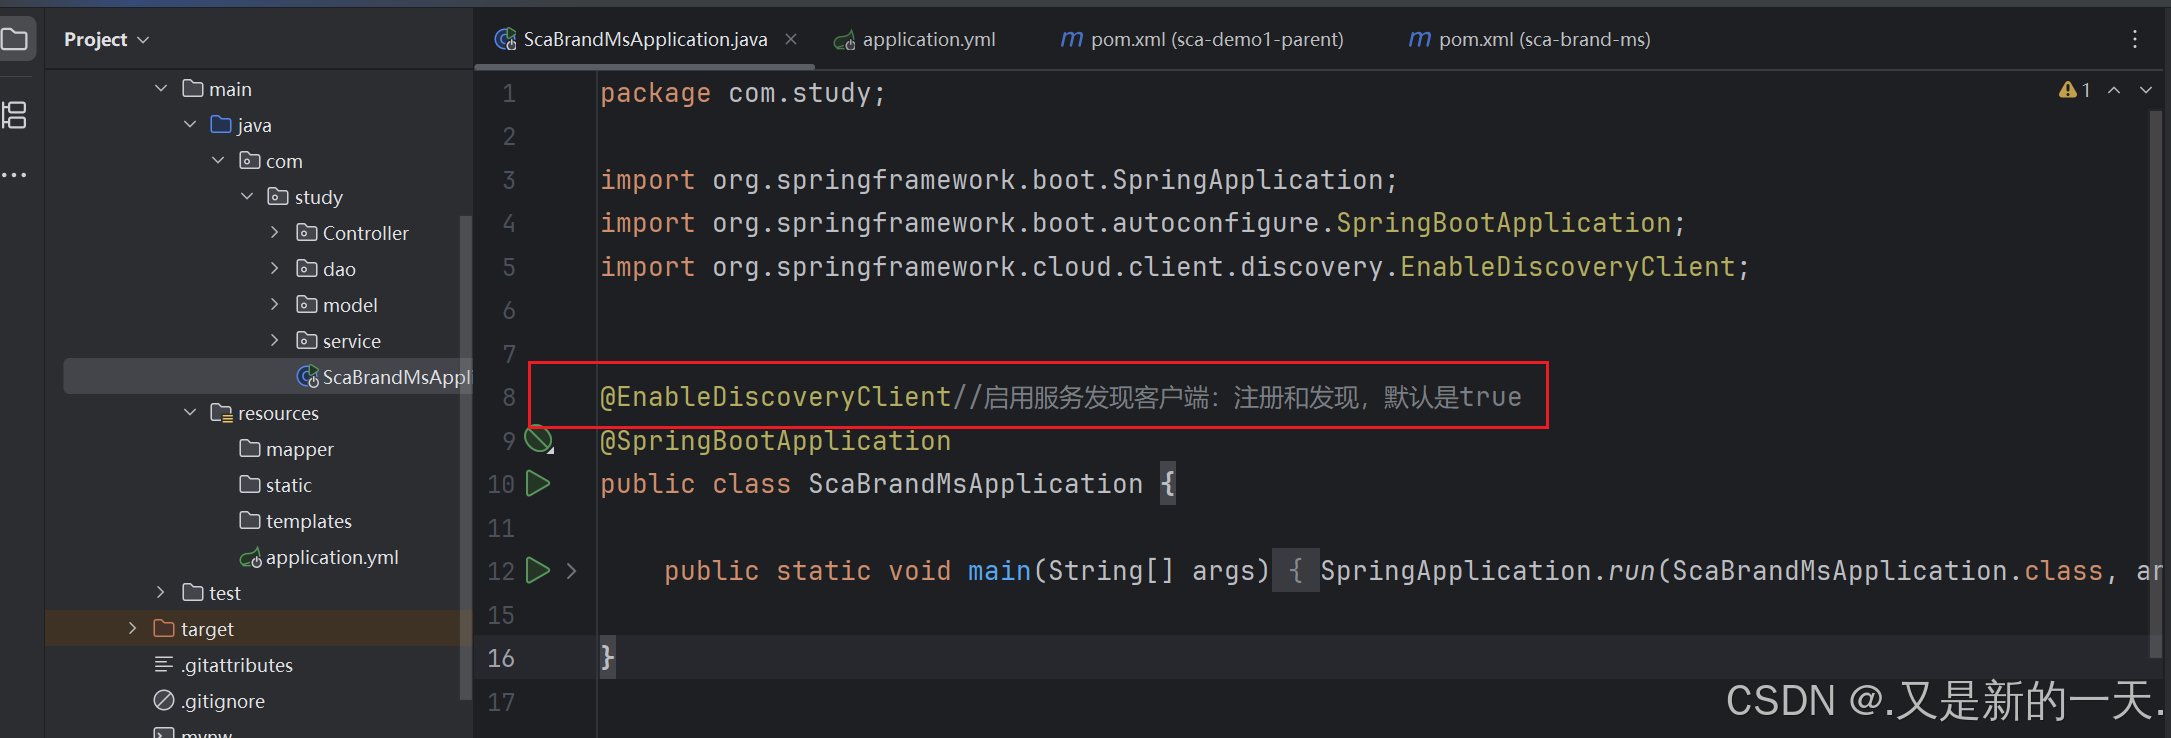
3.加注解:@EnableDiscoveryClient
在主启动类(子项目的启动类,因为父项目就是用于配置的,子项目才是 运行的)上面添加注解:@EnableDiscoveryClient
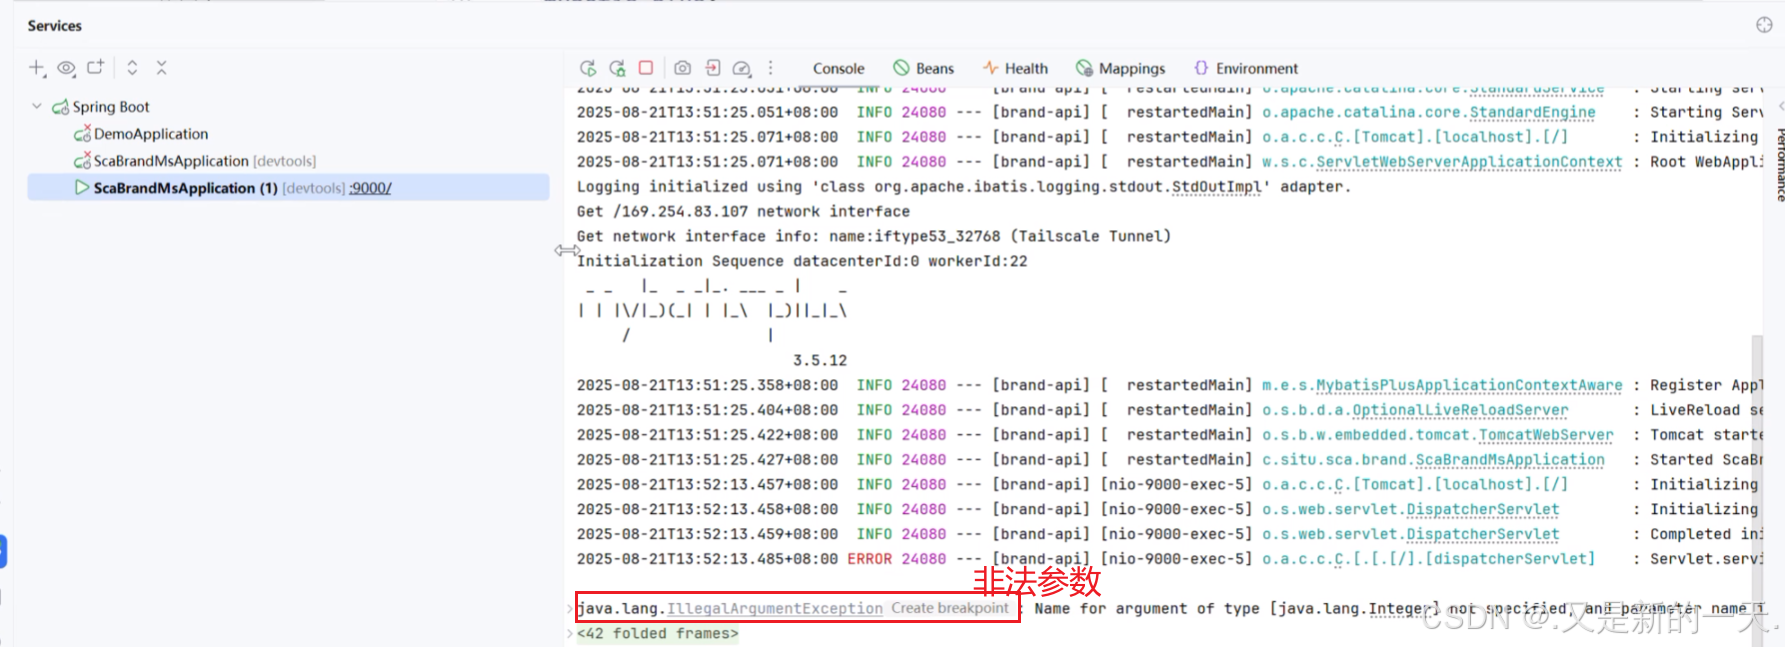
4.验证测试 :
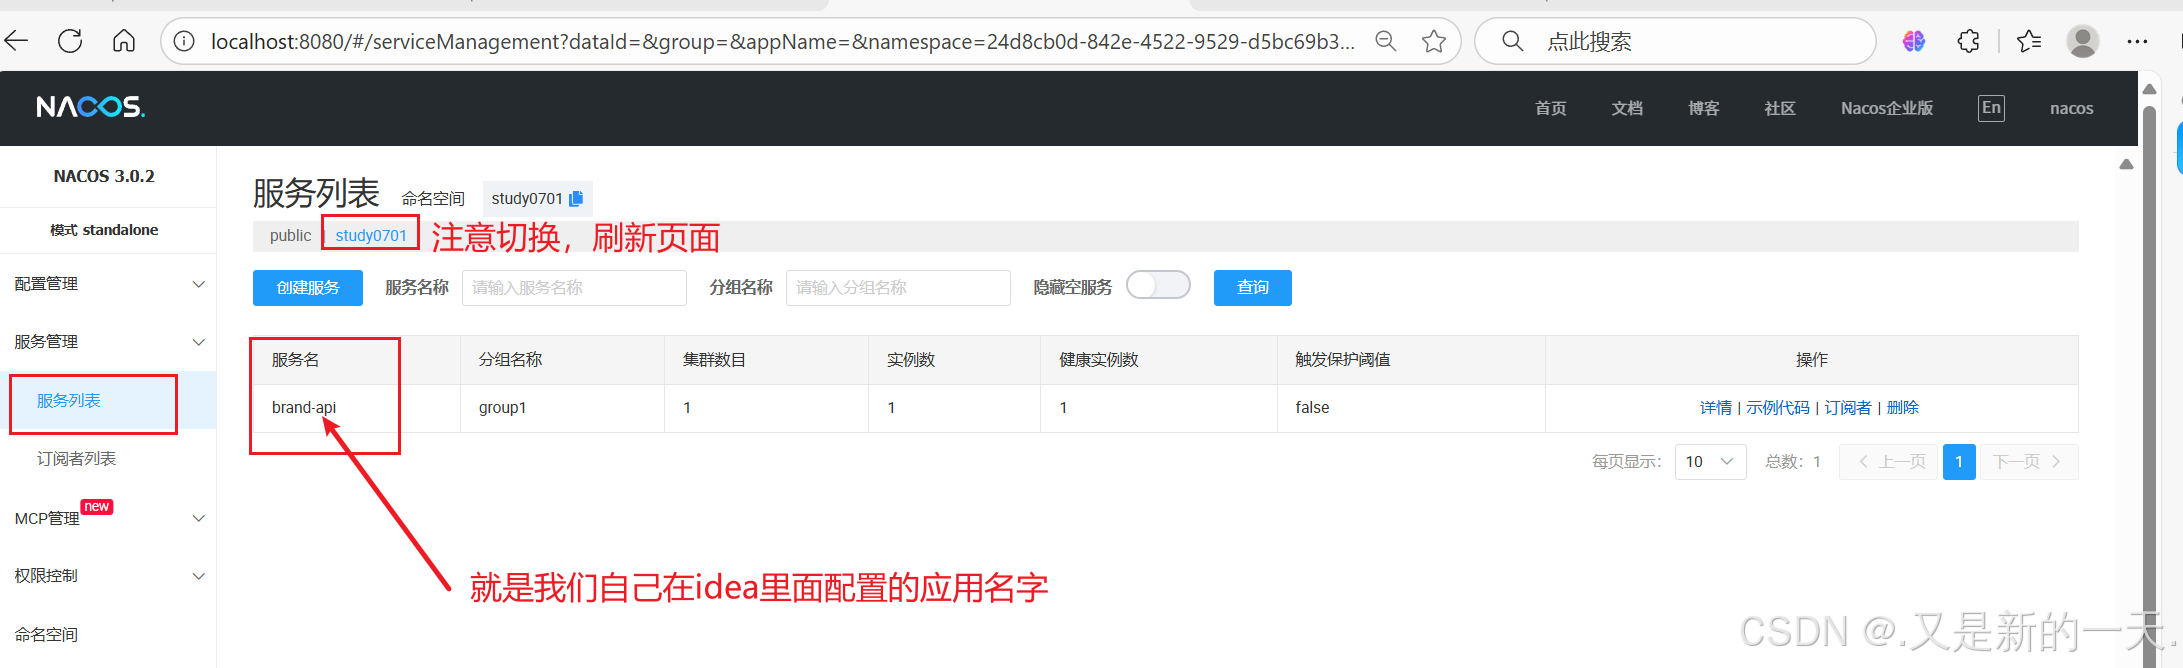
四、微服务的发现(远程发现)
新建一个微服务,在一个微服务里面调用 另外一个微服务 :
1. SCA-Nacos实现服务发现(远程服务调用)
创建子项目 sca-nacos-service-consumer-resttemplate 和 sca-nacos-service-consumer-openfeign,以下为基础公共 pom 配置:
<?xml version="1.0" encoding="UTF-8"?>
<project xmlns="http://maven.apache.org/POM/4.0.0" xmlns:xsi="http://www.w3.org/2001/XMLSchema-instance"xsi:schemaLocation="http://maven.apache.org/POM/4.0.0 https://maven.apache.org/xsd/maven-4.0.0.xsd"><modelVersion>4.0.0</modelVersion><parent><groupId>com.situ</groupId><artifactId>sca-nacos-parent</artifactId><version>1.0.0</version></parent><artifactId>sca-nacos-service-consumer-resttemplate</artifactId><version>1.0.0</version><name>sca-nacos-service-consumer-resttemplate</name><description>sca-nacos-service-consumer-resttemplate</description><properties><java.version>21</java.version></properties><dependencies><dependency><groupId>org.springframework.boot</groupId><artifactId>spring-boot-starter-web</artifactId></dependency><dependency><groupId>org.springframework.boot</groupId><artifactId>spring-boot-devtools</artifactId><scope>runtime</scope><optional>true</optional></dependency><dependency><groupId>org.projectlombok</groupId><artifactId>lombok</artifactId><optional>true</optional></dependency><dependency><groupId>org.springframework.boot</groupId><artifactId>spring-boot-starter-test</artifactId><scope>test</scope></dependency><!--nacos服务治理现依赖--><dependency><groupId>com.alibaba.cloud</groupId><artifactId>spring-cloud-starter-alibaba-nacos-discovery</artifactId></dependency><!--负载均衡--><dependency><groupId>org.springframework.cloud</groupId><artifactId>spring-cloud-starter-loadbalancer</artifactId></dependency><!--loadbalancer的缓存实现--><dependency><groupId>com.github.ben-manes.caffeine</groupId><artifactId>caffeine</artifactId></dependency></dependencies><build><plugins><plugin><groupId>org.apache.maven.plugins</groupId><artifactId>maven-compiler-plugin</artifactId><configuration><parameters>true</parameters><annotationProcessorPaths><path><groupId>org.projectlombok</groupId><artifactId>lombok</artifactId></path></annotationProcessorPaths></configuration></plugin><plugin><groupId>org.springframework.boot</groupId><artifactId>spring-boot-maven-plugin</artifactId><configuration><excludes><exclude><groupId>org.projectlombok</groupId><artifactId>lombok</artifactId></exclude></excludes></configuration></plugin></plugins></build></project>
在主启动类或配置类上添加@EnableDiscoveryClient 注解,指定属性 autoRegister = false ,表示自身不注册为服务。
2、RestTemplate 调用 Nacos 微服务
创建新的子项目,同样指定他的父项目 ,然后在父项目里面引入子项目,实现父子项目的关联:


如何实现在一个微服务里面调用另外一个微服务呢?
RestTemplate:用于专门访问远程服务。访问rest请求定义的一个专门的工具类.
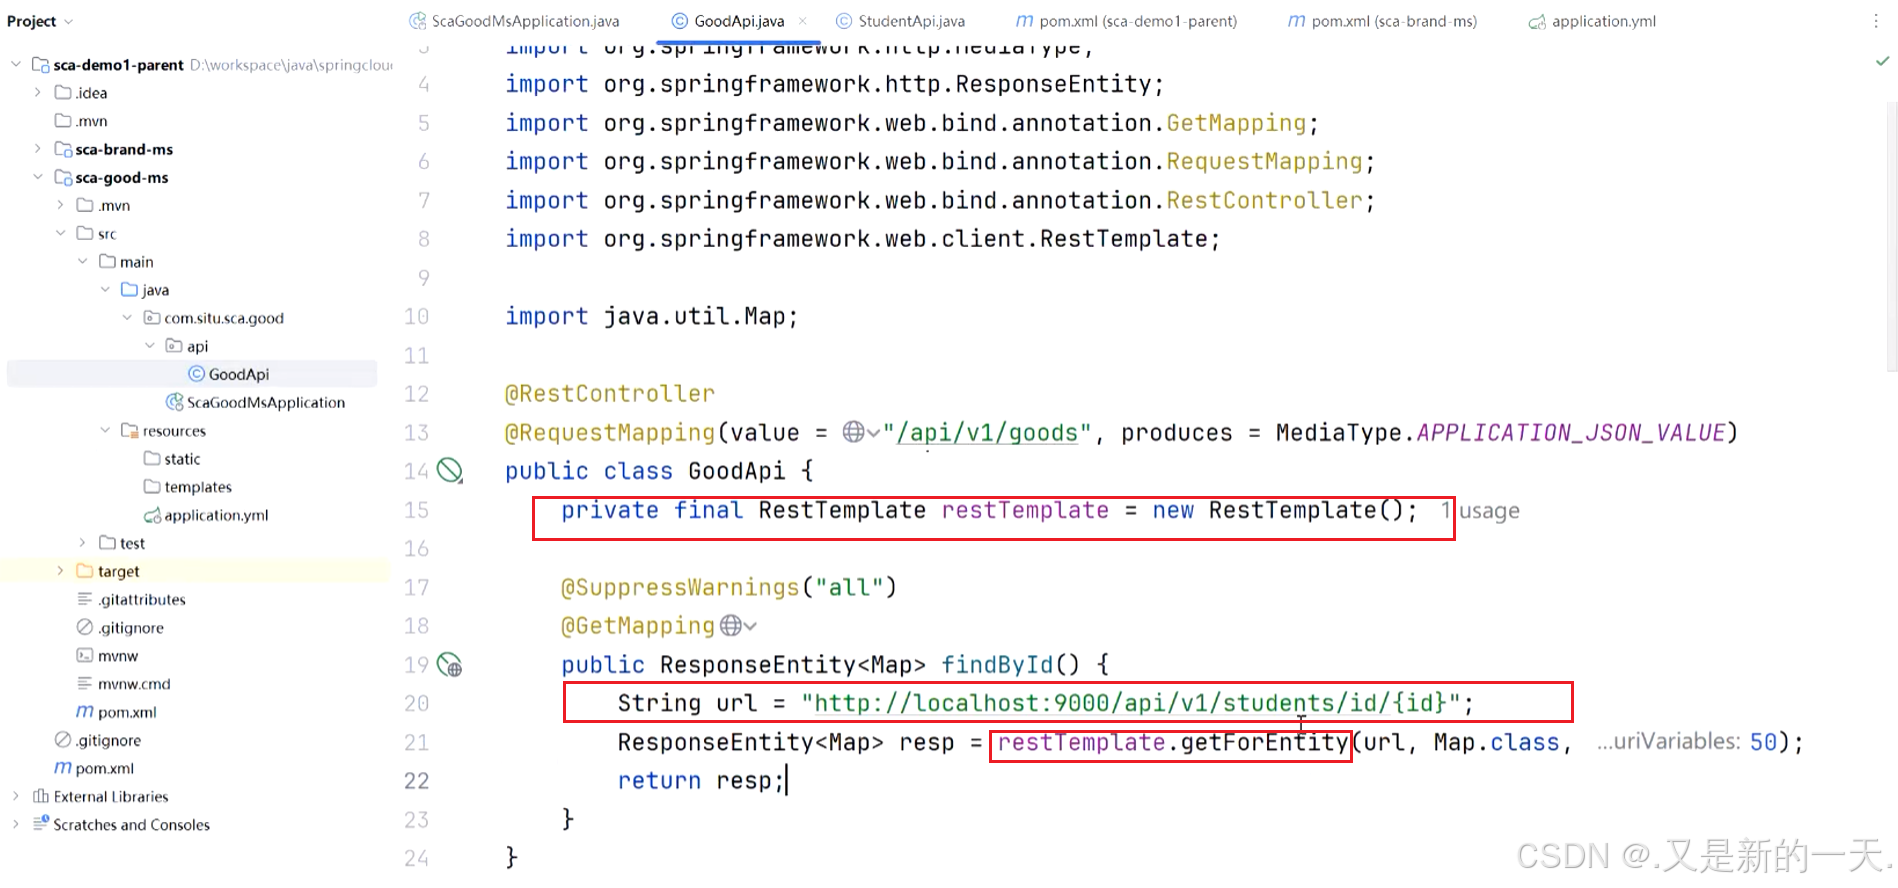
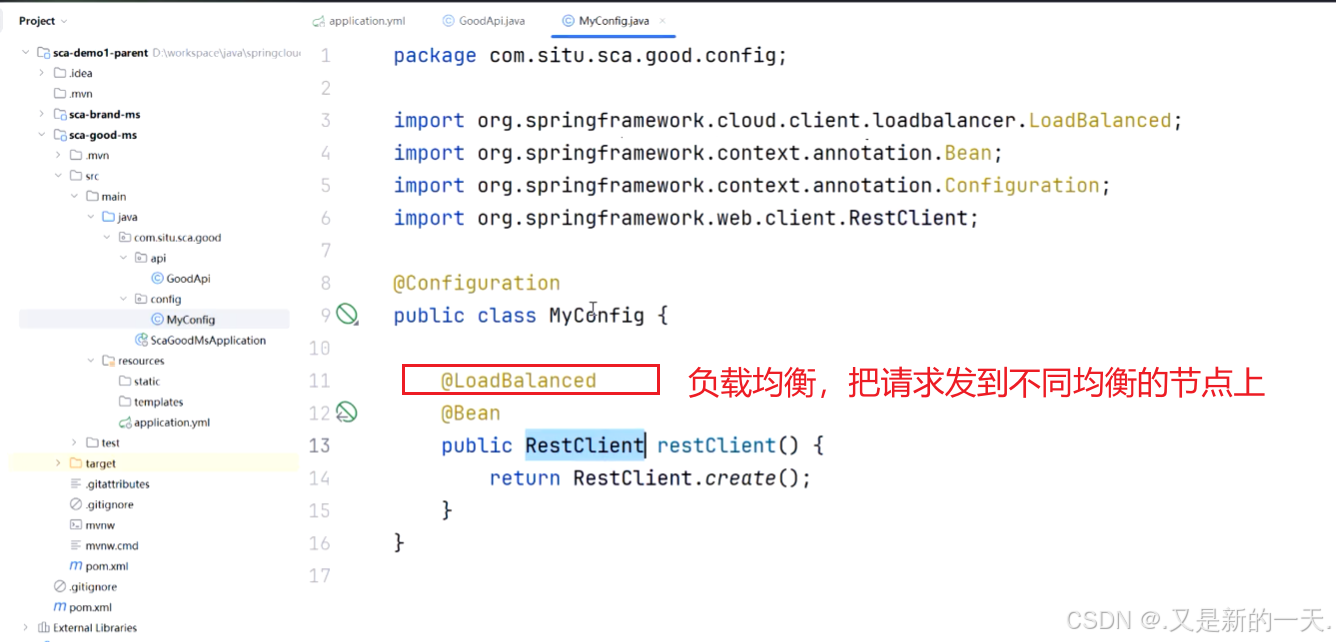
或者使用RestClient,以下是两种方式的示例:
package com.study.scagoodms.api;import org.springframework.beans.factory.annotation.Autowired;
import org.springframework.http.MediaType;
import org.springframework.http.ResponseEntity;
import org.springframework.web.bind.annotation.GetMapping;
import org.springframework.web.bind.annotation.RequestMapping;
import org.springframework.web.bind.annotation.RestController;
import org.springframework.web.client.RestClient;
import org.springframework.web.client.RestTemplate;
import java.util.Map;@RestController
@RequestMapping(value = "/api/v1/goods", produces = MediaType.APPLICATION_JSON_VALUE)
public class GoodApi {// RestTemplate:用于专门访问远程服务。访问rest请求定义的一个专门的工具类private RestTemplate restTemplate;private RestClient.Builder restClientBuilder;@Autowiredpublic void setRestTemplate(RestTemplate restTemplate) {this.restTemplate = restTemplate;}@Autowiredpublic void setRestClientBuilder(RestClient.Builder restClientBuilder) {this.restClientBuilder = restClientBuilder;}@SuppressWarnings("all")@GetMappingpublic ResponseEntity<Map> findById() {String url = "http://localhost:8080/api/v1/students/id/{id}";//ResponseEntity<Map> resp = restTemplate.getForEntity(url, Map.class, 50);Map<String, Object> map = restClientBuilder.build().get().uri(url, 50).retrieve().body(Map.class);return ResponseEntity.ok(map);}
}
但是上面是我们自己指定的端口号。比如有十个节点 ,我们使用 nacos可以自己去发现服务,不需要我们指定ip地址和 端口号,这就叫服务发现。
关于使用:
1.引入依赖 :
<!-- nacos的服务注册与发现 --><dependency><groupId>com.alibaba.cloud</groupId><artifactId>spring-cloud-starter-alibaba-nacos-discovery</artifactId></dependency>
2.配置
#nacos服务中心配置cloud:nacos:discovery:server-addr: localhost:8848username: nacospassword: 123456namespace: 1880fca8-2aaa-4811-bced-65da3fc805e5group: group1#微服务自身的ipip: 192.168.110.205port: 9002
如果只是发现别人,不需要写ip地址和端口号,如果不只是想发现别人,还想把自己注册到上面 去,就 需要写ip地址和端口号 ,另外,,注册还需要在启动 程序上面 添加注解@EnableDiscoveryClient。如果只是单纯想 发现 别人就不需要写这个注解了。
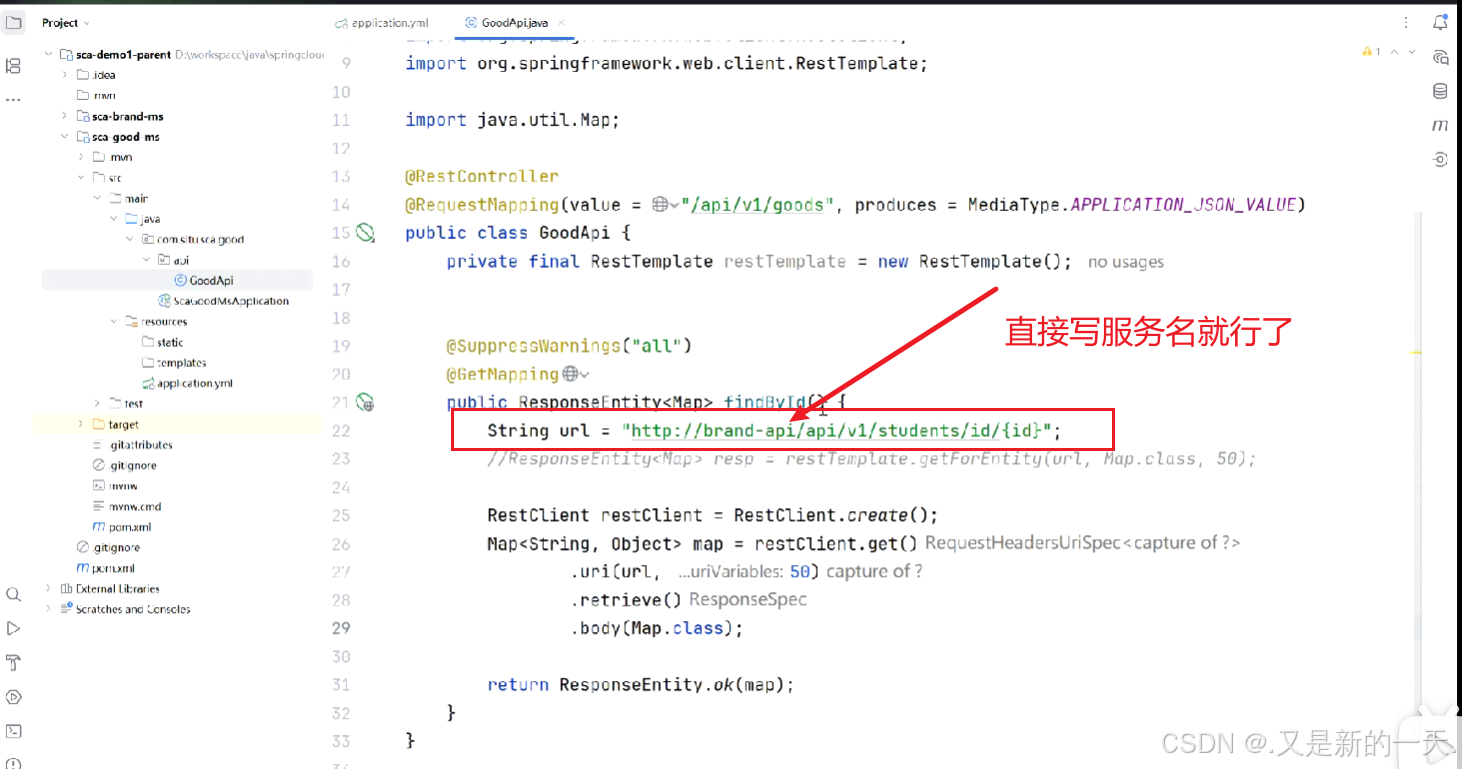
我们只需要指定服务名,至于 转发到哪个节点上面 ,由nacus帮我们 负载均衡 实现 ,我们不需要管 。
还需要额外配置负载的:
依赖 :
<!-- 负载均衡器:需要有缓存,所以也把缓存引入 --><dependency><groupId>org.springframework.cloud</groupId><artifactId>spring-cloud-starter-loadbalancer</artifactId></dependency><!--缓存--><dependency><groupId>com.github.ben-manes.caffeine</groupId><artifactId>caffeine</artifactId></dependency>
package com.study.scagoodms.api;import org.springframework.beans.factory.annotation.Autowired;
import org.springframework.http.MediaType;
import org.springframework.http.ResponseEntity;
import org.springframework.web.bind.annotation.GetMapping;
import org.springframework.web.bind.annotation.RequestMapping;
import org.springframework.web.bind.annotation.RestController;
import org.springframework.web.client.RestClient;
import org.springframework.web.client.RestTemplate;
import java.util.Map;@RestController
@RequestMapping(value = "/api/v1/goods", produces = MediaType.APPLICATION_JSON_VALUE)
public class GoodApi {// RestTemplate:用于专门访问远程服务。访问rest请求定义的一个专门的工具类private RestTemplate restTemplate;private RestClient.Builder restClientBuilder;//    @Autowired
//    public void setRestTemplate(RestTemplate restTemplate) {
//        this.restTemplate = restTemplate;
//    }@Autowiredpublic void setRestClientBuilder(RestClient.Builder restClientBuilder) {this.restClientBuilder = restClientBuilder;}@SuppressWarnings("all")@GetMappingpublic ResponseEntity<Map> findById() {String url = "http://brand-api/api/v1/students/id/{id}";ResponseEntity<Map> resp = restTemplate.getForEntity(url, Map.class, 50);Map<String, Object> map = restClientBuilder.build().get().uri(url, 50).retrieve().body(Map.class);return ResponseEntity.ok(map);}
}
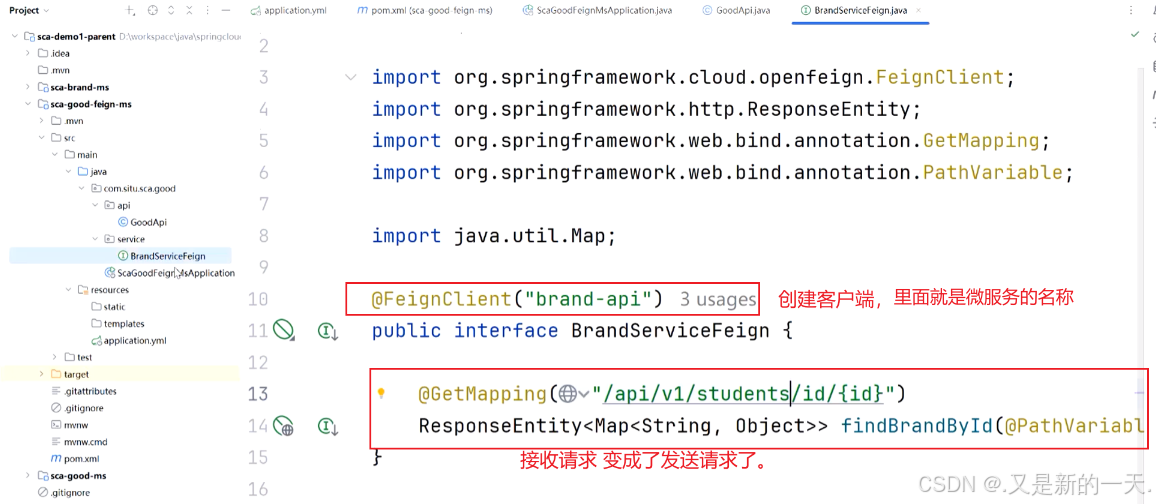
3.OpenFeign 调用 Nacos 微服务(推荐)
创建子项目,在子项目中添加父项目 ,在父项目里面引入 子项目,将二者关联,和以前操作的方式一样。
1.引入依赖 :在 pom 文件中引入依赖:
  <!--nacos的服务注册与发现-->
<dependency><groupId>com.alibaba.cloud</groupId><artifactId>spring-cloud-starter-alibaba-nacos-discovery</artifactId>
</dependency><!--用于远程服务调用,其功能类似于RestTemplate,但做了进一步抽象,定义接口即可自动调用-->
<dependency><groupId>org.springframework.cloud</groupId><artifactId>spring-cloud-starter-openfeign</artifactId>
</dependency><!--负载均衡,openfeign依赖loadbalancer-->
<dependency><groupId>org.springframework.cloud</groupId><artifactId>spring-cloud-starter-loadbalancer</artifactId>
</dependency><!--loadbalancer的缓存实现-->
<dependency><groupId>com.github.ben-manes.caffeine</groupId><artifactId>caffeine</artifactId>
</dependency>
2.配置
# 微服务的名字:很重要
spring:application:name: sca-good-feign# nacos服务中心配置:cloud:nacos:discovery:server-addr: localhost:8848username: nacospassword: 123456# 命名空间:idnamespace: 24d8cb0d-842e-4522-9529-d5bc69b38ef9group: group1#微服务自身的ip和端口,也可以注释掉让其自动探测获取ip: 192.168.110.205port: 9003# 数据库配置datasource:driver-class-name: com.mysql.cj.jdbc.Driverurl: jdbc:mysql://localhost:3306/students2025?characterEncoding=UTF-8&useSSL=false&autoReconnect=true&serverTimezone=Asia/Shanghai&allowPublicKeyRetrieval=trueusername: rootpassword: 123456# 微服务端口:
server:port: 9003
3.加注解
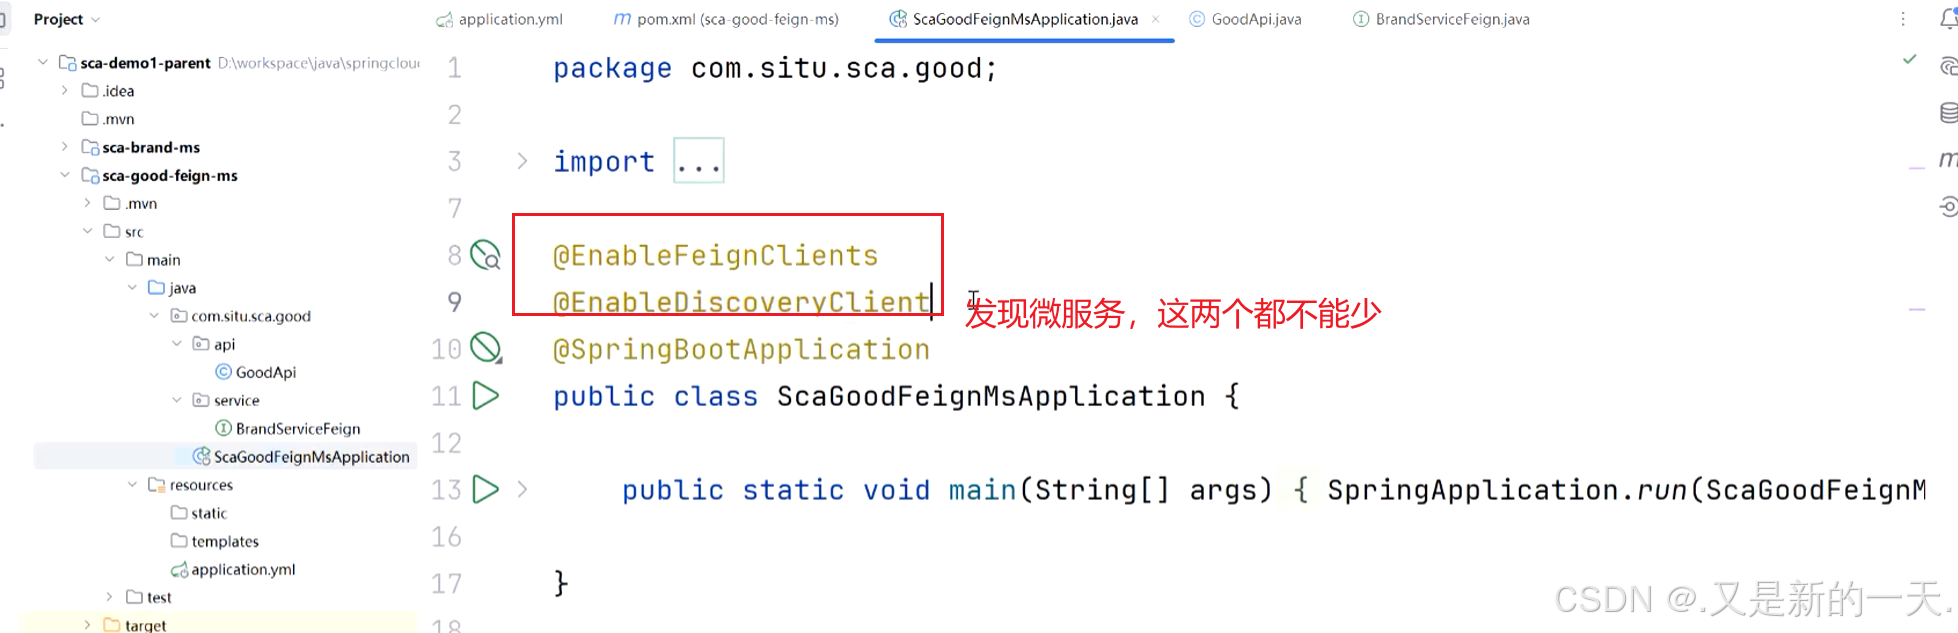
在主启动类上或配置类上添加@EnableFeignClients注解,表示启用 Feign 客户端。
注意:如果 @EnableFeignClients 声明在主启动类上,则默认递归扫描所有子包。如果是声明在配置类在,则需手动指定要扫描的包(basePackages 属性)。
/*** 注意:如果@EnableFeignClients定义在主启动类,则默认递归扫描所有子包。* 如果是定义在配置类,则需手动指定要扫描的包(basePackages 属性)。*/
@EnableFeignClients
@EnableDiscoveryClient(autoRegister = false)
@SpringBootApplication
public class ScaNacosServiceConsumerOpenfeignApplication {public static void main(String[] args) {SpringApplication.run(ScaNacosServiceConsumerOpenfeignApplication.class, args);}
}
4.测试调用
知识图