Flutter - UI布局
一、容器Widget
1. Scaffold
Scaffold 作为页面的脚手架,基础区域包含顶部导航栏 appBar、主体内容区 body、侧边抽屉 drawer、悬浮按钮 floatingActionButton、底部导航栏 bottomNavigationBar。
Scaffold(appBar: AppBar( // 顶部导航栏title: Text('首页'),),body: Center( // 主体child: Text('页面内容'),),drawer: Drawer( // 侧边栏child: ListView(children: [ListTile(title: Text('设置'))]),),floatingActionButton: FloatingActionButton( // 悬浮按钮child: Icon(Icons.add),tooltip: '悬浮按钮',onPressed: () {}, ),bottomNavigationBar:  BottomNavigationBar( // 底部导航栏items: [BottomNavigationBarItem(icon: Icon(Icons.home), label: '首页')],onTap: (index) {},),
)
2. Container
Container 是一个多功能容器,它通过组合多种基础功能(尺寸控制、边距、装饰、对齐等)简化复杂 UI 的实现。
Container(width: 160, height: 40, // 宽高padding:  EdgeInsets.symmetric(horizontal: 6), // 内边距alignment: Alignment.topLeft, // 顶部|左侧对齐color: Colors.white, // 背景色(与 decoration互斥)decoration: BoxDecoration( // 装饰组合(背景色、圆角、阴影等)color: Colors.black12,borderRadius: BorderRadius.circular(6),),child: Text("容器") // 子组件
)
二、布局Widget
1. Row
Row 用于水平排列子组件,通过主轴(水平方向)和交叉轴(垂直方向)控制子组件的排列方式。
Row(mainAxisAlignment: MainAxisAlignment.center, // 水平居中(默认值:start)crossAxisAlignment: CrossAxisAlignment.start, // 顶部对齐(默认值:center)textDirection: TextDirection.ltr, // 从左到右spacing: 6, // 间距children: [ // 子组件Expanded(flex: 1, child: Container(color: Colors.gray)), // 占1/3空间Expanded(flex: 2, child: Container(color: Colors.blue)), // 占2/3空间]
)
2. Column
Column 用于垂直排列子组件,通过主轴(垂直方向)和交叉轴(水平方向)控制子组件的排列方式。
Column(mainAxisAlignment: MainAxisAlignment.center, // 垂直居中(默认值:start)crossAxisAlignment: CrossAxisAlignment.start, // 左侧对齐(默认值:center)verticalDirection: VerticalDirection.down, // 从上到下spacing: 6, // 间隔children: [ // 子组件Expanded(flex: 2, child: Container(color: Colors.gray)), // 占2/3空间Expanded(flex: 1, child: Container(color: Colors.blue)), // 占1/3空间]
)
3. Stack
Stack 用于实现层叠布局,允许子组件按绘制顺序(从底部到顶部)堆叠在一起。
Stack(alignment: AlignmentDirectional.bottomStart, // 底部|左侧对齐(默认值:topStart)textDirection: TextDirection.ltr, // 从左到右children: [Container(height: 44, color: Colors.blue), // 设置高度、背景色Positioned(top: 10, left: 10, width: 20, height: 20, child: Icon(Icons.star)), // 定位组件Positioned.fill(child: Container(color: Color(0x33000000))), // 半透明遮罩],
)
4. Flex
Flex 用于创建弹性布局的核心组件,它通过主轴(main axis)和交叉轴(cross axis)控制子组件的排列方式。
Flex(direction: Axis.horizontal, // 水平方向spacing: 20, // 间距children: [ Flexible(flex: 1, child: Container(color: Colors.grey)), // 填充剩余空间Expanded(flex: 2, child: Container(color: Colors.red)), // 强制填满剩余空间],
)
5. SizedBox
SizedBox 用于精确控制尺寸,它既能约束子组件尺寸,也能作为空白占位符使用。
SizedBox(width: 180, height: 40, // 宽高child: Center(child: Text('精准宽高'),),
)Row(children: [SizedBox(width: 20), // 空白占位符Text('水平排列'),],
)
6. Align
Align 用于控制子组件在父容器中的位置。
Align(Alignment: Alignment.topLeft,child: Text('左侧|顶部对齐'),
)
7. Center
Center 用于控制子组件的水平|垂直居中。
Center(child: Text('水平|垂直居中'),
)
8. Padding
Padding 用于控制子组件内边距,通过在子组件周围添加空白区域来调整布局间距。
Padding(padding: EdgeInsets.all(8), child: Text('带内边距的文本'),
)
三、滚动Widget
1. SingleChildScrollView
SingleChildScrollView 用于包裹单个子组件的滚动容器,支持垂直或水平方向的滚动。
SingleChildScrollView(scrollDirection: Axis.vertical, // 纵向滚动physics: BouncingScrollPhysics(), // 边界回弹child: Container(height: 1000),
)
2. ListView
ListView 用于创建可滚动列表的核心组件,它可以高效地显示线性排列的数据项,支持垂直或水平滚动。
ListView( // 静态列表padding: EdgeInsets.symmetric(vertical: 10),children: [ListTile(title: Text('List')),Container(height: 50,alignment: Alignment.centerLeft,padding: EdgeInsets.symmetric(horizontal: 20),child: Text('Row 1'),),],
)
ListView.builder( // 动态列表itemCount: 20,itemBuilder: (context, index) {return Container(height: 50,alignment: Alignment.centerLeft,padding: EdgeInsets.symmetric(horizontal: 20),child: Text('Row ${index+1}'),);},
)
ListView.separated( // 动态列表(设置分隔线)itemCount: 20,separatorBuilder: (context, index) => Divider(height: 1),itemBuilder: (context, index) {return Container(height: 50,alignment: Alignment.centerLeft,padding: EdgeInsets.symmetric(horizontal: 20),child: Text('Row ${index+1}'),);},
)
3. GridView
GridView 用于创建网格布局,它可以在二维空间中排列子组件,支持垂直或水平滚动。
GridView( // 静态网格gridDelegate: SliverGridDelegateWithFixedCrossAxisCount(crossAxisCount: 3, // 每行3列crossAxisSpacing: 10, // 列间距mainAxisSpacing: 10, // 行间距childAspectRatio: 0.7 // 宽高比),children: [Image.asset('images/image_1.png'),Image.asset('images/image_2.png'),...],
)
GridView.count( // 静态网格crossAxisCount: 3, // 每行3列crossAxisSpacing: 10, // 列间距mainAxisSpacing: 10, // 行间距childAspectRatio: 0.7 // 宽高比children: [Image.asset('images/image_1.png'),Image.asset('images/image_2.png'),...],
)
GridView.builder( // 动态网格gridDelegate: SliverGridDelegateWithFixedCrossAxisCount(crossAxisCount: 3, // 每行3列crossAxisSpacing: 10, // 列间距mainAxisSpacing: 10, // 行间距childAspectRatio: 0.7 // 宽高比),itemBuilder: (BuildContext context, int index) {return Image.asset('images/image_${index+1}.png');}
)
四、内容Widget
1. Text
Text 用于文本内容的显示,提供了丰富的文本样式控制能力。
Text('文本内容',style: TextStyle(color: Color(0xFF333333), fontSize: 18), // 文本样式textAlign: TextAlign.left, // 文本对齐方式overflow: TextOverflow.ellipsis, // 溢出处理方式maxLines: 3, // 最高行数
)
2. TextField
TextField 用于文本输入,它提供了强大的文本输入、编辑和验证功能。
TextField(controller: TextEditingController(text: '123456'), // 管理文本内容decoration: InputDecoration( // 内容装饰hintText: '请输入密码',hintStyle: TextStyle(fontWeight: FontWeight.normal),),style: TextStyle(fontSize: 20, fontWeight: FontWeight.bold), // 样式keyboardType: TextInputType.phone, // 键盘类型textInputAction: TextInputAction.done, // 完成按钮obscureText: false, // 是否隐藏内容onChanged: (value) { }, // 文本变化回调onSubmitted: (value) { }, // 提交回调onEditingComplete: () { }, // 编辑完成回调
)
3. Image
Image 用于图片内容的展示,支持从多种来源加载图片(本地资源、网络、内存字节等)。
3.1 在工程的 pubspec.yaml 中配置 assets 路劲。
3.2 用 Image.asset 展示内置 images 图片。
Image.asset('images/logo.png',width: 120, height: 40,fit: BoxFit.fill, // 拉伸填充
)
3.2 用 Image.network 展示网络 URL 图片。
Image.network('http://gips2.baidu.com/it/u=195724436,3554684702&fm=3028&app=3028&f=JPEG&fmt=auto?w=1280&h=960',width: 300,height: 100,fit: BoxFit.cover, // 比例填充)五、手势Widget
1. GestureDetector
GestureDetector 用于添加各种手势事件,包含点击、长按、拖拽、缩放等手势操作。
GestureDetector(onTap: () => print('单击'),onDoubleTap: () => print('双击'),onLongPress: () => print('长按'),child: Padding(padding: EdgeInsets.symmetric(horizontal: 30, vertical: 15),child: Text('手势交互'),),
)
2. InkWell
InkWell 用于添加触摸事件,它提供了单击、长按等交互的视觉反馈,实现墨水涟漪效果必须包裹在 Material 组件内。
Material( // 添加Material层child: InkWell(onTap: () => print('单击'),onDoubleTap: () => print('双击'),onLongPress: () => print('长按'),splashColor: Color(0x22333333), // 飞溅颜色highlightColor: Color(0x44333333), // 高亮颜色child: Padding(padding: EdgeInsets.symmetric(horizontal: 20, vertical: 10),child: Text('点击 - 墨水涟漪效果'),),),
)六、按钮Widget
1. ElevatedButton
ElevatedButton 是凸起按钮,适用于主要操作、表单提交。
ElevatedButton(onPressed: () => print('点击'),child: Text('凸起按钮', style: TextStyle(fontSize: 20, color: Colors.white)),style: ElevatedButton.styleFrom(backgroundColor: Color(0xFF52d0c2), // 背景色elevation: 3, // 阴影高度shape: RoundedRectangleBorder(borderRadius: BorderRadius.circular(20), // 圆角),padding: EdgeInsets.symmetric(horizontal: 30, vertical: 15), // 内边距),
)
2. TextButton
TextButton 是扁平化文本按钮,适用于次要操作、对话框选项和链接式操作。
TextButton(onPressed: () => print('点击'),child: Text('文本按钮', style: TextStyle(fontSize: 20, color: Colors.white)),style: TextButton.styleFrom(backgroundColor: Colors.black, // 背景色padding: EdgeInsets.symmetric(horizontal: 30, vertical: 15), // 内边距),
)
3. FilledButton
FilledButton 是实心填充背景的按钮,介于 ElevatedButton 和 TextButton 之间。
FilledButton(onPressed: () => print('点击'),child: Text('填充按钮', style: TextStyle(fontSize: 20, color: Colors.white)),style: FilledButton.styleFrom(elevation: 3, // 阴影高度backgroundColor: Colors.black, // 背景色padding: EdgeInsets.symmetric(horizontal: 30, vertical: 15), // 内边距),
)
4. OutlinedButton
OutlinedButton 是带边框按钮,通过边框强调按钮形状,同时保持背景透明。
OutlinedButton(onPressed: () => print('点击'),child: Text('带边框按钮', style: TextStyle(fontSize: 20, color: Colors.black)),style: OutlinedButton.styleFrom(side: BorderSide(width: 1, color: Colors.black), // 边框属性backgroundColor: Colors.white, // 背景色padding: EdgeInsets.symmetric(horizontal: 30, vertical: 15), // 内边距),
),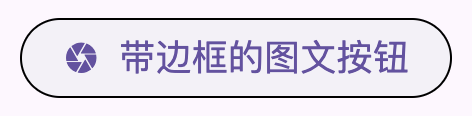
OutlinedButton(onPressed: () => print('点击'),child: SizedBox(width: 196,child: Row(mainAxisAlignment: MainAxisAlignment.center,spacing: 10,children: [Icon(Icons.camera) , Text('带边框的图文按钮', style: TextStyle(fontSize: 18))],),),style: OutlinedButton.styleFrom(side: BorderSide(width: 1, color: Colors.black),backgroundColor: Colors.white, // 背景色padding: EdgeInsets.symmetric(horizontal: 0, vertical: 15), // 内边距),
)