【踩坑笔记】50系显卡适配的 PyTorch 安装
1. 前提
PyTorch 支持的 windows 版本和 Python 版本。
-
Windows 7 及以上版本;推荐使用 Windows 10 及以上版本。
-
Windows Server 2008 R2 及以上版本
-
Windows 上的 PyTorch 仅支持 Python 3.9-3.12;不支持 Python 2.x
需要注意:
-
50系显卡需 cuda 安装 12.8 以上版本。
-
作为参考,我的 GPU 配置:NVIDIA GeForce RTX 5070 Ti Laptop GPU ,安装 12.9 版本可以正常兼容 PyTorch。之前安装 12.6 版本存在兼容性问题。
1.1 建议
为了避免 C盘 占用过高,建议配置 pip 或者 uv 缓存目录。
系统环境变量中配置:
# pip,缓存路径配置成自己的
PIP_CACHE_DIR = D:\workspace\packages\pip_cache
# uv
UV_CACHE_DIR = D:\workspace\packages\uv_cache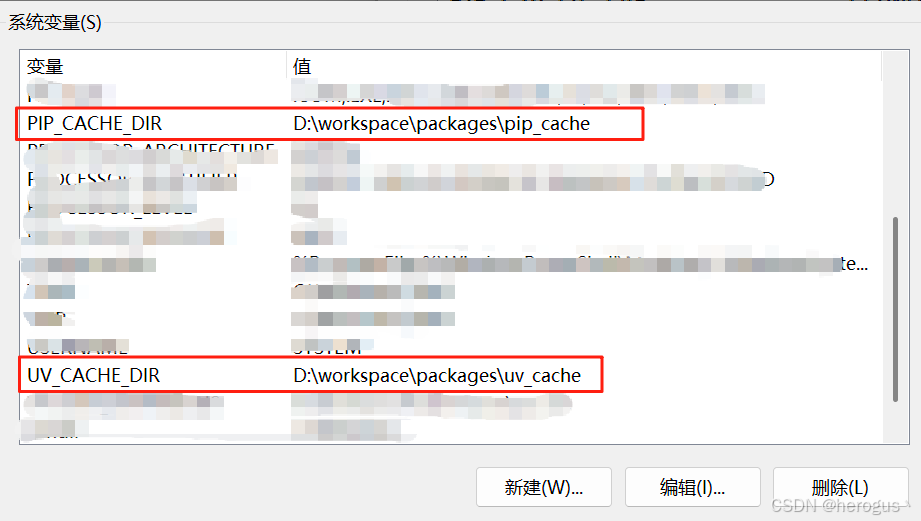
验证:
# pip,查看缓存目录
pip cache dir
# uv
uv cache dir
2. 安装
根据个人电脑 GPU 支持的 cuda 最高版本,下载指定的 PyTotch 版本。
PyTorch 最新版本对应 cuda 参考: Get Started
PyTorch 旧版本对应 cuda 参考:Previous PyTorch Versions
2.1 查看 cuda 版本
首先查看本机支持的 cuda 最高版本。
nvidia-smi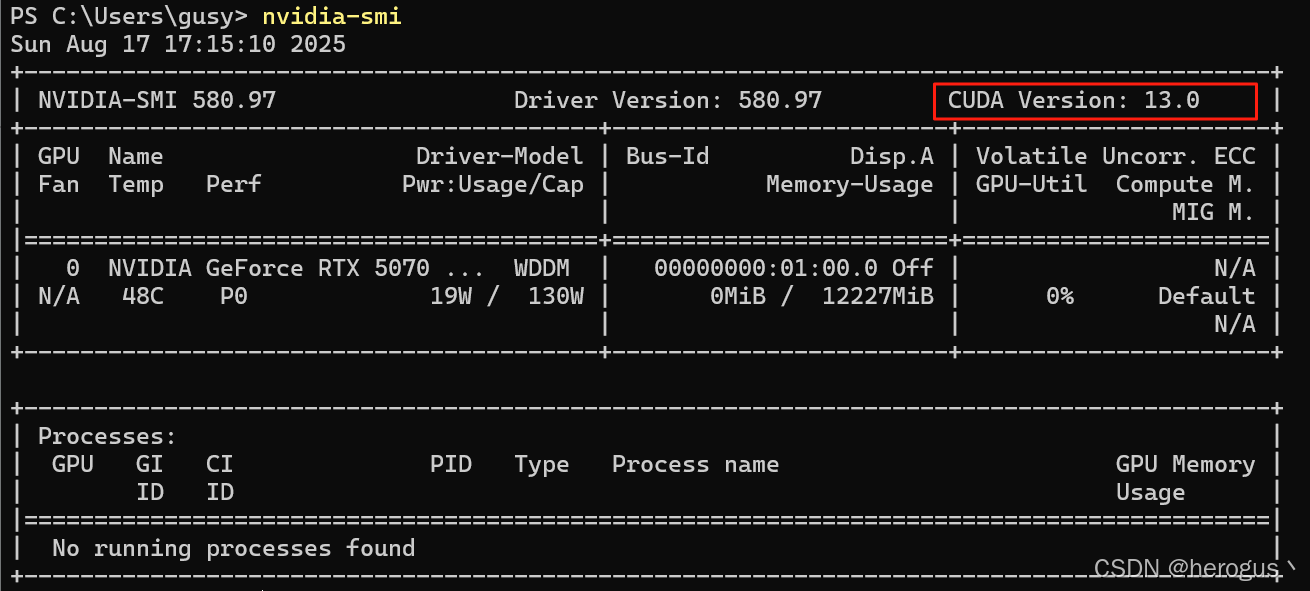
查看本机安装版本,我的 cuda 版本是 12.9,PyTorch 需要下载兼容 12.9 的版本。
nvcc --version
2.2 查看Pytorch是否已安装
查看 PyTorch 版本
# pip
pip show torch
# uv
uv pip show torch
删除 PyTorch (先执行目录 2.5 代码验证安装,如果出现兼容性问题,执行删除,然后按以下步骤重新安装)
# pip
pip uninstall torch torchvision torchaudio -y
# uv
uv pip uninstall torch torchvision torchaudio
2.3 安装 cuda
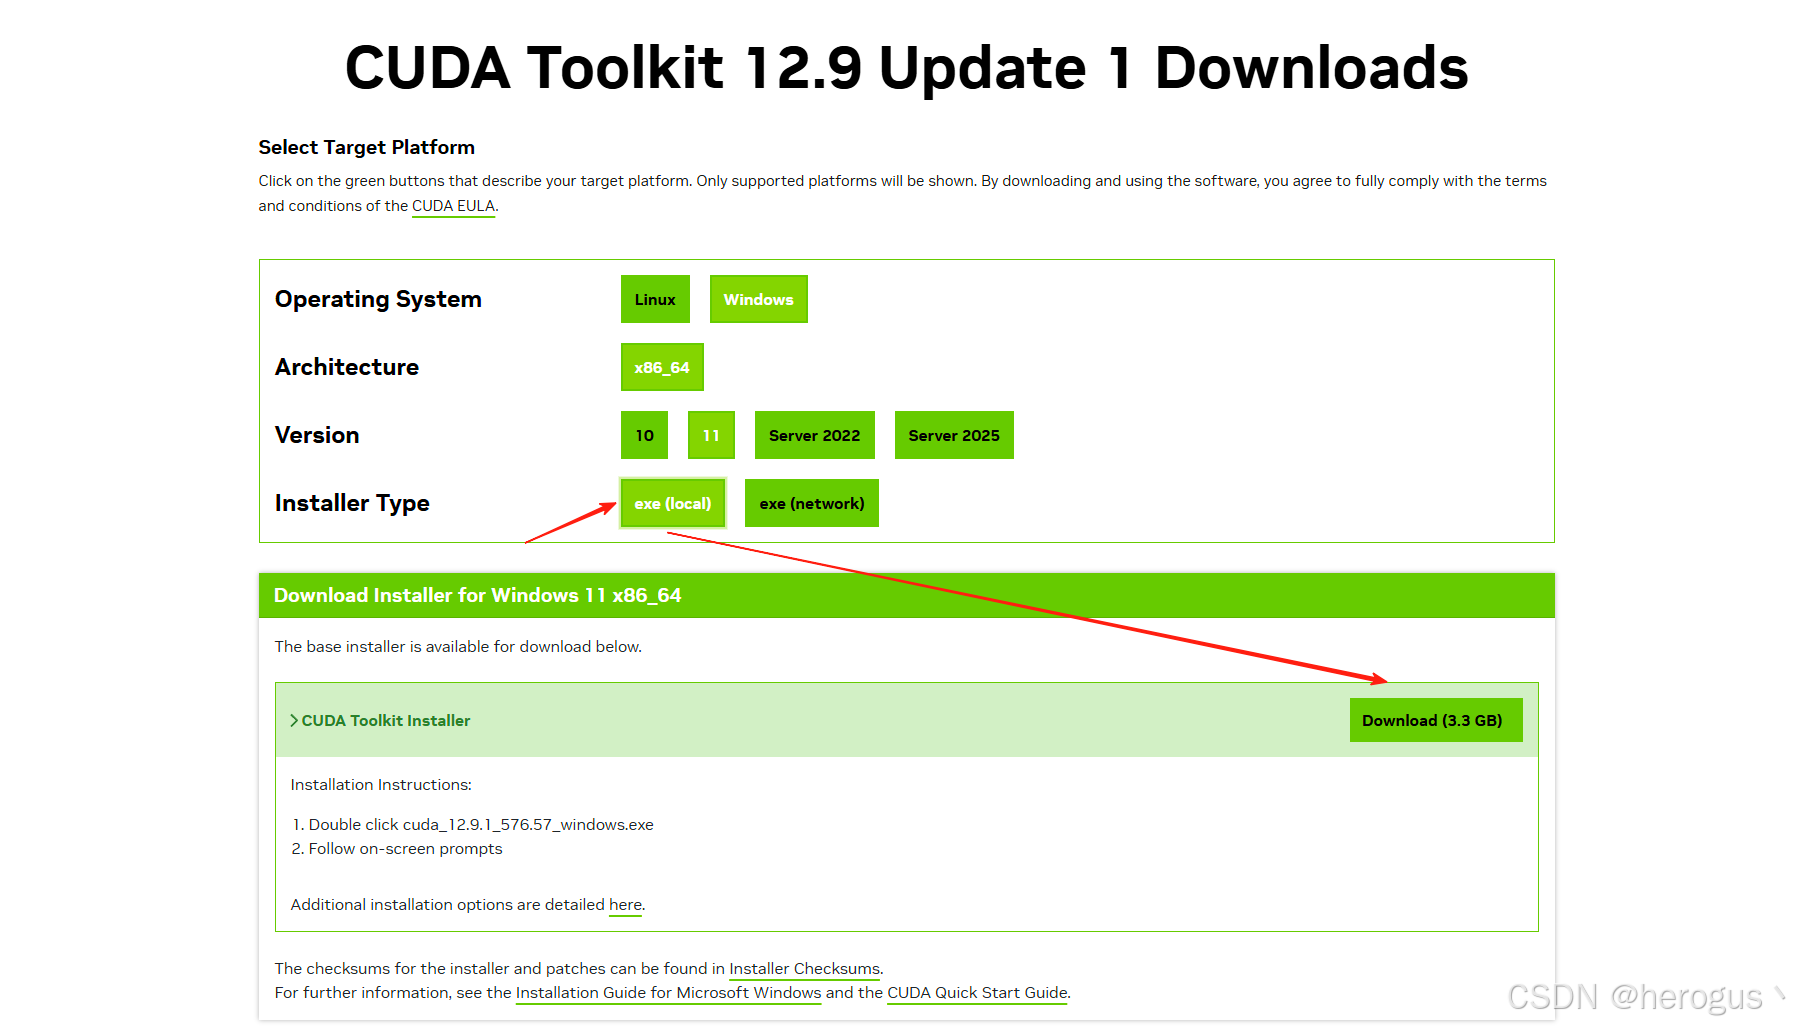
如果没有安装,进入官网下载:CUDA Toolkit 13.0 Downloads | NVIDIA Developer
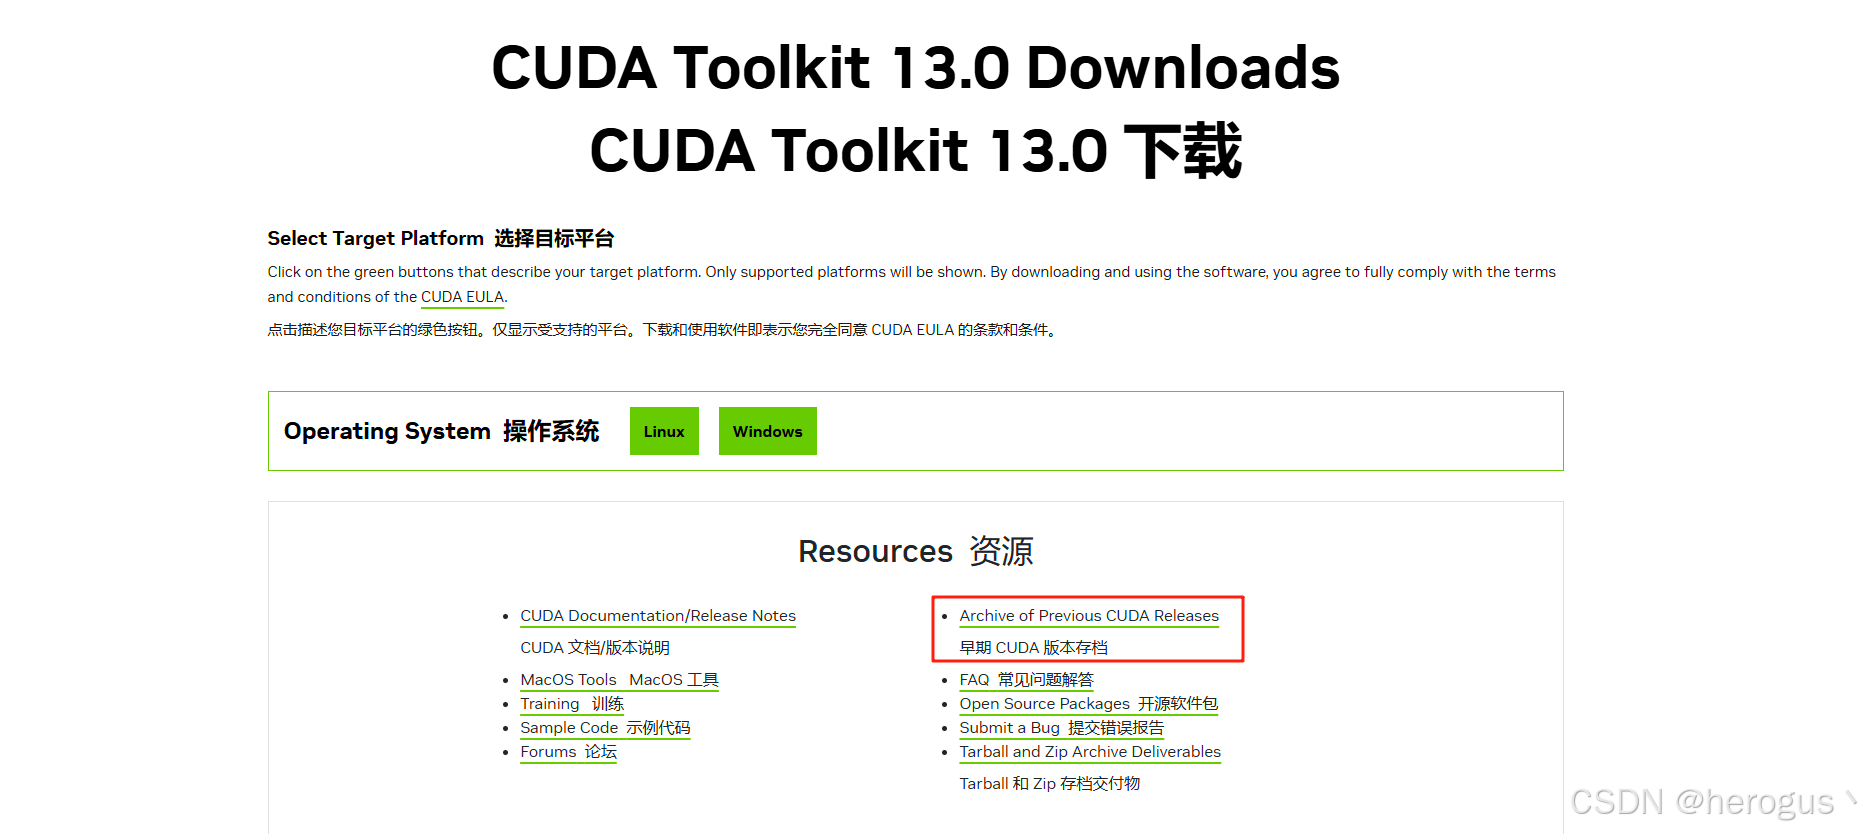
根据自己的 gpu 选择是的版本。
2.4 安装 PyTorch
根据 cuda 版本下载 pytorch,PyThorch 官网
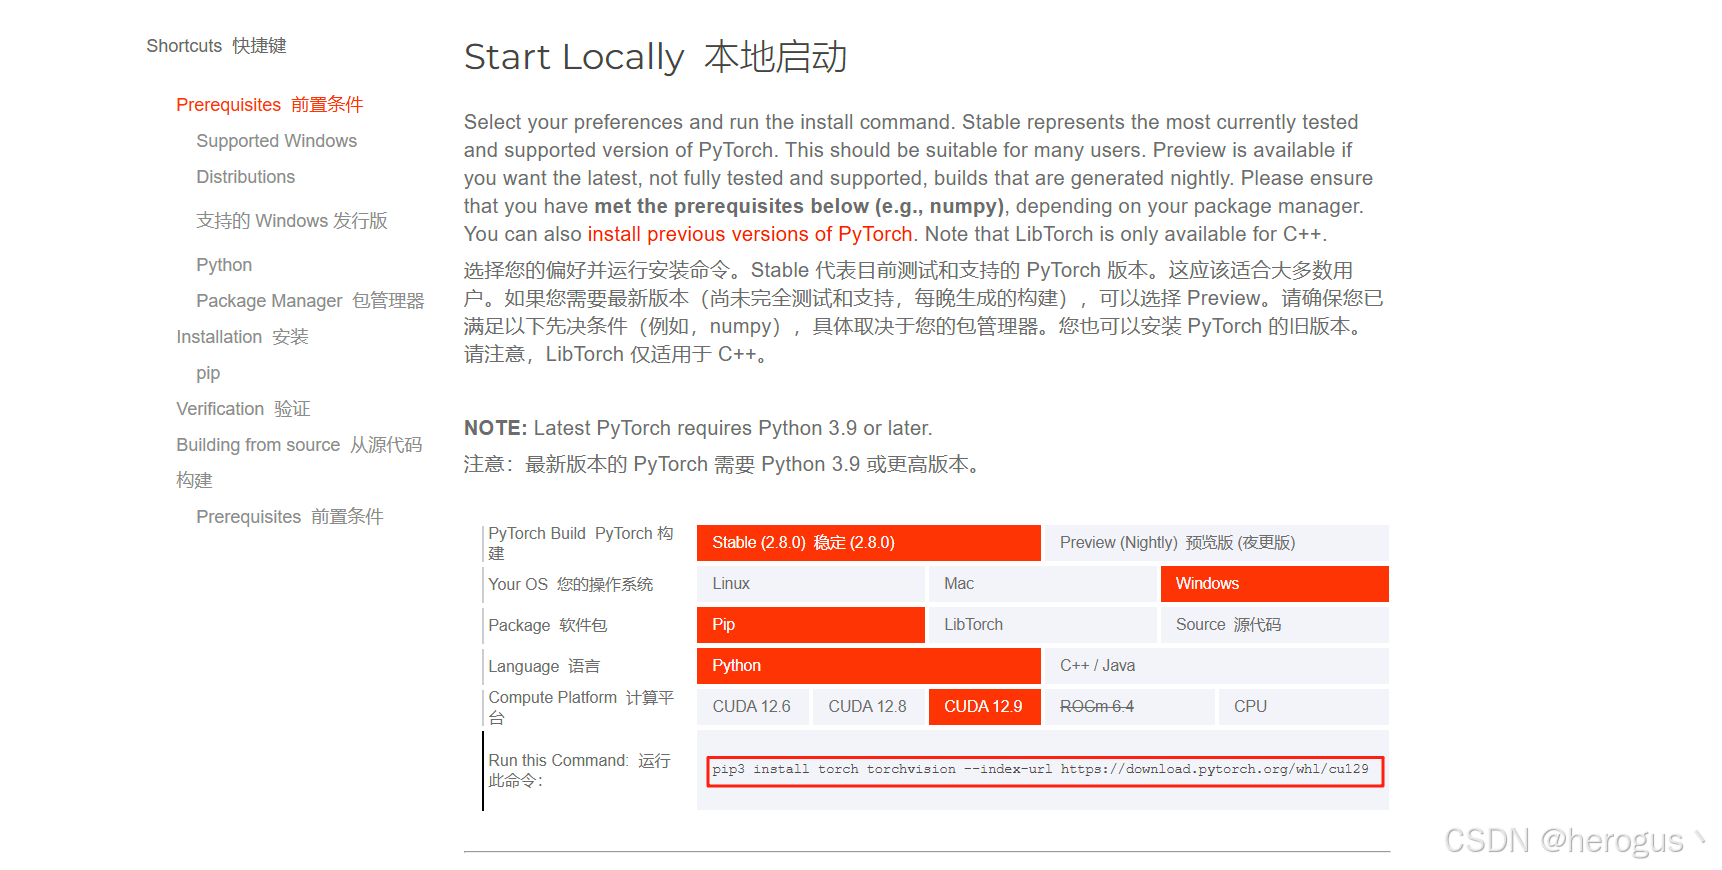
复制圈住的命令,安装与 cuda 对应的版本。
# pip
pip3 install torch torchvision --index-url https://download.pytorch.org/whl/cu129
# uv
uv pip install torch torchvision --index-url https://download.pytorch.org/whl/cu129
2.5 验证安装
执行一下 Python 代码验证
import torch
import torchvisionprint(f"PyTorch 版本: {torch.__version__}")
print(f"Torchvision 版本: {torchvision.__version__}")# 检查 CUDA 可用性
print(f"CUDA 可用: {torch.cuda.is_available()}")
if torch.cuda.is_available():print(f"CUDA 版本: {torch.version.cuda}")print(f"GPU 数量: {torch.cuda.device_count()}")print(f"当前 GPU: {torch.cuda.get_device_name(0)}")# 创建简单张量测试
x = torch.randn(3, 4)
print(f"测试张量: {x}")# GPU 测试(如果可用)
if torch.cuda.is_available():x_gpu = x.cuda()print(f"GPU 张量: {x_gpu.device}")
GPU 性能测试:
import torch
import time
import numpy as npdef comprehensive_gpu_test():""" GPU 综合性能测试"""print("=== GPU 性能测试 ===\n")device = torch.device("cuda")print(f"测试设备: {torch.cuda.get_device_name(0)}")print(f"显存总量: {torch.cuda.get_device_properties(0).total_memory / 1024 ** 3:.1f} GB")print(f"CUDA 版本: {torch.version.cuda}")print(f"PyTorch 版本: {torch.__version__}\n")# 1. 基础矩阵运算性能print("1. 矩阵运算性能测试:")sizes = [1024, 2048, 4096, 8192]for size in sizes:# GPU 测试a = torch.randn(size, size, device=device)b = torch.randn(size, size, device=device)# 预热for _ in range(3):_ = torch.mm(a, b)torch.cuda.synchronize()# 正式测试start_time = time.time()for _ in range(10):result = torch.mm(a, b)torch.cuda.synchronize()end_time = time.time()avg_time = (end_time - start_time) / 10 * 1000  # msflops = 2 * size ** 3 * 10  # 10次操作的总FLOPStflops = flops / (end_time - start_time) / 1e12print(f"   {size}x{size}: {avg_time:.2f} ms/次, {tflops:.2f} TFLOPS")# 2. 混合精度测试print("\n2. 混合精度 (FP16) 测试:")size = 4096a_fp32 = torch.randn(size, size, device=device)b_fp32 = torch.randn(size, size, device=device)a_fp16 = a_fp32.half()b_fp16 = b_fp32.half()# FP32torch.cuda.synchronize()start = time.time()result_fp32 = torch.mm(a_fp32, b_fp32)torch.cuda.synchronize()fp32_time = time.time() - start# FP16torch.cuda.synchronize()start = time.time()result_fp16 = torch.mm(a_fp16, b_fp16)torch.cuda.synchronize()fp16_time = time.time() - startspeedup = fp32_time / fp16_timeprint(f"   FP32: {fp32_time * 1000:.2f} ms")print(f"   FP16: {fp16_time * 1000:.2f} ms")print(f"   FP16 加速比: {speedup:.2f}x")# 3. 深度学习模拟测试print("\n3. 深度学习模拟测试:")# 模拟卷积网络conv_layers = [torch.nn.Conv2d(3, 64, 3, padding=1),torch.nn.Conv2d(64, 128, 3, padding=1),torch.nn.Conv2d(128, 256, 3, padding=1),torch.nn.Conv2d(256, 512, 3, padding=1),]for layer in conv_layers:layer = layer.to(device)batch_sizes = [1, 8, 16, 32]input_size = 224for batch_size in batch_sizes:x = torch.randn(batch_size, 3, input_size, input_size, device=device)torch.cuda.synchronize()start = time.time()# 前向传播for layer in conv_layers:x = layer(x)x = torch.relu(x)x = torch.max_pool2d(x, 2)torch.cuda.synchronize()end = time.time()throughput = batch_size / (end - start)print(f"   Batch size {batch_size:2d}: {(end - start) * 1000:.2f} ms, {throughput:.1f} imgs/sec")# 4. 内存带宽测试print("\n4. 显存带宽测试:")sizes_mb = [100, 500, 1000, 2000]for size_mb in sizes_mb:elements = size_mb * 1024 * 1024 // 4  # float32data = torch.randn(elements, device=device)torch.cuda.synchronize()start = time.time()# 内存复制测试for _ in range(10):data_copy = data.clone()torch.cuda.synchronize()end = time.time()bandwidth = (size_mb * 10 * 2) / (end - start) / 1024  # GB/s (读+写)print(f"   {size_mb} MB: {bandwidth:.1f} GB/s")# 5. Transformer 模拟测试print("\n5. Transformer 注意力机制测试:")seq_lengths = [512, 1024, 2048]d_model = 768num_heads = 12for seq_len in seq_lengths:# 模拟多头注意力batch_size = 8q = torch.randn(batch_size, num_heads, seq_len, d_model // num_heads, device=device)k = torch.randn(batch_size, num_heads, seq_len, d_model // num_heads, device=device)v = torch.randn(batch_size, num_heads, seq_len, d_model // num_heads, device=device)torch.cuda.synchronize()start = time.time()# 注意力计算scores = torch.matmul(q, k.transpose(-2, -1)) / np.sqrt(d_model // num_heads)attn_weights = torch.softmax(scores, dim=-1)output = torch.matmul(attn_weights, v)torch.cuda.synchronize()end = time.time()print(f"   序列长度 {seq_len}: {(end - start) * 1000:.2f} ms")def memory_stress_test():"""显存压力测试"""print("\n=== 显存压力测试 ===")device = torch.device("cuda")total_memory = torch.cuda.get_device_properties(0).total_memory / 1024 ** 3print(f"显卡总显存: {total_memory:.1f} GB")# 逐步增加显存使用tensors = []allocated_gb = 0try:while allocated_gb < total_memory * 0.9:  # 使用90%显存# 每次分配 100MBtensor = torch.randn(100 * 1024 * 1024 // 4, device=device)tensors.append(tensor)allocated_gb += 0.1current_allocated = torch.cuda.memory_allocated() / 1024 ** 3print(f"\r已分配显存: {current_allocated:.1f} GB", end="", flush=True)except RuntimeError as e:if "out of memory" in str(e):print(f"\n显存不足,最大可用: {torch.cuda.memory_allocated() / 1024 ** 3:.1f} GB")else:print(f"\n错误: {e}")# 清理显存del tensorstorch.cuda.empty_cache()print(f"\n显存已清理")if __name__ == "__main__":if torch.cuda.is_available():comprehensive_gpu_test()memory_stress_test()print(f"\n🎉 性能测试完成!")else:print("❌ CUDA 不可用")