Orange的运维学习日记--40.LNMP-LAMP架构最佳实践
Orange的运维学习日记–40.LNMP-LAMP架构最佳实践
组件组成
LAMP 与 LNMP 均以 Linux 系统为基础,区别在于所选的 Web 服务器组件不同
LAMP 架构
- Linux:操作系统,提供稳定可靠的运行环境
- Apache:模块化 Web 服务器,易于扩展
- MySQL/MariaDB:关系型数据库,支持事务及高可用方案
- PHP/Python/Perl:脚本语言,负责动态页面生成
LNMP 架构
- Linux:操作系统
- Nginx:高性能轻量级 Web 服务器,擅长并发连接
- MySQL/MariaDB:关系型数据库
- PHP/Python/Perl:脚本语言
PHP-FPM 简介
PHP-FPM(FastCGI Process Manager)是管理 PHP 进程池的扩展模块
它通过维护多个独立进程池来处理请求,支持动态进程调整、超时控制、日志记录和平滑重启
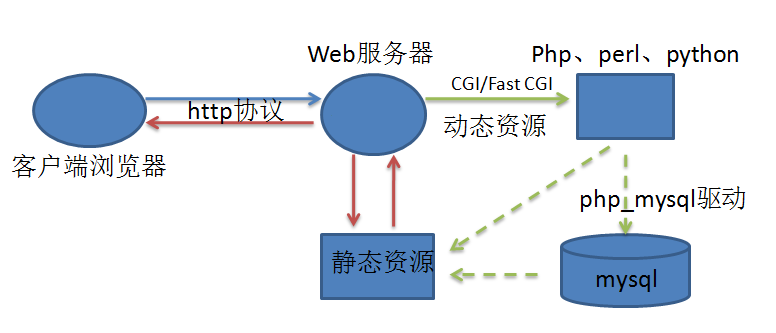
LAMP/LNMP 工作原理
客户端通过 HTTP 向 Web 服务器发起请求
Web 服务器解析请求后分发处理
- 静态资源:直接返回文件给客户端
- 动态资源:通过模块或 FastCGI 将请求转发给后端脚本解释器
- 在 LNMP 场景下由 PHP-FPM 接收 FastCGI 请求
- 脚本解释器执行页面逻辑,如需读写数据库则通过 MySQL 连接器交互
- 将渲染结果返回给 Web 服务器
Web 服务器汇总结果并响应客户端
PHP 与 Web 协同工作模式
CGI 模式
每个动态请求都会启动独立脚本解释器
开销较大,性能最差
Modules 模式
脚本引擎以模块形式嵌入到 Web 服务器进程
减少启动销毁开销,性能提升明显
FastCGI 模式
解释器以独立进程池运行
使用 Unix 域套接字或 TCP/IP 通信
前后端彻底分离,适应高并发场景
All-in-One 部署示例
以 WordPress 部署为例,所有组件运行在同一台主机上
实验环境
| 主机名 | IP 地址 | 角色 |
|---|---|---|
| blog.example.com | 10.1.8.10 | All-in-One 节点 |
部署数据库
安装并启动 MariaDB 服务
yum install -y mariadb-server
systemctl enable --now mariadb
firewall-cmd --permanent --add-service=mysql
firewall-cmd --reload
mysql_secure_installation
通过交互完成以下安全配置
- 为 root 用户设置密码,例如 rootpass
- 禁止 root 远程登录
- 删除匿名用户
- 删除测试数据库
创建 WordPress 专用数据库与用户
mysql -uroot -p
CREATE DATABASE wordpress;
CREATE USER 'wp'@'%' IDENTIFIED BY 'Example@123';
GRANT ALL PRIVILEGES ON wordpress.* TO 'wp'@'%';
FLUSH PRIVILEGES;
exit
部署 Nginx 服务
yum install -y nginx
echo 'Hello World !' > /usr/share/nginx/html/index.html
systemctl enable --now nginx
部署 PHP 服务
安装 PHP、PHP-FPM 与 MySQL 扩展
yum install -y php php-fpm php-mysqlnd
systemctl enable --now php-fpm
在 /etc/nginx/default.d/php.conf 添加 PHP 支持
location ~ \.php$ {try_files $uri =404fastcgi_pass 127.0.0.1:9000fastcgi_index index.phpfastcgi_param SCRIPT_FILENAME $document_root$fastcgi_script_nameinclude fastcgi_params
}
重启 Nginx
systemctl restart nginx
测试 PHP 环境
创建测试脚本并移动到 Web 根目录
cat > index.php <<EOF
<?php
echo "<h1>Hello World !</h1>\n";
?>
EOFcat > test-mysql.php <<EOF
<?php
\$link = mysqli_connect('10.1.8.10','wp','Example@123');
if(\$link) echo "<h1>Connect Mysql Success !</h1>\n"; else echo "<h1>Connect Mysql Failed !</h1>\n";
\$link->close();
?>
EOFcat > info.php <<EOF
<?php
phpinfo();
?>
EOFmv *.php /usr/share/nginx/html
命令行验证
php -f index.php
php -f test-mysql.php
浏览器访问 http://blog.example.com 查看运行效果
部署 WordPress 应用
下载并解压 WordPress 到 Web 根目录
unzip -o wordpress-4.9.4-zh_CN.zip -d /usr/share/nginx/html
chown -R nginx:nginx /usr/share/nginx/html/wordpress
修改 PHP-FPM 运行用户为 nginx
vim /etc/php-fpm.d/www.conf
# 设置 user=nginx group=nginx
systemctl restart php-fpm
在浏览器访问 http://blog.example.com/wordpress 并按向导完成安装
Standalone 部署示例
将各组件独立到不同节点以提升性能与可维护性
实验环境
| 主机名 | IP 地址 | 角色 |
|---|---|---|
| www.example.com | 10.1.8.21 | Apache |
| php.example.com | 10.1.8.22 | PHP-FPM |
| db.example.com | 10.1.8.23 | MariaDB |
| storage.example.com | 10.1.8.24 | NFS 存储 |
所有节点已关闭防火墙与 SELinux
预配置
统一主机名解析
cat >> /etc/hosts <<EOF
10.1.8.21 www.example.com www
10.1.8.22 php.example.com php
10.1.8.23 db.example.com db
10.1.8.24 storage.example.com storage
EOF
部署存储服务器
安装 NFS 并导出应用目录
yum install -y nfs-utils
mkdir -m 777 /www
echo '/www 10.1.8.0/24(rw)' > /etc/exports
systemctl enable --now nfs-server
上传并解压 WordPress 资源至 /www,同时添加测试脚本
unzip -o wordpress-4.9.4-zh_CN.zip -d /www
echo 'Hello World !' > /www/index.html
cat > /www/index.php <<EOF
<?php
echo "<h1>Hello World !</h1>\n";
?>
EOFcat > /www/test-mysql.php <<EOF
<?php
\$link = mysqli_connect('db.example.com','wp','Example@123');
if(\$link) echo "<h1>Connect Mysql Success !</h1>\n"; else echo "<h1>Connect Mysql Failed !</h1>\n";
\$link->close();
?>
EOFcat > /www/info.php <<EOF
<?php
phpinfo();
?>
EOF
部署数据库服务器
yum install -y mariadb-server
systemctl enable --now mariadb
mysql_secure_installation
创建数据库与用户
mysql -uroot -p
CREATE DATABASE wordpress;
CREATE USER 'wp'@'%' IDENTIFIED BY 'Example@123';
GRANT ALL PRIVILEGES ON wordpress.* TO 'wp'@'%';
FLUSH PRIVILEGES;
exit
部署 Nginx 服务器
挂载 NFS 存储并启动 Nginx
yum install -y nginx nfs-utils
echo 'storage.example.com:/www /usr/share/nginx/html nfs defaults 0 0' >> /etc/fstab
mount /usr/share/nginx/html
systemctl enable --now nginx
确认文件已挂载
ls /usr/share/nginx/html
部署 PHP 服务器
安装并配置 PHP-FPM
yum install -y php php-fpm php-mysqlnd
修改 /etc/php-fpm.d/www.conf
;listen = 127.0.0.1:9000
listen = 9000
;listen.allowed_clients = 127.0.0.1
启动 PHP-FPM 并添加 nginx 用户
systemctl enable --now php-fpm
useradd -u 997 -s /sbin/nologin nginx
挂载 NFS 存储并验证
yum install -y nfs-utils
mkdir /www
echo 'storage.example.com:/www /www nfs defaults 0 0' >> /etc/fstab
mount /www
php /www/index.php
php /www/test-mysql.php
配置 Nginx 对接 PHP
创建虚拟主机配置 /etc/nginx/conf.d/vhost-www.conf
cat > /etc/nginx/conf.d/vhost-www.conf <<EOF
server {listen 80server_name www.example.comlocation / {root /usr/share/nginx/htmlindex index.html index.htm index.php}location ~ \.php$ {fastcgi_pass php.example.com:9000fastcgi_index index.phpfastcgi_param SCRIPT_FILENAME /www/\$fastcgi_script_nameinclude fastcgi_params}
}
EOF
重启 Nginx
systemctl restart nginx
调整存储权限并同步 PHP-FPM 用户
chown -R 997 /www
vim /etc/php-fpm.d/www.conf
# 设置 user=nginx group=nginx
systemctl restart php-fpm
测试应用
在客户端配置 www.example.com 解析
访问 http://www.example.com/wordpress 进入安装向导
常见问题与解决
安装过程无法写入文件
若安装提示无法创建文件或目录,说明 Nginx 或 PHP-FPM 无写入权限
方法一 更新存储目录权限
chown -R 997 /www
vim /etc/php-fpm.d/www.conf
# 设置 user=nginx group=nginx
systemctl restart php-fpm
方法二 手动创建 wp-config.php
在存储节点编辑 /www/wordpress/wp-config.php,填写数据库连接、密钥与表前缀等配置
保存后返回安装向导继续下一步
补充建议
- 在生产环境中可采用 MySQL 主从复制或 Galera Cluster 提升数据库高可用性
- 针对 PHP-FPM 细化 pm.* 参数,优化资源分配
- 结合 Keepalived 或 LVS 构建高可用 Web 集群
FPM 无写入权限
方法一 更新存储目录权限
chown -R 997 /www
vim /etc/php-fpm.d/www.conf
# 设置 user=nginx group=nginx
systemctl restart php-fpm
方法二 手动创建 wp-config.php
在存储节点编辑 /www/wordpress/wp-config.php,填写数据库连接、密钥与表前缀等配置
保存后返回安装向导继续下一步
补充建议
- 在生产环境中可采用 MySQL 主从复制或 Galera Cluster 提升数据库高可用性
- 针对 PHP-FPM 细化 pm.* 参数,优化资源分配
- 结合 Keepalived 或 LVS 构建高可用 Web 集群
- 使用监控和日志分析工具及时发现性能瓶颈并进行调优