搭建基于Gitee文档笔记自动发布
搭建基于Gitee文档笔记自动发布
由于现在gitee不支持代理静态页面,并且github.io需要VPN,实际使用的话gitee更为方便。
一、为服务器和个人PC添加免密push和pull
参考链接:https://help.gitee.com/base/account/SSH%E5%85%AC%E9%92%A5%E8%AE%BE%E7%BD%AE
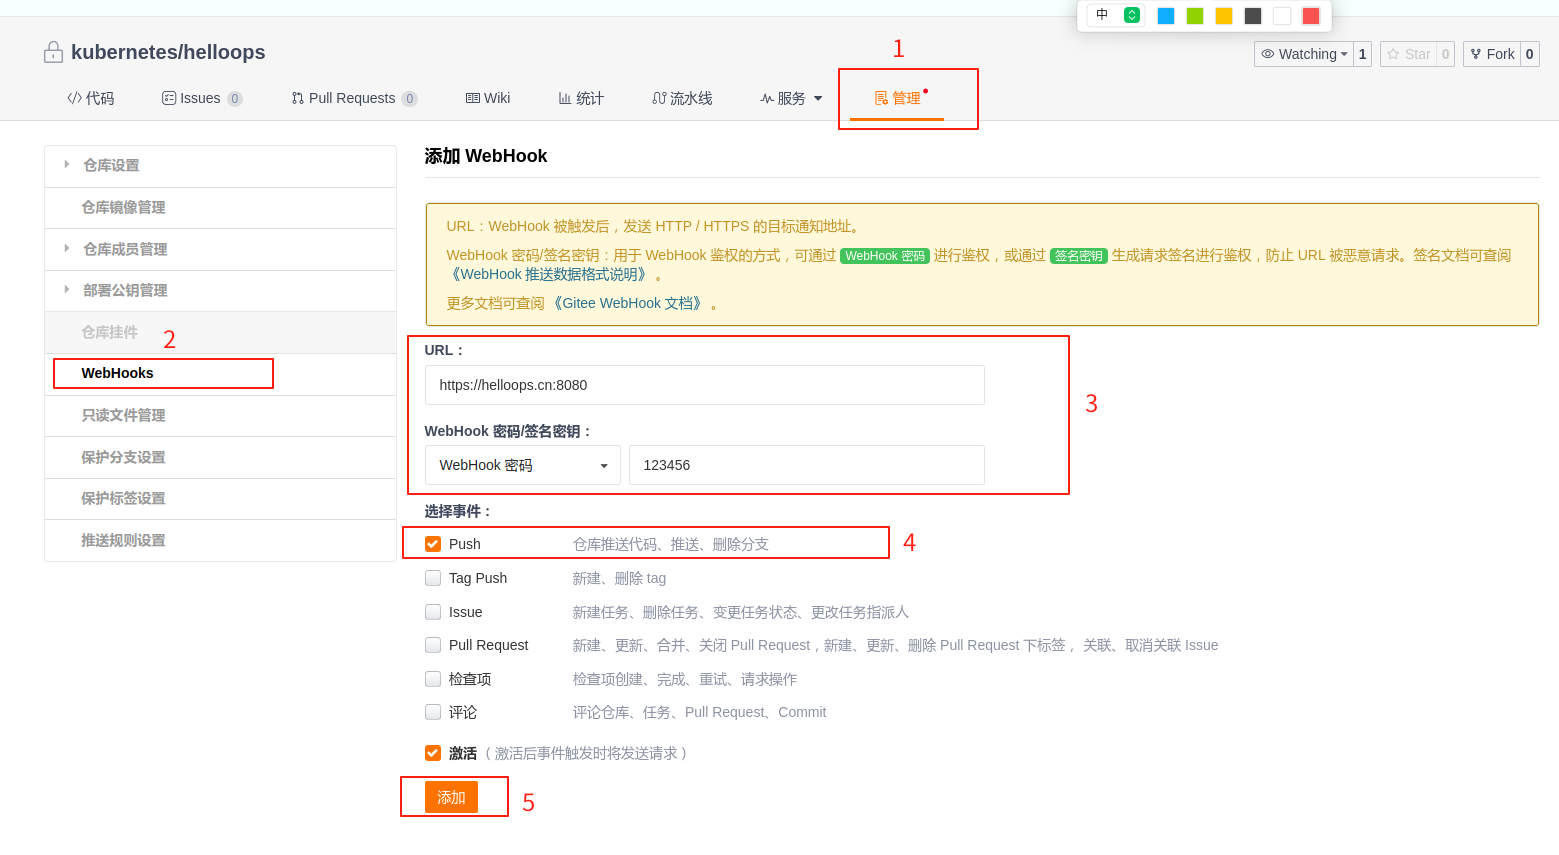
二、创建webhooks
创建webhooks目的是用于监听gitee仓库的push事件,自动触发服务器端pull更新代码和文档笔记。
三、创建服务监听
1、创建监听脚本文件
vim gitee-hook.sh
#!/bin/bash#Git 仓库所在目录,即执行 git pull 的工作目录
WORK_DIR="/root/helloops/"
#日志文件路径,记录脚本执行过程和结果
LOG_FILE="/root/gitee-hooks/hook.log"#将带时间戳的日志信息追加到 LOG_FILE
#示例输出:[20250630-143000] Starting git pull...
log() {echo "[$(date '+%Y%m%d-%H:%M:%S')] $1" >> $LOG_FILE
}#切换到工作目录并执行 git pull,将执行过程逐行记录到日志
execute_git_pull() {log "start git pull..."cd $WORK_DIR || { log "not cd workdir"; exit 1; }/usr/bin/git pull 2>&1 | while read line; dolog "git pull: $line"donelog "git pull started..."
}#解析 Gitee Webhook 发送的 HTTP 请求,验证 Token 并执行更新
parse_request(){while read -r line; do#根据自己设置的密码进行更换if [[ $line == "X-Gitee-Token: 123456" ]]; then VALID_TOKEN=truefiif [ -z "$line" ]; thenbreakfidonebody=$(cat)log "input gitee hook requests,Body size: ${#body}"execute_git_pull
}parse_request
2、创建监听服务文件
sudo cat > /lib/systemd/system/gitee-hook.service << 'EOF'
[Unit]
Description=Gitee Webhook Listener
After=network.target[Service]
Type=simple
ExecStart=/usr/bin/socat TCP-LISTEN:8080,fork EXEC:"/root/gitee-hook.sh"
WorkingDirectory=/root/gitee-hooks
User=root
Group=root
Restart=on-failure
RestartSec=5s
StandardOutput=syslog
StandardError=syslog
SyslogIdentifier=gitee-hook[Install]
WantedBy=multi-user.target
EOF#创建日志存储目录并授权脚本
sudo mkdir -p /root/gitee-hooks
sudo chmod +x /root/gitee-hook.sh#检查 socat 是否安装
which socat || sudo apt-get install socat -y  # Debian/Ubuntu
which socat || sudo yum install socat -y       # CentOS/RHEL#重载 systemd 配置并启动
sudo systemctl daemon-reload
sudo systemctl start gitee-hook#设置开机启动并查看状态
sudo systemctl enable gitee-hook
sudo systemctl status gitee-hook
四、测试操作
1、安装pandoc
apt -y install pandoc
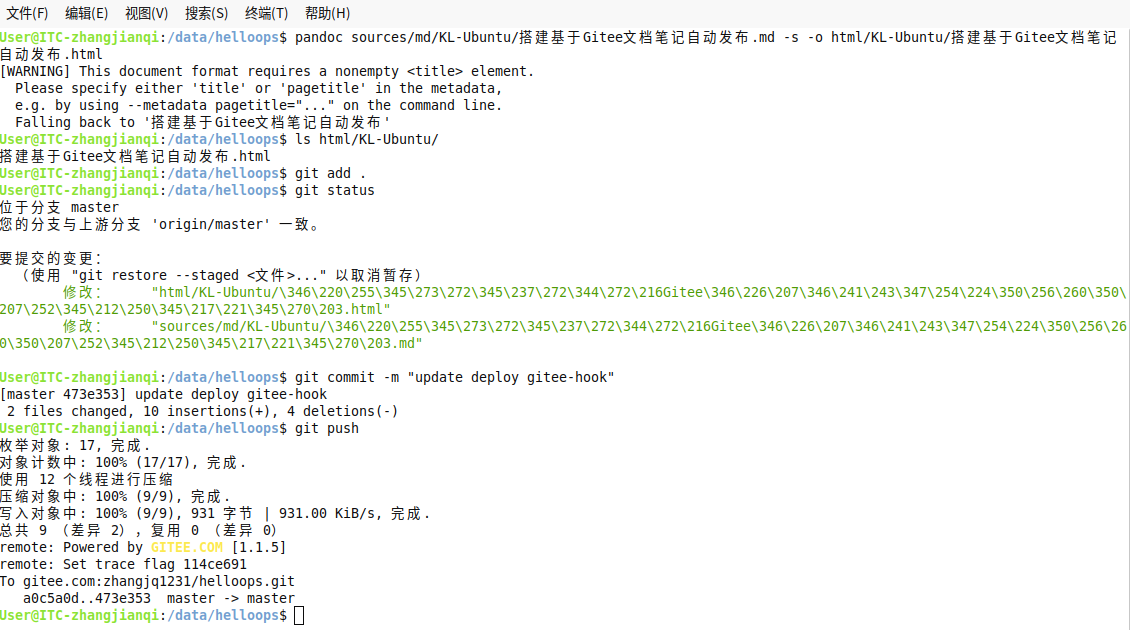
2、整个流程操作
pandoc sources/md/KL-Ubuntu/搭建基于Gitee文档笔记自动发布.md -s -o html/KL-Ubuntu/搭建基于Gitee文档笔记 自动发布.htmlgit add . git status git commit -m "add **"git push
五、Nginx配置参考以及目录结构参考
server {charset utf-8;server_name abc.cn www.abc.cn;client_max_body_size 1024m;gzip on;location / {alias /root/helloops/html/; autoindex on;}location /yaml {alias /root/helloops/yaml/;autoindex on;}location /windos {alias /root/helloops/sources/windos/;autoindex on;auth_basic "Restricted Access";auth_basic_user_file /etc/nginx/.htpasswd;add_header Cache-Control "no-cache, no-store, must-revalidate";add_header Pragma "no-cache";add_header Expires 0;}location /sources/images {alias /root/helloops/sources/images/;autoindex on;}listen 443 ssl; # managed by Certbotssl_certificate /etc/letsencrypt/live/helloops.cn/fullchain.pem; # managed by Certbotssl_certificate_key /etc/letsencrypt/live/helloops.cn/privkey.pem; # managed by Certbotinclude /etc/letsencrypt/options-ssl-nginx.conf; # managed by Certbotssl_dhparam /etc/letsencrypt/ssl-dhparams.pem; # managed by Certbot
}
server {if ($host = www.helloops.cn) {return 301 https://$host$request_uri;} # managed by Certbotif ($host = helloops.cn) {return 301 https://$host$request_uri;} # managed by Certbotlisten 80;server_name abc.cn www.abc.cn;}
目录结构
root@helloops# tree -d
.
├── html
│   ├── k8s
│   └── KL-Ubuntu
├── sources
│   ├── images
│   ├── md
│   │   ├── k8s
│   │   └── KL-Ubuntu
│   └── windos
└── yaml10 directories