使用 Python 构建并调用 ComfyUI 图像生成 API:完整实战指南
快速打造你自己的本地 AI 图像生成服务,支持 Web 前端一键调用!
📌 前言
在 AIGC 快速发展的今天,ComfyUI 作为一款模块化、节点式的图像生成界面,备受开发者青睐。但默认情况下,ComfyUI 主要通过界面交互操作,缺少标准化 API 接口。
本文将手把手教你如何:
-
用 Python 脚本调用 ComfyUI 本地服务生成图像;
-
使用 FastAPI 封装 API 接口;
-
搭建一个简单的 前端网页输入提示词 → 实时获取生成图像 的完整闭环系统。
适合希望将本地 ComfyUI 服务嵌入前后端系统或自动化流程的开发者。
🧱 环境准备
-
安装并运行 ComfyUI 本地服务
-
Python >= 3.10
-
安装依赖:
pip install fastapi uvicorn websockets
🧠 后端模块分层
我们将后端分为两层:
-
comfyuiservice.py:负责构造图像生成的 Prompt、连接 WebSocket、拉取图片等底层逻辑。
import websocket
import uuid
import json
import urllib.request
import urllib.parse
save_image_websocket = 'SaveImage'
server_address = "127.0.0.1:8188"
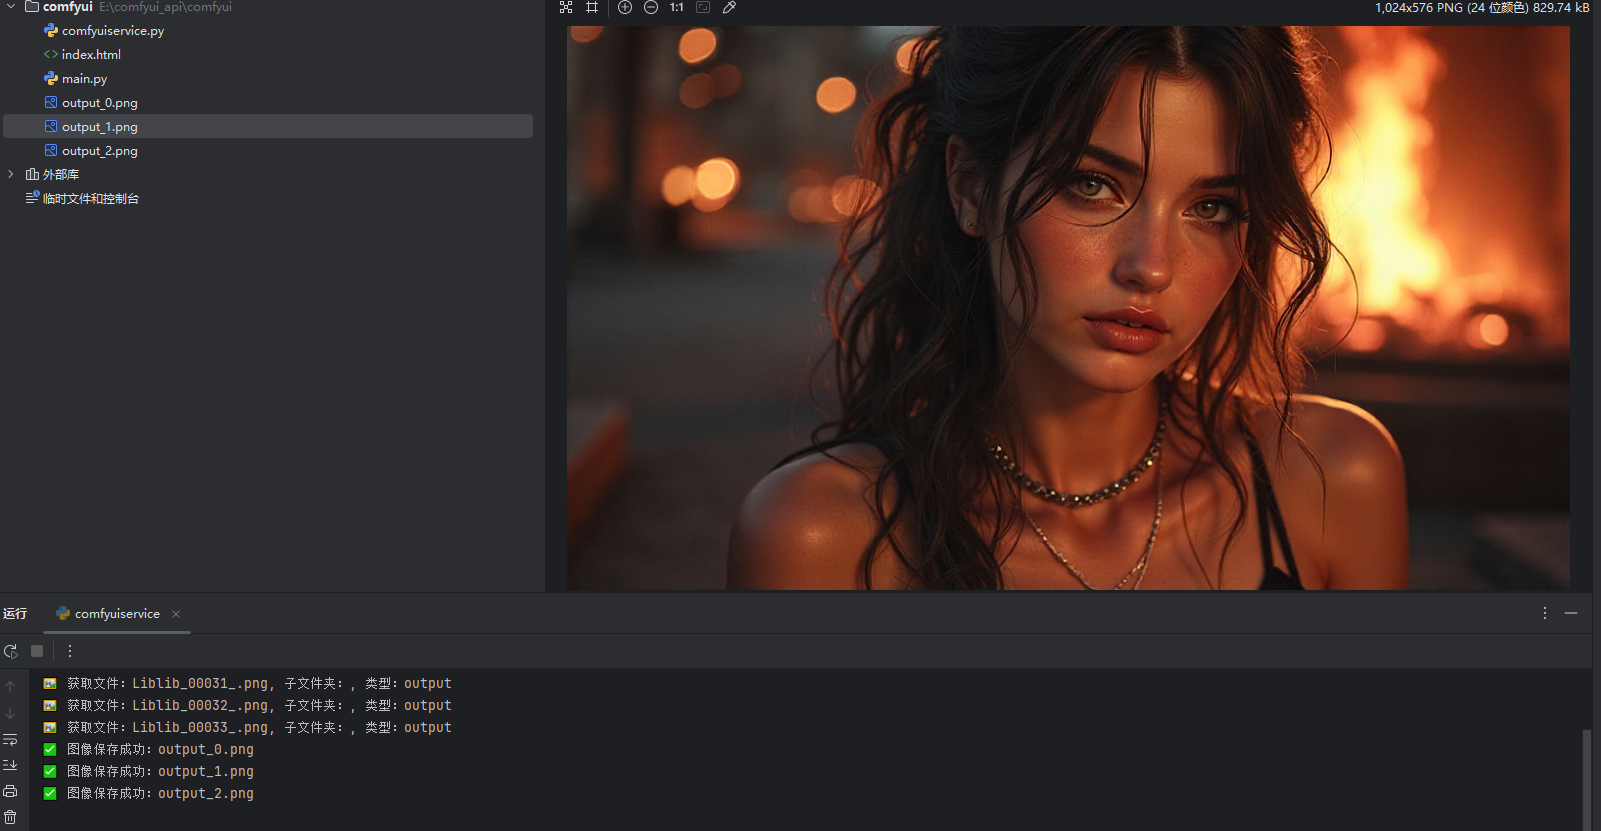
client_id = str(uuid.uuid4())def get_prompt_with_workflow(input, batch_size=3):prompt_text = r'''{"5": {"inputs": {"width": 1024,"height": 576,"batch_size": BATCH_SIZE_PLACEHOLDER},"class_type": "EmptyLatentImage","_meta": {"title": "空Latent"}},"6": {"inputs": {"text": "","clip": ["11",0]},"class_type": "CLIPTextEncode","_meta": {"title": "CLIP文本编码器"}},"8": {"inputs": {"samples": ["13",0],"vae": ["10",0]},"class_type": "VAEDecode","_meta": {"title": "VAE解码"}},"9": {"inputs": {"filename_prefix": "Liblib","images": ["8",0]},"class_type": "SaveImage","_meta": {"title": "保存图像"}},"10": {"inputs": {"vae_name": "taef1"},"class_type": "VAELoader","_meta": {"title": "VAE加载器"}},"11": {"inputs": {"clip_name1": "flux_text_encoders\\t5xxl_fp8_e4m3fn.safetensors","clip_name2": "flux_text_encoders\\clip_l.safetensors","type": "flux"},"class_type": "DualCLIPLoader","_meta": {"title": "双CLIP加载器"}},"12": {"inputs": {"unet_name": "F.1基础算法模型-哩布在线可运行_F.1-dev-fp8.safetensors","weight_dtype": "fp8_e4m3fn"},"class_type": "UNETLoader","_meta": {"title": "UNET加载器"}},"13": {"inputs": {"noise": ["25",0],"guider": ["22",0],"sampler": ["16",0],"sigmas": ["17",0],"latent_image": ["5",0]},"class_type": "SamplerCustomAdvanced","_meta": {"title": "自定义采样器(高级)"}},"16": {"inputs": {"sampler_name": "euler"},"class_type": "KSamplerSelect","_meta": {"title": "K采样器选择"}},"17": {"inputs": {"scheduler": "simple","steps": 20,"denoise": 1,"model": ["12",0]},"class_type": "BasicScheduler","_meta": {"title": "基础调度器"}},"22": {"inputs": {"model": ["12",0],"conditioning": ["6",0]},"class_type": "BasicGuider","_meta": {"title": "基础引导"}},"25": {"inputs": {"noise_seed": 334879893459679},"class_type": "RandomNoise","_meta": {"title": "随机噪波"}}}'''prompt_text = prompt_text.replace("BATCH_SIZE_PLACEHOLDER", str(batch_size))prompt_json = json.loads(prompt_text)prompt_json["6"]["inputs"]["text"] = inputreturn prompt_jsondef queue_prompt(prompt):p = {"prompt": prompt, "client_id": client_id}data = json.dumps(p).encode('utf-8')req = urllib.request.Request(f"http://{server_address}/prompt", data=data)return json.loads(urllib.request.urlopen(req).read())def get_image(filename, subfolder, folder_type):data = {"filename": filename, "subfolder": subfolder, "type": folder_type}url_values = urllib.parse.urlencode(data)with urllib.request.urlopen(f"http://{server_address}/view?{url_values}") as response:return response.read()def get_images(ws, prompt, batch_size):prompt_id = queue_prompt(prompt)['prompt_id']print(f"📩 prompt_id: {prompt_id}")images_data = []while True:out = ws.recv()if isinstance(out, str):try:message = json.loads(out)except json.JSONDecodeError:continuemsg_type = message.get('type')if msg_type == 'executed':data = message['data']current_prompt_id = data.get('prompt_id')node = data.get('node')print(f"🔄 执行中 - prompt_id: {current_prompt_id}, 节点: {node}")if current_prompt_id == prompt_id and node == "9":images = data.get('output', {}).get('images', [])if images and len(images) == batch_size:print(f"🖼️ 收到节点9的所有图像信息,共{len(images)}张")for img_info in images:filename = img_info['filename']subfolder = img_info.get('subfolder', '')folder_type = img_info.get('type', 'output')print(f"🖼️ 获取文件:{filename}, 子文件夹:{subfolder}, 类型:{folder_type}")image_bytes = get_image(filename, subfolder, folder_type)images_data.append((filename, image_bytes))breakelse:passreturn images_datadef fetch_images_from_comfy(input, batch_size=3):ws = websocket.WebSocket()ws.connect(f"ws://{server_address}/ws?clientId={client_id}")images = get_images(ws, get_prompt_with_workflow(input, batch_size), batch_size)ws.close()return imagesif __name__ == '__main__':# 生成3张图,保存为output_0.png, output_1.png, output_2.pngbatch = 3results = fetch_images_from_comfy("a gril", batch_size=batch)if results:for idx, (filename, img_bytes) in enumerate(results):out_name = f"output_{idx}.png"with open(out_name, "wb") as f:f.write(img_bytes)print(f"✅ 图像保存成功:{out_name}")else:print("❌ 没有生成图像")
-
main.py:用 FastAPI 提供标准接口,供前端或其他服务调用。
from fastapi import FastAPI, Query  # 导入FastAPI主框架和用于接收查询参数的Query
from fastapi.responses import StreamingResponse  # 用于返回流式响应(如图片流)
from fastapi.middleware.cors import CORSMiddleware  # 导入跨域资源共享中间件
import io  # 导入io模块,用于处理内存中的二进制流
import comfyuiservice  # 导入自定义的comfyui服务模块(负责图像生成)app = FastAPI()  # 创建FastAPI应用实例# 添加跨域中间件,允许所有来源访问API,适合开发和测试阶段
app.add_middleware(CORSMiddleware,allow_origins=["*"],  # 允许所有来源allow_credentials=True,  # 允许携带凭证allow_methods=["*"],  # 允许所有HTTP方法(GET、POST等)allow_headers=["*"],  # 允许所有请求头
)# 定义一个GET接口,路径为 /get-image,接收一个名为input的查询字符串参数
@app.get("/get-image")
async def get_image(input: str = Query(None)):# 调用comfyuiservice模块的fetch_image_from_comfy函数,传入输入文本,生成图像二进制数据images = comfyuiservice.fetch_images_from_comfy(input)# 将二进制图像数据放入BytesIO流中,方便返回给客户端image_stream = io.BytesIO(images[0][1]) # 只获取一张图片# 以流式响应返回图片,声明媒体类型为PNG格式return StreamingResponse(image_stream, media_type="image/png")# 定义一个简单的GET接口,路径为 /hello,用于测试服务是否正常
@app.get("/hello")
def read_hello():return {"message": "Hello World!"}  # 返回一个JSON字典,表示接口工作正常
🧩 comfyuiservice.py 详解
这是核心逻辑所在,通过 Python 控制 ComfyUI 本地服务进行图像生成。
✅ 核心功能包括:
-
构建 ComfyUI Workflow Prompt
-
使用 WebSocket 监听图像生成完成信号
-
通过 HTTP 接口拉取图像二进制流
📌 使用示例:
results = fetch_images_from_comfy("a gril", batch_size=1)
返回的图像是二进制格式,可直接保存为 .png 文件或通过接口流式返回。
🌐 main.py:FastAPI 封装接口
通过 FastAPI,我们将图像生成功能开放为 HTTP API,方便前端或自动化调用。
🔧 核心接口
GET /get-image?input=你的提示词
返回内容:生成的图像(image/png)
✅ 支持跨域(CORS)
通过添加 CORSMiddleware,支持前端跨域请求,方便调试和部署。
💻 前端页面:一键生成图像
<!DOCTYPE html>
<html lang="en">
<head><meta charset="UTF-8"><meta name="viewport" content="width=device-width, initial-scale=1.0"><title>Display Image</title>
</head>
<body><h1>Display Image from Comfy UI Server</h1><!-- Input field to get user input --><input type="text" id="user-input" placeholder="Enter text for image" /><button onclick="fetchImage()">Load Image</button><!-- Container for displaying the image --><div id="image-container"></div><script>function fetchImage() {// Get the value from the input fieldconst inputValue = document.getElementById('user-input').value;// Fetch the image with the input as a query parameterfetch(`http://127.0.0.1:8000/get-image?input=${encodeURIComponent(inputValue)}`).then(response => {if (!response.ok) throw new Error('Image not found');return response.blob();}).then(blob => {// Create an image element and set its source to the fetched blobconst img = document.createElement('img');img.src = URL.createObjectURL(blob);img.alt = "Image from server";// Clear any existing image and display the new onedocument.getElementById('image-container').innerHTML = '';document.getElementById('image-container').appendChild(img);}).catch(error => console.error('Error:', error));}</script>
</body>
</html>
前端请求 http://localhost:8000/get-image?input=xxx,后台返回图像 blob 后动态展示。
📦 项目结构建议
comfyui-api/
├── main.py                 # FastAPI 启动文件
├── comfyuiservice.py       # 图像生成逻辑
├── index.html          # 前端页面
🚀 启动服务
uvicorn main:app --reload
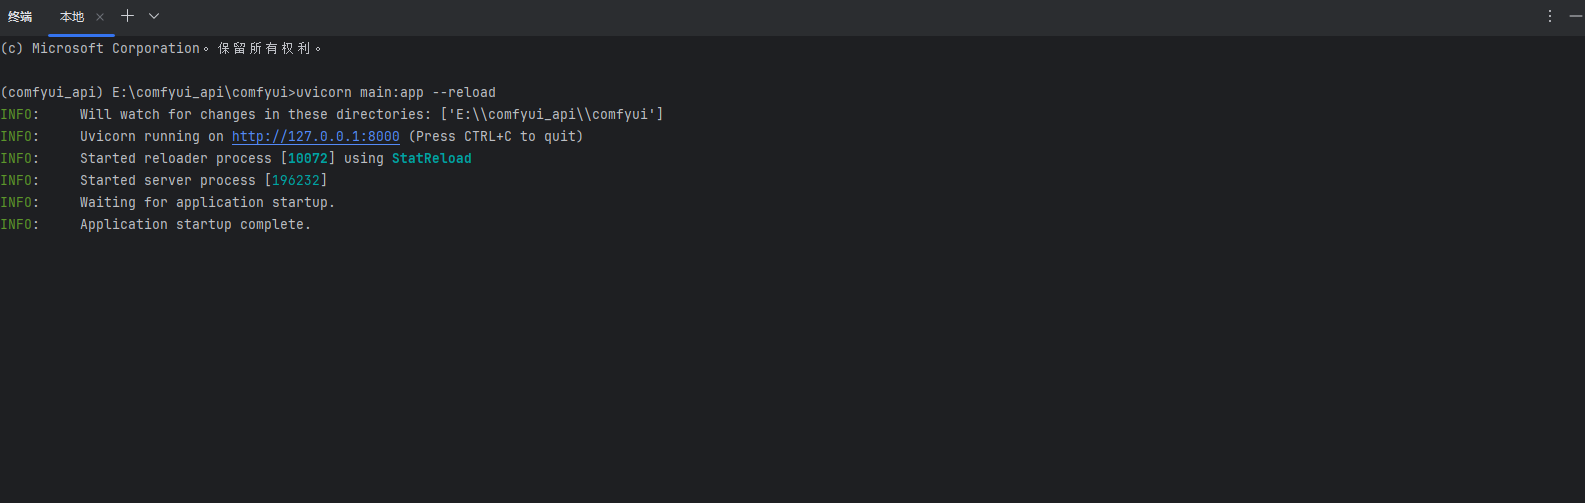
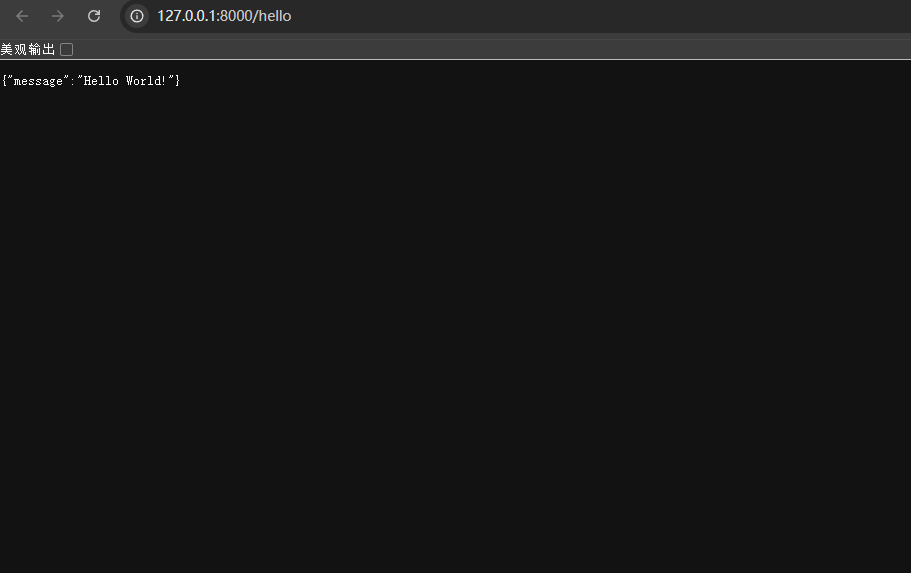
访问 http://127.0.0.1:8000/hello 查看是否运行成功。
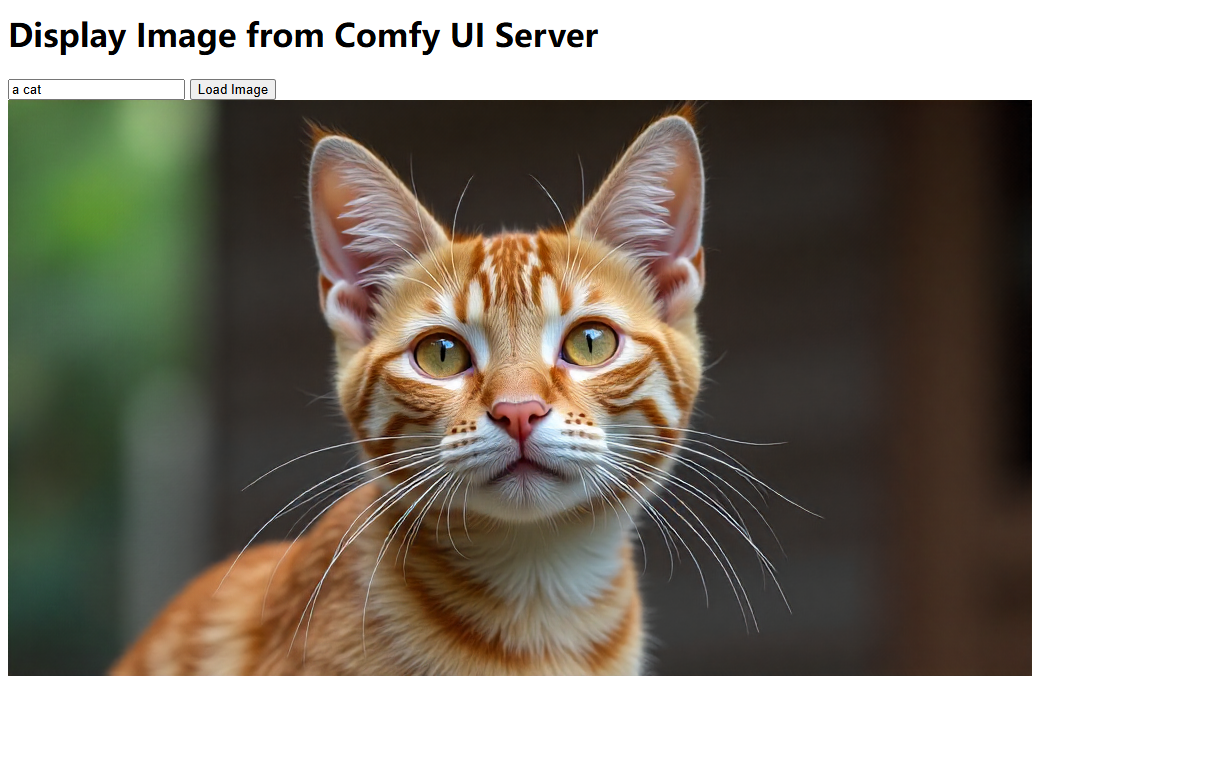
🧪 效果演示
在浏览器中打开 HTML 页面,输入提示词如 【a cat】,点击生成,几秒内即可看到生成图像显示在页面上。
✅ 总结
通过本文教程,我们完成了:
-
构建 Python 图像生成模块对接本地 ComfyUI;
-
使用 FastAPI 提供 HTTP API;
-
简单前端调用生成图像,完成 AIGC 接口开发。
🧾 结语
通过本文,你已经学会了如何使用 Python 和 FastAPI 调用本地 ComfyUI 接口,实现前端一键生成图像的完整流程。
这个方案适合:
-
AIGC 产品原型开发
-
本地 AI 模型部署与集成
-
前后端协作式图像生成系统搭建
如果你觉得这篇教程对你有帮助,欢迎点赞、收藏和转发分享给更多开发者。
💬 如果你在部署过程中遇到任何问题,或有更好的优化建议,欢迎在评论区留言交流!
你的每一个反馈,都是我持续更新的动力!✨
🔖 引用与参考资料
-
ComfyUI 官方仓库
 https://github.com/comfyanonymous/ComfyUI
 -
FastAPIFastAPI framework, high performance, easy to learn, fast to code, ready for production
https://fastapi.tiangolo.com/ -
WebSocket 文档 - MDN
https://developer.mozilla.org/zh-CN/docs/Web/API/WebSocket -
GitHub - dci05049/ComfyUiWebserverContribute to dci05049/ComfyUiWebserver development by creating an account on GitHub.
https://github.com/dci05049/ComfyUiWebserver