open3d:使用彩色图和深度图生成点云
一.相关函数介绍
1.create_from_color_and_depth
class RGBDImage(Geometry2D):""" RGBDImage is for a pair of registered color and depth images, viewed from the same view, of the same resolution. If you have other format, convert it first. """def create_from_color_and_depth(self, color, depth, depth_scale=1000.0, depth_trunc=3.0, convert_rgb_to_intensity=True): # real signature unknown; restored from __doc__"""create_from_color_and_depth(color, depth, depth_scale=1000.0, depth_trunc=3.0, convert_rgb_to_intensity=True)Function to make RGBDImage from color and depth imageArgs:color (open3d.geometry.Image): The color image.depth (open3d.geometry.Image): The depth image.depth_scale (float, optional, default=1000.0): The ratio to scale depth values. The depth values will first be scaled and then truncated.depth_trunc (float, optional, default=3.0): Depth values larger than ``depth_trunc`` gets truncated to 0. The depth values will first be scaled and then truncated.convert_rgb_to_intensity (bool, optional, default=True): Whether to convert RGB image to intensity image.Returns:open3d.geometry.RGBDImage"""pass解释
这段代码注释定义了一个名为 RGBDImage 的类及其方法 create_from_color_and_depth,这个类和方法属于 Open3D 几何库中的 Geometry2D 类。RGBDImage 类用于处理和存储一对已经配准的彩色图像和深度图像,这些图像是从同一个视角捕获且具有相同的分辨率。
类描述
-
RGBDImage:这个类的注释说明了它用于处理经过配准的彩色图像和深度图像。如果用户的图像数据格式不符合要求,需要先进行转换。
方法:create_from_color_and_depth
这个方法用于从彩色图像和深度图像创建一个 RGBDImage 对象。
参数
-
color (open3d.geometry.Image): 彩色图像。
-
depth (open3d.geometry.Image): 深度图像。
-
depth_scale (float, optional, default=1000.0): 深度值的比例因子。深度值首先会被该比例因子缩放,然后再进行截断。注意:比例因子为1000,说明深度图的坐标值单位默认为mm,单位转换为m。
-
depth_trunc (float, optional, default=3.0): 深度截断值。大于这个值的深度数据会被截断为0。深度值先缩放再截断。 注意:这里意思是将只保留距离相机3m以内的点云。
-
convert_rgb_to_intensity (bool, optional, default=True): 是否将彩色图像转换为强度图像。注意:强度图 即是 灰度图。
返回值
-
open3d.geometry.RGBDImage: 返回一个由彩色和深度图像组合而成的
RGBDImage对象。
功能说明
该方法的主要目的是将彩色图像和深度图像组合成一个 RGBDImage 对象,这样可以在后续的处理中同时使用颜色信息和深度信息,例如进行点云生成或三维重建等。通过调整 depth_scale 和 depth_trunc 参数,可以对深度数据进行预处理,以适应不同的应用场景。
2.create_from_rgbd_image
def create_from_rgbd_image(self, image, intrinsic, extrinsic, *args, **kwargs): # real signature unknown; NOTE: unreliably restored from __doc__ """create_from_rgbd_image(image, intrinsic, extrinsic=(with default value), project_valid_depth_only=True)Factory function to create a pointcloud from an RGB-D image and a camera. Given depth value d at (u, v) image coordinate, the corresponding 3d point is:- z = d / depth_scale- x = (u - cx) * z / fx- y = (v - cy) * z / fyArgs:image (open3d.geometry.RGBDImage): The input image.intrinsic (open3d.camera.PinholeCameraIntrinsic): Intrinsic parameters of the camera.extrinsic (numpy.ndarray[numpy.float64[4, 4]], optional) Default value:array([[1., 0., 0., 0.],[0., 1., 0., 0.],[0., 0., 1., 0.],[0., 0., 0., 1.]])project_valid_depth_only (bool, optional, default=True)Returns:open3d.geometry.PointCloud"""pass
解释
一个用于从深度图像创建三维点云的函数。
-
self:指的是类的实例(在Python中,所有类的方法都需要将实例本身作为第一个参数)。 -
depth: 输入的深度图像,可以是浮点数类型或16位无符号整数类型的图像。 -
intrinsic: 相机的内参矩阵,用于将图像坐标转换为三维坐标。 -
extrinsic: 相机的外参矩阵,默认值是单位矩阵,表示没有旋转或平移的变换。 -
*args, **kwargs: 表示除了上述参数外,可以传递任意数量的额外参数(在实际调用时可能不会用到)。
文档说明
-
返回值: 返回一个
open3d.geometry.PointCloud对象,代表从深度图像生成的点云。 -
stride: 步长参数,设置为大于1的值可以降低点云的分辨率。默认为1,表示使用图像中的所有像素。 #注意:一般设置为1 -
project_valid_depth_only: 一个布尔值,默认为True,表示只将有效的深度值投影到三维空间中。 注意:有的时候需要设置为False,这是点云文件中无效值将保存为Nan
坐标转换公式
给定深度值 d 在 (u, v) 图像坐标处,对应的三维点计算公式如下:
-
z = d / depth_scale:深度值转换为实际距离。 注意:depth_scale比例因子在函数1,深度图的单位为mm, 转换成m, 因此depth_scale=1000, 若需要修改,在函数1处进行修改 -
x = (u - cx) * z / fx:计算x坐标,考虑了相机的光学中心和焦距。 -
y = (v - cy) * z / fy:计算y坐标,原理同上。
其中,cx 和 cy 是相机的光学中心坐标,fx 和 fy 是相机的焦距(这些参数通常包含在 intrinsic 参数中)。
程序编写
1.d435i深度相机参数读取程序
参考1:Python读取Realsense D435深度相机内参_pyrealsense2获取深度相机的内参-CSDN博客
#2025.6.5
#参考 https://blog.csdn.net/ZNC1998/article/details/139124353?spm=1001.2014.3001.5506# 获取深度相机的内参import pyrealsense2 as rsdef get_intrinsics():# Create a context object. This object owns the handles to all connected realsense devicespipeline = rs.pipeline()config = rs.config()# Configure the pipeline to stream the depth streamconfig.enable_stream(rs.stream.depth, 1280, 720, rs.format.z16, 30)# Start streamingpipeline.start(config)# Get frames from the camera to get the intrinsic parametersprofile = pipeline.get_active_profile()depth_stream = profile.get_stream(rs.stream.depth)intr = depth_stream.as_video_stream_profile().get_intrinsics()# Stop the pipelinepipeline.stop()# Intrinsicsintrinsics_matrix = [[intr.fx, 0, intr.ppx],[0, intr.fy, intr.ppy],[0, 0, 1]]return intrinsics_matrixif __name__ == "__main__":intrinsics_matrix = get_intrinsics()print("Intrinsic matrix for RealSense D435 depth camera:")for row in intrinsics_matrix:print(row)  #按矩阵的行输出"""[646.5264282226562, 0, 640.8402099609375][0, 646.5264282226562, 356.4901123046875][0, 0, 1]"""
参考2:获取D405相机的内参的方法-CSDN博客
该代码需要获取相机本身的SN编号,
方法1:在购买相机时查看包装盒
方法2:使用程序读取
import pyrealsense2 as rs
import numpy as np
import cv2# Configure depth and color streams
#配置深度和视频流
#创建一个pipeline对象,用于管理数据流,以及一个config对象,用于配置相机流。
pipeline = rs.pipeline()
config = rs.config()# Get device product line for setting a supporting resolution
#获取设备产品线以设置支持的分辨率
pipeline_wrapper = rs.pipeline_wrapper(pipeline)
pipeline_profile = config.resolve(pipeline_wrapper)
device = pipeline_profile.get_device()
print(device) #<pyrealsense2.device: D435I (S/N: 2025651926  FW: 5.16.0.1  on USB3.2)>#注意每个人相机SN编号不一样,根据自已相机读取
import pyrealsense2 as rs# Create a pipeline
pipeline = rs.pipeline()# Create a config and configure the pipeline to stream
config = rs.config()#####
# config.enable_device('your_device_serial_number') # Optional: specify the serial number of your D405 camera
# 20256519299
config.enable_device('20256519299') #相机的sn 号,前12位
config.enable_stream(rs.stream.depth, 1280, 720, rs.format.z16, 30)# Start the pipeline
pipeline.start(config)# Get device product line for setting a supporting resolution
profile = pipeline.get_active_profile()
depth_sensor = profile.get_device().first_depth_sensor()
depth_scale = depth_sensor.get_depth_scale()print(f"depth_scale={depth_scale}")# Get the depth sensor's depth stream profile and extract intrinsic parameters
depth_stream = profile.get_stream(rs.stream.depth)
intrinsics = depth_stream.as_video_stream_profile().get_intrinsics()# Print intrinsics
print("Width:", intrinsics.width)
print("Height:", intrinsics.height)
print("PPX:", intrinsics.ppx)
print("PPY:", intrinsics.ppy)
print("FX:", intrinsics.fx)
print("FY:", intrinsics.fy)
print("Distortion Model:", intrinsics.model)
print("Coefficients:", intrinsics.coeffs)# Stop the pipeline
pipeline.stop()"""depth_scale=0.0010000000474974513
Width: 1280
Height: 720
PPX: 640.8402099609375
PPY: 356.4901123046875
FX: 646.5264282226562
FY: 646.5264282226562
Distortion Model: distortion.brown_conrady
Coefficients: [0.0, 0.0, 0.0, 0.0, 0.0]
"""
2.使用深度相机d435i拍摄深度图和彩色图
注意:深度图拍摄一定是png格式(16位,可以保存深度信息 2^16=65536mm,即 65m; 如果是jpg, 2^8=256mm, 深度信息几乎丢失)
#2025.6.3
"""
参考深度优化后的   深度图, 并保存为png,使用open3d查看  深度图优化后,形成的点云
""""""
参考: E:\pycharm\pyProject_d435i\my_demo\demo_photo\color_depth_infrared_demo03.py   进行修改
""""""
注意:
1. 深度图 对齐于  彩色图
"""import pyrealsense2 as rs
import numpy as np
import cv2# Configure depth and color streams
#配置深度和视频流
#创建一个pipeline对象,用于管理数据流,以及一个config对象,用于配置相机流。
pipeline = rs.pipeline()
config = rs.config()# Get device product line for setting a supporting resolution
#获取设备产品线以设置支持的分辨率
pipeline_wrapper = rs.pipeline_wrapper(pipeline)
pipeline_profile = config.resolve(pipeline_wrapper)
device = pipeline_profile.get_device()
# print(device)
device_product_line = str(device.get_info(rs.camera_info.product_line))
# print(device_product_line) #D400
# #
# pipeline_wrapper是pipeline对象的一个包装器,它提供了对pipeline的额外控制。
# config.resolve(pipeline_wrapper)用于根据配置文件解析pipeline_wrapper,创建一个pipeline_profile对象,该对象包含了流配置的详细信息。
# device是从pipeline_profile中获取的RealSense设备对象。
# device_product_line获取设备的产品线信息,并将其转换为字符串。产品线信息可以是“L500”或“D400”等,这有助于确定设备的型号和功能。
# ##查设备是否包含RGB相机。如果不含,则打印消息并退出程序。
found_rgb = False
for s in device.sensors:if s.get_info(rs.camera_info.name) == 'RGB Camera':found_rgb = Truebreak
if not found_rgb:print("The demo requires Depth camera with Color sensor")exit(0)
# #
# 如果found_rgb仍然是False,这意味着没有找到RGB相机。
# 打印一条消息,说明演示需要带有颜色传感器的深度相机。
# 调用exit(0)以终止程序。exit(0)表示程序正常退出,其中0是退出状态码,通常表示成功。
# ##配置深度和颜色流的参数,包括分辨率、格式和帧率。
config.enable_stream(rs.stream.depth, 1280, 720, rs.format.z16, 30)# config.enable_stream(rs.stream.color, 640, 480, rs.format.rgb8, 30)  #蓝色变红色,  黄色变蓝色
config.enable_stream(rs.stream.color, 1280, 720,  rs.format.bgr8, 30)  #正常肉眼颜色config.enable_stream(rs.stream.infrared, 1, 1280, 720,  rs.format.y8, 30)  # 第一个红外摄像头 左#启用红外摄像头流,索引为1,分辨率为1280x720,格式为Y8,帧率为30fps。
config.enable_stream(rs.stream.infrared, 2, 1280, 720,  rs.format.y8, 30)  # 第二个红外摄像头,右# Start streaming
#根据配置启动相机流
conf = pipeline.start(config)
align = rs.align(rs.stream.color)  # 这个函数用于  将深度图像  与彩色图像对齐# align = rs.align(rs.stream.depth) #2025.3.13尝试将  彩色图  与深度图对应,该方法没有用
depth_sensor = conf.get_device().first_depth_sensor()
depth_sensor.set_option(rs.option.emitter_enabled, 1)  # 0关闭红外激光,1开启i =1         #50-63  png  jpg  png    #64    png  png  png
#开始一个无限循环,用于连续捕获图像。
try:while True:# Wait for a coherent pair of frames: depth and color#等待直到有新的帧可用,并分别获取深度帧和颜色帧。如果任一帧丢失,则跳过当前循环。frames = pipeline.wait_for_frames()#对齐彩色和深度图aligned_frames = align.process(frames)  # 获取对齐帧,将深度框与颜色框对齐aligned_depth_frame = aligned_frames.get_depth_frame()  # 获取深度帧aligned_color_frame = aligned_frames.get_color_frame()  # 获取对齐帧中的的color帧# 对齐的两个红外图像aligned_infrared_frame_1 = aligned_frames.get_infrared_frame(1)aligned_infrared_frame_2 = aligned_frames.get_infrared_frame(2)# #未对齐# #未对齐的彩色和深度图# depth_frame = frames.get_depth_frame()# color_frame = frames.get_color_frame()## #未对齐的两个红外图像# # 获取红外图像# infrared_frame_1 = frames.get_infrared_frame(1)# infrared_frame_2 = frames.get_infrared_frame(2)# Validate that both frames are validif not aligned_depth_frame or not aligned_color_frame:continue# if not depth_frame or not color_frame:#     continue# Convert images to numpy arrays#将深度和颜色帧转换为NumPy数组。#对齐aligned_depth_image = np.asanyarray(aligned_depth_frame.get_data())aligned_color_image = np.asanyarray(aligned_color_frame.get_data())aligned_ir_image_1 = np.asanyarray(aligned_infrared_frame_1.get_data())aligned_ir_image_2 = np.asanyarray(aligned_infrared_frame_2.get_data())# #未对齐# depth_image = np.asanyarray(depth_frame.get_data())# color_image = np.asanyarray(color_frame.get_data())## # 将红外帧转换为可显示的图像# ir_image_1 = np.asanyarray(infrared_frame_1.get_data())# ir_image_2 = np.asanyarray(infrared_frame_2.get_data())# Remove background - Set pixels further than clipping_distance to grey# 创建一个3通道的深度图像,并将其与颜色图像组合,去除距离超过1m的背景。grey_color = 153#对齐aligned_depth_image_3d = np.dstack((aligned_depth_image, aligned_depth_image, aligned_depth_image))  # depth image is 1 channel, color is 3 channelsaligned_bg_removed_color = np.where(aligned_depth_image_3d <= 0, grey_color, aligned_color_image)aligned_ir_image_1_2 = np.hstack((aligned_ir_image_1, aligned_ir_image_2))aligned_ir_image_1_2_photo = aligned_ir_image_1_2.copy()# #未对齐# depth_image_3d = np.dstack(#     (depth_image, depth_image,depth_image))  # depth image is 1 channel, color is 3 channels# bg_removed_color = np.where(depth_image_3d <= 0, grey_color, color_image)# Apply colormap on depth image (image must be converted to 8-bit per pixel first)################ 深度图优化# 应用空间滤波器(边缘平滑)spatial = rs.spatial_filter()spatial.set_option(rs.option.filter_magnitude, 2)filtered_frame = spatial.process(aligned_depth_frame)   #接收相机帧,而不是np数组# 应用孔洞填充hole_filling = rs.hole_filling_filter()hole_filling.set_option(rs.option.holes_fill, 2)filled_frame = hole_filling.process(filtered_frame)filled_depth_image = np.asanyarray(filled_frame.get_data())#彩色图 覆盖灰色(深度无效值)aligned_depth_image_3d = np.dstack((filled_depth_image, filled_depth_image,filled_depth_image))  # depth image is 1 channel, color is 3 channelsaligned_bg_removed_color_filled = np.where(aligned_depth_image_3d <= 0, grey_color, aligned_color_image)aligned_depth_colormap_filled = cv2.applyColorMap(cv2.convertScaleAbs(filled_depth_image, alpha=0.05),cv2.COLORMAP_JET)aligned_images_filled = np.hstack((aligned_bg_removed_color_filled, aligned_depth_colormap_filled))################将深度图像转换为彩色图像,以便于可视化。aligned_depth_colormap = cv2.applyColorMap(cv2.convertScaleAbs(aligned_depth_image, alpha=0.05), cv2.COLORMAP_JET)aligned_images = np.hstack((aligned_bg_removed_color, aligned_depth_colormap))# np.hstack 水平拼接,   np.vstack 垂直拼接######## #获取深度和颜色图像的尺寸。# depth_colormap_dim = depth_colormap.shape  #行数、列数、通道数# color_colormap_dim = color_image.shape## # If depth and color resolutions are different, resize color image to match depth image for display# #如果深度和颜色图像的尺寸不同,则调整颜色图像的尺寸以匹配深度图像,然后将它们并排显示。# if depth_colormap_dim != color_colormap_dim:#     resized_color_image = cv2.resize(color_image, dsize=(depth_colormap_dim[1], depth_colormap_dim[0]), interpolation=cv2.INTER_AREA)#     images = np.hstack((resized_color_image, depth_colormap))# else:#     images = np.hstack((color_image, depth_colormap))h = 0while (h < 720):# cv2.line(img,(0,i),(1279,i),(0,255,0)):在img图像上绘制一条从点(0,i)到点(1279,i)的水平线。# 线的颜色由BGR值(0,255,0)指定,即绿色。这条线的y坐标是i(图像的行,高),x坐标从0延伸到1279(图像的列,宽)。#对齐cv2.line(aligned_images, (0, h), (2560, h), (0, 255, 0))  #对齐图像cv2.line(aligned_ir_image_1_2, (0, h), (2560, h), (0, 255, 0))# #未对齐# cv2.line(images, (0, i), (2560, i), (0, 255, 0))  #未对齐图像# cv2.line(ir_image_1_2, (0, i), (2560, i), (0, 255, 0))h = h + 36# Show images#对齐后的图像#对齐后的彩色图像(有深度图灰色 覆盖 深度值为0的点)cv2.namedWindow('aligned_RealSense', 0)#可调窗口大小cv2.imshow('aligned_RealSense', aligned_images)#单独运行,无cv2.namedWindow(),##滤波后深度图cv2.namedWindow('aligned_RealSense_filled', 0)  # 可调窗口大小cv2.imshow('aligned_RealSense_filled', aligned_images_filled)  # 单独运行,无cv2.namedWindow(),#红外图像#拼接的红外图像, 1 为左镜头, 2 为右镜头, 拼接后,像素坐标系原点在1 的左上角cv2.namedWindow("aligned_ir_image_1_2", 0)cv2.imshow("aligned_ir_image_1_2", aligned_ir_image_1_2)# #未对齐的图像# cv2.namedWindow('RealSense', 0)  # 可调窗口大小# cv2.imshow('RealSense', images)  # 单独运行,无cv2.namedWindow(),## cv2.namedWindow("ir_image_1_2", 0)# cv2.imshow("ir_image_1_2", ir_image_1_2)# 可以显示窗口,但无法调整大小(opencv-python版本为4.8),可能是opencv安装在虚拟机的问题key = cv2.waitKey(1) & 0xFFif key == ord('w'):  # 如果按下'w'键# 相对路径##深度图#保存对齐彩色图 的深度图(未进行优化)cv2.imwrite(r"E:\pycharm\pyProject_d435i\my_demo\second_demo_photo_v2_2025_5_19\images\depth_origin_png/depth_origin_%d.png" % i,aligned_depth_image) #aligned_depth_colormap,  aligned_depth_image# 保存对齐彩色图 的深度图(已经进行优化)cv2.imwrite(r"E:\pycharm\pyProject_d435i\my_demo\second_demo_photo_v2_2025_5_19\images\depth_process/depth_process_%d.png" % i,filled_depth_image)##深度图颜色映射#未优化的深度图颜色映射cv2.imwrite(r"E:\pycharm\pyProject_d435i\my_demo\second_demo_photo_v2_2025_5_19\images\depth_origin_color/aligned_depth_colormap_%d.png" % i,aligned_depth_colormap)#已优化的深度图颜色映射cv2.imwrite(r"E:\pycharm\pyProject_d435i\my_demo\second_demo_photo_v2_2025_5_19\images\depth_process_color/aligned_depth_colormap_filled_%d.png" % i,aligned_depth_colormap_filled)##彩色图# 报存彩色图像 jpgcv2.imwrite(r"E:\pycharm\pyProject_d435i\my_demo\second_demo_photo_v2_2025_5_19\images\colors_jpg/color_jpg_%d.jpg" % i,aligned_color_image)# 保存彩色图 pngcv2.imwrite(r"E:\pycharm\pyProject_d435i\my_demo\second_demo_photo_v2_2025_5_19\images\colors_png/color_png_%d.png" % i,aligned_color_image)##彩色图覆盖灰色(灰色:深度值为0的地方)#原因:使用深度图时可以直接查看是哪个图片深度信息保存较为完整),不需要手动去试#保存未优化的彩色图--灰色覆盖cv2.imwrite(r"E:\pycharm\pyProject_d435i\my_demo\second_demo_photo_v2_2025_5_19\images\colors_origin_depth_gray/aligned_bg_removed_color_%d.png" %i,aligned_bg_removed_color)#保存未优化的彩色图--灰色覆盖#aligned_bg_removed_color_filledcv2.imwrite(r"E:\pycharm\pyProject_d435i\my_demo\second_demo_photo_v2_2025_5_19\images\colors_process_depth_gray/aligned_bg_removed_color_filled_%d.png" % i,aligned_bg_removed_color_filled)# 保存拼接的红外图像cv2.imwrite(r"E:\pycharm\pyProject_d435i\my_demo\second_demo_photo_v2_2025_5_19\images\inf/inf_hstack_%d.png" % i,aligned_ir_image_1_2_photo )print("Save images %d succeed!" % i)i += 1elif key == ord('q'):  # 如果按下'q'键cv2.destroyAllWindows()break  # 退出循环,关闭窗口#在退出循环或出现异常时,停止相机流。这确保了即使在脚本异常结束时,相机资源也能被正确释放。
finally:# Stop streamingpipeline.stop()
拍摄效果展示:
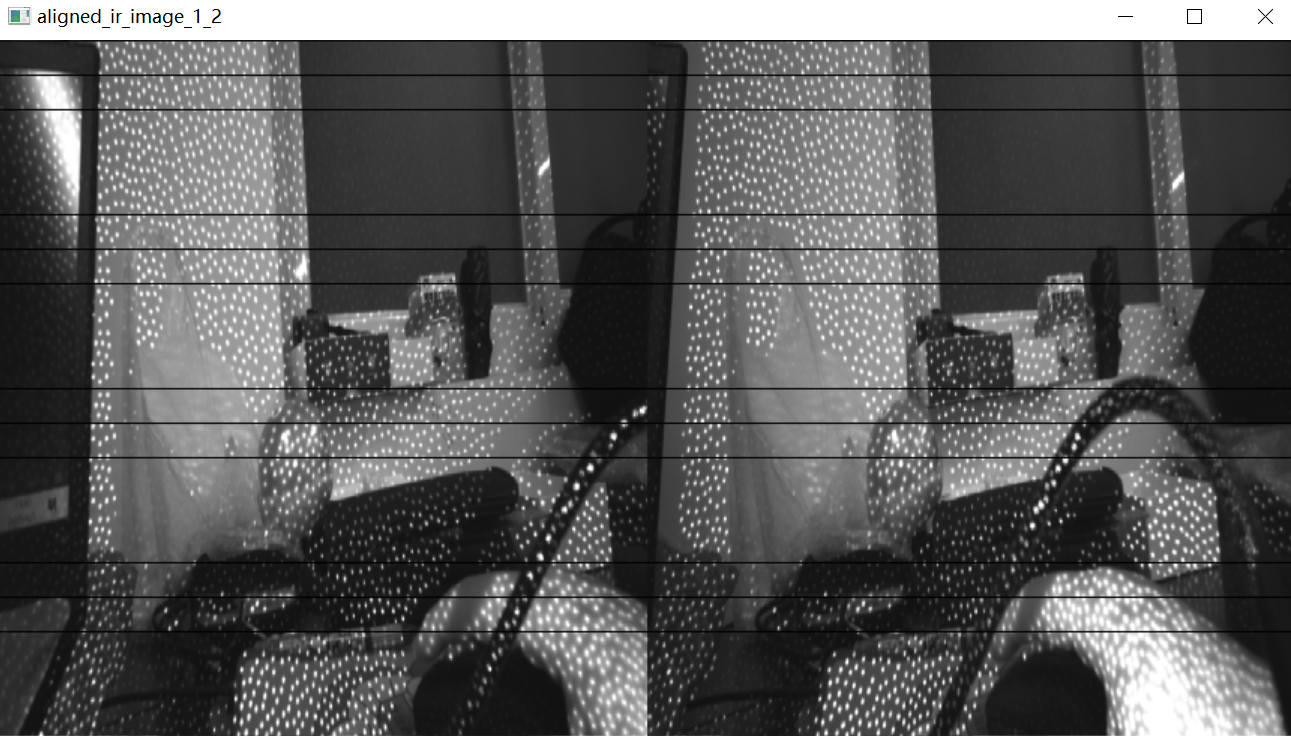
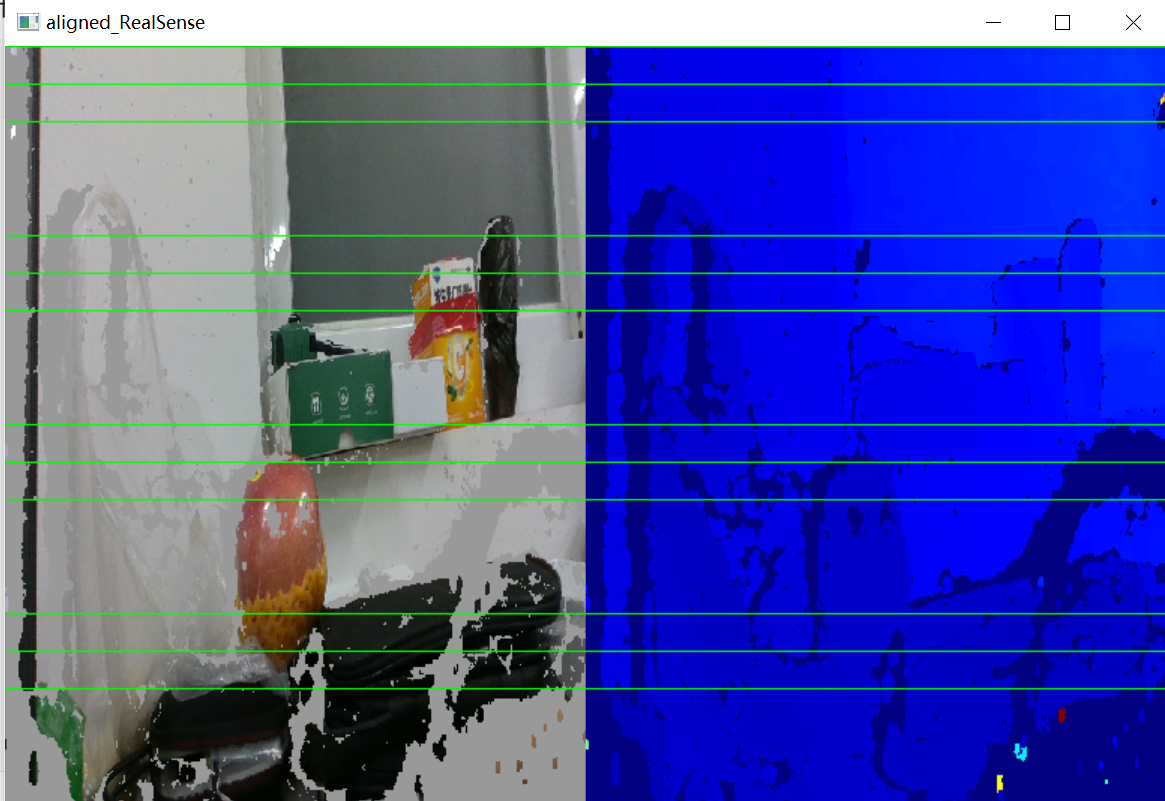
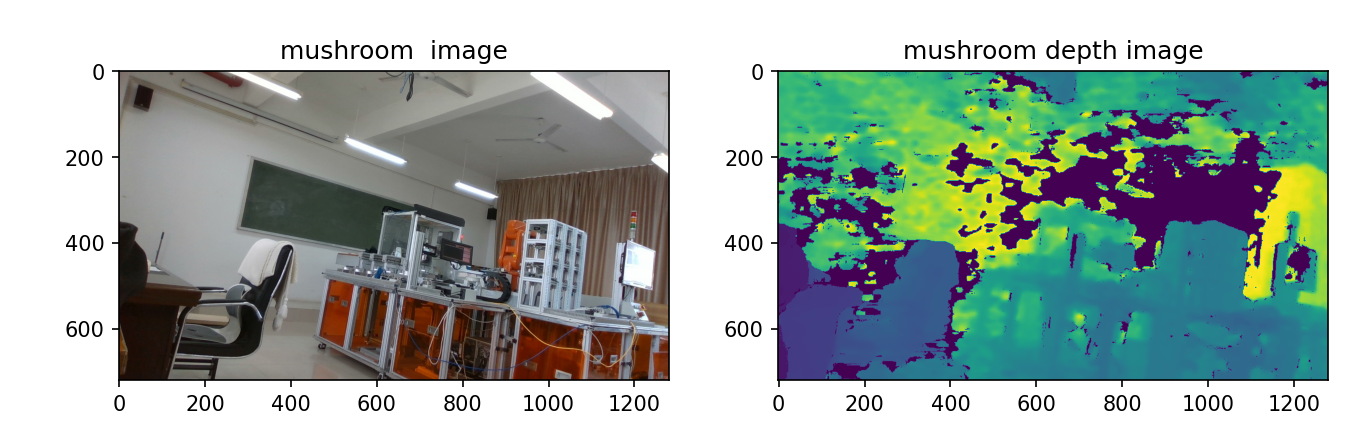
上图为未优化的深度图, 由于d435i深度相机有三个镜头,相机背对人脸,从左往右依次是:
彩色镜头,红外镜头1,红外投影仪,红外镜头2。
出现空洞的原因:
原因1:深度图主要有红外镜头1,2拍摄图像,通过图像匹配生成,因为 三个镜头是分开的,存在三个不同视角,导致彩色画面中像素在深度图中不存在,因此为无效深度值(这里深度图对齐与彩色图);原因2:光照原因导致图像匹配出现问题。
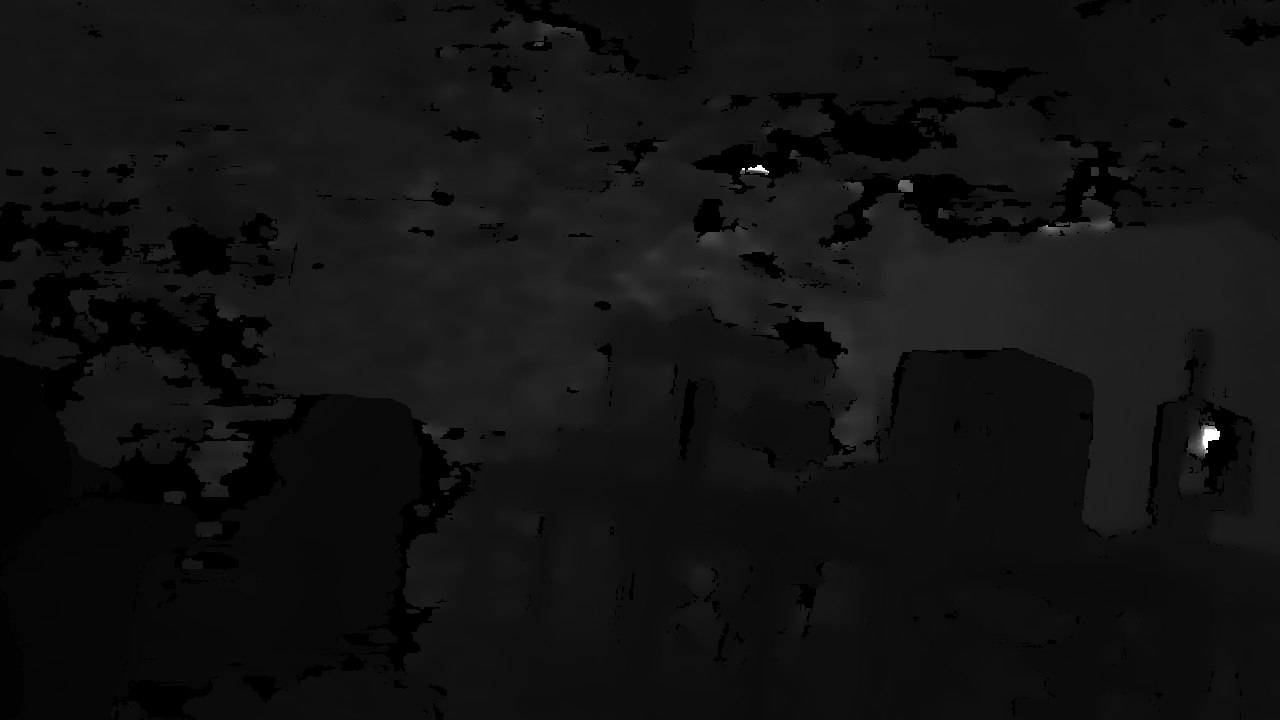
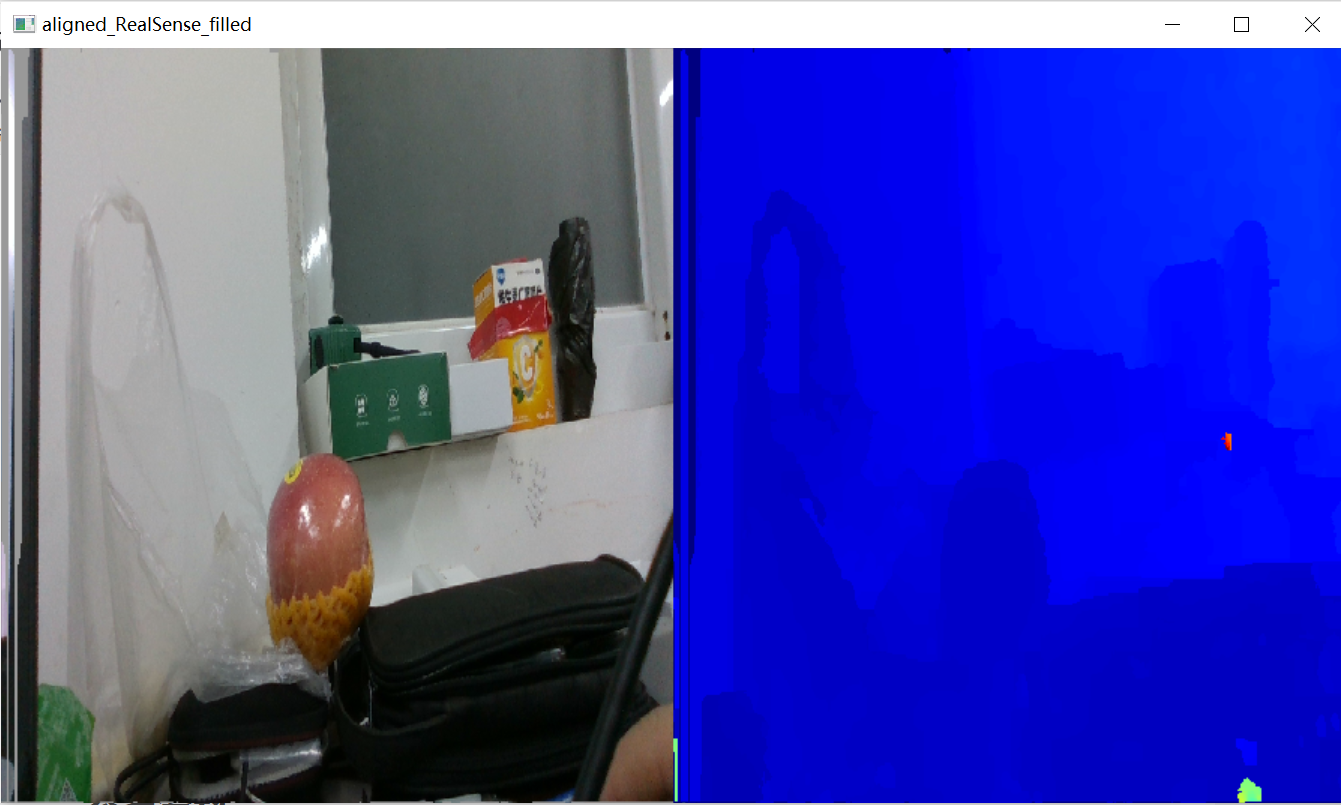 上图为经过空间滤波,空洞填充的优化深度图,但是其深度信息, 对于立体物体,尤其是微小的立体物体 存在失真, 本来是有高度层次变化的实例物体点云,优化后, 变为平面点云。对于平面点云效果较好。
点云生成以 彩色图jpg(png也可以), 未优化的深度图png
3.生成点云
#2025.6.5
"""
可视化 拍摄的点云和深度图参考 open3d课程
"""
"""
对 o3d_vis1 进行修改
"""import open3d as o3d
import numpy as np
import matplotlib.pyplot as plt
import os
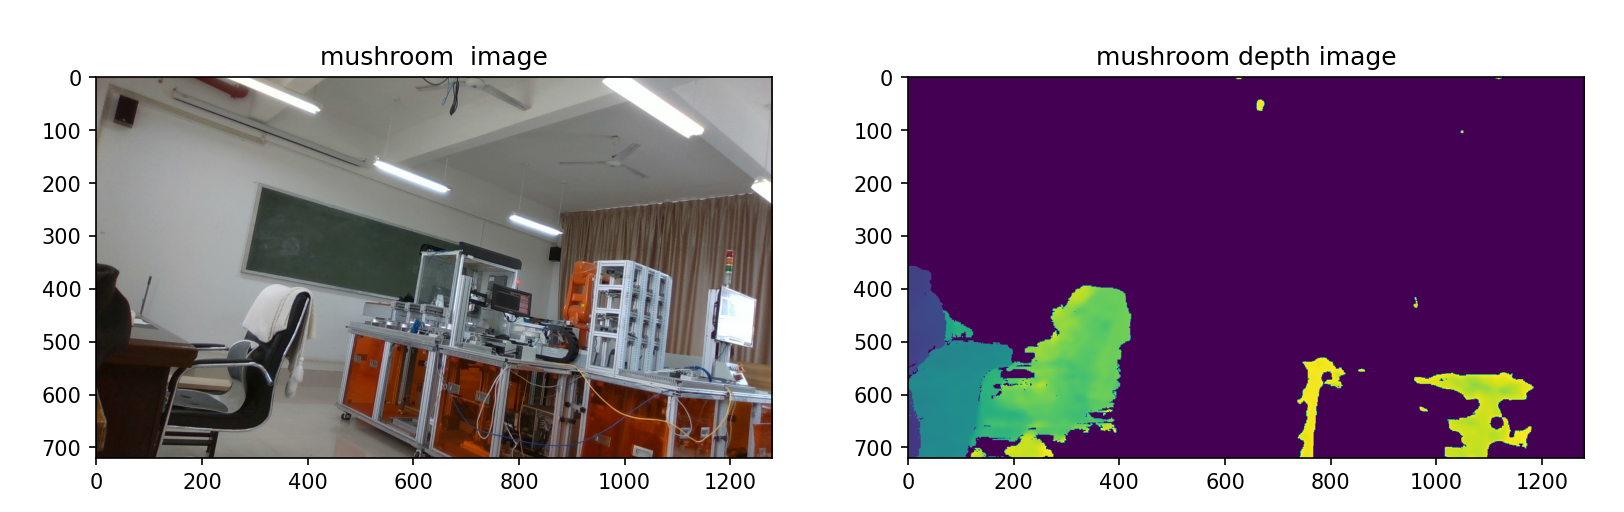
import syscolor_raw_path = r'E:\pycharm\pyProject_d435i\my_demo\second_demo_photo_v2_2025_5_19\images\colors_jpg\color_jpg_9.jpg'depth_raw_path = r'E:\pycharm\pyProject_d435i\my_demo\second_demo_photo_v2_2025_5_19\images\depth_origin_png\depth_origin_9.png'# depth_raw_path = r"E:\pycharm\pyProject_d435i\my_demo\second_demo_photo_v2_2025_5_19\images\depth_process\depth_process_1.png"color_raw = o3d.io.read_image(color_raw_path)
depth_raw = o3d.io.read_image(depth_raw_path)'''def create_from_color_and_depth(self, color, depth, depth_scale=1000.0, depth_trunc=3.0, convert_rgb_to_intensity=True): # real signature unknown; restored from __doc__"""create_from_color_and_depth(color, depth, depth_scale=1000.0, depth_trunc=3.0, convert_rgb_to_intensity=True)Function to make RGBDImage from color and depth imageArgs:color (open3d.geometry.Image): The color image.depth (open3d.geometry.Image): The depth image.depth_scale (float, optional, default=1000.0): The ratio to scale depth values. The depth values will first be scaled and then truncated.depth_trunc (float, optional, default=3.0): Depth values larger than ``depth_trunc`` gets truncated to 0. The depth values will first be scaled and then truncated.convert_rgb_to_intensity (bool, optional, default=True): Whether to convert RGB image to intensity image.Returns:open3d.geometry.RGBDImage"""pass
'''print(1.0/(0.0010000000474974513)) #999.999952502551
rgbd_image = o3d.geometry.RGBDImage.create_from_color_and_depth(color_raw, depth_raw, depth_scale= 1.0/(0.0010000000474974513), depth_trunc=8.0, convert_rgb_to_intensity=False ) #convert_rgb_to_intensity=False需要设置为False, 否则 彩色图片变为强度度,点云失去彩色信息(变为灰度图)
print('rgbd_image\n',rgbd_image)
"""
rgbd_imageRGBDImage of size
Color image : 1280x720, with 3 channels.
Depth image : 1280x720, with 1 channels.
Use numpy.asarray to access buffer data.
"""
print("color_raw\n",color_raw)
"""
color_rawImage of size 1280x720, with 3 channels.
Use numpy.asarray to access buffer data.
"""
print("depth_raw\n",depth_raw)
"""
depth_rawImage of size 1280x720, with 1 channels.
Use numpy.asarray to access buffer data.
"""plt.subplot(1, 2, 1) #plt.subplot(1, 2, 1):这行代码创建了一个1行2列的子图布局,并激活了第一个子图(位置索引为1)。
# plt.title('mushroom grayscale image')
plt.title('mushroom image')
plt.imshow(rgbd_image.color)
plt.subplot(1, 2, 2)
plt.title('mushroom depth image')
plt.imshow(rgbd_image.depth)
plt.show()#The RGBD image can be converted into a point cloud, given a set of camera parameters.
"""
Depth Intrinsics: [ 1280x720 p[640.84 356.49] f[646.526 646.526] Brown Conrady [0 0 0 0 0] ]
Color Intrinsics: [ 1280x720 p[648.297 368.739] f[910.241 909.903] Inverse Brown Conrady [0 0 0 0 0] ]
"""
#Depth Intrinsics width=1280, height=720, fx=646.526, fy=646.526 , cx=640.84, cy=356.49
#Color Intrinsics width=1280, height=720, fx=910.241, fy=909.903 , cx=648.297, cy=368.739
"""
个人相机d435i
深度流
depth_scale=0.0010000000474974513
Width: 1280
Height: 720
PPX: 640.8402099609375
PPY: 356.4901123046875
FX: 646.5264282226562
FY: 646.5264282226562
Distortion Model: distortion.brown_conrady
Coefficients: [0.0, 0.0, 0.0, 0.0, 0.0]"""# #方法1: 参考csdn 点运侠 RGBD/点云(用法总结)
# #自定义内参
# inter = o3d.camera.PinholeCameraIntrinsic()
# inter.set_intrinsics(1280, 720, 646.526, 646.526 , 640.84,356.49)
# #重置相机默认外参
# extrinsic = np.array([[1., 0., 0., 0.],
# [0., -1., 0., 0.],
# [0., 0., -1., 0.],
# [0., 0., 0., -1.]]) #呈现点云与人视线相同
# pcd = o3d.geometry.PointCloud.create_from_rgbd_image(rgbd_image,inter,extrinsic)# 方法2:参考b站open3d博主教程
#个人相机
# pcd = o3d.geometry.PointCloud.create_from_rgbd_image(
# rgbd_image,
# o3d.camera.PinholeCameraIntrinsic(width=1280, height=720, fx=646.526, fy=646.526 , cx=640.84, cy=356.49),
# )# 精度更高
#个人相机
#该函数的参数
"""
create_from_depth_image(depth, intrinsic, extrinsic=(with default value), depth_scale=1000.0, depth_trunc=1000.0, stride=1, project_valid_depth_only=True)
"""'''def create_from_rgbd_image(self, image, intrinsic, extrinsic, *args, **kwargs): # real signature unknown; NOTE: unreliably restored from __doc__ """create_from_rgbd_image(image, intrinsic, extrinsic=(with default value), project_valid_depth_only=True)Factory function to create a pointcloud from an RGB-D image and a camera. Given depth value d at (u, v) image coordinate, the corresponding 3d point is:- z = d / depth_scale- x = (u - cx) * z / fx- y = (v - cy) * z / fyArgs:image (open3d.geometry.RGBDImage): The input image.intrinsic (open3d.camera.PinholeCameraIntrinsic): Intrinsic parameters of the camera.extrinsic (numpy.ndarray[numpy.float64[4, 4]], optional) Default value:array([[1., 0., 0., 0.],[0., 1., 0., 0.],[0., 0., 1., 0.],[0., 0., 0., 1.]])project_valid_depth_only (bool, optional, default=True)Returns:open3d.geometry.PointCloud"""pass'''
#方法2
pcd = o3d.geometry.PointCloud.create_from_rgbd_image(rgbd_image,o3d.camera.PinholeCameraIntrinsic(width=1280, height=720, fx=646.5264282226562, fy=646.5264282226562 , cx=640.8402099609375, cy=356.4901123046875),project_valid_depth_only = False,)#方法3
# height, width = 720, 1280
# #Depth Intrinsics width=1280, height=720, fx=646.526, fy=646.526 , cx=640.84, cy=356.49
# fx, fy = 646.526, 646.526 # 焦距(以像素为单位)
# cx, cy = 640.84, 356.49 # 主点(相机坐标系的中心点)
# # 构建内参矩阵
# intrinsic = o3d.camera.PinholeCameraIntrinsic(width, height, fx, fy, cx, cy)
# # 使用相机内参来生成点云
# pcd = o3d.geometry.PointCloud.create_from_rgbd_image(rgbd_image, intrinsic, project_valid_depth_only=False) #无效值保存为nan# # Flip it, otherwise the pointcloud will be upside down 上下翻转点云
pcd.transform([[1, 0, 0, 0], [0, -1, 0, 0], [0, 0, -1, 0], [0, 0, 0, 1]]) #呈现点云与人视相同#M18K数据集,D405深度相机 深度流内参;
#width=1280, height=720, fx=647.2796020507812, fy=647.2796020507812 , cx=652.3068237304688, cy=367.90887451171875
o3d.visualization.draw_geometries([pcd])
获取的彩色图和深度图
截断距离为3m
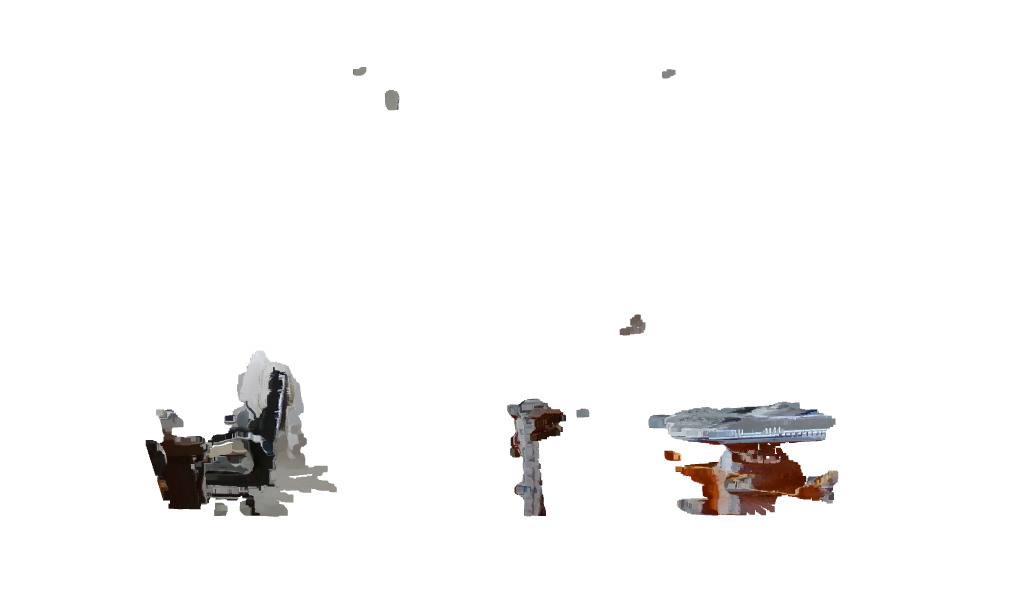
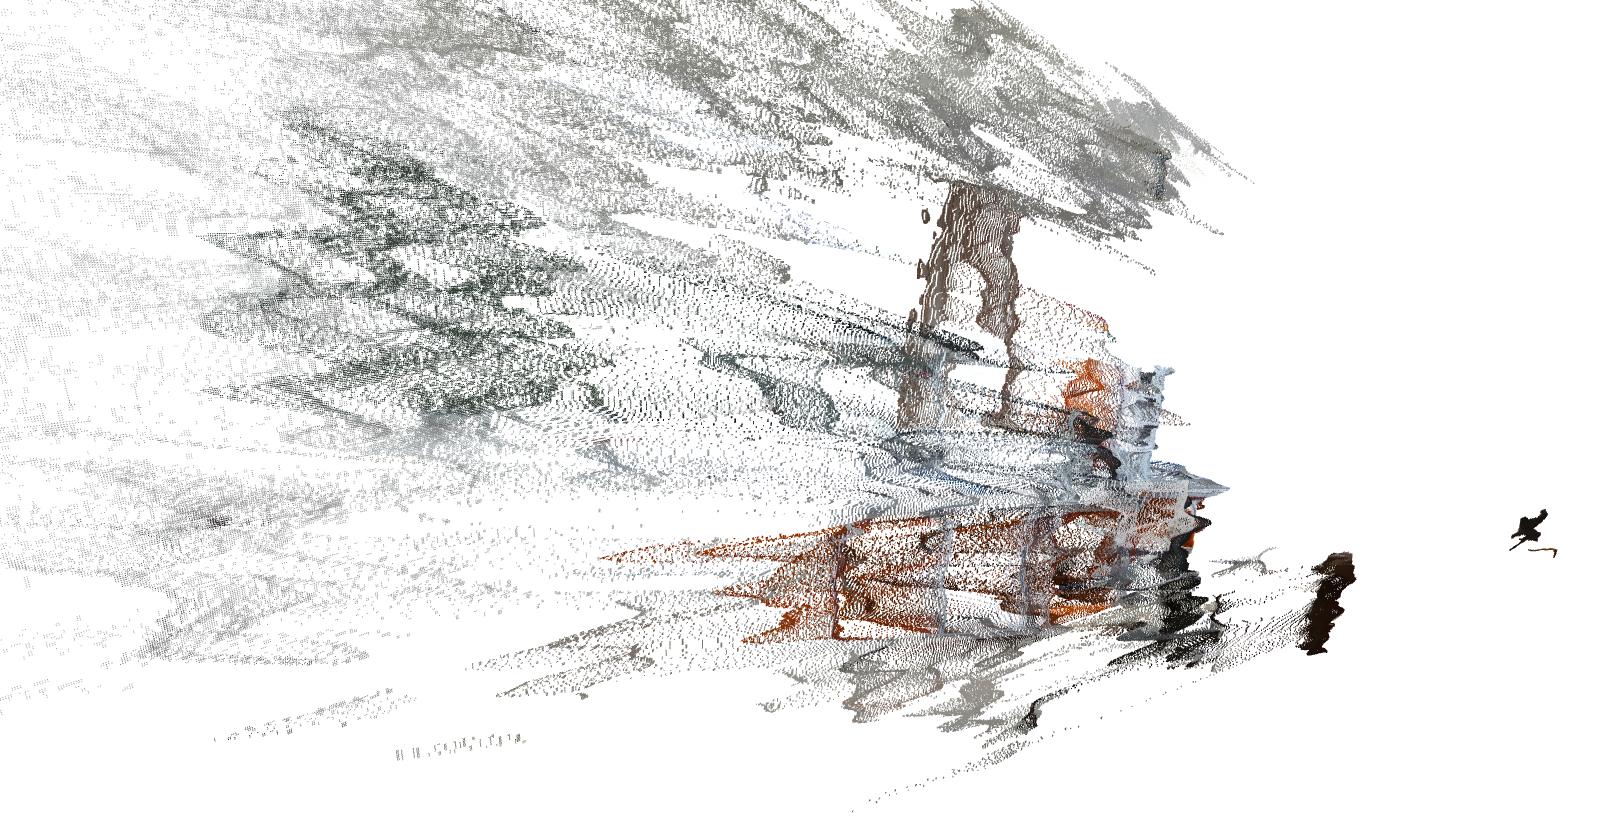
注意:此时
project_valid_depth_only = True 该参数设置为True才能显示点云,若设置为False则不会显示点云。不清楚原因,希望看到朋友的可以在评论区解释一下()
截断距离设为 depth_trunc=8.0

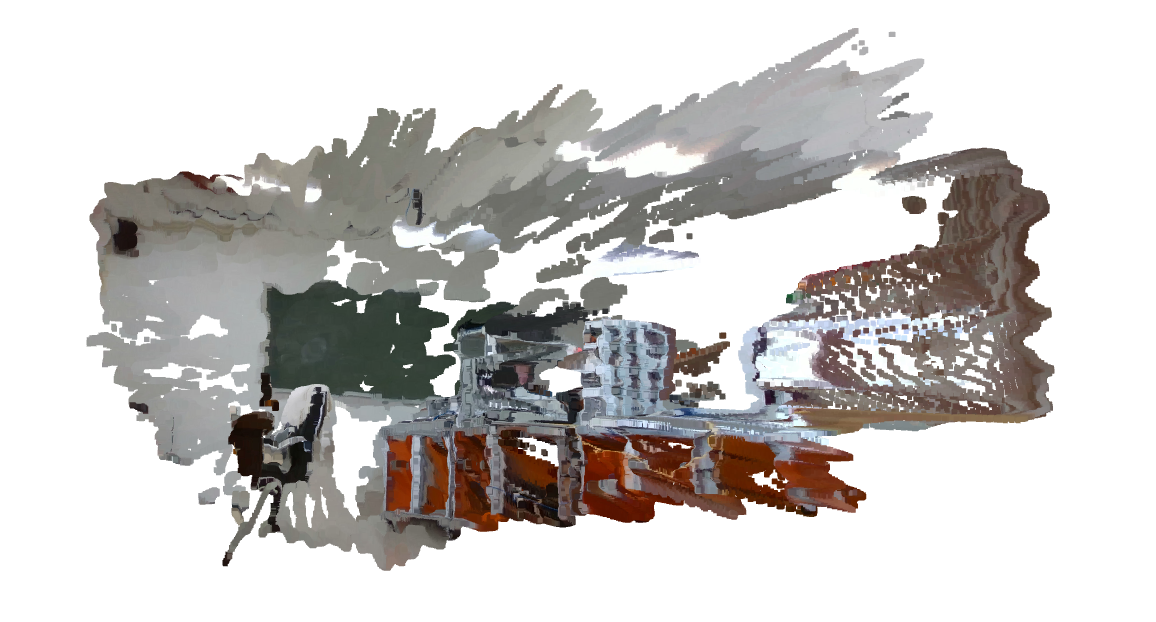
近距离看,远程点云有些失真,(可能是光照原因)褐色是玻璃(平面),显示的点云为凹形。
参考资料
1.open3d官网RGBD images - Open3D 0.19.0 documentation
2.点云侠
【2025最新版】Open3D 深度图像与彩色图像生成RGBD/点云(用法总结)_3d相机如何生成点云-CSDN博客
3.kimi.ai
获取相机内参
1.Python读取Realsense D435深度相机内参_pyrealsense2获取深度相机的内参-CSDN博客
2.获取D405相机的内参的方法-CSDN博客
深度相机使用
1.intelrealsense github 代码库示例