ASP.NET Core SignalR 身份认证集成指南(Identity + JWT)
文章目录
- 前言
- 一、完整解决方案架构
- 二、实现步骤
- 1.配置 Identity 和 JWT 认证
- 2. SignalR JWT配置
- 3.SignalR Hub 集成认证和授权
- 4.控制器
- 5.客户端集成 (JavaScript)
- 6.配置 appsettings.json
- 三、认证流程详解
- 1.用户登录:
- 2.SignalR 连接:
- 3.JWT 验证:
- 4.Hub 授权:
- 四、常见问题及解决方案:
- 总结
前言
本文将详细介绍如何在 ASP.NET Core SignalR 应用中结合 Identity 框架和 JWT 实现安全的身份认证与授权。
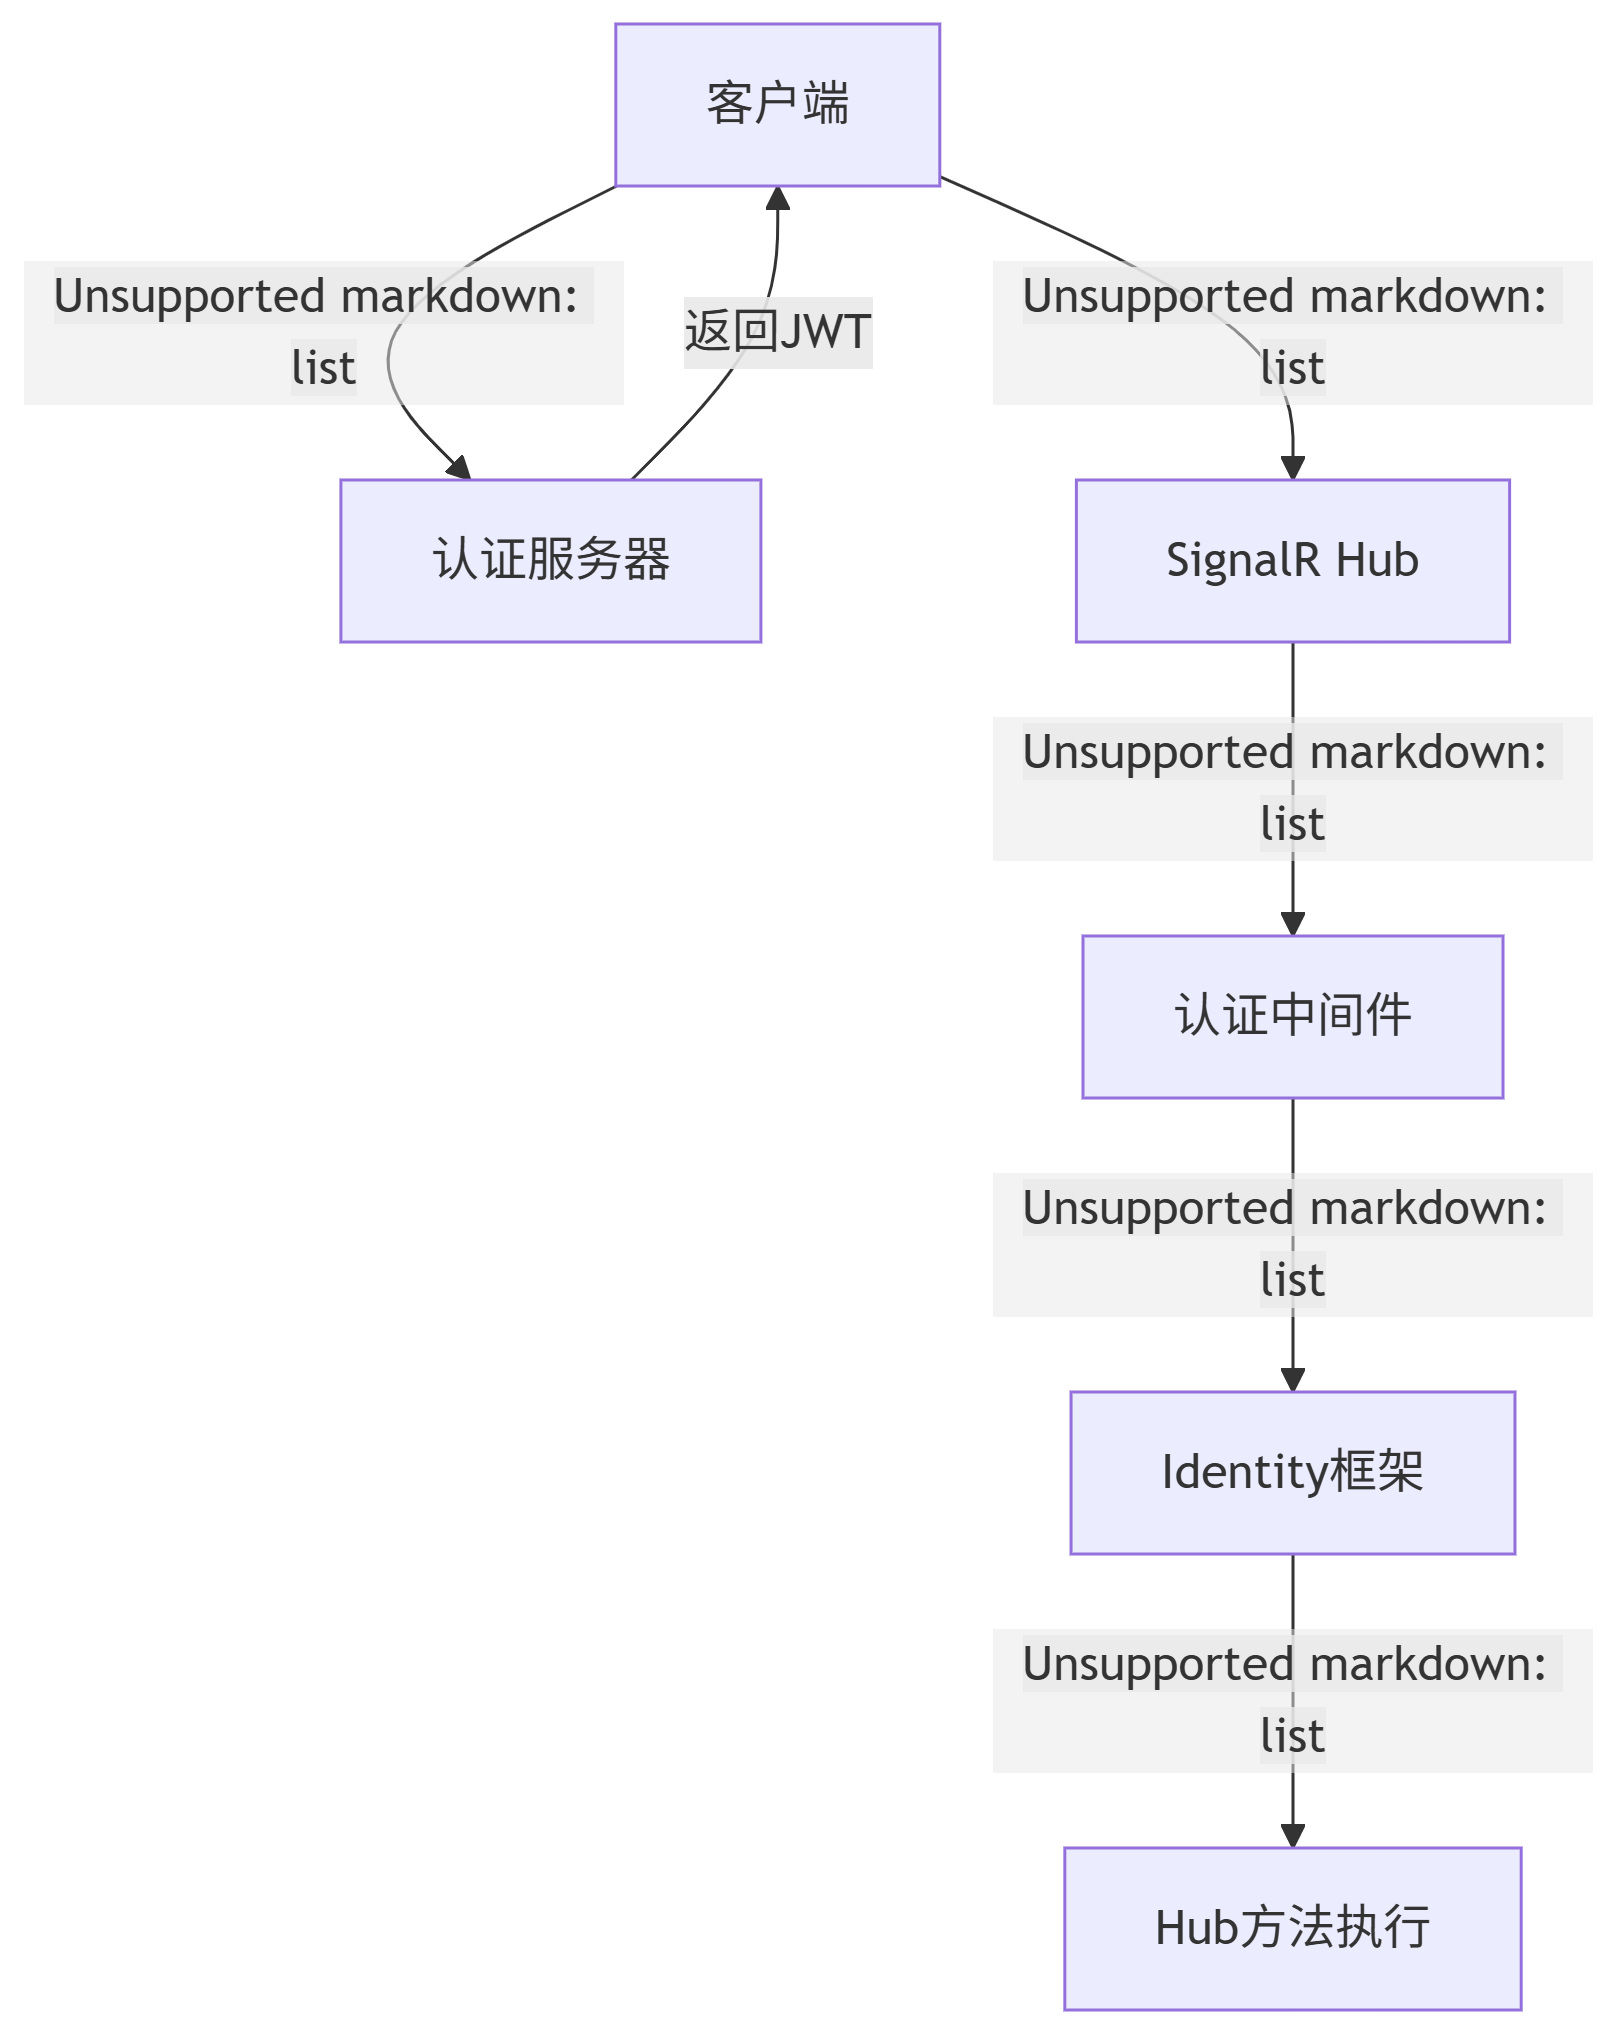
一、完整解决方案架构
二、实现步骤
1.配置 Identity 和 JWT 认证
Identity、JWT请参照【ASP.NET Core 中JWT的基本使用】、【ASP.NET Core Identity框架使用指南】
- Program.cs
using Microsoft.AspNetCore.Identity;
using Microsoft.EntityFrameworkCore;
using Microsoft.Extensions.Options;
using Microsoft.OpenApi.Models;
using SignalRDemo.Data;
using SignalRDemo.Entity;
using SignalRDemo.Extensions;
using SignalRDemo.HubService;
using SignalRDemo.Interfaces;
using SignalRDemo.Repositories;var builder = WebApplication.CreateBuilder(args);// Add services to the container.builder.Services.AddControllers();
// Learn more about configuring Swagger/OpenAPI at https://aka.ms/aspnetcore/swashbuckle
builder.Services.AddEndpointsApiExplorer();
builder.Services.AddSwaggerGen();
//数据库上下文
var connectionString = uilder.Configuration.GetConnectionString("DefaultConnection");
builder.Services.AddDbContext<MyDbContext>(opt => {opt.UseSqlServer(connectionString);
});
//配置Identity
builder.Services.AddIdentityCore<User>(opt => {opt.Lockout.MaxFailedAccessAttempts = 5;//登录失败多少次账号被锁定opt.Lockout.DefaultLockoutTimeSpan = TimeSpan.FromMinutes(1);//锁定多长时间opt.Password.RequireDigit = false;//密码是否需要数字    opt.Password.RequireLowercase = false;//密码是否需要小写字符opt.Password.RequireUppercase = false;//密码是否需要大写字符opt.Password.RequireNonAlphanumeric = false;//密码是否需要非字母数字的字符opt.Password.RequiredLength = 6;//密码长度opt.Tokens.PasswordResetTokenProvider = TokenOptions.DefaultEmailProvider;//密码重置令牌,使用默认的邮箱令牌提供程序来生成和验证令牌。此提供程序通常与用户邮箱关联,生成的令牌会通过邮件发送给用户,保证用户通过邮件接收密码重置链接。opt.Tokens.EmailConfirmationTokenProvider = TokenOptions.DefaultEmailProvider;//配置邮箱确认令牌(Email Confirmation Token)的生成和验证所使用的提供程序(Provider)
});
var idBuilder = new IdentityBuilder(typeof(User), typeof(Role), builder.Services);idBuilder.AddEntityFrameworkStores<MyDbContext>()
.AddDefaultTokenProviders().AddUserManager<UserManager<User>>()
.AddRoleManager<RoleManager<Role>>();builder.Services.Configure<JwtSettings>(builder.Configuration.GetSection("JwtSettings"));// 5. 注册应用服务
builder.Services.AddScoped<IUserRepository, UserRepository>();
builder.Services.AddScoped<IAuthService, AuthService>();// 添加 SignalR 服务
string redisServerAddress = "";
if (!string.IsNullOrWhiteSpace(redisServerAddress))
{builder.Services.AddSignalR().AddStackExchangeRedis(redisServerAddress, opt =>{opt.Configuration.ChannelPrefix = "MyAppSignalR"; // 通道前缀});
}
else
{builder.Services.AddSignalR();
}//跨域
string[] urls = new[] { "http://localhost:5173" };
builder.Services.AddCors(opt => opt.AddDefaultPolicy(builder => builder.WithOrigins(urls).AllowAnyMethod().AllowAnyHeader().AllowCredentials()));
// 添加JWT认证
// 认证服务配置(来自ServiceExtensions)
builder.Services.ConfigureJwtAuthentication(builder.Configuration);  // 扩展方法	ServiceExtensions.cs
//  授权策略配置(来自ServiceExtensions)
builder.Services.ConfigureAuthorizationPolicies();  // 扩展方法ServiceExtensions.cs
//配置Swagger中带JWT报文头
builder.Services.AddSwaggerGen(c =>
{c.SwaggerDoc("v1", new OpenApiInfo { Title = "My API", Version = "v1" });var securityScheme = new OpenApiSecurityScheme{Name = "Authorization",Description = "JWT Authorization header using the Bearer scheme.\r\nExample:'Bearer fadffdfadfds'",In = ParameterLocation.Header,Type = SecuritySchemeType.ApiKey,Scheme = "bearer",BearerFormat = "JWT",Reference = new OpenApiReference{Type = ReferenceType.SecurityScheme,Id = "Authorization"}};c.AddSecurityDefinition("Authorization", securityScheme);var securityRequirement = new OpenApiSecurityRequirement{{ securityScheme, new[] { "Bearer" } }};c.AddSecurityRequirement(securityRequirement);
});var app = builder.Build();// Configure the HTTP request pipeline.
if (app.Environment.IsDevelopment())
{app.UseSwagger();app.UseSwaggerUI();
}app.UseHttpsRedirection();
app.UseAuthentication();
app.UseAuthorization();
app.UseCors();
// 配置路由
app.MapHub<MyHubService>("/Hubs/MyHubService");// SignalR 终结点
app.MapControllers();app.Run();
2. SignalR JWT配置
- ServiceExtensions.cs
using Microsoft.AspNetCore.Authentication.JwtBearer;
using Microsoft.IdentityModel.Tokens;
using SignalRDemo.Entity;
using System.Security.Claims;
using System.Text;namespace SignalRDemo.Extensions
{public static class ServiceExtensions{// JWT认证配置public static void ConfigureJwtAuthentication(this IServiceCollection services, IConfiguration configuration){var jwtSettings = configuration.GetSection("JwtSettings").Get<JwtSettings>();services.AddAuthentication(options =>{options.DefaultAuthenticateScheme = JwtBearerDefaults.AuthenticationScheme;options.DefaultChallengeScheme = JwtBearerDefaults.AuthenticationScheme;}).AddJwtBearer(options =>{options.TokenValidationParameters = new TokenValidationParameters{ValidateIssuer = false,ValidIssuer = jwtSettings.Issuer,ValidateAudience = false,ValidAudience = jwtSettings.Audience,ValidateLifetime = false,ValidateIssuerSigningKey = false,IssuerSigningKey = new SymmetricSecurityKey(Encoding.UTF8.GetBytes(jwtSettings.SecretKey!)),//ClockSkew = TimeSpan.Zero,RoleClaimType = ClaimTypes.Role};options.Events = new JwtBearerEvents{OnAuthenticationFailed = context =>{if (context.Exception.GetType() == typeof(SecurityTokenExpiredException)){context.Response.Headers.Append("Token-Expired", "true");}return Task.CompletedTask;},//SignalR JWT配置OnMessageReceived = context =>{//websocket不支持自定义报文头//所以需要把JWT通过URL中的Querystring传递//然后在服务器端的OnMessageReceived中,把Querystring中的JWT读取出来var accessToken = context.Request.Query["access_token"];var path = context.HttpContext.Request.Path;if (!string.IsNullOrEmpty(accessToken) &&path.StartsWithSegments("/Hubs/MyHubService")){context.Token = accessToken;}return Task.CompletedTask;}};});}// 授权策略配置public static void ConfigureAuthorizationPolicies(this IServiceCollection services){services.AddAuthorization(options =>{// 基于角色的策略options.AddPolicy("AdminOnly", policy =>policy.RequireRole("admin"));options.AddPolicy("ManagerOnly", policy =>policy.RequireRole("admin"));// 基于自定义权限的策略options.AddPolicy("ContentEditor", policy =>policy.RequireClaim("permission", "content.edit"));options.AddPolicy("UserManagement", policy =>policy.RequireClaim("permission", "user.manage"));});}}
}
3.SignalR Hub 集成认证和授权
-
MyHubService.cs
using Microsoft.AspNetCore.Authorization;
using Microsoft.AspNetCore.SignalR;namespace SignalRDemo.HubService
{//[Authorize]public class MyHubService:Hub{[Authorize(Roles = "admin")]public Task SendMessageAsync(string user,string content){var connectionId=this.Context.ConnectionId;string msg = $"{connectionId},{DateTime.Now.ToString()}:{user}";return Clients.All.SendAsync("ReceiveMsg", msg, content);}}
}
4.控制器
-
AuthController.cs
using Microsoft.AspNetCore.Authorization;
using Microsoft.AspNetCore.Http;
using Microsoft.AspNetCore.Identity.Data;
using Microsoft.AspNetCore.Mvc;
using Microsoft.Extensions.Options;
using Microsoft.IdentityModel.Tokens;
using SignalRDemo.Entity;
using SignalRDemo.Interfaces;
using System.IdentityModel.Tokens.Jwt;
using System.Runtime;
using System.Security.Claims;
using System.Text;namespace SignalRDemo.Controllers
{[Route("api/[controller]/[action]")][ApiController]public class AuthController : ControllerBase{private readonly IAuthService _authService;public AuthController(IConfiguration config, IOptionsSnapshot<JwtSettings> settings, IAuthService authService){_config = config;_settings = settings;_authService = authService;}[HttpPost][AllowAnonymous]public async Task<IActionResult> Login([FromBody] LoginModel request){var result = await _authService.Authenticate(request.Username, request.Password);if (result == null) return Unauthorized();return Ok(result);}}
}
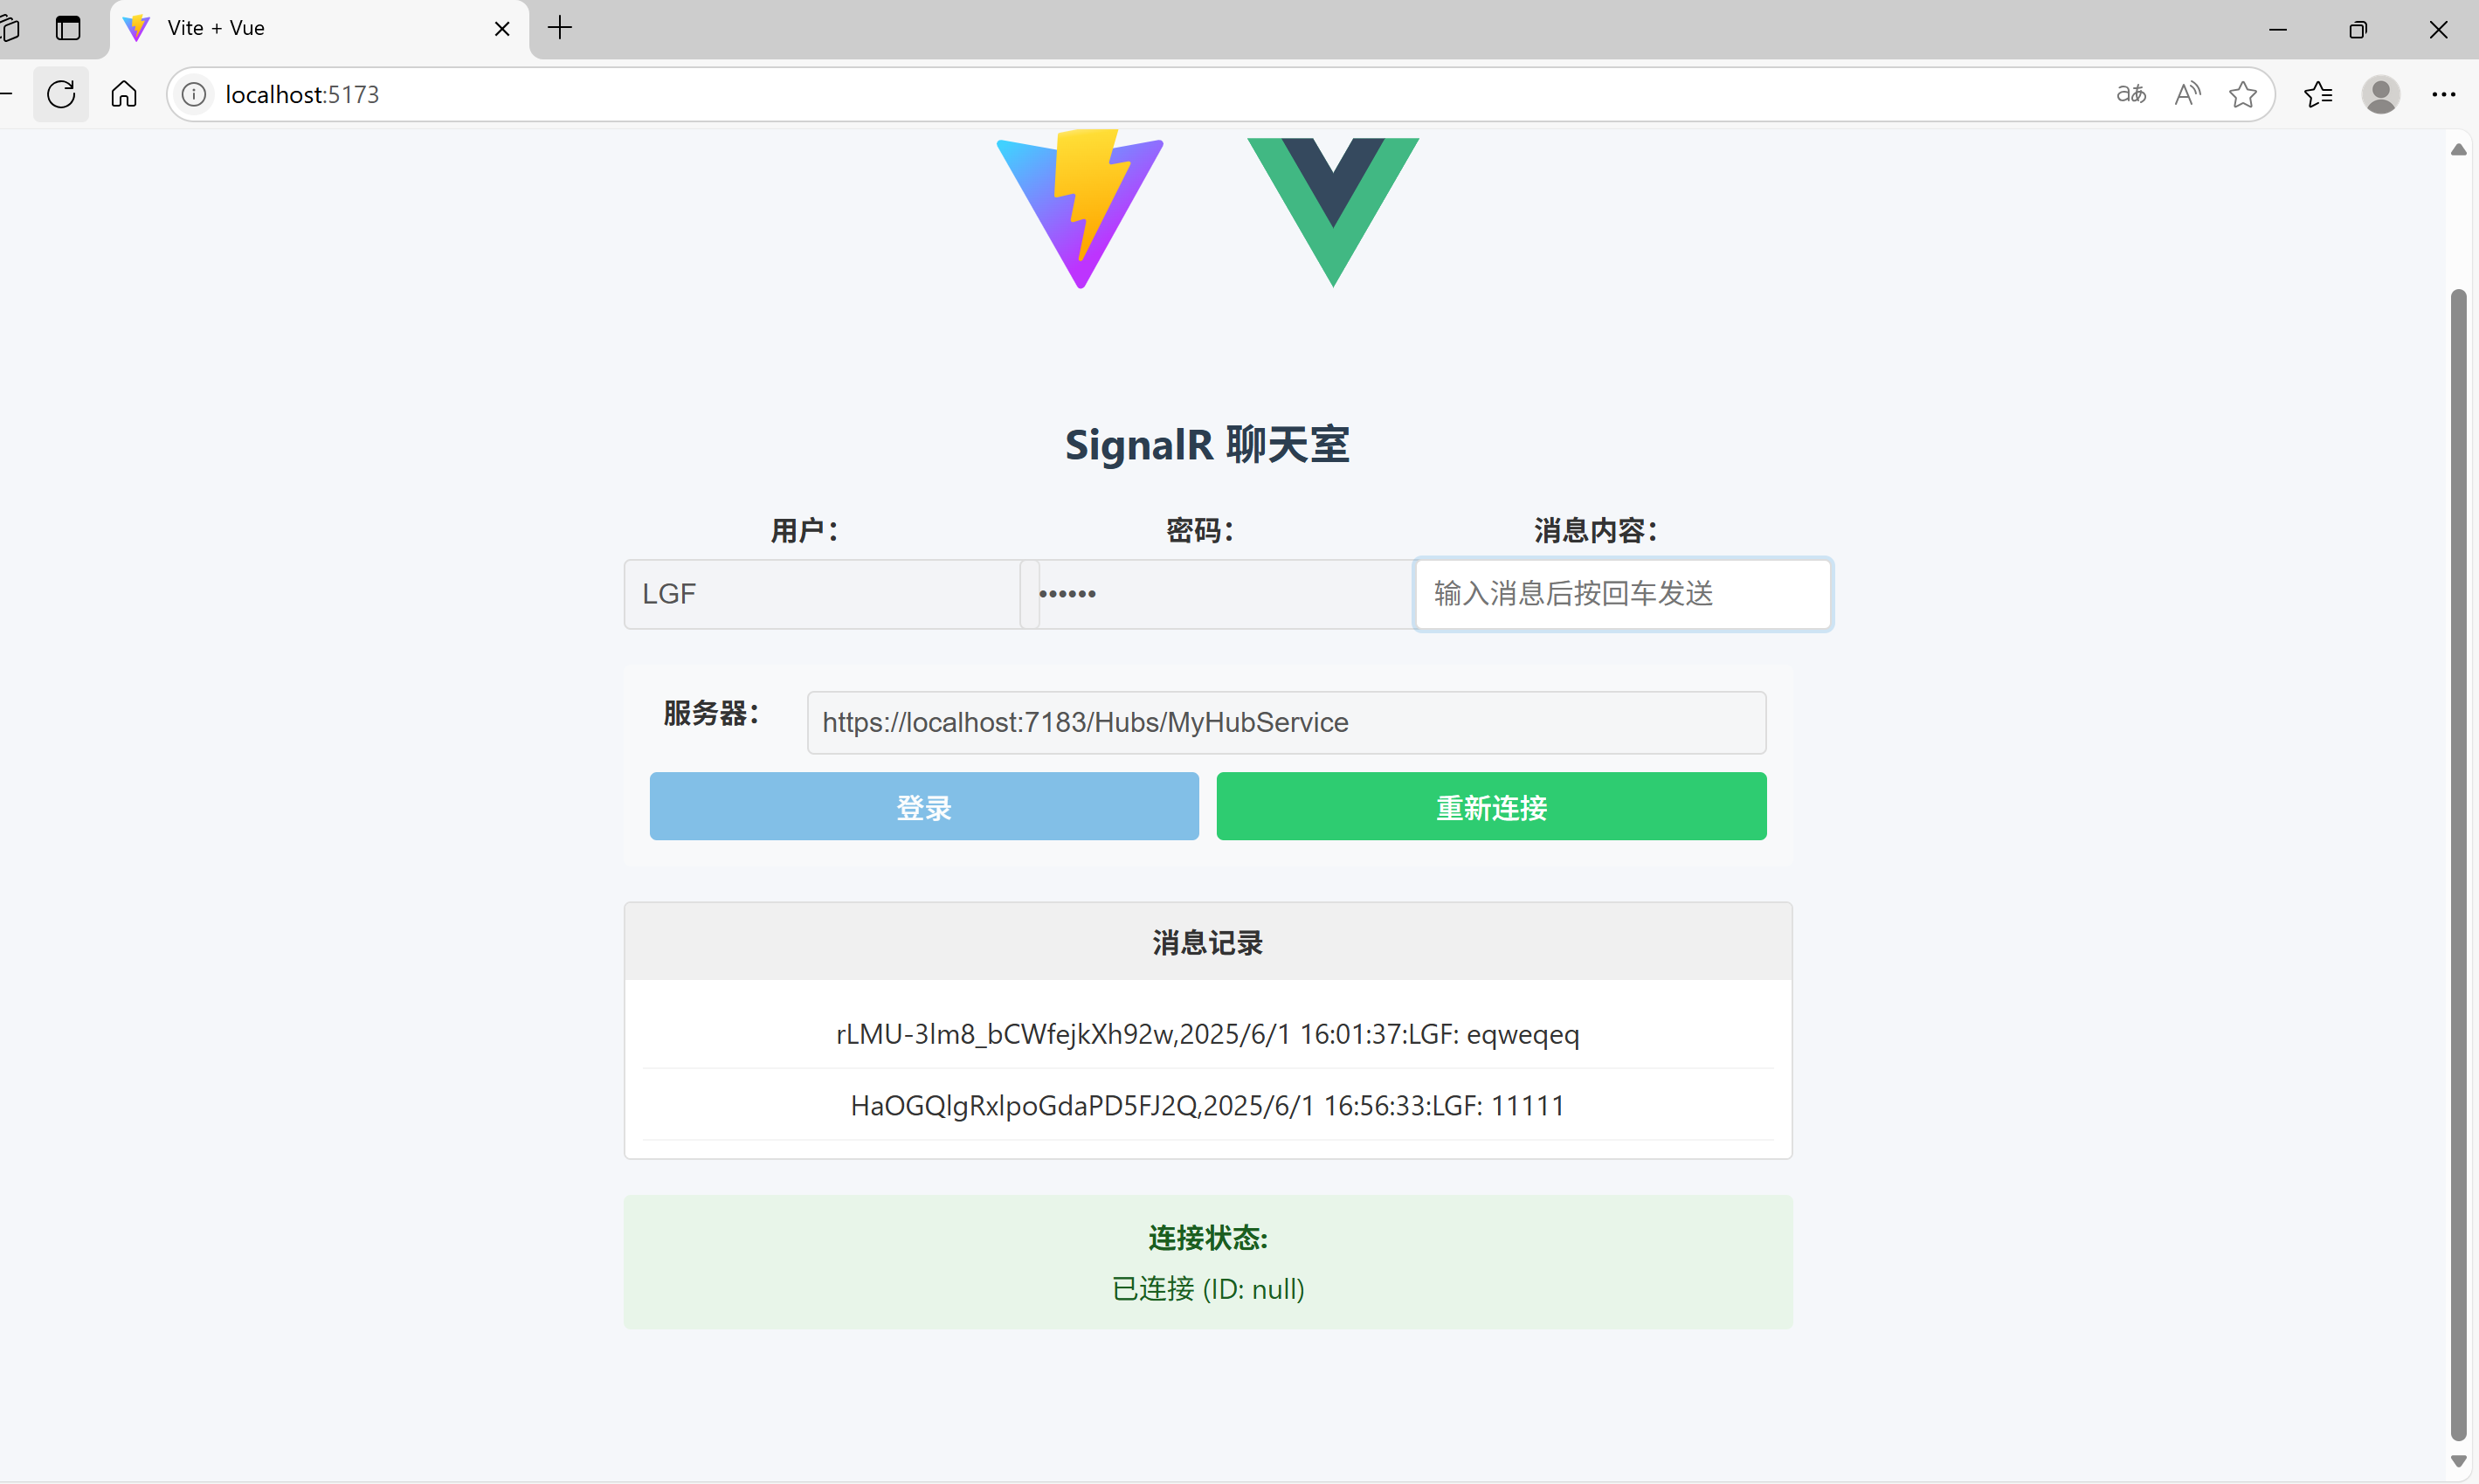
5.客户端集成 (JavaScript)
- 代码示例
<template><div style="padding: 20px; max-width: 800px; margin: 0 auto;"><h2 style="color: #2c3e50;">SignalR 聊天室</h2><!-- 消息发送区域 - 始终显示但禁用状态 --><div style="margin-bottom: 20px; display: flex; flex-wrap: wrap; gap: 10px; align-items: center;"><div style="flex: 1 1 200px;"><label style="display: block; font-weight: bold; margin-bottom: 5px;">用户:</label><input type="text" v-model="state.username" placeholder="输入用户名":disabled="state.isLoggingIn || state.isConnected"style="padding: 10px; border: 1px solid #ddd; border-radius: 4px; width: 100%;"/></div><div style="flex: 1 1 200px;"><label style="display: block; font-weight: bold; margin-bottom: 5px;">密码:</label><input type="password" v-model="state.password" placeholder="输入密码":disabled="state.isLoggingIn || state.isConnected"style="padding: 10px; border: 1px solid #ddd; border-radius: 4px; width: 100%;"/></div><div style="flex: 1 1 200px;"><label style="display: block; font-weight: bold; margin-bottom: 5px;">消息内容:</label><input type="text" v-model="state.contentMsg" @keydown.enter="sendMessage"placeholder="输入消息后按回车发送":disabled="!state.isConnected || state.isConnecting"style="padding: 10px; border: 1px solid #ddd; border-radius: 4px; width: 100%;"/></div></div><!-- 登录控制区域 --><div style="margin-bottom: 20px; background: #f8f9fa; padding: 15px; border-radius: 4px;"><div style="display: flex; margin-bottom: 10px;"><label style="margin-right: 10px; font-weight: bold; min-width: 80px;">服务器:</label><inputtype="text"v-model="state.serverUrl"placeholder="输入 SignalR Hub URL":disabled="state.isConnected"style="padding: 8px; border: 1px solid #ddd; border-radius: 4px; flex: 1;"/></div><div style="display: flex; gap: 10px;"><button @click="login":disabled="state.isLoggingIn || state.isConnected"style="padding: 8px 15px; background: #3498db; color: white; border: none; border-radius: 4px; cursor: pointer; flex: 1;"> {{ state.isLoggingIn ? '登录中...' : '登录' }}</button><button @click="reconnect":disabled="!state.token"style="padding: 8px 15px; background: #2ecc71; color: white; border: none; border-radius: 4px; cursor: pointer; flex: 1;">{{ state.isConnected ? '重新连接' : '连接' }}</button></div></div><!-- 消息记录区域 --><div style="border: 1px solid #e0e0e0; border-radius: 4px; overflow: hidden; margin-bottom: 20px;"><div style="background: #f0f0f0; padding: 10px; font-weight: bold;">消息记录</div><div style="max-height: 300px; overflow-y: auto; padding: 10px; background: white;"><div v-for="(msg, index) in state.messages" :key="index" style="padding: 8px 0; border-bottom: 1px solid #f5f5f5;">{{ msg }}</div><div v-if="state.messages.length === 0" style="text-align: center; color: #999; padding: 20px;">暂无消息</div></div></div><!-- 状态显示区域 --><div :style="{padding: '12px',borderRadius: '4px',marginBottom: '15px',backgroundColor: state.connectionStatus.includes('失败') ? '#ffebee' : state.connectionStatus.includes('连接') ? '#e8f5e9' : '#e3f2fd',color: state.connectionStatus.includes('失败') ? '#b71c1c' : state.connectionStatus.includes('连接') ? '#1b5e20' : '#0d47a1',border: state.connectionStatus.includes('失败') ? '1px solid #ffcdd2' : 'none'}"><div style="font-weight: bold; margin-bottom: 5px;">连接状态:</div><div>{{ state.connectionStatus }}</div><div v-if="state.errorDetails" style="margin-top: 10px; font-size: 0.9em; color: #b71c1c;"><div style="font-weight: bold;">错误详情:</div><div style="word-break: break-all;">{{ state.errorDetails }}</div></div></div></div> </template><script> import { reactive, onUnmounted } from 'vue'; import * as signalR from '@microsoft/signalr';export default {setup() {const state = reactive({username: "",password: "",contentMsg: "",messages: [],connectionStatus: "未连接",isConnected: false,isConnecting: false,isLoggingIn: false,serverUrl: "https://localhost:7183/Hubs/MyHubService",errorDetails: "",connection: null,retryCount: 0,token: null});const sendMessage = async () => {if (!state.contentMsg.trim()) return;if (!state.isConnected || !state.connection) {state.connectionStatus = "连接尚未建立,无法发送消息";return;}try {const possibleMethods = [// "SendMessage", "SendMessageAsync"// "BroadcastMessage",// "SendToAll",// "PublishMessage"];let lastError = null;for (const method of possibleMethods) {try {await state.connection.invoke(method, state.username, state.contentMsg);state.contentMsg = "";return;} catch (error) {lastError = error;}}state.connectionStatus = `发送失败: 未找到服务端方法`;state.errorDetails = `尝试的方法: ${possibleMethods.join(", ")}\n错误: ${lastError.message}`;} catch (error) {state.connectionStatus = `发送失败: ${error.message}`;state.errorDetails = error.toString();}};const initSignalRConnection = async (token) => {// token='12332131321';state.isConnecting = true;state.connectionStatus = "正在连接...";state.errorDetails = "";try {if (state.connection) {await state.connection.stop();state.connection = null;}state.connection = new signalR.HubConnectionBuilder().withUrl(state.serverUrl, {accessTokenFactory: () => token,skipNegotiation: true,transport: signalR.HttpTransportType.WebSockets}).withAutomaticReconnect({nextRetryDelayInMilliseconds: retryContext => {state.retryCount = retryContext.previousRetryCount + 1;return Math.min(1000 * Math.pow(2, state.retryCount), 30000);}}).configureLogging(signalR.LogLevel.Debug).build();state.connection.on('ReceiveMessage', rcvMsg => {state.messages.push(rcvMsg);});state.connection.on('ReceiveMsg', (rcvMsg, rcvContent) => {state.messages.push(`${rcvMsg}: ${rcvContent}`);});state.connection.onreconnecting(() => {state.isConnected = false;state.connectionStatus = "连接丢失,正在重连...";});state.connection.onreconnected(connectionId => {state.isConnected = true;state.isConnecting = false;state.retryCount = 0;state.connectionStatus = `已重新连接 (ID: ${connectionId})`;});state.connection.onclose(error => {state.isConnected = false;state.isConnecting = false;state.connectionStatus = error ? `连接关闭: ${error.message}` : "连接已关闭";});await state.connection.start();state.isConnected = true;state.isConnecting = false;state.retryCount = 0;state.connectionStatus = `已连接 (ID: ${state.connection.connectionId})`;} catch (error) {console.error("SignalR 连接失败:", error);state.isConnected = false;state.isConnecting = false;state.connectionStatus = `连接失败: ${error.message}`;state.errorDetails = error.toString();}};const reconnect = async () => {if (state.token) {await initSignalRConnection(state.token);} else {state.connectionStatus = "请先登录";}};const login = async () => {if (state.isLoggingIn || state.isConnected) return;state.isLoggingIn = true;state.connectionStatus = "正在登录...";try {const apiUrl = state.serverUrl.split('/Hubs/')[0] || 'https://localhost:7183';const response = await fetch(`${apiUrl}/api/auth/login`, {method: 'POST',headers: { 'Content-Type': 'application/json' },body: JSON.stringify({username: state.username,password: state.password}) });if (!response.ok) {throw new Error(`登录失败: ${response.status}`);}const result = await response.json();state.token = result.token;localStorage.setItem('jwtToken', result.token);// alert(result.token);// 登录成功后初始化SignalR连接await initSignalRConnection(result.token);} catch (error) {state.connectionStatus = `登录失败: ${error.message}`;state.errorDetails = error.toString();} finally {state.isLoggingIn = false;}};onUnmounted(() => {if (state.connection) {state.connection.stop();}});return { state, sendMessage, reconnect, login };} } </script><style> body {font-family: 'Segoe UI', Tahoma, Geneva, Verdana, sans-serif;background-color: #f5f7fa;margin: 0;padding: 20px;color: #333; }input, button {font-size: 1rem;transition: all 0.3s; }input:focus {outline: none;border-color: #3498db;box-shadow: 0 0 0 2px rgba(52, 152, 219, 0.2); }button {font-weight: 500; }button:hover:not(:disabled) {opacity: 0.9;transform: translateY(-1px); }button:disabled {opacity: 0.6;cursor: not-allowed; }label {display: block;margin-bottom: 5px; } </style> - 界面展示:
6.配置 appsettings.json
- appsettings.json
{"Logging": {"LogLevel": {"Default": "Information","Microsoft.AspNetCore": "Warning"}},"AllowedHosts": "*","ConnectionStrings": {"DefaultConnection": "Server=XXX;Database=XXX;User Id=sa;Password=XXX;TrustServerCertificate=True;Trusted_Connection=True;MultipleActiveResultSets=True"},"JwtSettings": {"Issuer": "yourdomain.com","Audience": "yourapp","SecretKey": "YourSuperSecretKeyAtLeast32CharactersLong","ExpirationMinutes": 60,"RefreshTokenExpirationDays": 7}
}
三、认证流程详解
1.用户登录:
- 客户端发送凭据到 /api/auth/login
- 服务器验证凭据,使用 Identity 检查用户
- 生成包含用户声明和角色的 JWT
- 返回 JWT 给客户端
2.SignalR 连接:
- 客户端使用 accessTokenFactory 提供 JWT
- SignalR 通过 WebSocket 或长轮询连接时携带 JWT
- 服务器在 OnMessageReceived 事件中提取 JWT
3.JWT 验证:
- 认证中间件验证 JWT 签名、有效期等
- 创建 ClaimsPrincipal 并附加到 HttpContext
- SignalR 继承此安全上下文
4.Hub 授权:
- [Authorize] 属性检查用户是否认证
- [Authorize(Roles = “Admin”)] 检查角色权限
四、常见问题及解决方案:
| 问题 | 解决方案 |
|---|---|
| 401 Unauthorized | 检查 JWT 是否过期,验证签名密钥 |
| 连接失败 | 确保 OnMessageReceived 正确提取令牌 |
| 角色授权失败 | 检查 JWT 是否包含正确的角色声明 |
| WebSocket 问题 | 检查服务器和代理的 WebSocket 配置 |
| CORS 问题 | 确保 CORS 策略包含 AllowCredentials() |
总结
通过以上配置,您可以构建一个安全、可扩展的 ASP.NET Core SignalR 应用,充分利用 Identity 框架进行用户管理,并通过 JWT 实现无状态认证。这种架构特别适用于需要实时通信的现代 Web 应用和移动应用。
本文来自互联网用户投稿,该文观点仅代表作者本人,不代表本站立场。本站仅提供信息存储空间服务,不拥有所有权,不承担相关法律责任。如若转载,请注明出处:http://www.dtcms.com/a/225391.html
如若内容造成侵权/违法违规/事实不符,请联系邮箱:809451989@qq.com进行投诉反馈,一经查实,立即删除!