threejs模型对象、材质
1. 三维向量Vector3与模型位置
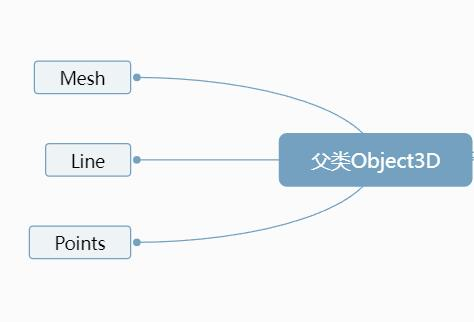
点模型Points、线模型Line、网格网格模型Mesh等模型对象的父类都是Object3D (opens new window),如果想对这些模型进行旋转、缩放、平移等操作,如何实现,可以查询Threejs文档Object3D (opens new window)对相关属性和方法的介绍。
三维向量Vector3
三维向量Vector3有xyz三个分量,threejs中会用三维向量Vector3表示很多种数据,本节课提到的比较简单,就是位置.position和缩放.scale属性。
查看three.js文档你可以知道Vector3对象具有属性.x、.y、.z,Vector3对象还具有.set()等方法。
//new THREE.Vector3()实例化一个三维向量对象
const v3 = new THREE.Vector3(0,0,0);
console.log('v3', v3);
v3.set(10,0,0);//set方法设置向量的值
v3.x = 100;//访问x、y或z属性改变某个分量的值
位置属性.position
// 位置属性.position使用threejs三维向量对象Vector3表示的
console.log('模型位置属性.position的值', mesh.position);
模型位置.position属性用一个三维向量表示,那意味着,以后你想改变位置属性,就应该查询文档Vector3。
这里之所以强调这一点,课程目的不单单是给你介绍具体的知识点,也是在引导你学会查文档,降低记忆压力。
改变位置属性
通过模型位置属性.position可以设置模型在场景Scene中的位置。模型位置.position的默认值是THREE.Vector3(0.0,0.0,0.0),表示坐标原点。
设置网格模型y坐标
mesh.position.y = 80;
设置模型xyz坐标
mesh.position.set(80,2,10);
平移
执行.translateX()、.translateY()等方法本质上改变的都是模型的位置属性.position。
网格模型沿着x轴正方向平移100,可以多次执行该语句,每次执行都是相对上一次的位置进行平移变换。
// 等价于mesh.position = mesh.position + 100;
mesh.translateX(100);//沿着x轴正方向平移距离100
沿着Z轴负方向平移距离50。
mesh.translateZ(-50);
沿着自定义的方向移动。
//向量Vector3对象表示方向
const axis = new THREE.Vector3(1, 1, 1);
axis.normalize(); //向量归一化
//沿着axis轴表示方向平移100
mesh.translateOnAxis(axis, 100);
效果如下:

缩放
属性.scale表示模型对象的xyz三个方向上的缩放比例,.scale的属性值是一个三维向量对象Vector3,默认值是THREE.Vector3(1.0,1.0,1.0)。
x轴方向放大2倍
mesh.scale.x = 2.0;
网格模型xyz方向分别缩放0.5,1.5,2倍
mesh.scale.set(0.5, 1.5, 2)
相关代码:
import * as THREE from "three";const geometry = new THREE.BoxGeometry(50, 50, 50); //矩形平面
const material = new THREE.MeshLambertMaterial({color: 0x00ffff, //黄色线条transparent: true,opacity: 0.5,
});const mesh = new THREE.Mesh(geometry, material);
// 创建了一个三维向量
const v3 = new THREE.Vector3(100, 100, 100);
v3.set(50, 50, 50);
console.log("v3", v3.x);
// 网格模型具有一个父类有position,scale属性,.translateX()方法,说明网格模型也有这个属性,会继承父类所有的公共属性
// mesh.position.set(0, 100, 0);
// mesh.position.z = 100
// mesh.scale.set(2,2,2)
// mesh.scale.x = 3
// mesh.position.x = 100
// mesh.translateX(100); //本质上改变的就是position属性的x分量
// console.log('mesh.position.x', mesh.position.x);
const v = new THREE.Vector3(1, 1, 1);
v.normalize(); //转化为单位向量
console.log("v", v);
mesh.translateOnAxis(v, 100);
export default mesh;
2. 欧拉Euler与角度属性.rotation
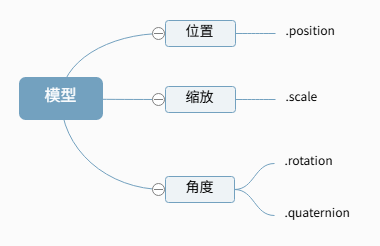
模型的角度属性.rotation和四元数属性.quaternion都是表示模型的角度状态,只是表示方法不同,.rotation属性值是欧拉对象Euler (opens new window),.quaternion属性值是是四元数对象Quaternion(opens new window)
大家刚入门,就先给大家介绍比较容易理解的角度属性.rotation和对应属性值欧拉对象Euler。
欧拉对象Euler
// 创建一个欧拉对象,表示绕着xyz轴分别旋转45度,0度,90度
const Euler = new THREE.Euler( Math.PI/4,0, Math.PI/2);
通过属性设置欧拉对象的三个分量值。
const Euler = new THREE.Euler();
Euler.x = Math.PI/4;
Euler.y = Math.PI/2;
Euler.z = Math.PI/4;
改变角度属性.rotation
角度属性.rotation的值是欧拉对象Euler,意味着你想改变属性.rotation,可以查询文档关于Euler类的介绍。
//绕y轴的角度设置为60度
mesh.rotation.y += Math.PI/3;
//绕y轴的角度增加60度
mesh.rotation.y += Math.PI/3;
//绕y轴的角度减去60度
mesh.rotation.y -= Math.PI/3;
旋转方法.rotateX()、.rotateY()、.rotateZ()
模型执行.rotateX()、.rotateY()等旋转方法,你会发现改变了模型的角度属性.rotation。
mesh.rotateX(Math.PI/4);//绕x轴旋转π/4
// 绕着Y轴旋转90度
mesh.rotateY(Math.PI / 2);
//控制台查看:旋转方法,改变了rotation属性
console.log(mesh.rotation);
旋转动画
// 渲染循环
function render() {model.rotation.y+=0.01;requestAnimationFrame(render);
}
function render() {model.rotateY(0.01);
}
绕某个轴旋转
网格模型绕(0,1,0)向量表示的轴旋转π/8
const axis = new THREE.Vector3(0,1,0);//向量axis
mesh.rotateOnAxis(axis,Math.PI/8);//绕axis轴旋转π/8
相关代码:
import * as THREE from "three";const geometry = new THREE.BoxGeometry(50, 50, 50); //矩形平面
const material = new THREE.MeshLambertMaterial({color: 0x00ffff, //黄色线条
});const mesh = new THREE.Mesh(geometry, material);
// const eu = new THREE.Euler(0,Math.PI,0)
// eu.x = Math.PI
// console.log('eu',eu.x);
// console.log("mesh.rotation", mesh.rotation);
// Math.PI相当于180°
// mesh.rotation.y = Math.PI / 8
// mesh.rotation.y += Math.PI / 8// mesh.rotateX(Math.PI / 4);
// mesh.rotateZ(Math.PI / 4);
// mesh.rotateY(Math.PI / 4);export default mesh;
3. 模型材质颜色(Color对象)
你去文档搜索MeshBasicMaterial、MeshLambertMaterial、MeshPhongMaterial等网格材质,可以看到他们都有一个颜色属性.color。
下面结合threejs文档,带领大家探索一下,如何通过查询文档来修改模型材质的颜色值.color。
材质颜色属性.coor
如果你想修改材质的颜色属性.color,那么你就需要了解该属性对应属性值的形式。
查文档,找到.color属性,可以发现threejs材质对象颜色属性.color是threejs的颜色对象Color。
console.log()打印:浏览器控制台查看材质颜色属性的属性值
console.log('material.color',material.color);
颜色对象Color
查看颜色对象Color文档,可以看到颜色对象有三个属性,分别为.r、.g、.b,表示颜色RGB的三个分量。
// 创建一个颜色对象
const color = new THREE.Color();//默认是纯白色0xffffff。
console.log('查看颜色对象结构',color);//可以查看rgb的值
// 查看Color对象设置0x00ff00对应的的.r、.g、.b值
const color = new THREE.Color(0x00ff00);
通过.r、.g、.b属性改变颜色值
color.r = 0.0;
color.b = 0.0;
改变颜色的方法
查看Color文档,可以看到Color提供了.setHex()、.setRGB()、.setStyle()、.set()等修改颜色值的方法。
color.setRGB(0,1,0);//RGB方式设置颜色
color.setHex(0x00ff00);//十六进制方式设置颜色
color.setStyle('#00ff00');//前端CSS颜色值设置颜色
.setHex()、.setStyle()风格的颜色值都可以作为.set()的参数
color.set(0x00ff00);//十六进制方式设置颜色
color.set('#00ff00');//前端CSS颜色值设置颜色
重置模型材质的颜色
十六进制颜色
material.color.set(0x00ffff);
前端CSS风格颜色值:'#00ff00'、'rgb(0,255,0)'等形式
material.color.set('#00ff00');
material.color.set('rgb(0,255,0)');
相关代码:
import * as THREE from "three";const geometry = new THREE.BoxGeometry(50, 50, 50); //矩形平面
const material = new THREE.MeshLambertMaterial({color: 0xffff00, //黄色线条
});const mesh = new THREE.Mesh(geometry, material);
console.log("material.color", material.color);
const color = new THREE.Color();
// color.setRGB(0, 1, 0);
// color.setStyle('#ff0000');
// color.set(0xff0000);
// color.r = 0;
// color.b = 0;
// console.log("color", color);
// material.color = color
// material.color.r = 0;
// material.color.b = 0;
// console.log("material.color", material.color);// material.color.set(0x00ff00);
// material.color.set('#00ff00');
material.color.set('rgb(255,255,255)');export default mesh;
4. 模型材质父类Material
材质父类Material
查询threejs文档,你可以看到基础网格材质MeshBasicMaterial、漫反射网格材质MeshLambertMaterial、高光网格材质MeshPhongMaterial等网格材质都有一个共同的父类Material。
网格材质继承父类属性
从JavaScript语法角度看子类都会继承父类的属性和方法,threejs的材质同样道理。
MeshBasicMaterial、MeshLambertMaterial、MeshPhongMaterial等子类网格材质会从父类Material继承一些属性和方法,比如透明度属性.opacity、面属性.side、是否透明属性.transparent等等。
材质半透明设置
material.transparent = true;//开启透明
material.opacity = 0.5;//设置透明度
材质面属性.side
你可以用矩形平面PlaneGeometry来测试材质的面属性.side。
查看文档,可以知道材质面属性.side默认值是THREE.FrontSide,表示网格模型正面可以看到,THREE.BackSide表示背面可以看到,THREE.DoubleSide表示双面可以看到。
material.side = THREE.BackSide;//背面可以看到
material.side = THREE.DoubleSide;//双面可见
THREE.FrontSide、THREE.BackSide、THREE.DoubleSide其实在theeejs内部都表示一个数字,你可以通过浏览器控制log打印查看验证,具体可以查看src目录下constants.js的源码文件。
console.log('material.side',material.side);
相关代码:
import * as THREE from "three";// const geometry = new THREE.BoxGeometry(50, 50, 50); //矩形平面
const geometry = new THREE.PlaneGeometry(50, 50, 50); //矩形平面
const material = new THREE.MeshLambertMaterial({color: 0x00ffff, //黄色线条// transparent: true,// opacity: 0.5,});
// material.transparent = true
// material.opacity = 0.5
material.side = THREE.FrontSide //0
material.side = THREE.BackSide //1
material.side = THREE.DoubleSide //2
console.log('material.side', material.side);
const mesh = new THREE.Mesh(geometry, material);
export default mesh;
5. 模型材质和几何体属性
本节课给大家介绍模型对象的几何体.geometry和材质属性.material。
浏览器控制台查看对象和属性
浏览器控制打印模型对象mesh,可以展开对象,查看对象的几何体.geometry和材质属性.material。
const mesh = new THREE.Mesh(geometry, material);
console.log('mesh',mesh);
浏览器控制台打印模型的几何体属性.geometry和材质属性.material。
console.log('mesh.geometry',mesh.geometry);
console.log('mesh.material',mesh.material);
访问改变模型材质属性
// 访问模型材质,并设置材质的颜色属性
mesh.material.color.set(0xffff00);
访问改变模型几何体属性
// 访问模型几何体,并平移几何体顶点数据
mesh.geometry.translate(0,100,0);
材质或几何体共享
const mesh = new THREE.Mesh(geometry, material);
const mesh2 = new THREE.Mesh(geometry, material);
mesh2.position.x = 100;
// 两个mesh共享一个材质,改变一个mesh的颜色,另一个mesh2的颜色也会跟着改变
// mesh.material和mesh2.material都指向同一个material
// 三者等价:mesh.material、mesh2.material、material
mesh.material.color.set(0xffff00);
// 三者等价:mesh.geometry、mesh2.geometry、geometry
mesh.geometry.translate(0,100,0);
相关代码:
model.js
import * as THREE from "three";const geometry = new THREE.BoxGeometry(50, 50, 50); //矩形平面
const material = new THREE.MeshLambertMaterial({color: 0x00ffff, //黄色线条
});
const mesh = new THREE.Mesh(geometry, material);
const mesh2 = new THREE.Mesh(geometry, material);
mesh2.position.x = 100
// 上面一段代码执行完了之后,geometry与material就会成为mesh的属性
console.log("mesh", mesh);
// console.log("mesh.geometry", mesh.geometry);
// console.log("mesh.material", mesh.material);
// 这三句代码等价
mesh.material.color.set(0xffff00)
mesh2.material.color.set(0xffff00)
material.color.set(0xffff00)
// material.color.set(0xffff00)
// 这两句等价
// mesh.geometry.translate(0, -100, 0);
mesh2.geometry.translate(0, -100, 0);
export {mesh,mesh2};
index.js
// 引入threejs
import * as THREE from "three";
// 引入轨道控制器扩展库OrbitControls.js
import { OrbitControls } from "three/addons/controls/OrbitControls.js";
import { mesh, mesh2 } from "./model.js";// 创建一个三维场景scene
const scene = new THREE.Scene();
scene.add(mesh, mesh2);// 创建一个三维坐标轴
const axesHelper = new THREE.AxesHelper(100);
scene.add(axesHelper); //将坐标轴对象添加到三维场景中// 创建一个光源对象  点光源
const pointLight = new THREE.PointLight(0xffffff, 1.0);
pointLight.decay = 0.0; //不随着距离的改变而衰减
pointLight.position.set(400, 200, 300); //偏移光源位置,观察渲染效果变化
// scene.add(pointLight); //点光源添加到场景中//可视化点光源
// const pointLightHelper = new THREE.PointLightHelper(pointLight, 10);
// scene.add(pointLightHelper);
// 添加一个环境光
const ambient = new THREE.AmbientLight(0xffffff, 0.4);
scene.add(ambient); //没有方向,也就没有立体的// 添加一个平行光
const directionalLight = new THREE.DirectionalLight(0xfffff, 0.8);
directionalLight.position.set(100, 100, 100); //棱角很弱,跟每个面的夹角都一样
directionalLight.position.set(100, 60, 50); //可以看出每个面的棱角不一样
// directionalLight.target = mesh; //默认坐标原点
scene.add(directionalLight);// 定义相机输出画布的尺寸(单位:像素px)
const width = window.innerWidth;
const height = window.innerHeight;
// 设置相机的四个参数// 创建一个透视投影相机对象
const camera = new THREE.PerspectiveCamera(30, width / height, 0.1, 3000);
// 设置相机的位置
camera.position.set(200, 200, 200); //相机在Three.js三维坐标系中的位置
// 相机的视线,观察目标点的坐标
camera.lookAt(0, 0, 0); //坐标原点// 创建一个WebGL渲染器
const renderer = new THREE.WebGLRenderer({antialias: true, //启用抗锯齿,线条更加流畅,减少锯齿状
});
renderer.setSize(width, height); //canvas画布的宽高度
renderer.render(scene, camera); //执行一个渲染操作,类比相机的拍照动作 咔
//把渲染结果canvas画布,也就是所谓的“照片”,添加到网页的页面上
document.body.appendChild(renderer.domElement);
// 插入到任意的html元素中
// document.getElementById("webgl").appendChild(renderer.domElement)console.log("查看当前屏幕设备像素比", window.devicePixelRatio); //查看当前屏幕设备像素比 2
// 告诉threejs你的屏幕的设备像素比window.devicePixelRatio,针对与像素接近于1的设置下面的语句可能不是很明显,对于屏幕比例是2的,高清屏这种,设置的效果会很明显,减少模糊
renderer.setPixelRatio(window.devicePixelRatio); //会很清晰,遇到模糊了不要忘记设置这个
// renderer.setClearColor(0x444444);// 渲染循环
// function render() {// console.log(obj.bool);// if (obj.bool)// model.rotateY(0.01); //周期性旋转,每次旋转0.01弧度// model.rotation.y += 0.01;
//   renderer.render(scene, camera); //周期性执行相机渲染功能,更新canvas画布上的内容
//   requestAnimationFrame(render);
// }
// render();// 创建一个相机控件对象
const controls = new OrbitControls(camera, renderer.domElement);
// controls.target.set(1000, 0, 1000); //默认为0,0,0
controls.update();
// 如果OrbitControls改变了相机参数,重新调用渲染器渲染三维场景
controls.addEventListener("change", function () {// console.log(camera.position);// 每当发生改变的时候就重新渲染renderer.render(scene, camera); //执行渲染操作
});window.onresize = function () {// 更新canvas画布的尺寸renderer.setSize(window.innerWidth, window.innerHeight);// 相机的视椎体宽高比一定和画布保持一致,否则物体就会扭曲camera.aspect = window.innerWidth / window.innerHeight;camera.updateProjectionMatrix();
};
index.html
<!DOCTYPE html>
<html lang="en"><head><meta charset="UTF-8" /><meta name="viewport" content="width=device-width, initial-scale=1.0" /><title>Document</title></head><body><!-- <div id="webgl" style="margin-top: 100px;margin-left: 200px;"></div> --><script type="importmap">{"imports": {"three": "../../three.js-r148/build/three.module.js","three/addons/": "../../three.js-r148/examples/jsm/"}}</script><script type="module" src="./index.js"></script></body>
</html>
6. 克隆.clone()和复制.copy()
克隆.clone()、复制.copy()是threejs很多对象都具有的方法,比如三维向量对象Vector3、网格模型Mesh、几何体、材质。
克隆.clone()
克隆.clone()简单说就是复制一个和原对象一样的新对象,下面以三维向量对象Vector3给大家举例,其他的threejs对象都可以参照类似的写法。
const v1 = new THREE.Vector3(1, 2, 3);
console.log('v1',v1);
//v2是一个新的Vector3对象,和v1的.x、.y、.z属性值一样
const v2 = v1.clone();
console.log('v2',v2);
复制.copy()
复制.copy()简单说就是把一个对象属性的属性值赋值给另一个对象,下面以三维向量对象Vector3给大家举例,其他的threejs对象都可以参照类似的写法。
const v1 = new THREE.Vector3(1, 2, 3);
const v3 = new THREE.Vector3(4, 5, 6);
//读取v1.x、v1.y、v1.z的赋值给v3.x、v3.y、v3.z
v3.copy(v1);
Mesh克隆.clone()
通过mesh克隆.clone()一个和mesh一样的新模型对象mesh2。
const mesh2 = mesh.clone();
mesh2.position.x = 100;
通过克隆.clone()获得的新模型和原来的模型共享材质和几何体
// 改变材质颜色,或者说改变mesh2颜色,mesh和mesh2颜色都会改变
// material.color.set(0xffff00);
mesh2.material.color.set(0xffff00);
几何体和材质克隆.clone()
const mesh2 = mesh.clone();
// 克隆几何体和材质,重新设置mesh2的材质和几何体属性
mesh2.geometry = mesh.geometry.clone();
mesh2.material = mesh.material.clone();
// 改变mesh2颜色,不会改变mesh的颜色
mesh2.material.color.set(0xff0000);
练习:mesh.position.copy()
改变mesh的位置,使之位于mesh2的正上方(y),距离100。
mesh.position.copy(mesh2.position);//1. 第1步位置重合
mesh.position.y += 100;//1. 第2步mesh在原来y的基础上增加100
练习:mesh.rotation.copy()
两个模型的姿态角度始终保持一样。
// 渲染循环
function render() {mesh.rotateY(0.01);// mesh旋转动画// 同步mesh2和mesh的姿态角度一样,不管mesh姿态角度怎么变化,mesh2始终保持同步mesh2.rotation.copy(mesh.rotation);renderer.render(scene, camera);requestAnimationFrame(render);
}
render();
相关练习代码
model.js
import * as THREE from "three";const geometry = new THREE.BoxGeometry(50, 50, 50); //矩形平面
const material = new THREE.MeshLambertMaterial({color: 0x00ffff, //黄色线条
});
const mesh = new THREE.Mesh(geometry, material);
// const mesh2 = new THREE.Mesh(geometry, material);
// mesh2.position.x = 100;const mesh2 = mesh.clone();
mesh2.position.x = 100;
// 网格模型1和2共享了同一个几何体属性和材质
mesh2.material = mesh.material.clone();
mesh2.material.color.set(0xffff00);
mesh.position.copy(mesh2.position); //位置相同
mesh.position.y += 100;// const v1 = new THREE.Vector3(1, 2, 3);
// console.log("v1", v1);
// const v2 = v1.clone();
// console.log("v2", v2);
// const v3 = new THREE.Vector3(4, 5, 6);
// v3.copy(v1)
// console.log('v3', v3);export { mesh, mesh2 };
index.js
// 引入threejs
import * as THREE from "three";
// 引入轨道控制器扩展库OrbitControls.js
import { OrbitControls } from "three/addons/controls/OrbitControls.js";
import { mesh, mesh2 } from "./model.js";// 创建一个三维场景scene
const scene = new THREE.Scene();
scene.add(mesh, mesh2);// 创建一个三维坐标轴
const axesHelper = new THREE.AxesHelper(100);
scene.add(axesHelper); //将坐标轴对象添加到三维场景中// 创建一个光源对象  点光源
const pointLight = new THREE.PointLight(0xffffff, 1.0);
pointLight.decay = 0.0; //不随着距离的改变而衰减
pointLight.position.set(400, 200, 300); //偏移光源位置,观察渲染效果变化
// scene.add(pointLight); //点光源添加到场景中//可视化点光源
// const pointLightHelper = new THREE.PointLightHelper(pointLight, 10);
// scene.add(pointLightHelper);
// 添加一个环境光
const ambient = new THREE.AmbientLight(0xffffff, 0.4);
scene.add(ambient); //没有方向,也就没有立体的// 添加一个平行光
const directionalLight = new THREE.DirectionalLight(0xfffff, 0.8);
directionalLight.position.set(100, 100, 100); //棱角很弱,跟每个面的夹角都一样
directionalLight.position.set(100, 60, 50); //可以看出每个面的棱角不一样
// directionalLight.target = mesh; //默认坐标原点
scene.add(directionalLight);// 定义相机输出画布的尺寸(单位:像素px)
const width = window.innerWidth;
const height = window.innerHeight;
// 设置相机的四个参数// 创建一个透视投影相机对象
const camera = new THREE.PerspectiveCamera(30, width / height, 0.1, 3000);
// 设置相机的位置
camera.position.set(200, 200, 200); //相机在Three.js三维坐标系中的位置
// 相机的视线,观察目标点的坐标
camera.lookAt(0, 0, 0); //坐标原点// 创建一个WebGL渲染器
const renderer = new THREE.WebGLRenderer({antialias: true, //启用抗锯齿,线条更加流畅,减少锯齿状
});
renderer.setSize(width, height); //canvas画布的宽高度
renderer.render(scene, camera); //执行一个渲染操作,类比相机的拍照动作 咔
//把渲染结果canvas画布,也就是所谓的“照片”,添加到网页的页面上
document.body.appendChild(renderer.domElement);
// 插入到任意的html元素中
// document.getElementById("webgl").appendChild(renderer.domElement)console.log("查看当前屏幕设备像素比", window.devicePixelRatio); //查看当前屏幕设备像素比 2
// 告诉threejs你的屏幕的设备像素比window.devicePixelRatio,针对与像素接近于1的设置下面的语句可能不是很明显,对于屏幕比例是2的,高清屏这种,设置的效果会很明显,减少模糊
renderer.setPixelRatio(window.devicePixelRatio); //会很清晰,遇到模糊了不要忘记设置这个
// renderer.setClearColor(0x444444);// 渲染循环
function render() {// console.log(obj.bool);// if (obj.bool)mesh.rotateY(0.01); //周期性旋转,每次旋转0.01弧度mesh2.rotation.copy(mesh.rotation); //同步姿态角度// mesh.rotation.y += 0.01;renderer.render(scene, camera); //周期性执行相机渲染功能,更新canvas画布上的内容requestAnimationFrame(render);
}
render();// 创建一个相机控件对象
const controls = new OrbitControls(camera, renderer.domElement);
// controls.target.set(1000, 0, 1000); //默认为0,0,0
controls.update();
// 如果OrbitControls改变了相机参数,重新调用渲染器渲染三维场景
controls.addEventListener("change", function () {// console.log(camera.position);// 每当发生改变的时候就重新渲染renderer.render(scene, camera); //执行渲染操作
});window.onresize = function () {// 更新canvas画布的尺寸renderer.setSize(window.innerWidth, window.innerHeight);// 相机的视椎体宽高比一定和画布保持一致,否则物体就会扭曲camera.aspect = window.innerWidth / window.innerHeight;camera.updateProjectionMatrix();
};