springboot使用xdoc-report包导出word

背景:项目需要使用xdoc-report.jar根据设置好的word模版,自动填入数据 导出word
框架使用
我的需求是我做一个模板然后往里面填充内容就导出我想要的word文件,问了下chatgpt还有百度,最后选用了xdocreport这个框架,主要它使用docx模板以及freemarker模板引擎就可以做导出,不用各种转换,而且文档demo也很齐全,虽然最新的版本已经两年没更新了!!参考文档
制作模板
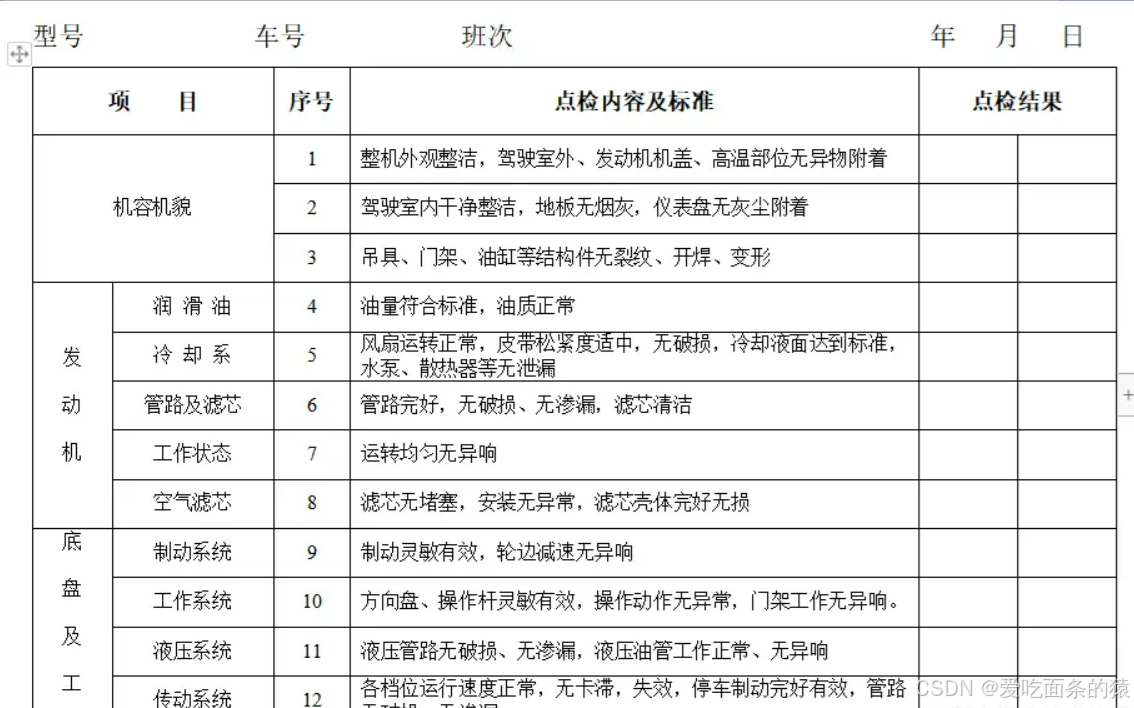
模板效果图如下
文字显示
比如说,我们需要显示一些文档的元数据,例如 文档的标题,文档的时间等等可以单独显示的属性。我们可以使用一个对象来封装这些属性,现在我封装了一个Project对象
class ExportProject() {  var title: String? = null  var type: String? = null  var car: String? = null  var className: String? = null  var date: String? = null  var problem: String? = null  var range: String? = null  var signature: IImageProvider? = null  constructor(vo: DriverCheckVo) : this() {  type = vo.spec  car = vo.usageCode  className = vo.shift  date = "${vo.date?.year} 年 ${vo.date?.monthValue} 月 ${vo.date?.dayOfMonth} 日"  xproblem = vo.problemSummary  }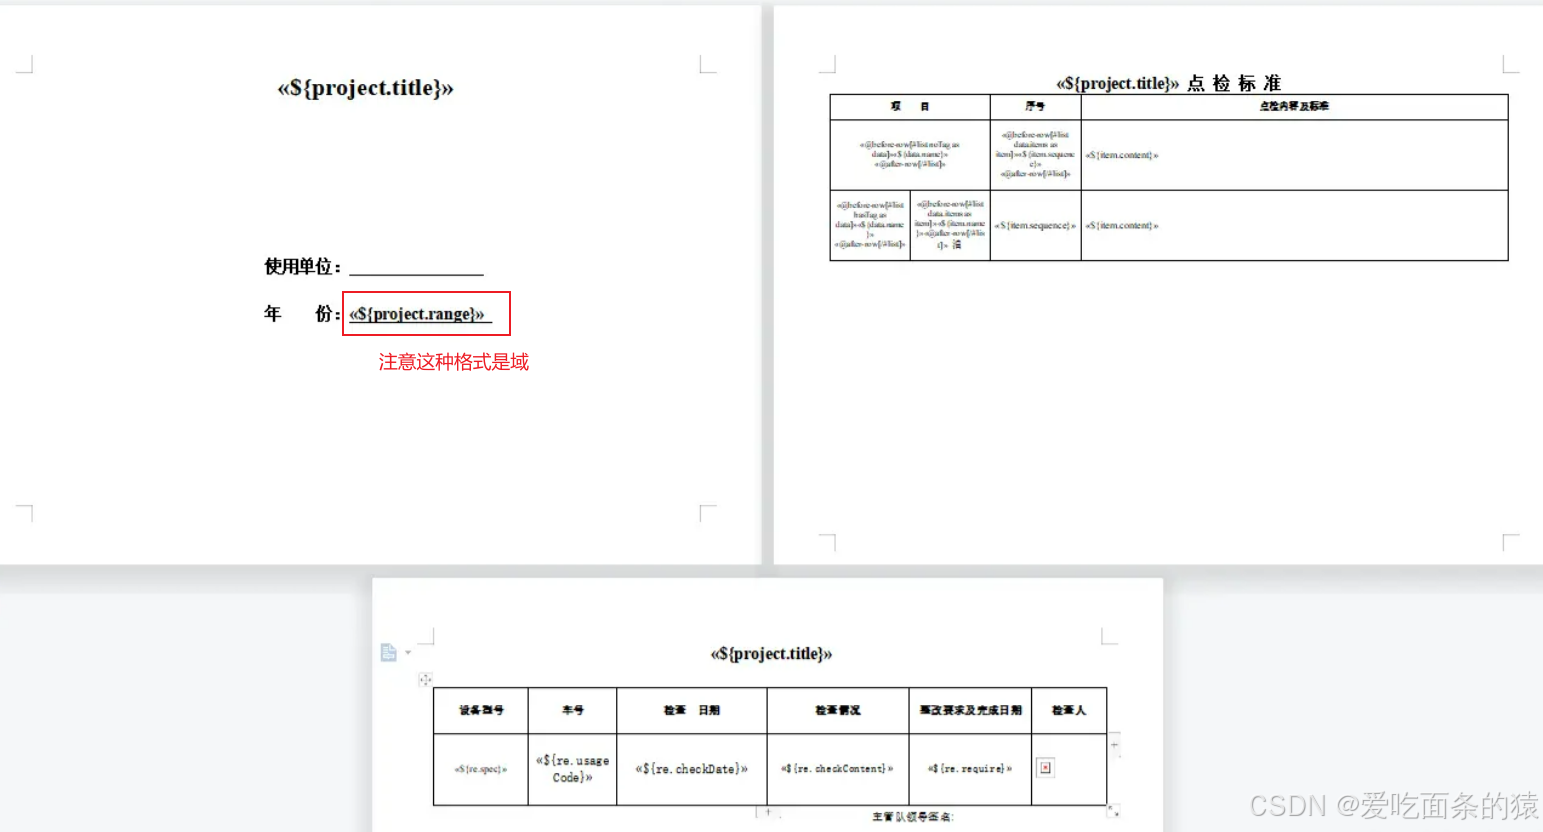
}生成word文档时,只要new一个对象实例,扔到xdocreport的context中,就可以使用啦。当然具体展示还是需要在docx模板上做特殊处理的。比如我想控制我生成的docx文件中的标题,我直接在标题处,生成一个域即可,具体操作步骤如下,(下列例子中使用了wps),另外模版的文件格式名一定是docx
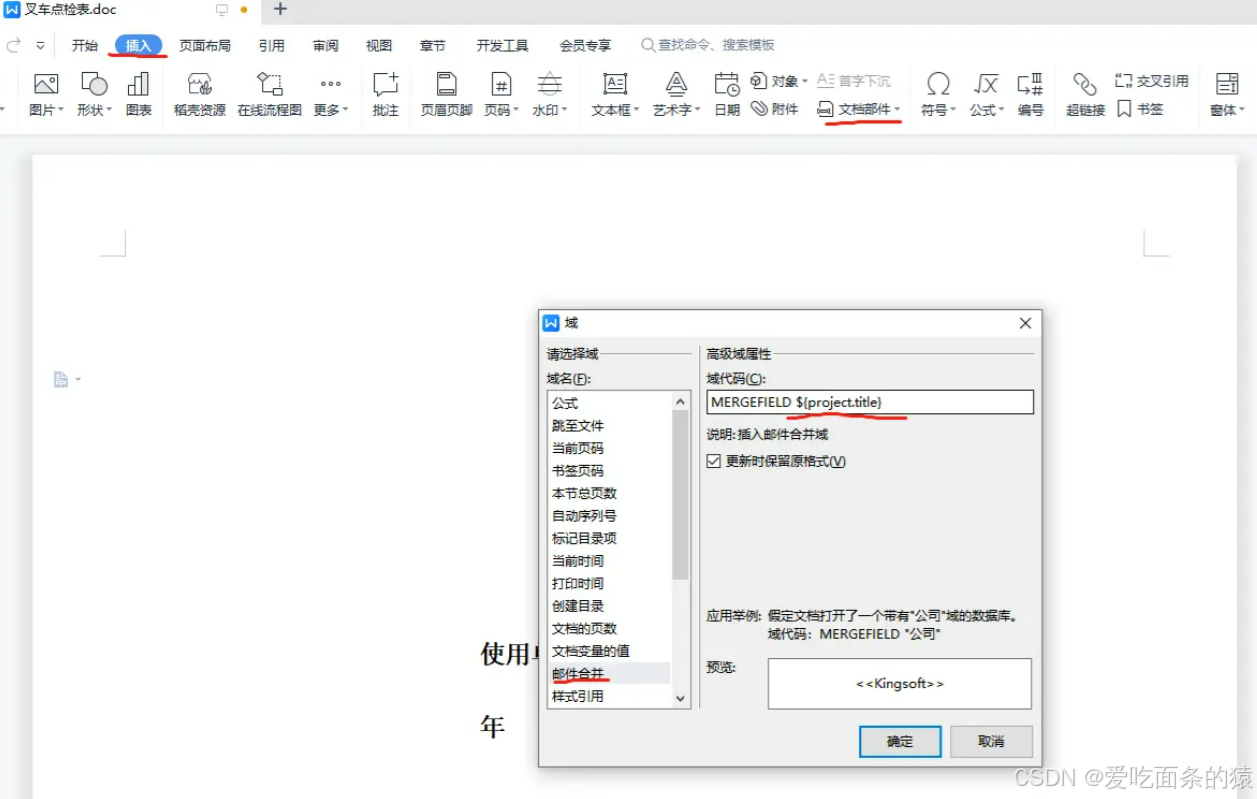
step-》 将光标放在标题处-》点击插入 -》选择文档部件-》点击域-》选择邮件合并-》输入变量 ${project.title} -》 点击确定
效果如下!
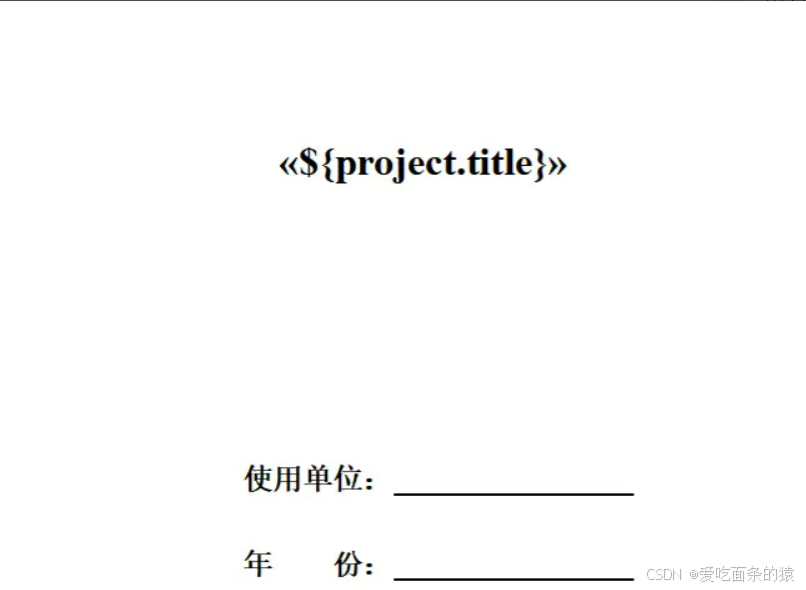
其他的地方,例如年份,也是一样 输入 变量 ${project.range}即可。这样我们就可以将需要单独显示的文字,控制在xdocreport context里面 project变量里面了,当然具体怎么取名,放在哪,都随便。
列表嵌套
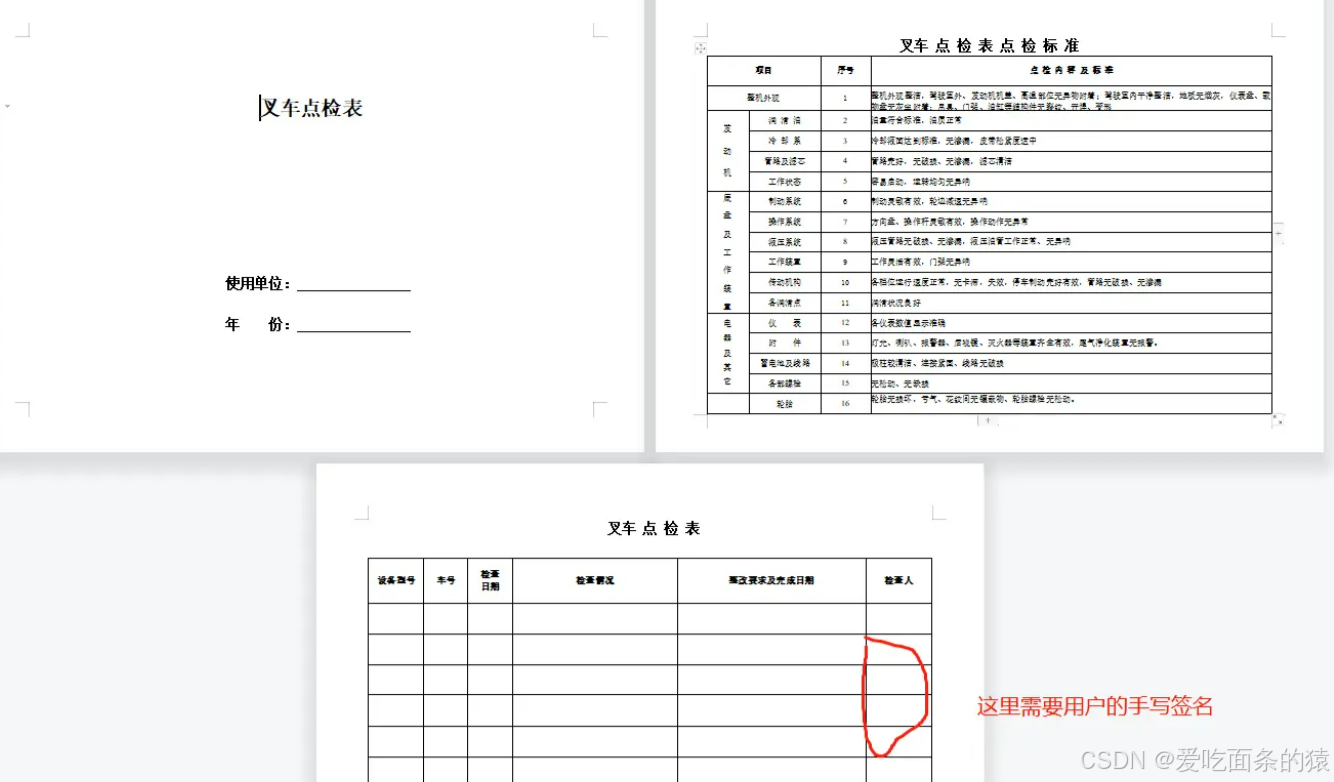
上面说了一些单独显示的文字显示,那列表控制如何显示呢,比如下图
首先还是定义控制对象
class DriverCheckData {
/**
* 大检查项
*/
var name: String? = null  /**
* 是否有小检查项
*/
var hasLittleCheck: Boolean? = false  /**
* 小检查项列表
*/
var items: List<DriverCheckItem>? = null
}  class DriverCheckItem {
/**
* 小检查项列表
*/
var name: String? = null  /**
* 序号
*/
var sequence: Int? = null  /**
* 检查内容
*/
var content: String? = null  /**
* 检查结果
*/
var result: String? = null
}
定义了两个类,大检查项类以及小检查项类,大检查项内嵌小检查项。这样我们在输出列表数据时,只需要定义一个大检查项列表就可以展示了,因为是展示的还是文本,所以定义还是跟上面一样,使用域来关联变量,写法么,就跟mybatis,el表达式差不多。
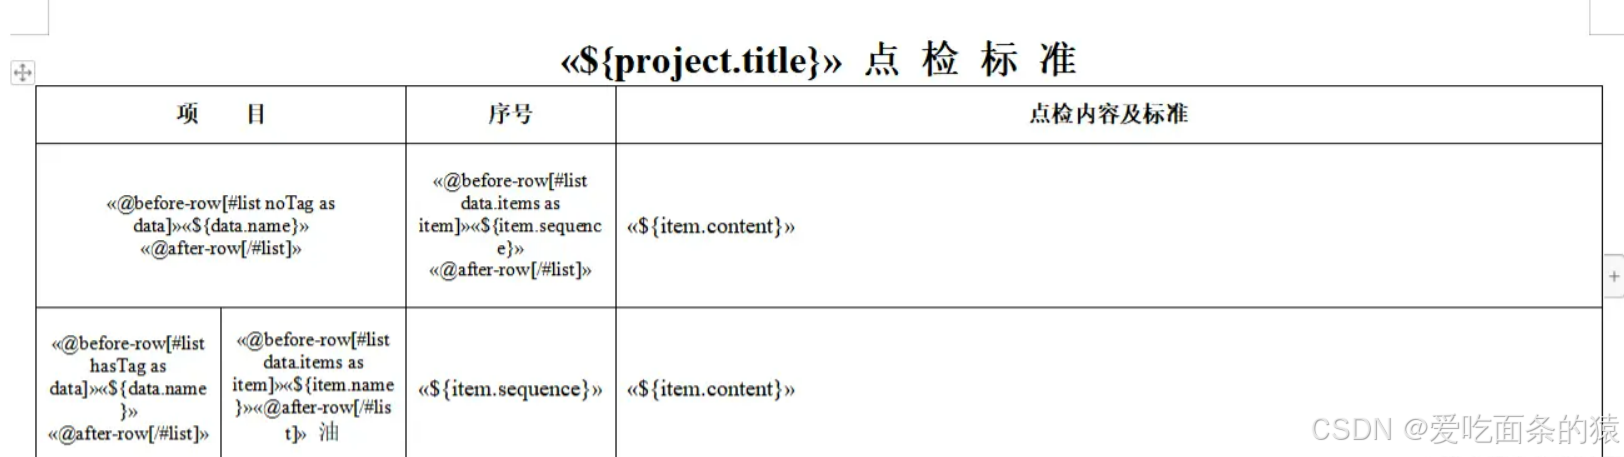
即使用 [#list noTag as data] 这个将 notag 这个list 里面的子元素 定义变量名为 data,[/#list] 代表列表结束,就跟html的标签对一样,然后是,data的数据展示了,直接使用 ${data.name} 这样的域就可以展示data里面的属性,可以看到,我这个图里面 用的不是[#list noTag as data] ,而是加了前缀,list的结尾也加了后缀,这是为了处理docx里面的表格而做的处理。照猫画虎即可,如果不是在表格里展示,直接使用
以下案例即可
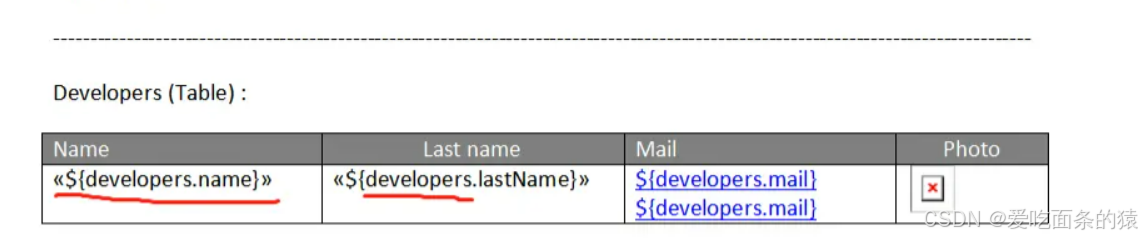
«[#list developers as developer]»Name: «${developer.name}»Mail : [${developer.mail}]Mail2 : [${developer.mail}]«[/#list]»
图片展示
例如我们展示文本,使用了域,对于图片呢,需要使用书签,如果我说的不清楚,直接看官方demo
流程如下:
step-》添加一个图片(啥图片都行)当做模板,选中图片-》点击插入-》书签-》添加书签名-》添加
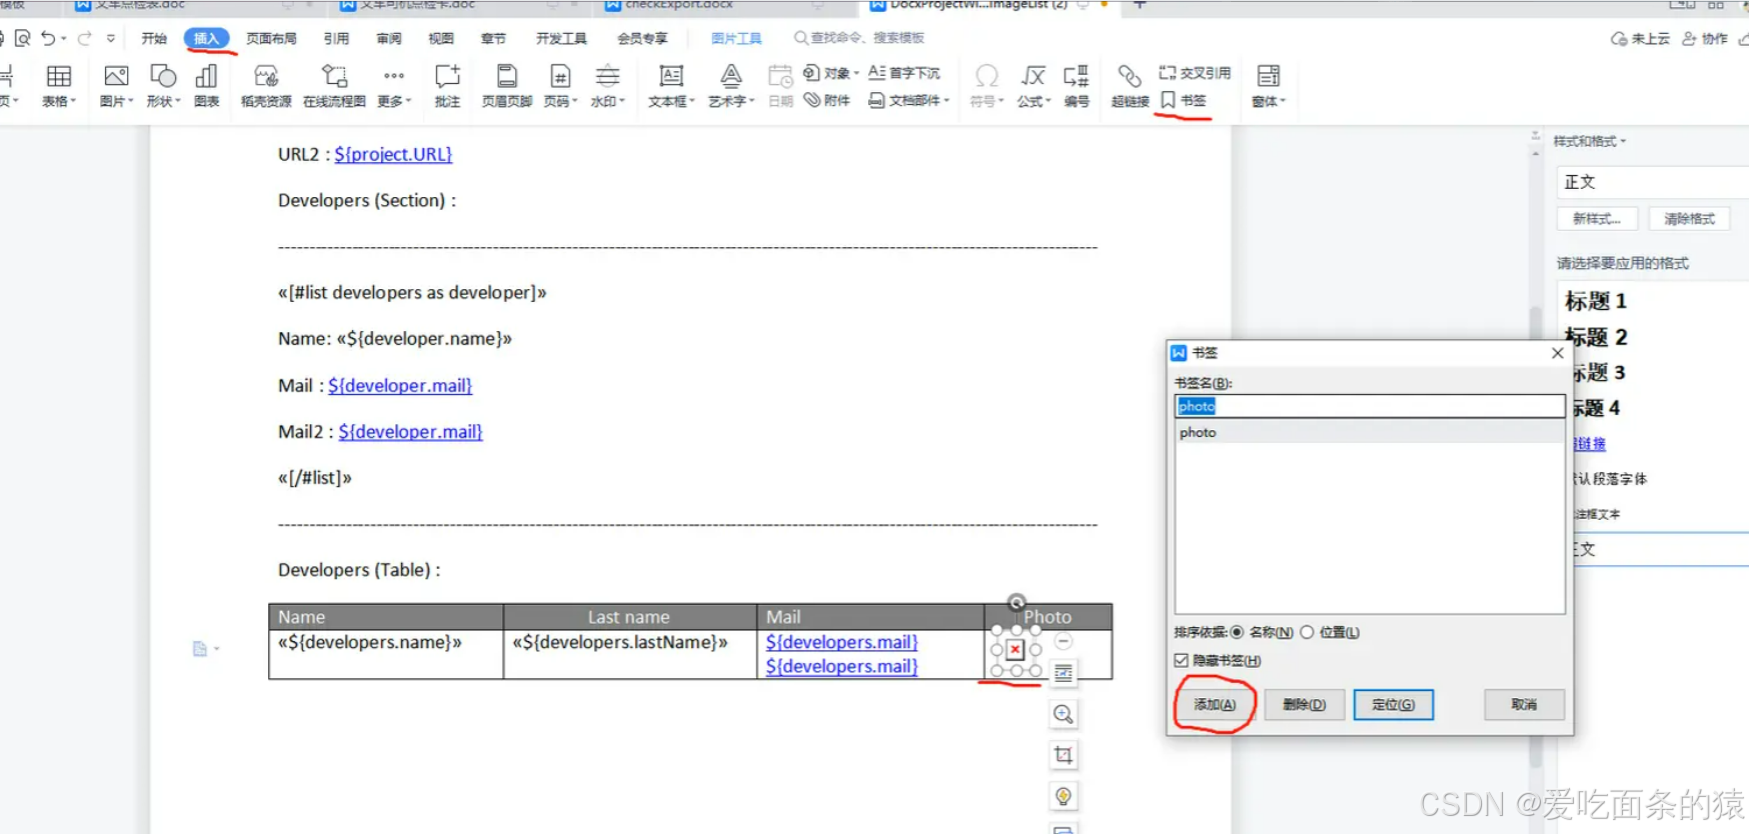
这个书签名非常重要,他的名字对应了我们在context里面设置的变量。如果是单独展示,直接设置一级变量名,与书签名对应即可,但是如果是图片列表,而且我们放在对象里面,怎么办呢?使用官方示例,不用[#list noTag as data],而是在java/kotlin程序里面对该列表进行处理,使用列表名中对应的图片属性即可。详见 官方示例
代码展示
springboot加载模板实例
@Component
@Data
class ExportInstanceConfig(
private val resourceLoader: ResourceLoader
) {
private var driverExport: IXDocReport? = null
private var checkExport: IXDocReport? = null
@PostConstruct
fun init(){
driverExport = getInstance("classpath:check.docx")
checkExport = getInstance("classpath:driver.docx")
}  private fun getInstance(path:String):IXDocReport{
var inputStream :InputStream? = null
try{
val res = resourceLoader.getResource(path)
inputStream = res.inputStream
return XDocReportRegistry
.getRegistry()
.loadReport(
inputStream,
TemplateEngineKind.Freemarker
)
}catch (e:IOException){
throw e
}finally {
inputStream?.close()
}
}
将导出的数据转成二进制数组
private fun exportProcess(report: IXDocReport, context: IContext): ByteArray {  val bos = ByteArrayOutputStream()  val res: ByteArray  try {  // 导入模板  report.process(context, bos)  res = bos.toByteArray()  } catch (e: IOException) {  throw e  } finally {  bos.close()  }  return res
}
进行单独图片导出
private fun exportDriverCheckDocx(param: DriverCheckVo, title: String): ByteArray {  val report = exportInstanceConfig.getDriverExport()  val metadata = report.createFieldsMetadata()  val context = report.createContext()  val exportProject = ExportProject(param).apply { this.title = title }  // 这里是对上传的图片的base64编码 进行解码val image = param.checkPeopleDocumentary?.split(",")?.let { decoder.decode(it[1]) }  if (image != null) {  // 对应模板中,单独显示的图片metadata.addFieldAsImage("signature")  // 导出图片时,图片对应的类 的格式context.put("signature",ByteArrayImageProvider(ByteArrayInputStream(image)))  }  val noTags = param.dataList?.filter { it.hasLittleCheck == false }?.toList()  val hasTags = param.dataList?.filter { it.hasLittleCheck == true }?.toList()  context.put("project", exportProject)  context.put("noTag", noTags)  context.put("hasTag", hasTags)  return exportProcess(report, context)
}
图片迭代导出
private fun exportCheckDocx(param: CheckVo, title: String, range: String?): ByteArray {  val report = exportInstanceConfig.getCheckExport()  val context = report.createContext()  val metadata = report.createFieldsMetadata()  // 对带图片列表的对象进行load处理,方便模板识别metadata.load("re",CheckRecord::class.java,true)  val exportProject = ExportProject().apply {  this.title = title  this.range = range  }  val noTags = param.dataList?.filter { it.hasLittleCheck == false }?.toList()  param.recordList?.forEach { it ->  if(it.documentary!=null){  val image = it.documentary?.split(",")?.let { decoder.decode(it[1]) }  if (image != null) {  it.signature = ByteArrayImageProvider(image).apply {  this.setSize(100f,100f)  }  }  }  }  val hasTags = param.dataList?.filter { it.hasLittleCheck == true }?.toList()  context.put("project", exportProject)  context.put("noTag", noTags)  context.put("hasTag", hasTags)  // 将带图片的列表加载进上下文context.put("re", param.recordList)  return exportProcess(report, context)
}
带图片的迭代对象定义
class CheckRecord {
/**
* 设备型号
*/
var spec: String? = null  /**
* 车号
*/
var usageCode: String? = null  /**
* 检查日期
*/
var checkDate: String? = null  /**
* 检查情况
*/
var checkContent: String? = null  /**
* 整改要求及完成日期
*/
var require: String? = null  /**
* 检查人签名
*/
var documentary: String? = null
/**
* 图片实体
*/
@get:FieldMetadata(images = [ ImageMetadata(name = "signature", behaviour = NullImageBehaviour.RemoveImageTemplate) ])
var signature: IImageProvider? = null
}
文件压缩
因为导出docx文件有多个,要求压缩成一个压缩包,这边使用的是
<dependency>
<groupId>org.apache.commons</groupId>
<artifactId>commons-compress</artifactId>
<version>1.23.0</version>
</dependency>
代码如下,将得到的docx二进制数组转成zip
// 不同类型的文件对应不同的MIME类型
response.apply {  characterEncoding = "UTF-8" // 设置编码字符  setHeader("Content-disposition", "attachment;filename=${URLEncoder.encode("下载文件" + ".zip", "utf-8")}")  contentType = "application/zip"
}
val zipOutputStream = ZipArchiveOutputStream(response.outputStream)
try {   var sequence = 0  taskExportVo.forEach {  // 实例化 ZipEntry 对象,源文件数组中的当前文件  sequence++  val date = it.date  val fileName = when (query.inspType) {  EqpInspPlanType.日常检查 ->  "${it.eqpCategoryName}${it.exportType}${date?.year}${date?.monthValue}${date?.dayOfMonth}-$sequence.docx"  EqpInspPlanType.点检员点检 -> "${it.eqpCategoryName}${it.exportType}.docx"  EqpInspPlanType.专检组专检 -> "${it.eqpCategoryName}${it.exportType}.docx"  }  zipOutputStream.putArchiveEntry(ZipArchiveEntry(fileName)) // 导出单个docx文件val data = memEqpInspCheckRecordService.exportDocx(it)  // 写入zip流data?.let { it1 -> zipOutputStream.write(it1, 0, it1.size) }  zipOutputStream.closeArchiveEntry()  }
} catch (i: IOException) {  i.printStackTrace()
} finally{zipOutputStream.close()
}
其他:可视化Word模板设计和导出可以使用NopReport引擎,它不依赖于poi库,直接使用Word进行模板设计。编辑juejin.cn
附录:Java版本读取数据库数据生成word模板并压缩成Zip中返回
参考:https://juejin.cn/post/7265673876032766015