第J7周:ResNeXt解析
- 🍨 本文为🔗365天深度学习训练营 中的学习记录博客
- 🍖 原作者:K同学啊
目标
具体实现
(一)环境
语言环境:Python 3.10
编 译 器: PyCharm
框 架: Tensorflow
(二)具体步骤
1. 代码
import os
import numpy as np
import tensorflow as tf
from tensorflow.keras import backend as K
from tensorflow.keras.models import Model
from tensorflow.keras.layers import ( Input, Conv2D, BatchNormalization, ReLU, Add, MaxPooling2D, GlobalAveragePooling2D, Dense, Concatenate, Lambda
)
from tensorflow.keras.callbacks import ModelCheckpoint, ReduceLROnPlateau, EarlyStopping, TensorBoard
from tensorflow.keras.preprocessing.image import ImageDataGenerator
import matplotlib.pyplot as plt
from datetime import datetime
import time # 设置GPU内存增长
gpus = tf.config.experimental.list_physical_devices('GPU')
if gpus: try: for gpu in gpus: tf.config.experimental.set_memory_growth(gpu, True) print(f"找到 {len(gpus)} 个GPU,已设置内存增长") except RuntimeError as e: print(f"设置GPU内存增长时出错: {e}") # 设置中文字体支持
def set_chinese_font(): """配置Matplotlib中文字体支持""" import platform if platform.system() == 'Windows': plt.rcParams['font.sans-serif'] = ['SimHei', 'Microsoft YaHei', 'SimSun'] else: # Linux/Mac plt.rcParams['font.sans-serif'] = ['WenQuanYi Micro Hei', 'Arial Unicode MS', 'Heiti TC'] plt.rcParams['axes.unicode_minus'] = False # 分组卷积块实现
def grouped_convolution_block(inputs, filters, strides, groups, prefix=None): """ 实现分组卷积 参数: - inputs: 输入张量 - filters: 过滤器数量 - strides: 步长 - groups: 分组数量 - prefix: 层名称前缀,用于避免命名冲突 返回: - 输出张量 """ # 确保过滤器数量可以被分组数整除 assert filters % groups == 0, "过滤器数量必须能被分组数整除" # 计算每组的过滤器数量 group_filters = filters // groups # 初始化保存分组卷积结果的列表 group_convs = [] # 对每个组执行卷积 for group_idx in range(groups): name = f'{prefix}_group_conv_{group_idx}' if prefix else None group_conv = Conv2D( group_filters, kernel_size=(3, 3), strides=strides, padding='same', use_bias=False, name=name )(inputs) group_convs.append(group_conv) # 合并所有组的卷积结果 if len(group_convs) > 1: name = f'{prefix}_concat' if prefix else None output = Concatenate(name=name)(group_convs) else: output = group_convs[0] return output # ResNeXt残差块
def block(x, filters, strides=1, groups=32, conv_shortcut=True, block_id=None): """ ResNeXt残差单元 参数: - x: 输入张量 - filters: 过滤器数量(最终输出将是filters*2) - strides: 步长 - groups: 分组数量 - conv_shortcut: 是否使用卷积快捷连接 - block_id: 块ID,用于唯一命名 返回: - 输出张量 """ prefix = f'block{block_id}' if block_id is not None else None # 快捷连接 if conv_shortcut: shortcut_name = f'{prefix}_shortcut_conv' if prefix else None shortcut = Conv2D(filters * 2, kernel_size=(1, 1), strides=strides, padding='same', use_bias=False, name=shortcut_name)(x) shortcut_bn_name = f'{prefix}_shortcut_bn' if prefix else None shortcut = BatchNormalization(epsilon=1.001e-5, name=shortcut_bn_name)(shortcut) else: shortcut = x # 三层卷积 # 第一层: 1x1卷积降维 conv1_name = f'{prefix}_conv1' if prefix else None x = Conv2D(filters=filters, kernel_size=(1, 1), strides=1, padding='same', use_bias=False, name=conv1_name)(x) bn1_name = f'{prefix}_bn1' if prefix else None x = BatchNormalization(epsilon=1.001e-5, name=bn1_name)(x) relu1_name = f'{prefix}_relu1' if prefix else None x = ReLU(name=relu1_name)(x) # 第二层: 分组3x3卷积 x = grouped_convolution_block(x, filters, strides, groups, prefix=prefix) bn2_name = f'{prefix}_bn2' if prefix else None x = BatchNormalization(epsilon=1.001e-5, name=bn2_name)(x) relu2_name = f'{prefix}_relu2' if prefix else None x = ReLU(name=relu2_name)(x) # 第三层: 1x1卷积升维 conv3_name = f'{prefix}_conv3' if prefix else None x = Conv2D(filters=filters * 2, kernel_size=(1, 1), strides=1, padding='same', use_bias=False, name=conv3_name)(x) bn3_name = f'{prefix}_bn3' if prefix else None x = BatchNormalization(epsilon=1.001e-5, name=bn3_name)(x) # 添加残差连接 add_name = f'{prefix}_add' if prefix else None x = Add(name=add_name)([x, shortcut]) relu3_name = f'{prefix}_relu3' if prefix else None x = ReLU(name=relu3_name)(x) return x # 堆叠残差块
def stack(x, filters, blocks, strides=1, groups=32, stack_id=None): """ 堆叠多个残差单元 参数: - x: 输入张量 - filters: 过滤器数量 - blocks: 残差单元数量 - strides: 第一个残差单元的步长 - groups: 分组数量 - stack_id: 堆栈ID,用于唯一命名 返回: - 输出张量 """ # 第一个残差单元可能会改变通道数和特征图大小 block_prefix = f'{stack_id}_0' if stack_id is not None else None x = block(x, filters, strides=strides, groups=groups, block_id=block_prefix) # 堆叠剩余的残差单元 for i in range(1, blocks): block_prefix = f'{stack_id}_{i}' if stack_id is not None else None x = block(x, filters, groups=groups, conv_shortcut=False, block_id=block_prefix) return x # 构建ResNeXt50模型
def ResNeXt50(input_shape=(224, 224, 3), num_classes=1000, groups=32): """ 构建ResNeXt-50模型 参数: - input_shape: 输入图像形状 - num_classes: 分类数量 - groups: 基数(分组数量) 返回: - Keras模型 """ # 定义输入 input_tensor = Input(shape=input_shape) # 初始卷积层 x = Conv2D(64, kernel_size=(7, 7), strides=2, padding='same', use_bias=False, name='conv1')(input_tensor) x = BatchNormalization(epsilon=1.001e-5, name='bn1')(x) x = ReLU(name='relu1')(x) # 最大池化 x = MaxPooling2D(pool_size=(3, 3), strides=2, padding='same', name='max_pool')(x) # 四个阶段的残差块堆叠 # Stage 1 x = stack(x, 128, 3, strides=1, groups=groups, stack_id='stage1') # Stage 2 x = stack(x, 256, 4, strides=2, groups=groups, stack_id='stage2') # Stage 3 x = stack(x, 512, 6, strides=2, groups=groups, stack_id='stage3') # Stage 4 x = stack(x, 1024, 3, strides=2, groups=groups, stack_id='stage4') # 全局平均池化 x = GlobalAveragePooling2D(name='avg_pool')(x) # 全连接分类层 x = Dense(num_classes, activation='softmax', name='fc')(x) # 创建模型 model = Model(inputs=input_tensor, outputs=x, name='resnext50') return model # 创建数据生成器
def create_data_generators(data_dir, img_size=(224, 224), batch_size=32): """ 创建训练、验证和测试数据生成器 参数: - data_dir: 数据集根目录 - img_size: 图像大小 - batch_size: 批次大小 返回: - train_generator: 训练数据生成器 - validation_generator: 验证数据生成器 - test_generator: 测试数据生成器 - num_classes: 类别数量 """ # 数据增强设置 - 训练集 train_datagen = ImageDataGenerator( rescale=1. / 255, rotation_range=20, width_shift_range=0.2, height_shift_range=0.2, shear_range=0.2, zoom_range=0.2, horizontal_flip=True, fill_mode='nearest' ) # 仅进行缩放 - 验证集和测试集 valid_datagen = ImageDataGenerator( rescale=1. / 255 ) # 路径设置 train_dir = os.path.join(data_dir, 'train') valid_dir = os.path.join(data_dir, 'val') test_dir = os.path.join(data_dir, 'test') # 检查目录是否存在 if not os.path.exists(train_dir): raise FileNotFoundError(f"训练集目录不存在: {train_dir}") if not os.path.exists(valid_dir): raise FileNotFoundError(f"验证集目录不存在: {valid_dir}") # 创建生成器 train_generator = train_datagen.flow_from_directory( train_dir, target_size=img_size, batch_size=batch_size, class_mode='categorical', shuffle=True ) validation_generator = valid_datagen.flow_from_directory( valid_dir, target_size=img_size, batch_size=batch_size, class_mode='categorical', shuffle=False ) # 检查测试集 test_generator = None if os.path.exists(test_dir): test_generator = valid_datagen.flow_from_directory( test_dir, target_size=img_size, batch_size=batch_size, class_mode='categorical', shuffle=False ) print(f"测试集已加载: {test_generator.samples} 张图像") num_classes = len(train_generator.class_indices) print(f"类别数量: {num_classes}") print(f"类别映射: {train_generator.class_indices}") return train_generator, validation_generator, test_generator, num_classes # 训练模型
def train_model(model, train_generator, validation_generator, epochs=20, initial_epoch=0): """ 训练模型 参数: - model: Keras模型 - train_generator: 训练数据生成器 - validation_generator: 验证数据生成器 - epochs: 总训练轮数 - initial_epoch: 初始轮数(用于断点续训) 返回: - history: 训练历史 """ # 创建保存目录 os.makedirs('models', exist_ok=True) os.makedirs('logs', exist_ok=True) # 设置回调函数 callbacks = [ # 保存最佳模型 ModelCheckpoint( filepath='models/resnext50_best.h5', monitor='val_accuracy', save_best_only=True, verbose=1 ), # 学习率调度器 ReduceLROnPlateau( monitor='val_loss', factor=0.5, patience=3, verbose=1, min_delta=0.0001, min_lr=1e-6 ), # 早停 EarlyStopping( monitor='val_loss', patience=8, verbose=1, restore_best_weights=True ), # TensorBoard日志 TensorBoard( log_dir=f'logs/resnext50_{datetime.now().strftime("%Y%m%d-%H%M%S")}', histogram_freq=1 ) ] # 编译模型 model.compile( optimizer=tf.keras.optimizers.Adam(learning_rate=0.001), loss='categorical_crossentropy', metrics=['accuracy'] ) # 设置训练步数 steps_per_epoch = train_generator.samples // train_generator.batch_size validation_steps = validation_generator.samples // validation_generator.batch_size # 确保至少有一个步骤 steps_per_epoch = max(1, steps_per_epoch) validation_steps = max(1, validation_steps) print(f"开始训练模型,共 {epochs} 轮...") print(f"训练步数: {steps_per_epoch}, 验证步数: {validation_steps}") # 训练模型 history = model.fit( train_generator, steps_per_epoch=steps_per_epoch, epochs=epochs, initial_epoch=initial_epoch, validation_data=validation_generator, validation_steps=validation_steps, callbacks=callbacks, verbose=1 ) # 保存最终模型 model.save('models/resnext50_final.h5') print("训练完成,模型已保存为 'models/resnext50_final.h5'") return history # 评估模型
def evaluate_model(model, generator, set_name="测试集"): """ 评估模型 参数: - model: Keras模型 - generator: 数据生成器 - set_name: 数据集名称(用于打印) 返回: - results: 评估结果 """ if generator is None: print(f"{set_name}不存在,跳过评估") return None print(f"评估模型在{set_name}上的性能...") steps = generator.samples // generator.batch_size steps = max(1, steps) # 确保至少有一个步骤 results = model.evaluate(generator, steps=steps, verbose=1) print(f"{set_name}损失: {results[0]:.4f}") print(f"{set_name}准确率: {results[1]:.4f}") return results # 绘制训练历史
def plot_training_history(history): """ 绘制训练历史曲线 参数: - history: 训练历史 """ set_chinese_font() # 创建图表 fig, (ax1, ax2) = plt.subplots(1, 2, figsize=(15, 5)) # 绘制准确率曲线 ax1.plot(history.history['accuracy'], label='训练准确率', linewidth=2) ax1.plot(history.history['val_accuracy'], label='验证准确率', linewidth=2) ax1.set_title('模型准确率', fontsize=14) ax1.set_ylabel('准确率', fontsize=12) ax1.set_xlabel('轮次', fontsize=12) ax1.grid(True, linestyle='--', alpha=0.7) ax1.legend(loc='lower right', fontsize=10) # 绘制损失曲线 ax2.plot(history.history['loss'], label='训练损失', linewidth=2) ax2.plot(history.history['val_loss'], label='验证损失', linewidth=2) ax2.set_title('模型损失', fontsize=14) ax2.set_ylabel('损失', fontsize=12) ax2.set_xlabel('轮次', fontsize=12) ax2.grid(True, linestyle='--', alpha=0.7) ax2.legend(loc='upper right', fontsize=10) plt.tight_layout() plt.savefig('training_history.png', dpi=120) plt.show() # 可视化预测结果
def visualize_predictions(model, generator, num_images=5): """ 可视化模型预测结果 参数: - model: Keras模型 - generator: 数据生成器 - num_images: 要显示的图像数量 """ set_chinese_font() # 获取类别标签 class_indices = generator.class_indices class_names = {v: k for k, v in class_indices.items()} # 获取一批图像 x, y_true = next(generator) # 仅使用前num_images张图像 x = x[:num_images] y_true = y_true[:num_images] # 预测 y_pred = model.predict(x) # 创建图表 fig = plt.figure(figsize=(15, 10)) for i in range(num_images): # 获取图像 img = x[i] # 获取真实标签和预测标签 true_label = np.argmax(y_true[i]) pred_label = np.argmax(y_pred[i]) pred_prob = y_pred[i][pred_label] # 获取类别名称 true_class_name = class_names[true_label] pred_class_name = class_names[pred_label] # 创建子图 plt.subplot(1, num_images, i + 1) # 显示图像 plt.imshow(img) # 设置标题 title_color = 'green' if true_label == pred_label else 'red' plt.title(f"真实: {true_class_name}\n预测: {pred_class_name}\n概率: {pred_prob:.2f}", color=title_color, fontsize=10) plt.axis('off') plt.tight_layout() plt.savefig('prediction_results.png', dpi=120) plt.show() # 测试单张图像
def predict_image(model, image_path, class_names, img_size=(224, 224)): """ 预测单张图像 参数: - model: Keras模型 - image_path: 图像路径 - class_names: 类别名称字典 - img_size: 图像大小 返回: - pred_class: 预测的类别 - confidence: 置信度 """ from tensorflow.keras.preprocessing import image # 加载图像 img = image.load_img(image_path, target_size=img_size) # 转换为数组 x = image.img_to_array(img) x = np.expand_dims(x, axis=0) x = x / 255.0 # 归一化 # 预测 preds = model.predict(x) # 获取最高置信度的类别 pred_class_idx = np.argmax(preds[0]) confidence = preds[0][pred_class_idx] # 获取类别名称 pred_class = class_names[pred_class_idx] return pred_class, confidence # 打印模型架构并显示中间特征图尺寸
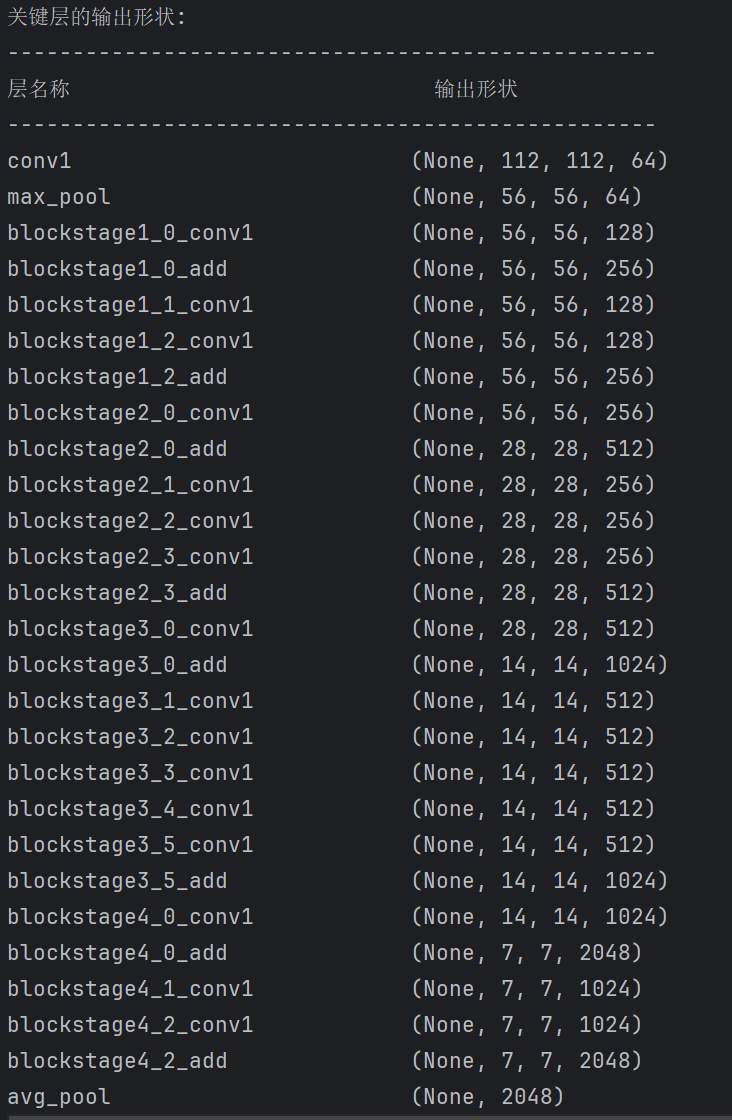
def print_model_architecture(model): """ 打印模型架构信息,包括每层输出形状 参数: - model: Keras模型 """ # 打印模型摘要 model.summary() # 显示每个块的输出形状 layer_outputs = [] layer_names = [] # 选择要显示的关键层 target_layers = [ 'conv1', 'max_pool', 'stage1_0_add', 'stage1_2_add', 'stage2_0_add', 'stage2_3_add', 'stage3_0_add', 'stage3_5_add', 'stage4_0_add', 'stage4_2_add', 'avg_pool' ] print("\n关键层的输出形状:") print("-" * 50) print(f"{'层名称':<30} {'输出形状':<20}") print("-" * 50) for layer in model.layers: if any(target_name in layer.name for target_name in target_layers): print(f"{layer.name:<30} {str(layer.output_shape):<20}") # 主函数
def main(): """主函数""" # 设置参数 DATA_DIR = './data' IMG_SIZE = (224, 224) BATCH_SIZE = 32 EPOCHS = 20 CARDINALITY = 32 # 获取当前设备信息 print(f"TensorFlow版本: {tf.__version__}") print(f"使用设备: {'GPU' if tf.config.list_physical_devices('GPU') else 'CPU'}") try: # 创建数据生成器 print("加载数据集...") train_generator, validation_generator, test_generator, num_classes = create_data_generators( DATA_DIR, IMG_SIZE, BATCH_SIZE ) # 创建模型 print(f"创建ResNeXt-50模型 (基数={CARDINALITY})...") model = ResNeXt50( input_shape=(IMG_SIZE[0], IMG_SIZE[1], 3), num_classes=num_classes, groups=CARDINALITY ) # 显示模型架构 print_model_architecture(model) # 计算模型参数量 trainable_params = np.sum([np.prod(v.get_shape()) for v in model.trainable_weights]) non_trainable_params = np.sum([np.prod(v.get_shape()) for v in model.non_trainable_weights]) total_params = trainable_params + non_trainable_params print(f"模型参数数量: {total_params:,}") print(f"可训练参数: {trainable_params:,}") print(f"不可训练参数: {non_trainable_params:,}") # 检查是否有已保存的模型,实现断点续训 initial_epoch = 0 if os.path.exists('models/resnext50_final.h5'): print("找到已保存的模型,询问是否继续训练...") choice = input("是否继续训练已保存的模型?(y/n): ") if choice.lower() == 'y': print("加载已保存的模型...") model = tf.keras.models.load_model('models/resnext50_final.h5') initial_epoch = int(input("请输入起始轮数: ")) else: print("从头开始训练新模型...") # 训练模型 print("开始训练模型...") start_time = time.time() history = train_model(model, train_generator, validation_generator, EPOCHS, initial_epoch) training_time = time.time() - start_time print(f"训练完成,耗时: {training_time:.2f} 秒") # 绘制训练历史 plot_training_history(history) # 评估验证集 evaluate_model(model, validation_generator, "验证集") # 评估测试集 evaluate_model(model, test_generator, "测试集") # 可视化预测结果 print("可视化预测结果...") visualize_predictions(model, validation_generator) # 找一张测试图像进行单独预测 if test_generator: print("查找测试图像进行单独预测...") # 获取测试集中的一张图像路径 test_dir = os.path.join(DATA_DIR, 'test') class_dirs = [d for d in os.listdir(test_dir) if os.path.isdir(os.path.join(test_dir, d))] if class_dirs: # 选择第一个类别目录 class_dir = class_dirs[0] class_path = os.path.join(test_dir, class_dir) # 获取目录中的图像 images = [f for f in os.listdir(class_path) if f.endswith(('.jpg', '.jpeg', '.png'))] if images: # 选择第一张图像 image_path = os.path.join(class_path, images[0]) # 获取类别名称 class_indices = test_generator.class_indices class_names = {v: k for k, v in class_indices.items()} # 预测图像 pred_class, confidence = predict_image(model, image_path, class_names, IMG_SIZE) print(f"测试图像路径: {image_path}") print(f"真实类别: {class_dir}") print(f"预测类别: {pred_class}") print(f"预测置信度: {confidence:.4f}") print("所有操作完成!") except Exception as e: print(f"发生错误: {e}") import traceback traceback.print_exc() if __name__ == "__main__": main()
2. 关于快捷链接
残差连接是ResNet和ResNeXt架构的核心创新之一,它允许信息直接从一层"跳过"到另一层,绕过中间的卷积操作。这解决了深层网络中的梯度消失问题,使得非常深的网络也能有效训练。
# 快捷连接
if conv_shortcut:  shortcut_name = f'{prefix}_shortcut_conv' if prefix else None  shortcut = Conv2D(filters * 2, kernel_size=(1, 1), strides=strides,  padding='same', use_bias=False, name=shortcut_name)(x)  shortcut_bn_name = f'{prefix}_shortcut_bn' if prefix else None  shortcut = BatchNormalization(epsilon=1.001e-5, name=shortcut_bn_name)(shortcut)
else:  shortcut = x
当conv_shortcut=True:当输入和输出的尺寸或通道数不匹配时,需要使用卷积型快捷连接,使用kernel_size=(1, 1)的卷积进行通道转换,将输入通道数转换为filters*2,然后使用批量归一批标准化卷积输出。
当conv_shortcut=False: 当输入和输出的尺寸和通道数完全匹配时,使用恒等型快捷连接,也就是不做任何的变换。确实这里可能会出现一个问题那就是通道数不匹配的问题,但是我们的代码是可以正常执行的,为什么呢?按我的理解:通道数不一致肯定不行。看一下残差堆叠的代码:
# 堆叠残差块
def stack(x, filters, blocks, strides=1, groups=32, stack_id=None):  """  堆叠多个残差单元  参数:  - x: 输入张量  - filters: 过滤器数量  - blocks: 残差单元数量  - strides: 第一个残差单元的步长  - groups: 分组数量  - stack_id: 堆栈ID,用于唯一命名  返回:  - 输出张量  """    # 第一个残差单元可能会改变通道数和特征图大小  block_prefix = f'{stack_id}_0' if stack_id is not None else None  x = block(x, filters, strides=strides, groups=groups, block_id=block_prefix)  # 堆叠剩余的残差单元  for i in range(1, blocks):  block_prefix = f'{stack_id}_{i}' if stack_id is not None else None  x = block(x, filters, groups=groups, conv_shortcut=False, block_id=block_prefix)  return x
在for之前,第一个残差单元是确定的:x = block(x, filters, strides=strides, groups=groups, block_id=block_prefix) 这是通道数已经完成了转换,而后续的残差单元是通过for在生成的,它并没有改变通道数,而是使用了第一个残差单元的通道数。那么最后输出肯定也是一致的通道数。
因此我们总结:
- 第一个残差单元总是默认conv_shortcut=True,完成了通道数的转换。
- 前一个block的返回值成为下一个block的输入,这样保证了通道数一致。