【“星睿O6”AI PC开发套件评测】+ MTCNN 开源模型部署和测试对比
经过了前几篇文章的铺垫,从搭建 tensorflow 开发环境,到测试官方 onnx 模型部署到 NPU,接着部署自己的 mnist tensorflow 模型到 NPU。这是一个从易到难的过程,本篇文章介绍开源复杂的人脸识别模型 mtcnn 到 “星睿O6” NPU 的部署和CPU对比测试。
本片计划分为三个小节:
- 环境搭建
- 对模型进行导出和转换 onnx,以及测试对比
- 对 onnx 模型进行转换到 cix,部署到 NPU 进行测试
环境搭建
这里主要是根据 mtcnn 的要求,搭建匹配的 python 和 tensorflow 等的虚拟环境,对模型进行前评估,因为这个开源模型是有三个模型串联起来的,所以前期测试找到开销最大的模型进行 NPU 部署,通过这种方式可以实现 CPU 和 NPU 性能对比的目的。
因为 mtcnn 要求Python >= 3.10 以及 TensorFlow >= 2.12,这里使用 conda 创建 python3.10 的虚拟环境:conda create --name mtcnn_tf12 python=3.10 ,然后切入到这个虚拟环境,安装 tensorflow==2.12 pip3 install tensorflow==2.12,接着在 mtcnn 仓库下安装需要的依赖,编写测试代码确认环境搭建成功,测试代码如下:
#!/home/yjoy/.conda/envs/mtcnn_tf12/bin/python3import os
import sys
import tensorflow as tf_abs_path = os.path.join(os.getcwd(), "../")
sys.path.append(_abs_path)from mtcnn import MTCNN
from mtcnn.utils.images import load_image# Create a detector instance
detector = MTCNN(device="CPU:0")# Load an image
image = load_image("resources/ivan.jpg")# Detect faces in the image
result = detector.detect_faces(image)# Display the result
print(result)
通过阅读 mtccn 的代码可以看到,主要由三个模型 PNET->RNET->ONET 组成,为了分析三个模型的时间开销,我修改了部分代码:
diff --git a/mtcnn/mtcnn.py b/mtcnn/mtcnn.py
index 3b0a6a6..aaf7e68 100644
--- a/mtcnn/mtcnn.py
+++ b/mtcnn/mtcnn.py
@@ -22,6 +22,7 @@import tensorflow as tfimport numpy as np
+from time import timefrom mtcnn.stages import StagePNet, StageRNet, StageONet@@ -156,7 +157,10 @@ class MTCNN:# Process images through each stage (PNet, RNet, ONet)for stage in self.stages:
+                    time_before=time()bboxes_batch = stage(bboxes_batch=bboxes_batch, images_normalized=images_normalized, images_oshapes=images_oshapes, **kwargs)
+                    index=self.stages.index(stage)
+                    print(f" delta{index} times:", time()-time_before)except tf.errors.InvalidArgumentError:  # No faces foundbboxes_batch = np.empty((0, 16))
运行测试代码,可以得到下面的结果:
▸ ./test00.py
2025-04-26 11:51:50.149177: I tensorflow/core/util/port.cc:110] oneDNN custom operations are on. You may see slightly different numerical results due to floating-point round-off errors from different computation orders. To turn them off, set the environment variable `TF_ENABLE_ONEDNN_OPTS=0`.
2025-04-26 11:51:50.150275: I tensorflow/tsl/cuda/cudart_stub.cc:28] Could not find cuda drivers on your machine, GPU will not be used.
2025-04-26 11:51:50.171004: I tensorflow/tsl/cuda/cudart_stub.cc:28] Could not find cuda drivers on your machine, GPU will not be used.
2025-04-26 11:51:50.171270: I tensorflow/core/platform/cpu_feature_guard.cc:182] This TensorFlow binary is optimized to use available CPU instructions in performance-critical operations.
To enable the following instructions: AVX2 AVX_VNNI FMA, in other operations, rebuild TensorFlow with the appropriate compiler flags.
2025-04-26 11:51:50.518333: W tensorflow/compiler/tf2tensorrt/utils/py_utils.cc:38] TF-TRT Warning: Could not find TensorRTdelta0 times: 0.059308767318725586delta1 times: 0.03779125213623047delta2 times: 0.011583089828491211
[{'box': [276, 92, 50, 63], 'confidence': 0.9999972581863403, 'keypoints': {'nose': [304, 131], 'mouth_right': [314, 141], 'right_eye': [315, 114], 'left_eye': [290, 116], 'mouth_left': [297, 143]}}, {'box': [9, 72, 36, 43], 'confidence': 0.8249890804290771, 'keypoints': {'nose': [28, 93], 'mouth_right': [36, 102], 'right_eye': [36, 85], 'left_eye': [20, 87], 'mouth_left': [23, 104]}}]
我们都数据进行可视化操作如下图:
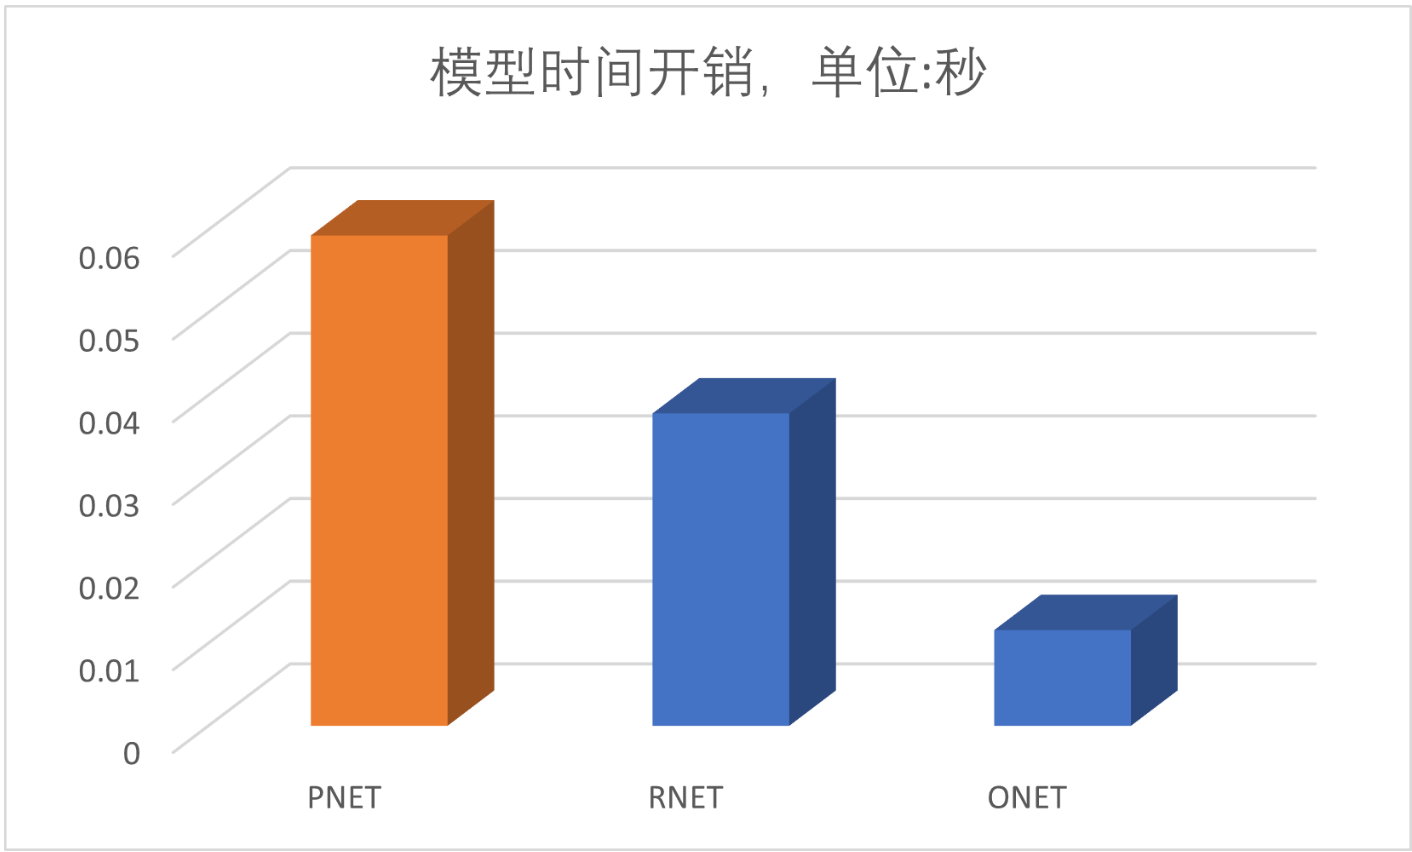
从结果可以看出,开销最大的是 PNET 模型,那么接下来我们就先对 PNET 下手了。
模型转换为 onnx 以及 CPU 部署测试
知道了要对 PNET 进行处理,我们首先对 PNET 模型进行导出,然后再进行 onnx 模型转换。这部分的 diff 如下:
diff --git a/mtcnn/stages/stage_pnet.py b/mtcnn/stages/stage_pnet.py
index 0138886..8418933 100644
--- a/mtcnn/stages/stage_pnet.py
+++ b/mtcnn/stages/stage_pnet.py
@@ -31,6 +31,7 @@ from mtcnn.utils.images import build_scale_pyramid, apply_scalesfrom mtcnn.utils.bboxes import generate_bounding_box, upscale_bboxes, smart_nms_from_bboxes, resize_to_squarefrom mtcnn.stages.base import StageBase
+from time import timeclass StagePNet(StageBase):
@@ -55,9 +56,15 @@ class StagePNet(StageBase):weights (str, optional): The file path to the weights for the PNet model. Default is "pnet.lz4"."""model = PNet()
-        model.build()  # Building the model (no need to specify input shape if default is provided)
+        model.build(input_shape=(1, 336, 336, 3))  # Building the model (no need to specify input shape if default is provided)model.set_weights(load_weights(weights))  # Load pre-trained weights+        print(model, model.summary(), "\nsummary done of pnet")
+        # 为了保存 mode, 需要使用 dummy_input 运行一下
+        dummy_input=np.random.rand(1,336,336,3)
+        model(dummy_input)
+        model.save("red_pnet/")
+        print("mode saved red_pnet dir done")super().__init__(stage_name=stage_name, stage_id=stage_id, model=model)def __call__(self, images_normalized, images_oshapes, min_face_size=20, min_size=12, scale_factor=0.709,
@@ -89,7 +96,10 @@ class StagePNet(StageBase):batch_size = images_normalized.shape[0]# 3. Get proposals bounding boxes and confidence from the model (PNet)
+        time_before=time()
+        # 模型运算耗时pnet_result = [self._model(s) for s in scales_result]
+        print("waste in pnet:", time()-time_before, "input:type and shape", type(scales_result), type(scales_result[0]), scales_result[0].shape)# 4. Generate bounding boxes per scale groupbboxes_proposals = [generate_bounding_box(result[0], result[1], threshold_pnet) for result in pnet_result]
这里输入,我根据参考图片进行了限制,明确了输入的 shape 是 (1, 336, 336, 3),导出之后模型就存储在了当前的 red_pnet 目录,如下所示:
▸ ls red_pnet/
assets fingerprint.pb keras_metadata.pb saved_model.pb variables
还是使用上一篇文章的脚本,修改下模型路径和要导出的onnx文件名,生成 mtcnn_pnet.onnx 并检查下模型的输入和输出:
▸ ./get_onnx_inputshape.py ~/gProjects/mtcnn/mtcnn_pnet.onnx
/home/yjoy/gProjects/mtcnn/mtcnn_pnet.onnx
Output Name: output_1
Output Name: output_2
Input shapes of the ONNX model:Name: red_inputShape: [1, 336, 336, 3]
接着修改原始仓库,试一试 onnxruntime 是否正常,调试到这里我发现 onnx 的输入要和 tensorflow 模型的保持一致(None, None, None, 3),否在在运行的时候会出错。所以要重新修改 onnx 模型转换脚本如下:
import tensorflow as tf
import tf2onnx# Load your TensorFlow Keras model or SavedModel
model = tf.keras.models.load_model('red_pnet') # Or tf.saved_model.load('your_saved_model')# Define the input signature
input_signature = [tf.TensorSpec(shape=(None, None, None, 3), dtype=tf.float32, name='red_input')]
#  input_signature = [tf.TensorSpec(shape=(1, 336, 336, 3), dtype=tf.float32, name='red_input')]# Convert the model to ONNX
onnx_model, _ = tf2onnx.convert.from_keras(model, input_signature=input_signature, opset=15)# Save the ONNX model
with open("mtcnn_pnet.onnx", "wb") as f:f.write(onnx_model.SerializeToString())
重新生成 mtcnn_pnet.onnx 模型文件,接着使用 onnx 模型进行推理,打印推理的时间损耗为 0.023632526397705078 秒:
▸ ./test00.py
2025-04-26 21:36:04.577597: I tensorflow/core/util/port.cc:110] oneDNN custom operations are on. You may see slightly different numerical results due to floating-point round-off errors from different computation orders. To turn them off, set the environment variable `TF_ENABLE_ONEDNN_OPTS=0`.
2025-04-26 21:36:04.578615: I tensorflow/tsl/cuda/cudart_stub.cc:28] Could not find cuda drivers on your machine, GPU will not be used.
2025-04-26 21:36:04.599424: I tensorflow/tsl/cuda/cudart_stub.cc:28] Could not find cuda drivers on your machine, GPU will not be used.
2025-04-26 21:36:04.599676: I tensorflow/core/platform/cpu_feature_guard.cc:182] This TensorFlow binary is optimized to use available CPU instructions in performance-critical operations.
To enable the following instructions: AVX2 AVX_VNNI FMA, in other operations, rebuild TensorFlow with the appropriate compiler flags.
2025-04-26 21:36:04.949215: W tensorflow/compiler/tf2tensorrt/utils/py_utils.cc:38] TF-TRT Warning: Could not find TensorRT
load onnx model
<class 'onnxruntime.capi.onnxruntime_inference_collection.InferenceSession'>
mode saved red_pnet dir done
input:type and shape <class 'list'> <class 'tensorflow.python.framework.ops.EagerTensor'> (1, 336, 336, 3)
wowo onnxruntime model
['output_1', 'output_2'] red_input
waste in pnet: 0.014083147048950195delta0 times: 0.023632526397705078delta1 times: 0.05084967613220215delta2 times: 0.014520645141601562
[{'box': [276, 92, 50, 63], 'confidence': 0.9999972581863403, 'keypoints': {'nose': [304, 131], 'mouth_right': [314, 141], 'right_eye': [315, 114], 'left_eye': [290, 116], 'mouth_left': [297, 143]}}, {'box': [9, 72, 36, 43], 'confidence': 0.8249915242195129, 'keypoints': {'nose': [28, 93], 'mouth_right': [36, 102], 'right_eye': [36, 85], 'left_eye': [20, 87], 'mouth_left': [23, 104]}}]
我将 pnet 三种推理方式包括:原始的方式推理耗时、加载tensorflow 模型进行推理、onnx 进行推理耗时进行了比对,开销如下图所示:
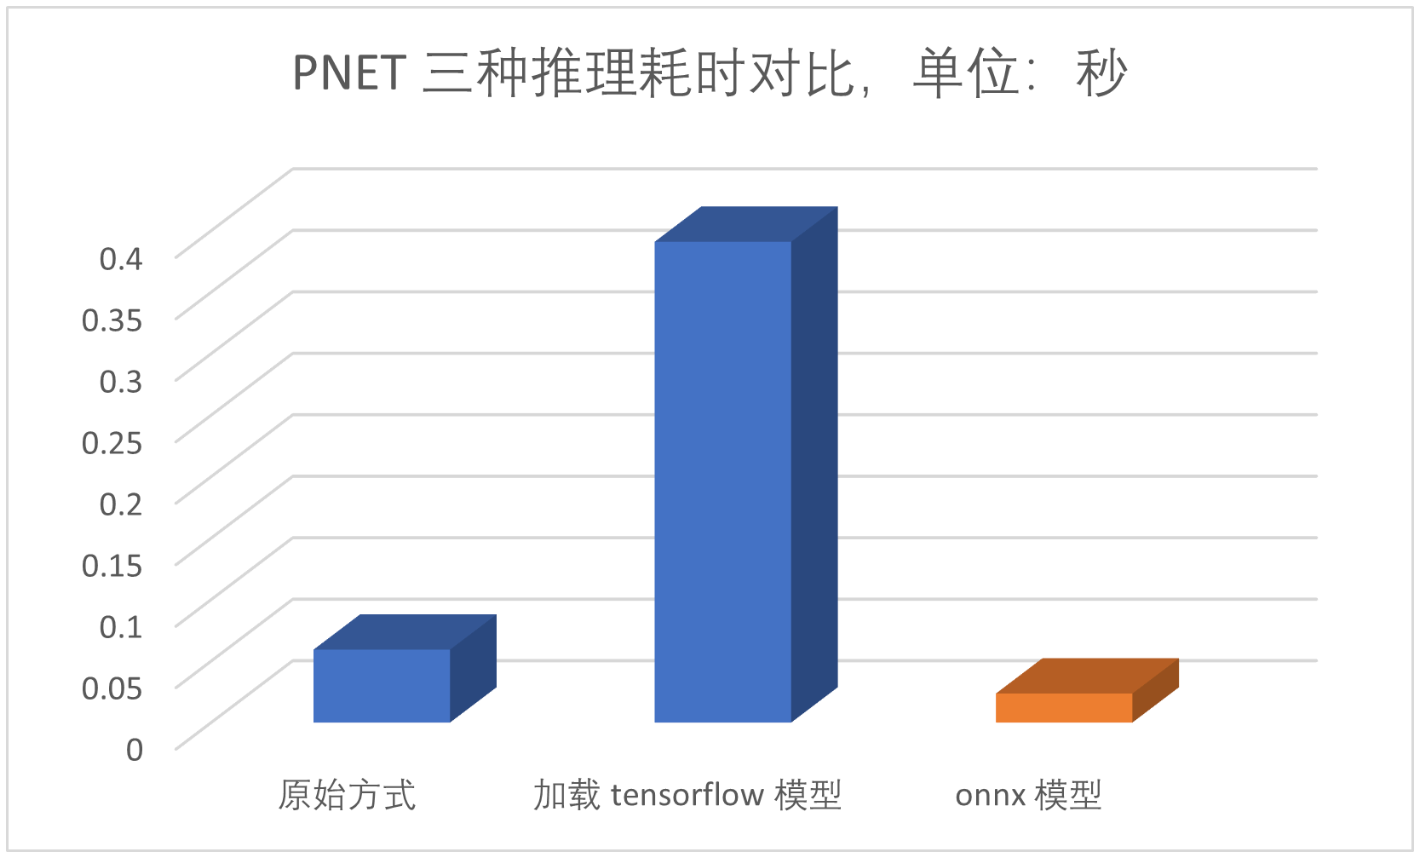
可以看出 onnx 模型推理相比原始方式耗时更低,直接加载 tensorflow 模型进行推理的方式耗时最高。到目前未知,受限于 PNET 网络的 onnx 模型输入 shape 时动态的,无法正常转换到 cix 格式。但是,我仔细查阅了官方文档,后面的 RNET 和 ONET 模型的输入都是固定 shape 的,其中 rnet 是 (24,24,3),onet 是(48, 48, 3)根据前面的分析,我们知道 RNET 的耗时处于中等,那么接下来我们就仿照 PNET 的处理方式,将 RNET 模型试着部署到 “星睿O6” NPU。
理想很丰满,现时很骨感,我想转化 RENT 模型到 onnx,这里的模型保存、模型转换,和 PNET 的操作类似,但是到模型保存和加载的时候,经过我的调试发现,RNET 网络中因为有一个 self.prelu4 = L.PReLU(name=“prelu4”) 的层,导致我加载的时候报错:````,为此,我还提了一个 issue [Bug] after I saved rnet to saved model. when I try to load, get errors. · Issue #138 · ipazc/mtcnn。
后来,我尝试修改为 self.prelu4 = L.PReLU(shared_axes=1, name="prelu4") 发现可以正常加载模型了,然后我就加载默认的权重参数,新的错误来了,因为这样修改完之后这一层的 Param 从 128 变到了 1,直接加载模型的权重值会报错的,shape 不一致,为了保持兼容,我在 mtcnn/utils/tensorflow.py 文件中新定义了一个方法加载 RNET 的权重数据,思路就是只取这一层参数的第一个数据,作为新 layer 的权重值,这部分关键代码如下:
ans_new = ans[11][0].reshape(1,)
ans[11]=ans_new
return ans
测试层修改之后的预测结果,发现和之前的结果几乎一致,说明可以向下进行。
下一步就是将 tensorflow 的 saved mode 转换为 onnx 模型,这部分代码很通用的和前面文章描述的类似,这里就不赘述了。此外就是使用 onnx 模型推理,这一步的改动比较多:
input_name = self._model.get_inputs()[0].name
output_names = [ s.name for s in self._model.get_outputs() ]
output_name = self._model.get_outputs()[0].name
nump_patchs=np.array(patches)
nump_patchs0=nump_patchs[0].reshape(1,24,24,3)
bboxes_offsets = []
scores = []
for item in nump_patchs:item=item.reshape(1,24,24,3)ans_offsets, ans_scores = self._model.run(output_names, {input_name: item})bboxes_offsets.append(ans_offsets)scores.append(ans_scores)
bboxes_offsets = np.array(bboxes_offsets)
scores = np.array(scores)
bboxes_offsets = bboxes_offsets.reshape(189, 4)
scores = scores.reshape(189, 2)
使用 onnx 模型,进行推理得到结果如下:
▸ ./test00.py
2025-04-27 20:44:31.934047: I tensorflow/core/util/port.cc:110] oneDNN custom operations are on. You may see slightly different numerical results due to floating-point round-off errors from different computation orders. To turn them off, set the environment variable `TF_ENABLE_ONEDNN_OPTS=0`.
2025-04-27 20:44:31.935124: I tensorflow/tsl/cuda/cudart_stub.cc:28] Could not find cuda drivers on your machine, GPU will not be used.
2025-04-27 20:44:31.956077: I tensorflow/tsl/cuda/cudart_stub.cc:28] Could not find cuda drivers on your machine, GPU will not be used.
2025-04-27 20:44:31.956337: I tensorflow/core/platform/cpu_feature_guard.cc:182] This TensorFlow binary is optimized to use available CPU instructions in performance-critical operations.
To enable the following instructions: AVX2 AVX_VNNI FMA, in other operations, rebuild TensorFlow with the appropriate compiler flags.
2025-04-27 20:44:32.308963: W tensorflow/compiler/tf2tensorrt/utils/py_utils.cc:38] TF-TRT Warning: Could not find TensorRT
load onnx model
<class 'onnxruntime.capi.onnxruntime_inference_collection.InferenceSession'>
mode saved red_pnet dir done
load rnet onnx model
<class 'onnxruntime.capi.onnxruntime_inference_collection.InferenceSession'>
input:type and shape <class 'list'> <class 'tensorflow.python.framework.ops.EagerTensor'> (1, 336, 336, 3)
wowo onnxruntime model
['output_1', 'output_2'] red_input
waste in pnet: 0.020001649856567383delta0 times: 0.031189441680908203
fc4 <keras.layers.core.dense.Dense object at 0x7fe53e417880>
wowo rnet use onnx format
input_name: red_input
output_name: ['output_1', 'output_2']
<class 'tensorflow.python.framework.ops.EagerTensor'> <class 'numpy.ndarray'>
(189, 24, 24, 3)
(1, 24, 24, 3)delta1 times: 0.028551578521728516
[{'box': [272, 93, 63, 63], 'confidence': 0.9978725910186768}, {'box': [477, 280, 62, 62], 'confidence': 0.9208611845970154}, {'box': [7, 71, 43, 43], 'confidence': 0.899211585521698}, {'box': [9, 72, 31, 31], 'confidence': 0.8957539796829224}, {'box': [100, 408, 43, 43], 'confidence': 0.8824490308761597}, {'box': [485, 205, 62, 62], 'confidence': 0.8461334109306335}, {'box': [305, 181, 47, 47], 'confidence': 0.7558432221412659}]
然后,在“星睿O6”上测试下,使用 CPU 测试下我们的 onnx 模型:
▸ ./test00.py
[UMD ERR] /home/alezhe02/project/Compass_Runtime_Midware_release/aipulib_build/umd/src/device/aipu/aipu.cpp:55:aipu_ll_status_t aipudrv::Aipu::init(): query capability [fail]
[ERROR][init:28][UMD].AIPU UMD API input argument(s) contain NULL pointer.
load onnx model
<class 'onnxruntime.capi.onnxruntime_inference_collection.InferenceSession'>
mode saved red_pnet dir done
load rnet onnx model
<class 'onnxruntime.capi.onnxruntime_inference_collection.InferenceSession'>
input:type and shape <class 'list'> <class 'tensorflow.python.framework.ops.EagerTensor'> (1, 336, 336, 3)
wowo onnxruntime model
['output_1', 'output_2'] red_input
waste in pnet: 0.04717898368835449delta0 times: 0.06585574150085449
fc4 <keras.src.layers.core.dense.Dense object at 0xffff2f5813d0>
wowo rnet use onnx format
input_name: red_input
output_name: ['output_1', 'output_2']
<class 'tensorflow.python.framework.ops.EagerTensor'> <class 'numpy.ndarray'>
(189, 24, 24, 3)
(1, 24, 24, 3)delta1 times: 0.09265422821044922
[{'box': [272, 93, 63, 63], 'confidence': 0.9978725910186768}, {'box': [477, 280, 62, 62], 'confidence': 0.9208603501319885}, {'box': [7, 71, 43, 43], 'confidence': 0.8992096185684204}, {'box': [9, 72, 31, 31], 'confidence': 0.8957546353340149}, {'box': [100, 408, 43, 43], 'confidence': 0.8824417591094971}, {'box': [485, 205, 62, 62], 'confidence': 0.8461276888847351}, {'box': [305, 181, 47, 47], 'confidence': 0.7558623552322388}]
这里,我们得到一个关键数据,在使用 onnx 推理耗时 0.09265422821044922 秒,最高可信度是 0.9978725910186768,检测的人脸框坐标是 [272, 93, 63, 63]。
模型转换为 cix 以及 NPU 部署测试
变换 cix 关键的是创建一个shape 是 (1,24,24,3)的数据集 npy 文件,然后编写一个 cfg 配置文件,npy 文件,我是在预测过程中直接将原始的数据保存了一个到 npy 文件,cfg 配置文件如下:
▸ /usr/bin/cat cfg/tf_mtcnn.cfg
[Common]
mode = build[Parser]
model_type = onnx
model_name = mtcnn
detection_postprocess =
model_domain = image_classification
input_model = ./mtcnn_rnet.onnx
input = red_input
input_shape = [1, 24, 24, 3]
output = output_1, output_2
output_dir = ./mtcnn_out[Optimizer]
calibration_data = datasets/rand1.npy
output_dir = ./out
dataset = numpydataset
save_statistic_info = True
cast_dtypes_for_lib = True[GBuilder]
outputs = mtcnn_rnet.cix
target = X2_1204MP3
profile = True
tiling = fps
至此,就生成了 ** mtcnn_rnet.cix**,下面编写 npu 推理部分,有了 onnx 推理的基础,这部分 NPU 推理关键代码如下:
nump_patchs=np.array(patches)
bboxes_offsets = []
scores = []
nump_patches = [ item.reshape(1,24,24,3) for item in nump_patchs]
for item in nump_patchs:#  item=item.reshape(1,24,24,3)# time_before=time()ans_offsets, ans_scores = self._model.forward(item)# print("time_waste in cix rnet:", time()-time_before)bboxes_offsets.append(ans_offsets)scores.append(ans_scores)
bboxes_offsets = np.array(bboxes_offsets)
scores = np.array(scores)
bboxes_offsets = bboxes_offsets.reshape(189, 4)
scores = scores.reshape(189, 2)
self._model.clean()
print("npu done here")
使用npu进行推理测试:
▸ ./test00.py
[UMD ERR] /home/alezhe02/project/Compass_Runtime_Midware_release/aipulib_build/umd/src/device/aipu/aipu.cpp:55:aipu_ll_status_t aipudrv::Aipu::init(): query capability [fail]
[ERROR][init:28][UMD].AIPU UMD API input argument(s) contain NULL pointer.
load onnx model
<class 'onnxruntime.capi.onnxruntime_inference_collection.InferenceSession'>
mode saved red_pnet dir done
load rnet cix model
npu: noe_init_context success
npu: noe_load_graph success
Input tensor count is 1.
Output tensor count is 2.
npu: noe_create_job success
input:type and shape <class 'list'> <class 'tensorflow.python.framework.ops.EagerTensor'> (1, 336, 336, 3)
wowo onnxruntime model
['output_1', 'output_2'] red_input
waste in pnet: 0.045818328857421875delta0 times: 0.06419897079467773
fc4 <keras.src.layers.core.dense.Dense object at 0xfffee7443150>
wowo rnet use cix format
(189, 24, 24, 3)
(1, 24, 24, 3)
npu: noe_clean_job success
npu: noe_unload_graph success
npu: noe_deinit_context success
npu done heredelta1 times: 0.11026811599731445
[{'box': [272, 92, 63, 63], 'confidence': 0.9916430115699768}, {'box': [6, 70, 43, 43], 'confidence': 0.897944450378418}, {'box': [9, 72, 31, 31], 'confidence': 0.8823280334472656}, {'box': [101, 408, 43, 43], 'confidence': 0.8589034080505371}, {'box': [486, 205, 61, 61], 'confidence': 0.7886294722557068}, {'box': [477, 279, 64, 64], 'confidence': 0.7652048468589783}]
发现使用 npu 推理耗时 0.11026811599731445 秒,最高可信度是 0.9916430115699768,检测的人脸框坐标是 [272, 93, 63, 63]。顺便地,我也测试下 saved model 的推理耗时作为参考对比:
。。。。 省略
rnet model type saved: <class 'keras.src.saving.legacy.saved_model.load.RNet'>
Model: "r_net"
_________________________________________________________________Layer (type)                Output Shape              Param #
=================================================================conv1 (Conv2D)              multiple                  784prelu1 (PReLU)              multiple                  28maxpooling1 (MaxPooling2D)  multiple                  0conv2 (Conv2D)              multiple                  12144prelu2 (PReLU)              multiple                  48maxpooling2 (MaxPooling2D)  multiple                  0conv3 (Conv2D)              multiple                  12352prelu3 (PReLU)              multiple                  64permute (Permute)           multiple                  0flatten3 (Flatten)          multiple                  0fc4 (Dense)                 multiple                  73856prelu4 (PReLU)              multiple                  1fc5-1 (Dense)               multiple                  516fc5-2 (Dense)               multiple                  258=================================================================
Total params: 100051 (390.82 KB)
Trainable params: 100051 (390.82 KB)
Non-trainable params: 0 (0.00 Byte)
_________________________________________________________________
None
input:type and shape <class 'list'> <class 'tensorflow.python.framework.ops.EagerTensor'> (1, 336, 336, 3)
wowo onnxruntime model
['output_1', 'output_2'] red_input
waste in pnet: 0.036742448806762695delta0 times: 0.05244040489196777
fc4 <keras.src.layers.core.dense.Dense object at 0xfffefc137b50>
use saveed model to rnet predict
6/6 [==============================] - 0s 8ms/stepdelta1 times: 0.23819351196289062
[{'box': [272, 93, 63, 63], 'confidence': 0.9978725910186768}, {'box': [477, 280, 62, 62], 'confidence': 0.9208602905273438}, {'box': [7, 71, 43, 43], 'confidence': 0.8992095589637756}, {'box': [9, 72, 31, 31], 'confidence': 0.8957547545433044}, {'box': [100, 408, 43, 43], 'confidence': 0.8824415802955627}, {'box': [485, 205, 62, 62], 'confidence': 0.8461276888847351}, {'box': [305, 181, 47, 47], 'confidence': 0.7558619976043701}]
关键的数据是推理耗时 0.23819351196289062秒,最高可信度是 0.9978725910186768,检测的人脸框坐标是 [272, 93, 63, 63] 可以看到初了推理耗时,其它数据和 onnx 模型得到的是一样的。
考虑到推理的识别框的结果是一致的,我从推理耗时和可信度两个角度绘制三种 RNET 模型的数据对比图如下:
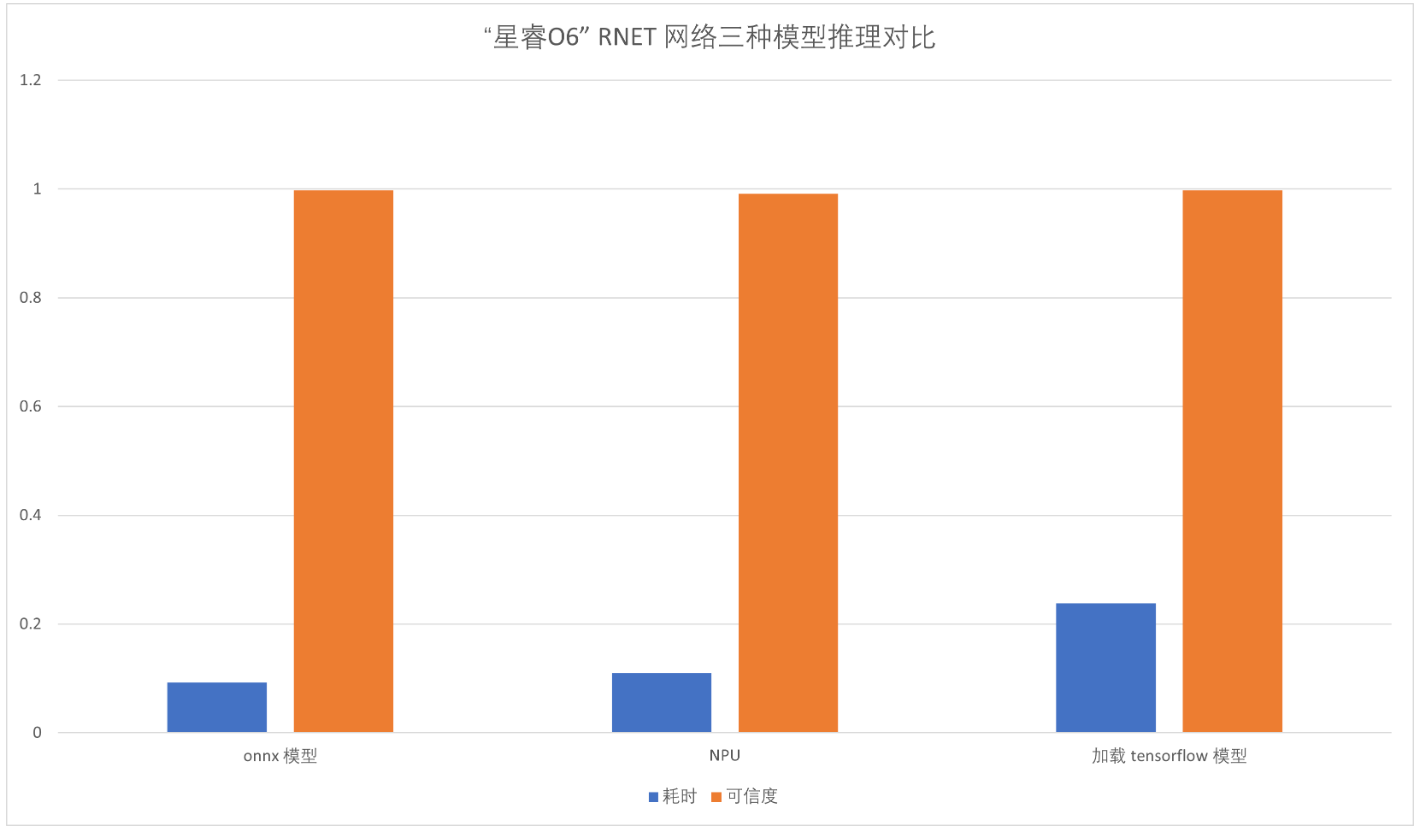
仔细固安察可以发现,NPU推理的结果的可信度指标最低,耗时比 ONNX 略高,ONNX 模型的可信度和直接加载 tensorflow 的 saved model 是一致的。
RTSP 拉流推理显示
有了上面的基础,我们就可以进一步做一些 demo 型的应用,这里我在 PC 开发机器上使用 live555 部署了一个 rtsp 推流服务。接着,在前面部分的基础上编写了 python 代码实现了在星瑞“O6”通过 mtcnn 模型实现人脸识别标框和显示的效果,这部分代码如下所示:
#!/usr/bin/python3from mtcnn.utils.images import load_image
from mtcnn.utils.plotting import plot_bbox
from mtcnn.utils.plotting import plot_landmarks
from mtcnn.utils.plotting import plot
from PIL import Image
import tensorflow as tf
import time
import cv2# Create a detector instance
detector = MTCNN(stages="face_detection_only", device="CPU:0")rtsp_url ='rtsp://192.168.99.240:8554/output.webm'
cap = cv2.VideoCapture(rtsp_url)if not cap.isOpened():print("Could not open RTSP stream.")exit(-1)face_cascade = cv2.CascadeClassifier(cv2.data.haarcascades + 'haarcascade_frontalface_default.xml')while True:ret, frame = cap.read()if not ret:print("Failed to read frame.")breaktime_before=time.time()result = detector.detect_faces(frame)time_delta = time.time() -time_beforeprint("detect waste(sec):", time_delta)if len(result) > 0:frame=plot(frame, result[0])cv2.imshow('RTSP Video Stream with Person Detection', frame)if cv2.waitKey(1) & 0xFF == ord('q'):break
这里,我截了一个视频演示的一张图片:
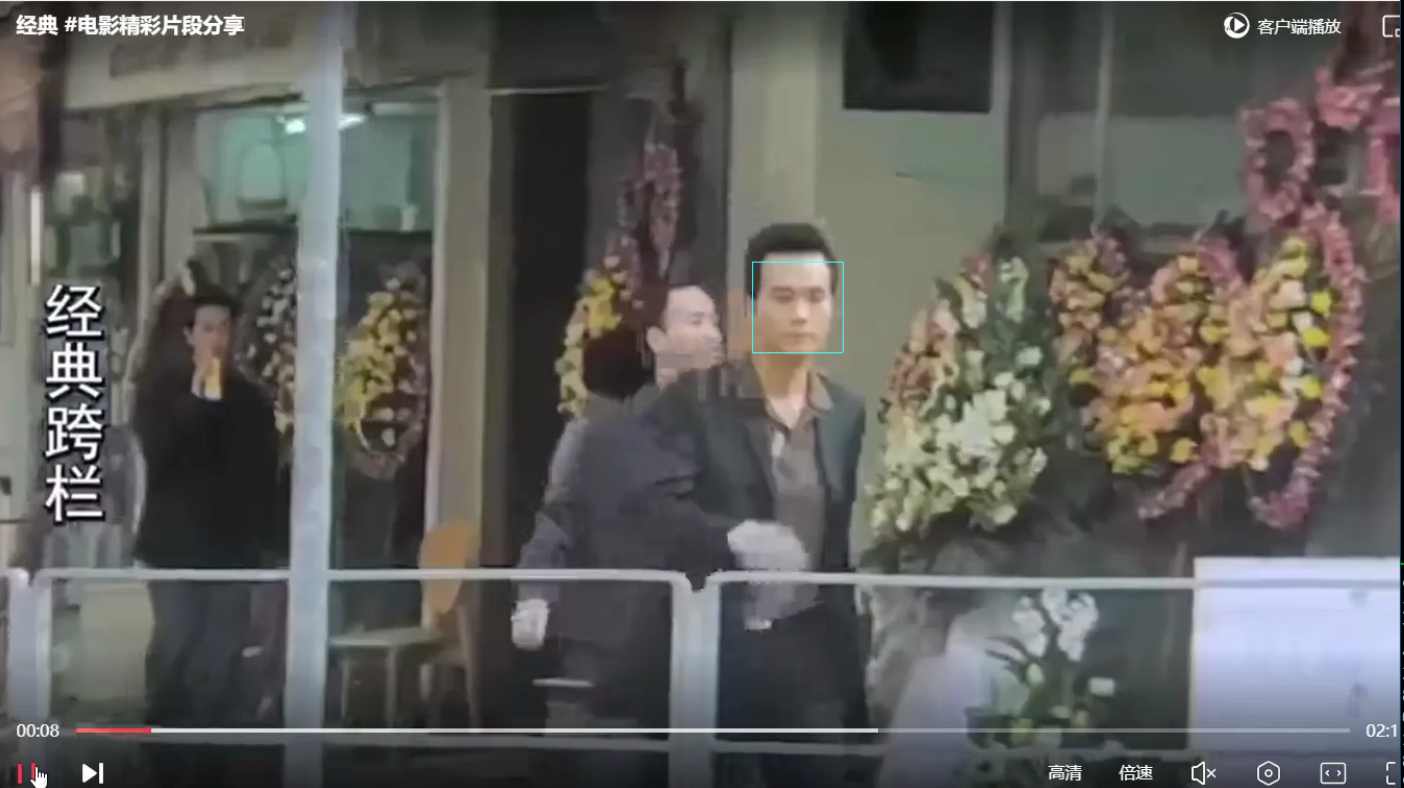
可以看到准确框出了人脸的位置,实现了mtcnn 模型在星瑞“O6” NPU 上部署和推理的过程。