Vue3实战八、路由权限和动态路由
目录
- 路由权限和动态路由
- 问题
- 解决问题
- 实现步骤:
- 第一步:封装调用接口 API 方法
- 第二步:路由权限控制获取登录用户数据
- 后端动态路由配置表配置步骤
- Glob 导入注意事项:
- 第一步、import.meta.glob的加载与匹配
- 第二步、添加动态路由 router.addRoute
- 第三步:使用 Pinia 保存动态路由(菜单)数据
- 第四步、缓存路由名称 name 值存在到 pinia
- 第五步、修改Layout渲染出口缓存 `<keep-alive>`
- 第六步、动态渲染左侧主菜单
- 第七步、查看效果:
- 按钮级权限控制:
- 第一步:自定义权限指令(全局指令)
- 第二步、使用自定义指令控制权限
- 自定义权限函数
- 第一步:定义authFunction函数权限文件
- 第二步、使用自定义的权限函数
- 第三步、测试使用效果
路由权限和动态路由
问题
当前系统如果未登录,可以进行访问系统功能,这样肯定需要避免的,登陆后只能获取到令牌access_token,我们还需要获取登录的用户信息,并且获取用户拥有的菜单和按钮权限
解决问题
解决问题:通过路由前置beforeEach实现路由权限控制
- 判断用户是否已经登录并拥有
accsee_token。 - 如果没有登陆,也就是没有
accsee_token,则跳转到登录页面。 - 如果已登录,有
accsee_token令牌,判断是否有菜单信息或者用户信息,如果有则正常页面跳转,如果没有则请求接口获取菜单及用户信息后,则进行动态路由加载route.addRoute,然后正常页面跳转。
实现步骤:
第一步:封装调用接口 API 方法
- 在
src/api/auth/index.ts文件中定义查询用户权限信息接口:import request from "@/utils/request"; const baseUrl = "/auth"; // 查询用户拥有的菜单按钮权限(动态路由) export function getMenuUser() { return request({ url: `${baseUrl}/user`, method: 'GET', }); }
第二步:路由权限控制获取登录用户数据
登录后,如果未获取到用户信息和权限信息,则发送请求获取,获取后进行pinia将数据管理起来。
- 在
src/types/pinia.d.ts完善 用户认证状态 类型/** * pinia状态类型定义 */ declare interface layoutConfigState { isCollapse: boolean; // 是否展开菜单 globalTitle: string; // 网站主标题 isFullscreen: boolean; // 是否全屏 isDark: boolean; // 是否暗黑主题 } // 登录信息 declare interface LoginData { username: string; password: string; } // 认证用户信息 declare interface UserInfo { nickName: string; username: string; imageUrl: string; } // 用户认证状态 declare interface AuthState<T = any> { rememberData?: LoginData; // 记住我(登录数据) accessToken?: string; //访问令牌 userInfo?: UserInfo; // 登录用户信息 ++++++ buttonList: string[]; // 路由菜单权限 ++++++ menuList: T[]; // 路由菜单权限 ++++++ } - 在
src/stores/auth.ts中管理用户信息userInfo、buttonList按钮权限、menuList菜单权限import { defineStore } from 'pinia'; import type { RouteRecordRaw } from 'vue-router'; import { Session, Local } from '@/utils/storage'; import { login, logout, getMenuUser } from '@/api/auth'; // 保存到 Local或 Session的key名 export const Key = { rememberKey: 'isRemember', // 记住密码的key accessTokenKey: 'accessToken', // 访问令牌本地保存的key userInfoKey: 'userInfo', // 用户信息本地保存的key } /** * 用户所拥有的路由权限 */ export const useAuthStore = defineStore('auth', { state: (): AuthState<RouteRecordRaw> => { return { rememberData: Local.get(Key.rememberKey), // 记住密码 accessToken: Session.get(Key.accessTokenKey), // 访问令牌字符串 userInfo: Session.get(Key.userInfoKey), buttonList: [], menuList: [] } }, actions: { // 更新用户信息 ++++++ async setUserInfo(data: UserInfo) { this.userInfo = data; Session.set(Key.userInfoKey, data); }, // 获取按钮列表 async setButtonList(data: string[]) { this.buttonList = data; }, // 更新菜单权限 async setMenuList(data = [] as RouteRecordRaw[]) { this.menuList = data; }, // 记住密码 setRememberPwd(data?: LoginData) { this.rememberData = data; if (data) { Local.set(Key.rememberKey, { username: data.username, password: data.password }); } else { Local.remove(Key.rememberKey); } }, // 登录操作 userLogin(loginData: LoginData) { return new Promise((resolve, reject) => { login(loginData).then((res: any) => { const { data } = res; // 状态赋值 const { access_token } = data; this.accessToken = access_token; // 保存到session中 Session.set(Key.accessTokenKey, access_token); // 正常响应钩子 resolve(res); }).catch((error: Error) => { reject(error); // 异常 }); }); }, userLogout() { return new Promise((resolve, reject) => { logout().then((res: any) => { // 重置状态 this.resetUserState(); // 重新加载当前页,需认证页面会去登录页 window.location.reload(); resolve(res); }).catch((error: Error) => { reject(error); }) }); }, // 重置用户状态 resetUserState() { this.menuList = []; this.accessToken = undefined; this.userInfo = undefined; // 移除保存的数据 Session.remove(Key.accessTokenKey); Session.remove(Key.userInfoKey); } } }); - 创建路由权限控制文件:
src/router/permission.ts,核心使用路由前置beforeEach进行处理import router from '@/router'; import { initBackEndRoutes } from '../router/backEnd'; import { useAuthStore } from '@/stores/auth'; // 白名单,无需认证可访问路由地址 const whiteList = ['/login'] // no redirect whitelist // 路由前置:跳转到目标路由前被调用 router.beforeEach(async (to, from, next) => { const authStore = useAuthStore(); // 获取访问令牌 const hasToken = authStore.accessToken; if (hasToken) { // 已登录,有令牌 if (to.path === '/login') { return next({ path: '/' }); } else { // 获取用户拥有的菜单权限信息 if (!authStore.userInfo || authStore.menuList.length <= 0) { // 后端控制路由 await initBackEndRoutes(); // 解决刷新时:一直跳 404 页面问题 return next({ path: to.path, query: to.query }); } else { return next(); } } } else { // 未登录,无令牌 // 如果是白明单,放行 if (whiteList.indexOf(to.path) !== -1) { return next(); } else { // 无令牌,跳转登录页 return next(`/login?redirect=${to.path}`); } } }); - 创建后端动态路由控制文件
src/router/backEnd.ts,文件中定义initBackEndRoutes方法,方法目前实现获取用户信息和权限信息:import { getMenuUser } from '@/api/auth/index'; import { useAuthStore } from '@/stores/auth'; /** * 根据后端返回路由数据,进行动态路由控制 * 1. 请求接口获取用户数据和权限数据 */ export async function initBackEndRoutes() { // 1、判断用户是否登录,未登录结束 const authStore = useAuthStore(); if (!authStore.accessToken) return false; // 2、请求接口获取用户拥有的权限菜单(路由数据) const { data } = await getMenuUser(); const { userInfo, menuList, buttonList } = data; // 3、没有任何菜单权限,返回false if (!userInfo || !menuList || menuList.length <= 0) return false; authStore.setUserInfo(userInfo); authStore.setButtonList(buttonList); authStore.setMenuList(menuList); } - 在
main.ts中引入路由权限拦截器,让其生效。import { createApp } from 'vue' import { createPinia } from 'pinia' import App from './App.vue' import router from './router' // 图标 import { useElIcon } from '@/utils/setGlobal'; // 引入路由拦截器 import '@/router/permission'; const app = createApp(App) app.use(createPinia()) app.use(router) app.use(ElementPlus, { locale: zhCn }); // 全局注册图标`ele-`开头(样式在index.scss中) useElIcon(app); app.mount('#app')
后端动态路由配置表配置步骤
当前路由配置表是静态定义在src/router/index.ts文件中,如果要添加路由配置则需要在此文件中添加,希望根据后端返回的用户菜单权限数据来进行动态路由配置,用户有什么菜单权限,则只动态配置对应的路由,没有的权限菜单则不配置路由,上面的步骤中,已经获取了用户拥有的菜单权限,根据获取的菜单权限动态配置到路由表中。
Glob 导入注意事项:
Glob文档直通车
- 这只是一个
Vite独有的功能而不是一个Web或ES标准- 该
Glob模式会被当成导入标识符:必须是相对路径(以./开头)或绝对路径(以/开头,相对于项目 根目录解析)或一个别名路径(请看resolve.alias选项)。Glob匹配是使用fast-glob来实现的 —— 阅读它的文档来查阅 支持的Glob模式。- 所有
import.meta.glob的参数都必须以字面量传入。- 你 不 可以在其中使用变量或表达式
- 以
!作为前缀,忽略结果中的一些文件- 返回结果为对象数组:
[{key文件路径,value动态导入组件方法}]
如: ['/src/views/home/index.vue', () => import("/src/views/home/index.vue")]
第一步、import.meta.glob的加载与匹配
后端返回的 menuList 菜单权限数据中的 component 属性值是字符串,则在路由配置时动态引用组件的函数,我们可以 Vite 提供的 import.meta.glob 函数加载项目中的多个文件模块,再根据 component 属性值从加载的文件模块中匹配出来。
-
在
src/router/backEnd.ts代码实现:import { getMenuUser } from '@/api/auth/index'; import { useAuthStore } from '@/stores/auth'; // ++++++ import type { RouteComponent, RouteRecordRaw } from 'vue-router'; /** * 获取 src/views 目录下的 .vue 全部文件,排除其 components 目录下的子组件文件 */ const modules: Record<string, RouteComponent> = import.meta.glob(['@/views/**/*.vue', '!@/views/**/components/**']); // 相对路径路由模块: 将 key本地路由组件路径 `/src/views` 或 `../views` 都替换为 '' const viewsModules: Record<string, RouteComponent> = Object.keys(modules).reduce((prevObj, currKey) => Object.assign(prevObj, { [currKey.replace(/\/src\/views|..\/views/, '')]: modules[currKey] }), {}); console.log('viewsModules', viewsModules); /** * 根据后端返回路由数据,进行动态路由控制 * 1. 请求接口获取用户数据和权限数据 */ export async function initBackEndRoutes() { // 省略 }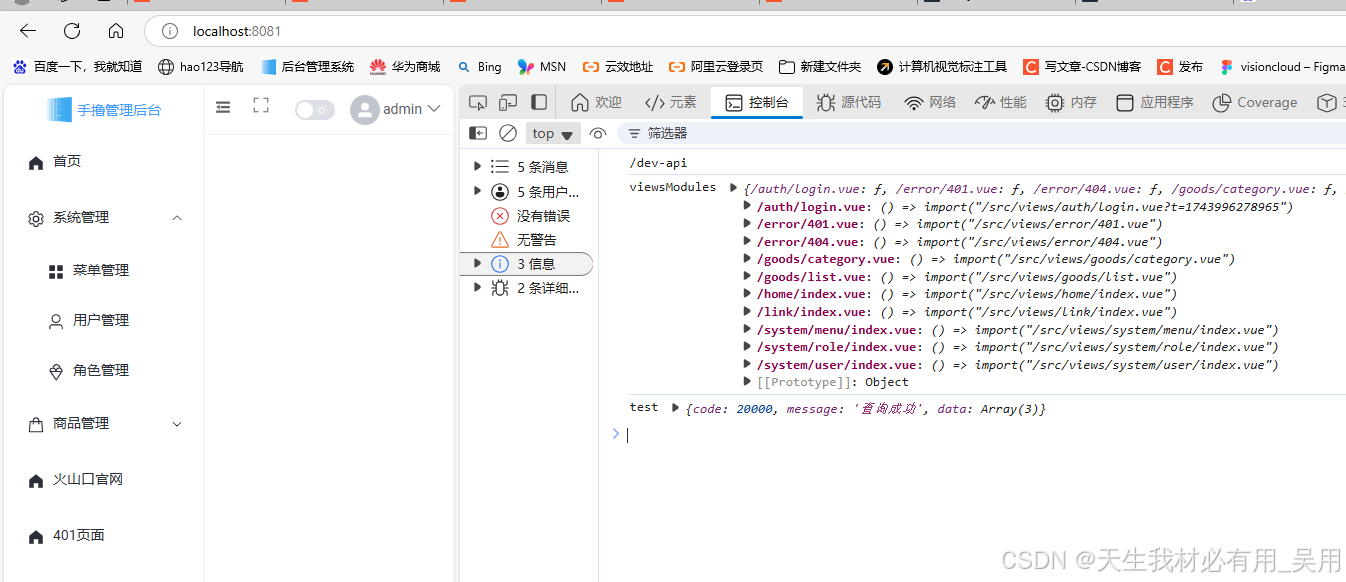
-
后端路表中
component转换为动态导入路由组件函数import { dynamicRoutes, defaultRoutes } from '@/router'; /** * 后端路表中 component 转换为动态导入路由组件 * @param dynamicRoutes 后端返回的路由表数组 * @returns component 值已转换为动态导入路由组件方法 */ export function dynamicImportComponent(dynamicRoutes: RouteRecordRaw[]) { if (!dynamicRoutes || dynamicRoutes.length <= 0) return; return dynamicRoutes.map((route) => { // 存在 component 值,则查找对应动态导入组件方法 const { component } = route; if (component) route.component = viewsModules[`${component}`] || viewsModules[`/${component}`]; route.children && dynamicImportComponent(route.children); return route; }); }
3.拆分前端路由配置表
修改
src/router/index.ts路由静态配置表:
- 在 dynamicRoutes 存放可权限控制的动态路由:后端请求路由配置数据后,赋值给下面路由数组的顶级对象的
children属性(即 布局Layout对象的children属性)。- 增加
defaultRoutes用于配置默认路由:将所有用户都可访问的路由,不管前端控制还是后端控制路由权限,都要将下面添加到此配置中。fullscreenRoutes全屏显示路由,不作用到layout布局渲染出口,且不通过后端控制其配置路由是一直存在的。- 然后创建路由对象中,将
defaultRoutesfullscreenRoutes路由配置解构合并起来:即:routes: [...defaultRoutes, ...fullscreenRoutes]
完整代码实现:
import { createRouter, createWebHistory, createWebHashHistory } from 'vue-router';
import type { RouteRecordRaw } from 'vue-router';
/**
* 因为 Vue-Router 提供的配置路由对象的 meta 属性有限,所以须要扩展 RouteMeta 接口。
* 路由对象 meta 属性说明:
* meta: {
* title: 菜单标题
* icon: 菜单图标
* linkTo: 外链地址(新窗口打开)
* cache: 是否缓存:true缓存,false不缓存,会将 name 值用于 <keep-alive>的includes上
* hidden: 是否在菜单中显示:true显示,false隐藏
* isBreadcrumb: 是否显示到面包屑:默认或true会显示,false不显示。
* }
*/
declare module 'vue-router' {
  interface RouteMeta {
    title?: string;
    icon?: string;
    linkTo?: string;
    cache?: boolean;
    hidden?: boolean;
    isBreadcrumb?: boolean;
  }
}
/**
* 动态路由:后端请求路由配置数据后,赋值给下面路由数组的顶级对象的children属性(即 布局 Layout 对象的
children属性)
* @returns 动态路由配置数组
*/
export const dynamicRoutes: RouteRecordRaw[] = [
  {
    path: '/',
    name: 'Layout',
    component: () => import('@/layout/index.vue'),
    redirect: '/home',
    children: [
      {
        path: '/home',
        name: 'Home',
        component: () => import('@/views/home/index.vue'),
        meta: {
          title: '首页',
          icon: 'ele-HomeFilled',
        }
      },
      {
        path: '/system',
        name: 'System',
        redirect: '/system/menu',
        meta: {
          title: '系统管理',
          icon: 'ele-Setting',
        },
        children: [
          {
            path: '/system/menu',
            name: 'SystemMenu',
            component: () => import('@/views/system/menu/index.vue'),
            meta: {
              title: '菜单管理',
              icon: 'ele-Menu',
            }
          },
          {
            path: '/system/role',
            name: 'SystemRole',
            component: () => import('@/views/system/role/index.vue'),
            meta: {
              title: '角色管理',
              icon: 'ele-IceCream',
            }
          },
          {
            path: '/system/user',
            name: 'SystemUser',
            component: () => import('@/views/system/user/index.vue'),
            meta: {
              title: '用户管理',
              icon: 'ele-User',
            }
          }
        ]
      },
      {
        path: "/goods",
        name: "Goods",
        redirect: "/goods/list",
        meta: {
          title: "商品管理",
          icon: "ele-Goods",
          cache: true,
          hidden: false
        },
        children: [
          {
            path: "/goods/list",
            name: "GoodsList",
            component: () => import('@/views/goods/list.vue'),
            meta: {
              title: "商品列表",
              icon: "ele-GoodsFilled",
              cache: false,
              hidden: false
            }
          },
          {
            path: "/goods/category",
            name: "GoodsCategory",
            component: () => import('@/views/goods/category.vue'),
            meta: {
              title: "商品分类",
              icon: "ele-Operation",
              cache: false,
              hidden: false
            }
          }
        ]
      },
      {
        path: '/huoshankou',
        name: 'Mengxuegu',
        component: () => import('@/views/link/index.vue'),
        meta: {
          title: '火山口官网',
          icon: 'ele-Link',
          linkTo: 'https://www.atjuboyun.com' // 外链跳转地址
        }
      },
    ]
  },
];
/**
* 默认路由配置,所有用户都可访问的路由,不管前端控制还是后端控制路由权限,都要将下面添加到路由表
* (后端路由控制:后端配置菜单数据中不需要下面的菜单项)
* @returns 默认路由配置数组
*/
export const defaultRoutes: RouteRecordRaw[] = [
  {
    path: '/401',
    name: 'NoPermission',
    component: () => import('@/views/error/401.vue'),
    meta: {
      title: '401页面',
      icon: 'ele-Warning',
      hidden: false,
    },
  },
  {
    path: '/:path(.*)*', // 404匹配其他路由地址
    name: 'NotFound',
    component: () => import('@/views/error/404.vue'),
    meta: {
      title: '未找到此页面',
      hidden: true,
    },
  },
];
/**
* 全屏显示路由,不作用到 layout 布局渲染出口。
* (后端路由控制:后端配置菜单数据中不需要下面的菜单项)
*/
export const fullscreenRoutes: RouteRecordRaw[] = [
  {
    path: '/login',
    name: 'Login',
    component: () => import('@/views/auth/login.vue'),
    meta: {
      title: '登录',
      hidden: true,
    },
  },
];
// 创建路由实例
export const router = createRouter({
  // 参数获取的是 vite.config.ts 中的 base 属性值
  history: createWebHashHistory(import.meta.env.BASE_URL),
  // 默认添加 401、404 路由配置,有 404 可防止控制台一直提示 No match found for location with path  'xxx'
  routes: [...defaultRoutes, ...fullscreenRoutes],
});
export default router;
第二步、添加动态路由 router.addRoute
/**
* 添加动态路由,使用 `router.addRoute`
* @link 参考:https://router.vuejs.org/zh/guide/advanced/dynamic-routing.html
*/
export function addRouteHandle() {
  // 1. 将默认路由 401、404 合并,防止不在 layout 布局中;不然会全屏显示401、404页面
  const layoutRouteChildren = [...dynamicRoutes[0].children || [], ...defaultRoutes];
  dynamicRoutes[0].children = layoutRouteChildren;
  // 2. 添加动态路由
  dynamicRoutes.forEach(route => {
    router.addRoute(route);
  });
}
第三步:使用 Pinia 保存动态路由(菜单)数据
将转换后的所有目标路由 使用 Pinia Store 保存下来
/**
* 将动态路由保存到pinia状态中
*/
function setDynamicRoutes() {
  // 存储动态路由
  const authStore = useAuthStore();
  authStore.setMenuList(dynamicRoutes[0].children);
}
第四步、缓存路由名称 name 值存在到 pinia
在 src/layout/layoutMain/index.vue 文件中使用 <keep-alive :includes=[xxx, xxx] /> 的 includes 属性来指定要缓存路由组件name值。而 includes 指定的是路由配置表中的 meta.name (当然此值要与 <script setup name="组件name"> name属性值相同),且配置了 meta.cache: true 才会进行缓存。
下面我们就将路由配置中的 meta.cache: true 的 meta.name 值获取到进行Pinia管理起来。
-
在
src/types/pinia.d.ts定义视图路由状态类型// 视图路由状态 declare interface ViewRoutesState { cacheRouteNames: string[]; // 要缓存路由的name } -
创建
src/stores/viewRoutes.ts管理 要缓存的组件name
import { defineStore } from 'pinia';
/**
* 管理路由组件
*/
export const useViewRoutesStore = defineStore('viewRoutes', {
  state: (): ViewRoutesState => {
    return {
      cacheRouteNames: [], // 要缓存的组件name
    }
  },
  actions: {
    // 更新状态
    async setCacheRouteNames(data: string[]) {
      this.cacheRouteNames = data;
    },
  }
});
- 在
src/router/backEnd.ts添加setCacheRouteNames方法,获取需要缓存的路由名称name存在到
pinia/** * 获取需要缓存的路由名称 `name` 存在到pinia * 用于:src/layout/layoutMain/index.vue 文件中的 <keep-alive :includes=[xxx, xxx] /> */ export function setCacheRouteNames() { // 存储缓存路由 name const cacheRouteNames: string[] = []; const _getNames = (route: RouteRecordRaw) => { // 获取缓存路由的name值 if (route.meta?.cache && route.name) cacheRouteNames.push(route.name as string); // 有子路由,则递归获取name值 if (route.children && route.children.length) { route.children.forEach(item => _getNames(item)); } } _getNames(dynamicRoutes[0]); // 保存到 pinia const viewRoutesStore = useViewRoutesStore(); viewRoutesStore.setCacheRouteNames(cacheRouteNames); }
src/router/backEnd.ts 完整代码:
import { getMenuUser } from '@/api/auth/index';
import { router } from '@/router';
import { dynamicRoutes, defaultRoutes } from '@/router';
import { useAuthStore } from '@/stores/auth';
import type { RouteComponent, RouteRecordRaw } from 'vue-router';
import { useViewRoutesStore } from '@/stores/viewRoutes';
/**
* 获取 src/views 目录下的 .vue 全部文件,排除其 components 目录下的子组件文件
* import.meta.glob 参考:https://cn.vitejs.dev/guide/features.html#glob-import
*/
const modules: Record<string, RouteComponent> = import.meta.glob(['@/views/**/*.vue',
'!@/views/**/components/**']);
// 相对路径路由模块: 将key本地路由组件路径 `/src/views` 或 `../views` 都替换为 ''
const viewsModules: Record<string, RouteComponent> = Object.keys(modules).reduce((prevObj, currKey) => Object.assign(prevObj, {
[currKey.replace(/\/src\/views|..\/views/, '')]:
modules[currKey]
}), {});
// console.log('viewsModules', viewsModules);
/**
* 根据后端返回路由数据,进行动态路由控制
* 1. 请求接口获取用户数据和权限数据
*/
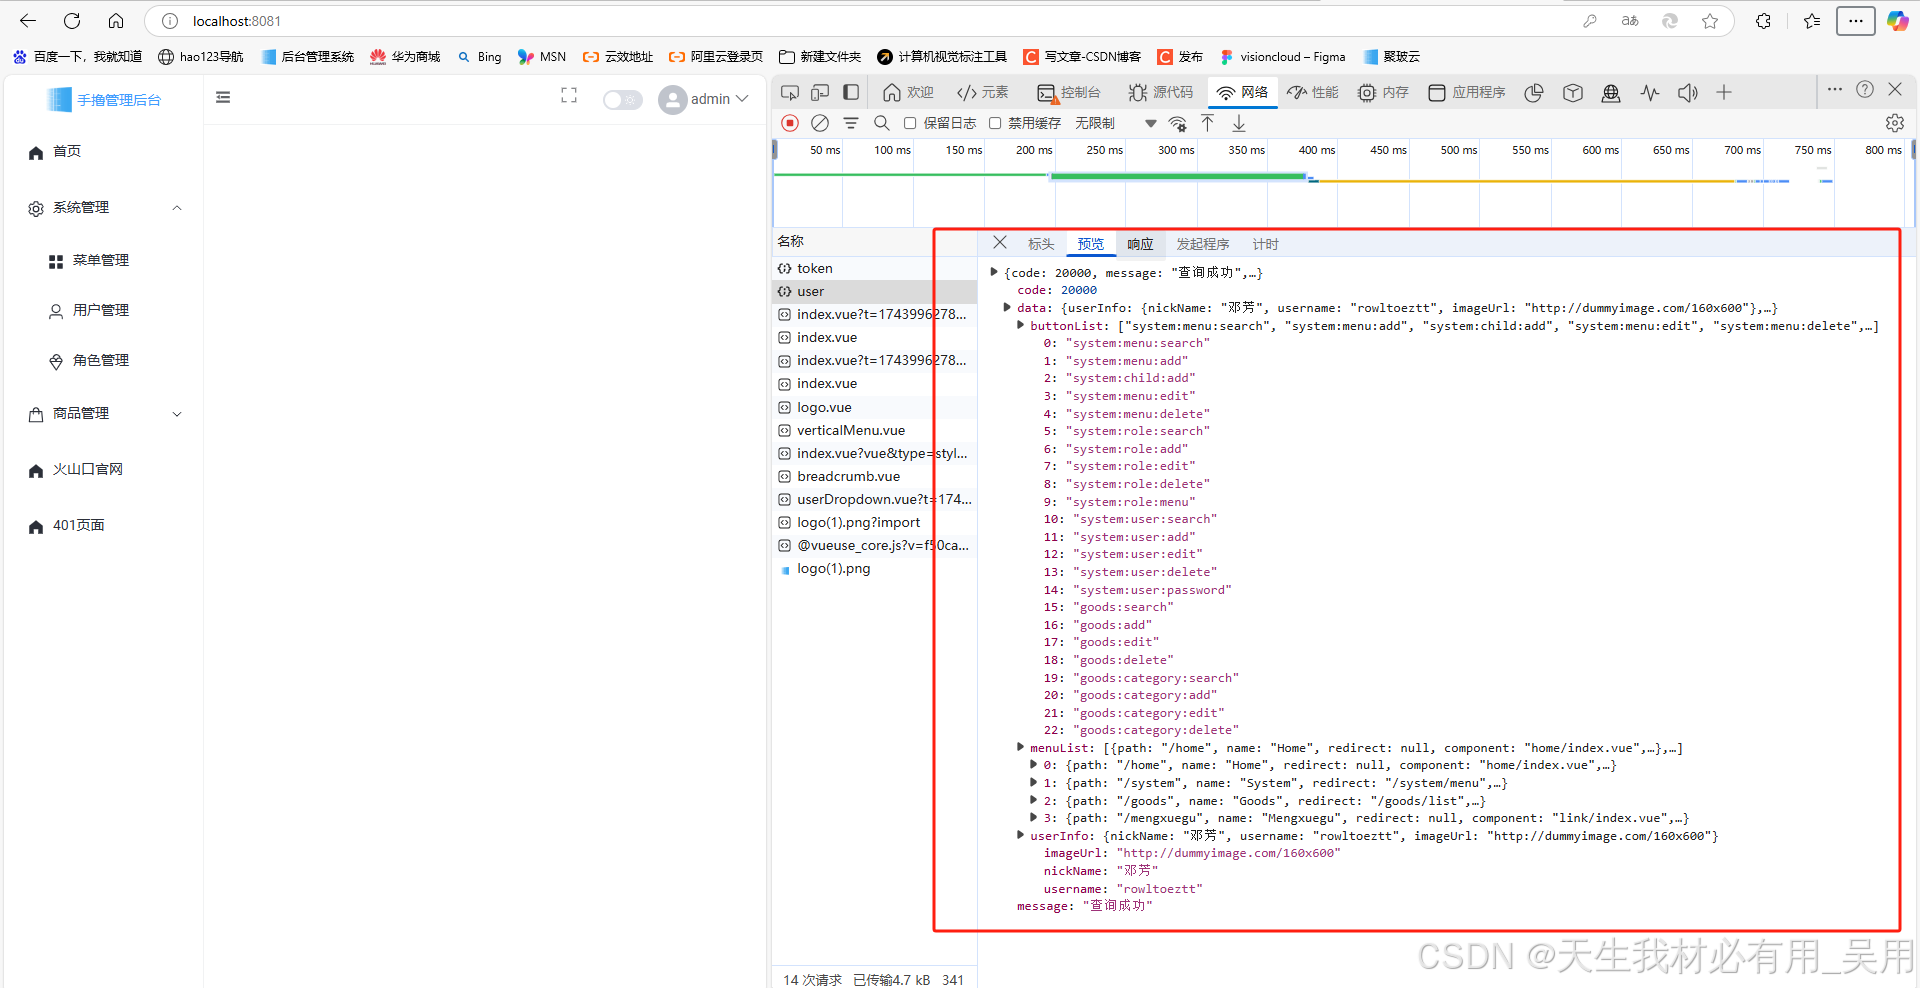
export async function initBackEndRoutes() {
// 1、判断用户是否登录,未登录结束
const authStore = useAuthStore();
if (!authStore.accessToken) return false;
// 2、请求接口获取用户拥有的权限菜单(路由数据)
const { data } = await getMenuUser();
const { userInfo, menuList, buttonList } = data;
// 3、没有任何菜单权限,返回false
if (!userInfo || !menuList || menuList.length <= 0) return false;
authStore.setUserInfo(userInfo);
authStore.setButtonList(buttonList);
// authStore.setMenuList(menuList);
// 4、路由对象中 component 属性的字符串值,从 viewsModules 中查找对应的动态导入路由组件方法
dynamicRoutes[0].children = dynamicImportComponent(menuList);
// console.log('dynamicRoutes0', dynamicRoutes, data);
// 5. 添加动态路由
await addRouteHandle();
// 6. 存储动态路由到 pinia store
setDynamicRoutes();
// 7. 存储缓存路由名到 pinia store
setCacheRouteNames();
}
/**
* 后端路表中 component 转换为动态导入路由组件
* @param dynamicRoutes 后端返回的路由表数组
* @returns component 值已转换为动态导入路由组件方法
*/
export function dynamicImportComponent(dynamicRoutes: RouteRecordRaw[]) {
if (!dynamicRoutes || dynamicRoutes.length <= 0) return;
return dynamicRoutes.map((route) => {
// 存在 component 值,则查找对应动态导入组件方法
const { component } = route;
if (component) route.component = viewsModules[`${component}`] ||
viewsModules[`/${component}`];
route.children && dynamicImportComponent(route.children);
return route;
});
}
/**
* 添加动态路由,使用 `router.addRoute`
* @link 参考:https://router.vuejs.org/zh/guide/advanced/dynamic-routing.html
*/
export function addRouteHandle() {
// 1. 将默认路由 401、404 合并,防止不在 layout 布局中;不然会全屏显示401、404页面
const layoutRouteChildren = [...dynamicRoutes[0].children || [], ...defaultRoutes];
dynamicRoutes[0].children = layoutRouteChildren;
// 2. 添加动态路由
// console.log('dynamicRoutes', dynamicRoutes)
dynamicRoutes.forEach(route => {
router.addRoute(route);
});
}
/**
* 将动态路由保存到pinia状态中
*/
function setDynamicRoutes() {
// 存储动态路由
const authStore = useAuthStore();
authStore.setMenuList(dynamicRoutes[0].children);
}
/**
* ++++++
* 获取需要缓存的路由名称 `name` 存在到pinia
* 用于:src/layout/layoutMain/index.vue 文件中的 <keep-alive :includes=[xxx, xxx] />
*/
export function setCacheRouteNames() {
// 存储缓存路由name
const cacheRouteNames: string[] = [];
const _getNames = (route: RouteRecordRaw) => {
// 获取缓存路由的name值
if (route.meta?.cache && route.name) cacheRouteNames.push(route.name as string);
// 有子路由,则递归获取name值
if (route.children && route.children.length) {
route.children.forEach(item => _getNames(item));
}
}
_getNames(dynamicRoutes[0]);
// 保存到 pinia
const viewRoutesStore = useViewRoutesStore();
viewRoutesStore.setCacheRouteNames(cacheRouteNames);
}
第五步、修改Layout渲染出口缓存 <keep-alive>
在 src/layout/layoutMain/index.vue,获取 pinia 存储的 要缓存的路由组件name,然后指定到<keep-alive :include="xxx">
 <template>
  <!-- 右侧主区域 -->
  <el-main class="layout-main">
    <el-scrollbar>
      <div class="layout-main-warp">
        <router-view v-slot="{ Component }">
          <transition name="fade-transform" mode="out-in">
            <keep-alive :include="cacheRouteNames">
              <component :is="Component"></component>
            </keep-alive>
          </transition>
        </router-view>
      </div>
    </el-scrollbar>
  </el-main>
</template>

<script setup lang="ts" name="LayoutMain">
import { useViewRoutesStore } from "../../stores/viewRoutes";
import { computed } from "vue";
const viewRoutesStore = useViewRoutesStore();
// 获取要缓存的路由组件name
const cacheRouteNames = computed(() => viewRoutesStore.cacheRouteNames);
</script>

<style scoped lang="scss">
:deep(.el-scrollbar__view) {
  /* 铺满高度 */
  height: 100%;
}
</style>
第六步、动态渲染左侧主菜单
- 在
src/layout/layoutAside/index.vue从Pinia中获取保存用户权限菜单数据menuList,将其数据过滤掉不显示的隐藏菜单(meta.hidden为false),只保留meta.hidden为true的数据,将过滤后的目标数据传递到子组件VerticalMenu中:<!-- <template> <div class="h100"> <el-aside class="layout-container layout-aside layout-aside-menu-200" :class=" layoutConfig.isCollapse ? 'layout-aside-menu-60' : 'layout-aside-menu-200' " > <logo /> <VerticalMenu /> </el-aside> </div> </template> --> <template> <!-- 左侧菜单区域 --> <div class="h100"> <el-aside class="layout-aside layout-aside-menu-200" :class=" layoutConfig.isCollapse ? 'layout-aside-menu-60' : 'layout-aside-menu-200' " > <!-- LOGO --> <Logo /> <!-- 菜单 --> <VerticalMenu :menuList="state.menuList" /> </el-aside> </div> </template> <script setup lang="ts" name="LayoutAside"> import { useLayoutConfigStore } from "../../stores/layoutConfig"; import { useAuthStore } from "../../stores/auth"; import { defineAsyncComponent, onMounted, reactive } from "vue"; import type { RouteRecordRaw } from "vue-router"; const authStore = useAuthStore(); const Logo = defineAsyncComponent(() => import("./logo.vue")); const layoutConfig = useLayoutConfigStore(); const VerticalMenu = defineAsyncComponent(() => import("./verticalMenu.vue")); // 开始 const state = reactive({ menuList: [] as RouteRecordRaw[], }); onMounted(() => { setFilterRoutes(); }); // 过滤菜单(路由)数据 function setFilterRoutes() { const _filterRoutes = (routes: RouteRecordRaw[]) => { // 只要·非隐藏·菜单 const targetRoutes = routes.filter((item) => !item.meta?.hidden); // 递归子路由 targetRoutes.forEach((item) => { if (item.children && item.children.length) item.children = _filterRoutes(item.children); }); return targetRoutes; }; // 拷贝一份,不修改pinia状态值 const copyMenuList = JSON.parse(JSON.stringify(authStore.menuList)); state.menuList = _filterRoutes(copyMenuList); } // 结束 </script> <style> </style> - 创建一个
src/layout/layoutAside/subMenu.vue子菜单组件,用于循环复用
<script setup lang='ts' name="SubMenu">
import type { RouteRecordRaw } from "vue-router";
// 父组件传递的prop
defineProps<{
  menu: RouteRecordRaw;
}>();
</script>
<template>
  <!-- 只有一级菜单,没有子菜单 -->
  <el-menu-item
    v-if="!menu.children || menu.children.length <= 0"
    :index="menu.path"
  >
    <SvgIcon :name="menu.meta?.icon"></SvgIcon>
    <template #title>{{ menu.meta?.title }}</template>
  </el-menu-item>
  <!-- 有子菜单 -->
  <template v-else>
    <el-sub-menu :key="menu.path" :index="menu.path">
      <template #title>
        <SvgIcon :name="menu.meta?.icon"></SvgIcon>
        <span>{{ menu.meta?.title }}</span>
      </template>
      <!-- 引用当前组件,渲染子组件,注意要组件名 name 值为 SubMenu -->
      <SubMenu
        v-for="childMenu in menu.children"
        :menu="childMenu"
        :key="childMenu.path"
      />
    </el-sub-menu>
  </template>
</template>
- 动态渲染左侧主菜单
在src/layout/layoutAside/verticalMenu.vue子组件中接收传递的menuList来渲染数据
<!-- 侧栏(垂直)菜单-->
<script setup lang='ts'>
import { storeToRefs } from "pinia";
import { useLayoutConfigStore } from "../../stores/layoutConfig";
import { defineAsyncComponent } from "vue";
import type { RouteRecordRaw } from "vue-router";
const SubMenu = defineAsyncComponent(
  () => import("../../layout/layoutAside/subMenu.vue")
);
const layoutConfig = useLayoutConfigStore();
// 是否折叠收起菜单
const { isCollapse } = storeToRefs(layoutConfig);
// 父组件传递的prop
withDefaults(
  defineProps<{
    menuList: RouteRecordRaw[];
  }>(),
  {
    menuList: () => [],
  }
);
</script>
<template>
  <!--滚动条-->
  <el-scrollbar>
    <!--
      router 开启路由功能,使用 index 属性指定路由地址
      default-active 默认选中哪个菜单
      background-color 背景色
      :default-openeds 默认选中哪个菜单,值为index值数组,要v-bind绑定
    -->
    <el-menu
      router
      :default-active="$route.path"
      background-color="transparent"
      :default-openeds="['/system']"
      :collapse="isCollapse"
    >
      <SubMenu v-for="menu in menuList" :key="menu.path" :menu="menu" />
    </el-menu>
  </el-scrollbar>
</template>
<style scoped>
</style>
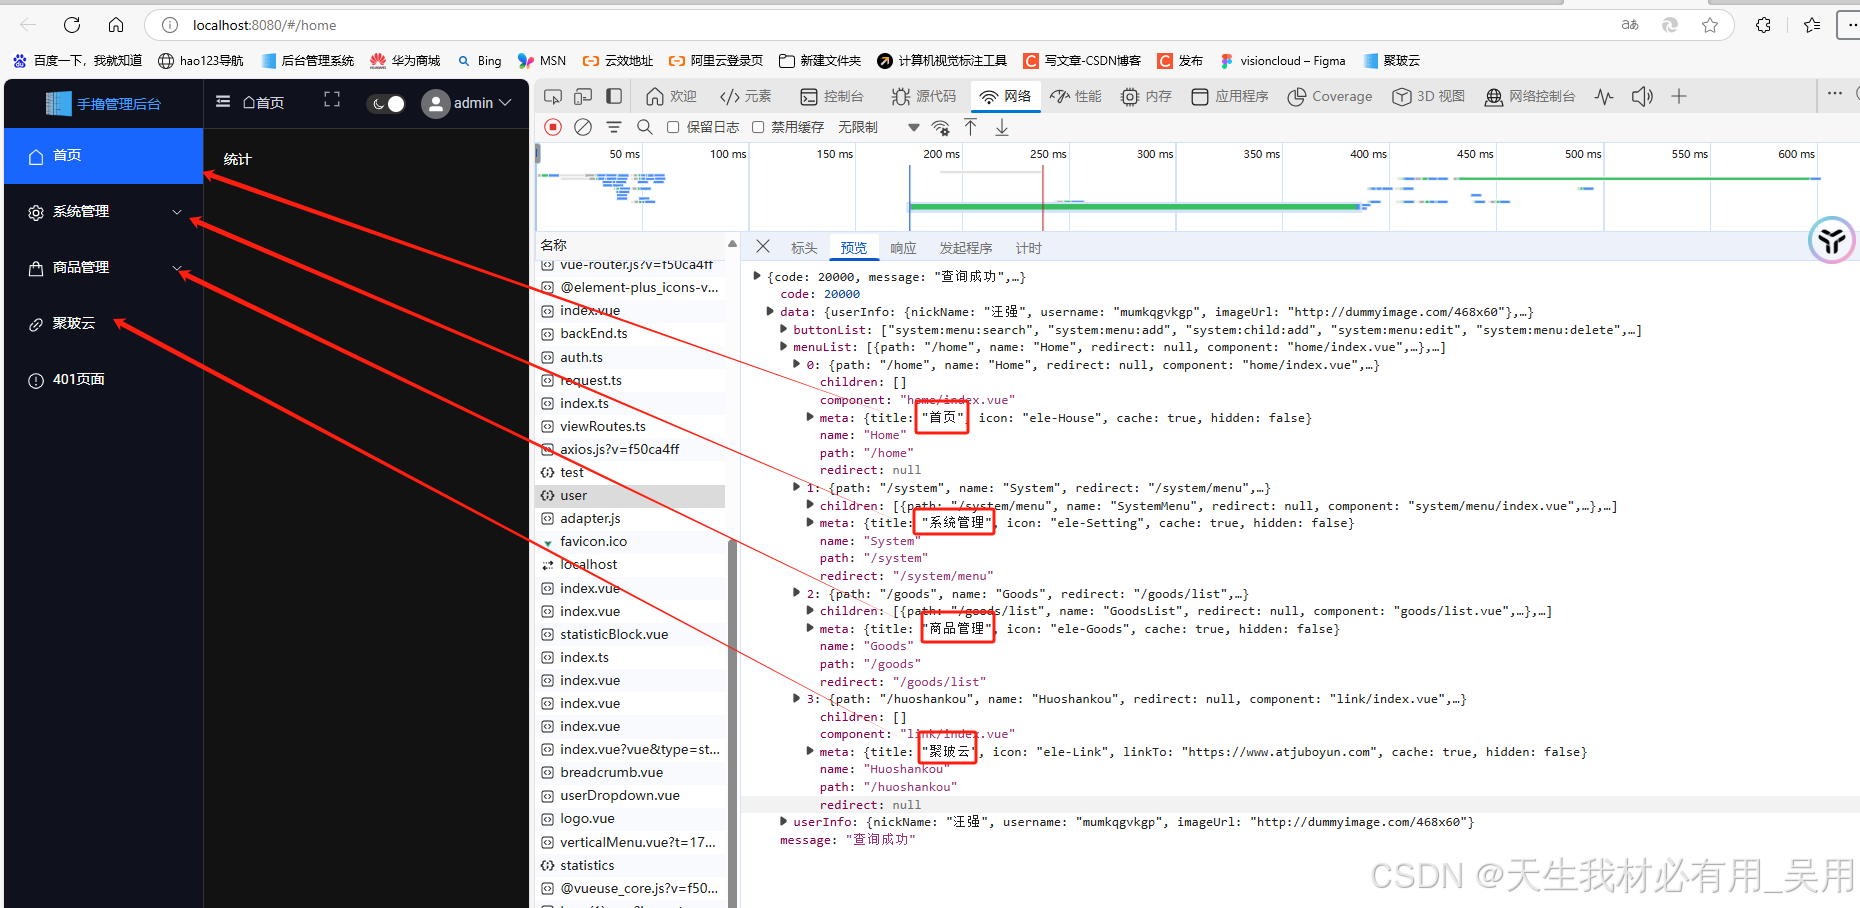
第七步、查看效果:
按钮级权限控制:
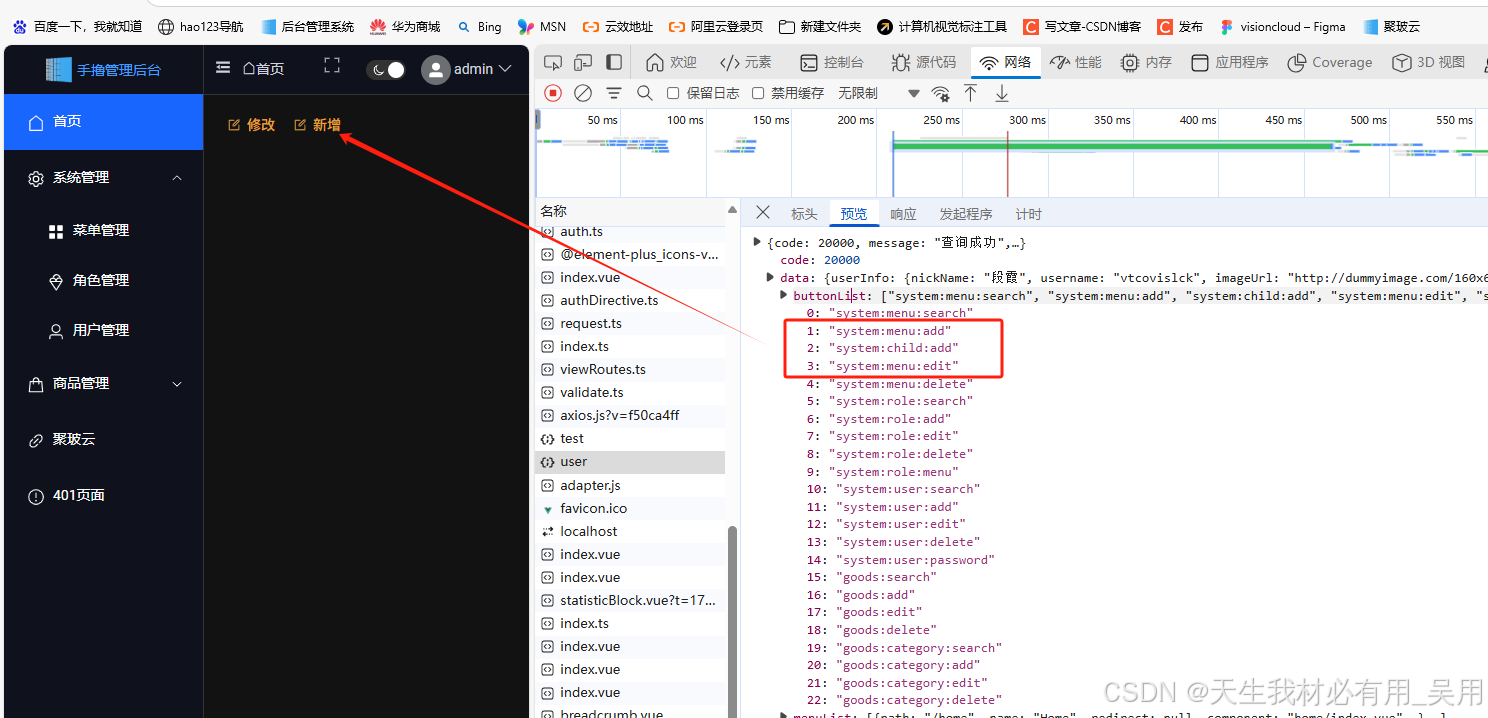
用户登录后,会获取用户拥有的所有按钮权限标识 buttonList ,我们通常可以自定义指令和自定义函数两种方式来进行控制按钮的权限,如果用户没有对应按钮权限,则隐藏该按钮,有权限则显示。
自定义指令:用于组件模板中,显示隐藏对应元素。
v-permission="xxx"单个权限校验 。v-permission="[xxx, xxx]"多个权限校验,满足其中一个则显示 。v-permission-all="[xxx, xxx]"多个权限验证,全部满足则显示。
自定义函数:用于js逻辑代码中,有权限则执行有权限逻辑代码,无权限则执行无权限逻辑代码。
permission('xxx')单个权限验证。permission(['xxx', 'xxx'])多个权限验证,满足一个则返回true。permissionAll(['xxx', 'xxx'])多个权限验证,全部满足则返回true。
第一步:自定义权限指令(全局指令)
自定义权限指令 v-permission 、 v-permissions 、 v-permission-all ,创建 src/directive/authDirective.ts 实现:
import type { App } from 'vue';
import { isContainArr } from '@/utils/validate';
import { useAuthStore } from "@/stores/auth";
/**
* 用户权限指令
* 1、v-permission="xxx" 单个权限校验
* 2、v-permissions="[xxx, xxx]" 多个权限校验,满足其中一个则显示
* 3、v-permission-all="[xxx, xxx]" 多个权限验证,全部满足则显示
* 注意:vue3 有了片段支持以后,组件可能会有多个根节点。当被应用在一个多根节点的组件上时,指令会被忽略,并且会抛出一个警告。
* [Vue warn]: Runtime directive used on component with non-element root node. Thedirectives will not function as intended.
*/
export async function permissionDirective(app: App) {
  const permissionStore = useAuthStore();
  // v-permission="xxx" 单个权限校验
  // 第1个参数是指令名,v-permission 使用,而在声明指令名时候不能加 v-
  app.directive('permission', {
    mounted(el, binding) {
      // 获取用户当前所拥有的所有按钮权限
      const buttonList = permissionStore.buttonList;
      // 如果没有权限, 将元素移除
      if (!buttonList.some((btn: string) => btn === binding.value)) {
        el.parentNode.removeChild(el);
      }
    },
  });
  // v-permissions="[xxx, xxx]" 多个权限校验,满足其中一个则显示
  app.directive('permissions', {
    mounted(el, binding) {
      // 获取用户当前所拥有的所有按钮权限
      const buttonList = permissionStore.buttonList;
      // 存在传递过来的其中一个则返回true,说明有权限
      if (!buttonList.some((btn: string) => binding.value.indexOf(btn) != -1)) {
        el.parentNode.removeChild(el);
      }
    },
  });
  // v-permission-all="[xxx, xxx]" 多个权限验证,全部满足则显示
  app.directive('permission-all', {
    mounted(el, binding) {
      // 获取用户当前所拥有的所有按钮权限
      const buttonList = permissionStore.buttonList;
      if (!isContainArr(buttonList, binding.value)) el.parentNode.removeChild(el);
    },
  });
}
创建 src/directive/index.ts 作为管理自定义指令的入口,将上面自定义指令导入,方便管理
import type { App } from 'vue';
// 引入所有要注册的全局指令:权限指令
import { permissionDirective } from '@/directive/authDirective';
/**
* 导出指令方法:v-xxx
* @methods permissionDirective 用户权限指令,用法:v-permission
*/
export function directive(app: App) {
  // 用户权限指令
  permissionDirective(app);
  // 其他自定义指令
}
在 main.ts 中注册自定义全局指令
import { createApp } from 'vue'
import { createPinia } from 'pinia'

import App from './App.vue'
import router from './router'

// 整合ElementPlus
import ElementPlus from 'element-plus';
// @ts-ignore 汉化
import zhCn from 'element-plus/dist/locale/zh-cn.mjs';
import "@/styles/index.scss"
// 图标
import { useElIcon } from '@/utils/setGlobal';
import '@/router/permission';
// 自定义全局指令
import { directive } from '@/directive';
const app = createApp(App)
app.use(createPinia())
app.use(router)
app.use(ElementPlus, { locale: zhCn });
// 全局注册图标`ele-`开头(样式在index.scss中)
useElIcon(app);
//注册自定义全局指令
directive(app);

app.mount('#app')
第二步、使用自定义指令控制权限
       <el-button
      v-permission="'system:menu:edit'"
      link
      type="warning"
      icon="ele-Edit"
    >
      修改
    </el-button>
    <el-button
      v-permission="'system:menu:add'"
      link
      type="warning"
      icon="ele-Edit"
    >
      新增
    </el-button>
    <el-button
      v-permission="'system:menu:aaa'"
      link
      type="warning"
      icon="ele-Edit"
    >
      新增
    </el-button>
效果:
自定义权限函数
有时候,管理后台开发中可能需要在js逻辑代码中进行权限控制,而上面的指令是无法在js代码中使用。我们可以自定义权限函数,实现在js中进行权限控制。自定义函数:用于js逻辑代码中,有权限则执行有权限逻辑代码,无权限则执行无权限逻辑代码。
auth('xxx')单个权限验证 。auths(['xxx', 'xxx'])多个权限验证,满足一个则返回true。authAll(['xxx', 'xxx'])多个权限验证,全部满足则返回true。
第一步:定义authFunction函数权限文件
- 创建
src/utils/authFunction.ts自定义权限函数import { isContainArr } from '@/utils/validate'; import { useAuthStore } from "@/stores/auth"; /** * auth('xxx') 单个权限验证 * 在 js 中使用: * import {permission, permissions, permissionAll} from '@/directive/authFunction'; * const info = auth('goods:add') ? '有权限': '无权限'; * @param value 权限值 * @returns 有权限,返回 `true`,反之则反 */ export function permission(value: string): boolean { const authStore = useAuthStore(); return authStore.buttonList.some((btn: string) => btn === value); } /** * auths(['xxx', 'xxx']) 多个权限验证,满足一个则返回 true * @param value 权限值 * @returns 有权限,返回 `true`,反之则反 */ export function permissions(value: string[]): boolean { const authStore = useAuthStore(); return authStore.buttonList.some((btn: string) => value.indexOf(btn) != -1) } /** * authAll(['xxx', 'xxx']) 多个权限验证,全部满足则返回 true * @param value 权限值 * @returns 有权限,返回 `true`,反之则反 */ export function permissionAll(value: string[]): boolean { const authStore = useAuthStore(); return isContainArr(authStore.buttonList, value); }
第二步、使用自定义的权限函数
<template>
<div>
<el-button icon="ele-Plus" type="success" @click="handleAddBefore()"
>新增用户</el-button
>
</div>
</template>
<script lang="ts" setup name="statisticBlock">
import { getStatisticsData } from "../../../api/home/index";
import { onMounted, reactive } from "vue";
import { permission } from "../../../utils/authFunction";
import { ElMessage } from "element-plus";
const state = reactive({
loading: false,
statisticData: {
totalOrderNum: 0,
totalSaleMoney: 0,
totalReturnedMoney: 0,
totalIncomeMoney: 0,
} as any,
});
onMounted(() => {
loadStatisticsData();
});
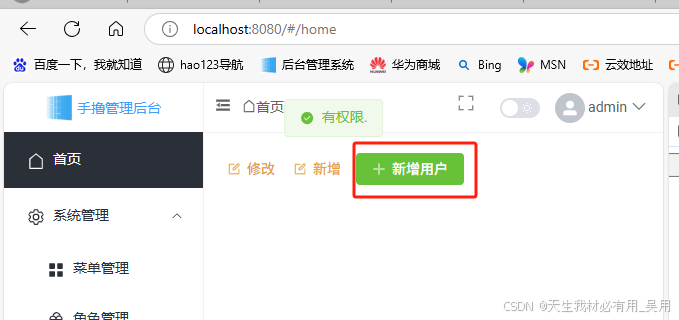
function handleAddBefore() {
if (!permission("system:user:add")) {
return ElMessage({
message: "没有权限.",
type: "warning",
});
} else {
return ElMessage({
message: "有权限.",
type: "success",
});
}
}
async function loadStatisticsData() {
try {
state.loading = true;
const { data } = await getStatisticsData();
console.log("data", data);
// state.statisticData = data;
} catch (error) {
} finally {
state.loading = false;
}
}
</script>
第三步、测试使用效果