HarmonyOS NEXT开发进阶(十三):网络请求封装
文章目录
- 一、HTTP 网络请求
- 二、HTTP 网络请求封装
- 2.1 创建 NetWorkManage 实例
- 2.2 创建请求拦截器
- 2.3 响应拦截器
- 三、使用泛型对数据转换
- 四、接口请求示例
- 五、拓展阅读
一、HTTP 网络请求
鸿蒙应用可通过HTTP发起一个数据请求,支持常见的GET、POST、OPTIONS、HEAD、PUT、DELETE、TRACE、CONNECT方法。
HTTP数据请求功能主要由http模块提供。使用该功能需要申请ohos.permission.INTERNET权限。
涉及的接口如下表,具体的接口说明请参考API文档。
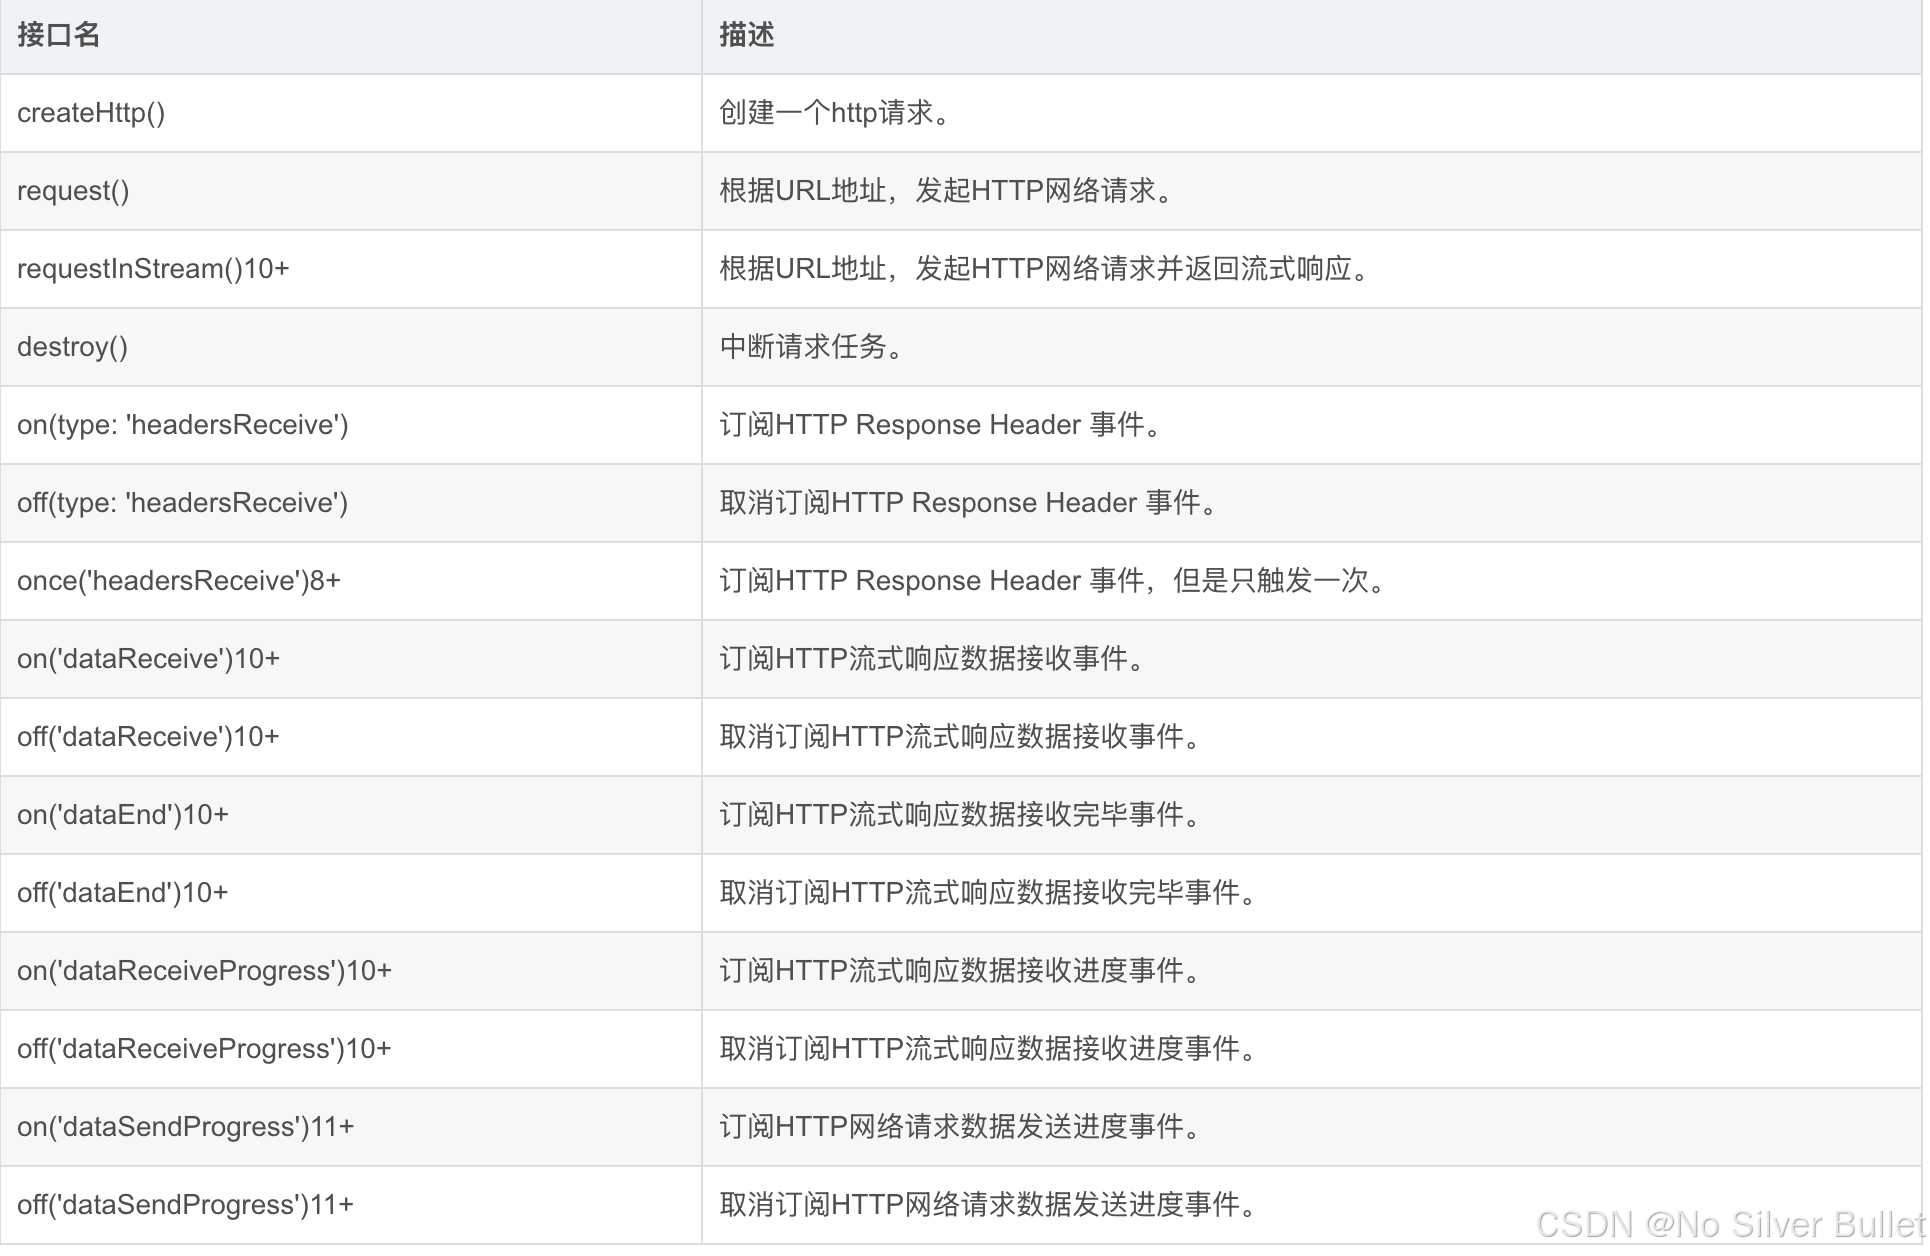
request接口开发步骤如下:
- 从
@kit.NetworkKit中导入http命名空间。- 调用
createHttp()方法,创建一个HttpRequest对象。- 调用该对象的
on()方法,订阅http响应头事件,此接口会比request请求先返回。可以根据业务需要订阅此消息。- 调用该对象的
request()方法,传入http请求的url地址和可选参数,发起网络请求。- 按照实际业务需要,解析返回结果。
- 调用该对象的
off()方法,取消订阅http响应头事件。- 当该请求使用完毕时,调用
destroy()方法主动销毁。
应用示例如下:
// 引入包名
import { http } from '@kit.NetworkKit';
import { BusinessError } from '@kit.BasicServicesKit';

// 每一个httpRequest对应一个HTTP请求任务,不可复用
let httpRequest = http.createHttp();
// 用于订阅HTTP响应头,此接口会比request请求先返回。可以根据业务需要订阅此消息
// 从API 8开始,使用on('headersReceive', Callback)替代on('headerReceive', AsyncCallback)。
httpRequest.on('headersReceive', (header) => {
  console.info('header: ' + JSON.stringify(header));
});
httpRequest.request(
  // 填写HTTP请求的URL地址,可以带参数也可以不带参数。URL地址需要开发者自定义。请求的参数可以在extraData中指定
  "EXAMPLE_URL",
  {
    method: http.RequestMethod.POST, // 可选,默认为http.RequestMethod.GET
    // 开发者根据自身业务需要添加header字段
    header: {
      'Content-Type': 'application/json'
    },
    // 当使用POST请求时此字段用于传递请求体内容,具体格式与服务端协商确定
    extraData: "data to send",
    expectDataType: http.HttpDataType.STRING, // 可选,指定返回数据的类型
    usingCache: true, // 可选,默认为true
    priority: 1, // 可选,默认为1
    connectTimeout: 60000, // 可选,默认为60000ms
    readTimeout: 60000, // 可选,默认为60000ms
    usingProtocol: http.HttpProtocol.HTTP1_1, // 可选,协议类型默认值由系统自动指定
    usingProxy: false, // 可选,默认不使用网络代理,自API 10开始支持该属性
    caPath:'/path/to/cacert.pem', // 可选,默认使用系统预制证书,自API 10开始支持该属性
    clientCert: { // 可选,默认不使用客户端证书,自API 11开始支持该属性
      certPath: '/path/to/client.pem', // 默认不使用客户端证书,自API 11开始支持该属性
      keyPath: '/path/to/client.key', // 若证书包含Key信息,传入空字符串,自API 11开始支持该属性
      certType: http.CertType.PEM, // 可选,默认使用PEM,自API 11开始支持该属性
      keyPassword: "passwordToKey" // 可选,输入key文件的密码,自API 11开始支持该属性
    },
    multiFormDataList: [ // 可选,仅当Header中,'content-Type'为'multipart/form-data'时生效,自API 11开始支持该属性
      {
        name: "Part1", // 数据名,自API 11开始支持该属性
        contentType: 'text/plain', // 数据类型,自API 11开始支持该属性
        data: 'Example data', // 可选,数据内容,自API 11开始支持该属性
        remoteFileName: 'example.txt' // 可选,自API 11开始支持该属性
      }, {
        name: "Part2", // 数据名,自API 11开始支持该属性
        contentType: 'text/plain', // 数据类型,自API 11开始支持该属性
        // data/app/el2/100/base/com.example.myapplication/haps/entry/files/fileName.txt
        filePath: `${getContext(this).filesDir}/fileName.txt`, // 可选,传入文件路径,自API 11开始支持该属性
        remoteFileName: 'fileName.txt' // 可选,自API 11开始支持该属性
      }
    ]
  }, (err: BusinessError, data: http.HttpResponse) => {
    if (!err) {
      // data.result为HTTP响应内容,可根据业务需要进行解析
      console.info('Result:' + JSON.stringify(data.result));
      console.info('code:' + JSON.stringify(data.responseCode));
      // data.header为HTTP响应头,可根据业务需要进行解析
      console.info('header:' + JSON.stringify(data.header));
      console.info('cookies:' + JSON.stringify(data.cookies)); // 8+
      // 当该请求使用完毕时,调用destroy方法主动销毁
      httpRequest.destroy();
    } else {
      console.error('error:' + JSON.stringify(err));
      // 取消订阅HTTP响应头事件
      httpRequest.off('headersReceive');
      // 当该请求使用完毕时,调用destroy方法主动销毁
      httpRequest.destroy();
    }
  }
);
requestInStream接口开发步骤如下:
- 从
@kit.NetworkKit中导入http命名空间。- 调用
createHttp()方法,创建一个HttpRequest对象。- 调用该对象的
on()方法,可以根据业务需要订阅HTTP响应头事件、HTTP流式响应数据接收事件、HTTP流式响应数据接收进度事件和HTTP流式响应数据接收完毕事件。- 调用该对象的
requestInStream()方法,传入http请求的url地址和可选参数,发起网络请求。- 按照实际业务需要,可以解析返回的响应码。
- 调用该对象的
off()方法,取消订阅响应事件。- 当该请求使用完毕时,调用
destroy()方法主动销毁。
应用示例如下:
// 引入包名
import { http } from '@kit.NetworkKit';
import { BusinessError } from '@kit.BasicServicesKit';

// 每一个httpRequest对应一个HTTP请求任务,不可复用
let httpRequest = http.createHttp();
// 用于订阅HTTP响应头事件
httpRequest.on('headersReceive', (header: Object) => {
  console.info('header: ' + JSON.stringify(header));
});
// 用于订阅HTTP流式响应数据接收事件
let res = new ArrayBuffer(0);
httpRequest.on('dataReceive', (data: ArrayBuffer) => {
   const newRes = new ArrayBuffer(res.byteLength + data.byteLength);
   const resView = new Uint8Array(newRes);
   resView.set(new Uint8Array(res));
   resView.set(new Uint8Array(data), res.byteLength);
   res = newRes;
   console.info('res length: ' + res.byteLength);
});
// 用于订阅HTTP流式响应数据接收完毕事件
httpRequest.on('dataEnd', () => {
  console.info('No more data in response, data receive end');
});
// 用于订阅HTTP流式响应数据接收进度事件
class Data {
  receiveSize: number = 0;
  totalSize: number = 0;
}
httpRequest.on('dataReceiveProgress', (data: Data) => {
  console.log("dataReceiveProgress receiveSize:" + data.receiveSize + ", totalSize:" + data.totalSize);
});

let streamInfo: http.HttpRequestOptions = {
  method: http.RequestMethod.POST,  // 可选,默认为http.RequestMethod.GET
  // 开发者根据自身业务需要添加header字段
  header: {
    'Content-Type': 'application/json'
  },
  // 当使用POST请求时此字段用于传递请求体内容,具体格式与服务端协商确定
  extraData: "data to send",
  expectDataType:  http.HttpDataType.STRING,// 可选,指定返回数据的类型
  usingCache: true, // 可选,默认为true
  priority: 1, // 可选,默认为1
  connectTimeout: 60000, // 可选,默认为60000ms
  readTimeout: 60000, // 可选,默认为60000ms。若传输的数据较大,需要较长的时间,建议增大该参数以保证数据传输正常终止
  usingProtocol: http.HttpProtocol.HTTP1_1 // 可选,协议类型默认值由系统自动指定
}

// 填写HTTP请求的URL地址,可以带参数也可以不带参数。URL地址需要开发者自定义。请求的参数可以在extraData中指定
httpRequest.requestInStream("EXAMPLE_URL", streamInfo).then((data: number) => {
  console.info("requestInStream OK!");
  console.info('ResponseCode :' + JSON.stringify(data));
  // 取消订阅HTTP响应头事件
  httpRequest.off('headersReceive');
  // 取消订阅HTTP流式响应数据接收事件
  httpRequest.off('dataReceive');
  // 取消订阅HTTP流式响应数据接收进度事件
  httpRequest.off('dataReceiveProgress');
  // 取消订阅HTTP流式响应数据接收完毕事件
  httpRequest.off('dataEnd');
  // 当该请求使用完毕时,调用destroy方法主动销毁
  httpRequest.destroy();
}).catch((err: Error) => {
  console.info("requestInStream ERROR : err = " + JSON.stringify(err));
});
二、HTTP 网络请求封装
本文基于官方网络请求库,进行二次封装,满足特定场景需要。
二次封装有以下几点好处:
- 代码封装之后,开发人员只用关注业务层面的东西,不用去过多浪费时间在接口请求数据处理上。
- 封装之后代码更加简洁,通俗易懂,方便后期维护,统一管理。
- 对经验不足的开发人员友好,只需要依葫芦画瓢,参照之前的例子就可以进行开发。
- 随着团队规模变大,代码封装之后,减少代码冗余,防止屎山代码。
- 统一处理token修改配置项,统一对错误数据和数据返回进行处理提示等。
2.1 创建 NetWorkManage 实例
这里主要提供 2 个能力:
- 设置
BaseUrl,当然也支持 path 参数传“http:host/path” 完整的链路请求,兼容多域名应用; - 配置默认的
Content-type、connectTimeout、readTimeout;
NetWorkManage.ets 请求工具类应用示例如下:
import { http } from '@kit.NetworkKit'
import ResponseResult from '../../viewmodel/ResponseResult'
import { startsWithHttpOrHttps } from './CommonUtil'
import { DefaultHeadersInterceptor, HttpInterceptor } from './InterceptUtil'

const DEFAULT_CONNECT_TIMEOUT = 1000 * 10
const DEFAULT_READ_TIMEOUT = 1000 * 10

export const enum ContentType {
  JSON = "application/json",
  TEXT_HTML = "text/html",
  TEXT_PLAIN = "text/plain",
  FORM_URLENCODED = "application/x-www-form-urlencoded",
  FORM_DATA = "multipart/form-data",
}

export interface RequestOption {
  method: http.RequestMethod,
  path: string,
  data?: string | Object | ArrayBuffer,
  header?: Record<string, string>
}

class NetWorkManage {
  private BASE_URL: string = ''
  private requestOption: RequestOption = { method: http.RequestMethod.GET, path: '' }
  private REQUEST_INTERCEPTORS: Array<HttpInterceptor> = [new DefaultHeadersInterceptor()]

  setBaseUrl(url: string) {
    this.BASE_URL = url
  }

  addRequestInterceptor(interceptor: HttpInterceptor) {
    this.REQUEST_INTERCEPTORS.push(interceptor)
  }

  createRequest(requestOption: RequestOption): NetWorkManage {
    if (!this.BASE_URL) {
      throw Error('BaseUrl not null')
    }
    let requestConfig = requestOption
    let headers: Record<string, string> = requestOption.header || {}
    if (!headers['Content-type']) {
      headers['Content-type'] = ContentType.JSON
    }
    requestConfig.header = headers
    this.requestOption = requestConfig
    return this
  }

  request<T>() {
    // http.HttpRequestOptions
    let requestOption: http.HttpRequestOptions = {
      method: this.requestOption.method,
      header: this.requestOption.header,
      extraData: this.requestOption.data || '',
      readTimeout: DEFAULT_READ_TIMEOUT,
      connectTimeout: DEFAULT_CONNECT_TIMEOUT
    }
    // http request url
    let url = this.requestOption.path
    if (!startsWithHttpOrHttps(this.requestOption.path)) {
      url = this.BASE_URL + url
    }
    // execute interceptor
    this.REQUEST_INTERCEPTORS.forEach((interceptor: HttpInterceptor) => {
      interceptor.intercept(requestOption)
    })
    let httpRequest = http.createHttp();

    // return result
    let serverData: ResponseResult<T> = new ResponseResult()
    return new Promise<ResponseResult<T>>((resolve, reject) => {
      httpRequest.request(url, requestOption).then((value: http.HttpResponse) => {

        let result: ResponseResult<T> = JSON.parse(`${value.result}`) as ResponseResult<T>
        if (value.responseCode === http.ResponseCode.OK && result.code == 'success') {
          serverData = result
          resolve(serverData)
        } else {
          serverData.msg = `${$r('app.string.http_error_message')}&${value.responseCode}`
          reject(serverData)
        }

      })
        .catch(() => {
          serverData.msg = $r('app.string.http_error_message')
          reject(serverData)
        })
    })
  }
}

export default new NetWorkManage()
2.2 创建请求拦截器
主要涉及对公共 header 处理,如传递用户Token等,或者对请求 data 进行二次封装,具体依自身业务需求实施。
DefaultHeadersInterceptor 为默认的拦截器示例,开发者可以自行修改其中内容。
InterceptUtil.ets 拦截器类
// 拦截器接口
export interface HttpInterceptor {
  intercept: (options: http.HttpRequestOptions) => http.HttpRequestOptions
}

// 默认拦截器,可自行修改,下面提供了对请求heade修改的示例
export class DefaultHeadersInterceptor implements HttpInterceptor {
  intercept(options: http.HttpRequestOptions) {
    let headers: Record<string, string> = options.header as Record<string, string>
    headers.test1 = 'test'
    return options
  }
}
NetWorkManage.ets 请求工具类
// 声明拦截器数组
private REQUEST_INTERCEPTORS: Array<HttpInterceptor> = [new DefaultHeadersInterceptor()]

// 添加拦截器
addRequestInterceptor(interceptor: HttpInterceptor) {
  this.REQUEST_INTERCEPTORS.push(interceptor)
}
2.3 响应拦截器
可以模仿请求拦截器,再单独实现一套响应拦截器,对统一的响应数据进行处理
InterceptUtil.ets 拦截器类
// 拦截器接口
export interface HttpResponseInterceptor {
  intercept: (data: http.HttpResponse) => http.HttpResponse
}

export class DefaultResponseInterceptor implements HttpResponseInterceptor {
  intercept(data: http.HttpResponse){
    // 对 data 进行错误类型统一处理
    return data
  }
}
NetWorkManage.ets 请求工具类
// 声明响应拦截器数组
private RESPONSE_INTERCEPTORS: Array<HttpInterceptor> = [new DefaultHeadersInterceptor()]

// 添加拦截器
addResponseInterceptor(interceptor: HttpInterceptor) {
  this.RESPONSE_INTERCEPTORS.push(interceptor)
}
整合后的InterceptUtil.ets 拦截器类文件如下:
import { http } from "@kit.NetworkKit";

export interface HttpInterceptor {
  intercept: (options: http.HttpRequestOptions) => http.HttpRequestOptions
}

export class DefaultHeadersInterceptor implements HttpInterceptor {
  intercept(options: http.HttpRequestOptions) {
    let headers: Record<string, string> = options.header as Record<string, string>
    headers.test1 = 'test'
    return options
  }
}

export interface HttpResponseInterceptor {
  intercept: (data: http.HttpResponse) => http.HttpResponse
}

export class DefaultResponseInterceptor implements HttpResponseInterceptor {
  intercept(data: http.HttpResponse){
    // 对 data 进行错误类型统一处理
    return data
  }
}
三、使用泛型对数据转换
- 封装请求响应类
ResponseResult; - 传入
T泛型,数据转换对应类型,返回前台;
ResponseResult.ets 请求响应封装

export default class ResponseResult<T> {
  code: string
  msg: string | Resource
  data?: T
  constructor() {
    this.code = ''
    this.msg = ''
  }
}

`NetWorkManage.ets`  请求工具类
request<T>() {
  // http.HttpRequestOptions 处理
  ...
  // http request url
  let url = this.requestOption.path
  if (!startsWithHttpOrHttps(this.requestOption.path)) {
    url = this.BASE_URL + url
  }
  // execute interceptor
  this.REQUEST_INTERCEPTORS.forEach((interceptor: HttpInterceptor) => {
    interceptor.intercept(requestOption)
  })
  let httpRequest = http.createHttp();

  // return result
  let serverData: ResponseResult<T> = new ResponseResult()
  return new Promise<ResponseResult<T>>((resolve, reject) => {
    httpRequest.request(url, requestOption).then((value: http.HttpResponse) => {
	  // 转换数据,示例是json数据,如果是xml等需要自行处理
      let result: ResponseResult<T> = JSON.parse(`${value.result}`) as ResponseResult<T>
      if (value.responseCode === http.ResponseCode.OK && result.code == 'success') {
        serverData = result
        resolve(serverData)
      } else {
        serverData.msg = `${$r('app.string.http_error_message')}&${value.responseCode}`
        reject(serverData)
      }

    })
      .catch(() => {
        serverData.msg = $r('app.string.http_error_message')
        reject(serverData)
      })
  })
}
四、接口请求示例
在请求过程中,除了拦截器统一处理请求内容,也支持单个接口对 header 信息进行定制处理。
注意:请求 data 可以传入 string,也可以传入 object,如果是 get 请求,官方库会默认转把 object 类型换成 “key1=sss&uuu=222”,post 请求需要传入 object。
class NewsViewModel {
  // 获取新闻类型
  async getNewsTypeList(): Promise<NewsTypeModel[]> {
    const result = await NetWorkManage.createRequest({
      method: http.RequestMethod.GET,
      path: Const.GET_NEWS_TYPE,
      header: {
        'test222': 'aqqq'
      }
    }).request<NewsTypeModel[]>()
    if (result.code === 'success' && result.data) {
      return result.data
    }
    return Const.TabBars_DEFAULT_NEWS_TYPES;
  }

  getDefaultNewsType(): NewsTypeModel[] {
    return Const.TabBars_DEFAULT_NEWS_TYPES
  }

  // 获取新闻列表
  getNewsList(currPage: number, pageSize: number, path: string): Promise<ResponseResult<NewsData[]>> {
    const params: Record<string, number> = {
      'currentPage': currPage,
      'pageSize': pageSize
    }
    return NetWorkManage.createRequest({
      method: http.RequestMethod.GET,
      path: path,
      data: params
    }).request<NewsData[]>()
  }
}

let newsViewModel = new NewsViewModel();

export default newsViewModel as NewsViewModel;
完整项目工程参见demo_ohos
五、拓展阅读
- Network Kit简介