java IO涉及实现的各个接口
IO涉及实现的各类接口
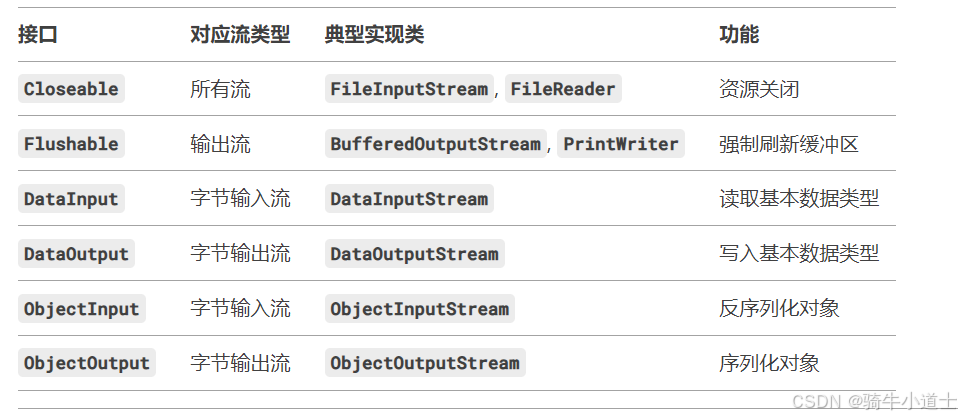
- IO各种类型接口
- Closeable接口和AutoCloseable接口
- Flushable接口
- DataInput/DataOutput接口
- Readable接口
- CharBuffer抽象类
- Appendable接口
IO各种类型接口
 根据IO流的功能进行梳理
- IO流本质是一种数据传输,是内存和目标地之间的传输,这种通道之间可以进行关闭处理,所以所有的流都可以实现close操作,实现的是Closeable接口
- IO流是数据传输,那么是在进行内存和目标地之间,比如内存和文件之间,那么内存和硬盘文件之间存在缓冲区间,将缓冲区的内容"强制复制"到硬盘中,就需要Flush方法,所以输出流才会用到Flushable接口
- IO进行数据传输,那边针对各种类型的数据传出对应的接口功能的接口
数据流输入输出涉及的接口DataInput/DataOutput,字符流输入输出涉及的接口Readable/Appendable
Closeable接口和AutoCloseable接口
Closeable接口代码
public interface Closeable extends AutoCloseable {
    public void close() throws IOException;
}
AutoCloseable接口代码
public interface AutoCloseable{
    void close() throws Exception;
}
从以上代码看,都有close方法 所以具有相同关闭流功能,而且两者之间关系存在继承关系,区别在于
在JDK1.7以前,如果我们要用到上面的这些资源类,因为没有他们没有实现AutoCloseable接口, 正常的做法是需要使用try-finally结构, 在finally中手动的释放资源
        //JDK1.7之前,释放资源方式
         FileInputStream fileInputStream = null;
         try {
             fileInputStream = new FileInputStream("");
         } catch (FileNotFoundException e) {
             e.printStackTrace();
         } finally {
             try {
                 fileInputStream.close();
             } catch (IOException e) {
                 e.printStackTrace();
             }
         }
而现在实现了AutoCloseable接口后可以使用try-with-resources 语法
        //1.7之后,只要实现了AutoCloseable接口
         try (FileInputStream fileInputStream2 = new FileInputStream("");
                Reader rd = new Reader()) {
         } catch (FileNotFoundException e) {
             e.printStackTrace();
         } catch (IOException e) {
             e.printStackTrace();
而且可以多个资源管理
try (Resource res1 = new Resource();
     Resource res2 = new Resource()) {
    res1.doSomething();
    res2.doSomething();
} catch (Exception e) {
    e.printStackTrace();
}
Flushable接口
Flushable接口里面只要一个flush()方法
package java.io;
import java.io.IOException;
public interface Flushable {
   /**
     * Flushes this stream by writing any buffered output to the underlying stream 调用flush方法将所有缓存输出写入到底层流
     */
    void flush() throws IOException;
}
flush() 方法作用强制刷新缓冲区,将缓冲区中的数据立即输出到文件或者网络中,不需要等到缓冲区满了或者程序结束才输出,所以Flushable接口对应的IO流是输出流
当然Flushable接口只是定义了一个 flush()方法用来实现强制刷新缓存区,具体如何实现刷新缓存的还是具体子类实现的方式
示例
FileOutputStream ostream = new FileOutputStream("t.txt");
ObjectOutputStream p = new ObjectOutputStream(ostream);
p.flush();

①//这里flush方法是的ObjectOutputStream的flush();
    public void flush() throws IOException {
        bout.flush();
    }

②//再点进去看 bout.flush()里面是俩个方法;
public void flush() throws IOException {
    drain();//ObjectOutputStream类自己定义的缓存方法
    out.flush();// ObjectOutputStream OutputStream
}

③//ObjectOutputStream 类自定义的缓存清零方法drain()
oid drain() throws IOException {
//pos 表示缓冲区中已写入但尚未刷新到底层流的数据长度
    if (pos == 0) {
       return;
    }
//在块模式下(blkmode=true),pos 的值会直接影响块头的写入逻辑
  if (blkmode) {
     writeBlockHeader(pos);
   }
   // 将缓存内容写入文件或目标类
     out.write(buf, 0, pos);
     //pos值归零
     pos = 0;
}

④// 再看out.flush();
点击进去发现是引用的ObjectOutputStream的父类OutputStream类的方法
    public void flush() throws IOException {
    }
但是没有具有的实现方法
Java的方法覆盖机制:当一个子类覆盖了父类的方法,调用该方法时,会执行子类的实现,而不是父类的。因此,即使OutputStream的flush方法是空的,如果ObjectOutputStream覆盖了它,执行的就是子类的实现
所以说 flush方法具体的实现是各个子类执行的清空缓存方式
大多分
1.查看缓存探针是否存在缓存值
2.缓冲区中的数据被写入底层流,缓存内容强制写入到目标文件中,一般使用的是各个字符流write方法
3.指针归零 重置缓存区
注意:flush()方法是 刷新缓存,从底层实现方法看,并不是清空缓存,不是stop或者clear 是刷新!!!
以 BufferedOutputStream 为例:
public class BufferedOutputStream extends FilterOutputStream {
    protected byte[] buf;  // 缓冲区(如 byte[8192])
    protected int count;   // 当前写入位置

    public synchronized void flush() throws IOException {
        if (count > 0) {
        // 将数据写入底层流(如 FileOutputStream)
            out.write(buf, 0, count);
            count = 0;  // 重置指针,但 buf 内存不变
        }
        out.flush(); // 调用底层流的 flush()
    }
}
缓冲区的本质
- 内存复用:缓冲区(如 BufferedOutputStream 的 byte[] buf)是一个固定大小的数组,内存不会被释放。
- 指针重置:调用 flush() 后,缓冲区的写入位置指针(如 count 或 pos)会被重置为 0,后续写入会覆盖之前的数据。
地盘不变,人员迭代替换
DataInput/DataOutput接口
Readable接口
Readable 接口定义了一个核心方法
public interface Readable {
    int read(CharBuffer cb) throws IOException;
}
这个方法作用是(看名字也能看出字符缓冲,所以 Readable针对字符流)
- 功能:将字符读入一个 CharBuffer 缓冲区
- 返回值:实际读取的字符数(若返回 -1 表示已到达输入末尾)
CharBuffer抽象类
CharBuffe抽象类是Java NIO(New Input/Output)库中的一个重要组成部分,主要用于处理字符数据
从类结构看继承了Buffer 实现了很多关于字符处理的接口
public abstract class CharBuffer
    extends Buffer
    implements Comparable<CharBuffer>, Appendable, CharSequence, Readable
{
    final char[] hb;                  // Non-null only for heap buffers
    final int offset;
    boolean isReadOnly;                 // Valid only for heap buffers

   CharBuffer(int mark, int pos, int lim, int cap,
                 char[] hb, int offset)
    {
        super(mark, pos, lim, cap);
        this.hb = hb;
        this.offset = offset;
    }

    // Creates a new buffer with the given mark, position, limit, and capacity
    CharBuffer(int mark, int pos, int lim, int cap) { // package-private
        this(mark, pos, lim, cap, null, 0);
    }
以下是CharBuffer类的一些常用方法:
1.创建 CharBuffer的方法
- allocate(int capacity):这是一个静态方法,用于创建一个具有指定容量的新CharBuffer。新缓冲区的位置将为零,极限将是它的容量,标记将是不确定的,并且其每个元素都将初始化为零。
- wrap包装现有的一个char数组或者字符串
//以下是静态工厂方法
// 创建一个指定容量的 CharBuffer
CharBuffer buffer = CharBuffer.allocate(1024);
// 包装一个已有的 char 数组
char[] array = new char[1024];
CharBuffer buffer = CharBuffer.wrap(array);

// 包装一个已有的字符串
CharBuffer buffer = CharBuffer.wrap("Hello, CharBuffer!");
// 创建一个直接缓冲区(由操作系统管理内存)
CharBuffer buffer = CharBuffer.allocateDirect(1024);
2.基本读写操作方法
- put(char c):写入一个字符。
- put(char[] src):写入一个字符数组。
- get():读取一个字符。
- get(char[] dst):读取字符到数组中。
- flip():这个方法用于准备从缓冲区中读取数据,它会将极限设为当前位置,然后将位置设为零。
public static void main(String[] args) {
        // 创建 CharBuffer
        CharBuffer buffer = CharBuffer.allocate(16);

        // 写入数据
        buffer.put("Hello");
        buffer.put(", CharBuffer!");

        // 切换到读模式
        buffer.flip();

        // 读取数据
        while (buffer.hasRemaining()) {
            System.out.print(buffer.get());
        }

        // 创建子缓冲区
        CharBuffer slice = buffer.slice();

        // 读取子缓冲区数据
        while (slice.hasRemaining()) {
            System.out.print(slice.get());
        }
    }
3.缓冲区操作
- flip():将缓冲区从写模式切换到读模式
- clear():清空缓冲区,准备重新写入。
- rewind():重置 position=0,但 limit 不变,用于重新读取数据。
- mark():标记当前 position,后续可通过 reset() 恢复到此位置
- reset():将 position 重置到 mark() 标记的位置(mark()和reset()需要成对使用,如果未调用mark()直接调用reset()会抛出InvalidMarkException)
- compact():压缩缓冲区,将未读取的数据(从position到limit之间的数据)复制到缓冲区的起始位置,然后将position设置为剩余数据的末尾,limit设为capacity,适用于写模式下继续写入而不丢失未读数据。
public class CharBufferMethodsExample {
    public static void main(String[] args) {
        // 初始化一个容量为 10 的 CharBuffer
        CharBuffer buffer = CharBuffer.allocate(10);

        // 1. 写入数据到缓冲区
        buffer.put("Hello");
        System.out.println("写入数据后:");
        printBufferState(buffer); // Position=5, Limit=10, Capacity=10

        // 2. 切换到读模式(flip())
        buffer.flip();
        System.out.println("切换到读模式后:");
        printBufferState(buffer); // Position=0, Limit=5, Capacity=10

        // 3. 使用 mark() 标记当前位置
        buffer.mark(); // 标记 position=0
        System.out.println("调用 mark() 后:");
        printBufferState(buffer);

        // 4. 读取前 3 个字符
        char[] firstPart = new char[3];
        buffer.get(firstPart);
        System.out.println("读取前3字符: " + new String(firstPart)); // Hel
        printBufferState(buffer); // Position=3, Limit=5

        // 5. 调用 reset() 回到标记位置
        buffer.reset();
        System.out.println("调用 reset() 后:");
        printBufferState(buffer); // Position=0, Limit=5

        // 6. 使用 rewind() 重置位置
        buffer.rewind();
        System.out.println("调用 rewind() 后:");
        printBufferState(buffer); // Position=0, Limit=5

        // 7. 读取全部数据
        char[] allData = new char[buffer.limit()];
        buffer.get(allData);
        System.out.println("读取全部数据: " + new String(allData)); // Hello
        printBufferState(buffer); // Position=5, Limit=5

        // 8. 切换到写模式(clear())
        buffer.clear();
        System.out.println("调用 clear() 后:");
        printBufferState(buffer); // Position=0, Limit=10

        // 9. 写入新数据(但保留旧数据)
        buffer.put("World");
        System.out.println("写入新数据后:");
        printBufferState(buffer); // Position=5, Limit=10

        // 10. 切换到读模式并读取数据
        buffer.flip();
        System.out.println("再次切换到读模式:");
        printBufferState(buffer); // Position=0, Limit=5
        char[] newData = new char[buffer.limit()];
        buffer.get(newData);
        System.out.println("读取新数据: " + new String(newData)); // World
        printBufferState(buffer); // Position=5, Limit=5

        // 11. 使用 compact() 压缩缓冲区
        buffer.compact();
        System.out.println("调用 compact() 后:");
        printBufferState(buffer); // Position=0, Limit=10

        // 12. 继续写入数据
        buffer.put("123");
        System.out.println("压缩后写入新数据:");
        printBufferState(buffer); // Position=3, Limit=10

        // 13. 切换到读模式并读取全部数据
        buffer.flip();
        char[] finalData = new char[buffer.limit()];
        buffer.get(finalData);
        System.out.println("最终数据: " + new String(finalData)); // World123
    }

    // 打印缓冲区的状态(position, limit, capacity)
    private static void printBufferState(CharBuffer buffer) {
        System.out.printf("Position: %d, Limit: %d, Capacity: %d%n",
            buffer.position(), buffer.limit(), buffer.capacity());
    }
}
代码执行顺序结果集
1. 写入数据到缓冲区
初始化一个容量为 10 的 CharBuffer,写入 "Hello"(5 个字符)。
状态变化:Position=5, Limit=10, Capacity=10(写模式)。

2. 切换到读模式(flip())
调用 flip() 将缓冲区切换为读模式。
状态变化:Position=0, Limit=5, Capacity=10(读模式)。

3. 使用 mark() 标记当前位置
标记当前 Position=0,后续可通过 reset() 返回该位置。

4. 读取前 3 个字符
读取 "Hel",Position 移动到 3。
状态变化:Position=3, Limit=5。

5. 调用 reset() 回到标记位置
将 Position 重置到 mark() 的位置(0)。
状态变化:Position=0, Limit=5。

6. 使用 rewind() 重置位置
将 Position 重置为 0,但 Limit 不变。
状态变化:Position=0, Limit=5。

7. 读取全部数据
读取完整的 "Hello",Position 移动到 5。
状态变化:Position=5, Limit=5。

8. 切换到写模式(clear())
调用 clear() 清空缓冲区,准备重新写入。
状态变化:Position=0, Limit=10, Capacity=10(写模式)。

9. 写入新数据
写入 "World"(5 个字符),Position 移动到 5。
注意:此时缓冲区内容为 WorldHello(clear() 不会清空数据,只是重置指针)。

10. 再次切换到读模式并读取数据
调用 flip() 后,Position=0, Limit=5,读取 "World"。

11. 使用 compact() 压缩缓冲区
将未读数据(从 Position 到 Limit)移动到缓冲区头部。由于此时 Position=5, Limit=5,未读数据为空,compact() 将 Position=0, Limit=10。
状态变化:Position=0, Limit=10(写模式)。

12. 继续写入数据
写入 "123",Position 移动到 3。
缓冲区内容:123lo(compact() 后保留未读数据,但此例中未读数据为空)。

13. 切换到读模式并读取最终数据
调用 flip() 后,Position=0, Limit=3,读取 "123"。
4.视图支持
- slice():创建一个子缓冲区
public class CharBufferSliceExample {
    public static void main(String[] args) {
        CharBuffer buffer = CharBuffer.allocate(16);
        buffer.put("Hello, World!");

        // 切换到读模式
        buffer.flip();

        // 创建子缓冲区
        CharBuffer slice = buffer.slice();

        // 读取子缓冲区数据
        while (slice.hasRemaining()) {
            System.out.print(slice.get());
        }
    }
}
- duplicate():创建一个共享数据的副本。
- asReadOnlyBuffer():创建一个只读视图。
5.字符编码
- encode():将 CharBuffer 编码为 ByteBuffer。
- decode():将 ByteBuffer 解码为 CharBuffer。
public class CharBufferEncodingExample {
    public static void main(String[] args) {
        // 创建 CharBuffer
        CharBuffer charBuffer = CharBuffer.wrap("Hello, 世界!");

        // 编码为 ByteBuffer
        ByteBuffer byteBuffer = Charset.forName("UTF-8").encode(charBuffer);

        // 解码为 CharBuffer
        CharBuffer decodedBuffer = Charset.forName("UTF-8").decode(byteBuffer);

        // 输出解码后的字符
        System.out.println(decodedBuffer.toString());
    }
}
Appendable接口
import java.io.IOException;
public interface Appendable {
//将指定的 CharSequence 追加到此 Appendable 对象中
Appendable append(CharSequence csq) throws IOException;

//将指定的 CharSequence 追加到此指定位标
Appendable append(CharSequence csq, int start, int end) throws IOException;

//将指定的 char 追加到此 Appendable 对象中。返回此 Appendable 对象
Appendable append(char c) throws IOException;
}
CharSequence是一个描述字符串结构的接口,在这个接口里面一般发现有三种常用的子类:String类、StringBuffer类、StringBuilder类,Appendable接口里面的方法参数看出,Appendable接口主要针对的是字符或者字符串的操作