RK3588平台部署MNN和OPENCL
1、检查本地opencl的库的位置,我的如下:
/lib/aarch64-linux-gnu/libOpenCL.so.1另外opencl的头文件都是公用的,去git下载,或者在MNN编译过程中,打开-DMNN_OPENCL=ON,也会自动去下载。测试opencl硬件:
#include <stdio.h>
#include <stdlib.h>
#include <CL/cl.h>#define MAX_PLATFORMS 10
#define MAX_DEVICES 10int main() {cl_platform_id platforms[MAX_PLATFORMS];cl_device_id devices[MAX_DEVICES];cl_uint num_platforms, num_devices;cl_context context;cl_command_queue command_queue;cl_program program;cl_kernel kernel;cl_int ret;// 获取平台数量ret = clGetPlatformIDs(MAX_PLATFORMS, platforms, &num_platforms);if (ret != CL_SUCCESS) {printf("Failed to get platform IDs\n");return -1;}printf("Number of platforms: %u\n", num_platforms);// 遍历打印平台信息for (cl_uint i = 0; i < num_platforms; i++) {char platform_name[128];char platform_vendor[128];ret = clGetPlatformInfo(platforms[i], CL_PLATFORM_NAME, sizeof(platform_name), platform_name, NULL);if (ret != CL_SUCCESS) {printf("Failed to get platform name for platform %u\n", i);}ret = clGetPlatformInfo(platforms[i], CL_PLATFORM_VENDOR, sizeof(platform_vendor), platform_vendor, NULL);if (ret != CL_SUCCESS) {printf("Failed to get platform vendor for platform %u\n", i);}printf("Platform %u:\n", i);printf("    Name: %s\n", platform_name);printf("    Vendor: %s\n", platform_vendor);printf("\n");}// 获取设备数量ret = clGetDeviceIDs(platforms[0], CL_DEVICE_TYPE_GPU, MAX_DEVICES, devices, &num_devices);if (ret != CL_SUCCESS) {printf("Failed to get device IDs\n");return -1;}// 创建OpenCL上下文context = clCreateContext(NULL, num_devices, devices, NULL, NULL, &ret);if (ret != CL_SUCCESS) {printf("Failed to create context\n");return -1;}// 创建命令队列command_queue = clCreateCommandQueue(context, devices[0], 0, &ret);if (ret != CL_SUCCESS) {printf("Failed to create command queue\n");return -1;}// 定义和构建OpenCL内核const char *kernel_source = "__kernel void hello_world() {\n""    printf(\"Hello, World!\\n\");\n""}\n";program = clCreateProgramWithSource(context, 1, &kernel_source, NULL, &ret);if (ret != CL_SUCCESS) {printf("Failed to create program\n");return -1;}ret = clBuildProgram(program, num_devices, devices, NULL, NULL, NULL);if (ret != CL_SUCCESS) {printf("Failed to build program\n");return -1;}// 创建OpenCL内核对象kernel = clCreateKernel(program, "hello_world", &ret);if (ret != CL_SUCCESS) {printf("Failed to create kernel\n");return -1;}// 执行内核函数ret = clEnqueueTask(command_queue, kernel, 0, NULL, NULL);if (ret != CL_SUCCESS) {printf("Failed to enqueue task\n");return -1;}// 等待执行完成ret = clFinish(command_queue);if (ret != CL_SUCCESS) {printf("Failed to finish execution\n");return -1;}printf("Kernel executed successfully\n");// 清理资源ret = clReleaseKernel(kernel);ret = clReleaseProgram(program);ret = clReleaseCommandQueue(command_queue);ret = clReleaseContext(context);return 0;
}
这里plat.cpp和CL头文件在同一级目录下,编译如下:
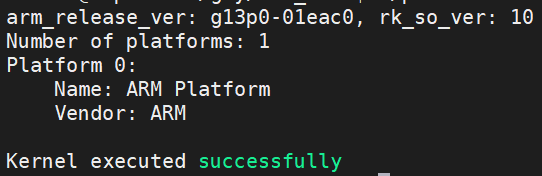
g++ plat.cpp -o platform /lib/aarch64-linux-gnu/libOpenCL.so.1 -I./结果如下,表示正常
2、编译MNN
首先需要修改代码,或者自己建立软链接
MNN-3.3.0\source\backend\opencl\core\runtime\OpenCLWrapper.cpp,在58行附近修改
#elif defined(__linux__)// ARM64 (aarch64) specific paths"/lib/aarch64-linux-gnu/libOpenCL.so.1","/lib/aarch64-linux-gnu/libOpenCL.so","/usr/lib/aarch64-linux-gnu/libOpenCL.so.1","/usr/lib/aarch64-linux-gnu/libOpenCL.so","/usr/lib/libOpenCL.so","/usr/local/lib/libOpenCL.so","/usr/local/lib/libpocl.so","/usr/lib64/libOpenCL.so","/usr/lib32/libOpenCL.so","libOpenCL.so"添加OpenCL的库文件,然后进行编译和安装
cmake .. -DCMAKE_INSTALL_PREFIX=/home/linaro/gzy/ -DCMAKE_BUILD_TYPE=Release -DMNN_BUILD_CONVERTER=ON -DMNN_BUILD_OPENCV=ON -DMNN_IMGCODECS=ON -DBUILD_SHARED_LIBS=ON -DMNN_OPENMP=ON -DMNN_USE_THREAD_POOL=OFF -DMNN_OPENCL=ON -DMNN_VULKAN=ON -DMNN_BUILD_BENCHMARK=ON MNN/build/libMNN.so,MNN/build/express/libMNN_Express.so,MNN/build/tools/cv/libMNNOpenCV.so ,MNN-3.3.0/build/source/backend/opencl/libMNN_CL.so添加到libs,
另外头文件CL、cv、MNN都拷贝放在一起,方便添加和使用
3、代码动态加载libMNN_CL.so的库,可以在构造函数中添加,
void* handle = dlopen("./lib/libMNN_CL.so", RTLD_LAZY | RTLD_LOCAL);
if (!handle) {std::cout << "无法加载libMNN_CL.so: " << dlerror() << std::endl;
}
第二个在参数配置中,否则opencl中初始化,创建session就很慢很慢,官方给出建议要修改如下配置(https://www.yuque.com/mnn/cn/create_session)
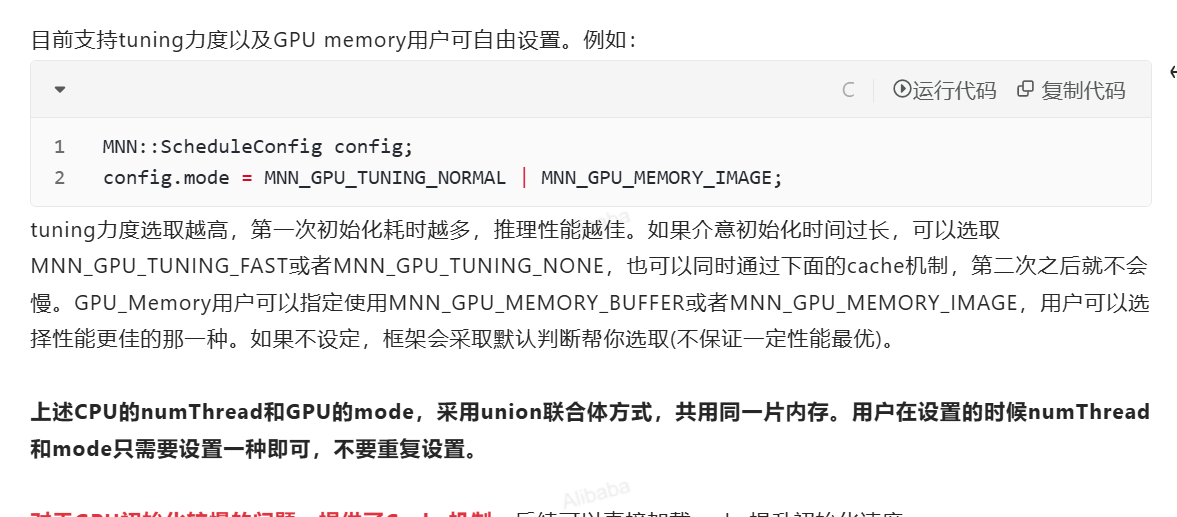
MNN::ScheduleConfig sConfig;sConfig.type = MNN_FORWARD_OPENCL;sConfig.numThread = thread;// https://www.yuque.com/mnn/cn/create_sessionsConfig.mode=MNN_GPU_TUNING_NORMAL | MNN_GPU_MEMORY_IMAGE;MNN::BackendConfig bConfig;bConfig.precision = MNN::BackendConfig::PrecisionMode::Precision_Normal;bConfig.power = MNN::BackendConfig::Power_High; // 高性能模式bConfig.memory = MNN::BackendConfig::Memory_High; sConfig.backendConfig = &bConfig;4、实际测试:
在CPU中耗时是1600ms,在opencl耗时是5ms,就是加载模型创建session稍微慢点,反正就是一次没啥关系,耗时很短,真香。比用RKNN那一套好了很多