2025 年 Redis 面试天花板
前言
Redis 作为当前最流行的内存数据库,已成为大厂面试的必考题。无论是初级开发工程师还是资深架构师,Redis 相关知识点都是面试中的重中之重。本文汇总了 2025 年各大互联网公司(阿里、腾讯、字节、美团、拼多多等)最新 Redis 面试真题,从基础到进阶,从原理到实战,全方位解析 Redis 核心知识点,助你轻松应对各类 Redis 面试挑战。
一、Redis 基础概念
1. 什么是 Redis?它有哪些核心特性?
Redis(Remote Dictionary Server)是一个开源的、高性能的键值对存储数据库,它支持多种数据结构,采用内存存储,同时提供持久化功能。
核心特性:
- 基于内存操作,速度快(读速度约 110000 次 / 秒,写速度约 81000 次 / 秒)
- 支持多种数据结构:String、Hash、List、Set、Sorted Set、Bitmaps、HyperLogLogs、Geospatial 等
- 支持持久化(RDB 和 AOF 两种方式)
- 支持主从复制、哨兵模式和集群
- 支持事务、Lua 脚本
- 支持过期键自动删除
- 支持发布 / 订阅模式
- 单线程架构,避免了多线程切换的开销
2. Redis 和 Memcached 有什么区别?
| 特性 | Redis | Memcached |
|---|---|---|
| 数据结构 | 丰富(String、Hash、List 等) | 单一(主要是 String) |
| 持久化 | 支持(RDB、AOF) | 不支持 |
| 主从复制 | 支持 | 不支持原生,需第三方 |
| 集群 | 支持 | 不支持原生,需第三方 |
| 内存管理 | 自己管理,支持多种淘汰策略 | 使用 Slab Allocation |
| 多线程 | 网络 IO 多线程,数据操作单线程 | 多线程 |
| 适用场景 | 复杂数据结构、持久化需求、高可用需求 | 简单缓存、高并发场景 |
3. Redis 为什么这么快?
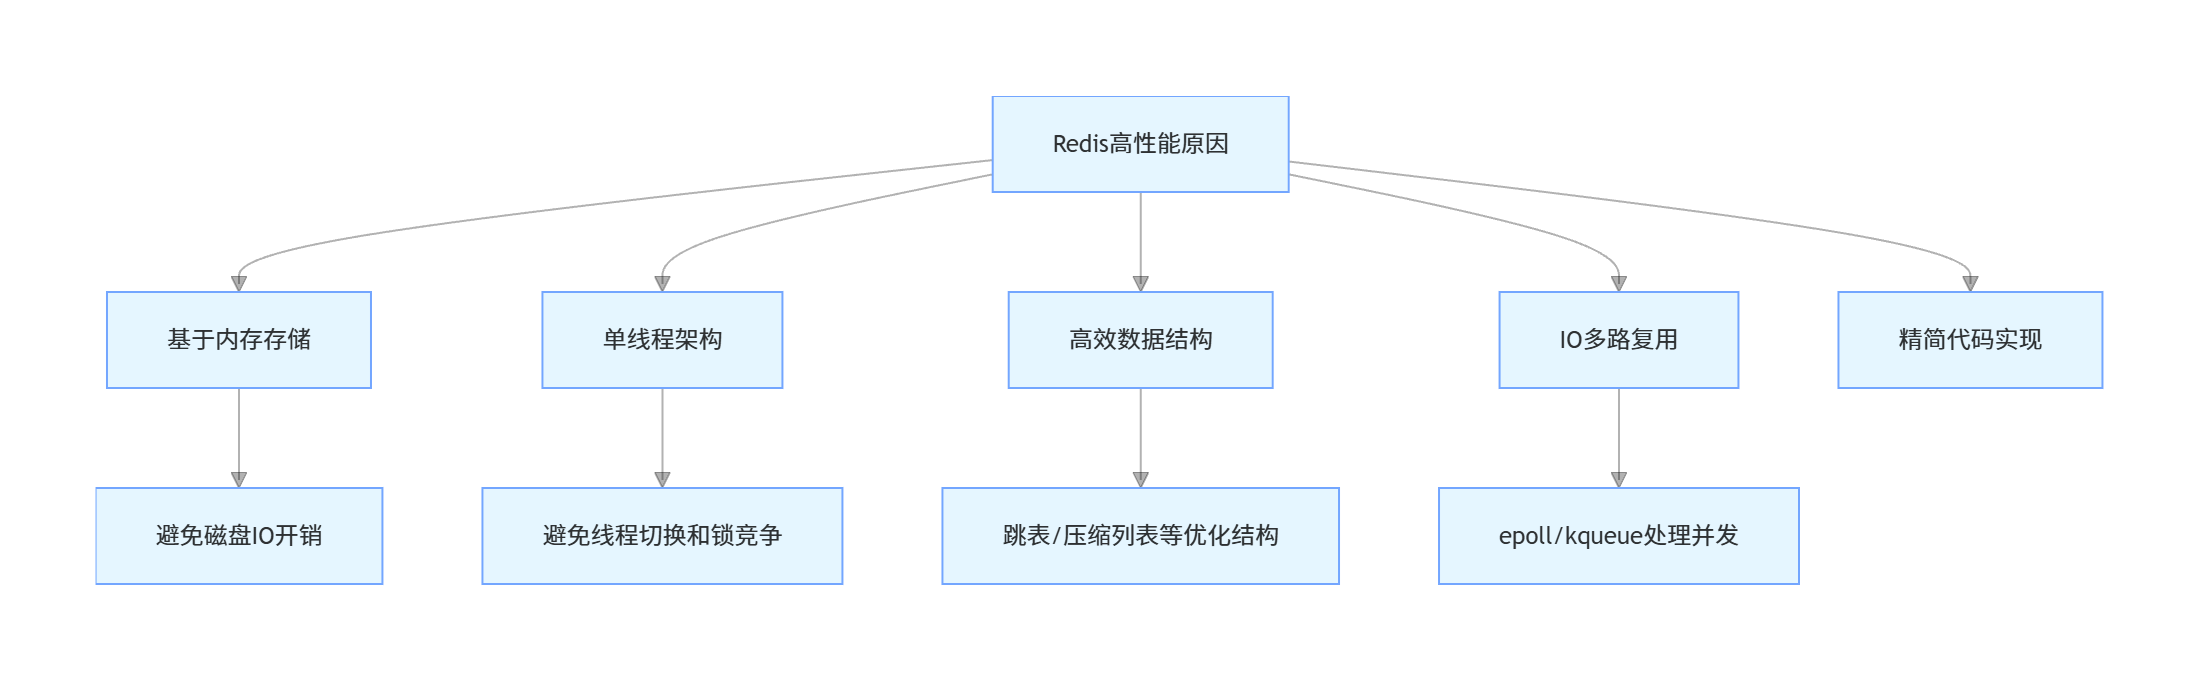
Redis 之所以性能优异,主要原因有以下几点:
- 基于内存存储:所有数据都在内存中,避免了磁盘 IO 的开销
- 单线程架构:避免了多线程上下文切换和锁竞争的开销
- 高效的数据结构:针对不同场景设计了高效的数据结构(如跳表、压缩列表等)
- IO 多路复用:采用 epoll/kqueue 等 IO 多路复用技术,高效处理并发连接
- 精简的代码实现:代码量小,逻辑清晰,执行效率高
二、Redis 数据结构
4. Redis 有哪些数据结构?各自的使用场景是什么?
Redis 提供了多种数据结构,每种结构都有其特定的应用场景:
String(字符串)
- 最基本的数据结构,可存储字符串、整数或浮点数
- 应用场景:缓存用户信息、计数器、分布式锁等
Hash(哈希)
- 键值对集合,适合存储对象
- 应用场景:存储用户信息、商品详情等对象数据
List(列表)
- 有序字符串列表,可在两端操作
- 应用场景:消息队列、最新消息展示、排行榜等
Set(集合)
- 无序且唯一的字符串集合
- 应用场景:好友关系、标签、去重等
Sorted Set(有序集合)
- 有序且唯一的字符串集合,通过分数排序
- 应用场景:排行榜、带权重的消息队列等
Bitmaps(位图)
- 按位存储,节省空间
- 应用场景:用户签到、活跃用户统计等
HyperLogLogs(基数统计)
- 用于基数统计,占用空间小
- 应用场景:UV 统计、独立访客数统计等
Geospatial(地理空间)
- 存储地理位置信息
- 应用场景:附近的人、地理位置查询等
5. 详细介绍 Redis 的 String 数据结构及其实现原理
String 是 Redis 最基本的数据结构,它可以存储字符串(二进制安全)、整数和浮点数,最大长度为 512MB。
String 的内部实现:
- 当存储的是整数且范围在 long 类型范围内时,Redis 会直接用 long 类型存储
- 当存储的是字符串时,Redis 使用 SDS(Simple Dynamic String)结构存储
SDS 结构定义(Redis 6.0+):
struct __attribute__ ((__packed__)) sdshdr8 {uint8_t len; /* 已使用长度 */uint8_t alloc; /* 总分配长度,不包括头部和空终止符 */unsigned char flags; /* 标志位,区分不同的sdshdr类型 */char buf[]; /* 柔性数组,存储实际字符串 */
};
SDS 相比 C 语言字符串的优势:
- 常数时间获取字符串长度
- 避免缓冲区溢出
- 减少字符串修改时的内存重分配次数
- 二进制安全
- 兼容部分 C 字符串函数
示例:使用 String 存储用户信息
import org.springframework.data.redis.core.RedisTemplate;
import org.springframework.stereotype.Service;
import com.alibaba.fastjson2.JSON;
import lombok.RequiredArgsConstructor;
import lombok.extern.slf4j.Slf4j;
import io.swagger.annotations.Api;
import io.swagger.annotations.ApiOperation;/*** Redis String 数据结构示例服务* @author ken*/
@Service
@Slf4j
@RequiredArgsConstructor
@Api(tags = "Redis String 示例")
public class RedisStringService {private final RedisTemplate<String, Object> redisTemplate;/*** 存储用户信息到Redis* @param userId 用户ID* @param user 用户对象*/@ApiOperation("存储用户信息")public void saveUser(Long userId, User user) {if (ObjectUtils.isEmpty(userId) || ObjectUtils.isEmpty(user)) {log.error("用户ID或用户信息不能为空");throw new IllegalArgumentException("用户ID或用户信息不能为空");}String key = "user:" + userId;// 将用户对象转为JSON字符串存储redisTemplate.opsForValue().set(key, JSON.toJSONString(user));log.info("用户信息已保存到Redis,key: {}", key);}/*** 从Redis获取用户信息* @param userId 用户ID* @return 用户对象*/@ApiOperation("获取用户信息")public User getUser(Long userId) {if (ObjectUtils.isEmpty(userId)) {log.error("用户ID不能为空");throw new IllegalArgumentException("用户ID不能为空");}String key = "user:" + userId;String userJson = (String) redisTemplate.opsForValue().get(key);if (StringUtils.hasText(userJson)) {return JSON.parseObject(userJson, User.class);}return null;}/*** 自增计数器* @param counterKey 计数器键名* @param increment 增量* @return 自增后的值*/@ApiOperation("计数器自增")public Long incrementCounter(String counterKey, long increment) {if (!StringUtils.hasText(counterKey)) {log.error("计数器键名不能为空");throw new IllegalArgumentException("计数器键名不能为空");}return redisTemplate.opsForValue().increment(counterKey, increment);}
}
6. Redis 的 Hash 数据结构底层是如何实现的?
Hash 数据结构用于存储键值对集合,适合存储对象。其底层实现有两种方式:
压缩列表(ziplist):当哈希表中元素数量少且元素值小时使用
- 元素数量少于 hash-max-ziplist-entries(默认 512)
- 每个元素的键和值的长度都小于 hash-max-ziplist-value(默认 64 字节)
哈希表(hashtable):当不满足压缩列表条件时使用
压缩列表是一种紧凑的连续内存结构,由一系列特殊编码的连续内存块组成,相比哈希表更节省内存,但操作效率较低。当数据量增大时,Redis 会自动将压缩列表转换为哈希表。
哈希表的实现类似于 Java 中的 HashMap,采用数组 + 链表(或红黑树)的结构,通过链地址法解决哈希冲突。
示例:使用 Hash 存储商品信息
import org.springframework.data.redis.core.HashOperations;
import org.springframework.data.redis.core.RedisTemplate;
import org.springframework.stereotype.Service;
import lombok.RequiredArgsConstructor;
import lombok.extern.slf4j.Slf4j;
import io.swagger.annotations.Api;
import io.swagger.annotations.ApiOperation;
import org.springframework.util.CollectionUtils;
import org.springframework.util.ObjectUtils;
import org.springframework.util.StringUtils;
import java.util.Map;
import java.util.Set;/*** Redis Hash 数据结构示例服务* @author ken*/
@Service
@Slf4j
@RequiredArgsConstructor
@Api(tags = "Redis Hash 示例")
public class RedisHashService {private final RedisTemplate<String, Object> redisTemplate;/*** 存储商品信息到Hash* @param productId 商品ID* @param productInfo 商品信息键值对*/@ApiOperation("存储商品信息")public void saveProduct(Long productId, Map<String, Object> productInfo) {if (ObjectUtils.isEmpty(productId) || CollectionUtils.isEmpty(productInfo)) {log.error("商品ID或商品信息不能为空");throw new IllegalArgumentException("商品ID或商品信息不能为空");}String key = "product:" + productId;HashOperations<String, String, Object> hashOps = redisTemplate.opsForHash();hashOps.putAll(key, productInfo);log.info("商品信息已保存到Redis Hash,key: {}", key);}/*** 获取商品的某个属性* @param productId 商品ID* @param field 属性名* @return 属性值*/@ApiOperation("获取商品属性")public Object getProductField(Long productId, String field) {if (ObjectUtils.isEmpty(productId) || !StringUtils.hasText(field)) {log.error("商品ID或属性名不能为空");throw new IllegalArgumentException("商品ID或属性名不能为空");}String key = "product:" + productId;HashOperations<String, String, Object> hashOps = redisTemplate.opsForHash();return hashOps.get(key, field);}/*** 获取商品的所有信息* @param productId 商品ID* @return 商品所有属性键值对*/@ApiOperation("获取商品所有信息")public Map<String, Object> getProductAllFields(Long productId) {if (ObjectUtils.isEmpty(productId)) {log.error("商品ID不能为空");throw new IllegalArgumentException("商品ID不能为空");}String key = "product:" + productId;HashOperations<String, String, Object> hashOps = redisTemplate.opsForHash();return hashOps.entries(key);}/*** 删除商品的某个属性* @param productId 商品ID* @param fields 要删除的属性名* @return 删除的数量*/@ApiOperation("删除商品属性")public Long deleteProductFields(Long productId, String... fields) {if (ObjectUtils.isEmpty(productId) || ObjectUtils.isEmpty(fields)) {log.error("商品ID或属性名不能为空");throw new IllegalArgumentException("商品ID或属性名不能为空");}String key = "product:" + productId;HashOperations<String, String, Object> hashOps = redisTemplate.opsForHash();return hashOps.delete(key, (Object[]) fields);}
}
7. Redis 的 Sorted Set 底层实现原理是什么?
Sorted Set(有序集合)是 Redis 中最有特色的数据结构之一,它兼具集合和排序的功能,每个元素都有一个分数(score),用于排序。
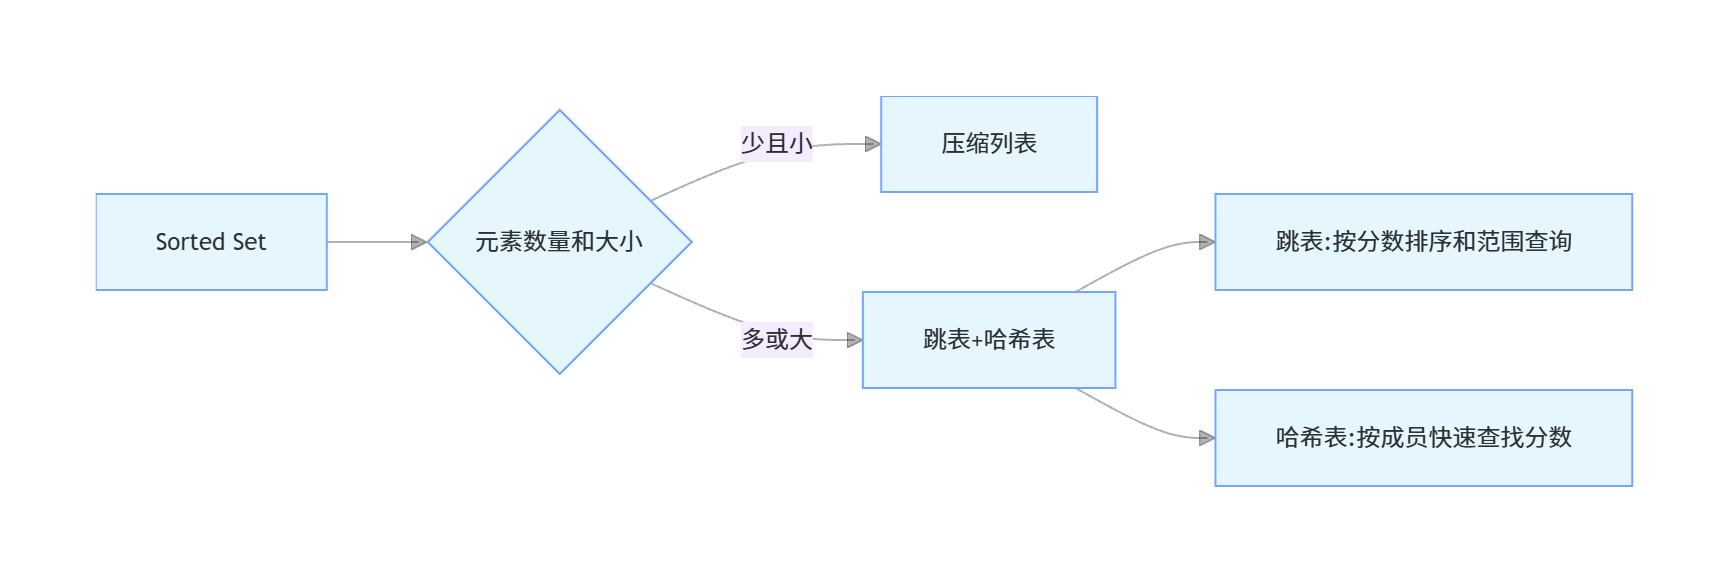
Sorted Set 的底层实现有两种方式:
压缩列表(ziplist):当元素数量少且元素值小时使用
- 元素数量少于 zset-max-ziplist-entries(默认 128)
- 每个元素的成员(member)长度小于 zset-max-ziplist-value(默认 64 字节)
跳表(skiplist)+ 哈希表:当不满足压缩列表条件时使用
- 跳表:用于根据分数范围获取元素,支持快速插入、删除和查找
- 哈希表:用于根据成员快速查找分数,时间复杂度为 O (1)
跳表是一种有序数据结构,它通过在每个节点中维持多个指向其他节点的指针,从而达到快速访问节点的目的。跳表的查找、插入、删除操作的平均时间复杂度为 O (logN),最坏情况下为 O (N)。
示例:使用 Sorted Set 实现排行榜功能
import org.springframework.data.redis.core.RedisTemplate;
import org.springframework.data.redis.core.ZSetOperations;
import org.springframework.stereotype.Service;
import lombok.RequiredArgsConstructor;
import lombok.extern.slf4j.Slf4j;
import io.swagger.annotations.Api;
import io.swagger.annotations.ApiOperation;
import org.springframework.util.ObjectUtils;
import org.springframework.util.StringUtils;
import java.util.Set;/*** Redis Sorted Set 数据结构示例服务(排行榜)* @author ken*/
@Service
@Slf4j
@RequiredArgsConstructor
@Api(tags = "Redis Sorted Set 示例(排行榜)")
public class RedisSortedSetService {private final RedisTemplate<String, Object> redisTemplate;/*** 添加用户分数到排行榜* @param rankKey 排行榜键名* @param userId 用户ID* @param score 分数*/@ApiOperation("添加用户分数到排行榜")public void addUserScore(String rankKey, Long userId, double score) {if (!StringUtils.hasText(rankKey) || ObjectUtils.isEmpty(userId)) {log.error("排行榜键名或用户ID不能为空");throw new IllegalArgumentException("排行榜键名或用户ID不能为空");}ZSetOperations<String, Object> zSetOps = redisTemplate.opsForZSet();zSetOps.add(rankKey, userId, score);log.info("用户{}已添加到排行榜{},分数: {}", userId, rankKey, score);}/*** 增加用户分数* @param rankKey 排行榜键名* @param userId 用户ID* @param increment 增加的分数* @return 增加后的分数*/@ApiOperation("增加用户分数")public Double incrementUserScore(String rankKey, Long userId, double increment) {if (!StringUtils.hasText(rankKey) || ObjectUtils.isEmpty(userId)) {log.error("排行榜键名或用户ID不能为空");throw new IllegalArgumentException("排行榜键名或用户ID不能为空");}ZSetOperations<String, Object> zSetOps = redisTemplate.opsForZSet();return zSetOps.incrementScore(rankKey, userId, increment);}/*** 获取用户排名(从高到低)* @param rankKey 排行榜键名* @param userId 用户ID* @return 排名(从0开始)*/@ApiOperation("获取用户排名")public Long getUserRank(String rankKey, Long userId) {if (!StringUtils.hasText(rankKey) || ObjectUtils.isEmpty(userId)) {log.error("排行榜键名或用户ID不能为空");throw new IllegalArgumentException("排行榜键名或用户ID不能为空");}ZSetOperations<String, Object> zSetOps = redisTemplate.opsForZSet();// 注意:zRank是从低到高排名,zReverseRank是从高到低排名return zSetOps.reverseRank(rankKey, userId);}/*** 获取排行榜前N名用户* @param rankKey 排行榜键名* @param topN 前N名* @return 前N名用户及分数*/@ApiOperation("获取排行榜前N名")public Set<ZSetOperations.TypedTuple<Object>> getTopUsers(String rankKey, long topN) {if (!StringUtils.hasText(rankKey) || topN <= 0) {log.error("排行榜键名不能为空且topN必须大于0");throw new IllegalArgumentException("排行榜键名不能为空且topN必须大于0");}ZSetOperations<String, Object> zSetOps = redisTemplate.opsForZSet();// 0到topN-1表示前topN名,true表示按分数从高到低return zSetOps.reverseRangeWithScores(rankKey, 0, topN - 1);}/*** 获取用户分数* @param rankKey 排行榜键名* @param userId 用户ID* @return 用户分数*/@ApiOperation("获取用户分数")public Double getUserScore(String rankKey, Long userId) {if (!StringUtils.hasText(rankKey) || ObjectUtils.isEmpty(userId)) {log.error("排行榜键名或用户ID不能为空");throw new IllegalArgumentException("排行榜键名或用户ID不能为空");}ZSetOperations<String, Object> zSetOps = redisTemplate.opsForZSet();return zSetOps.score(rankKey, userId);}
}
三、Redis 持久化
8. Redis 有哪些持久化方式?各有什么优缺点?
Redis 提供两种主要的持久化方式:RDB(Redis Database)和 AOF(Append Only File)。
RDB(快照持久化)
RDB 是指在指定的时间间隔内将内存中的数据集快照写入磁盘。
优点:
- RDB 文件是紧凑的二进制文件,体积小,适合备份和灾难恢复
- 恢复大数据集时,RDB 方式比 AOF 方式快
- RDB 持久化对 Redis 性能影响较小,因为主进程只需 fork 一个子进程来完成 RDB 文件的创建
缺点:
- 数据安全性较低,如果 Redis 意外宕机,可能会丢失最后一次 RDB 快照后的所有数据
- 如果数据集很大,fork 子进程可能会阻塞 Redis 服务器一段时间
AOF(追加文件持久化)
AOF 是以日志的形式记录 Redis 的每一个写操作,在 Redis 重启时,通过重新执行这些命令来恢复数据。
优点:
- 数据安全性更高,支持多种同步策略(always、everysec、no)
- AOF 文件是可读的文本文件,便于理解和修改
- 即使 AOF 文件损坏,也可以通过 redis-check-aof 工具修复
缺点:
- AOF 文件通常比 RDB 文件大很多
- 在高写入负载下,AOF 可能会影响 Redis 性能
- 恢复大数据集时,AOF 方式比 RDB 方式慢

9. RDB 和 AOF 的实现原理是什么?
RDB 实现原理
RDB 持久化通过以下步骤实现:
- Redis 主进程收到 RDB 持久化命令(save 或 bgsave)
- 如果是 save 命令,主进程会直接进行 RDB 持久化,期间会阻塞所有客户端请求
- 如果是 bgsave 命令,主进程会 fork 一个子进程
- 子进程负责将内存中的数据写入临时 RDB 文件
- 写入完成后,原子性地替换旧的 RDB 文件
- 子进程退出
RDB 文件是一个经过压缩的二进制文件,包含了 Redis 在某个时间点的所有数据。
AOF 实现原理
AOF 持久化通过以下步骤实现:
- 开启 AOF 后,Redis 会将每个写命令追加到 AOF 缓冲区
- 根据配置的同步策略(appendfsync),将缓冲区内容同步到磁盘
- always:每个写命令都立即同步到磁盘,安全性最高,性能最差
- everysec:每秒同步一次,平衡安全性和性能
- no:由操作系统决定何时同步,性能最好,安全性最差
- AOF 文件会随着时间变得越来越大,Redis 通过 AOF 重写(rewrite)机制来压缩 AOF 文件
- AOF 重写可以通过 bgrewriteaof 命令触发,也可以根据配置自动触发
- 重写过程与 RDB 类似,也是通过 fork 子进程来完成,不会阻塞主进程
AOF 重写不是对旧文件进行修改,而是直接读取当前内存中的数据,生成一系列新的写命令来替代旧的命令序列,从而减小文件体积。
10. RDB 和 AOF 如何选择?Redis 4.0 后的混合持久化是什么?
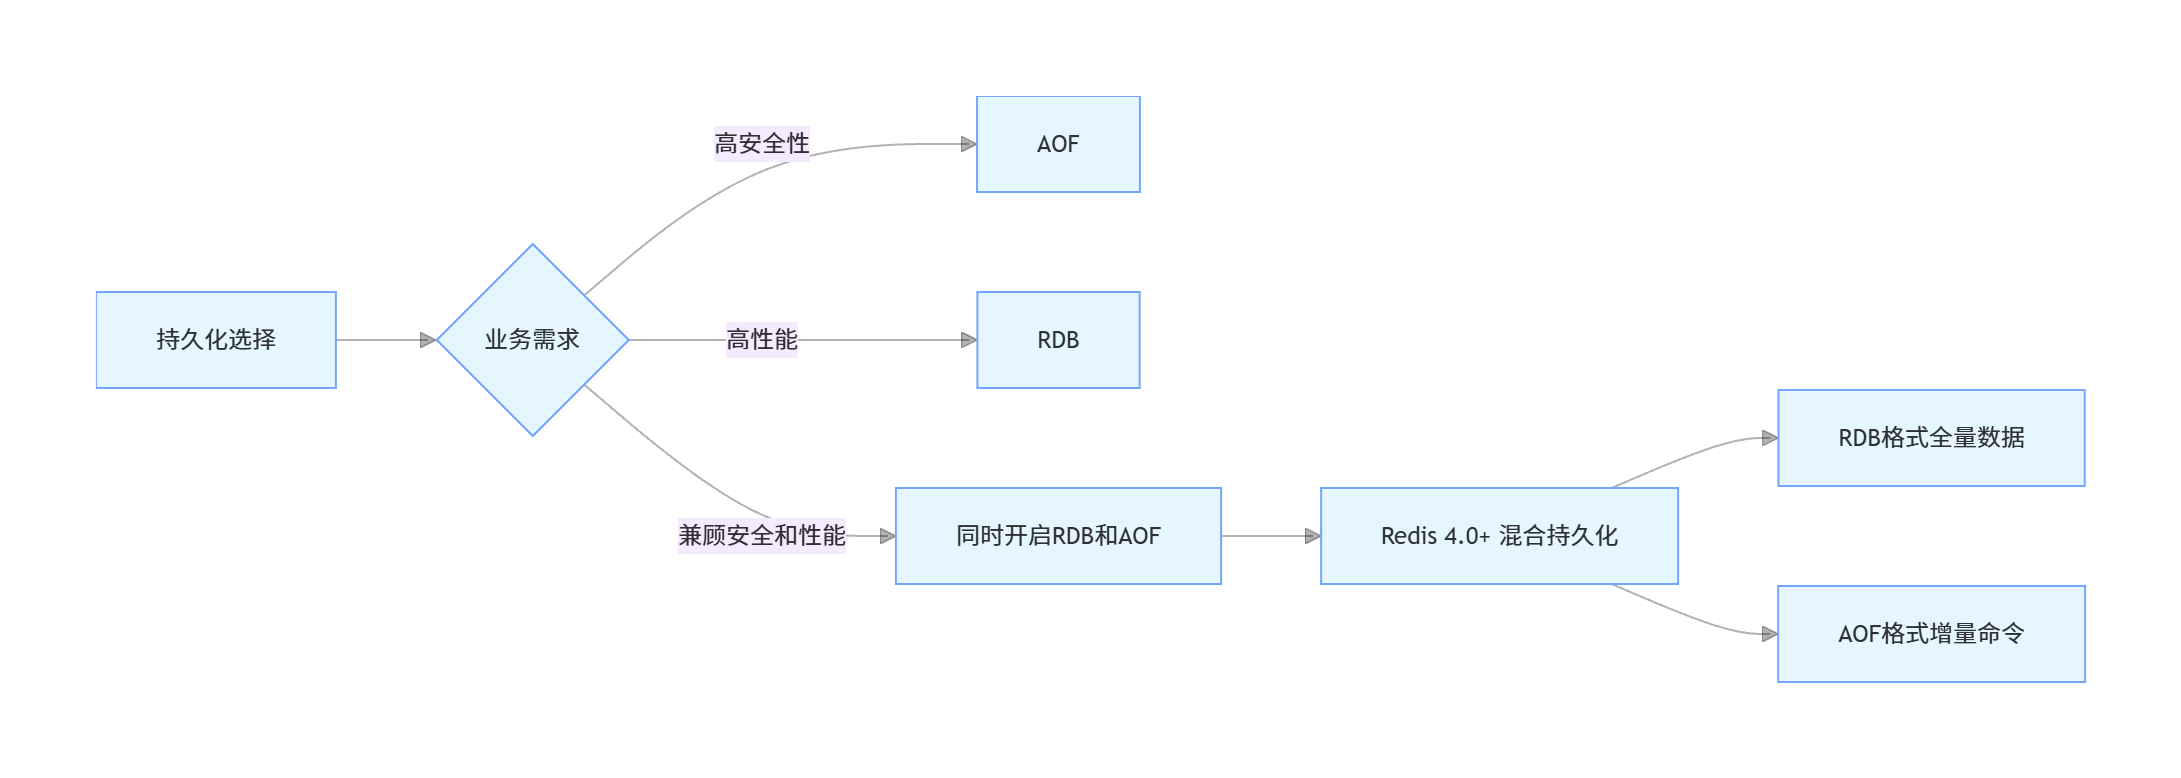
RDB 和 AOF 的选择取决于具体的业务需求:
- 如果追求数据安全性,愿意牺牲一些性能和存储空间,选择 AOF
- 如果追求性能和快速恢复,对数据安全性要求不高,选择 RDB
- 实际生产环境中,通常建议同时开启 RDB 和 AOF,以兼顾安全性和性能
Redis 4.0 后的混合持久化
Redis 4.0 引入了混合持久化(RDB-AOF 混合模式),它结合了 RDB 和 AOF 的优点:
- AOF 文件的开头是 RDB 格式的全量数据快照
- 后续是 AOF 格式的增量命令
- 这样既保证了快速恢复(利用 RDB),又保证了数据安全性(利用 AOF)
混合持久化的配置:
aof-use-rdb-preamble yes
混合持久化的恢复过程:
- 先加载 RDB 部分的全量数据
- 再执行 AOF 部分的增量命令
四、Redis 高可用
11. Redis 主从复制的原理是什么?如何配置?
Redis 主从复制是实现高可用的基础,它允许将一台 Redis 服务器(主节点)的数据复制到其他 Redis 服务器(从节点)。
主从复制的原理
- 建立连接:从节点通过 slaveof 命令连接主节点,发送 SYNC 命令
- 全量复制:主节点收到 SYNC 命令后,执行 bgsave 生成 RDB 文件,同时记录此后的写命令到缓冲区
- 传输 RDB 文件:主节点将 RDB 文件发送给从节点,从节点接收并加载 RDB 文件
- 增量复制:主节点将缓冲区中的写命令发送给从节点,从节点执行这些命令
- 命令传播:此后主节点每执行一个写命令,都会将该命令发送给从节点,从节点执行该命令以保持数据同步
从 Redis 2.8 开始,引入了部分重同步功能,通过偏移量(offset)和复制积压缓冲区(replication backlog)来实现:
- 主从节点都维护一个偏移量,记录已复制的命令字节数
- 主节点有一个固定大小的环形缓冲区,保存最近执行的写命令
- 当从节点断线重连后,会发送自己的偏移量,如果主节点的缓冲区中包含该偏移量之后的所有命令,则进行部分重同步,否则进行全量重同步
主从复制配置
主节点通常不需要特殊配置,从节点配置如下:
# 从节点配置文件 redis.conf
# 连接主节点的IP和端口
slaveof 192.168.1.100 6379# 如果主节点有密码,需要配置密码
masterauth password# 从节点是否只读(建议设置为yes)
slave-read-only yes# 复制缓冲区大小,默认1MB
repl-backlog-size 1mb# 主节点断线后,从节点等待多久后成为主节点(仅在哨兵模式下有效)
replica-priority 100
也可以通过命令动态配置:
redis-cli
# 从节点执行
127.0.0.1:6379> slaveof 192.168.1.100 6379
OK# 如果需要取消从节点身份
127.0.0.1:6379> slaveof no one
OK
示例:Java 代码中使用主从复制
import org.springframework.context.annotation.Bean;
import org.springframework.context.annotation.Configuration;
import org.springframework.data.redis.connection.RedisConnectionFactory;
import org.springframework.data.redis.connection.RedisStandaloneConfiguration;
import org.springframework.data.redis.connection.lettuce.LettuceConnectionFactory;
import org.springframework.data.redis.core.RedisTemplate;
import org.springframework.data.redis.serializer.GenericJackson2JsonRedisSerializer;
import org.springframework.data.redis.serializer.StringRedisSerializer;/*** Redis 主从复制配置* @author ken*/
@Configuration
public class RedisConfig {/*** 配置Redis连接工厂,连接从节点进行读操作* @return Redis连接工厂*/@Beanpublic RedisConnectionFactory redisConnectionFactory() {// 配置从节点信息RedisStandaloneConfiguration config = new RedisStandaloneConfiguration();config.setHostName("192.168.1.101"); // 从节点IPconfig.setPort(6379); // 从节点端口config.setPassword("password"); // 密码,如果有的话return new LettuceConnectionFactory(config);}/*** 配置RedisTemplate* @param connectionFactory Redis连接工厂* @return RedisTemplate*/@Beanpublic RedisTemplate<String, Object> redisTemplate(RedisConnectionFactory connectionFactory) {RedisTemplate<String, Object> template = new RedisTemplate<>();template.setConnectionFactory(connectionFactory);// 设置键序列化器template.setKeySerializer(new StringRedisSerializer());// 设置值序列化器template.setValueSerializer(new GenericJackson2JsonRedisSerializer());// 设置Hash键序列化器template.setHashKeySerializer(new StringRedisSerializer());// 设置Hash值序列化器template.setHashValueSerializer(new GenericJackson2JsonRedisSerializer());template.afterPropertiesSet();return template;}/*** 配置主节点RedisTemplate,用于写操作* @return 主节点RedisTemplate*/@Bean("masterRedisTemplate")public RedisTemplate<String, Object> masterRedisTemplate() {// 配置主节点信息RedisStandaloneConfiguration config = new RedisStandaloneConfiguration();config.setHostName("192.168.1.100"); // 主节点IPconfig.setPort(6379); // 主节点端口config.setPassword("password"); // 密码,如果有的话LettuceConnectionFactory connectionFactory = new LettuceConnectionFactory(config);connectionFactory.afterPropertiesSet();RedisTemplate<String, Object> template = new RedisTemplate<>();template.setConnectionFactory(connectionFactory);// 设置序列化器,同上template.setKeySerializer(new StringRedisSerializer());template.setValueSerializer(new GenericJackson2JsonRedisSerializer());template.setHashKeySerializer(new StringRedisSerializer());template.setHashValueSerializer(new GenericJackson2JsonRedisSerializer());template.afterPropertiesSet();return template;}
}
12. Redis 哨兵(Sentinel)的工作原理是什么?如何配置?
Redis 哨兵是 Redis 官方提供的高可用解决方案,它可以监控 Redis 主从节点,并在主节点故障时自动将从节点晋升为主节点,实现故障自动转移。
哨兵的工作原理
- 监控(Monitoring):哨兵不断检查主节点和从节点是否正常运行
- 通知(Notification):当某个节点出现故障时,哨兵可以通过 API 通知管理员或其他应用程序
- 自动故障转移(Automatic failover):当主节点不可用时,哨兵会自动将一个从节点晋升为主节点,并让其他从节点指向新的主节点
哨兵的核心功能是通过以下机制实现的:
- 心跳检测:哨兵向所有节点发送 PING 命令,如果在指定时间内没有收到有效回复,则认为该节点主观下线(SDOWN)
- 客观下线:当多个哨兵都认为主节点主观下线时,会通过投票机制确定主节点是否客观下线(ODOWN)
- 领导者选举:当主节点客观下线后,哨兵之间会进行领导者选举,选出一个哨兵来执行故障转移
- 故障转移:领导者哨兵会从所有健康的从节点中选择一个作为新的主节点,然后让其他从节点复制新的主节点

哨兵配置
哨兵通常以集群形式部署,至少需要 3 个哨兵实例以保证高可用。
哨兵配置文件(sentinel.conf)示例:
# 哨兵实例端口
port 26379# 监控主节点,mymaster是主节点名称,192.168.1.100 6379是主节点地址,2是投票数
sentinel monitor mymaster 192.168.1.100 6379 2# 主节点密码
sentinel auth-pass mymaster password# 哨兵认为主节点主观下线的时间(毫秒)
sentinel down-after-milliseconds mymaster 30000# 故障转移超时时间(毫秒)
sentinel failover-timeout mymaster 180000# 故障转移时,最多有多少个从节点同时对新主节点进行同步
sentinel parallel-syncs mymaster 1
启动哨兵:
redis-sentinel /path/to/sentinel.conf
Java 代码中使用哨兵模式:
import org.springframework.context.annotation.Bean;
import org.springframework.context.annotation.Configuration;
import org.springframework.data.redis.connection.RedisNode;
import org.springframework.data.redis.connection.RedisSentinelConfiguration;
import org.springframework.data.redis.connection.lettuce.LettuceConnectionFactory;
import org.springframework.data.redis.core.RedisTemplate;
import org.springframework.data.redis.serializer.GenericJackson2JsonRedisSerializer;
import org.springframework.data.redis.serializer.StringRedisSerializer;
import java.util.Collections;/*** Redis 哨兵模式配置* @author ken*/
@Configuration
public class RedisSentinelConfig {/*** 配置Redis哨兵连接工厂* @return Redis连接工厂*/@Beanpublic LettuceConnectionFactory redisConnectionFactory() {// 配置哨兵RedisSentinelConfiguration sentinelConfig = new RedisSentinelConfiguration();// 主节点名称sentinelConfig.setMaster("mymaster");// 哨兵节点列表sentinelConfig.setSentinels(Collections.singletonList(new RedisNode("192.168.1.100", 26379)));// 添加更多哨兵节点sentinelConfig.addSentinel(new RedisNode("192.168.1.101", 26379));sentinelConfig.addSentinel(new RedisNode("192.168.1.102", 26379));// 设置密码sentinelConfig.setPassword("password");return new LettuceConnectionFactory(sentinelConfig);}/*** 配置RedisTemplate* @param connectionFactory Redis连接工厂* @return RedisTemplate*/@Beanpublic RedisTemplate<String, Object> redisTemplate(LettuceConnectionFactory connectionFactory) {RedisTemplate<String, Object> template = new RedisTemplate<>();template.setConnectionFactory(connectionFactory);// 设置序列化器template.setKeySerializer(new StringRedisSerializer());template.setValueSerializer(new GenericJackson2JsonRedisSerializer());template.setHashKeySerializer(new StringRedisSerializer());template.setHashValueSerializer(new GenericJackson2JsonRedisSerializer());template.afterPropertiesSet();return template;}
}
13. Redis Cluster(集群)的原理和架构是什么?如何配置?
Redis Cluster 是 Redis 官方提供的分布式解决方案,用于解决单节点 Redis 的容量和性能瓶颈,支持数据分片、高可用和自动故障转移。
Redis Cluster 的原理和架构
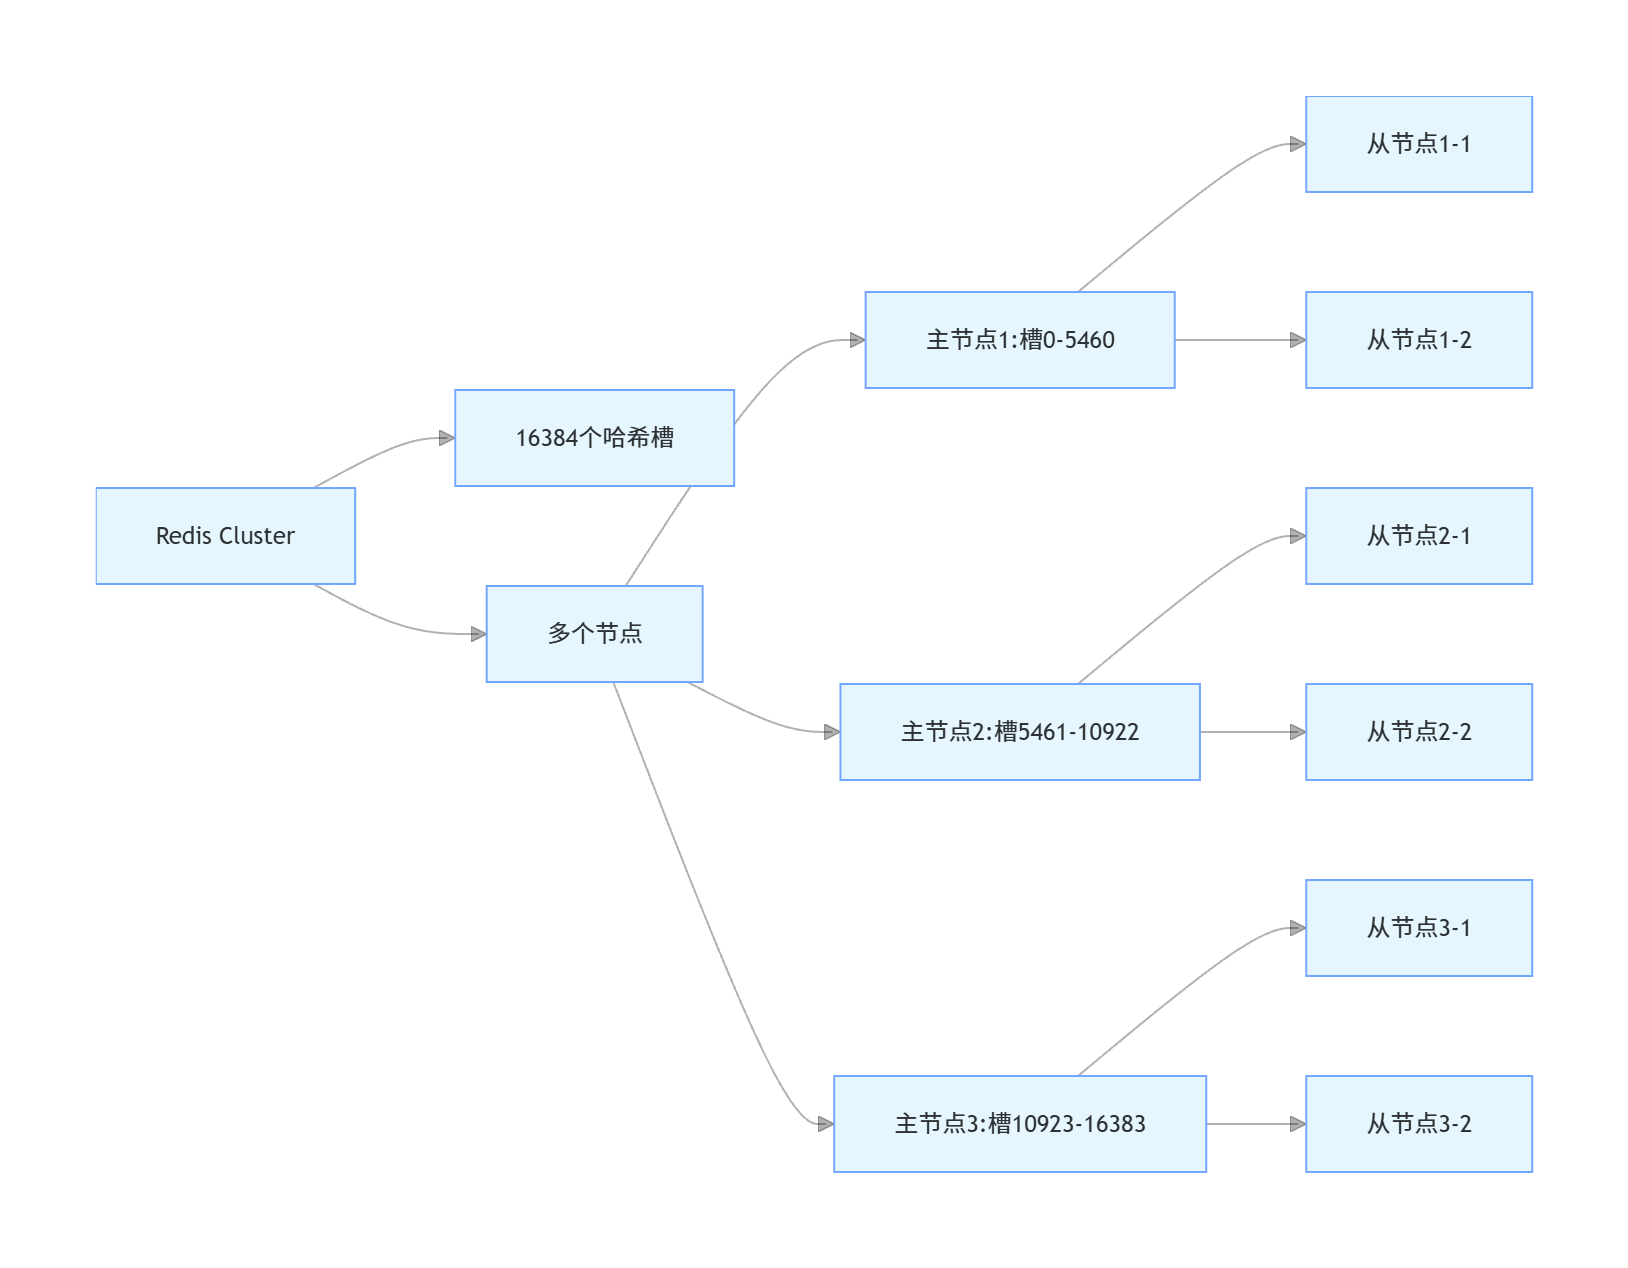
- 数据分片:Redis Cluster 将数据分散存储在多个节点上,采用哈希槽(hash slot)机制,共有 16384 个哈希槽
- 哈希槽分配:每个节点负责一部分哈希槽,键通过 CRC16 (key) % 16384 计算所属的哈希槽
- 节点通信:节点之间通过 Gossip 协议进行通信,交换节点状态信息
- 高可用:每个主节点可以有多个从节点,当主节点故障时,从节点会晋升为主节点
- 客户端路由:客户端可以连接任意节点,如果该节点不负责请求的哈希槽,会返回 MOVED 或 ASK 重定向
Redis Cluster 的最小配置是 3 个主节点,每个主节点至少有 1 个从节点,共 6 个节点,以保证高可用。
Redis Cluster 配置
- 每个节点的配置文件(redis.conf)需要添加以下配置:
# 开启集群模式
cluster-enabled yes# 集群配置文件,由Redis自动生成和更新
cluster-config-file nodes-6379.conf# 节点超时时间(毫秒)
cluster-node-timeout 15000# 当主节点无法正常工作时,是否允许从节点自动晋升为主节点
cluster-require-full-coverage no
- 启动所有节点:
redis-server /path/to/redis.conf
- 创建集群:
# Redis 5.0+使用redis-cli创建集群
redis-cli --cluster create \
192.168.1.100:6379 \
192.168.1.101:6379 \
192.168.1.102:6379 \
192.168.1.103:6380 \
192.168.1.104:6380 \
192.168.1.105:6380 \
--cluster-replicas 1
Java 代码中使用 Redis Cluster:
import org.springframework.context.annotation.Bean;
import org.springframework.context.annotation.Configuration;
import org.springframework.data.redis.connection.RedisClusterConfiguration;
import org.springframework.data.redis.connection.RedisNode;
import org.springframework.data.redis.connection.lettuce.LettuceConnectionFactory;
import org.springframework.data.redis.core.RedisTemplate;
import org.springframework.data.redis.serializer.GenericJackson2JsonRedisSerializer;
import org.springframework.data.redis.serializer.StringRedisSerializer;
import java.util.Arrays;
import java.util.List;/*** Redis Cluster 配置* @author ken*/
@Configuration
public class RedisClusterConfig {/*** 配置Redis集群连接工厂* @return Redis连接工厂*/@Beanpublic LettuceConnectionFactory redisConnectionFactory() {// 集群节点列表List<RedisNode> clusterNodes = Arrays.asList(new RedisNode("192.168.1.100", 6379),new RedisNode("192.168.1.101", 6379),new RedisNode("192.168.1.102", 6379),new RedisNode("192.168.1.103", 6380),new RedisNode("192.168.1.104", 6380),new RedisNode("192.168.1.105", 6380));// 配置集群RedisClusterConfiguration clusterConfig = new RedisClusterConfiguration();clusterConfig.setClusterNodes(clusterNodes);// 设置最大重定向次数clusterConfig.setMaxRedirects(3);// 设置密码clusterConfig.setPassword("password");return new LettuceConnectionFactory(clusterConfig);}/*** 配置RedisTemplate* @param connectionFactory Redis连接工厂* @return RedisTemplate*/@Beanpublic RedisTemplate<String, Object> redisTemplate(LettuceConnectionFactory connectionFactory) {RedisTemplate<String, Object> template = new RedisTemplate<>();template.setConnectionFactory(connectionFactory);// 设置序列化器template.setKeySerializer(new StringRedisSerializer());template.setValueSerializer(new GenericJackson2JsonRedisSerializer());template.setHashKeySerializer(new StringRedisSerializer());template.setHashValueSerializer(new GenericJackson2JsonRedisSerializer());template.afterPropertiesSet();return template;}
}
五、Redis 缓存问题
14. 什么是缓存穿透?如何解决?
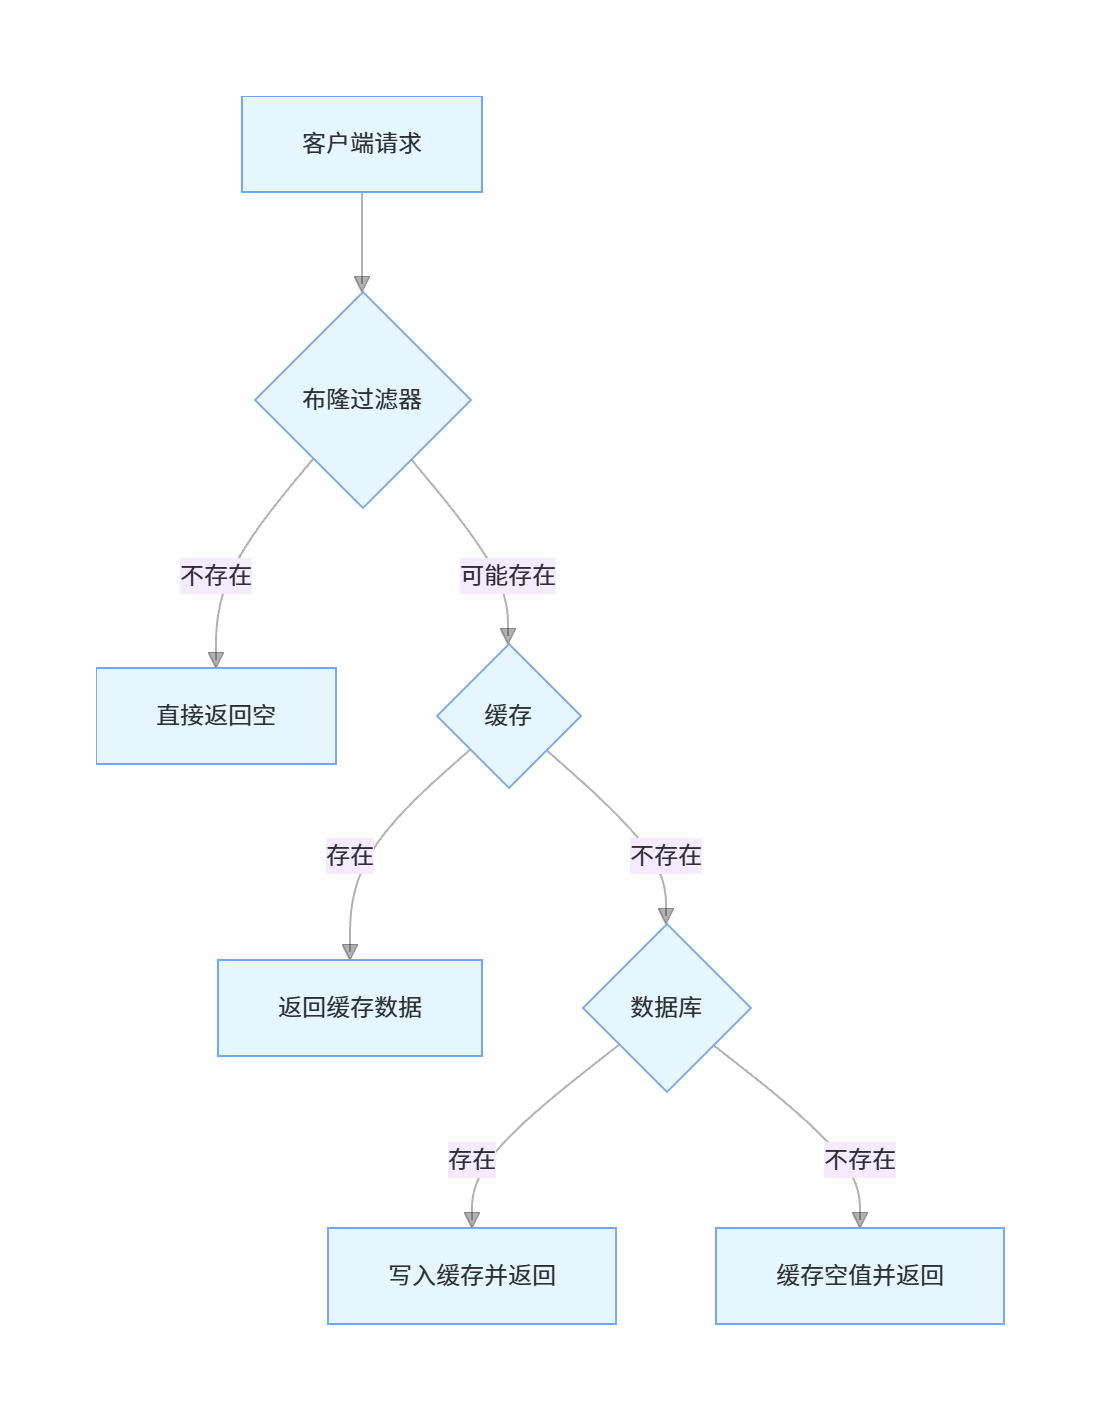
缓存穿透是指查询一个不存在的数据,由于缓存中没有该数据,所有请求都会穿透到数据库,导致数据库压力增大,甚至宕机。
缓存穿透的解决方案
空值缓存:对于查询结果为空的数据,也将其缓存起来,设置一个较短的过期时间
- 优点:实现简单
- 缺点:可能会缓存大量空值,浪费内存
布隆过滤器(Bloom Filter):在缓存之前设置布隆过滤器,过滤掉一定不存在的数据
- 优点:高效判断数据是否存在,内存占用小
- 缺点:有一定的误判率,删除困难
接口层校验:在接口层对请求参数进行校验,过滤掉明显不合理的参数
- 优点:提前拦截无效请求
- 缺点:只能过滤简单的无效请求
限流降级:对数据库访问进行限流,当请求量超过阈值时进行降级处理
- 优点:保护数据库不被压垮
- 缺点:可能影响正常用户体验
示例:使用布隆过滤器解决缓存穿透
import com.google.common.hash.BloomFilter;
import com.google.common.hash.Funnels;
import org.springframework.stereotype.Component;
import javax.annotation.PostConstruct;
import java.nio.charset.StandardCharsets;
import java.util.List;/*** 布隆过滤器工具类,用于解决缓存穿透* @author ken*/
@Component
public class BloomFilterUtil {// 预计数据量private static final long EXPECTED_INSERTIONS = 1000000;// 误判率private static final double FALSE_POSITIVE_RATE = 0.01;// 布隆过滤器实例private BloomFilter<String> bloomFilter;/*** 初始化布隆过滤器,加载所有可能存在的ID*/@PostConstructpublic void init() {// 创建布隆过滤器bloomFilter = BloomFilter.create(Funnels.stringFunnel(StandardCharsets.UTF_8),EXPECTED_INSERTIONS,FALSE_POSITIVE_RATE);// 从数据库加载所有存在的ID并添加到布隆过滤器loadExistingIds();}/*** 从数据库加载所有存在的ID*/private void loadExistingIds() {// 实际项目中,这里会从数据库查询所有存在的IDList<String> existingIds = Arrays.asList("1", "2", "3", "4", "5");// 将ID添加到布隆过滤器for (String id : existingIds) {bloomFilter.put(id);}}/*** 判断ID是否可能存在* @param id 要判断的ID* @return true:可能存在;false:一定不存在*/public boolean mightContain(String id) {if (!StringUtils.hasText(id)) {return false;}return bloomFilter.mightContain(id);}/*** 添加ID到布隆过滤器* @param id 要添加的ID*/public void put(String id) {if (StringUtils.hasText(id)) {bloomFilter.put(id);}}
}
使用布隆过滤器的服务类:
import org.springframework.data.redis.core.RedisTemplate;
import org.springframework.stereotype.Service;
import lombok.RequiredArgsConstructor;
import lombok.extern.slf4j.Slf4j;
import io.swagger.annotations.Api;
import io.swagger.annotations.ApiOperation;
import org.springframework.util.StringUtils;/*** 使用布隆过滤器解决缓存穿透示例服务* @author ken*/
@Service
@Slf4j
@RequiredArgsConstructor
@Api(tags = "缓存穿透解决方案示例")
public class CachePenetrationService {private final RedisTemplate<String, Object> redisTemplate;private final BloomFilterUtil bloomFilter;private final UserMapper userMapper;/*** 获取用户信息,解决缓存穿透问题* @param userId 用户ID* @return 用户信息*/@ApiOperation("获取用户信息(防缓存穿透)")public User getUserById(String userId) {if (!StringUtils.hasText(userId)) {log.error("用户ID不能为空");throw new IllegalArgumentException("用户ID不能为空");}String key = "user:" + userId;// 1. 先检查布隆过滤器,如果不存在,直接返回nullif (!bloomFilter.mightContain(userId)) {log.info("布隆过滤器判断用户ID:{}不存在,直接返回", userId);return null;}// 2. 从缓存获取数据User user = (User) redisTemplate.opsForValue().get(key);if (user != null) {log.info("从缓存获取用户信息,userId:{}", userId);return user;}// 3. 缓存未命中,从数据库获取log.info("缓存未命中,从数据库获取用户信息,userId:{}", userId);user = userMapper.selectById(userId);if (user != null) {// 4. 数据库存在,写入缓存,设置合理的过期时间redisTemplate.opsForValue().set(key, user, 30, TimeUnit.MINUTES);log.info("用户信息写入缓存,userId:{}", userId);} else {// 5. 数据库不存在,缓存空值,设置较短的过期时间redisTemplate.opsForValue().set(key, null, 5, TimeUnit.MINUTES);log.info("用户信息不存在,缓存空值,userId:{}", userId);}return user;}
}
15. 什么是缓存击穿?如何解决?
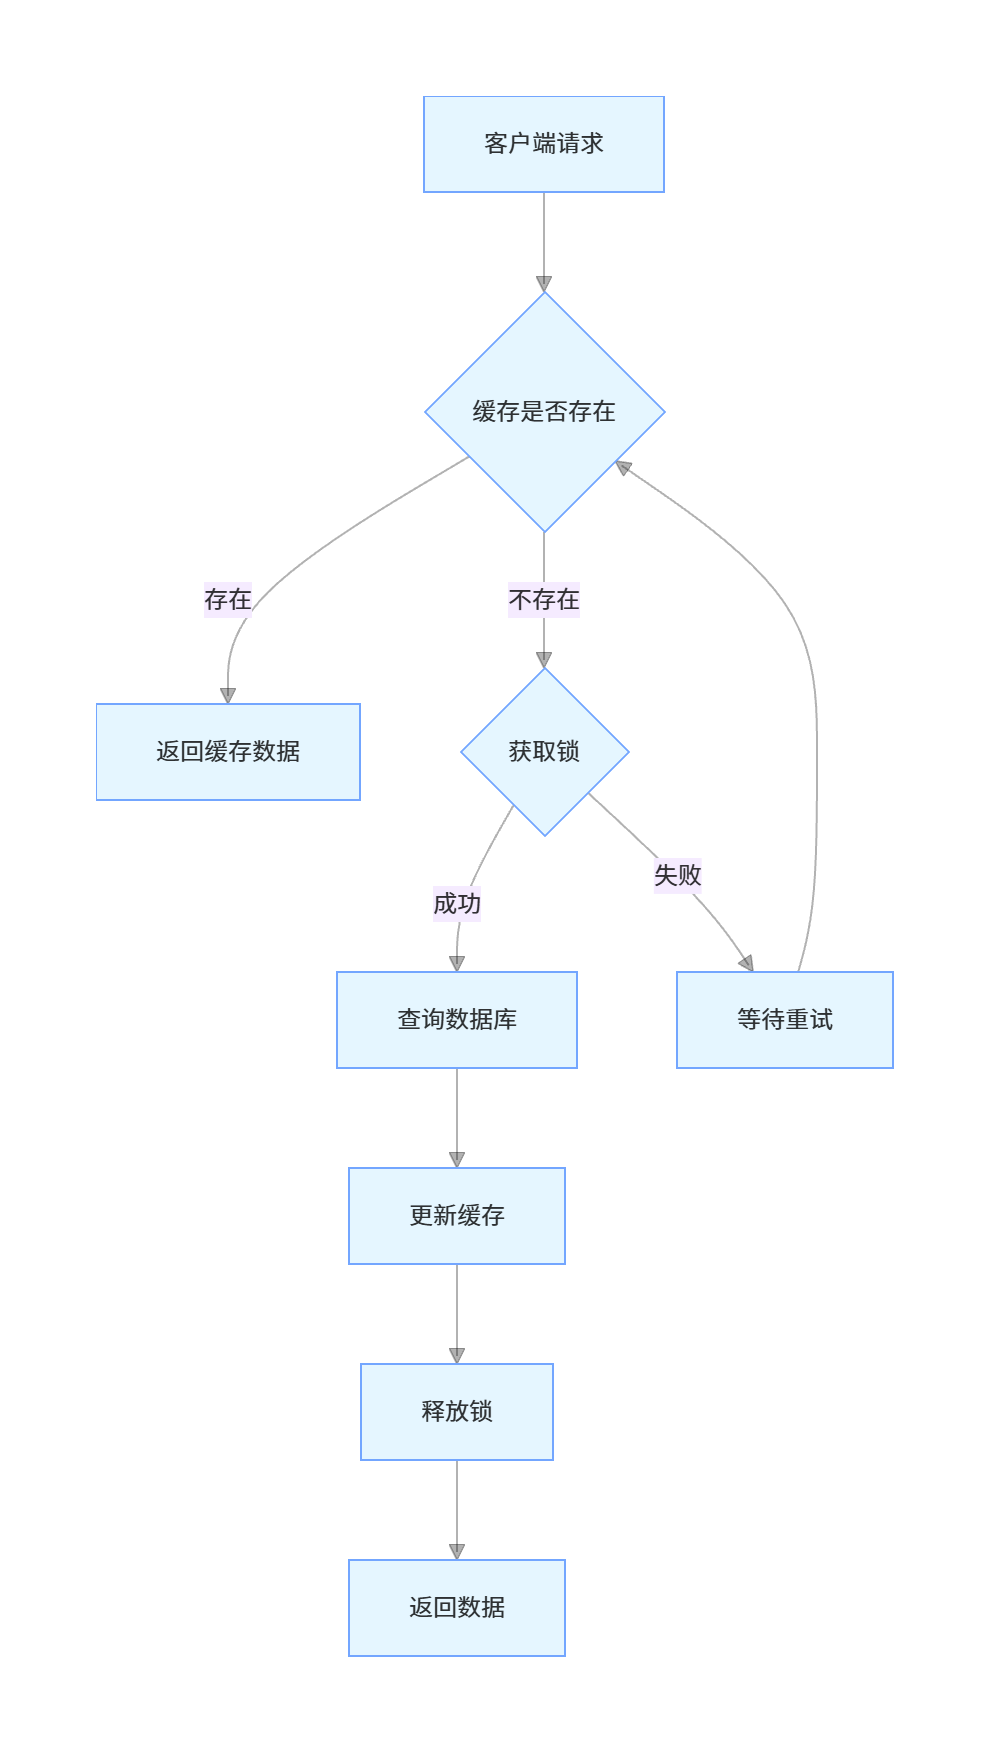
缓存击穿是指一个热点 key 在缓存中过期的瞬间,有大量并发请求同时访问这个 key,导致所有请求都穿透到数据库,造成数据库压力骤增。
缓存击穿的解决方案
互斥锁:当缓存失效时,只允许一个线程去数据库查询并更新缓存,其他线程等待
- 优点:实现简单,能有效防止缓存击穿
- 缺点:可能导致线程阻塞,影响性能
热点 key 永不过期:对于热点 key,不设置过期时间,通过后台线程定期更新
- 优点:不会出现缓存过期的情况
- 缺点:需要额外的线程维护,可能存在数据不一致
过期时间加随机值:为热点 key 的过期时间加上一个随机值,避免大量热点 key 同时过期
- 优点:实现简单,能分散缓存过期时间
- 缺点:只能减轻缓存击穿问题,不能完全解决
熔断降级:当请求量超过阈值时,对部分请求进行降级处理,返回默认值
- 优点:保护数据库
- 缺点:可能影响用户体验
示例:使用互斥锁解决缓存击穿
import org.springframework.data.redis.core.RedisTemplate;
import org.springframework.data.redis.core.script.DefaultRedisScript;
import org.springframework.stereotype.Service;
import lombok.RequiredArgsConstructor;
import lombok.extern.slf4j.Slf4j;
import io.swagger.annotations.Api;
import io.swagger.annotations.ApiOperation;
import org.springframework.util.ObjectUtils;
import org.springframework.util.StringUtils;
import java.util.Collections;
import java.util.concurrent.TimeUnit;/*** 使用互斥锁解决缓存击穿示例服务* @author ken*/
@Service
@Slf4j
@RequiredArgsConstructor
@Api(tags = "缓存击穿解决方案示例")
public class CacheBreakdownService {private final RedisTemplate<String, Object> redisTemplate;private final ProductMapper productMapper;// 分布式锁前缀private static final String LOCK_PREFIX = "lock:";// 锁过期时间(毫秒)private static final long LOCK_EXPIRE = 30000;// 重试间隔(毫秒)private static final long RETRY_INTERVAL = 100;/*** 获取商品信息,解决缓存击穿问题* @param productId 商品ID* @return 商品信息*/@ApiOperation("获取商品信息(防缓存击穿)")public Product getProductById(Long productId) {if (ObjectUtils.isEmpty(productId)) {log.error("商品ID不能为空");throw new IllegalArgumentException("商品ID不能为空");}String key = "product:" + productId;// 1. 从缓存获取数据Product product = (Product) redisTemplate.opsForValue().get(key);if (product != null) {log.info("从缓存获取商品信息,productId:{}", productId);return product;}// 2. 缓存未命中,尝试获取锁String lockKey = LOCK_PREFIX + key;boolean locked = false;try {// 尝试获取锁locked = tryLock(lockKey);if (locked) {// 3. 成功获取锁,再次检查缓存(防止其他线程已更新缓存)product = (Product) redisTemplate.opsForValue().get(key);if (product != null) {log.info("再次检查缓存命中,productId:{}", productId);return product;}// 4. 缓存仍未命中,从数据库获取log.info("从数据库获取商品信息,productId:{}", productId);product = productMapper.selectById(productId);if (product != null) {// 5. 写入缓存,设置过期时间,并添加随机值避免同时过期int expireTime = 30 + (int) (Math.random() * 10);redisTemplate.opsForValue().set(key, product, expireTime, TimeUnit.MINUTES);log.info("商品信息写入缓存,productId:{}, 过期时间:{}分钟", productId, expireTime);}} else {// 6. 未获取到锁,等待重试log.info("未获取到锁,等待重试,productId:{}", productId);Thread.sleep(RETRY_INTERVAL);// 递归重试return getProductById(productId);}} catch (InterruptedException e) {log.error("获取商品信息异常", e);Thread.currentThread().interrupt();} finally {// 7. 释放锁if (locked) {unlock(lockKey);log.info("释放锁,lockKey:{}", lockKey);}}return product;}/*** 尝试获取分布式锁* @param lockKey 锁的键名* @return 是否获取成功*/private boolean tryLock(String lockKey) {// 使用setIfAbsent实现分布式锁,相当于SETNX命令Boolean result = redisTemplate.opsForValue().setIfAbsent(lockKey, "1", LOCK_EXPIRE, TimeUnit.MILLISECONDS);return Boolean.TRUE.equals(result);}/*** 释放分布式锁* @param lockKey 锁的键名*/private void unlock(String lockKey) {// 使用Lua脚本确保释放锁的原子性String script = "if redis.call('get', KEYS[1]) == ARGV[1] then return redis.call('del', KEYS[1]) else return 0 end";DefaultRedisScript<Long> redisScript = new DefaultRedisScript<>(script, Long.class);Long result = redisTemplate.execute(redisScript, Collections.singletonList(lockKey), "1");if (result != null && result > 0) {log.info("锁释放成功,lockKey:{}", lockKey);} else {log.info("锁释放失败或锁已过期,lockKey:{}", lockKey);}}
}
16. 什么是缓存雪崩?如何解决?
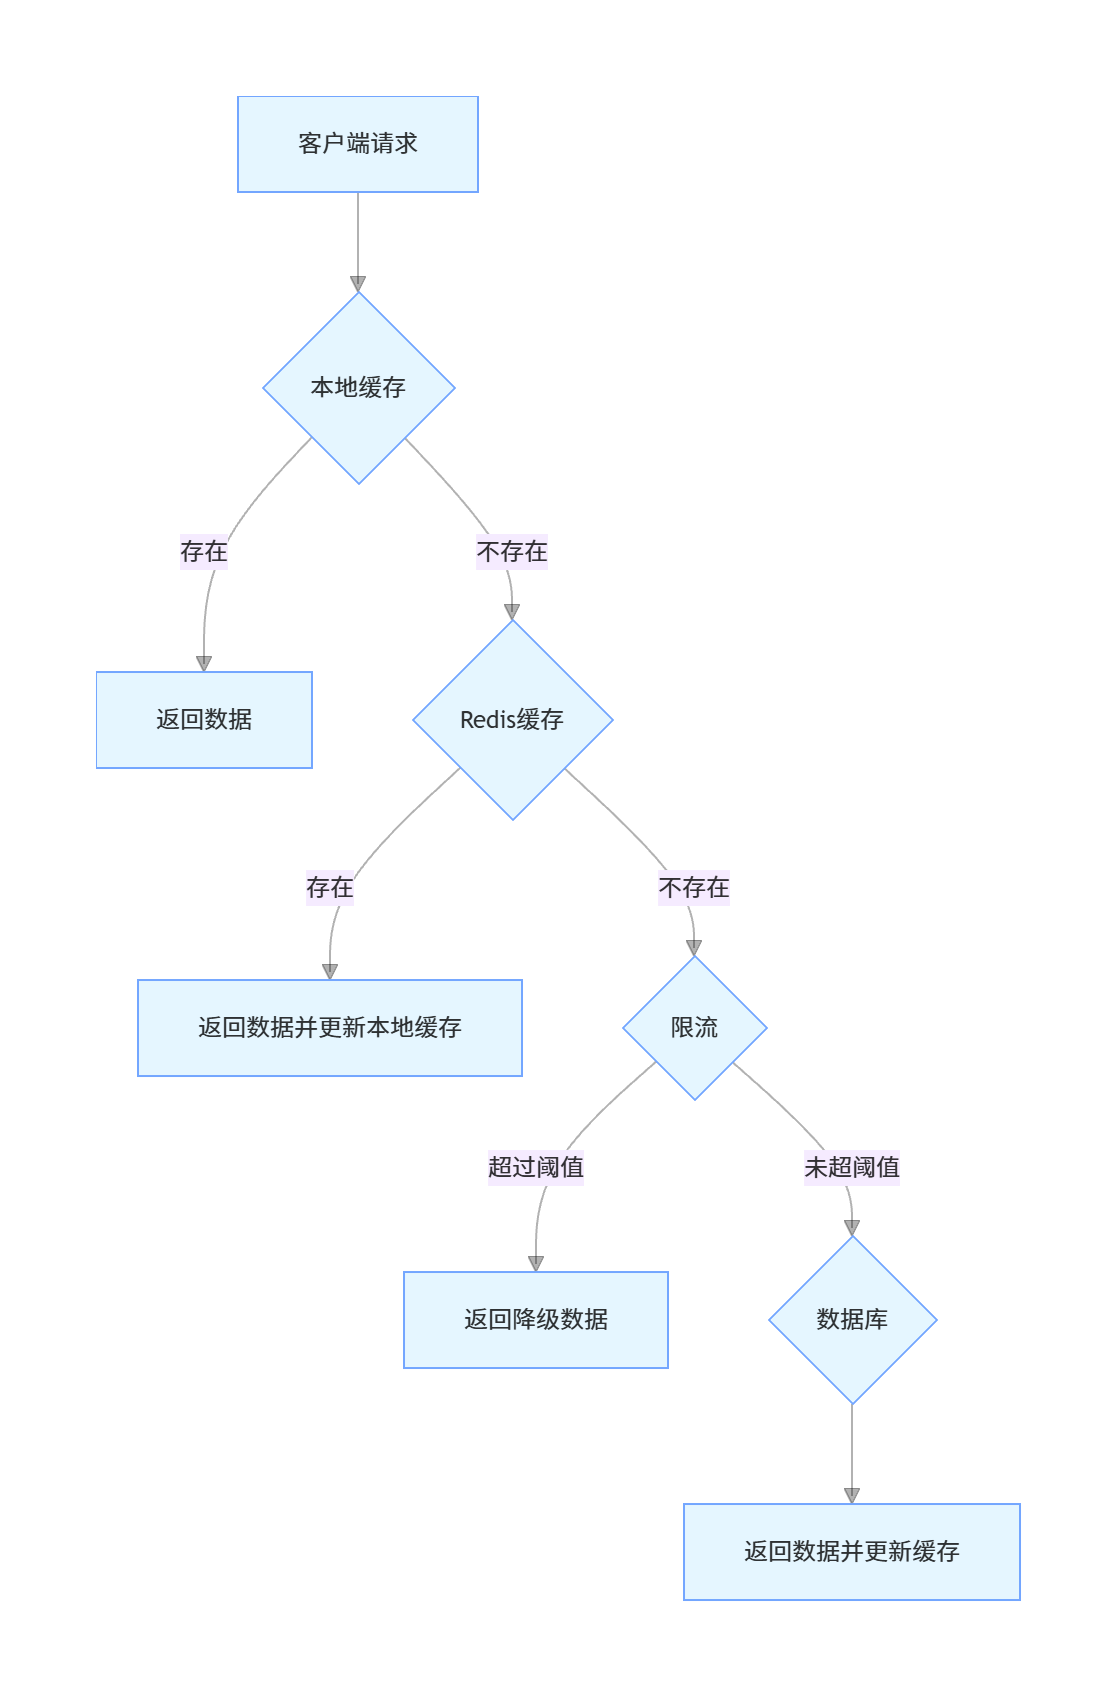
缓存雪崩是指在某一时间段内,缓存中大量 key 同时过期或 Redis 服务宕机,导致大量请求直接穿透到数据库,造成数据库压力骤增,甚至宕机。
缓存雪崩的解决方案
过期时间加随机值:为 key 的过期时间加上一个随机值,避免大量 key 同时过期
- 优点:实现简单
- 缺点:只能解决 key 同时过期的问题
多级缓存:使用本地缓存(如 Caffeine)+ 分布式缓存(Redis)的多级缓存架构
- 优点:即使分布式缓存失效,本地缓存还能提供服务
- 缺点:实现复杂,可能存在数据一致性问题
服务熔断与降级:当数据库压力过大时,对部分请求进行熔断或降级处理
- 优点:保护数据库不被压垮
- 缺点:可能影响用户体验
Redis 高可用:部署 Redis 集群(主从 + 哨兵或 Redis Cluster),避免单点故障
- 优点:提高 Redis 的可用性
- 缺点:增加系统复杂度和运维成本
缓存预热:在系统启动或低峰期,提前将热点数据加载到缓存中
- 优点:避免高峰期缓存未命中
- 缺点:需要额外的预热机制
限流:对访问数据库的请求进行限流,控制并发量
- 优点:保护数据库
- 缺点:可能影响用户体验
示例:使用多级缓存和限流解决缓存雪崩
import com.github.benmanes.caffeine.cache.Cache;
import com.github.benmanes.caffeine.cache.Caffeine;
import org.springframework.data.redis.core.RedisTemplate;
import org.springframework.stereotype.Service;
import lombok.RequiredArgsConstructor;
import lombok.extern.slf4j.Slf4j;
import io.swagger.annotations.Api;
import io.swagger.annotations.ApiOperation;
import org.springframework.util.ObjectUtils;
import java.util.concurrent.TimeUnit;
import java.util.concurrent.locks.ReentrantLock;/*** 使用多级缓存和限流解决缓存雪崩示例服务* @author ken*/
@Service
@Slf4j
@RequiredArgsConstructor
@Api(tags = "缓存雪崩解决方案示例")
public class CacheAvalancheService {private final RedisTemplate<String, Object> redisTemplate;private final GoodsMapper goodsMapper;private final RateLimiterUtil rateLimiter;// 本地缓存,使用Caffeineprivate final Cache<Long, Goods> localCache = Caffeine.newBuilder().maximumSize(10000) // 最大缓存数量.expireAfterWrite(5, TimeUnit.MINUTES) // 写入后过期时间.build();// 互斥锁,用于本地缓存更新private final ReentrantLock lock = new ReentrantLock();/*** 获取商品信息,解决缓存雪崩问题* @param goodsId 商品ID* @return 商品信息*/@ApiOperation("获取商品信息(防缓存雪崩)")public Goods getGoodsById(Long goodsId) {if (ObjectUtils.isEmpty(goodsId)) {log.error("商品ID不能为空");throw new IllegalArgumentException("商品ID不能为空");}String redisKey = "goods:" + goodsId;Goods goods;// 1. 先查询本地缓存goods = localCache.getIfPresent(goodsId);if (goods != null) {log.info("从本地缓存获取商品信息,goodsId:{}", goodsId);return goods;}// 2. 本地缓存未命中,查询Redis缓存goods = (Goods) redisTemplate.opsForValue().get(redisKey);if (goods != null) {log.info("从Redis缓存获取商品信息,goodsId:{}", goodsId);// 更新本地缓存localCache.put(goodsId, goods);return goods;}// 3. Redis缓存未命中,尝试获取数据库访问权限(限流)boolean acquire = rateLimiter.tryAcquire();if (!acquire) {log.warn("数据库访问被限流,goodsId:{}", goodsId);// 返回降级数据return getFallbackGoods(goodsId);}try {// 4. 获取到访问权限,查询数据库// 使用本地锁防止并发查询数据库lock.lock();try {// 双重检查,防止其他线程已更新缓存goods = (Goods) redisTemplate.opsForValue().get(redisKey);if (goods != null) {log.info("双重检查Redis缓存命中,goodsId:{}", goodsId);localCache.put(goodsId, goods);return goods;}log.info("从数据库获取商品信息,goodsId:{}", goodsId);goods = goodsMapper.selectById(goodsId);if (goods != null) {// 5. 写入Redis缓存,添加随机过期时间,避免同时过期int baseExpire = 30; // 基础过期时间30分钟int randomExpire = (int) (Math.random() * 10); // 0-10分钟随机值redisTemplate.opsForValue().set(redisKey, goods, baseExpire + randomExpire, TimeUnit.MINUTES);log.info("商品信息写入Redis缓存,goodsId:{}, 过期时间:{}分钟", goodsId, baseExpire + randomExpire);// 更新本地缓存localCache.put(goodsId, goods);}} finally {lock.unlock();}} finally {// 释放限流令牌(如果需要)rateLimiter.release();}return goods;}/*** 获取降级商品信息* @param goodsId 商品ID* @return 降级商品信息*/private Goods getFallbackGoods(Long goodsId) {Goods fallback = new Goods();fallback.setId(goodsId);fallback.setName("商品信息加载中,请稍后重试");fallback.setPrice(0.0);return fallback;}/*** 缓存预热方法,在系统启动或低峰期调用*/@ApiOperation("缓存预热")public void preloadCache() {log.info("开始进行缓存预热");// 获取热点商品ID列表List<Long> hotGoodsIds = goodsMapper.selectHotGoodsIds();for (Long goodsId : hotGoodsIds) {try {Goods goods = goodsMapper.selectById(goodsId);if (goods != null) {String redisKey = "goods:" + goodsId;// 添加随机过期时间int baseExpire = 30;int randomExpire = (int) (Math.random() * 10);redisTemplate.opsForValue().set(redisKey, goods, baseExpire + randomExpire, TimeUnit.MINUTES);// 更新本地缓存localCache.put(goodsId, goods);log.info("缓存预热完成,goodsId:{}", goodsId);}} catch (Exception e) {log.error("缓存预热失败,goodsId:{}", goodsId, e);}}log.info("缓存预热完成,共预热{}个商品", hotGoodsIds.size());}
}
限流工具类实现:
import com.google.common.util.concurrent.RateLimiter;
import org.springframework.stereotype.Component;/*** 限流工具类,使用Guava的RateLimiter* @author ken*/
@Component
public class RateLimiterUtil {// 每秒允许的请求数private static final double PERMITS_PER_SECOND = 100.0;// 创建RateLimiter实例private final RateLimiter rateLimiter = RateLimiter.create(PERMITS_PER_SECOND);/*** 尝试获取令牌* @return 是否获取成功*/public boolean tryAcquire() {return rateLimiter.tryAcquire();}/*** 获取令牌,会阻塞直到获取成功*/public void acquire() {rateLimiter.acquire();}/*** 释放令牌(对于RateLimiter来说,不需要显式释放,这里只是为了统一接口)*/public void release() {// RateLimiter不需要释放令牌,空实现}
}
六、Redis 分布式锁
17. 如何使用 Redis 实现分布式锁?需要注意哪些问题?
分布式锁是分布式系统中用于解决并发问题的一种机制,Redis 凭借其高性能和单线程特性,成为实现分布式锁的常用选择。
Redis 分布式锁的基本实现
获取锁:使用 SET 命令的 NX(只在键不存在时才设置)和 PX(设置过期时间)选项
SET lock:key value NX PX 30000- 成功返回 OK,表示获取锁成功
- 失败返回 nil,表示获取锁失败
释放锁:使用 Lua 脚本确保释放锁的原子性,防止误释放其他线程的锁
if redis.call('get', KEYS[1]) == ARGV[1] thenreturn redis.call('del', KEYS[1])
elsereturn 0
end
Redis 分布式锁需要注意的问题
锁超时问题:如果持有锁的线程在锁过期前未完成操作,会导致锁被其他线程获取,可能引发并发问题
- 解决方案:设置合理的过期时间,或实现锁的自动续期(看门狗机制)
锁释放问题:如果持有锁的线程在释放锁前崩溃,会导致锁永远无法释放
- 解决方案:必须为锁设置过期时间
误释放问题:如果线程 A 的锁已过期,线程 B 获取了锁,此时线程 A 执行完操作释放锁,可能会释放线程 B 的锁
- 解决方案:释放锁时检查锁的所有者
Redis 集群下的锁可靠性问题:在 Redis 集群中,主节点宕机可能导致锁丢失
- 解决方案:使用 Redlock 算法,或使用 Redis Cluster 的同步机制
并发性能问题:大量线程竞争锁可能导致性能下降
- 解决方案:合理设置锁粒度,或使用分段锁
示例:Redis 分布式锁实现(带看门狗机制)
java
运行
import org.springframework.data.redis.core.RedisTemplate;
import org.springframework.data.redis.core.script.DefaultRedisScript;
import org.springframework.stereotype.Component;
import lombok.RequiredArgsConstructor;
import lombok.extern.slf4j.Slf4j;
import org.springframework.util.StringUtils;
import java.util.Collections;
import java.util.UUID;
import java.util.concurrent.*;
import java.util.concurrent.atomic.AtomicBoolean;/*** Redis分布式锁实现(带看门狗机制)* @author ken*/
@Component
@Slf4j
@RequiredArgsConstructor
public class RedisDistributedLock {private final RedisTemplate<String, Object> redisTemplate;// 线程池,用于执行看门狗任务private final ScheduledExecutorService scheduler = Executors.newScheduledThreadPool(Runtime.getRuntime().availableProcessors() + 1,new ThreadFactory() {private int counter = 0;@Overridepublic Thread newThread(Runnable r) {Thread thread = new Thread(r, "redis-lock-watchdog-" + counter++);thread.setDaemon(true); // 守护线程,随主线程退出return thread;}});// 默认锁过期时间(毫秒)private static final long DEFAULT_LOCK_EXPIRE = 30000;// 看门狗续期间隔(为过期时间的1/3)private static final long WATCHDOG_INTERVAL = DEFAULT_LOCK_EXPIRE / 3;/*** 获取分布式锁* @param lockKey 锁的键名* @return 锁的标识(用于释放锁),null表示获取失败*/public String lock(String lockKey) {return lock(lockKey, DEFAULT_LOCK_EXPIRE);}/*** 获取分布式锁* @param lockKey 锁的键名* @param expireTime 锁的过期时间(毫秒)* @return 锁的标识(用于释放锁),null表示获取失败*/public String lock(String lockKey, long expireTime) {if (!StringUtils.hasText(lockKey)) {log.error("锁的键名不能为空");throw new IllegalArgumentException("锁的键名不能为空");}if (expireTime <= 0) {expireTime = DEFAULT_LOCK_EXPIRE;}// 生成唯一的锁标识String lockValue = UUID.randomUUID().toString();// 使用SET NX PX命令获取锁Boolean success = redisTemplate.opsForValue().setIfAbsent(lockKey, lockValue, expireTime, TimeUnit.MILLISECONDS);if (Boolean.TRUE.equals(success)) {log.info("获取分布式锁成功,lockKey:{}", lockKey);// 启动看门狗,自动续期startWatchdog(lockKey, lockValue, expireTime);return lockValue;}log.info("获取分布式锁失败,lockKey:{}", lockKey);return null;}/*** 尝试获取分布式锁,在指定时间内获取不到则返回失败* @param lockKey 锁的键名* @param waitTime 最大等待时间(毫秒)* @param expireTime 锁的过期时间(毫秒)* @return 锁的标识(用于释放锁),null表示获取失败* @throws InterruptedException 线程中断异常*/public String tryLock(String lockKey, long waitTime, long expireTime) throws InterruptedException {long startTime = System.currentTimeMillis();long interval = 100; // 重试间隔(毫秒)while (true) {// 尝试获取锁String lockValue = lock(lockKey, expireTime);if (lockValue != null) {return lockValue;}// 检查是否超时if (System.currentTimeMillis() - startTime >= waitTime) {log.info("尝试获取分布式锁超时,lockKey:{}", lockKey);return null;}// 等待一段时间后重试Thread.sleep(interval);}}/*** 释放分布式锁* @param lockKey 锁的键名* @param lockValue 锁的标识(获取锁时返回的值)* @return 是否释放成功*/public boolean unlock(String lockKey, String lockValue) {if (!StringUtils.hasText(lockKey) || !StringUtils.hasText(lockValue)) {log.error("锁的键名或标识不能为空");return false;}// Lua脚本:检查锁的标识是否匹配,匹配则释放锁String script = "if redis.call('get', KEYS[1]) == ARGV[1] then " +"return redis.call('del', KEYS[1]) " +"else " +"return 0 " +"end";DefaultRedisScript<Long> redisScript = new DefaultRedisScript<>(script, Long.class);Long result = redisTemplate.execute(redisScript, Collections.singletonList(lockKey), lockValue);// 停止看门狗stopWatchdog(lockKey, lockValue);if (result != null && result > 0) {log.info("释放分布式锁成功,lockKey:{}", lockKey);return true;} else {log.info("释放分布式锁失败或锁已过期,lockKey:{}", lockKey);return false;}}/*** 启动看门狗,自动续期* @param lockKey 锁的键名* @param lockValue 锁的标识* @param expireTime 锁的过期时间(毫秒)*/private void startWatchdog(String lockKey, String lockValue, long expireTime) {// 创建看门狗任务WatchdogTask task = new WatchdogTask(lockKey, lockValue, expireTime);// 存储任务,用于后续停止ThreadLocalHolder.set(lockKey + ":" + lockValue, task);// 定时执行任务,延迟expireTime/3后执行,之后每隔expireTime/3执行一次scheduler.scheduleWithFixedDelay(task,WATCHDOG_INTERVAL,WATCHDOG_INTERVAL,TimeUnit.MILLISECONDS);}/*** 停止看门狗* @param lockKey 锁的键名* @param lockValue 锁的标识*/private void stopWatchdog(String lockKey, String lockValue) {String key = lockKey + ":" + lockValue;WatchdogTask task = ThreadLocalHolder.get(key);if (task != null) {task.cancel();ThreadLocalHolder.remove(key);}}/*** 看门狗任务,负责锁的自动续期*/private class WatchdogTask implements Runnable {private final String lockKey;private final String lockValue;private final long expireTime;private final AtomicBoolean cancelled = new AtomicBoolean(false);public WatchdogTask(String lockKey, String lockValue, long expireTime) {this.lockKey = lockKey;this.lockValue = lockValue;this.expireTime = expireTime;}@Overridepublic void run() {if (cancelled.get()) {return;}// Lua脚本:检查锁的标识是否匹配,匹配则续期String script = "if redis.call('get', KEYS[1]) == ARGV[1] then " +"return redis.call('pexpire', KEYS[1], ARGV[2]) " +"else " +"return 0 " +"end";DefaultRedisScript<Long> redisScript = new DefaultRedisScript<>(script, Long.class);Long result = redisTemplate.execute(redisScript,Collections.singletonList(lockKey),lockValue,String.valueOf(expireTime));if (result == null || result == 0) {log.info("锁续期失败或锁已释放,lockKey:{}", lockKey);cancel();} else {log.debug("锁续期成功,lockKey:{}, 过期时间:{}ms", lockKey, expireTime);}}public void cancel() {cancelled.set(true);}}/*** ThreadLocal工具类,用于存储看门狗任务*/private static class ThreadLocalHolder {private static final ThreadLocal<ConcurrentHashMap<String, WatchdogTask>> holder = ThreadLocal.withInitial(ConcurrentHashMap::new);public static void set(String key, WatchdogTask task) {holder.get().put(key, task);}public static WatchdogTask get(String key) {return holder.get().get(key);}public static void remove(String key) {holder.get().remove(key);}}
}
分布式锁使用示例:
java
运行
import org.springframework.stereotype.Service;
import lombok.RequiredArgsConstructor;
import lombok.extern.slf4j.Slf4j;
import io.swagger.annotations.Api;
import io.swagger.annotations.ApiOperation;
import org.springframework.util.StringUtils;/*** 分布式锁使用示例服务* @author ken*/
@Service
@Slf4j
@RequiredArgsConstructor
@Api(tags = "分布式锁使用示例")
public class DistributedLockDemoService {private final RedisDistributedLock distributedLock;private final OrderMapper orderMapper;/*** 创建订单,使用分布式锁防止超卖* @param productId 商品ID* @param userId 用户ID* @return 订单ID*/@ApiOperation("创建订单(防超卖)")public Long createOrder(Long productId, Long userId) {if (productId == null || userId == null) {log.error("商品ID和用户ID不能为空");throw new IllegalArgumentException("商品ID和用户ID不能为空");}// 锁的键名,使用商品ID确保同一商品的并发控制String lockKey = "order:lock:" + productId;String lockValue = null;try {// 尝试获取锁,最多等待3秒,锁过期时间5秒lockValue = distributedLock.tryLock(lockKey, 3000, 5000);if (!StringUtils.hasText(lockValue)) {log.error("获取分布式锁失败,无法创建订单,productId:{}", productId);throw new RuntimeException("系统繁忙,请稍后再试");}// 检查库存Product product = orderMapper.selectProductById(productId);if (product == null) {log.error("商品不存在,productId:{}", productId);throw new RuntimeException("商品不存在");}if (product.getStock() <= 0) {log.error("商品库存不足,productId:{}", productId);throw new RuntimeException("商品库存不足");}// 扣减库存int rows = orderMapper.decreaseStock(productId, 1);if (rows <= 0) {log.error("扣减库存失败,productId:{}", productId);throw new RuntimeException("创建订单失败");}// 创建订单Order order = new Order();order.setProductId(productId);order.setUserId(userId);order.setStatus(1); // 待支付orderMapper.insert(order);log.info("订单创建成功,orderId:{}, productId:{}", order.getId(), productId);return order.getId();} catch (InterruptedException e) {log.error("创建订单异常", e);Thread.currentThread().interrupt();throw new RuntimeException("创建订单失败");} finally {// 释放锁if (StringUtils.hasText(lockValue)) {distributedLock.unlock(lockKey, lockValue);}}}
}
七、Redis 高级特性
18. Redis 事务的实现原理是什么?有什么局限性?
Redis 事务允许一次执行多个命令,提供了批量执行命令的功能,并保证这些命令的原子性:要么全部执行,要么全部不执行。
Redis 事务的实现原理
Redis 事务通过以下四个命令实现:
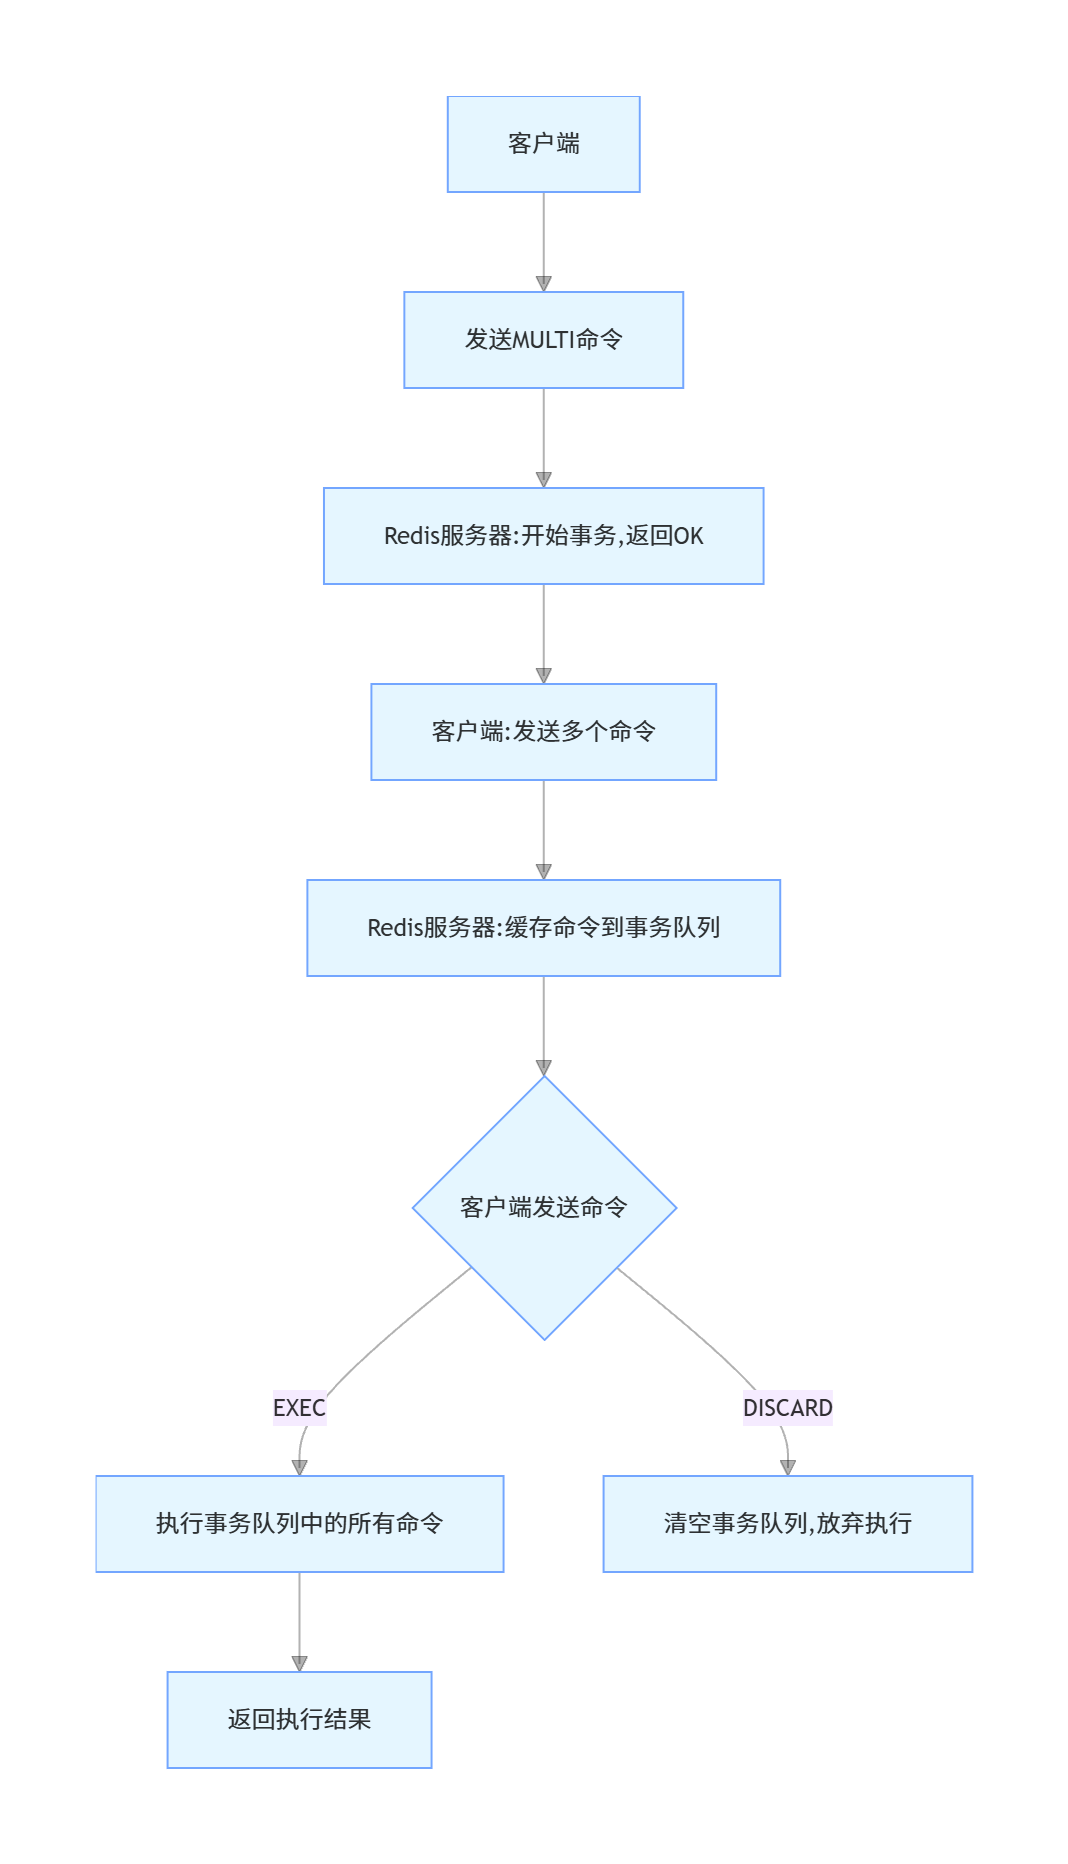
- MULTI:标记一个事务块的开始
- EXEC:执行事务块中的所有命令
- DISCARD:取消事务,放弃执行事务块中的所有命令
- WATCH:监视一个或多个键,如果在事务执行前这些键被其他命令修改,则事务被打断
Redis 事务的执行过程:
- 客户端发送 MULTI 命令,Redis 服务器返回 "OK",表示事务开始
- 客户端发送的所有命令都会被服务器缓存到一个事务队列中,而不是立即执行
- 客户端发送 EXEC 命令,服务器会按顺序执行事务队列中的所有命令,并将结果返回给客户端
- 如果在事务执行前客户端发送了 DISCARD 命令,服务器会清空事务队列,并放弃执行事务
- 如果使用了 WATCH 命令监视键,在事务执行前如果有被监视的键被修改,事务会被取消
Redis 事务的局限性
- 没有隔离级别的概念:事务执行过程中,其他客户端的命令可以正常执行,可能看到事务执行过程中的中间结果
- 不支持回滚:如果事务中的某个命令执行失败,其他命令仍然会继续执行,不会回滚
- WATCH 命令的局限性:WATCH 只能监视键的修改,无法监视键的过期或删除
- 事务队列中的命令不支持条件判断:无法根据前一个命令的结果决定是否执行下一个命令
- 长时间运行的事务会阻塞其他命令:Redis 是单线程的,长时间运行的事务会阻塞其他命令的执行
示例:Redis 事务使用
import org.springframework.data.redis.core.RedisTemplate;
import org.springframework.data.redis.core.SessionCallback;
import org.springframework.stereotype.Service;
import lombok.RequiredArgsConstructor;
import lombok.extern.slf4j.Slf4j;
import io.swagger.annotations.Api;
import io.swagger.annotations.ApiOperation;
import org.springframework.util.ObjectUtils;
import java.util.List;/*** Redis事务示例服务* @author ken*/
@Service
@Slf4j
@RequiredArgsConstructor
@Api(tags = "Redis事务示例")
public class RedisTransactionService {private final RedisTemplate<String, Object> redisTemplate;/*** 使用Redis事务进行转账操作* @param fromAccount 转出账户* @param toAccount 转入账户* @param amount 转账金额* @return 转账是否成功*/@ApiOperation("使用Redis事务进行转账")public boolean transfer(String fromAccount, String toAccount, double amount) {if (!StringUtils.hasText(fromAccount) || !StringUtils.hasText(toAccount)) {log.error("转出账户和转入账户不能为空");throw new IllegalArgumentException("转出账户和转入账户不能为空");}if (amount <= 0) {log.error("转账金额必须大于0");throw new IllegalArgumentException("转账金额必须大于0");}if (fromAccount.equals(toAccount)) {log.error("转出账户和转入账户不能相同");throw new IllegalArgumentException("转出账户和转入账户不能相同");}String fromKey = "account:" + fromAccount;String toKey = "account:" + toAccount;// 使用SessionCallback执行事务List<Object> results = redisTemplate.execute(new SessionCallback<List<Object>>() {@Override@SuppressWarnings("unchecked")public List<Object> execute(RedisOperations operations) throws Exception {// 监视转出账户,防止在事务执行前被修改operations.watch(fromKey);// 检查转出账户余额Double fromBalance = (Double) operations.opsForValue().get(fromKey);if (fromBalance == null) {log.error("转出账户不存在:{}", fromAccount);operations.unwatch(); // 取消监视return null;}if (fromBalance < amount) {log.error("转出账户余额不足:{},余额:{},转账金额:{}", fromAccount, fromBalance, amount);operations.unwatch(); // 取消监视return null;}// 开始事务operations.multi();// 扣减转出账户余额operations.opsForValue().increment(fromKey, -amount);// 增加转入账户余额,如果账户不存在则初始化为0后再增加operations.opsForValue().increment(toKey, amount);// 执行事务return operations.exec();}});if (ObjectUtils.isEmpty(results)) {log.error("转账失败,事务未执行");return false;}log.info("转账成功,从{}到{},金额:{}", fromAccount, toAccount, amount);return true;}/*** 初始化账户余额* @param account 账户名* @param balance 初始余额*/@ApiOperation("初始化账户余额")public void initAccount(String account, double balance) {if (!StringUtils.hasText(account)) {log.error("账户名不能为空");throw new IllegalArgumentException("账户名不能为空");}if (balance < 0) {log.error("初始余额不能为负数");throw new IllegalArgumentException("初始余额不能为负数");}String key = "account:" + account;redisTemplate.opsForValue().set(key, balance);log.info("账户初始化成功,account:{}, balance:{}", account, balance);}/*** 查询账户余额* @param account 账户名* @return 账户余额*/@ApiOperation("查询账户余额")public Double getAccountBalance(String account) {if (!StringUtils.hasText(account)) {log.error("账户名不能为空");throw new IllegalArgumentException("账户名不能为空");}String key = "account:" + account;Double balance = (Double) redisTemplate.opsForValue().get(key);return balance == null ? 0.0 : balance;}
}
19. Redis 的 Lua 脚本有什么作用?如何使用?
Lua 脚本是 Redis 支持的一种脚本语言,允许用户在 Redis 服务器端执行自定义的脚本,提供了更强大的功能和灵活性。
Redis Lua 脚本的作用
- 原子性操作:Lua 脚本在 Redis 中是原子执行的,不会被其他命令打断,保证了复杂操作的原子性
- 减少网络开销:将多个命令打包成一个 Lua 脚本执行,减少了客户端与服务器之间的网络交互
- 自定义命令:可以通过 Lua 脚本实现 Redis 不支持的自定义命令
- 提高性能:脚本在服务器端执行,减少了数据传输和命令解析的开销
Redis Lua 脚本的使用
EVAL 命令:直接执行 Lua 脚本
redis-cli
EVAL "return KEYS[1] .. ARGV[1]" 1 "hello" "world"EVALSHA 命令:执行已缓存的 Lua 脚本(通过脚本的 SHA1 哈希值)
redis-cli
# 先加载脚本并获取SHA1哈希值
SCRIPT LOAD "return KEYS[1] .. ARGV[1]"
# 执行脚本
EVALSHA <sha1> 1 "hello" "world"
SCRIPT 命令:管理 Lua 脚本,如加载、删除、检查是否存在等
Lua 脚本中可以使用 Redis 命令:
-- 示例:实现一个原子性的增减操作,如果键不存在则初始化
local current = redis.call('get', KEYS[1])
if current == nil thenredis.call('set', KEYS[1], ARGV[1])return ARGV[1]
elselocal result = current + ARGV[1]redis.call('set', KEYS[1], result)return result
end
Lua 脚本的注意事项
- 避免长时间运行的脚本:Redis 是单线程的,长时间运行的脚本会阻塞其他命令的执行
- 脚本的原子性:脚本执行过程中,其他客户端的命令会被阻塞,直到脚本执行完成
- 脚本的安全性:避免在脚本中使用不确定的操作(如随机数、时间等),可能导致复制不一致
- 内存使用:大量的 Lua 脚本会占用 Redis 的内存,可以使用 SCRIPT FLUSH 命令清除所有缓存的脚本
示例:Redis Lua 脚本使用
import org.springframework.data.redis.core.RedisTemplate;
import org.springframework.data.redis.core.script.DefaultRedisScript;
import org.springframework.stereotype.Service;
import lombok.RequiredArgsConstructor;
import lombok.extern.slf4j.Slf4j;
import io.swagger.annotations.Api;
import io.swagger.annotations.ApiOperation;
import org.springframework.util.CollectionUtils;
import org.springframework.util.StringUtils;
import java.util.Collections;
import java.util.List;/*** Redis Lua脚本示例服务* @author ken*/
@Service
@Slf4j
@RequiredArgsConstructor
@Api(tags = "Redis Lua脚本示例")
public class RedisLuaScriptService {private final RedisTemplate<String, Object> redisTemplate;/*** 使用Lua脚本实现原子性的库存扣减* @param productId 商品ID* @param quantity 扣减数量* @return 扣减后的库存,-1表示库存不足,-2表示商品不存在*/@ApiOperation("使用Lua脚本扣减库存")public Long decreaseStockWithLua(Long productId, int quantity) {if (ObjectUtils.isEmpty(productId) || quantity <= 0) {log.error("商品ID不能为空且扣减数量必须大于0");throw new IllegalArgumentException("商品ID不能为空且扣减数量必须大于0");}String key = "stock:" + productId;// Lua脚本:原子性扣减库存String luaScript = "local current = redis.call('get', KEYS[1]) " +"if current == nil then " +"    return -2 " +  // 商品不存在"end " +"if tonumber(current) < tonumber(ARGV[1]) then " +"    return -1 " +  // 库存不足"end " +"local result = redis.call('decrby', KEYS[1], ARGV[1]) " +"return result";   // 返回扣减后的库存DefaultRedisScript<Long> redisScript = new DefaultRedisScript<>(luaScript, Long.class);// 执行Lua脚本Long result = redisTemplate.execute(redisScript,Collections.singletonList(key),String.valueOf(quantity));log.info("库存扣减结果,productId:{}, quantity:{}, result:{}", productId, quantity, result);return result;}/*** 使用Lua脚本实现分布式限流* @param limitKey 限流键名* @param limit 限制次数* @param period 时间窗口(秒)* @return 是否允许访问:1-允许,0-拒绝*/@ApiOperation("使用Lua脚本实现分布式限流")public Long rateLimitWithLua(String limitKey, int limit, int period) {if (!StringUtils.hasText(limitKey) || limit <= 0 || period <= 0) {log.error("限流键名不能为空且限制次数和时间窗口必须大于0");throw new IllegalArgumentException("限流键名不能为空且限制次数和时间窗口必须大于0");}// Lua脚本:实现滑动窗口限流String luaScript = "local current = redis.call('incr', KEYS[1]) " +"if current == 1 then " +"    redis.call('expire', KEYS[1], ARGV[2]) " +  // 设置过期时间"end " +"if current > tonumber(ARGV[1]) then " +"    return 0 " +  // 超过限制,拒绝访问"else " +"    return 1 " +  // 未超过限制,允许访问"end";DefaultRedisScript<Long> redisScript = new DefaultRedisScript<>(luaScript, Long.class);// 执行Lua脚本Long result = redisTemplate.execute(redisScript,Collections.singletonList(limitKey),String.valueOf(limit),String.valueOf(period));log.info("限流结果,limitKey:{}, limit:{}, period:{}, result:{}", limitKey, limit, period, result);return result;}/*** 加载Lua脚本并返回其SHA1哈希值* @param luaScript Lua脚本内容* @return 脚本的SHA1哈希值*/@ApiOperation("加载Lua脚本")public String loadLuaScript(String luaScript) {if (!StringUtils.hasText(luaScript)) {log.error("Lua脚本内容不能为空");throw new IllegalArgumentException("Lua脚本内容不能为空");}DefaultRedisScript<String> script = new DefaultRedisScript<>(luaScript, String.class);String sha1 = redisTemplate.execute(script, Collections.emptyList());log.info("Lua脚本加载成功,SHA1:{}", sha1);return sha1;}/*** 通过SHA1哈希值执行已加载的Lua脚本* @param sha1 脚本的SHA1哈希值* @param keys 键列表* @param args 参数列表* @return 脚本执行结果*/@ApiOperation("通过SHA1执行Lua脚本")public Object executeLuaScriptBySha1(String sha1, List<String> keys, List<String> args) {if (!StringUtils.hasText(sha1)) {log.error("SHA1哈希值不能为空");throw new IllegalArgumentException("SHA1哈希值不能为空");}if (CollectionUtils.isEmpty(keys)) {keys = Collections.emptyList();}if (CollectionUtils.isEmpty(args)) {args = Collections.emptyList();}DefaultRedisScript<Object> script = new DefaultRedisScript<>();script.setSha1(sha1);script.setResultType(Object.class);Object result = redisTemplate.execute(script, keys, args.toArray());log.info("通过SHA1执行Lua脚本,结果:{}", result);return result;}
}
20. Redis 的发布 / 订阅机制是什么?如何使用?
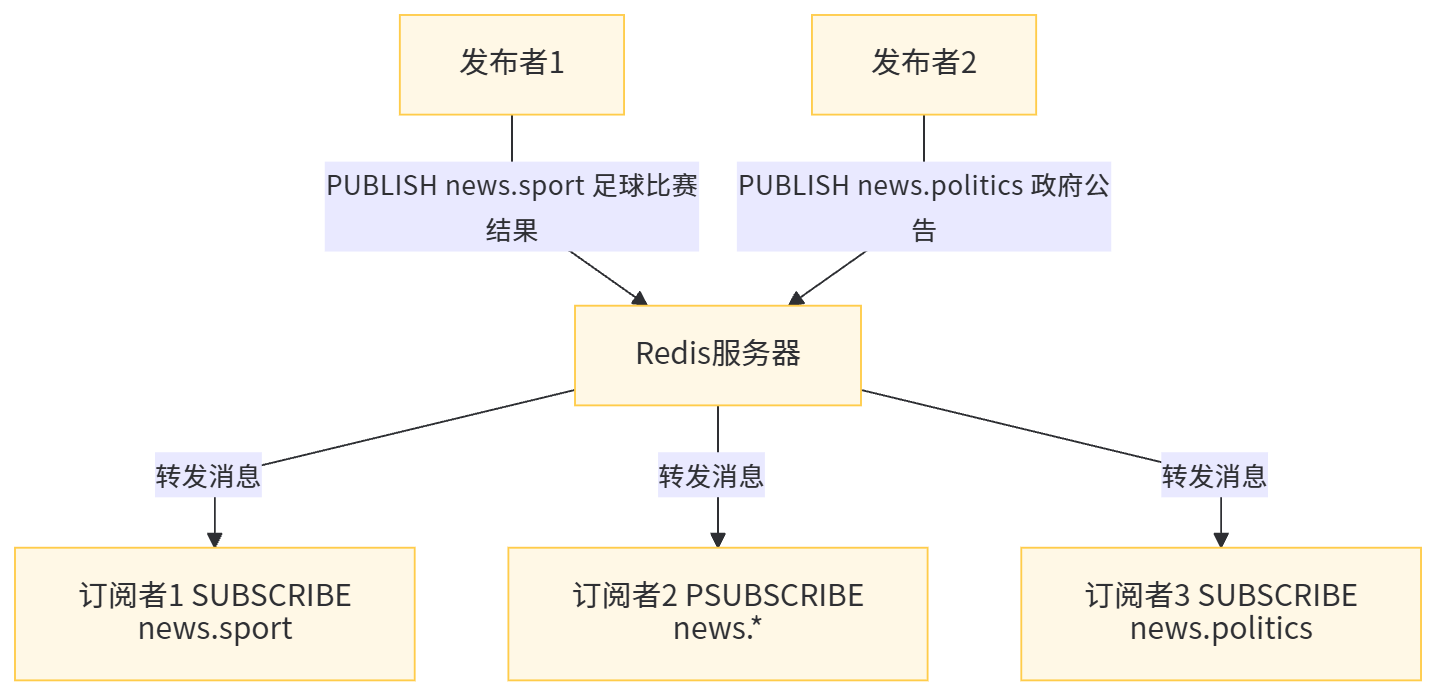
Redis 的发布 / 订阅(Pub/Sub)机制是一种消息通信模式,允许发送者(发布者)发送消息,接收者(订阅者)接收消息。Redis 作为中间代理,负责将发布者发送的消息转发给所有订阅了相关频道的订阅者。
Redis 发布 / 订阅的基本概念
- 频道(Channel):消息的传递通道,每个消息都发送到指定的频道
- 发布者(Publisher):发送消息到指定频道的客户端
- 订阅者(Subscriber):订阅一个或多个频道,接收发送到这些频道的消息
- 模式订阅(Pattern Matching):订阅者可以通过模式匹配订阅多个相关的频道(如订阅 "news.*" 可以接收 "news.sport"、"news.politics" 等频道的消息)
Redis 发布 / 订阅的命令
发布消息:
PUBLISH channel message:向指定频道发布消息,返回接收消息的订阅者数量
订阅频道:
SUBSCRIBE channel [channel ...]:订阅一个或多个频道PSUBSCRIBE pattern [pattern ...]:通过模式匹配订阅多个频道
取消订阅:
UNSUBSCRIBE [channel [channel ...]]:取消订阅一个或多个频道PUNSUBSCRIBE [pattern [pattern ...]]:取消通过模式匹配订阅的频道
Redis 发布 / 订阅的特点
- 实时性:消息一经发布,立即发送给所有订阅者
- 无持久化:Redis 不会持久化发布的消息,如果订阅者在消息发布时未在线,则会错过该消息
- 多对多:一个发布者可以向多个频道发布消息,一个订阅者可以订阅多个频道
- 轻量级:实现简单,开销小
Redis 发布 / 订阅的局限性
- 消息不持久:没有消息堆积和持久化机制,不适合需要可靠消息传递的场景
- 没有消息确认机制:无法确认订阅者是否收到消息
- 不支持消息回溯:订阅者只能收到订阅之后发布的消息
- 集群支持有限:在 Redis 集群中,发布的消息只会发送给同一个节点上的订阅者
对于需要可靠消息传递的场景,建议使用专门的消息队列(如 RabbitMQ、Kafka 等)。
示例:Redis 发布 / 订阅使用
import org.springframework.data.redis.connection.Message;
import org.springframework.data.redis.connection.MessageListener;
import org.springframework.data.redis.core.RedisTemplate;
import org.springframework.data.redis.listener.ChannelTopic;
import org.springframework.data.redis.listener.RedisMessageListenerContainer;
import org.springframework.data.redis.listener.adapter.MessageListenerAdapter;
import org.springframework.stereotype.Service;
import lombok.RequiredArgsConstructor;
import lombok.extern.slf4j.Slf4j;
import io.swagger.annotations.Api;
import io.swagger.annotations.ApiOperation;
import org.springframework.util.StringUtils;
import javax.annotation.PostConstruct;
import javax.annotation.PreDestroy;/*** Redis发布/订阅示例服务* @author ken*/
@Service
@Slf4j
@RequiredArgsConstructor
@Api(tags = "Redis发布/订阅示例")
public class RedisPubSubService {private final RedisTemplate<String, Object> redisTemplate;private final RedisMessageListenerContainer redisMessageListenerContainer;/*** 发布消息到指定频道* @param channel 频道名称* @param message 消息内容* @return 接收消息的订阅者数量*/@ApiOperation("发布消息")public Long publishMessage(String channel, String message) {if (!StringUtils.hasText(channel) || !StringUtils.hasText(message)) {log.error("频道名称和消息内容不能为空");throw new IllegalArgumentException("频道名称和消息内容不能为空");}Long count = redisTemplate.convertAndSend(channel, message);log.info("向频道{}发布消息:{},接收者数量:{}", channel, message, count);return count;}/*** 订阅指定频道* @param channel 频道名称* @param listener 消息监听器*/@ApiOperation("订阅频道")public void subscribeChannel(String channel, MessageListener listener) {if (!StringUtils.hasText(channel) || listener == null) {log.error("频道名称和监听器不能为空");throw new IllegalArgumentException("频道名称和监听器不能为空");}redisMessageListenerContainer.addMessageListener(listener, new ChannelTopic(channel));log.info("已订阅频道:{}", channel);}/*** 通过模式匹配订阅多个频道* @param pattern 模式(如"news.*")* @param listener 消息监听器*/@ApiOperation("模式订阅")public void psubscribePattern(String pattern, MessageListener listener) {if (!StringUtils.hasText(pattern) || listener == null) {log.error("模式和监听器不能为空");throw new IllegalArgumentException("模式和监听器不能为空");}redisMessageListenerContainer.addMessageListener(listener, new PatternTopic(pattern));log.info("已通过模式订阅:{}", pattern);}/*** 取消订阅指定频道* @param channel 频道名称* @param listener 消息监听器*/@ApiOperation("取消订阅")public void unsubscribeChannel(String channel, MessageListener listener) {if (!StringUtils.hasText(channel) || listener == null) {log.error("频道名称和监听器不能为空");throw new IllegalArgumentException("频道名称和监听器不能为空");}redisMessageListenerContainer.removeMessageListener(listener, new ChannelTopic(channel));log.info("已取消订阅频道:{}", channel);}/*** 示例:新闻消息监听器*/@Servicepublic static class NewsMessageListener implements MessageListener {@Overridepublic void onMessage(Message message, byte[] pattern) {String channel = new String(message.getChannel());String body = new String(message.getBody());log.info("收到新闻消息,频道:{},内容:{}", channel, body);// 处理消息的业务逻辑processNewsMessage(channel, body);}private void processNewsMessage(String channel, String content) {// 实际业务处理逻辑log.info("处理新闻消息: {} - {}", channel, content);}}/*** 初始化示例订阅*/@PostConstructpublic void initSubscriptions() {// 创建新闻消息监听器NewsMessageListener newsListener = new NewsMessageListener();// 订阅体育新闻频道subscribeChannel("news.sport", newsListener);// 通过模式匹配订阅所有新闻频道psubscribePattern("news.*", newsListener);}/*** 销毁时关闭监听器容器*/@PreDestroypublic void destroy() {redisMessageListenerContainer.stop();log.info("Redis消息监听器容器已关闭");}
}
Redis 消息监听器容器配置:
import org.springframework.context.annotation.Bean;
import org.springframework.context.annotation.Configuration;
import org.springframework.data.redis.connection.RedisConnectionFactory;
import org.springframework.data.redis.listener.RedisMessageListenerContainer;
import java.util.concurrent.Executor;
import java.util.concurrent.Executors;/*** Redis消息监听器配置* @author ken*/
@Configuration
public class RedisMessageListenerConfig {/*** 配置Redis消息监听器容器* @param connectionFactory Redis连接工厂* @return Redis消息监听器容器*/@Beanpublic RedisMessageListenerContainer redisMessageListenerContainer(RedisConnectionFactory connectionFactory) {RedisMessageListenerContainer container = new RedisMessageListenerContainer();container.setConnectionFactory(connectionFactory);// 配置线程池,用于处理消息Executor executor = Executors.newFixedThreadPool(Runtime.getRuntime().availableProcessors() + 1);container.setTaskExecutor(executor);return container;}
}
八、Redis 性能优化
21. 如何优化 Redis 的性能?
Redis 是高性能的内存数据库,但在高并发场景下,仍可能遇到性能瓶颈。以下是一些常见的 Redis 性能优化方法:
1. 合理配置内存
- 设置最大内存限制(maxmemory),避免 Redis 耗尽系统内存
- 根据业务需求选择合适的内存淘汰策略(maxmemory-policy)
- volatile-lru:从已设置过期时间的数据集挑选最近最少使用的数据淘汰
- allkeys-lru:从所有数据集挑选最近最少使用的数据淘汰
- volatile-lfu:从已设置过期时间的数据集挑选最不经常使用的数据淘汰
- allkeys-lfu:从所有数据集挑选最不经常使用的数据淘汰
- volatile-random:从已设置过期时间的数据集随机挑选数据淘汰
- allkeys-random:从所有数据集随机挑选数据淘汰
- volatile-ttl:从已设置过期时间的数据集挑选将要过期的数据淘汰
- noeviction:不淘汰任何数据,内存满时新写入操作报错
# 配置示例
maxmemory 4gb
maxmemory-policy allkeys-lru
2. 优化数据结构和命令
- 选择合适的数据结构,避免过度使用 String 存储复杂数据
- 避免使用 O (N) 复杂度的命令(如 KEYS、HGETALL 等),大数据集优先使用 SCAN、HSCAN 等迭代命令
- 使用批量命令(如 MSET、MGET、HMSET、HMGET)减少网络往返次数
- 对大型集合使用分片处理,避免单个键过大
/*** 优化示例:使用SCAN替代KEYS命令* @author ken*/
@ApiOperation("使用SCAN命令遍历键,替代KEYS")
public List<String> scanKeys(String pattern) {if (!StringUtils.hasText(pattern)) {pattern = "*";}List<String> keys = Lists.newArrayList();ScanOptions options = ScanOptions.scanOptions().match(pattern).count(100) // 每次扫描数量.build();RedisConnection connection = redisTemplate.getConnectionFactory().getConnection();try (Cursor<byte[]> cursor = connection.scan(options)) {while (cursor.hasNext()) {String key = new String(cursor.next(), StandardCharsets.UTF_8);keys.add(key);}} finally {connection.close();}return keys;
}
3. 持久化优化
- 根据业务需求选择合适的持久化方式(RDB、AOF 或混合持久化)
- 调整 AOF 重写触发条件,避免频繁重写
- 对于 AOF,优先使用 everysec 同步策略平衡安全性和性能
- 大内存实例建议关闭 RDB 自动保存,手动在低峰期执行 bgsave
redis.conf
# AOF重写配置示例
auto-aof-rewrite-min-size 64mb
auto-aof-rewrite-percentage 100
appendfsync everysec# 关闭自动RDB保存
save ""
4. 网络优化
- 使用连接池管理 Redis 连接,避免频繁创建和关闭连接
- 调整 TCP 参数,优化网络传输效率
- 大 value 数据建议压缩后存储,减少网络传输量
- 避免大量小命令,合并为批量命令执行
/*** Redis连接池配置优化* @author ken*/
@Configuration
public class RedisPoolConfig {@Beanpublic LettuceConnectionFactory redisConnectionFactory() {RedisStandaloneConfiguration config = new RedisStandaloneConfiguration();config.setHostName("127.0.0.1");config.setPort(6379);// 连接池配置GenericObjectPoolConfig<Object> poolConfig = new GenericObjectPoolConfig<>();poolConfig.setMaxTotal(16); // 最大连接数poolConfig.setMaxIdle(8); // 最大空闲连接poolConfig.setMinIdle(4); // 最小空闲连接poolConfig.setMaxWait(Duration.ofSeconds(3)); // 最大等待时间poolConfig.setTestOnBorrow(true); // 借用时测试连接可用性LettucePoolingClientConfiguration clientConfig = LettucePoolingClientConfiguration.builder().poolConfig(poolConfig).commandTimeout(Duration.ofSeconds(2)).build();return new LettuceConnectionFactory(config, clientConfig);}
}
5. 集群优化
- 合理分配哈希槽,避免数据倾斜
- 为每个主节点配置足够的从节点,提高可用性
- 实现读写分离,将读请求分散到从节点
- 热点数据分散存储,避免单节点压力过大
6. 硬件和系统优化
- 使用高性能 CPU 和大内存,避免内存不足导致 swap
- 配置大页内存(hugepage)提高内存访问效率
- 关闭 THP(Transparent Huge Pages),避免 Redis 延迟波动
- 使用 SSD 存储持久化文件,提升 RDB/AOF 读写速度
- 调整系统内核参数,优化网络和内存性能
# 关闭THP示例(Linux系统)
echo never > /sys/kernel/mm/transparent_hugepage/enabled
7. 监控和调优
- 监控 Redis 关键指标(内存使用、命中率、响应时间等)
- 使用 Redis 自带的 INFO 命令分析性能瓶颈
- 定期进行性能测试,验证优化效果
- 根据监控数据持续调优配置

22. Redis 的内存淘汰策略有哪些?如何选择?
Redis 的内存淘汰策略是指当 Redis 的内存使用达到 maxmemory 限制时,如何选择要淘汰的键,以释放内存空间。
内存淘汰策略分类
基于过期时间的淘汰策略
- volatile-lru:从已设置过期时间的键中,淘汰最近最少使用的键
- volatile-lfu:从已设置过期时间的键中,淘汰最不经常使用的键
- volatile-random:从已设置过期时间的键中,随机淘汰
- volatile-ttl:从已设置过期时间的键中,淘汰剩余生存时间最短的键
全量数据淘汰策略
- allkeys-lru:从所有键中,淘汰最近最少使用的键
- allkeys-lfu:从所有键中,淘汰最不经常使用的键
- allkeys-random:从所有键中,随机淘汰
禁止淘汰策略
- noeviction:不淘汰任何键,内存满时新写入操作报错(默认策略)
淘汰策略选择依据
业务数据特性
- 有明确过期时间的业务:优先选择 volatile-* 系列策略
- 无过期时间的缓存业务:选择 allkeys-* 系列策略
- 数据访问分布均匀:可选择 random 系列策略
访问模式
- 热点数据集中:优先选择 LRU/LFU 策略,保留热点数据
- 访问频率差异大:LFU 比 LRU 更适合,能淘汰长期访问频率低的键
数据重要性
- 数据不允许丢失:选择 noeviction 策略,结合持久化保证数据安全
- 允许部分数据丢失:选择 LRU/LFU 等策略,保证服务可用性
实际应用建议
- 缓存场景:优先使用 allkeys-lru 或 allkeys-lfu,确保热点数据不被淘汰
- 会话存储:使用 volatile-ttl,确保会话过期后及时释放内存
- 计数器 / 限流器:使用 volatile-lru,保留近期活跃的计数数据
- 高可用要求高的场景:避免使用 noeviction,防止服务不可用
/*** 动态调整Redis内存淘汰策略* @author ken*/
@ApiOperation("调整Redis内存淘汰策略")
public boolean setMemoryPolicy(String policy) {if (!StringUtils.hasText(policy)) {log.error("淘汰策略不能为空");throw new IllegalArgumentException("淘汰策略不能为空");}// 验证策略合法性List<String> validPolicies = Arrays.asList("volatile-lru", "volatile-lfu", "volatile-random", "volatile-ttl","allkeys-lru", "allkeys-lfu", "allkeys-random", "noeviction");if (!validPolicies.contains(policy)) {log.error("无效的淘汰策略:{}", policy);return false;}try {redisTemplate.execute((RedisCallback<Void>) connection -> {connection.setConfig("maxmemory-policy", policy);return null;});log.info("Redis内存淘汰策略已调整为:{}", policy);return true;} catch (Exception e) {log.error("调整内存淘汰策略失败", e);return false;}
}
23. 如何解决 Redis 的热点 key 问题?
热点 key 是指访问频率极高的 key,可能导致单个 Redis 节点压力过大,成为性能瓶颈。
热点 key 的危害
- 单个节点 CPU 利用率过高
- 网络带宽占用过大
- 可能导致缓存击穿
- 影响整个 Redis 集群的稳定性
热点 key 解决方案
客户端缓存
- 在应用端本地缓存热点数据(如使用 Caffeine)
- 减少对 Redis 的重复访问,降低 Redis 压力
数据分片
- 将热点 key 分散到多个 Redis 节点
- 通过添加随机后缀实现(如 key:{random_num})
读写分离
- 主节点负责写操作,多个从节点负责读操作
- 将热点 key 的读请求分散到多个从节点
热点 key 预加载
- 系统启动时提前加载热点数据到 Redis
- 定期更新热点数据,避免缓存失效
限流熔断
- 对热点 key 的访问进行限流,避免节点被压垮
- 超过阈值时返回降级数据,保护 Redis
热点 key 检测
- 通过 Redis 监控工具(如 RedisInsight)识别热点 key
- 利用 Redis 的 INFO 命令统计命令执行频率
- 结合业务日志分析高频访问的 key
/*** 热点key处理示例:客户端缓存+随机后缀分片* @author ken*/
@Service
public class HotKeyService {// 本地缓存热点数据,过期时间1分钟private final LoadingCache<String, Object> localCache = Caffeine.newBuilder().expireAfterWrite(1, TimeUnit.MINUTES).maximumSize(1000).build(this::loadDataFromRedis);/*** 获取热点数据(本地缓存+Redis分片)* @param baseKey 基础key* @return 数据*/@ApiOperation("获取热点数据(防热点key优化)")public Object getHotData(String baseKey) {if (!StringUtils.hasText(baseKey)) {throw new IllegalArgumentException("key不能为空");}try {// 优先从本地缓存获取return localCache.get(baseKey);} catch (Exception e) {log.error("获取热点数据失败", e);return null;}}/*** 从Redis加载数据(带随机后缀分片)* @param baseKey 基础key* @return 数据*/private Object loadDataFromRedis(String baseKey) {// 生成随机后缀(0-9),将热点key分散到10个不同的keyint randomSuffix = ThreadLocalRandom.current().nextInt(10);String shardedKey = baseKey + ":" + randomSuffix;// 从Redis获取数据Object data = redisTemplate.opsForValue().get(shardedKey);// 如果当前分片没有数据,从主key同步if (data == null) {String mainKey = baseKey + ":main";data = redisTemplate.opsForValue().get(mainKey);// 同步到当前分片,设置较短过期时间if (data != null) {redisTemplate.opsForValue().set(shardedKey, data, 5, TimeUnit.MINUTES);}}return data;}/*** 更新热点数据(同步所有分片)* @param baseKey 基础key* @param data 新数据*/@ApiOperation("更新热点数据")public void updateHotData(String baseKey, Object data) {if (!StringUtils.hasText(baseKey) || ObjectUtils.isEmpty(data)) {throw new IllegalArgumentException("key和数据不能为空");}// 更新主keyString mainKey = baseKey + ":main";redisTemplate.opsForValue().set(mainKey, data, 30, TimeUnit.MINUTES);// 批量更新所有分片keyList<String> shardedKeys = Lists.newArrayList();for (int i = 0; i < 10; i++) {shardedKeys.add(baseKey + ":" + i);}// 使用管道批量操作redisTemplate.executePipelined((RedisCallback<Void>) connection -> {for (String key : shardedKeys) {connection.set(key.getBytes(), JSON.toJSONBytes(data));connection.expire(key.getBytes(), 30 * 60);}return null;});// 清除本地缓存,下次重新加载localCache.invalidate(baseKey);}
}
九、Redis 集群实战
24. Redis Cluster 如何处理数据分片和迁移?
Redis Cluster 通过哈希槽(Hash Slot)实现数据分片,共有 16384 个哈希槽,每个键通过哈希算法分配到特定的槽位。
数据分片原理
- 哈希计算:键的槽位计算公式为
CRC16(key) % 16384 - 槽位分配:集群中的每个主节点负责一部分连续的哈希槽
- 数据存储:键根据计算出的槽位存储到对应的节点
数据迁移机制
Redis Cluster 支持在线数据迁移,用于节点扩容、缩容或负载均衡,迁移过程不影响集群可用性。
迁移触发方式
- 手动触发:通过
CLUSTER MIGRATE命令迁移单个槽 - 自动触发:通过
redis-cli --cluster reshard命令自动重新分片
- 手动触发:通过
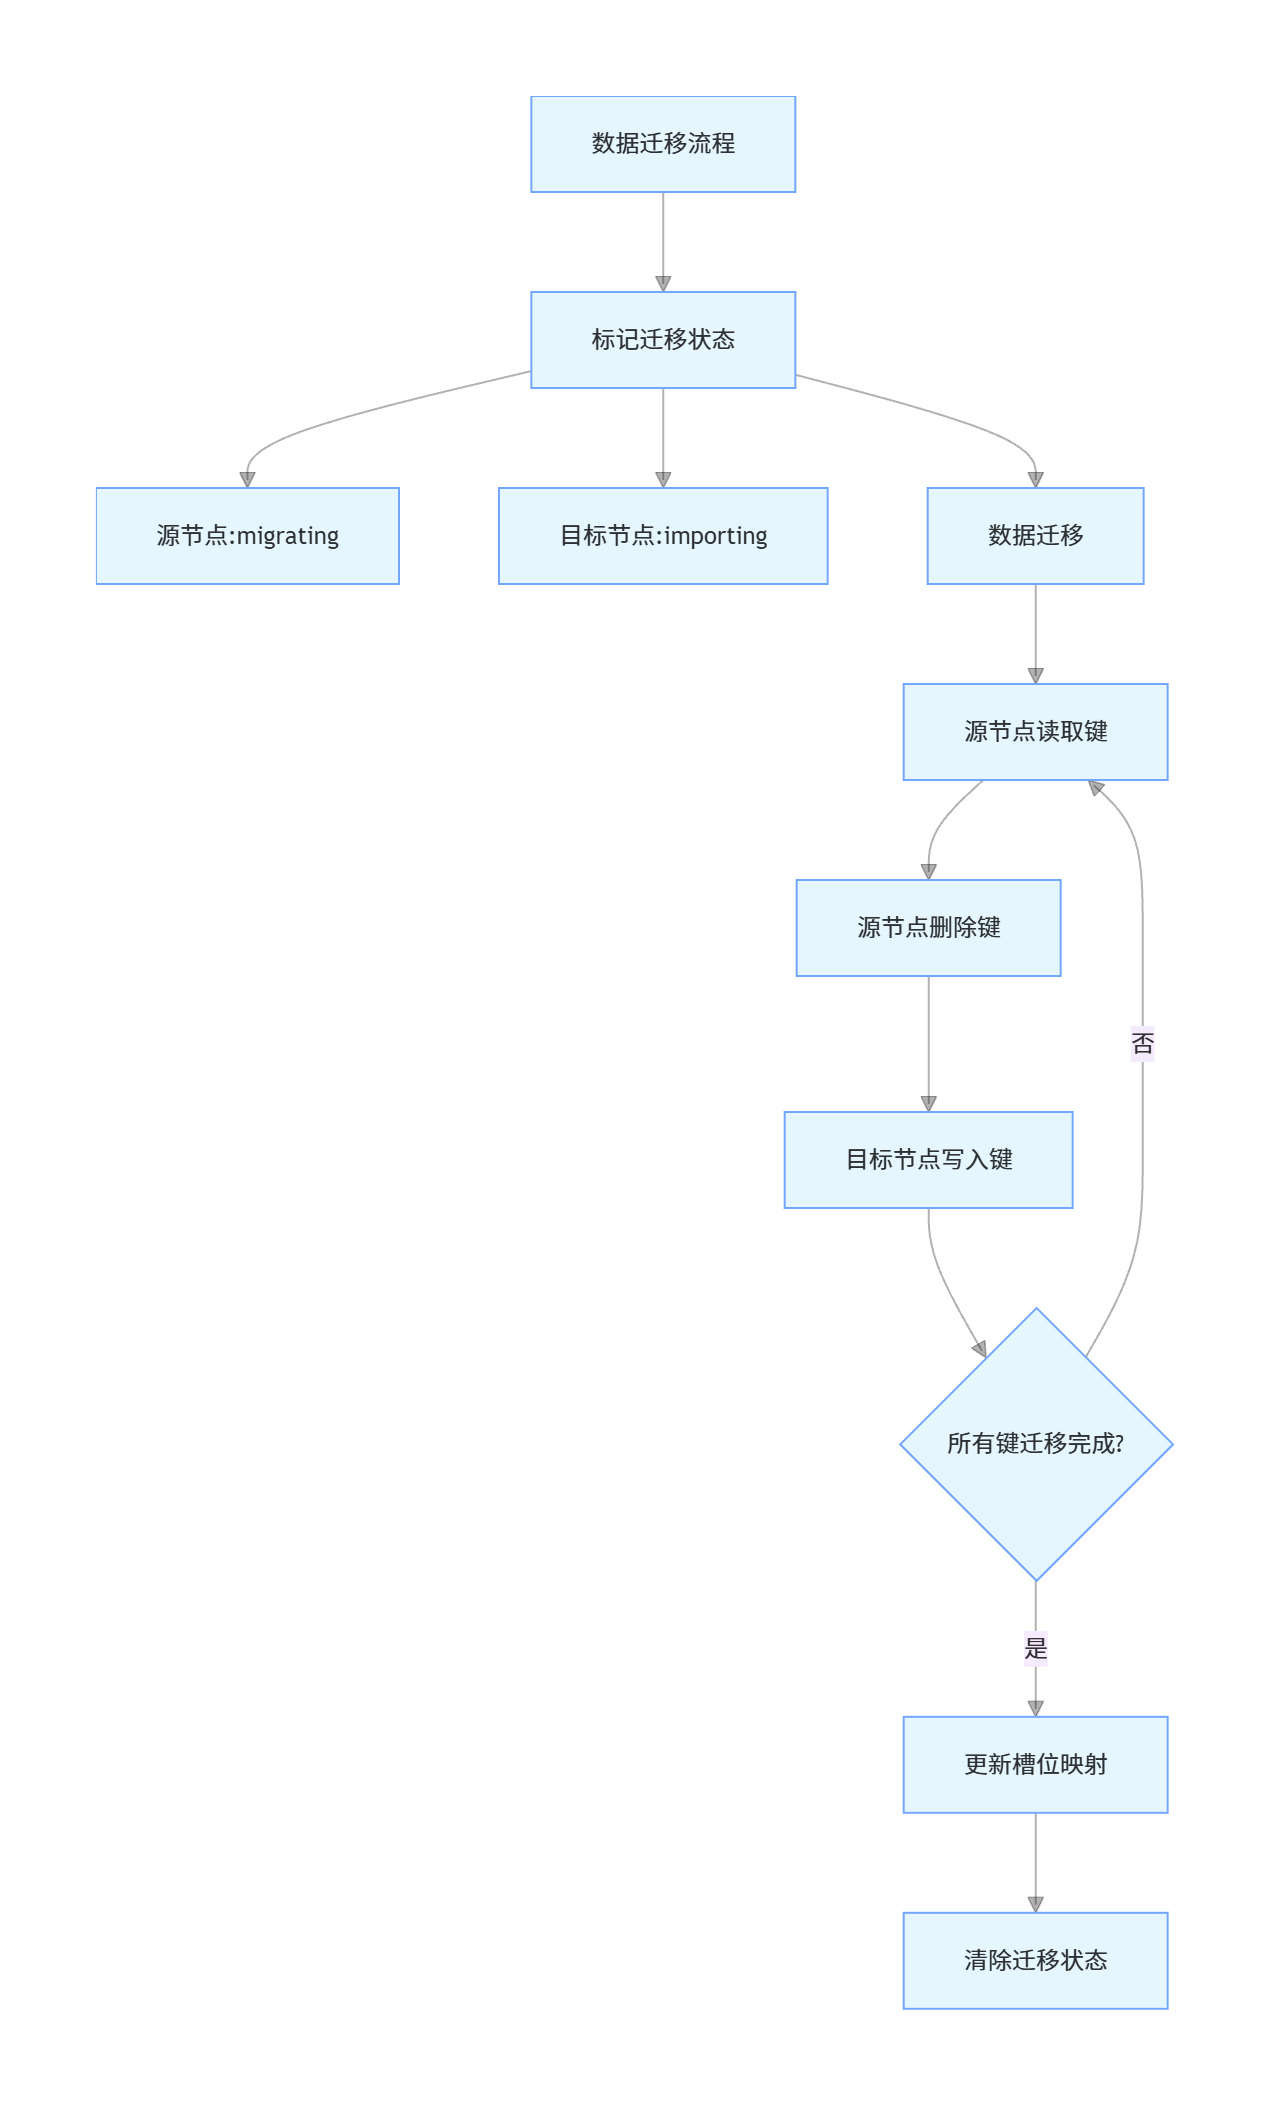
迁移流程
- 源节点标记槽为 "migrating" 状态
- 目标节点标记槽为 "importing" 状态
- 源节点将槽中的数据逐把迁移到目标节点
- 迁移完成后,更新集群槽位映射表
- 源节点和目标节点分别清除 "migrating" 和 "importing" 状态
迁移特点
- 增量迁移:每次迁移一个键,避免大槽迁移阻塞
- 原子性:单个键的迁移是原子的,不会出现数据不一致
- 在线迁移:迁移过程中,槽仍可正常读写
数据迁移示例(Java 代码)
/*** Redis Cluster数据迁移工具类* @author ken*/
@Service
@Slf4j
@RequiredArgsConstructor
@Api(tags = "Redis Cluster数据迁移")
public class RedisClusterMigrationService {private final RedisTemplate<String, Object> redisTemplate;/*** 迁移单个哈希槽* @param slot 槽位编号* @param targetNode 目标节点(格式:ip:port)* @return 迁移是否成功*/@ApiOperation("迁移单个哈希槽")public boolean migrateSlot(int slot, String targetNode) {if (slot < 0 || slot >= 16384) {log.error("无效的槽位编号:{}", slot);throw new IllegalArgumentException("槽位编号必须在0-16383之间");}if (!StringUtils.hasText(targetNode) || !targetNode.contains(":")) {log.error("无效的目标节点格式:{}", targetNode);throw new IllegalArgumentException("目标节点格式必须为ip:port");}String[] nodeInfo = targetNode.split(":");String targetHost = nodeInfo[0];int targetPort = Integer.parseInt(nodeInfo[1]);try {// 1. 获取当前槽位的源节点String sourceNode = getSlotNode(slot);if (sourceNode.equals(targetNode)) {log.info("槽位{}已在目标节点{}上,无需迁移", slot, targetNode);return true;}log.info("开始迁移槽位{},从{}到{}", slot, sourceNode, targetNode);// 2. 执行槽位迁移命令String migrateCmd = String.format("CLUSTER SETSLOT %d MIGRATING %s",slot, targetNode);executeClusterCommand(migrateCmd);// 3. 目标节点准备接收槽位String importCmd = String.format("CLUSTER SETSLOT %d IMPORTING %s",slot, sourceNode);executeClusterCommandOnNode(importCmd, targetHost, targetPort);// 4. 迁移槽位中的所有键migrateSlotKeys(slot, targetHost, targetPort);// 5. 更新集群槽位映射String setSlotCmd = String.format("CLUSTER SETSLOT %d NODE %s",slot, getNodeId(targetHost, targetPort));executeClusterCommand(setSlotCmd);log.info("槽位{}迁移完成", slot);return true;} catch (Exception e) {log.error("槽位{}迁移失败", slot, e);return false;}}/*** 获取槽位当前所在节点* @param slot 槽位编号* @return 节点信息(ip:port)*/private String getSlotNode(int slot) {return redisTemplate.execute((RedisCallback<String>) connection -> {ClusterSlotInformation slotInfo = connection.clusterGetSlotInformation(slot);return slotInfo.getMaster().getHost() + ":" + slotInfo.getMaster().getPort();});}/*** 迁移槽位中的所有键* @param slot 槽位编号* @param targetHost 目标节点IP* @param targetPort 目标节点端口*/private void migrateSlotKeys(int slot, String targetHost, int targetPort) {redisTemplate.execute((RedisCallback<Void>) connection -> {// 迭代获取槽位中的所有键ScanOptions options = ScanOptions.scanOptions().count(100).build();Cursor<byte[]> cursor = connection.scan(options);while (cursor.hasNext()) {byte[] keyBytes = cursor.next();String key = new String(keyBytes, StandardCharsets.UTF_8);// 验证键所属的槽位int keySlot = CRC16.crc16(key.getBytes()) % 16384;if (keySlot != slot) {continue;}// 迁移单个键到目标节点connection.migrate(targetHost,targetPort,keyBytes,0,Duration.ofSeconds(5),true,true);log.debug("已迁移键:{}到节点{}:{}", key, targetHost, targetPort);}return null;});}/*** 获取节点ID* @param host 节点IP* @param port 节点端口* @return 节点ID*/private String getNodeId(String host, int port) {return redisTemplate.execute((RedisCallback<String>) connection -> {Collection<ClusterNodeInformation> nodes = connection.clusterGetNodes();for (ClusterNodeInformation node : nodes) {if (node.getHost().equals(host) && node.getPort() == port) {return node.getId();}}throw new RuntimeException("节点" + host + ":" + port + "不存在");});}/*** 执行集群命令* @param command 命令内容* @return 命令执行结果*/private String executeClusterCommand(String command) {return redisTemplate.execute((RedisCallback<String>) connection -> {byte[][] commandBytes = parseCommand(command);return new String(connection.execute(commandBytes), StandardCharsets.UTF_8);});}/*** 在指定节点执行集群命令* @param command 命令内容* @param host 节点IP* @param port 节点端口* @return 命令执行结果*/private String executeClusterCommandOnNode(String command, String host, int port) {return redisTemplate.execute((RedisCallback<String>) connection -> {byte[][] commandBytes = parseCommand(command);return new String(connection.executeOnNode(commandBytes, new RedisNode(host, port)),StandardCharsets.UTF_8);});}/*** 解析命令字符串为字节数组* @param command 命令字符串* @return 命令字节数组*/private byte[][] parseCommand(String command) {String[] parts = command.split(" ");byte[][] result = new byte[parts.length][];for (int i = 0; i < parts.length; i++) {result[i] = parts[i].getBytes(StandardCharsets.UTF_8);}return result;}
}
25. Redis Cluster 如何处理节点故障?
Redis Cluster 具备自动故障检测和恢复能力,确保集群在节点故障时仍能正常运行。
故障检测机制
- 节点心跳检测:集群中的每个节点定期向其他节点发送 PING 消息
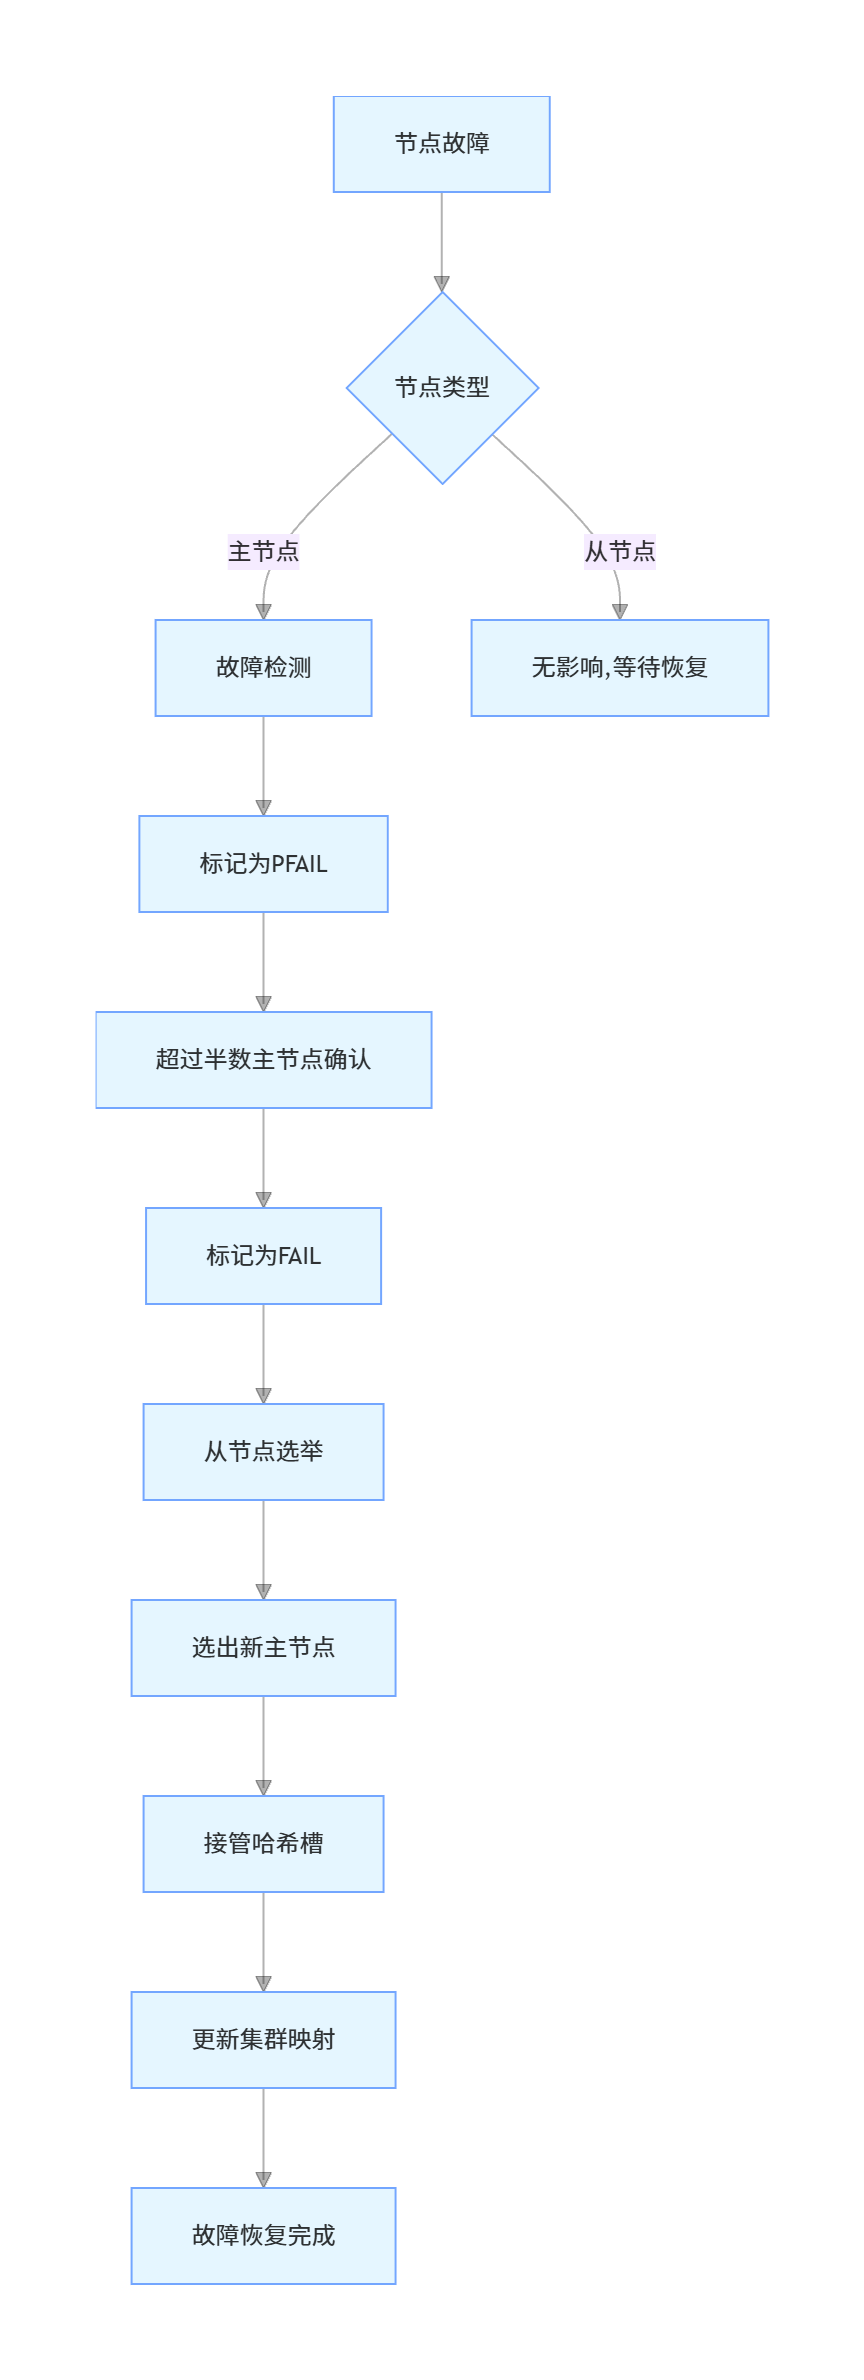
- 故障判断:如果一个节点在 cluster-node-timeout 时间内未响应,被标记为疑似下线(PFAIL)
- 故障确认:当超过半数主节点认为该节点疑似下线时,标记为确定下线(FAIL)
故障恢复流程
主节点故障恢复
- 从节点检测到主节点下线
- 从节点触发故障转移选举
- 选出一个从节点晋升为主节点
- 新主节点接管原主节点的哈希槽
- 集群更新槽位映射表,通知所有节点
从节点故障恢复
- 从节点故障不影响集群可用性
- 仅需确保主节点有其他可用从节点
- 故障从节点恢复后,自动重新加入集群并同步数据
故障恢复配置优化
redis.conf
# 节点超时时间(默认15000毫秒)
cluster-node-timeout 15000# 主节点故障后,从节点选举超时时间
cluster-slave-validity-factor 10# 允许从节点优先选举的偏移量差距
cluster-slave-no-failover-on-down-after-milliseconds 10000# 禁止故障转移时全量覆盖配置
cluster-config-file-update-on-failover yes
故障检测示例代码
/*** Redis Cluster故障检测服务* @author ken*/
@Service
@Slf4j
@RequiredArgsConstructor
@Api(tags = "Redis Cluster故障检测")
public class RedisClusterMonitorService {private final RedisTemplate<String, Object> redisTemplate;private ScheduledExecutorService executor;/*** 启动集群监控* @param interval 监控间隔(秒)*/@ApiOperation("启动集群监控")public void startMonitor(int interval) {if (interval <= 0) {interval = 10; // 默认10秒}executor = Executors.newSingleThreadScheduledExecutor(r -> new Thread(r, "redis-cluster-monitor"));executor.scheduleAtFixedRate(this::checkClusterHealth,0,interval,TimeUnit.SECONDS);log.info("Redis Cluster监控已启动,监控间隔:{}秒", interval);}/*** 停止集群监控*/@ApiOperation("停止集群监控")public void stopMonitor() {if (executor != null && !executor.isShutdown()) {executor.shutdown();log.info("Redis Cluster监控已停止");}}/*** 检查集群健康状态*/private void checkClusterHealth() {try {// 获取集群信息ClusterInfo clusterInfo = redisTemplate.execute(RedisCallback<ClusterInfo> :: connection -> connection.clusterGetClusterInfo());// 检查集群状态if (!"ok".equals(clusterInfo.getStatus())) {log.error("Redis Cluster状态异常:{}", clusterInfo.getStatus());sendAlert("Redis Cluster状态异常: " + clusterInfo.getStatus());return;}// 检查节点状态Collection<ClusterNodeInformation> nodes = redisTemplate.execute(RedisCallback<Collection<ClusterNodeInformation>> :: connection -> connection.clusterGetNodes());for (ClusterNodeInformation node : nodes) {// 检查节点是否下线if (node.getNodeStatus() == ClusterNodeInformation.NodeStatus.FAIL ||node.getNodeStatus() == ClusterNodeInformation.NodeStatus.PFAIL) {String alertMsg = String.format("节点%s:%d状态异常,状态:%s",node.getHost(), node.getPort(), node.getNodeStatus());log.error(alertMsg);sendAlert(alertMsg);}// 检查主节点的从节点数量if (node.getNodeRole() == ClusterNodeInformation.NodeRole.MASTER) {long slaveCount = nodes.stream().filter(n -> n.getNodeRole() == ClusterNodeInformation.NodeRole.SLAVE).filter(n -> n.getMasterId().equals(node.getId())).count();if (slaveCount < 1) {String alertMsg = String.format("主节点%s:%d没有从节点,存在单点故障风险",node.getHost(), node.getPort());log.warn(alertMsg);sendAlert(alertMsg);}}}// 检查哈希槽分配checkSlotAllocation();} catch (Exception e) {log.error("集群健康检查异常", e);sendAlert("Redis Cluster监控异常: " + e.getMessage());}}/*** 检查哈希槽分配情况*/private void checkSlotAllocation() {redisTemplate.execute((RedisCallback<Void>) connection -> {// 检查是否有未分配的槽位int unassignedSlots = 0;for (int slot = 0; slot < 16384; slot++) {ClusterSlotInformation slotInfo = connection.clusterGetSlotInformation(slot);if (slotInfo == null || slotInfo.getMaster() == null) {unassignedSlots++;}}if (unassignedSlots > 0) {String alertMsg = String.format("Redis Cluster有%d个哈希槽未分配,集群不可用",unassignedSlots);log.error(alertMsg);sendAlert(alertMsg);}return null;});}/*** 发送告警通知* @param message 告警信息*/private void sendAlert(String message) {// 实际项目中可集成短信、邮件、钉钉等告警方式log.error("【Redis Cluster告警】{}", message);// TODO: 集成告警渠道}
}
26. Redis Cluster 如何实现读写分离?
Redis Cluster 的读写分离是指将写操作路由到主节点,读操作分散到从节点,以提高集群的读性能和吞吐量。
读写分离实现原理
节点角色分工
- 主节点:负责处理写操作和读操作
- 从节点:仅负责处理读操作,数据从主节点同步
路由策略
- 写操作:必须路由到键所在槽位的主节点
- 读操作:可路由到主节点或其任意从节点
一致性保证
- 同步策略:从节点通过复制机制同步主节点数据
- 数据延迟:从节点数据可能存在短暂延迟,需业务容忍
读写分离配置实现
客户端配置
- 配置读写分离规则,读请求优先路由到从节点
- 支持故障转移,从节点不可用时自动切换到主节点
集群配置
- 确保每个主节点有足够的从节点
- 配置合理的复制同步策略
/*** Redis Cluster读写分离配置* @author ken*/
@Configuration
@Api(tags = "Redis Cluster读写分离配置")
public class RedisClusterReadWriteConfig {/*** 配置主节点RedisTemplate(写操作)* @return 主节点RedisTemplate*/@Bean("masterRedisTemplate")public RedisTemplate<String, Object> masterRedisTemplate() {RedisClusterConfiguration clusterConfig = new RedisClusterConfiguration();// 添加所有集群节点List<RedisNode> clusterNodes = Arrays.asList(new RedisNode("192.168.1.100", 6379),new RedisNode("192.168.1.101", 6379),new RedisNode("192.168.1.102", 6379),new RedisNode("192.168.1.103", 6380),new RedisNode("192.168.1.104", 6380),new RedisNode("192.168.1.105", 6380));clusterConfig.setClusterNodes(clusterNodes);clusterConfig.setMaxRedirects(3);clusterConfig.setPassword("password");// 配置仅连接主节点LettuceClientConfiguration clientConfig = LettuceClientConfiguration.builder().readFrom(ReadFrom.MASTER) // 仅从主节点读取.commandTimeout(Duration.ofSeconds(2)).build();LettuceConnectionFactory factory = new LettuceConnectionFactory(clusterConfig, clientConfig);factory.afterPropertiesSet();return createRedisTemplate(factory);}/*** 配置从节点RedisTemplate(读操作)* @return 从节点RedisTemplate*/@Bean("slaveRedisTemplate")public RedisTemplate<String, Object> slaveRedisTemplate() {RedisClusterConfiguration clusterConfig = new RedisClusterConfiguration();List<RedisNode> clusterNodes = Arrays.asList(new RedisNode("192.168.1.100", 6379),new RedisNode("192.168.1.101", 6379),new RedisNode("192.168.1.102", 6379),new RedisNode("192.168.1.103", 6380),new RedisNode("192.168.1.104", 6380),new RedisNode("192.168.1.105", 6380));clusterConfig.setClusterNodes(clusterNodes);clusterConfig.setMaxRedirects(3);clusterConfig.setPassword("password");// 配置优先从从节点读取,从节点不可用时切换到主节点LettuceClientConfiguration clientConfig = LettuceClientConfiguration.builder().readFrom(ReadFrom.REPLICA_PREFERRED) // 优先从从节点读取.commandTimeout(Duration.ofSeconds(2)).build();LettuceConnectionFactory factory = new LettuceConnectionFactory(clusterConfig, clientConfig);factory.afterPropertiesSet();return createRedisTemplate(factory);}/*** 创建RedisTemplate实例* @param factory 连接工厂* @return RedisTemplate*/private RedisTemplate<String, Object> createRedisTemplate(LettuceConnectionFactory factory) {RedisTemplate<String, Object> template = new RedisTemplate<>();template.setConnectionFactory(factory);// 设置序列化器StringRedisSerializer keySerializer = new StringRedisSerializer();GenericJackson2JsonRedisSerializer valueSerializer = new GenericJackson2JsonRedisSerializer();template.setKeySerializer(keySerializer);template.setValueSerializer(valueSerializer);template.setHashKeySerializer(keySerializer);template.setHashValueSerializer(valueSerializer);template.afterPropertiesSet();return template;}
}
读写分离服务实现
/*** Redis Cluster读写分离服务* @author ken*/
@Service
@Slf4j
@RequiredArgsConstructor
@Api(tags = "Redis Cluster读写分离服务")
public class RedisReadWriteService {@Qualifier("masterRedisTemplate")private final RedisTemplate<String, Object> masterRedisTemplate;@Qualifier("slaveRedisTemplate")private final RedisTemplate<String, Object> slaveRedisTemplate;/*** 写操作(使用主节点)* @param key 键* @param value 值*/@ApiOperation("写操作(主节点)")public void set(String key, Object value) {if (!StringUtils.hasText(key) || ObjectUtils.isEmpty(value)) {throw new IllegalArgumentException("key和value不能为空");}masterRedisTemplate.opsForValue().set(key, value, 30, TimeUnit.MINUTES);log.info("写操作完成,key:{}", key);}/*** 读操作(使用从节点,优先)* @param key 键* @return 值*/@ApiOperation("读操作(从节点优先)")public Object get(String key) {if (!StringUtils.hasText(key)) {throw new IllegalArgumentException("key不能为空");}try {// 优先从从节点读取Object value = slaveRedisTemplate.opsForValue().get(key);log.info("从从节点读取数据,key:{}, value:{}", key, value);return value;} catch (Exception e) {log.error("从从节点读取数据失败,切换到主节点", e);// 从节点读取失败,切换到主节点Object value = masterRedisTemplate.opsForValue().get(key);log.info("从主节点读取数据,key:{}, value:{}", key, value);return value;}}/*** 批量写操作* @param keyValueMap 键值对集合*/@ApiOperation("批量写操作(主节点)")public void batchSet(Map<String, Object> keyValueMap) {if (CollectionUtils.isEmpty(keyValueMap)) {throw new IllegalArgumentException("键值对集合不能为空");}masterRedisTemplate.executePipelined((RedisCallback<Void>) connection -> {for (Map.Entry<String, Object> entry : keyValueMap.entrySet()) {connection.set(entry.getKey().getBytes(),JSON.toJSONBytes(entry.getValue()));connection.expire(entry.getKey().getBytes(), 30 * 60);}return null;});log.info("批量写操作完成,共{}个键", keyValueMap.size());}/*** 批量读操作* @param keys 键列表* @return 键值对集合*/@ApiOperation("批量读操作(从节点优先)")public Map<String, Object> batchGet(List<String> keys) {if (CollectionUtils.isEmpty(keys)) {throw new IllegalArgumentException("键列表不能为空");}Map<String, Object> result = Maps.newHashMap();try {// 从从节点批量读取List<Object> values = slaveRedisTemplate.opsForValue().multiGet(keys);for (int i = 0; i < keys.size(); i++) {result.put(keys.get(i), values.get(i));}log.info("从从节点批量读取完成,共{}个键", keys.size());} catch (Exception e) {log.error("从从节点批量读取失败,切换到主节点", e);// 切换到主节点List<Object> values = masterRedisTemplate.opsForValue().multiGet(keys);for (int i = 0; i < keys.size(); i++) {result.put(keys.get(i), values.get(i));}log.info("从主节点批量读取完成,共{}个键", keys.size());}return result;}
}
十、Redis 实战场景
27. 如何使用 Redis 实现分布式限流?
分布式限流是指在分布式系统中,对接口或资源的访问频率进行限制,防止系统被过度请求压垮。Redis 凭借其高性能和原子性操作,是实现分布式限流的理想选择。
常见的限流算法
- 固定窗口计数器:在固定时间窗口内限制请求数量
- 滑动窗口计数器:将时间窗口划分为更小的区间,平滑限流效果
- 漏桶算法:控制请求处理速度,平滑突发流量
- 令牌桶算法:允许一定程度的突发流量,灵活性更高
Redis 实现固定窗口计数器
/*** Redis分布式限流服务(固定窗口计数器)* @author ken*/
@Service
@Slf4j
@RequiredArgsConstructor
@Api(tags = "Redis分布式限流")
public class RedisRateLimiterService {private final RedisTemplate<String, Object> redisTemplate;/*** 固定窗口计数器限流* @param key 限流键(如接口名、用户ID等)* @param maxCount 窗口内最大请求数* @param windowSeconds 窗口大小(秒)* @return 是否允许访问*/@ApiOperation("固定窗口计数器限流")public boolean fixedWindowLimit(String key, int maxCount, int windowSeconds) {if (!StringUtils.hasText(key) || maxCount <= 0 || windowSeconds <= 0) {throw new IllegalArgumentException("参数非法");}String redisKey = "rate_limit:fixed:" + key;// Lua脚本实现原子性操作String luaScript = "local current = redis.call('incr', KEYS[1]) " +"if current == 1 then " +"    redis.call('expire', KEYS[1], ARGV[2]) " +"end " +"if current > tonumber(ARGV[1]) then " +"    return 0 " +"else " +"    return 1 " +"end";DefaultRedisScript<Long> script = new DefaultRedisScript<>(luaScript, Long.class);Long result = redisTemplate.execute(script,Collections.singletonList(redisKey),String.valueOf(maxCount),String.valueOf(windowSeconds));boolean allowed = Boolean.TRUE.equals(result != null && result == 1);log.info("固定窗口限流,key:{}, 允许访问:{}", key, allowed);return allowed;}/*** 滑动窗口计数器限流* @param key 限流键* @param maxCount 窗口内最大请求数* @param windowSeconds 窗口大小(秒)* @param segmentSeconds 时间片大小(秒)* @return 是否允许访问*/@ApiOperation("滑动窗口计数器限流")public boolean slidingWindowLimit(String key, int maxCount, int windowSeconds, int segmentSeconds) {if (!StringUtils.hasText(key) || maxCount <= 0 || windowSeconds <= 0 || segmentSeconds <= 0) {throw new IllegalArgumentException("参数非法");}if (segmentSeconds >= windowSeconds) {throw new IllegalArgumentException("时间片大小必须小于窗口大小");}String redisKey = "rate_limit:sliding:" + key;long currentTime = System.currentTimeMillis() / 1000;long windowStart = currentTime - windowSeconds;// Lua脚本实现滑动窗口限流String luaScript = "local currentTime = tonumber(ARGV[1]) " +"local windowStart = tonumber(ARGV[2]) " +"local maxCount = tonumber(ARGV[3]) " +"local segmentSeconds = tonumber(ARGV[4]) " +-- 移除窗口外的时间片"redis.call('zremrangebyscore', KEYS[1], 0, windowStart) " +-- 统计当前窗口内的请求数"local currentCount = redis.call('zcard', KEYS[1]) " +"if currentCount >= maxCount then " +"    return 0 " +"end " +-- 添加当前请求的时间片"local segment = math.floor(currentTime / segmentSeconds) * segmentSeconds " +"redis.call('zadd', KEYS[1], currentTime, segment .. ':' .. redis.call('incr', KEYS[1] .. ':seq')) " +-- 设置过期时间"redis.call('expire', KEYS[1], ARGV[5]) " +"return 1";DefaultRedisScript<Long> script = new DefaultRedisScript<>(luaScript, Long.class);Long result = redisTemplate.execute(script,Collections.singletonList(redisKey),String.valueOf(currentTime),String.valueOf(windowStart),String.valueOf(maxCount),String.valueOf(segmentSeconds),String.valueOf(windowSeconds + segmentSeconds));boolean allowed = Boolean.TRUE.equals(result != null && result == 1);log.info("滑动窗口限流,key:{}, 允许访问:{}", key, allowed);return allowed;}/*** 令牌桶算法限流* @param key 限流键* @param capacity 令牌桶容量* @param rate 令牌生成速率(个/秒)* @return 是否允许访问*/@ApiOperation("令牌桶算法限流")public boolean tokenBucketLimit(String key, int capacity, double rate) {if (!StringUtils.hasText(key) || capacity <= 0 || rate <= 0) {throw new IllegalArgumentException("参数非法");}String redisKey = "rate_limit:token:" + key;long currentTime = System.currentTimeMillis();// Lua脚本实现令牌桶限流String luaScript = "local currentTime = tonumber(ARGV[1]) " +"local capacity = tonumber(ARGV[2]) " +"local rate = tonumber(ARGV[3]) " +-- 获取当前桶内令牌数和最后更新时间"local bucket = redis.call('hmget', KEYS[1], 'tokens', 'last_time') " +"local tokens = tonumber(bucket[1]) or capacity " +"local lastTime = tonumber(bucket[2]) or currentTime " +-- 计算令牌补充数量"local elapsed = currentTime - lastTime " +"local addTokens = math.floor(elapsed * rate) " +"tokens = math.min(tokens + addTokens, capacity) " +-- 尝试获取令牌"if tokens >= 1 then " +"    tokens = tokens - 1 " +"    redis.call('hmset', KEYS[1], 'tokens', tokens, 'last_time', currentTime) " +"    redis.call('expire', KEYS[1], 3600) " +"    return 1 " +"else " +"    return 0 " +"end";DefaultRedisScript<Long> script = new DefaultRedisScript<>(luaScript, Long.class);Long result = redisTemplate.execute(script,Collections.singletonList(redisKey),String.valueOf(currentTime),String.valueOf(capacity),String.valueOf(rate));boolean allowed = Boolean.TRUE.equals(result != null && result == 1);log.info("令牌桶限流,key:{}, 允许访问:{}", key, allowed);return allowed;}
}
限流注解实现
/*** 分布式限流注解* @author ken*/
@Target({ElementType.METHOD})
@Retention(RetentionPolicy.RUNTIME)
@Documented
public @interface RedisRateLimit {/*** 限流键前缀*/String prefix() default "rate_limit";/*** 限流键(支持EL表达式)*/String key() default "";/*** 限流类型*/LimitType type() default LimitType.FIXED_WINDOW;/*** 最大请求数*/int maxCount();/*** 窗口大小(秒)*/int windowSeconds() default 60;/*** 时间片大小(仅滑动窗口使用)*/int segmentSeconds() default 10;/*** 令牌桶容量(仅令牌桶使用)*/int capacity() default 100;/*** 令牌生成速率(个/秒,仅令牌桶使用)*/double rate() default 10.0;/*** 限流提示信息*/String message() default "请求过于频繁,请稍后再试";/*** 限流类型枚举*/enum LimitType {FIXED_WINDOW,    // 固定窗口SLIDING_WINDOW,  // 滑动窗口TOKEN_BUCKET     // 令牌桶}
}
限流切面实现
/*** 分布式限流切面* @author ken*/
@Aspect
@Component
@Slf4j
@RequiredArgsConstructor
public class RedisRateLimitAspect {private final RedisRateLimiterService rateLimiterService;private final ExpressionParser expressionParser = new SpelExpressionParser();/*** 切入点*/@Pointcut("@annotation(com.example.redis.annotation.RedisRateLimit)")public void rateLimitPointcut() {}/*** 环绕通知*/@Around("rateLimitPointcut() && @annotation(rateLimit)")public Object around(ProceedingJoinPoint joinPoint, RedisRateLimit rateLimit) throws Throwable {// 解析限流键String key = resolveKey(joinPoint, rateLimit);String fullKey = rateLimit.prefix() + ":" + key;// 执行限流检查boolean allowed = false;switch (rateLimit.type()) {case FIXED_WINDOW:allowed = rateLimiterService.fixedWindowLimit(fullKey,rateLimit.maxCount(),rateLimit.windowSeconds());break;case SLIDING_WINDOW:allowed = rateLimiterService.slidingWindowLimit(fullKey,rateLimit.maxCount(),rateLimit.windowSeconds(),rateLimit.segmentSeconds());break;case TOKEN_BUCKET:allowed = rateLimiterService.tokenBucketLimit(fullKey,rateLimit.capacity(),rateLimit.rate());break;}// 限流处理if (!allowed) {log.warn("接口限流触发,key:{}", fullKey);throw new BusinessException(429, rateLimit.message());}// 执行目标方法return joinPoint.proceed();}/*** 解析限流键(支持EL表达式)*/private String resolveKey(ProceedingJoinPoint joinPoint, RedisRateLimit rateLimit) {String key = rateLimit.key();if (!StringUtils.hasText(key)) {// 默认使用类名+方法名MethodSignature signature = (MethodSignature) joinPoint.getSignature();return signature.getDeclaringTypeName() + "." + signature.getName();}// 解析EL表达式MethodSignature signature = (MethodSignature) joinPoint.getSignature();EvaluationContext context = new MethodBasedEvaluationContext(joinPoint.getTarget(),signature.getMethod(),joinPoint.getArgs(),new DefaultParameterNameDiscoverer());return expressionParser.parseExpression(key).getValue(context, String.class);}
}
28. 如何使用 Redis 实现延迟队列?
延迟队列是指消息发送后,不立即被消费,而是在指定的延迟时间后才被消费。Redis 可以通过多种方式实现延迟队列,适用于订单超时取消、定时任务等场景。
Redis 实现延迟队列的几种方式
- Sorted Set 方式:利用分数存储时间戳,实现有序性
- List + 过期事件方式:结合 List 和 Redis 过期事件通知
- Stream 方式:Redis 5.0 + 新增的 Stream 数据结构,支持消费者组和消息确认
Sorted Set 实现延迟队列
/*** Redis延迟队列服务(Sorted Set实现)* @author ken*/
@Service
@Slf4j
@RequiredArgsConstructor
@Api(tags = "Redis延迟队列")
public class RedisDelayQueueService {private final RedisTemplate<String, Object> redisTemplate;private final ScheduledExecutorService executor = Executors.newSingleThreadScheduledExecutor(r -> new Thread(r, "delay-queue-consumer"));// 延迟队列前缀private static final String QUEUE_PREFIX = "delay_queue:";/*** 启动延迟队列消费者* @param queueName 队列名称* @param interval 轮询间隔(毫秒)*/@PostConstructpublic void startConsumer() {// 启动消费者,轮询间隔100毫秒executor.scheduleAtFixedRate(this::consumeMessage,0,100,TimeUnit.MILLISECONDS);log.info("Redis延迟队列消费者已启动");}/*** 发送延迟消息* @param queueName 队列名称* @param message 消息内容* @param delayMillis 延迟时间(毫秒)* @return 消息ID*/@ApiOperation("发送延迟消息")public String sendDelayMessage(String queueName, Object message, long delayMillis) {if (!StringUtils.hasText(queueName) || ObjectUtils.isEmpty(message) || delayMillis <= 0) {throw new IllegalArgumentException("参数非法");}String queueKey = QUEUE_PREFIX + queueName;String messageId = UUID.randomUUID().toString();long executeTime = System.currentTimeMillis() + delayMillis;// 消息内容序列化String messageJson = JSON.toJSONString(message);// 写入Sorted Set,分数为执行时间戳ZSetOperations<String, Object> zSetOps = redisTemplate.opsForZSet();zSetOps.add(queueKey, messageJson, executeTime);log.info("延迟消息发送成功,queue:{}, messageId:{}, executeTime:{}",queueName, messageId, new Date(executeTime));return messageId;}/*** 消费延迟消息*/private void consumeMessage() {// 获取所有队列Set<String> queueKeys = redisTemplate.keys(QUEUE_PREFIX + "*");if (CollectionUtils.isEmpty(queueKeys)) {return;}long currentTime = System.currentTimeMillis();for (String queueKey : queueKeys) {String queueName = queueKey.substring(QUEUE_PREFIX.length());try {// 批量获取已到期的消息(分数 <= 当前时间戳)ZSetOperations<String, Object> zSetOps = redisTemplate.opsForZSet();Set<ZSetOperations.TypedTuple<Object>> messages = zSetOps.rangeByScoreWithScores(queueKey,0,currentTime,0,10 // 每次最多消费10条消息);if (CollectionUtils.isEmpty(messages)) {continue;}// 消费消息for (ZSetOperations.TypedTuple<Object> message : messages) {String messageJson = (String) message.getValue();double score = message.getScore();try {// 处理消息handleMessage(queueName, messageJson);// 消息处理成功后删除zSetOps.remove(queueKey, messageJson);log.info("延迟消息消费成功,queue:{}, executeTime:{}",queueName, new Date((long) score));} catch (Exception e) {log.error("延迟消息消费失败,queue:{}, message:{}", queueName, messageJson, e);// 消息处理失败,可根据业务需求重试或转移到死信队列handleFailedMessage(queueName, messageJson, e);}}} catch (Exception e) {log.error("消费延迟消息异常,queue:{}", queueName, e);}}}/*** 处理延迟消息* @param queueName 队列名称* @param messageJson 消息内容(JSON格式)*/private void handleMessage(String queueName, String messageJson) {// 根据队列名称路由到对应的消息处理器switch (queueName) {case "order_timeout":handleOrderTimeoutMessage(messageJson);break;case "task_schedule":handleTaskScheduleMessage(messageJson);break;default:log.warn("未知的队列名称:{}", queueName);}}/*** 处理订单超时消息*/private void handleOrderTimeoutMessage(String messageJson) {OrderTimeoutMessage message = JSON.parseObject(messageJson, OrderTimeoutMessage.class);log.info("处理订单超时消息,orderId:{}, userId:{}", message.getOrderId(), message.getUserId());// 实际业务逻辑:取消订单、恢复库存等// orderService.cancelOrder(message.getOrderId());}/*** 处理定时任务消息*/private void handleTaskScheduleMessage(String messageJson) {ScheduleMessage message = JSON.parseObject(messageJson, ScheduleMessage.class);log.info("处理定时任务消息,taskId:{}, taskName:{}", message.getTaskId(), message.getTaskName());// 实际业务逻辑:执行定时任务// taskService.executeTask(message.getTaskId());}/*** 处理消费失败的消息*/private void handleFailedMessage(String queueName, String messageJson, Exception e) {// 简单实现:转移到死信队列String deadLetterKey = "dead_letter_queue:" + queueName;redisTemplate.opsForList().rightPush(deadLetterKey, messageJson);redisTemplate.expire(deadLetterKey, 24, TimeUnit.HOURS);}/*** 停止消费者*/@PreDestroypublic void stopConsumer() {executor.shutdown();try {if (!executor.awaitTermination(1, TimeUnit.SECONDS)) {executor.shutdownNow();}} catch (InterruptedException e) {executor.shutdownNow();}log.info("Redis延迟队列消费者已停止");}/*** 订单超时消息实体*/@Datapublic static class OrderTimeoutMessage {private String orderId;private String userId;private BigDecimal amount;}/*** 定时任务消息实体*/@Datapublic static class ScheduleMessage {private String taskId;private String taskName;private Map<String, Object> params;}
}
Stream 实现延迟队列(Redis 5.0+)
/*** Redis延迟队列服务(Stream实现,Redis 5.0+)* @author ken*/
@Service
@Slf4j
@RequiredArgsConstructor
@Api(tags = "Redis Stream延迟队列")
public class RedisStreamDelayQueueService {private final RedisTemplate<String, Object> redisTemplate;private static final String STREAM_PREFIX = "stream_delay_queue:";private static final String CONSUMER_GROUP = "delay_group";/*** 初始化消费者组* @param queueName 队列名称*/@ApiOperation("初始化延迟队列消费者组")public void initConsumerGroup(String queueName) {if (!StringUtils.hasText(queueName)) {throw new IllegalArgumentException("队列名称不能为空");}String streamKey = STREAM_PREFIX + queueName;try {// 创建消费者组,不存在则创建redisTemplate.opsForStream().createGroup(streamKey,CONSUMER_GROUP,ReadOffset.latest());log.info("消费者组创建成功,queue:{}, group:{}", queueName, CONSUMER_GROUP);} catch (Exception e) {// 忽略消费者组已存在的异常if (!e.getMessage().contains("BUSYGROUP")) {log.error("创建消费者组失败", e);throw e;}log.info("消费者组已存在,queue:{}, group:{}", queueName, CONSUMER_GROUP);}}/*** 发送延迟消息* @param queueName 队列名称* @param message 消息内容* @param delayMillis 延迟时间(毫秒)* @return 消息ID*/@ApiOperation("发送Stream延迟消息")public String sendStreamDelayMessage(String queueName, Object message, long delayMillis) {if (!StringUtils.hasText(queueName) || ObjectUtils.isEmpty(message) || delayMillis <= 0) {throw new IllegalArgumentException("参数非法");}String streamKey = STREAM_PREFIX + queueName;long executeTime = System.currentTimeMillis() + delayMillis;// 构建消息体,包含执行时间和消息内容Map<String, Object> messageMap = Maps.newHashMap();messageMap.put("execute_time", executeTime);messageMap.put("content", JSON.toJSONString(message));messageMap.put("create_time", System.currentTimeMillis());// 发送消息到StreamRecordId recordId = redisTemplate.opsForStream().add(StreamRecords.newRecord().ofMap(messageMap).withStreamKey(streamKey));String messageId = recordId.getValue();log.info("Stream延迟消息发送成功,queue:{}, messageId:{}, executeTime:{}",queueName, messageId, new Date(executeTime));return messageId;}/*** 消费Stream延迟消息* @param queueName 队列名称* @param consumerName 消费者名称*/@ApiOperation("消费Stream延迟消息")public void consumeStreamMessage(String queueName, String consumerName) {if (!StringUtils.hasText(queueName) || !StringUtils.hasText(consumerName)) {throw new IllegalArgumentException("队列名称和消费者名称不能为空");}// 初始化消费者组initConsumerGroup(queueName);String streamKey = STREAM_PREFIX + queueName;// 启动消费者线程new Thread(() -> {while (!Thread.currentThread().isInterrupted()) {try {// 读取消息,每次最多读取10条,阻塞时间1秒StreamRecords<String, Object> records = redisTemplate.opsForStream().read(Consumer.from(CONSUMER_GROUP, consumerName),StreamReadOptions.empty().count(10).block(Duration.ofSeconds(1)),StreamOffset.create(streamKey, ReadOffset.lastConsumed()));if (CollectionUtils.isEmpty(records)) {continue;}// 处理消息for (MapRecord<String, String, Object> record : records) {handleStreamMessage(queueName, record);}} catch (Exception e) {log.error("消费Stream消息异常", e);try {Thread.sleep(1000);} catch (InterruptedException ie) {Thread.currentThread().interrupt();break;}}}}, "stream-consumer-" + queueName).start();log.info("Stream延迟队列消费者已启动,queue:{}, consumer:{}", queueName, consumerName);}/*** 处理Stream延迟消息*/private void handleStreamMessage(String queueName, MapRecord<String, String, Object> record) {String streamKey = record.getStream();String messageId = record.getId();Map<String, Object> messageMap = record.getValue();try {// 获取执行时间和消息内容long executeTime = Long.parseLong(messageMap.get("execute_time").toString());String content = messageMap.get("content").toString();long currentTime = System.currentTimeMillis();if (currentTime < executeTime) {// 消息未到期,重新加入队列,等待下次消费redisTemplate.opsForStream().acknowledge(streamKey, CONSUMER_GROUP, messageId);// 重新发送消息(延迟时间为剩余时间)sendStreamDelayMessage(queueName, JSON.parseObject(content), executeTime - currentTime);log.info("消息未到期,重新加入队列,messageId:{}, remainingTime:{}ms",messageId, executeTime - currentTime);return;}// 消息已到期,执行消费逻辑log.info("Stream延迟消息消费,queue:{}, messageId:{}, content:{}",queueName, messageId, content);// 实际业务处理processStreamMessage(queueName, content);// 消息处理成功,确认消费redisTemplate.opsForStream().acknowledge(streamKey, CONSUMER_GROUP, messageId);log.info("Stream延迟消息消费成功,messageId:{}", messageId);// 删除已消费的消息(可选,根据业务需求)redisTemplate.opsForStream().delete(streamKey, messageId);} catch (Exception e) {log.error("处理Stream消息失败,messageId:{}", messageId, e);// 处理失败,根据重试策略处理handleStreamFailedMessage(streamKey, messageId, messageMap);}}/*** 处理Stream消息内容*/private void processStreamMessage(String queueName, String content) {// 根据队列名称处理不同类型的消息switch (queueName) {case "order_timeout":OrderTimeoutMessage orderMessage = JSON.parseObject(content, OrderTimeoutMessage.class);// orderService.cancelOrder(orderMessage.getOrderId());break;case "task_schedule":ScheduleMessage taskMessage = JSON.parseObject(content, ScheduleMessage.class);// taskService.executeTask(taskMessage.getTaskId());break;}}/*** 处理消费失败的Stream消息*/private void handleStreamFailedMessage(String streamKey, String messageId, Map<String, Object> messageMap) {// 获取消息重试次数int retryCount = messageMap.containsKey("retry_count")? Integer.parseInt(messageMap.get("retry_count").toString()) + 1: 1;if (retryCount > 3) {// 超过最大重试次数,转移到死信队列String deadLetterKey = "stream_dead_letter:" + streamKey;messageMap.put("retry_count", retryCount);redisTemplate.opsForStream().add(StreamRecords.newRecord().ofMap(messageMap).withStreamKey(deadLetterKey));// 确认消费,避免重复处理redisTemplate.opsForStream().acknowledge(streamKey, CONSUMER_GROUP, messageId);log.info("消息超过最大重试次数,转移到死信队列,messageId:{}", messageId);return;}// 未超过重试次数,延迟重试messageMap.put("retry_count", retryCount);long delayMillis = (long) (Math.pow(2, retryCount) * 1000); // 指数退避策略redisTemplate.opsForStream().add(StreamRecords.newRecord().ofMap(messageMap).withStreamKey(streamKey));// 确认消费原消息redisTemplate.opsForStream().acknowledge(streamKey, CONSUMER_GROUP, messageId);log.info("消息消费失败,进行重试,messageId:{}, retryCount:{}, delay:{}ms",messageId, retryCount, delayMillis);}
}
29. 如何使用 Redis 实现分布式 Session?
分布式 Session 是指在分布式系统中,将用户 Session 数据存储在 Redis 中,实现多实例共享 Session,解决单点登录和 Session 共享问题。
分布式 Session 实现原理
- Session 存储:将用户 Session 数据存储在 Redis 中,以 SessionID 为键
- SessionID 传递:通过 Cookie 或 URL 参数传递 SessionID
- Session 管理:实现 Session 的创建、读取、更新和删除
- 过期处理:设置 Session 过期时间,自动清理过期 Session
Spring Boot 集成 Redis 实现分布式 Session
/*** Redis分布式Session配置* @author ken*/
@Configuration
@EnableRedisHttpSession(maxInactiveIntervalInSeconds = 1800, // Session过期时间30分钟redisNamespace = "distributed:session", // Redis键前缀redisFlushMode = RedisFlushMode.ON_SAVE, // 保存时刷新到RediscleanupCron = "0 * * * * *" // 定时清理过期Session的Cron表达式
)
@Api(tags = "Redis分布式Session配置")
public class RedisSessionConfig {/*** 配置Redis连接工厂*/@Beanpublic LettuceConnectionFactory redisConnectionFactory() {RedisStandaloneConfiguration config = new RedisStandaloneConfiguration();config.setHostName("127.0.0.1");config.setPort(6379);config.setPassword("password");// 连接池配置GenericObjectPoolConfig<Object> poolConfig = new GenericObjectPoolConfig<>();poolConfig.setMaxTotal(16);poolConfig.setMaxIdle(8);poolConfig.setMinIdle(4);poolConfig.setMaxWait(Duration.ofSeconds(3));LettucePoolingClientConfiguration clientConfig = LettucePoolingClientConfiguration.builder().poolConfig(poolConfig).commandTimeout(Duration.ofSeconds(2)).build();return new LettuceConnectionFactory(config, clientConfig);}/*** 配置SessionRepository*/@Beanpublic RedisOperationsSessionRepository sessionRepository(RedisConnectionFactory connectionFactory) {RedisOperationsSessionRepository repository = new RedisOperationsSessionRepository(connectionFactory);// 设置Session序列化器(默认使用JdkSerializationRedisSerializer,建议替换为JSON序列化)repository.setDefaultSerializer(new GenericJackson2JsonRedisSerializer());// 设置Session过期时间repository.setDefaultMaxInactiveInterval(1800);return repository;}/*** 配置Session过滤器*/@Beanpublic FilterRegistrationBean<SessionRepositoryFilter<?>> sessionRepositoryFilterRegistration(SessionRepositoryFilter<?> filter) {FilterRegistrationBean<SessionRepositoryFilter<?>> registration = new FilterRegistrationBean<>(filter);registration.setOrder(SessionRepositoryFilter.DEFAULT_ORDER);registration.addUrlPatterns("/*");return registration;}
}
分布式 Session 操作服务
/*** 分布式Session操作服务* @author ken*/
@Service
@Slf4j
@RequiredArgsConstructor
@Api(tags = "分布式Session操作")
public class DistributedSessionService {private final HttpSession session;private final RedisOperationsSessionRepository sessionRepository;/*** 设置Session属性* @param key 属性键* @param value 属性值*/@ApiOperation("设置Session属性")public void setAttribute(String key, Object value) {if (!StringUtils.hasText(key)) {throw new IllegalArgumentException("属性键不能为空");}session.setAttribute(key, value);log.info("设置Session属性,key:{}, sessionId:{}", key, session.getId());}/*** 获取Session属性* @param key 属性键* @return 属性值*/@ApiOperation("获取Session属性")public Object getAttribute(String key) {if (!StringUtils.hasText(key)) {return null;}Object value = session.getAttribute(key);log.info("获取Session属性,key:{}, sessionId:{}, value:{}", key, session.getId(), value);return value;}/*** 移除Session属性* @param key 属性键*/@ApiOperation("移除Session属性")public void removeAttribute(String key) {if (StringUtils.hasText(key)) {session.removeAttribute(key);log.info("移除Session属性,key:{}, sessionId:{}", key, session.getId());}}/*** 获取当前SessionID* @return SessionID*/@ApiOperation("获取当前SessionID")public String getSessionId() {String sessionId = session.getId();log.info("获取SessionID:{}", sessionId);return sessionId;}/***  invalidate当前Session*/@ApiOperation("销毁当前Session")public void invalidateSession() {String sessionId = session.getId();session.invalidate();log.info("销毁Session,sessionId:{}", sessionId);}/*** 根据SessionID获取Session信息* @param sessionId SessionID* @return Session信息*/@ApiOperation("根据SessionID获取Session信息")public Map<String, Object> getSessionBySessionId(String sessionId) {if (!StringUtils.hasText(sessionId)) {return Collections.emptyMap();}RedisSession session = (RedisSession) sessionRepository.findById(sessionId);if (session == null || session.isExpired()) {log.warn("Session不存在或已过期,sessionId:{}", sessionId);return Collections.emptyMap();}Map<String, Object> attributes = Maps.newHashMap();session.getAttributeNames().asIterator().forEachRemaining(key -> attributes.put(key, session.getAttribute(key)));// 添加Session基本信息attributes.put("sessionId", sessionId);attributes.put("creationTime", new Date(session.getCreationTime()));attributes.put("lastAccessedTime", new Date(session.getLastAccessedTime()));attributes.put("maxInactiveInterval", session.getMaxInactiveInterval());log.info("根据SessionID获取Session信息,sessionId:{}, attributes:{}", sessionId, attributes.size());return attributes;}/*** 延长Session过期时间* @param sessionId SessionID* @param seconds 延长时间(秒)* @return 是否成功*/@ApiOperation("延长Session过期时间")public boolean extendSessionExpiration(String sessionId, int seconds) {if (!StringUtils.hasText(sessionId) || seconds <= 0) {return false;}RedisSession session = (RedisSession) sessionRepository.findById(sessionId);if (session == null || session.isExpired()) {log.warn("Session不存在或已过期,无法延长有效期,sessionId:{}", sessionId);return false;}// 延长Session过期时间session.setMaxInactiveInterval(Duration.ofSeconds(seconds));sessionRepository.save(session);log.info("延长Session过期时间,sessionId:{}, 新有效期:{}秒", sessionId, seconds);return true;}/*** 获取在线用户数量* @return 在线用户数量*/@ApiOperation("获取在线用户数量")public long getOnlineUserCount() {// 扫描所有Session键String pattern = "distributed:session:sessions:*";Set<String> sessionKeys = redisTemplate.keys(pattern);return sessionKeys != null ? sessionKeys.size() : 0;}
}
分布式 Session 控制器示例
/*** 分布式Session控制器* @author ken*/
@RestController
@RequestMapping("/api/session")
@Api(tags = "分布式Session接口")
@RequiredArgsConstructor
public class SessionController {private final DistributedSessionService sessionService;/*** 用户登录,创建Session*/@PostMapping("/login")@ApiOperation("用户登录")public Result login(@RequestBody LoginRequest request) {// 实际项目中需验证用户名密码if (!"admin".equals(request.getUsername()) || !"123456".equals(request.getPassword())) {return Result.fail("用户名或密码错误");}// 登录成功,设置用户信息到SessionUserInfo userInfo = new UserInfo();userInfo.setUserId("10001");userInfo.setUsername(request.getUsername());userInfo.setNickname("管理员");userInfo.setRole("ADMIN");sessionService.setAttribute("USER_INFO", userInfo);return Result.success(Map.of("sessionId", sessionService.getSessionId(),"userInfo", userInfo));}/*** 获取当前登录用户信息*/@GetMapping("/currentUser")@ApiOperation("获取当前登录用户信息")public Result getCurrentUser() {UserInfo userInfo = (UserInfo) sessionService.getAttribute("USER_INFO");if (userInfo == null) {return Result.fail("未登录");}return Result.success(userInfo);}/*** 用户登出,销毁Session*/@PostMapping("/logout")@ApiOperation("用户登出")public Result logout() {sessionService.invalidateSession();return Result.success("登出成功");}/*** 获取在线用户数量*/@GetMapping("/onlineCount")@ApiOperation("获取在线用户数量")public Result getOnlineCount() {return Result.success(sessionService.getOnlineUserCount());}@Datapublic static class LoginRequest {private String username;private String password;}@Datapublic static class UserInfo {private String userId;private String username;private String nickname;private String role;}
}
30. 如何使用 Redis 实现分布式锁?
分布式锁是分布式系统中控制共享资源访问的一种机制,用于解决多个进程或服务同时操作共享资源导致的数据不一致问题。Redis 凭借其高性能和原子性操作,是实现分布式锁的常用选择。
分布式锁的核心要求
- 互斥性:同一时间只能有一个线程持有锁
- 安全性:锁只能被持有锁的线程释放
- 可用性:即使 Redis 节点故障,也能保证锁的可用性
- 幂等性:锁的获取和释放操作具有幂等性
- 防死锁:具备自动释放锁的机制,防止死锁
Redis 实现分布式锁(基于 SET 命令)
/*** Redis分布式锁服务* @author ken*/
@Service
@Slf4j
@RequiredArgsConstructor
@Api(tags = "Redis分布式锁")
public class RedisDistributedLockService {private final RedisTemplate<String, Object> redisTemplate;// 锁的默认过期时间(30秒)private static final long DEFAULT_EXPIRE = 30000;// 锁的前缀private static final String LOCK_PREFIX = "distributed:lock:";// 线程本地存储当前持有的锁private final ThreadLocal<Map<String, Integer>> localLocks = ThreadLocal.withInitial(Maps::newHashMap);/*** 获取分布式锁* @param lockKey 锁的键* @param expire 过期时间(毫秒)* @param timeout 获取锁的超时时间(毫秒)* @return 是否获取成功*/@ApiOperation("获取分布式锁")public boolean tryLock(String lockKey, long expire, long timeout) {if (!StringUtils.hasText(lockKey)) {throw new IllegalArgumentException("锁的键不能为空");}if (expire <= 0) {expire = DEFAULT_EXPIRE;}String realLockKey = LOCK_PREFIX + lockKey;String lockValue = UUID.randomUUID().toString(); // 唯一值,用于标识锁的持有者long startTime = System.currentTimeMillis();// 循环获取锁,直到超时while (true) {// 使用SET命令的NX(不存在则设置)和PX(过期时间毫秒)参数实现原子操作Boolean success = redisTemplate.opsForValue().setIfAbsent(realLockKey, lockValue, expire, TimeUnit.MILLISECONDS);if (Boolean.TRUE.equals(success)) {// 获取锁成功,记录到本地线程Map<String, Integer> locks = localLocks.get();locks.put(realLockKey, locks.getOrDefault(realLockKey, 0) + 1);log.info("获取分布式锁成功,lockKey:{}, value:{}", realLockKey, lockValue);// 启动锁续约线程,防止业务执行时间超过锁过期时间startLockRenewal(realLockKey, lockValue, expire);return true;}// 检查是否超时if (System.currentTimeMillis() - startTime >= timeout) {log.warn("获取分布式锁超时,lockKey:{}", realLockKey);return false;}// 短暂休眠后重试,避免频繁请求Redistry {Thread.sleep(100);} catch (InterruptedException e) {Thread.currentThread().interrupt();return false;}}}/*** 获取分布式锁(使用默认参数)* @param lockKey 锁的键* @return 是否获取成功*/@ApiOperation("获取分布式锁(默认参数)")public boolean tryLock(String lockKey) {return tryLock(lockKey, DEFAULT_EXPIRE, 5000);}/*** 释放分布式锁* @param lockKey 锁的键* @return 是否释放成功*/@ApiOperation("释放分布式锁")public boolean unlock(String lockKey) {if (!StringUtils.hasText(lockKey)) {return false;}String realLockKey = LOCK_PREFIX + lockKey;Map<String, Integer> locks = localLocks.get();// 检查当前线程是否持有锁if (!locks.containsKey(realLockKey) || locks.get(realLockKey) <= 0) {log.warn("当前线程未持有锁,无法释放,lockKey:{}", realLockKey);return false;}// 减少重入计数int count = locks.get(realLockKey) - 1;if (count > 0) {locks.put(realLockKey, count);log.info("重入锁计数减少,lockKey:{}, 剩余计数:{}", realLockKey, count);return true;}// 计数为0,真正释放锁locks.remove(realLockKey);// 使用Lua脚本保证释放锁的原子性String luaScript = "if redis.call('get', KEYS[1]) == ARGV[1] then " +"    return redis.call('del', KEYS[1]) " +"else " +"    return 0 " +"end";String lockValue = (String) redisTemplate.opsForValue().get(realLockKey);DefaultRedisScript<Long> script = new DefaultRedisScript<>(luaScript, Long.class);Long result = redisTemplate.execute(script, Collections.singletonList(realLockKey), lockValue);boolean success = Boolean.TRUE.equals(result != null && result > 0);if (success) {log.info("释放分布式锁成功,lockKey:{}", realLockKey);// 停止锁续约线程stopLockRenewal(realLockKey);} else {log.warn("释放分布式锁失败,lockKey:{}", realLockKey);}return success;}/*** 锁续约(防止业务执行时间超过锁过期时间)* @param lockKey 锁的键* @param lockValue 锁的值* @param expire 过期时间(毫秒)*/private void startLockRenewal(String lockKey, String lockValue, long expire) {// 续约线程,每隔1/3过期时间执行一次续约ScheduledExecutorService executor = Executors.newSingleThreadScheduledExecutor(r -> new Thread(r, "lock-renewal-" + lockKey));long period = expire / 3;executor.scheduleAtFixedRate(() -> {try {// 检查锁是否还存在且属于当前线程String currentValue = (String) redisTemplate.opsForValue().get(lockKey);if (lockValue.equals(currentValue)) {// 续约,重置过期时间redisTemplate.expire(lockKey, expire, TimeUnit.MILLISECONDS);log.debug("分布式锁续约成功,lockKey:{}, 剩余时间:{}ms", lockKey, expire);} else {// 锁已释放或被其他线程获取,停止续约stopLockRenewal(lockKey);}} catch (Exception e) {log.error("分布式锁续约失败", e);stopLockRenewal(lockKey);}}, period, period, TimeUnit.MILLISECONDS);// 存储续约线程,用于后续停止redisTemplate.opsForValue().set(lockKey + ":renewal", executor, expire, TimeUnit.MILLISECONDS);}/*** 停止锁续约* @param lockKey 锁的键*/private void stopLockRenewal(String lockKey) {try {Object executorObj = redisTemplate.opsForValue().get(lockKey + ":renewal");if (executorObj instanceof ScheduledExecutorService) {ScheduledExecutorService executor = (ScheduledExecutorService) executorObj;executor.shutdown();redisTemplate.delete(lockKey + ":renewal");log.debug("分布式锁续约已停止,lockKey:{}", lockKey);}} catch (Exception e) {log.error("停止锁续约失败", e);}}/*** 尝试获取锁并执行任务(自动释放锁)* @param lockKey 锁的键* @param task 要执行的任务* @param <T> 任务返回值类型* @return 任务执行结果*/@ApiOperation("尝试获取锁并执行任务")public <T> T tryLockAndExecute(String lockKey, Supplier<T> task) {return tryLockAndExecute(lockKey, DEFAULT_EXPIRE, 5000, task);}/*** 尝试获取锁并执行任务(自动释放锁)* @param lockKey 锁的键* @param expire 锁过期时间* @param timeout 获取锁超时时间* @param task 要执行的任务* @param <T> 任务返回值类型* @return 任务执行结果*/@ApiOperation("尝试获取锁并执行任务(带参数)")public <T> T tryLockAndExecute(String lockKey, long expire, long timeout, Supplier<T> task) {boolean locked = false;try {locked = tryLock(lockKey, expire, timeout);if (locked) {return task.get();} else {throw new BusinessException("获取分布式锁失败,无法执行任务");}} finally {if (locked) {unlock(lockKey);}}}
}
分布式锁使用示例
/*** 分布式锁使用示例控制器* @author ken*/
@RestController
@RequestMapping("/api/lock")
@Api(tags = "分布式锁使用示例")
@RequiredArgsConstructor
public class LockExampleController {private final RedisDistributedLockService lockService;private final OrderService orderService;/*** 秒杀接口(使用分布式锁防止超卖)*/@PostMapping("/seckill")@ApiOperation("秒杀接口")public Result seckill(@RequestParam String productId, @RequestParam String userId) {// 使用商品ID作为锁的键,确保同一商品同一时间只有一个请求处理String lockKey = "seckill:" + productId;return lockService.tryLockAndExecute(lockKey, () -> {// 执行秒杀逻辑boolean success = orderService.createSeckillOrder(productId, userId);if (success) {return Result.success("秒杀成功");} else {return Result.fail("商品已售罄");}});}/*** 库存扣减接口(使用分布式锁保证原子性)*/@PostMapping("/deductStock")@ApiOperation("库存扣减接口")public Result deductStock(@RequestParam String productId, @RequestParam int quantity) {String lockKey = "stock:" + productId;return lockService.tryLockAndExecute(lockKey, 60000, 3000, () -> {// 扣减库存逻辑boolean success = orderService.deductStock(productId, quantity);if (success) {return Result.success("库存扣减成功");} else {return Result.fail("库存不足");}});}
}
Redisson 分布式锁集成(推荐)
Redisson 是一个基于 Redis 的 Java 驻留内存数据网格,提供了更完善的分布式锁实现,支持可重入锁、公平锁、读写锁等高级特性。
/*** Redisson分布式锁配置* @author ken*/
@Configuration
@Api(tags = "Redisson分布式锁配置")
public class RedissonConfig {@Beanpublic RedissonClient redissonClient() {Config config = new Config();// 单节点配置config.useSingleServer().setAddress("redis://127.0.0.1:6379").setPassword("password").setConnectionPoolSize(16).setConnectionMinimumIdleSize(4).setIdleConnectionTimeout(30000).setConnectTimeout(10000).setTimeout(3000);// 集群配置示例/*config.useClusterServers().addNodeAddress("redis://192.168.1.100:6379","redis://192.168.1.101:6379","redis://192.168.1.102:6379").setPassword("password").setScanInterval(2000);*/return Redisson.create(config);}
}
/*** Redisson分布式锁服务* @author ken*/
@Service
@Slf4j
@RequiredArgsConstructor
@Api(tags = "Redisson分布式锁服务")
public class RedissonLockService {private final RedissonClient redissonClient;/*** 获取可重入锁* @param lockKey 锁的键* @return RLock对象*/@ApiOperation("获取可重入锁")public RLock getReentrantLock(String lockKey) {if (!StringUtils.hasText(lockKey)) {throw new IllegalArgumentException("锁的键不能为空");}return redissonClient.getLock("redisson:lock:" + lockKey);}/*** 获取公平锁* @param lockKey 锁的键* @return RLock对象*/@ApiOperation("获取公平锁")public RLock getFairLock(String lockKey) {if (!StringUtils.hasText(lockKey)) {throw new IllegalArgumentException("锁的键不能为空");}return redissonClient.getFairLock("redisson:fair:lock:" + lockKey);}/*** 获取读写锁* @param lockKey 锁的键* @return RReadWriteLock对象*/@ApiOperation("获取读写锁")public RReadWriteLock getReadWriteLock(String lockKey) {if (!StringUtils.hasText(lockKey)) {throw new IllegalArgumentException("锁的键不能为空");}return redissonClient.getReadWriteLock("redisson:rw:lock:" + lockKey);}/*** 使用可重入锁执行任务* @param lockKey 锁的键* @param expire 锁过期时间(秒)* @param task 要执行的任务* @param <T> 任务返回值类型* @return 任务执行结果*/@ApiOperation("使用可重入锁执行任务")public <T> T executeWithLock(String lockKey, int expire, Supplier<T> task) {RLock lock = getReentrantLock(lockKey);boolean locked = false;try {// 尝试获取锁,最多等待3秒,10秒后自动释放locked = lock.tryLock(3, expire, TimeUnit.SECONDS);if (locked) {return task.get();} else {throw new BusinessException("获取Redisson锁失败,无法执行任务");}} catch (InterruptedException e) {Thread.currentThread().interrupt();throw new BusinessException("获取锁被中断");} finally {if (locked && lock.isHeldByCurrentThread()) {lock.unlock();log.info("Redisson锁已释放,lockKey:{}", lockKey);}}}/*** 使用读写锁执行读任务* @param lockKey 锁的键* @param task 读任务* @param <T> 任务返回值类型* @return 任务执行结果*/@ApiOperation("使用读写锁执行读任务")public <T> T executeWithReadLock(String lockKey, Supplier<T> task) {RReadWriteLock rwLock = getReadWriteLock(lockKey);RLock readLock = rwLock.readLock();boolean locked = false;try {locked = readLock.tryLock(3, 60, TimeUnit.SECONDS);if (locked) {return task.get();} else {throw new BusinessException("获取读锁失败");}} catch (InterruptedException e) {Thread.currentThread().interrupt();throw new BusinessException("获取读锁被中断");} finally {if (locked && readLock.isHeldByCurrentThread()) {readLock.unlock();}}}/*** 使用读写锁执行写任务* @param lockKey 锁的键* @param task 写任务* @param <T> 任务返回值类型* @return 任务执行结果*/@ApiOperation("使用读写锁执行写任务")public <T> T executeWithWriteLock(String lockKey, Supplier<T> task) {RReadWriteLock rwLock = getReadWriteLock(lockKey);RLock writeLock = rwLock.writeLock();boolean locked = false;try {locked = writeLock.tryLock(3, 60, TimeUnit.SECONDS);if (locked) {return task.get();} else {throw new BusinessException("获取写锁失败");}} catch (InterruptedException e) {Thread.currentThread().interrupt();throw new BusinessException("获取写锁被中断");} finally {if (locked && writeLock.isHeldByCurrentThread()) {writeLock.unlock();}}}
}
十一、Redis 最佳实践与总结
31. Redis 使用有哪些最佳实践?
Redis 作为高性能的内存数据库,在实际使用中需要遵循一些最佳实践,以确保其稳定性、安全性和高效性。
1. 键设计最佳实践
- 使用统一的命名规范:采用 “业务:模块:标识” 的格式(如
user:info:10001) - 避免过长的键名:键名不宜过长,会占用更多内存和带宽
- 合理使用 Hash 存储对象:将相关字段存储在 Hash 中,减少键的数量
- 避免大量小键:大量小键会增加 Redis 的管理开销,可适当合并
/*** 键设计示例* @author ken*/
public class RedisKeyGenerator {// 用户信息键:user:info:{userId}public static String getUserInfoKey(String userId) {return "user:info:" + userId;}// 商品库存键:product:stock:{productId}public static String getProductStockKey(String productId) {return "product:stock:" + productId;}// 用户订单列表键:user:orders:{userId}public static String getUserOrdersKey(String userId) {return "user:orders:" + userId;}// 热点数据计数器:counter:hot:{key}public static String getHotCounterKey(String key) {return "counter:hot:" + key;}
}
2. 数据结构选择最佳实践
- String:适合存储单个值、计数器、分布式锁等
- Hash:适合存储对象类型数据(如用户信息、商品详情)
- List:适合实现队列、栈、最新列表等
- Set:适合实现去重、交集、并集等集合操作
- Sorted Set:适合实现排行榜、延迟队列、范围查询等
- Bitmap:适合存储二值状态数据(如签到、在线状态)
- HyperLogLog:适合进行基数统计(如 UV 统计)
3. 命令使用最佳实践
- 避免使用 O (N) 复杂度命令:如 KEYS、HGETALL、SMEMBERS 等,改用 SCAN 系列命令
- 使用批量命令减少网络开销:如 MSET、MGET、HMSET 等
- 合理使用管道(Pipeline):批量执行命令,减少往返次数
- 避免在事务中执行过多命令:事务会阻塞其他操作,影响性能
- 谨慎使用 KEYS 命令:生产环境禁止使用,会阻塞 Redis
4. 内存管理最佳实践
- 设置合理的过期时间:避免内存无限增长
- 选择合适的内存淘汰策略:根据业务场景选择 LRU/LFU 等策略
- 定期清理无效数据:通过脚本或定时任务清理过期数据
- 避免存储大 Value:大 Value 会增加网络传输时间和内存占用
- 压缩存储大对象:对大对象进行压缩后再存储
/*** 大Value压缩存储示例* @author ken*/
@Service
public class CompressedStorageService {private final RedisTemplate<String, Object> redisTemplate;private final SnappyCompressor compressor = new SnappyCompressor(); // 使用Snappy压缩@Autowiredpublic CompressedStorageService(RedisTemplate<String, Object> redisTemplate) {this.redisTemplate = redisTemplate;}/*** 压缩存储对象*/public void setCompressed(String key, Object value, long expireSeconds) {try {// 序列化对象byte[] data = JSON.toJSONBytes(value);// 压缩数据byte[] compressedData = compressor.compress(data);// 存储压缩后的数据redisTemplate.opsForValue().set(key, compressedData, expireSeconds, TimeUnit.SECONDS);log.info("压缩存储成功,key:{}, 原始大小:{} bytes, 压缩后:{} bytes",key, data.length, compressedData.length);} catch (Exception e) {log.error("压缩存储失败", e);throw new RuntimeException("压缩存储失败", e);}}/*** 获取并解压对象*/public <T> T getCompressed(String key, Class<T> clazz) {try {byte[] compressedData = (byte[]) redisTemplate.opsForValue().get(key);if (compressedData == null) {return null;}// 解压数据byte[] data = compressor.decompress(compressedData);// 反序列化对象return JSON.parseObject(data, clazz);} catch (Exception e) {log.error("解压获取失败", e);throw new RuntimeException("解压获取失败", e);}}
}
5. 高可用最佳实践
- 使用主从复制:至少一主一从,避免单点故障
- 部署 Redis Cluster:实现数据分片和自动故障转移
- 合理配置哨兵:监控主从节点,实现自动故障转移
- 定期备份数据:结合 RDB 和 AOF,确保数据可恢复
- 跨机房部署:关键业务采用跨机房部署,提高可用性
6. 安全最佳实践
- 设置密码认证:通过 requirepass 配置 Redis 密码
- 限制网络访问:通过防火墙限制 Redis 端口的访问来源
- 禁用危险命令:通过 rename-command 禁用 FLUSHALL、FLUSHDB 等危险命令
- 不使用 root 用户运行:使用普通用户运行 Redis,减少安全风险
- 定期更新 Redis 版本:及时修复已知的安全漏洞
# 安全配置示例
requirepass strong_password_here# 禁用危险命令
rename-command FLUSHALL ""
rename-command FLUSHDB ""
rename-command KEYS ""
rename-command CONFIG ""# 绑定特定IP(生产环境建议只绑定内网IP)
bind 192.168.1.100
7. 监控与运维最佳实践
- 实时监控关键指标:内存使用、命中率、响应时间、连接数等
- 设置告警阈值:当指标超过阈值时及时告警
- 定期性能测试:模拟高并发场景,验证 Redis 性能
- 记录慢查询日志:通过 slowlog 配置记录慢查询,优化性能
- 制定应急响应预案:针对 Redis 故障制定恢复流程
# 慢查询日志配置
slowlog-log-slower-than 10000  # 记录执行时间超过10ms的命令
slowlog-max-len 1000           # 最多保存1000条慢查询记录
32. Redis 常见问题与解决方案总结
1. 缓存穿透
- 问题:查询不存在的数据,导致请求穿透到数据库
- 解决方案:
- 缓存空值,设置较短的过期时间
- 使用布隆过滤器过滤不存在的键
- 接口层实现限流和参数校验
/*** 布隆过滤器解决缓存穿透示例* @author ken*/
@Service
public class BloomFilterService {private final RedisTemplate<String, Object> redisTemplate;private final BloomFilter<String> idBloomFilter;@Autowiredpublic BloomFilterService(RedisTemplate<String, Object> redisTemplate) {this.redisTemplate = redisTemplate;// 初始化布隆过滤器,预计元素100万,误判率0.01this.idBloomFilter = BloomFilter.create(Funnels.stringFunnel(Charset.defaultCharset()), 1000000, 0.01);// 预热布隆过滤器(从数据库加载已存在的ID)preloadBloomFilter();}/*** 查询数据(带布隆过滤器校验)*/public Object getData(String id) {// 1. 布隆过滤器校验,如果不存在直接返回if (!idBloomFilter.mightContain(id)) {log.info("ID不存在,布隆过滤器拦截,id:{}", id);return null;}// 2. 查询缓存String key = "data:" + id;Object data = redisTemplate.opsForValue().get(key);if (data != null) {return data;}// 3. 查询数据库data = queryDataFromDB(id);if (data != null) {// 4. 写入缓存redisTemplate.opsForValue().set(key, data, 30, TimeUnit.MINUTES);} else {// 5. 缓存空值,避免缓存穿透redisTemplate.opsForValue().set(key, "", 5, TimeUnit.MINUTES);}return data;}// 从数据库加载已存在的ID到布隆过滤器private void preloadBloomFilter() {// 实际项目中从数据库批量查询IDList<String> existingIds = Arrays.asList("1001", "1002", "1003");existingIds.forEach(idBloomFilter::put);log.info("布隆过滤器预热完成,加载ID数量:{}", existingIds.size());}// 模拟从数据库查询private Object queryDataFromDB(String id) {// 实际项目中实现数据库查询逻辑return "data_" + id;}
}
2. 缓存击穿
- 问题:热点 key 过期瞬间,大量请求穿透到数据库
- 解决方案:
- 热点 key 设置永不过期
- 互斥锁:获取锁的线程更新缓存,其他线程等待
- 定时任务提前更新过期的热点 key
3. 缓存雪崩
- 问题:大量缓存同时过期或 Redis 宕机,导致请求全部穿透到数据库
- 解决方案:
- 缓存过期时间添加随机值,避免同时过期
- 部署 Redis 集群,提高可用性
- 服务降级和限流,保护数据库
- 多级缓存:本地缓存 + 分布式缓存
4. 数据一致性
- 问题:缓存与数据库数据不一致
- 解决方案:
- 先更新数据库,再删除缓存(Cache Aside Pattern)
- 写入缓存时设置合理的过期时间
- 关键业务采用分布式事务保证一致性
- 最终一致性:通过消息队列异步更新缓存
5. 大 key 问题
- 问题:单个 key 存储过大的数据,导致性能问题
- 解决方案:
- 将大 key 拆分为多个小 key
- 压缩大 value 后存储
- 避免使用 HGETALL 等命令获取全部字段
- 定期清理大 key
/*** 大key拆分示例* @author ken*/
@Service
public class BigKeySplitService {private final RedisTemplate<String, Object> redisTemplate;private static final int SPLIT_SIZE = 1000; // 每个分片的大小@Autowiredpublic BigKeySplitService(RedisTemplate<String, Object> redisTemplate) {this.redisTemplate = redisTemplate;}/*** 存储大列表(拆分存储)*/public void setBigList(String key, List<Object> dataList, long expireSeconds) {if (CollectionUtils.isEmpty(dataList)) {return;}// 计算分片数量int totalSize = dataList.size();int splitCount = (totalSize + SPLIT_SIZE - 1) / SPLIT_SIZE;// 存储分片信息String metaKey = key + ":meta";redisTemplate.opsForValue().set(metaKey, splitCount, expireSeconds, TimeUnit.SECONDS);// 分片存储数据for (int i = 0; i < splitCount; i++) {int start = i * SPLIT_SIZE;int end = Math.min(start + SPLIT_SIZE, totalSize);List<Object> subList = dataList.subList(start, end);String splitKey = key + ":split:" + i;redisTemplate.opsForValue().set(splitKey, subList, expireSeconds, TimeUnit.SECONDS);}log.info("大列表拆分存储完成,key:{}, 总大小:{}, 分片数量:{}", key, totalSize, splitCount);}/*** 获取大列表(合并分片)*/public List<Object> getBigList(String key) {String metaKey = key + ":meta";Integer splitCount = (Integer) redisTemplate.opsForValue().get(metaKey);if (splitCount == null || splitCount <= 0) {return Collections.emptyList();}List<Object> result = Lists.newArrayList();// 合并所有分片for (int i = 0; i < splitCount; i++) {String splitKey = key + ":split:" + i;List<Object> subList = (List<Object>) redisTemplate.opsForValue().get(splitKey);if (CollectionUtils.isNotEmpty(subList)) {result.addAll(subList);}}log.info("大列表合并完成,key:{}, 总大小:{}", key, result.size());return result;}
}
6. 网络问题
- 问题:Redis 与应用之间的网络延迟或中断
- 解决方案:
- 使用连接池管理连接,设置合理的超时时间
- 实现重试机制,处理临时网络故障
- 部署 Redis 在与应用相同的机房,减少网络延迟
- 监控网络指标,及时发现网络问题
33. Redis 发展趋势与总结
Redis 发展趋势
- 多数据模型增强:Redis 不断丰富数据结构,如 Redis 6.2 引入的 BITFIELD_RO,Redis 7.0 增强的 Stream 功能
- 性能持续优化:不断优化内存管理和 IO 模型,提升处理能力
- 增强的集群功能:改进分片机制,提高集群稳定性和扩展性
- 与云原生融合:更好地支持容器化部署和 Kubernetes 集成
- 安全性增强:加强访问控制和数据加密功能
- AI 集成:探索在 Redis 中集成机器学习功能,支持实时数据分析
总结
Redis 作为高性能的内存数据库,凭借其丰富的数据结构、卓越的性能和灵活的部署方式,已成为分布式系统中不可或缺的组件。无论是作为缓存、数据库、消息队列还是分布式协调工具,Redis 都能发挥重要作用。